
[Tutorial] Upgrading OEM Clarion Digital Tuner / EQ stack

Thread Starter
Joined: Jul 2002
Posts: 3,219
Likes: 8
From: Washington State
[Tutorial] Upgrading OEM Clarion Digital Tuner / EQ stack
Here is the working draft of the tutorial for upgrading the OEM Clarion Digital Tuner with 9-band Equalizer
Upgrading Clarion Digital Tuner with EQ - 84-85 Mazda RX-7
This tutorial includes:
Upgrading Clarion Digital Tuner with EQ - 84-85 Mazda RX-7
This tutorial includes:
- Tapping Aux inputs to the factory cassette deck
- Connecting and triggering an aftermarket line-level amp to the factory tuner
Thread Starter
Joined: Jul 2002
Posts: 3,219
Likes: 8
From: Washington State
Please feel free to contact me with any corrections or updates, questions etc.
Disclaimer:
At the time of writing, 6/22/2013, my system has the following issues:
I am currently working through the system and tracking these down, however I suspect that they may simply be a matter of 30 year old, blown capacitors inside the head unit itself.
If that is in fact the case, tune in next time for a tutorial on how to replace dead capacitors inside the head unit! Yay!
I'll seriously buy you a beer or three if you can find any error in my wiring thats leading to any one of those problems I'm having!
At this point, I can only suggest doing this at your own risk, as my system is far from flawless. I suspect a bunk head unit, but if it is in fact my wiring, revisions will need to be made.
~Geoff
Disclaimer:
At the time of writing, 6/22/2013, my system has the following issues:
- Pop on power-down
- Constant subtle line noise (like tape hiss)
- Constant subtle whine (introduced when I wired in A-Pillar gauges)
- Tapping the tape deck buttons acts like tapping a microphone, can hear it at high volumes
I am currently working through the system and tracking these down, however I suspect that they may simply be a matter of 30 year old, blown capacitors inside the head unit itself.
If that is in fact the case, tune in next time for a tutorial on how to replace dead capacitors inside the head unit! Yay!
I'll seriously buy you a beer or three if you can find any error in my wiring thats leading to any one of those problems I'm having!
At this point, I can only suggest doing this at your own risk, as my system is far from flawless. I suspect a bunk head unit, but if it is in fact my wiring, revisions will need to be made.
~Geoff
Joined: Aug 2011
Posts: 3,078
Likes: 42
From: Cambridge, Minnesota
Read through it and it looks awesome! Would be an awesome upgrade to any stock unit. I can't see any flaws in the writeup personally.
Here's a vote to get it archived!
See if you can put the pics as attachments for longevity, and format the writing into the forum here and this would be a much needed addition to the Archive
Here's a vote to get it archived!
See if you can put the pics as attachments for longevity, and format the writing into the forum here and this would be a much needed addition to the Archive
Thread Starter
Joined: Jul 2002
Posts: 3,219
Likes: 8
From: Washington State
We need to eliminate the bugs before hitting the forums and archive.
All but 2 of the images are hosted in my build thread. I'll pull those over to attachments and, once we get it dialed, write it into a post.
G
All but 2 of the images are hosted in my build thread. I'll pull those over to attachments and, once we get it dialed, write it into a post.
G

Junior Member
Joined: May 2013
Posts: 13
Likes: 0
From: Shoreline, WA
Since I'm only interested in tapping into the direct inputs, would it be "easier" to skip pulling out the components and just splice into the existing wires from the cassette deck? I don't plan on adding any external amps, etc. I just want to be able to pop a gutted cassette in and have a direct input rather than use a tape adapter.
Otherwise, could anyone give any helpful tips on removing the components with minimal risk of damaging all the plastic around it?
The guide looks very good ioTus. Just wondering how you get everything to that point with everything out of the dash. I'm guessing you've had to do that a few times in the process, haha.
Thanks!
Thread Starter
Joined: Jul 2002
Posts: 3,219
Likes: 8
From: Washington State
To get the stereo out:
1) remove the shifter surround. There are two tabs towards the rear of the car, 3/4 the way back. I use a putty knife or something wide and not too sharp to gently gently pry the surround.
2) Remove shift **** and shifter surround
3) Remove two screws at the base of the center console.
4) Pull off the blower and heater *****
5) 14mm deep socket to remove the nuts holding the blower and heater controls on. Don't lose them, they're easy to drop.
From here, you can either unscrew the controls from the back of the center console (PITA) or gently pull the whole assembly up and rest the lower part on the shifter, careful not to over-extend the wires coming out from the controls.
There are now 4 screws securing and grounding the stereo surround. Pull them out.
The stereo has several plugs going into it from behind - all keyed so they will only go in one spot, pull them out.
Trending Topics
Thread Starter
Joined: Jul 2002
Posts: 3,219
Likes: 8
From: Washington State
Since I'm only interested in tapping into the direct inputs, would it be "easier" to skip pulling out the components and just splice into the existing wires from the cassette deck? I don't plan on adding any external amps, etc. I just want to be able to pop a gutted cassette in and have a direct input rather than use a tape adapter.
Thanks!
Thanks!
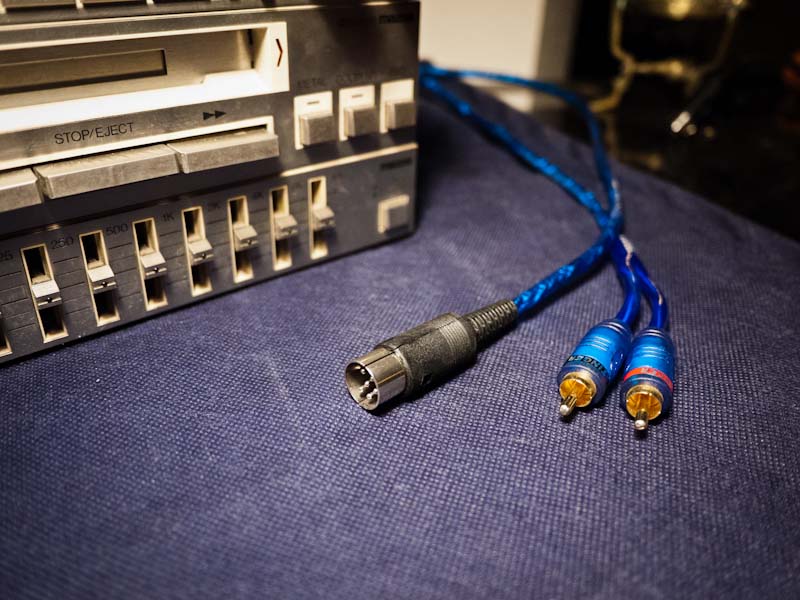
I wanted a clean aesthetic and secure connection that I could put whatever sort of wire on I wanted - hence I chose the chassis mounted RCA jacks.
I used to live in Shoreline! Did you make it to Old School Reunion in Bothell June 9th?
Junior Member
Joined: May 2013
Posts: 13
Likes: 0
From: Shoreline, WA
Thanks for the guide to removal, ioTus! I will most likely go this route to have a nice ,clean connection like you describe. Your finished product looks very professional.
Didn't make the Old School Reunion as unfortunately I had to be out of town that day. It was super close to my house too, I definately want to make the next one.
Just got my 85 GSL, it's now up to a whopping 29K original miles. I want to keep it as stock as possible, as it is one clean machine. I'm looking forward to not having to mess with a tape adapter.
I'll definately be bringing it out to a meet sometime, it's just too pristine to not show off, haha!
Since I just got the house, and my car, my finances are a bit tight at the moment. I really appreciate being able to see guides like this that can improve functionality while still keeping everything stock, with hardly any cost. I don't want some ugly aftermarket stereo messing up my dash!
By the way, has anyone else noticed that if you are actually using a cassette tape that they play back quite a bit faster than they should? I seem to remember that my other 80's Mazdas with the same stock stereo had the same problem. Doesn't matter of course when you are plugging in something else, but it's pretty distracting to me when I'm feeling really old school and want to actually put a tape in there!
Thread Starter
Joined: Jul 2002
Posts: 3,219
Likes: 8
From: Washington State
http://davidnavone.com/zencart/index...products_id=18
I'm currently in communication with the guy who makes these - mine is having an issue where audio quality degrades over time. Switching to a standard headphone jack clears up the signal. Switching back degrades.
Again, once we get the bugs worked out this will be a great setup.
I'm currently in communication with the guy who makes these - mine is having an issue where audio quality degrades over time. Switching to a standard headphone jack clears up the signal. Switching back degrades.
Again, once we get the bugs worked out this will be a great setup.
love the braaaap
Joined: Jul 2003
Posts: 3,771
Likes: 5
From: Bognor, Ontario
On your subject of hiss and popping sounds, it could be dead capacitors, or simply ignition/alternator noise. I'd be willing to guess that Clarion didn't bother with too much noise suppression in the line out from the tape deck and the line in on the main radio (or eq as the case may be) since the tape hiss would cover it up anyway. I have the same problem with the aux jack install I did. My 79 didn't come with a tape deck, but it did still have the input, and I happened to have the connector to the radio that I could salvage of a broken RX-7 tape deck. Works well but there is obviously not much noise suppression since even my grounded headphone jack has a bit of noise still. Gets real bad if I plug in the charger to the music player I am using.
You might have to look at other options for noise suppression.
You might have to look at other options for noise suppression.


Junior Member
Joined: May 2013
Posts: 13
Likes: 0
From: Shoreline, WA
I added a set of aux inputs this weekend using this tutorial, thanks! I appreciate the explanation on getting covering parts removed as well. One thing that came up for me was that the wire on the right hand climate control **** did not give me enough slack. I had to remove the 3 screws per side removing the control backs from the main panel in order to remove the stereo deck. I had to improvise a little ratchet to get those out, the right side didn't even have enough room to get a screwdriver back there...
This was a great guide, thanks!
This was a great guide, thanks!
Maybe something like this? http://www.amazon.com/gp/aw/d/B005ST...dir_mdp_mobile
Thread Starter
Joined: Jul 2002
Posts: 3,219
Likes: 8
From: Washington State
FYI important update on this mod:
I've found that just by nature of having the tape head pickup hooked into the system, you will get a lot of line noise- yet still retain the function of the tape deck.
I recently found a way to eliminate about 99% of all line noise - and that is to tap the Aux inputs DIRECTLY through to the outpouts, by losing the ability to play tapes.
What this entails is to de-solder the "OUTPUT" L (Yellow) and R (black) from the PCB, and solder the input wires directly inline. The next step is to de-solder the tape motor. This bypasses all circuitry of the tape deck, passing a high-quality signal directly into the EQ or tuner units.
You will lose function of the tape player, however you still use the tape deck to trigger a blank signal override for the tuner.
I recently did this for a customer, will be updating my system here within the week and updating the tutorial.
So, I modified the procedure a bit. Found a bluetooth speaker at Fry's that has an integrated microphone in it for $10. Pulled it apart, and wired up the speaker output to the yellow & blue wires. Works reasonably well, but for some reason, there is a periodic cut-out (about every 3 seconds). Not sure what's going on there, but anyone with "cassette knowledge" who can chime in would be most appreciated. BTW, it's pretty sweet have a factory setup with bluetooth. 
I followed some directions on the forum (link not handy) to add a component plug
for my ipod to play through the stock radio which does have a tape deck as well.
Plugging in the ipod causes the radio to cease playing and the ipod to play clearly
over the system. If I plug the ipod into its charger then all kinds of noise ensues. I
suspect some sort of ground loop or something. Doesn't bother me because I
rarely need to ipod more than the 4 hours a charge usually lasts.
I have an 80 GS with the combo radio and cassette deck.
I think its cool to use modern gadgets with the old equipment without marring it or
removing it. Keeps the 80s coolness factor and still plays your good music.
Thread Starter
Joined: Jul 2002
Posts: 3,219
Likes: 8
From: Washington State
Dave, I encountered this issue when modifying Fungus_Mungus' deck. That was the first time I'd ever heard of this problem before. I tried troubleshooting all manner of things, isolating circuits on the PCBs, disabling components, etc, nothing would resolve it.
Ultimately, this issue is what led me to discover the lossless passthrough revision I posted above.
So far as I can tell, the problem is the auto-reverse is continuously being triggered, cutting out audio and reversing or restarting the tape motor.
The problem is two-fold:
1) The tape deck outputs line noise continuously and a click when the auto-reverse is engaged
2) The tape motor will physically stop and start again, resulting in a mechanical click coinciding with the audio noise.
To address these issues:
1) Wire your aux inputs directly to the outputs on the dongle. Desolder or cut (so you can remember which wires go where later) the far-left black wire (RIGHT output) and second-from-right yellow wire (LEFT output). This bypasses the line noise and audio pop completely.
2) Desolder the two wires to the tape motor and cap them off. This disables the motor from spinning and making the mechanical click.
Thread Starter
Joined: Jul 2002
Posts: 3,219
Likes: 8
From: Washington State
I followed some directions on the forum (link not handy) to add a component plug
for my ipod to play through the stock radio which does have a tape deck as well.
Plugging in the ipod causes the radio to cease playing and the ipod to play clearly
over the system. If I plug the ipod into its charger then all kinds of noise ensues. I
suspect some sort of ground loop or something. Doesn't bother me because I
rarely need to ipod more than the 4 hours a charge usually lasts.
I have an 80 GS with the combo radio and cassette deck.
I think its cool to use modern gadgets with the old equipment without marring it or
removing it. Keeps the 80s coolness factor and still plays your good music.
for my ipod to play through the stock radio which does have a tape deck as well.
Plugging in the ipod causes the radio to cease playing and the ipod to play clearly
over the system. If I plug the ipod into its charger then all kinds of noise ensues. I
suspect some sort of ground loop or something. Doesn't bother me because I
rarely need to ipod more than the 4 hours a charge usually lasts.
I have an 80 GS with the combo radio and cassette deck.
I think its cool to use modern gadgets with the old equipment without marring it or
removing it. Keeps the 80s coolness factor and still plays your good music.
Once I'm back on the road, I will be completing this write-up and tutorial, and hopefully resolve the powered iPhone issue.
One thing I will note is that even on my vintage Harmon Kardon home stereo amp, if i have my iPhone plugged in to charge and then plug in the iPhone via headphone-to-rca, there is significantly more line noise and a pop on plugging it in. Its possible this is an iPhone issue with its power cable.
I'm using an Enerplex bluetooth external speaker. It has a small battery in it, plus microphone and will sync both to the music and to the phone profiles on my phone. The UPC# for it is 854556004551 and it can be seen here: EnerPlex� ACSPEAKPK - Mini Bluetooth speaker, Pink or here: FRYS.com | EnerPlex. Fry's has it right now for $5.00. Yep, wire in bluetooth to your car for $5.

I'm thinking about following your lead with an AUX input but before I bothered I wanted to get an idea of the potential of the system. I was a little disappointed to find there is a 100Hz highpass filter somewhere in the system.
Using a ECM8000 microphone and Room EQ Wizard I took some samples from the driver's seat with the fader dead center (see attached image). Blue is the output with the EQ turned off. Red is after cutting below 500Hz and gradually boosting above that. Listening shows a clear improvement in overall balance of the system with the new EQ settings. However, even if I were to replace the speakers with ones easily capable of handling more power, I'd have to hunt down this high pass filter and disable it, if at all possible. Otherwise the head unit is basically junk. I tried massively boosting the lowest band but it boosts 100Hz even more while not really affecting 60Hz.
Using a ECM8000 microphone and Room EQ Wizard I took some samples from the driver's seat with the fader dead center (see attached image). Blue is the output with the EQ turned off. Red is after cutting below 500Hz and gradually boosting above that. Listening shows a clear improvement in overall balance of the system with the new EQ settings. However, even if I were to replace the speakers with ones easily capable of handling more power, I'd have to hunt down this high pass filter and disable it, if at all possible. Otherwise the head unit is basically junk. I tried massively boosting the lowest band but it boosts 100Hz even more while not really affecting 60Hz.