
What did you do to your FB today?


I drove an FB for the first time ever today.... Gotta say FB brakes are lightyears ahead of SA brakes.
I also solderd a patch in my radiator. Silly aluminum, copper is for radiators!!
I also solderd a patch in my radiator. Silly aluminum, copper is for radiators!!
Joined: Jun 2008
Posts: 8,376
Likes: 30
From: Chino Hills, CA
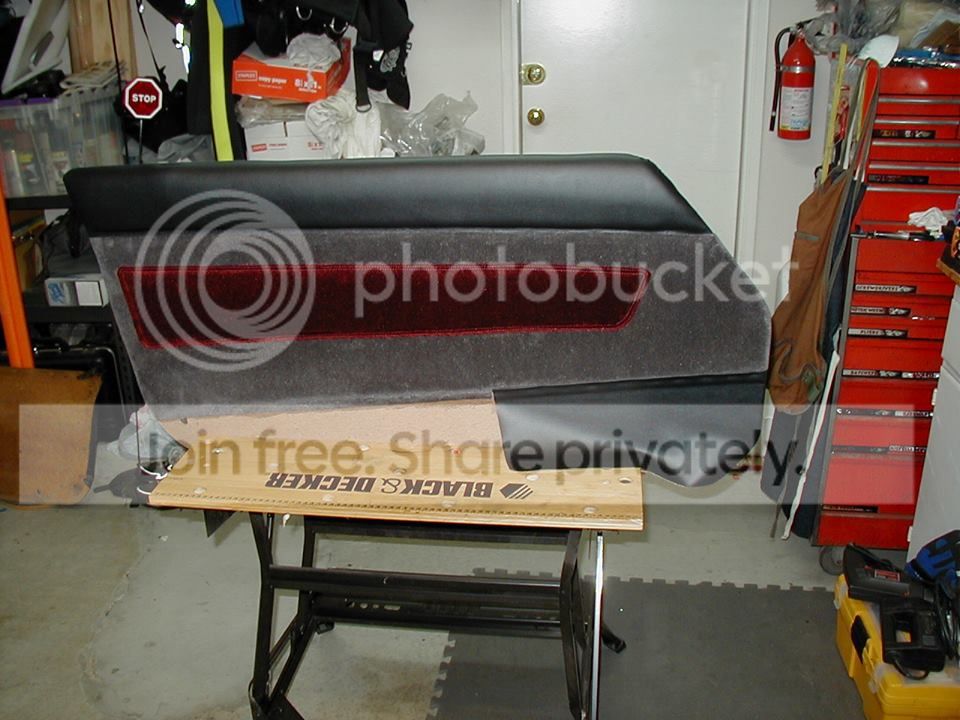
12 hours on door skins, but got one essentially done, patterns and methodology for the other all worked out so it'll go much faster.
I took some pictures, but the colors are all gross - way too light under the flash.
I took some pictures, but the colors are all gross - way too light under the flash.
Sin City Rotary
Joined: Sep 2009
Posts: 1,707
Likes: 2
From: Las Vegas
Finally have her up and running again after being neglected for a while ... now to fix the broken stud at the presilencer ... and determine why the clutch is still bleeding out no moisture on fire wall after rebuilding the clutch master so next the slave and the new hose ... start on a couple of others things as we get even closer to WHiV7 ... looking forward o see what DD has been up to
Joined: Jun 2008
Posts: 8,376
Likes: 30
From: Chino Hills, CA
Tonight, panel #1 assembly and map pocket carpet. Then on to panel #2. I probably won't have time to do the behind-the-door side panels before WHIV, but if I can get both door panels done along with the seats, I'll install them.
Joined: Jun 2008
Posts: 8,376
Likes: 30
From: Chino Hills, CA
So would I; got stuck tonight for lack of proper glue, only available during business hours. And I need to do wife faction tomorrow night. Sigh. Hopefully finishing touches in Panel 1 will be Wednesday night. Pix as soon as possible.
Not happy with the shot lines on the passenger side fender/door. I straightened the bent-up pinch welds underneath the car so I could gain access to the two bolts on the bottom that hold the fender on. I was then able to reposition the fender so the shot lines were acceptable. Not perfect, but much better than before.
fm
fm
GSL-EV
Joined: Jun 2012
Posts: 450
Likes: 8
From: Rapid City, SD
GSL-EV:
In the space of a week two of the three screws that hold the horn switch in place against the spring came loose. I removed the cover and removed the last screw and cleaned the crud that accumulates behind the button over course of 30 years. I soaked the spring in Evaporust and then oiled it. Prepped the rubber cover by removing the Mazda emblem, used the SEM plastic/leather cleaner and then painted it with the Burgundy SEM paint. I will put the emblem back on the cover and put that back on the car tomorrow. I will take a couple of photos tomorrow when I put it all back together. This is my daily driver and today I got complements on the car twice. Surpassed 3400 EV miles today. The chassis will get to 150k miles sometime this month.
GSL-SE:
Last weekend I charged up the battery and managed to get it started. I am getting a small amount of odorless white smoke for several minutes after I start it while idling. If it was coolant I would expect the exhaust to smell something like coolant right? Could water in the gas do this or am I fooling myself? After it starts it idles well and runs great. Took it for a 30 mile drive around town. The red one always gets attention!
Joined: Jun 2008
Posts: 8,376
Likes: 30
From: Chino Hills, CA
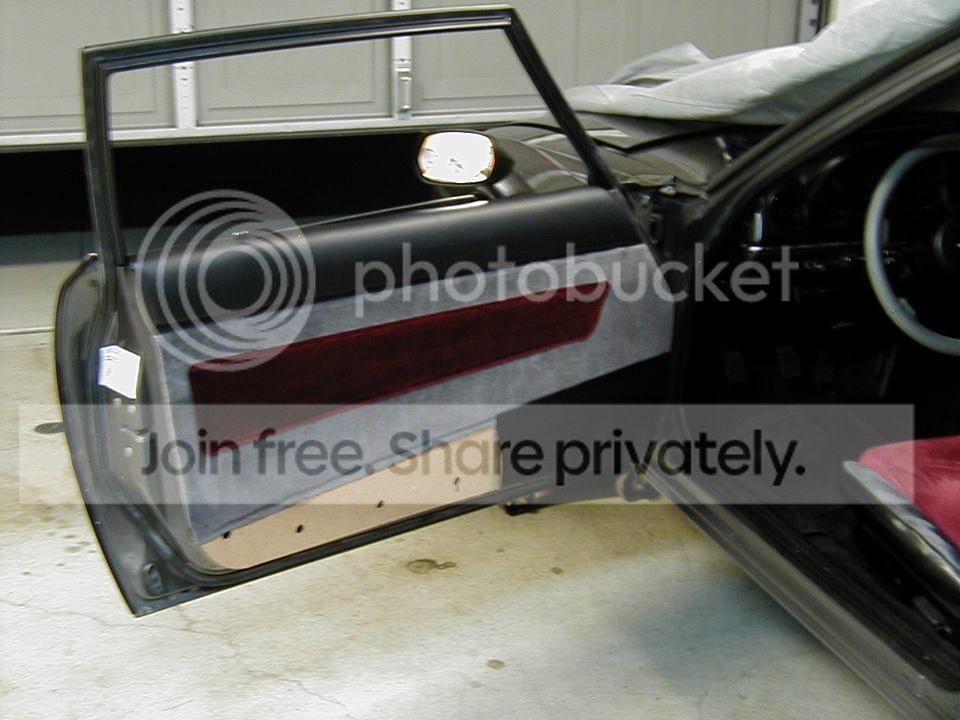
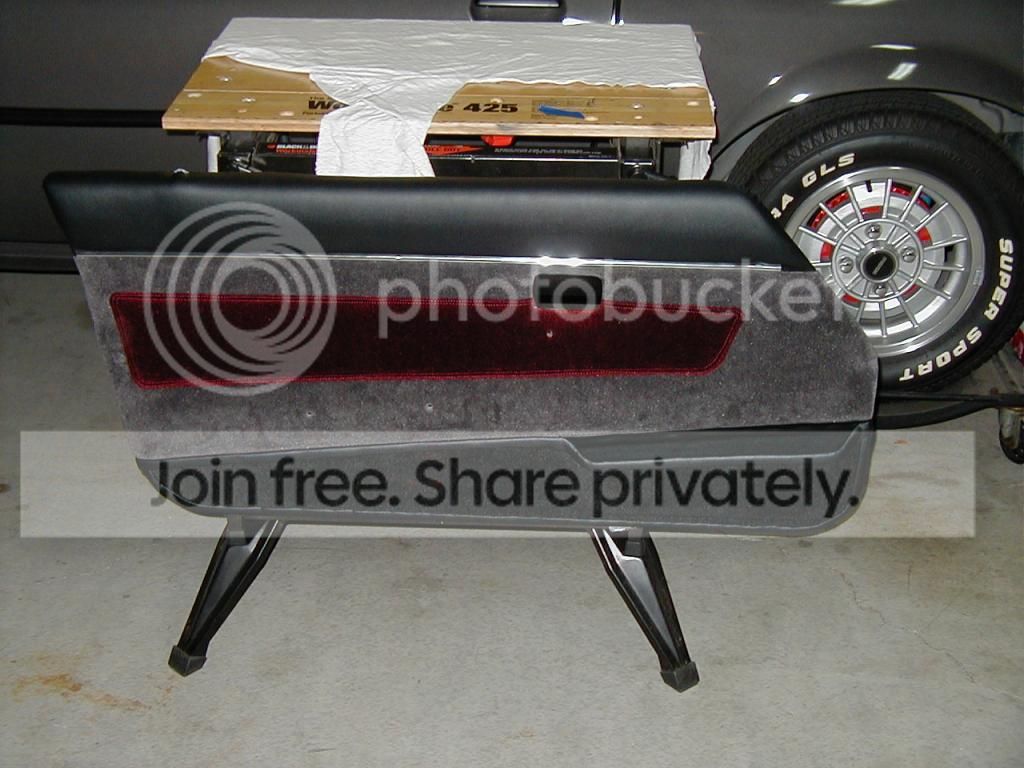
This matches the new seat fabric, too; maroon inserts, grey facing, black vinyl back.
The obligatory 80-interior chrome stripe is also only possible on the vinyl backing. Bonds like iron to vinyl, won't stick to cloth well at all. I'll be installing it tonight.
Getting that 1/4" wide recess for the stripe to come out right took some doing, though. It has to dodge the upper edge of the door-release cutout & the plastic 'cup' that goes in it, & still line up with the stripe on the dash fairly well.
I'm glad you'll be doing the chrome stripe. Will you also do the rotor shape on these? If done well, it should look tasteful. Otherwise might look like rice. Your call whether to do them again, obviously. 
Joined: Jun 2008
Posts: 8,376
Likes: 30
From: Chino Hills, CA
Yes, the chrome stripe really needs to be there in some semblance on an 80. With the chrome shift surround and armrest trim, it looks odd not to have them, in my opinion.
If I couldn't get the chrome to work out, I was considering silver-thread embroidery as a backup plan.
On the rotor crests, I decided to forego them this time in favor of the stock panel profile.
I can always add them later, if I want. I didn't do the chrome inlays on the previous panels until just a couple years ago, and the black/silver MAZDA cap centers (cast urethane copies of the wheel centers, cut down slightly) I only really finished a year or so ago.
Joined: Jun 2006
Posts: 4,815
Likes: 24
From: Columbia, Tennessee
You should sell these! (Not your actual panels) , but take orders. I'd pay upwards of $250-300 for a nicely recovered pair of panels. You obviously have a skill for fabric and interior work. I would love a pair just like these, without the chrome or the red accent, and darker gray center.
Full Member
Joined: Apr 2014
Posts: 138
Likes: 1
From: Wheeling WV
fixed the small curved coolant hose on the beehive, assembled the clean & blasted hive and stand off back on the car - 4 new O rings and 2 new crush washers, and did it all from up TOP! swivel head gear wrenches are worth their weight in gold. still had to climb under and take the oil pan off. damned thing had almost NO silicone on it and no paper gasket to speak of. no wonder it leaked! even got a new o ring for the oil level sender. gotta throw back on the stripped Nikki and hopefully get it on the road for the first time. just too many issues to fix before trusting it.
Joined: Jun 2008
Posts: 8,376
Likes: 30
From: Chino Hills, CA
Another night, another roadblock. This time, getting the door pocket carpet to behave ate up hours. I intentionally bought a type designed to stretch (the original is heat-molded to the cup shape) and it turned out to be a bit TOO stretchy, and hard to get it lay down properly. Got it stitched up last night but no time to put it on as I have to be up at 5am to get ready for work every day.
Being the last piece to go on, it has to be customized to take into account all the other variations that may have struck along the way.
Thanks for the compliment. Better wait and see how it turns out, though.
I think I'd lose money on that deal, even if the old panels & hardware were available to use as cores, simply because of the massive amount of time it takes to do them right. Materials costs aren't so bad, depending on the cloth used, but even a small difficulty can eat up hours, & I have little free time these days.
I'll know more once I finish the first one & tackle the second from known patterns; better measurement than the first which absorbs all the "dammit, now what?" time. That and I'm tooled up with all materials needed now.
1/8" tempered hardboard; same material the originals were made out of. Fairly easy to cut, stands up to moisture and such OK, & inexpensive. Does need a moisture barrier inside the door, though.
Home Depot sells a 2'x4' piece for something like $6, that's an easy cut-down and doesn't need a pickup truck to haul.
Search Results for 1/8 hardboard at The Home Depot
Being the last piece to go on, it has to be customized to take into account all the other variations that may have struck along the way.
You should sell these! (Not your actual panels) , but take orders. I'd pay upwards of $250-300 for a nicely recovered pair of panels. You obviously have a skill for fabric and interior work. I would love a pair just like these, without the chrome or the red accent, and darker gray center.
I think I'd lose money on that deal, even if the old panels & hardware were available to use as cores, simply because of the massive amount of time it takes to do them right. Materials costs aren't so bad, depending on the cloth used, but even a small difficulty can eat up hours, & I have little free time these days.
I'll know more once I finish the first one & tackle the second from known patterns; better measurement than the first which absorbs all the "dammit, now what?" time. That and I'm tooled up with all materials needed now.
1/8" tempered hardboard; same material the originals were made out of. Fairly easy to cut, stands up to moisture and such OK, & inexpensive. Does need a moisture barrier inside the door, though.
Home Depot sells a 2'x4' piece for something like $6, that's an easy cut-down and doesn't need a pickup truck to haul.
Search Results for 1/8 hardboard at The Home Depot


GSL-EV
Joined: Jun 2012
Posts: 450
Likes: 8
From: Rapid City, SD
Here is the photo of the horn button after being painted and put back on the car. I had intended to take a picture of the guts before I put the cover back on but I put it in place and it just slipped into place. They are much more difficult to take off than to put on.
Anyways, I think it looks great! My only complaint would be slightly too shiny. After it finishes out gassing I will try some non shiny protectant.
Anyways, I think it looks great! My only complaint would be slightly too shiny. After it finishes out gassing I will try some non shiny protectant.
Awwwww yeah Divin! That looks FRESH!
Doug - Horn button turned out great! Did you use the SEM burgundy? If you ever use Armorall on your interior - I might suggest not doing a finishing layer to dull it down. The shine matches almost PERFECTLY next to a fresh coat of the Armorall.
Doug - Horn button turned out great! Did you use the SEM burgundy? If you ever use Armorall on your interior - I might suggest not doing a finishing layer to dull it down. The shine matches almost PERFECTLY next to a fresh coat of the Armorall.