
Making old parts look new again :)


If you need it, I'll send you two good ones for your gutted ignitor. Sound good? I've got extra emissions stuff too, if you need any of that crap. Let me know what you need and I'll include it with the temp sensor as long as I have it...
Thread Starter
Joined: Nov 2006
Posts: 8,482
Likes: 31
From: Huntsville AL
Actually, that temp sensor (referred to as water temp sensor/switch #1 [I believe] in the FSM) is only used by the OEM emissions control unit. The actual water temperature sending unit for your stock gauge is located on the left side of the engine right in front, or towards the front, of the oil pressure sending unit. There aren't many (if any) gauge wires that run through X-01, the big black harness connector near the firewall by the relays and left strut tower, most of them are run through a smaller 6- or 8-pin connector that I can't remember the FSM's name of right off; just follow your oil psi sending unit to it's connector and that's the one your gauges are connected to (besides tach and speedo)...
If you need it, I'll send you two good ones for your gutted ignitor. Sound good? I've got extra emissions stuff too, if you need any of that crap. Let me know what you need and I'll include it with the temp sensor as long as I have it...
If you need it, I'll send you two good ones for your gutted ignitor. Sound good? I've got extra emissions stuff too, if you need any of that crap. Let me know what you need and I'll include it with the temp sensor as long as I have it...
I sold the Dizzy with the MSD ignitor, but I have one here without a back plate and already gutted that you can have if you want. I was talking to someone about it and I don't think they ever got back to me on if they wanted it or not.
Thread Starter
Joined: Nov 2006
Posts: 8,482
Likes: 31
From: Huntsville AL
On the left harness you will see a black wire with blue stripe, it is a pretty heavy gauge:

Only reference in the FSM I can find is that it would be connection X-17, connector to transmission harness (for A/T). Off with its head?
Only reference in the FSM I can find is that it would be connection X-17, connector to transmission harness (for A/T). Off with its head?

Full Member
Joined: Nov 2008
Posts: 56
Likes: 0
From: London England
Pls excuse my loack of knowledge but what is "a brass wheel" -I'm thinking its like the wire wheel that I put on my drill - is the brass one softer ? as the wire one will be too harsh -n'est-ce pas? -Can the cleaning be done on Alternator in situ.
I was told that aluminium oxidisation is not a bad thing as it acts as a protector- but it don't look good - and is it ok to laquer as there will be excessive heat as in the engine bay ?
Not being pinnicky just learning.
By the way the paint code for the original blue on Air Filter is [B]Mazda Impulse Blue code [/B]AY Stuff looks great -I'm rebuilding FB now and nearing finish.
Thread Starter
Joined: Nov 2006
Posts: 8,482
Likes: 31
From: Huntsville AL
This is the brass wheel I use:

Goes right on the power drill It is a softer metal and will not gouge the surface, unless you are putting you whole weight on it.
You can clean the alternator while it is on the car, loosen the bolts on the tension rod and water pump so you can rotate it around. It would be much easier if you took it out of the car.
As for paint, I just used wheel clear. Supposed to hold up to harsh environments.
Goes right on the power drill
It is a softer metal and will not gouge the surface, unless you are putting you whole weight on it. You can clean the alternator while it is on the car, loosen the bolts on the tension rod and water pump so you can rotate it around. It would be much easier if you took it out of the car.
As for paint, I just used wheel clear. Supposed to hold up to harsh environments.
About the oscillator; what exactly does it do? I would assume that it's a timer of sorts (or a frequency for the ECU to assist in determining a specified time period), but what role does it play with the flashers, turn signals, etc.? It does something with the stock manual choke as I can see from the '83 wiring diagram, but I'd guess that it just ensures the choke has retracted in a specified time period after one of the water temp switches has opened after the vehicle has been started and running. Is there some sort of internal circuitry that determines the rate of flash for the flashers and signals in the Control/Central Processing Unit (X-16 in FSM) instead of using a conventional flasher like most other vehicles? In short, what exactly will be affected when I remove it?
I believe that was me that you were talking to about the spare gutted ignitor, I must've thought I replied one drunken night. Sorry. I don't really NEED it, I just figured that a gutted ignitor bolted to the side of the dizzy would help keep the pick-up connector held securely in place instead of just using male quick-connects.
I posted that last night without even seeing the second page (I have my thread view options set to 50 posts per page), it looks like we're both undertaking the same task. I have already relocated my battery to behind the passengers seat; I bought a 26lb Optima yellow top deep cycle-D51R, it has a lower Amp-Hr and CCA rating than most other Optimas but was light enough for my requirements and the price was right at the local Advance Auto Parts ($145 or so plus a $25 rebate that I've yet to receive). It's in a battery box from Napa, a $10 box that's a bit oversize for the Optima, but has enough room to act as a bit of extra hidden storage if needed.
I'm not finished with my de-wiring job yet-I'm about in the same place you are, maybe a little behind you. My emissions control unit connector has just been depinned; the only wires left are ones that run to the starter, ignition hot, and another one or two that I thought I may need to use for my alarm system when I get around to installing it.
My car, an '83 GS, had most of the emissions crap deleted by the previous owner and he did an absolute crappy job of eliminating unnecessary wires and re-taping the harness. Each branch of the harness had about four layers of electrical tape over it, and everything under the hood was covered with wire loom, like the throttle cable, brake lines, ect. It looked horrible, but it's gone now. Almost all of my harnesses are completely untaped at the moment except for a few pieces holding certain bundles together while I'm removing what's not needed...
I'm not sure about that one; I haven't gotten that far yet. Trace it down manually and verify that you don't need it before cutting it out. It probably changes color at one or more connectors, so make sure that you either buzz it out with a continuity tester on a VOM or keep your fingers on it until you find its termination point. My wiring diagrams aren't in front of me right now, but it never hurts to double check...
The heavy gauge wires are usually there for a reason; follow it back to the fuse box or ignition switch and see where it connects there. That's just what I'd do before removing it...
So the back of the water pump sensor is just emissions related? Sweet, so I won't need it. I will look for the water temp sensor in a few, and I don't use the stock oil pressure gauge either.
I sold the Dizzy with the MSD ignitor, but I have one here without a back plate and already gutted that you can have if you want. I was talking to someone about it and I don't think they ever got back to me on if they wanted it or not.
I sold the Dizzy with the MSD ignitor, but I have one here without a back plate and already gutted that you can have if you want. I was talking to someone about it and I don't think they ever got back to me on if they wanted it or not.
I posted that last night without even seeing the second page (I have my thread view options set to 50 posts per page), it looks like we're both undertaking the same task. I have already relocated my battery to behind the passengers seat; I bought a 26lb Optima yellow top deep cycle-D51R, it has a lower Amp-Hr and CCA rating than most other Optimas but was light enough for my requirements and the price was right at the local Advance Auto Parts ($145 or so plus a $25 rebate that I've yet to receive). It's in a battery box from Napa, a $10 box that's a bit oversize for the Optima, but has enough room to act as a bit of extra hidden storage if needed.
I'm not finished with my de-wiring job yet-I'm about in the same place you are, maybe a little behind you. My emissions control unit connector has just been depinned; the only wires left are ones that run to the starter, ignition hot, and another one or two that I thought I may need to use for my alarm system when I get around to installing it.
My car, an '83 GS, had most of the emissions crap deleted by the previous owner and he did an absolute crappy job of eliminating unnecessary wires and re-taping the harness. Each branch of the harness had about four layers of electrical tape over it, and everything under the hood was covered with wire loom, like the throttle cable, brake lines, ect. It looked horrible, but it's gone now. Almost all of my harnesses are completely untaped at the moment except for a few pieces holding certain bundles together while I'm removing what's not needed...
The heavy gauge wires are usually there for a reason; follow it back to the fuse box or ignition switch and see where it connects there. That's just what I'd do before removing it...
Thread Starter
Joined: Nov 2006
Posts: 8,482
Likes: 31
From: Huntsville AL
About the oscillator; what exactly does it do? I would assume that it's a timer of sorts (or a frequency for the ECU to assist in determining a specified time period), but what role does it play with the flashers, turn signals, etc.? It does something with the stock manual choke as I can see from the '83 wiring diagram, but I'd guess that it just ensures the choke has retracted in a specified time period after one of the water temp switches has opened after the vehicle has been started and running. Is there some sort of internal circuitry that determines the rate of flash for the flashers and signals in the Control/Central Processing Unit (X-16 in FSM) instead of using a conventional flasher like most other vehicles? In short, what exactly will be affected when I remove it?
I believe that was me that you were talking to about the spare gutted ignitor, I must've thought I replied one drunken night. Sorry. I don't really NEED it, I just figured that a gutted ignitor bolted to the side of the dizzy would help keep the pick-up connector held securely in place instead of just using male quick-connects.
I posted that last night without even seeing the second page (I have my thread view options set to 50 posts per page), it looks like we're both undertaking the same task. I have already relocated my battery to behind the passengers seat; I bought a 26lb Optima yellow top deep cycle-D51R, it has a lower Amp-Hr and CCA rating than most other Optimas but was light enough for my requirements and the price was right at the local Advance Auto Parts ($145 or so plus a $25 rebate that I've yet to receive). It's in a battery box from Napa, a $10 box that's a bit oversize for the Optima, but has enough room to act as a bit of extra hidden storage if needed.
I'm not finished with my de-wiring job yet-I'm about in the same place you are, maybe a little behind you. My emissions control unit connector has just been depinned; the only wires left are ones that run to the starter, ignition hot, and another one or two that I thought I may need to use for my alarm system when I get around to installing it.
My car, an '83 GS, had most of the emissions crap deleted by the previous owner and he did an absolute crappy job of eliminating unnecessary wires and re-taping the harness. Each branch of the harness had about four layers of electrical tape over it, and everything under the hood was covered with wire loom, like the throttle cable, brake lines, ect. It looked horrible, but it's gone now. Almost all of my harnesses are completely untaped at the moment except for a few pieces holding certain bundles together while I'm removing what's not needed...
I'm not sure about that one; I haven't gotten that far yet. Trace it down manually and verify that you don't need it before cutting it out. It probably changes color at one or more connectors, so make sure that you either buzz it out with a continuity tester on a VOM or keep your fingers on it until you find its termination point. My wiring diagrams aren't in front of me right now, but it never hurts to double check...
The heavy gauge wires are usually there for a reason; follow it back to the fuse box or ignition switch and see where it connects there. That's just what I'd do before removing it...
If you want the ignitor it's yours!All of my X-01 connection has been deloomed about 3 years back. I am down to about 5 wires (off the top of my head) on that harness, and I am about to remove the nikki float wire as well to help trim it down. Now that I don't need the back of the water temp sensor, I can take that out as well.
The battery I will be using is from a NB miata. It is small enough to fit between the back seat and rear tower bar.
Joined: Jun 2008
Posts: 8,376
Likes: 30
From: Chino Hills, CA
I've discovered a tool that's even easier on the aluminum than is the brass wheel:
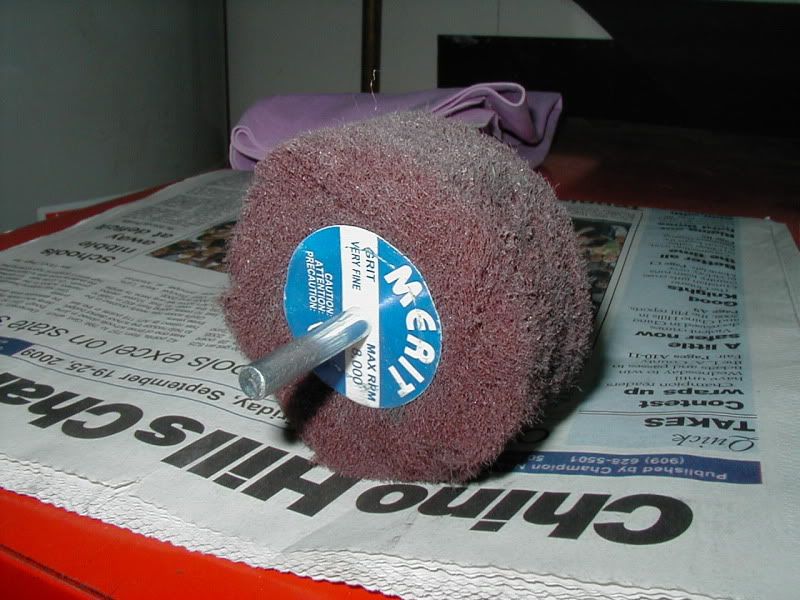
Like a scrubbing pad, but stacked and mounted on a shaft. Takes the oxydation but doesn't scratch or reduce the casting detail at all.
You have to use them carefully, though; too much pressure or letting them get hung up on an edge will cause the pad to tear apart rapidly.
Like a scrubbing pad, but stacked and mounted on a shaft. Takes the oxydation but doesn't scratch or reduce the casting detail at all.
You have to use them carefully, though; too much pressure or letting them get hung up on an edge will cause the pad to tear apart rapidly.
Rotating

Joined: Jan 2008
Posts: 605
Likes: 9
From: New Zealand
Thread Starter
Joined: Nov 2006
Posts: 8,482
Likes: 31
From: Huntsville AL
I've discovered a tool that's even easier on the aluminum than is the brass wheel:
Like a scrubbing pad, but stacked and mounted on a shaft. Takes the oxydation but doesn't scratch or reduce the casting detail at all.
You have to use them carefully, though; too much pressure or letting them get hung up on an edge will cause the pad to tear apart rapidly.
Like a scrubbing pad, but stacked and mounted on a shaft. Takes the oxydation but doesn't scratch or reduce the casting detail at all.
You have to use them carefully, though; too much pressure or letting them get hung up on an edge will cause the pad to tear apart rapidly.


This is the brass wheel I use:
Goes right on the power drill It is a softer metal and will not gouge the surface, unless you are putting you whole weight on it.
You can clean the alternator while it is on the car, loosen the bolts on the tension rod and water pump so you can rotate it around. It would be much easier if you took it out of the car.
As for paint, I just used wheel clear. Supposed to hold up to harsh environments.
Goes right on the power drill
It is a softer metal and will not gouge the surface, unless you are putting you whole weight on it. You can clean the alternator while it is on the car, loosen the bolts on the tension rod and water pump so you can rotate it around. It would be much easier if you took it out of the car.
As for paint, I just used wheel clear. Supposed to hold up to harsh environments.
Thread Starter
Joined: Nov 2006
Posts: 8,482
Likes: 31
From: Huntsville AL
I've had a field day hacking out unnecessary wiring from my car today; I'll have to run new grounds for a few things like my brake fluid level sensor and I still have to figure out a few of the relay connections, but I'm making progress. Maybe I snap some pics of my wiring mess tomorrow and post them so you can see the nightmare I've jumped into; "Where'd all the electrical tape go?!?"
Oh, if you want some clean looking NEW connectors to replace the big X-01 style OEM pieces that I'm sure you're only keeping a few wires from, check out Jeg's Ignition/Electrical section. Or search for "Caspers Weatherpack" on their site. I picked up one of those, a GM-style one- to four-wire kit with many connectors-both male and female and different sized terminals for up to 12awg. You can also buy extra connectors and versions that hold up to six wires too. It also comes with a tool to disassemble them, and the connectors have weather-proof boots and can be used for anything where you need to connect one or more wires. It's a great deal at around $70 IMHO. Casper's also makes at least two other kits; a Metripack and another, but they're both for 6+ wires I believe and are more expensive. The GM stlye weatherpack connectors work fine for me, and I believe that you'll end up seeing more of them under my hood than the stock versions by the time I'm finished...
About the ignitor, I think I'll just file or cut down some male quick-connects for them; if they don't stay in the dizzy well enough for me and I can't make or come up with something to secure them better, I may take you up on that ignitor. I've got one Jeg's brand GM HEI-style module/ignitor that should be in tomorrow (I think I'll try to hide it inside the FC leading coil base, though). The Jeg's brand modules are rated to 9K, 3Krpms higher than the generic Wells brand modules that everybody else uses. I've also got my first WB/UEGO Air/fuel ratio gauge that I should see tomorrow, too. Jeg's had a sale on the AEM units, so I figured I'd try them out and save almost $175 over the Innovate LC/X16 deal (I don't have anykind of data logger right now, but I'm sure I can build my own on down the road with my PIC MCU and electronics experience; I've also got a couple extra Motorola/Freescale MPX4250APs-the same MAP sensors used in the MSII-that I plan to use to build some custom boost and elevation correction equipment for my carb'ed application before I install the MSII. Oops, my nerd's showing!)...
Keep up the good work, Stu! Let me know if that's the same BL heavy-gauge wire that I found...
Joined: Jun 2008
Posts: 8,376
Likes: 30
From: Chino Hills, CA
I use a heavy canvas shop apron and gloves when wirebrushing. And safety glasses and a hat.
Thread Starter
Joined: Nov 2006
Posts: 8,482
Likes: 31
From: Huntsville AL
I usually wire wheel with the wheel facing away from me. Although doing my alternator I used some glasses.
No pain no gain, but no eyes no... something.
Thread Starter
Joined: Nov 2006
Posts: 8,482
Likes: 31
From: Huntsville AL
I found one identical to that with a single female (maybe, could've been male) terminal in the engine compartment that had been left dangling by the previous owner. I traced it back to the cruise control unit behind the driver's side rear seat, then hacked it out. I didn't need it, if you're not using your cruise, you probably won't either; I'd just manually verify it before taking my word for it as I don't know what year your car or most of your harness is...
I've had a field day hacking out unnecessary wiring from my car today; I'll have to run new grounds for a few things like my brake fluid level sensor and I still have to figure out a few of the relay connections, but I'm making progress. Maybe I snap some pics of my wiring mess tomorrow and post them so you can see the nightmare I've jumped into; "Where'd all the electrical tape go?!?"
Totally looking forward to that thread. My grounds I left intact, for the most part. Anything I removed that had a ground, I removed the ground for that as well. The thing with the stock wiring, is that most of the wire grounds are ran through a common ground wire. They just connect it all together.
Oh, if you want some clean looking NEW connectors to replace the big X-01 style OEM pieces that I'm sure you're only keeping a few wires from, check out Jeg's Ignition/Electrical section. Or search for "Caspers Weatherpack" on their site. I picked up one of those, a GM-style one- to four-wire kit with many connectors-both male and female and different sized terminals for up to 12awg. You can also buy extra connectors and versions that hold up to six wires too. It also comes with a tool to disassemble them, and the connectors have weather-proof boots and can be used for anything where you need to connect one or more wires. It's a great deal at around $70 IMHO. Casper's also makes at least two other kits; a Metripack and another, but they're both for 6+ wires I believe and are more expensive. The GM stlye weatherpack connectors work fine for me, and I believe that you'll end up seeing more of them under my hood than the stock versions by the time I'm finished...
About the ignitor, I think I'll just file or cut down some male quick-connects for them; if they don't stay in the dizzy well enough for me and I can't make or come up with something to secure them better, I may take you up on that ignitor. I've got one Jeg's brand GM HEI-style module/ignitor that should be in tomorrow (I think I'll try to hide it inside the FC leading coil base, though). The Jeg's brand modules are rated to 9K, 3Krpms higher than the generic Wells brand modules that everybody else uses. I've also got my first WB/UEGO Air/fuel ratio gauge that I should see tomorrow, too. Jeg's had a sale on the AEM units, so I figured I'd try them out and save almost $175 over the Innovate LC/X16 deal (I don't have anykind of data logger right now, but I'm sure I can build my own on down the road with my PIC MCU and electronics experience; I've also got a couple extra Motorola/Freescale MPX4250APs-the same MAP sensors used in the MSII-that I plan to use to build some custom boost and elevation correction equipment for my carb'ed application before I install the MSII. Oops, my nerd's showing!)...

I probably shouldn't have been online last night, but it's too late now-at least I didn't **** anybody off (that I know of)...you can tell if I've been drinking and usually about how much by the frequency of misspelled words and improper punctuation in my posts.
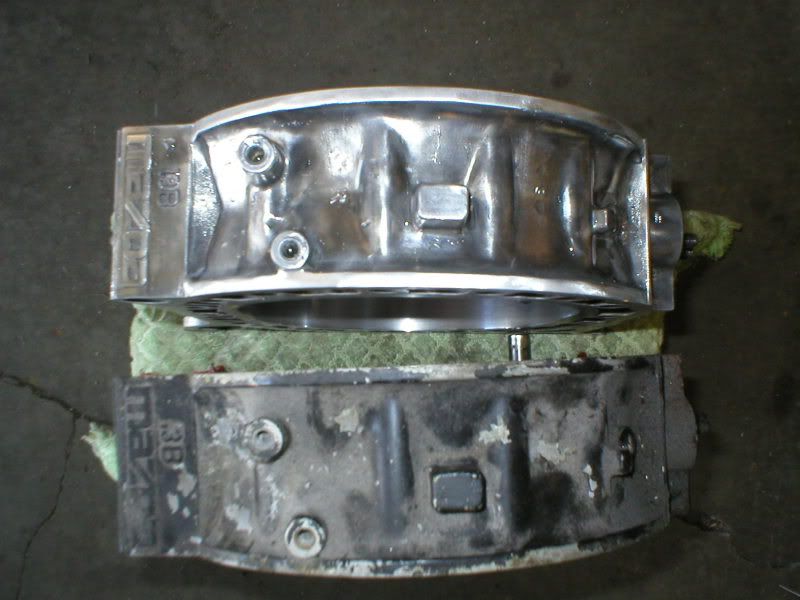
That Black/Blue heavy gauge wire that I cut out of my harness was left dangling in the engine compartment by the PO-it looked just like yours in the pic above; I manually traced it back through the firewall and into the rear harness to the cruise control module behind the drivers seat. The '83 wiring diagram says it has something to do with an automatic tranny. Do you still have the B-25 cruise control module connector behind your driver's seat? That's where mine originated, but I removed the entire B-25 connector today along with a few more wires. I had my camera, but I forgot to snap pics. I'll make sure to do that one day this week if not tomorrow.
I'm also swapping in an S3 dash at the same time, and annoyances like different connectors for the headlight retractor switch, emergency flashers, rear window defroster switch, and other crap can be a pain at times. I've almost mastered the art of removing wires from OEM Mazda connectors by now so swapping them out on the above parts shouldn't take much time. Luckily, they're all colored identically so I can't screw it up. I'll just have to pull everything back out to install the correct S3 electrical heater unit and heater core so I'll be able to drive her this winter; the '83 version doesn't want to work right with the '85 controls...
I can't wait to see how your under-hood wiring is going to turn out! I hadn't even thought of trying to really hide mine, I just wanted to greatly simplify things and upgrade the wiring for the 80 Amp FC alternator I'll be using, but I realized how much unnecessary crap was there and had to do something about it.
It always starts out as a simple modification and ends up being a huge job before it's finished, doesn't it?
As far as my nerdy ideas, I've got a few plans up my sleeves. I think I'll start with a 4x20 LCD display in the car and just monitor vacuum (eventually boost) and ambient pressure with the MAP sensors and display the estimated elevation along with the actual pressure at the other sensor in real time (and/or a corrected calculation for the estimated elevation). I have an 1/8" NPT 70psi-rated pressure solenoid that I'd like to eventually use to close off a wastegate signal, having it triggered by a certain boost pressure that I can electronically control from my driver's seat. Nothing new, just a nerdy DIY electronic boost control. It would also be cool to run an FC CAS in a carburated FB with a custom-built ignition interface, but I'm not ready to attempt something like that yet...
Thread Starter
Joined: Nov 2006
Posts: 8,482
Likes: 31
From: Huntsville AL
I probably shouldn't have been online last night, but it's too late now-at least I didn't **** anybody off (that I know of)...you can tell if I've been drinking and usually about how much by the frequency of misspelled words and improper punctuation in my posts.
That Black/Blue heavy gauge wire that I cut out of my harness was left dangling in the engine compartment by the PO-it looked just like yours in the pic above; I manually traced it back through the firewall and into the rear harness to the cruise control module behind the drivers seat. The '83 wiring diagram says it has something to do with an automatic tranny. Do you still have the B-25 cruise control module connector behind your driver's seat? That's where mine originated, but I removed the entire B-25 connector today along with a few more wires. I had my camera, but I forgot to snap pics. I'll make sure to do that one day this week if not tomorrow.
I'm also swapping in an S3 dash at the same time, and annoyances like different connectors for the headlight retractor switch, emergency flashers, rear window defroster switch, and other crap can be a pain at times. I've almost mastered the art of removing wires from OEM Mazda connectors by now so swapping them out on the above parts shouldn't take much time. Luckily, they're all colored identically so I can't screw it up. I'll just have to pull everything back out to install the correct S3 electrical heater unit and heater core so I'll be able to drive her this winter; the '83 version doesn't want to work right with the '85 controls...
I can't wait to see how your under-hood wiring is going to turn out! I hadn't even thought of trying to really hide mine, I just wanted to greatly simplify things and upgrade the wiring for the 80 Amp FC alternator I'll be using, but I realized how much unnecessary crap was there and had to do something about it.
It always starts out as a simple modification and ends up being a huge job before it's finished, doesn't it?
As far as my nerdy ideas, I've got a few plans up my sleeves. I think I'll start with a 4x20 LCD display in the car and just monitor vacuum (eventually boost) and ambient pressure with the MAP sensors and display the estimated elevation along with the actual pressure at the other sensor in real time (and/or a corrected calculation for the estimated elevation). I have an 1/8" NPT 70psi-rated pressure solenoid that I'd like to eventually use to close off a wastegate signal, having it triggered by a certain boost pressure that I can electronically control from my driver's seat. Nothing new, just a nerdy DIY electronic boost control. It would also be cool to run an FC CAS in a carburated FB with a custom-built ignition interface, but I'm not ready to attempt something like that yet...
Better at home drinking than driving!No clue on the CC module in the bins, I have back seats that I would rather not touch. They are all minty.
I hear ya on the nerdy part. I have been throwing the idea around of using some MSD rev pills to have an F1 style shift light (like 5 greens, 5 yellows, and 3 reds) for over revs. Stick that sucker on the bottom of the instrument cluster for easy viewing in peripheral vision.
Haven't gotten to the wiring today. I think I have everything I want out right now. Tomorrow I will mock up where everything will sit and pre-tape it up.
I still have to find some way to cover the holes in the engine bay without welding. I have no welder, and I don't want to just bondo the holes.


Full Member
Joined: Oct 2007
Posts: 136
Likes: 1
From: Vancouver, BC Canada
Great job, this thread has inspired me to do some "rejuvenating" on the engine bay. Does anyone know if I have to remove the radiator to get the side brackets out to derust/paint them or if I could remove one at a time (i.e. is one bracket stong enough to hold the rad?)