
12a SP Build-Up Winter Project

I tried setting the end play over the weekend...no matter what spacer I use, this motor is too tight. Im figuring my lapped plates might have a lot do do with this. I will take my Z spacer and gently file it down over some sand paper to get my .04mm of end play.


Does it rotate freely with no thrust bearings? E- shaft could be making contact with the stationary gear. If it is too tight then a wider spacer should do it not a thinner one... Just rambling with my fingers here.


Joined: Mar 2001
Posts: 31,833
Likes: 3,232
From: https://www2.mazda.com/en/100th/
ok so a bit of panic set in and I removed the rear counter weight and all the front spacers, bearing pulleys etc to make sure my eccentric shaft moved freely in the engine
Thank god! I then proceeded to test endplay with a x spacer and a z spacer...and yes I actually got a bit of a reading on the dial indicator. Can someone confirm I am setting up my indicator correctly???

Uploaded with ImageShack.us
Thank god! I then proceeded to test endplay with a x spacer and a z spacer...and yes I actually got a bit of a reading on the dial indicator. Can someone confirm I am setting up my indicator correctly???

Uploaded with ImageShack.us
Sorry the video is so dark, but I was just trying to ensure that there was play in the eccentric shaft...is it ok to run multiple spacers to achieve a specific endplay?
The dial indicator won't measure anything like that. The magnet needs to be on the plate. The indicator tip can be on the flywheel. Or vice versa.
I use a feeler gauge. Most don't but I like the feeling right between .002" and .003" as a bit of drag where .003 is too tight but .002 is a light drag. So about .0025"
Multiple spacers won't work. Do you know the order and placement of the various parts? A while back I blew this up and printed it out.
I think part of your problem is the spacer that sits on the shaft stat bearing journal (the thick and small one). It has a taper on one side. This taper fits against the shaft bevel where it expands to the stat bearing size. The needle bearing rides against the flat other side, as does the thrust spacer. The spacer needs a flat surface. The rest is pretty easy. Or it should be. Let us know and take another video. That one, while dark, clearly showed the movement and sound which looks and sounds fine.
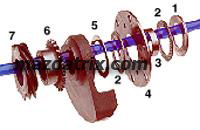
Ok so the spacer you are referring to would be number 1 in the illustration you provided...correct? If that were upside down I would obtain an incorrect reading. I see what you mean about how my gauge is set up...the equivelent of holding my foot on the door while pulling on the **** to open it lol. When I get home from work tonight I will inspect and retry. I did have my parts in the right order...hope that counts for something. When you use the feeler gauge method are you measuring between the flywheel and rear stationary gear??? That looks like a difficult place to get a gauge in and get an accurate "feel" Thanks again for all the help guys and sorry bout all the questions...
Thanks Jeff...you were exactly right about that spacer being upside down. Had 10 minutes to play around with this tonight and got .0032" with a x spacer so still have to sort out the correct end play but am def headed in the right direction. Thanks all again and video and pics to follow.
Here is just a clip of my latest attempt at endplay from the post above. I tried with a "z" spacer and got to about .0030", but I would like to get it to about half of that. Since the z spacer is the smallest it seems I would need to grind down this one to get the end play I am after.
"three hundred thousanths"...lol...should have said thirty thousanths of an inch. sorry bout that. Juggling act between holding phone, moving the flywheel and trying to speak sensibly
I will be back at it this weekend and hopefully buttoning this guy up.
"three hundred thousanths"...lol...should have said thirty thousanths of an inch. sorry bout that. Juggling act between holding phone, moving the flywheel and trying to speak sensibly
I will be back at it this weekend and hopefully buttoning this guy up.
Last edited by cfamilyfix; Mar 12, 2013 at 08:49 AM.
Cool, glad it was upside down - a simple fix.
You are looking for .002" to .0025". I usually don't like making them tighter than .002". Don't make them any looser than .0035".
You are looking for .002" to .0025". I usually don't like making them tighter than .002". Don't make them any looser than .0035".
.027 FTW!!!! got he front cover all buttoned up. Will be switching out the stock flywheel for a racing beat lightweight steel and 83-85 rear counter weight. It was easier setting the endplay with a flywheel in place. Thinking about an fd oil pressure regulator and then this motor should be ready to go in a vehicle. I cant wait to hear it run!
Cool. I'm going with an FD pressure reg in my SP 12A too! Currently in the process of masking the side plates for paint.  I'll probably make a thread about it so I don't clutter up this one.
I'll probably make a thread about it so I don't clutter up this one.
I figured I would update this here too. Finally got this engine in my 79. There was a lot of "re-wiring" to do on the later style alternator upgrade and properly doing the electronic distributor upgrade. The good news is it runs. The bad news is it howls like it has a gilmer drive on it.
Joined: Jun 2006
Posts: 4,815
Likes: 24
From: Columbia, Tennessee
Sounds like bearings! Slight possibility its the carburetor or a huge vacuum leak around the manifold. Did you pressurize the oil system prior to startup? You should pull your ENGINE fuse and spark plugs and crank for 30 seconds. Unscrew the oil filter and check that theres oil making its way through the engine before starting.
Like front cover bearings????? As in Torrington bearings????? uggghhhh. Its hard to pin down where the noise is coming from since Im the guy behind the wheel with my foot trying to keep the engine running. I guess the only thing I can do is get it all in running condition, belts, gear oil in tranny, alt hooked up and go through it with a stethoscope listening to where the noise is originating from. I went through a whole saga priming the oil pump so I do know there is oil pressure.
I had a chance to spend an hour with the car tonight and the noise is def coming from the intake manifold area, so fingers crossed. I tried cranking down on the bolts to the manifold which improved it a little but it looks like I will have to butter the manifold with rtv or use a thicker gasket or something. I will be out there with it first thing in the morning...updates to follow
I had one do that once. It was an intermediate plate that wasn't machined perfectly accurate from the factory. It made the primary area of the gasket sound like a piece a grass you hold in your thumbs and blow. You know the sound, like a reed from a sax or something. You could push on the gasket and it would change the sound. A little RTV fixed it.
When I got this RE setup it had rtv smeared all over it with the gasket still stuck to it...now I know why. A lot of their parts never seem sturdy enough...maybe its just me

Thread
Thread Starter
Forum
Replies
Last Post
heywier427
Naturally Aspirated Performance Forum
2
Sep 11, 2015 04:49 PM

