
(FUEL) How To: Install Carter Fuel Pump & Holley FPR

Full Member
Joined: Aug 2006
Posts: 175
Likes: 0
From: Lodi, Ca
Originally Posted by DublyDurty
MtotheIKEo,
That is awesome!!! I didn't even know there was a "typical" setup, and that all the numbers actually mean something in some universal electrical universe.
Thanks!!!!!
DD
That is awesome!!! I didn't even know there was a "typical" setup, and that all the numbers actually mean something in some universal electrical universe.
Thanks!!!!!
DD
Full Member
Joined: Aug 2006
Posts: 175
Likes: 0
From: Lodi, Ca
I just installed a Holley regulator this morning. Made a bracket and bolted it to some bolt on top of the motor. Next up is installing the Holley pump. I had the NOS gauage laying around so it is being used. I didnt feel like paying 30 bucks for a new gauge right now. Maybe down the road I will.


Onward thru the fog!
Joined: Feb 2006
Posts: 317
Likes: 1
From: On the couch
MtotheIKEo,
Looks good! And I can't tell you how much that diagram helped! It's so simple (now) that it makes me feel kind of stupid. Well, anyway, I guess everything is easy...once you know how to do it.
Lodi huh? That's not by any chance Lodi, Ohio is it? If so, I did some cruisin' there "back in the day" when my 69 Z-28 Camaro was only 3 years old. Boy, was THAT a long time ago.
Thanks again!
DD
Full Member
Joined: Aug 2006
Posts: 175
Likes: 0
From: Lodi, Ca
Originally Posted by DublyDurty
MtotheIKEo,
Looks good! And I can't tell you how much that diagram helped! It's so simple (now) that it makes me feel kind of stupid. Well, anyway, I guess everything is easy...once you know how to do it.
DD
Looks good! And I can't tell you how much that diagram helped! It's so simple (now) that it makes me feel kind of stupid. Well, anyway, I guess everything is easy...once you know how to do it.
DD
Sorry but its Lodi, CA.
MtotheIKEo how big of a fuse did you go with for the carter pump?
personally i like using these relays, i have used them on my second gen for the pump and e-fan with great success.
http://cgi.ebay.com/ebaymotors/Bosch...spagenameZWDVW
personally i like using these relays, i have used them on my second gen for the pump and e-fan with great success.
http://cgi.ebay.com/ebaymotors/Bosch...spagenameZWDVW
Full Member
Joined: Aug 2006
Posts: 175
Likes: 0
From: Lodi, Ca
Originally Posted by projectredsuns
MtotheIKEo how big of a fuse did you go with for the carter pump?
personally i like using these relays, i have used them on my second gen for the pump and e-fan with great success.
http://cgi.ebay.com/ebaymotors/Bosch...spagenameZWDVW
personally i like using these relays, i have used them on my second gen for the pump and e-fan with great success.
http://cgi.ebay.com/ebaymotors/Bosch...spagenameZWDVW
Onward thru the fog!
Joined: Feb 2006
Posts: 317
Likes: 1
From: On the couch
I'm requesting one more response to make this Fuel Pump relay installation "idiot proof" for me and future reference.
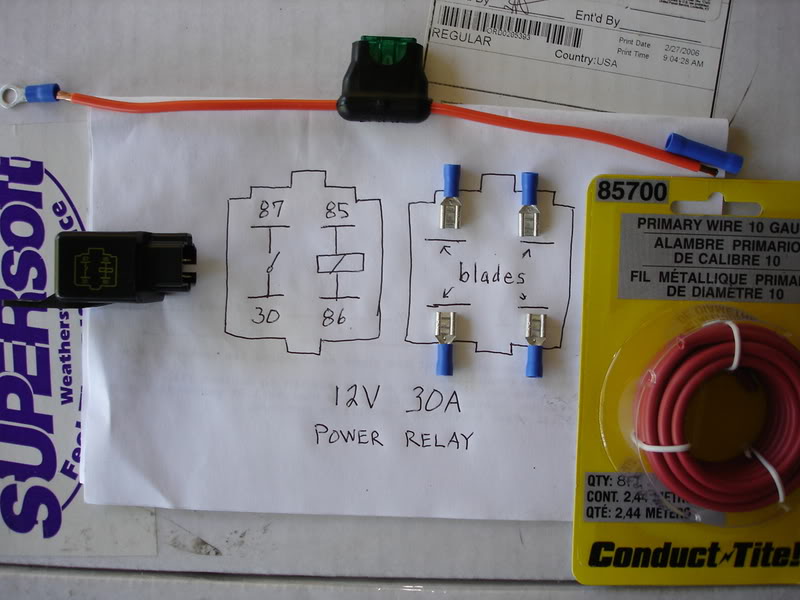
On the relay there are 4 numbers.
#30 goes to the inline fuse holder and fusible link location for power.
#85 goes to ground.
#86 goes to ignition (switch).
#87 goes to fuel pump.
Here is the white plastic connector (that will be disconnected) under the driver's side storage bin where the relay will be installed.
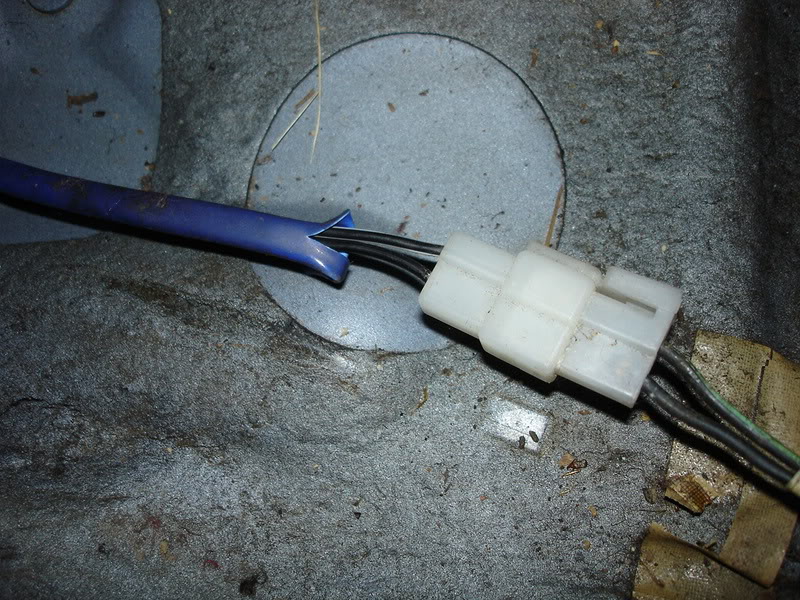
I separate the plug and now have a connector A on the left with 2 wires that go to the fuel pump through a grommet in the floor of the bin area (the wires are wrapped in a blue tube in the picture above).
Left wire 1 is black with a white stripe.
Left wire 2 is black.
I also have a connector B on the right that goes to the front of the car (ignition switch I presume).
Right wire 3 is black with a green stripe.
Right wire 4 is black.
Here's where I ask you to fill in the missing information:
Relay #87 gets connected to Left wire (is it 1 or 2)?
Relay #85 goes to ground. Does this connect to an existing wire, or do I just run a ground wire to the metal in the bin area?
Relay #30 gets connected to Right wire (is it 3 or 4)?
Relay #86 gets connected to Right wire (is it 3 or 4)?
Feel free to correct anything I've stated above. What I need, simply put, are "relay" numbers to connect to "wire" numbers. There's a great wiring diagram on page 289 (top right corner) of the Haynes manual that I looked at as I stroked my chin and said "hmmmm".
Thanks,
DD
On the relay there are 4 numbers.
#30 goes to the inline fuse holder and fusible link location for power.
#85 goes to ground.
#86 goes to ignition (switch).
#87 goes to fuel pump.
Here is the white plastic connector (that will be disconnected) under the driver's side storage bin where the relay will be installed.
I separate the plug and now have a connector A on the left with 2 wires that go to the fuel pump through a grommet in the floor of the bin area (the wires are wrapped in a blue tube in the picture above).
Left wire 1 is black with a white stripe.
Left wire 2 is black.
I also have a connector B on the right that goes to the front of the car (ignition switch I presume).
Right wire 3 is black with a green stripe.
Right wire 4 is black.
Here's where I ask you to fill in the missing information:
Relay #87 gets connected to Left wire (is it 1 or 2)?
Relay #85 goes to ground. Does this connect to an existing wire, or do I just run a ground wire to the metal in the bin area?
Relay #30 gets connected to Right wire (is it 3 or 4)?
Relay #86 gets connected to Right wire (is it 3 or 4)?
Feel free to correct anything I've stated above. What I need, simply put, are "relay" numbers to connect to "wire" numbers. There's a great wiring diagram on page 289 (top right corner) of the Haynes manual that I looked at as I stroked my chin and said "hmmmm".
Thanks,
DD
Thread Starter
Lives on the Forum
Joined: Jun 2004
Posts: 11,359
Likes: 14
From: Grand Rapids Michigan
Damn, I knew I should've take some pics when I did this... Actually, I think I did but I can't find them on my wife's computer.  Okay, for the trigger wire just find out which of the two wires show voltage while cranking. Other than that, you have power to the relay; power to the pump; and ground (which goes to ground, I used a bolt under the storage bin). I hope this helps, its the best I can do without tearing out my storage bins...
Okay, for the trigger wire just find out which of the two wires show voltage while cranking. Other than that, you have power to the relay; power to the pump; and ground (which goes to ground, I used a bolt under the storage bin). I hope this helps, its the best I can do without tearing out my storage bins...
The General RE


Joined: Apr 2003
Posts: 924
Likes: 13
From: San Diego, CA
Kentesu mentioned getting more power by rewiring the fuel pump. This makes me suspect some serious pressure drop going on from the pump to the regulator. I am curious how much peak pressure drop there is through the 5/16" lines. Carters come with an internal pressure relief preset at 6, 8, or 18. If you have the 6 it is likely you don't have 6 by the time it gets to the Carb. Since most of you have fancy FRPs the 18 might be a better choise. I personally prefer an EFI pump. They never run out of pressure and are real quite.
I have general rant about having 2-port fuel pressure regulators mounted in line to the carb. It's fine to do this if you don't have a return line, but the RX has one. A 2-port regulator is commonly known as a backbressure regulator and should be used as such. If you ran it off a tee on the line to the carb it would still regulate pressure and would not obstruct flow. Essentially it would function as a 3-port regulator.
I have general rant about having 2-port fuel pressure regulators mounted in line to the carb. It's fine to do this if you don't have a return line, but the RX has one. A 2-port regulator is commonly known as a backbressure regulator and should be used as such. If you ran it off a tee on the line to the carb it would still regulate pressure and would not obstruct flow. Essentially it would function as a 3-port regulator.
Onward thru the fog!
Joined: Feb 2006
Posts: 317
Likes: 1
From: On the couch
Got it figured out. Now I can read a wiring diagram better. The striped wire is the switched 12V source. That's what I suspected but wanted it confirmed.
What kept throwing me off, kentetsu, was that you never mentioned the original black (ground) wire coming from the fuel pump (the one wrapped in a blue tube)getting grounded anywhere. But it HAS to go to ground to complete the circuit, right. So I'll ground it where I also ground the relay.
You actually show the pump negative going to ground in your "line drawing" but it wasn't stated anywhere and that was the missing link for me.
Thanks,
DD
Thread Starter
Lives on the Forum
Joined: Jun 2004
Posts: 11,359
Likes: 14
From: Grand Rapids Michigan
Sorry, I started off by using the stock ground wire on my new pump. Later, I also added a ground wire going right to the mounting point of the pump just to be sure that I had a good ground...
Thread Starter
Lives on the Forum
Joined: Jun 2004
Posts: 11,359
Likes: 14
From: Grand Rapids Michigan
Yes, the pump is loud. When mounted on the frame rail it is not nearly as loud as when mounted below the storage bin. I think that if somebody (um, Respeed maybe?) was to fabricate a mount for the pump to further isolate it from the frame rail, this would help with both the noise and any mounting difficulties. We'll have to see what Billy has to say on this.

Full Member
Joined: Sep 2006
Posts: 108
Likes: 0
From: Definitely not here.
Before I go for an inspection, I need to secure the pump a bit. It's not hanging down enough to scrape so much, but it does need a skid plate. I want to try and flip the pump and mount it to the skid oplate like the factory did it. The only thing that's stopping me is the hose routing. The pump is so bulky that it would take a LOT more hose just to route them again. Mine is loud, but I also have no radio, and mostly have heard it at idle. On my one test drive it kind of faded into the background.,,,,BD
Originally Posted by Kentetsu
Okay, I'll give this a quick go. I used a relay designed for fog lights (30 amp, about 3 bucks at Autozone). 10 gauge wire attached at the fusible link location (where power goes into the block, not out), with an inline fuse holder (30 amp fuse used) runs back to the storage bin location (wire shown red in attachment). Remove the storage bin, and you will see the wiring for the pump exiting through a grommet in the floor of the bin area. I separated the plug on the original wiring at this point (right there in the bin area) and used the striped wire to trigger the relay which I mounted in the bin area (green wire in attachment). Another wire will go from the relay to ground (black in attachment). The last of the four prongs on the relay is for the power feed to the pump (shown as blue). Which wire goes to which prong on the relay? Well, look on the back of the package for a description because they tend to use numbers which mean nothing to me on the relay itself. I thought about taking pics and doing a nice writeup on this, but was pressed for time (sorry). I hope this is clear enough, if not then fire away with the questions.
Thread Starter
Lives on the Forum
Joined: Jun 2004
Posts: 11,359
Likes: 14
From: Grand Rapids Michigan
Sorry buddy, but that was the only pic I had and I don't even have that one anymore. If you have a specific question, I will try to answer it to the best of my ability...
i tried this and my pump isnt getting any power. any suggestions?
here is a pic of how mine is wired.
also, i dont know if this matters or not, but the ground from the pump and from the relay are set at the same place, the bolt that holds the drivers side seat belt assembly to the car. there in the same crimp with the end of the crimp underneath the lock washer tightened down. my only other ideas are either i need to redo the switch wire a different way, or my trailing ignitor is out?

There should be no power going to the pump on ACC (i'm assuming you're doing this mod to your 84 and not your 80) The 84-85, the power only comes on when you crank the engine. This can be overrided by the shorting a connection under the dash.
Onward thru the fog!
Joined: Feb 2006
Posts: 317
Likes: 1
From: On the couch
Onward thru the fog!
Joined: Feb 2006
Posts: 317
Likes: 1
From: On the couch
Is the striped wire from the fuel pump connected to 87 on the relay?
You double checked and cleaned the grounds?
Of course, test the wires themselves for conductivity and the new fuse you installed near the fuse block (aw, just replace the fuse).
Maybe the relay is bad?
If you take pictures of each wire connection at the fuse block, the relay, and the fuel pump, maybe we can see what's happening.
Onward thru the fog!
Joined: Feb 2006
Posts: 317
Likes: 1
From: On the couch
Hey, I just thought of something else. Since you shouldn't have cut any wires to do this mod/upgrade, just hook your fuel pump back up in the original configuration and make sure everything still works!
If it does, then your new setup is definately at fault. If it doesn't, then your fuel pump or another fuse may be bad... Two separate issues.
Don't give up.
DD
If it does, then your new setup is definately at fault. If it doesn't, then your fuel pump or another fuse may be bad... Two separate issues.
Don't give up.
DD
i figured it out. the wire that runs from the relay to the battery had come loose when i was pulling it through the fire wall. i hooked it back up and it worked fine all day yesterday. my pump wasnt quieter though. also, i had my fuel pressure gauge hooked up when it came on. i had my pressure set at 2psi before. as soon as i started my car with this set up it was only showing around 1.5-1.75psi. i readjusted it back to 2psi. i dont see why itd make the pressure drop if the pump is getting more power now? oh well. its working fine so im happy.