
(Carb) How to seal nikki carb throttle shaft

Thread Starter
Joined: Aug 2010
Posts: 1,416
Likes: 5
From: East Palestine, Oh
(Carb) How to seal nikki carb throttle shaft
If you guys saw my other thread, i was getting a nasty vac leak at the primary throttle shaft on the linkage side. I pulled it apart and saw the crappy nylon (maybe?) bushing in there that is supposed to make the seal. Everything checked out, so i put my throttle body back together and tossed it on the car. Still leaked.
Time to get creative.
Materials:
1. Your carb
2. A drill press
3. Bench vice
4. O ring
5. Drill bit
6. misc sockets, pliers, screwdrivers, and wrenches to tear carb apart.
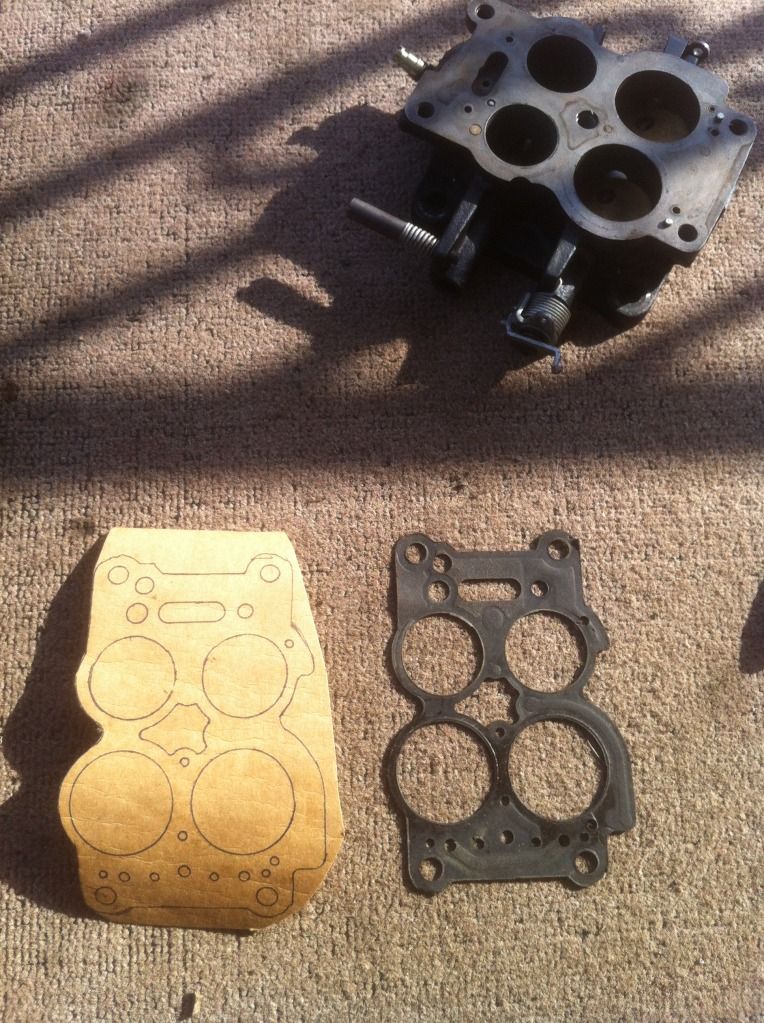
Step one: Dissamble the main body of the carb from the throttle body.
I am working on a sterling nikki, but its basically the same just a few more steps if you have emissions and all that junk on there. I didnt take any pictures of this, but on my carb I had to remove the throttle return spring, the AP jet linkage, the fast idle rod, and the rod that goes to the secondaries to make them mechanical. Then of course you need to remove the 4 10mm bolts that bolt the main body to the throttle body. Dont forget the big bolt in the middle of the carb, i always to then wonder why it wont come apart for a second
Step Two: Dissamble the linkage.
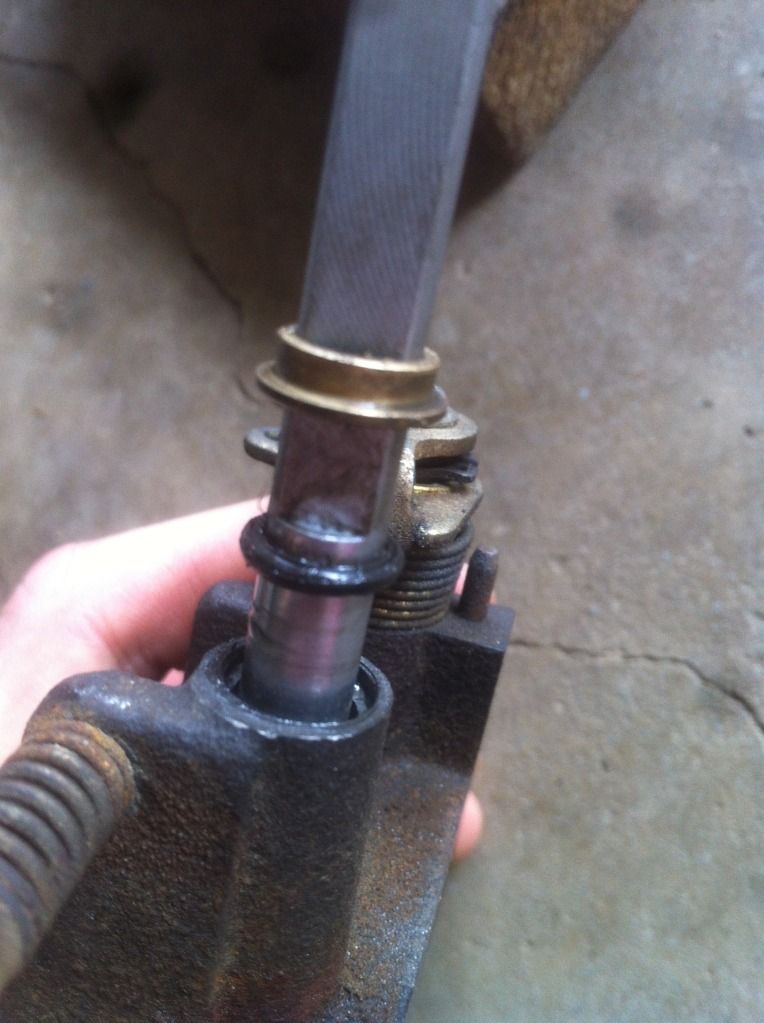
This part is really easy. However, re-assembly is not. Be very careful when pulling yours apart! Take pictures, lay out the linkage in a line the way it comes off, print out the FSM etc or you'll have a hell of a time getting it back together. The sterling linkage only has like 10 parts where as the stock has 15,000ish (guestimated , check FSM). Here is a picture of mine all tore apart with just the primary throttle plates needing removed so i can slide the shaft out.
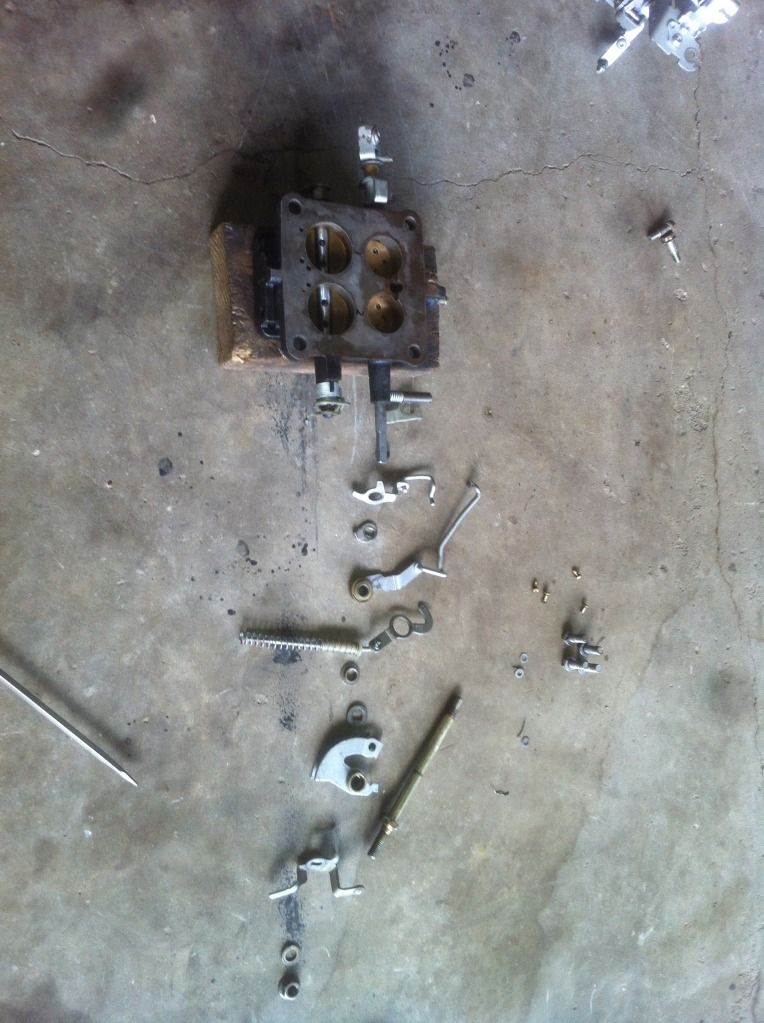
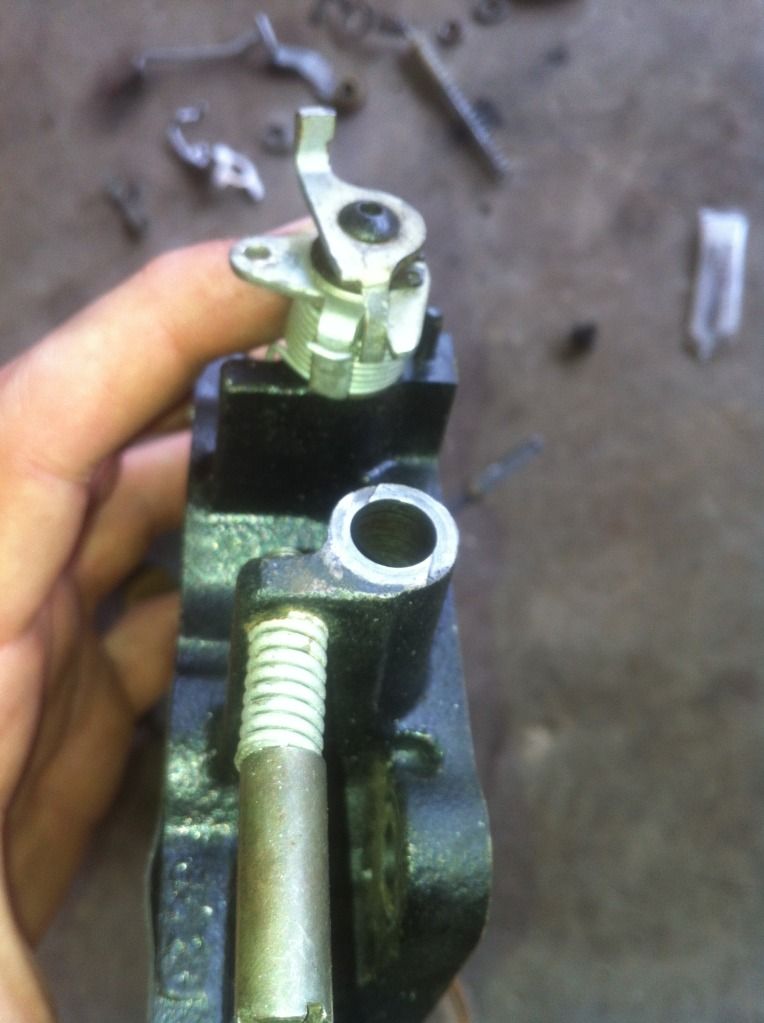
And this is what we are looking at with the plates removed and the primary shaft slid from the throttle body.
Step Three: Drill input for primary shaft on a drill press.
To determine the size of the drill bit, you first need to find an o ring that will fit the shaft snuggly, but not too tight or your throttle with stick. If it sticks you will have problems, especially at WOT. You dont want this. Ill find the size of the o ring that i used and report back, i just took some from work. After determining the proper drill bit size, toss it in your drill press (or your helpful neighbors )
)
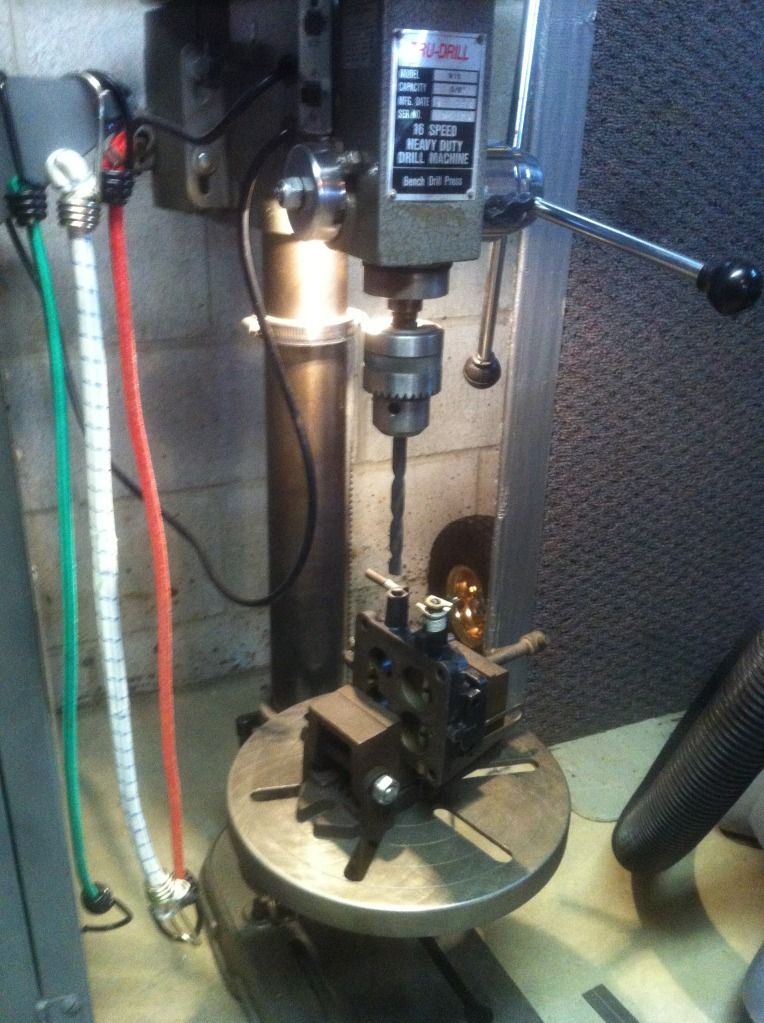
Put your throttle body in the vice and make the hole for the primary shaft as level as possible. Verify that your drill bit is plub and start the drilling. I eyeballed it, but you only want to drill the thinkness of the o ring or a HAIR deeper.
Time to get creative.
Materials:
1. Your carb
2. A drill press
3. Bench vice
4. O ring
5. Drill bit
6. misc sockets, pliers, screwdrivers, and wrenches to tear carb apart.
Step one: Dissamble the main body of the carb from the throttle body.
I am working on a sterling nikki, but its basically the same just a few more steps if you have emissions and all that junk on there. I didnt take any pictures of this, but on my carb I had to remove the throttle return spring, the AP jet linkage, the fast idle rod, and the rod that goes to the secondaries to make them mechanical. Then of course you need to remove the 4 10mm bolts that bolt the main body to the throttle body. Dont forget the big bolt in the middle of the carb, i always to then wonder why it wont come apart for a second
Step Two: Dissamble the linkage.
This part is really easy. However, re-assembly is not. Be very careful when pulling yours apart! Take pictures, lay out the linkage in a line the way it comes off, print out the FSM etc or you'll have a hell of a time getting it back together. The sterling linkage only has like 10 parts where as the stock has 15,000ish (guestimated
, check FSM). Here is a picture of mine all tore apart with just the primary throttle plates needing removed so i can slide the shaft out.And this is what we are looking at with the plates removed and the primary shaft slid from the throttle body.
Step Three: Drill input for primary shaft on a drill press.
To determine the size of the drill bit, you first need to find an o ring that will fit the shaft snuggly, but not too tight or your throttle with stick. If it sticks you will have problems, especially at WOT. You dont want this. Ill find the size of the o ring that i used and report back, i just took some from work. After determining the proper drill bit size, toss it in your drill press (or your helpful neighbors
) Put your throttle body in the vice and make the hole for the primary shaft as level as possible. Verify that your drill bit is plub and start the drilling. I eyeballed it, but you only want to drill the thinkness of the o ring or a HAIR deeper.
Thread Starter
Joined: Aug 2010
Posts: 1,416
Likes: 5
From: East Palestine, Oh
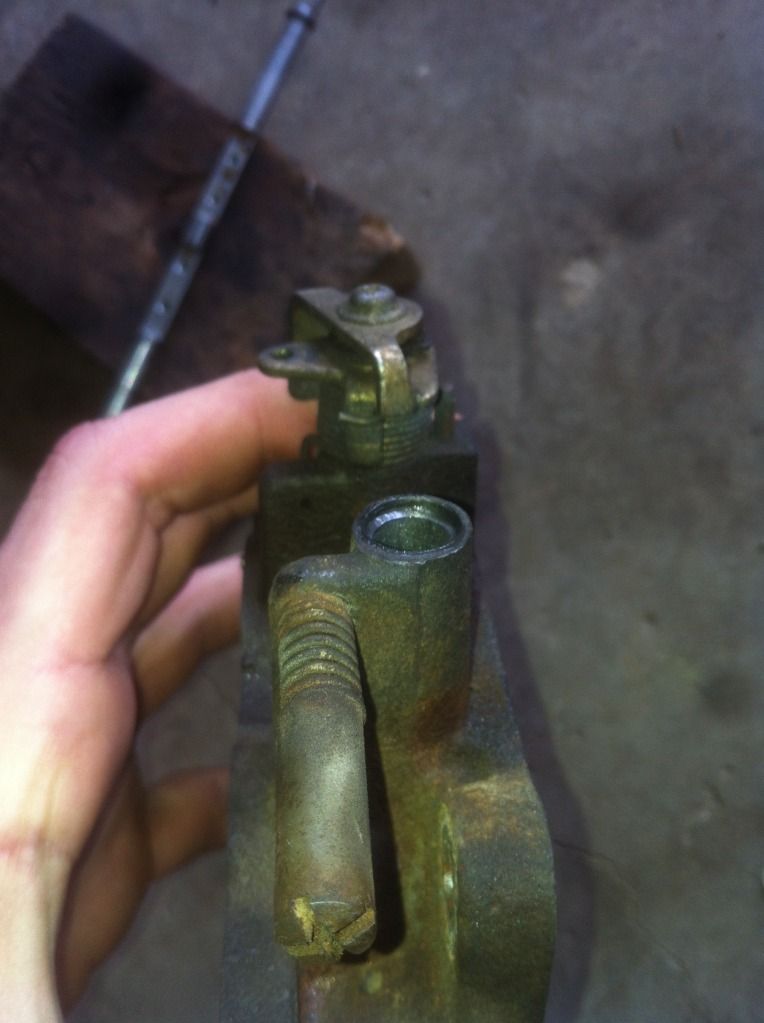
Step Four: Start the re-assembly.
First ill show some pics of what we did here.
Stock:
Milled:
O ring being slid on, that brass piece was to seat the o ring. Its part of the linkage.
O ring being pushed in, I used some left over energy suspension grease to help her go.
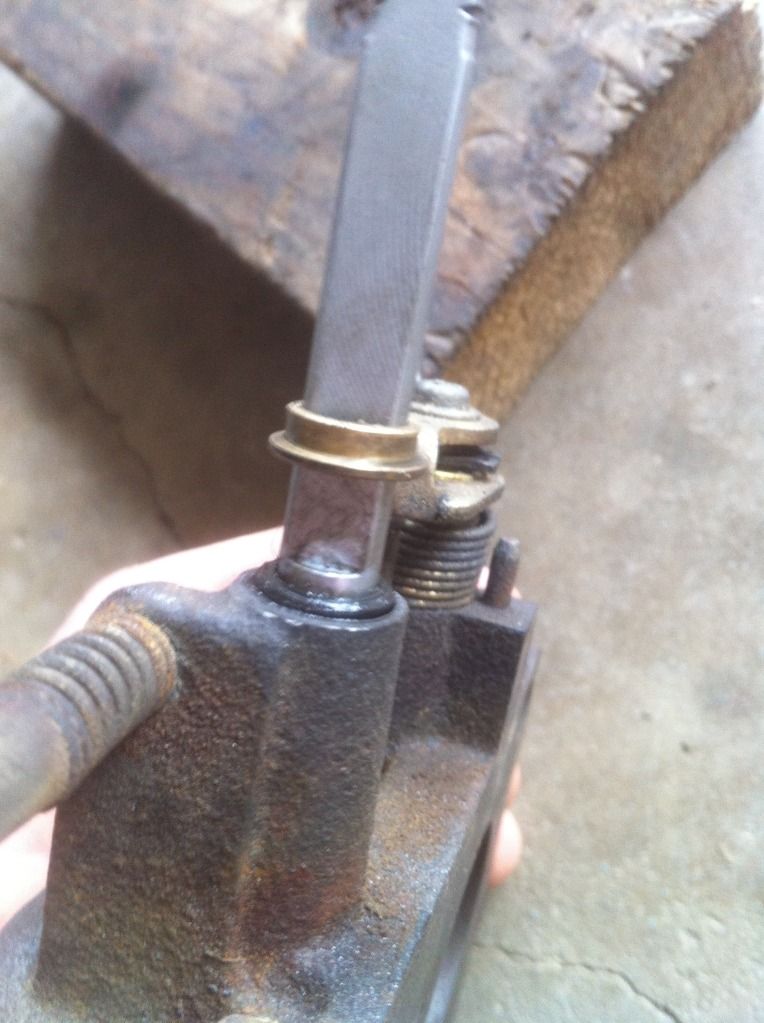
O ring fully seated.
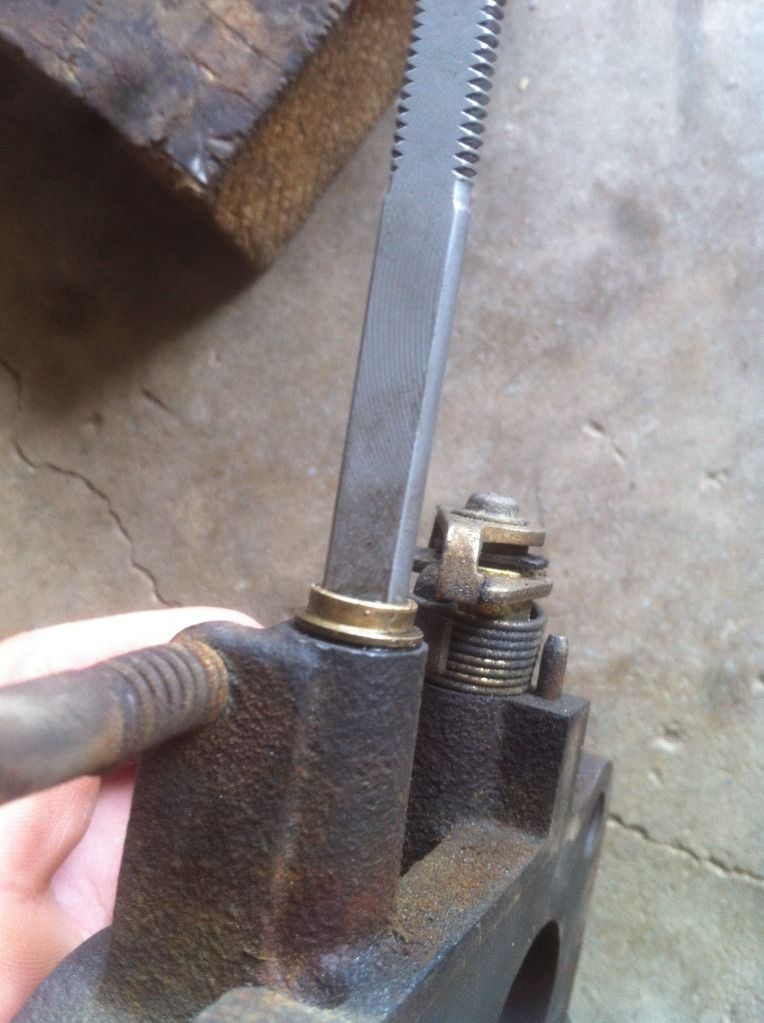
The o ring should fit snug on the shaft, but bee able to spin with little to no effort. If its too tight, your throttle return spring wont be strong enough to return the throttle and it will stick open. Again, you dont want this.
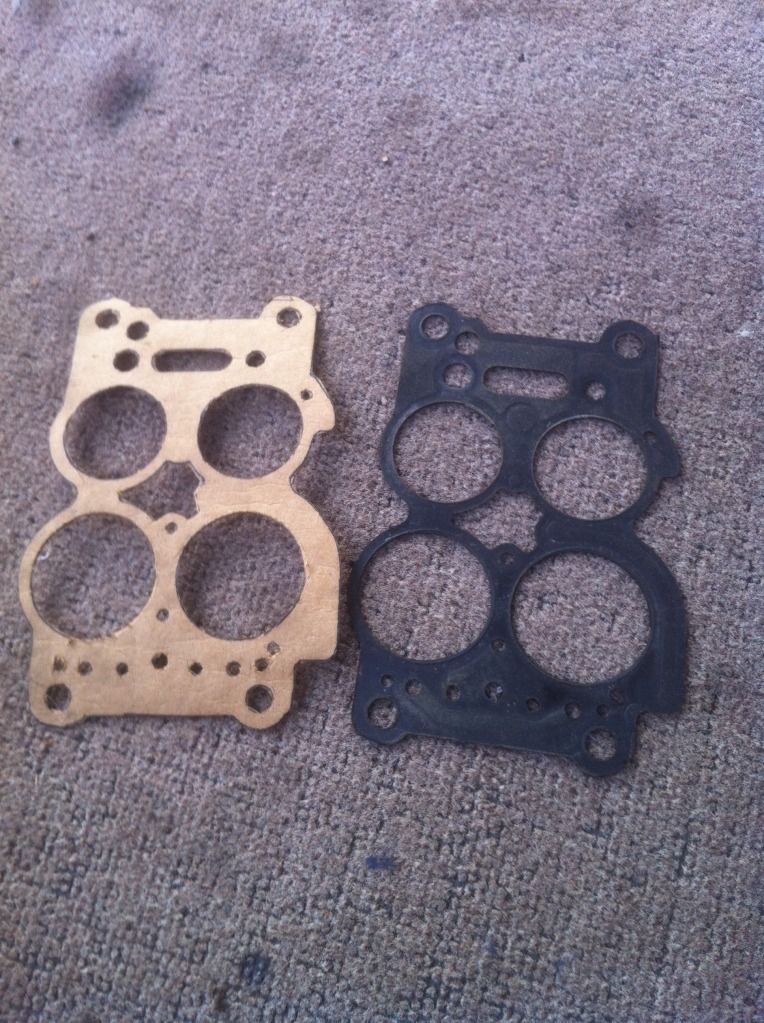
My carb was recently rebuilt so i didnt want to buy a rebuild kit to to get the main body to TB gasket. If yours needs or should be rebuilt go but a kit and do it while its all apart.
I did make a new one though.
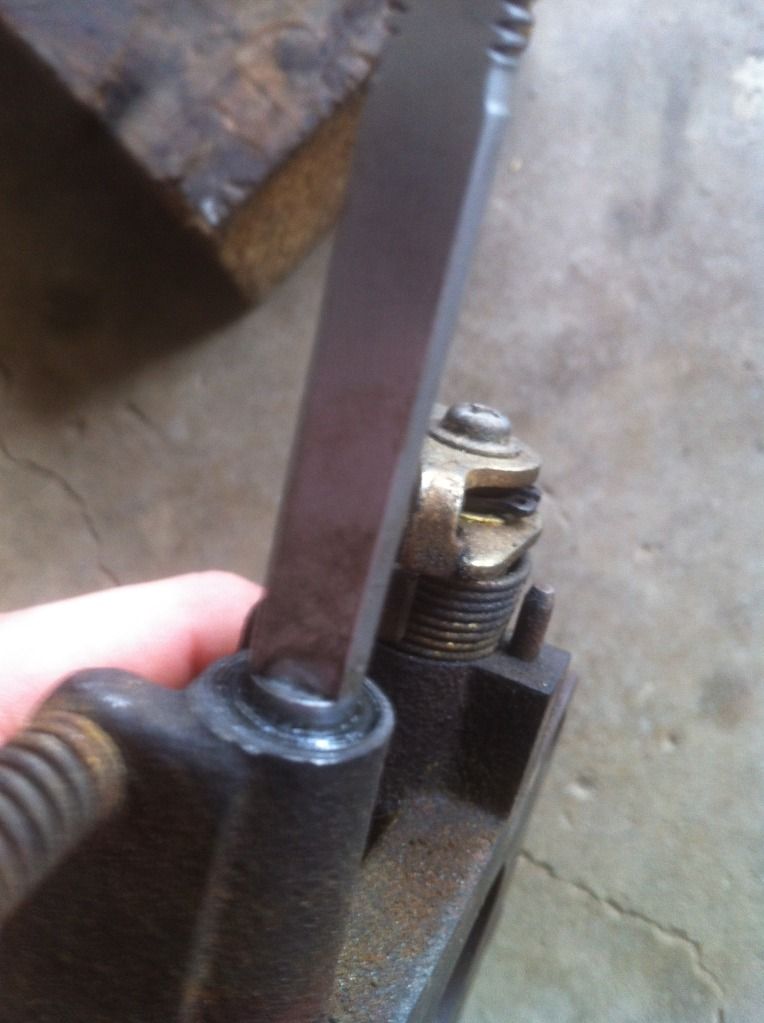
Step Five: Finish assembly
Start by putting your linkage back together in the order you removed it. You do remember how, dont you ?
?
Re attach TB to main body, and re make all connections on the carb. Before installing the carb on the car, be sure to make sure that the throttle plates will fully close, your throttle opens freely, and most importantly be sure to make sure it CLOSES after you let go.
Step Six: Install carb on car
Toss the carb on, hook it all up, and start the car. You'll have to re tune your idle, id recommend www.sterlingmetalworks.com for the how to on that. Your vac leak at the shaft should be fixed now and your car should idle better than ever. To verify you for sure no longer have a vac leak spray some carb cleaner on the shaft when the car is running. Before i did this mine would rev right up about 1500 more rpm that it idled at, now i have zero leak.
Unfortunatly this didnt fix my crappy idle like i had hoped there has to be something messed up inside my carb causing it to not idle. It did however fix my vac leak here 100%. Im also going to be doing this to my turbo prep nikki i have on the shelf.
I take no responsibility if you try this and mess up your carb or wreck your car due to throttle sticking. If done right you'll have no problems at all.
Thanks for reading!
First ill show some pics of what we did here.
Stock:
Milled:
O ring being slid on, that brass piece was to seat the o ring. Its part of the linkage.
O ring being pushed in, I used some left over energy suspension grease to help her go.
O ring fully seated.
The o ring should fit snug on the shaft, but bee able to spin with little to no effort. If its too tight, your throttle return spring wont be strong enough to return the throttle and it will stick open. Again, you dont want this.
My carb was recently rebuilt so i didnt want to buy a rebuild kit to to get the main body to TB gasket. If yours needs or should be rebuilt go but a kit and do it while its all apart.
I did make a new one though.
Step Five: Finish assembly
Start by putting your linkage back together in the order you removed it. You do remember how, dont you
?Re attach TB to main body, and re make all connections on the carb. Before installing the carb on the car, be sure to make sure that the throttle plates will fully close, your throttle opens freely, and most importantly be sure to make sure it CLOSES after you let go.
Step Six: Install carb on car
Toss the carb on, hook it all up, and start the car. You'll have to re tune your idle, id recommend www.sterlingmetalworks.com for the how to on that. Your vac leak at the shaft should be fixed now and your car should idle better than ever. To verify you for sure no longer have a vac leak spray some carb cleaner on the shaft when the car is running. Before i did this mine would rev right up about 1500 more rpm that it idled at, now i have zero leak.
Unfortunatly this didnt fix my crappy idle like i had hoped there has to be something messed up inside my carb causing it to not idle. It did however fix my vac leak here 100%. Im also going to be doing this to my turbo prep nikki i have on the shelf.
I take no responsibility if you try this and mess up your carb or wreck your car due to throttle sticking. If done right you'll have no problems at all.
Thanks for reading!

Thread Starter
Joined: Aug 2010
Posts: 1,416
Likes: 5
From: East Palestine, Oh


Trending Topics
When you mentioned how you were going to do this fix, I have to admit it sounded like a bad idea to me. I didn't think it would work. However, you pulled it off and it looks good! The energy suspension grease was a good touch. It should keep that thing lubricated for a long time to come. Best of all, it's easily rebuildable! So if that o-ring dries out or gets loose you can get to it in about 5-10 minutes without the risk of damaging anything. I like it!
I may do this to mine, even before I know if it leaks or not. It's a 10,000 times better idea than that stupid paper bushing that Mazda used stock. Please post the detailed sizes for your drill bit, and the o-rings that you used. This thread won't truly be complete without them! Maybe measure them with a dial caliper and share?
Thanks!
Jamie
Oh yeah, I was also going to ask you how you got the screws out that hold in the throttle plates? I thought Sterling said that he crimps the back of the threads so they won't come out? Did yours give you any problems when you removed them? I'm assuming they use an allen key for removal?
Thread Starter
Joined: Aug 2010
Posts: 1,416
Likes: 5
From: East Palestine, Oh
well, funny you asked that. I thought sterling carbs were supposed to have thinned primary and secondary shafts and have allen head screws. The secondary shaft wasnt milled, but had allen heads. The primary was thinned but had the stock screws in it? Not sure whats up with that... I work in a hospital and fix medical equipment (hospital mechanic lol) i used o rings for a surgical dental unit lol ill measure one tomorrow with digital calipers and get back to you guys.
Thanks for the sticky Dave! and thanks for all the other ataboys guys!
Thanks for the sticky Dave! and thanks for all the other ataboys guys!
That's odd. Yeah, I'm 99% sure that Sterling thins out both of the shafts, and then puts allen head screws in them. Well, anyway if you can post the sizes of the drill bit and o-ring that you used I would appreciate it.
Jamie
Jamie
Thread Starter
Joined: Aug 2010
Posts: 1,416
Likes: 5
From: East Palestine, Oh
The kid i bought the car from said he bought it in 8/09, it sat on a shelf, then was installed about 5 months before i bought the car. He never even drove the car and said he never touched the carb. I dont get it.
Thread Starter
Joined: Aug 2010
Posts: 1,416
Likes: 5
From: East Palestine, Oh
The o ring that i used was from a company we use to buy dental unit supplies from. The name of the company is replacement parts industries, inc. The part number from them for the o rings i used is RPO305. The x-sec (thickness?) of the o ring is .070", the ID is .239" and the OD is .379". The catalog also gave an industry part number for them which is AS568A-010.
These o rings have a snug fit over the shaft but still allow it to spin with little effort, been driving since the day i posted the write up with no problems at all.
For the drill size, ill have to check when i get home. I just slipped the oring on the shaft and found a drill bit that was close to the OD of the oring when it was slid on the shaft. Dont size the drill bit to the oring by itself, it stretches a little its on the shaft.
Hope that helped, maybe a mod can add the sizes where they are supposed to be in the original post.
Can you tell me the drill bit size you used for this? You never posted it above. I'm planning on doing this modification to my throttle body tomorrow. If you could post the drill bit size you used I would really appreciate it.
Thanks!
Jamie
Thanks!
Jamie


clutch rider
Joined: Jun 2012
Posts: 24
Likes: 0
From: los angeles.
What's with the crappy attitude new guy? Oneiros is a very helpful member around here. Cut him some slack. This isn't HondaTech....

Senior Member
Joined: Nov 2009
Posts: 346
Likes: 3
From: Australia
lol. I read the whole thread, I just don't understand how you get a vacuum leak through the throttle shafts that is severe enough to cause any problems. Even the OP said that this didn't solve his idle problems. Added to this I remember someone with a lot of Nikki boost prep experience saying that you don't need to seal the shafts. So obviously there wasn't much of a boost leak, if any.
Would just like a little more info, that's all.
Would just like a little more info, that's all.

Thread
Thread Starter
Forum
Replies
Last Post