My 4 port 13B
 03-19-05, 03:34 AM
#1
My 4 port 13B
I've collected enough parts to build a functional engine. It's got parts from three R5 13Bs. This is my first attempt at a large streetport, so be gentle. 
Stock
Not so stock.
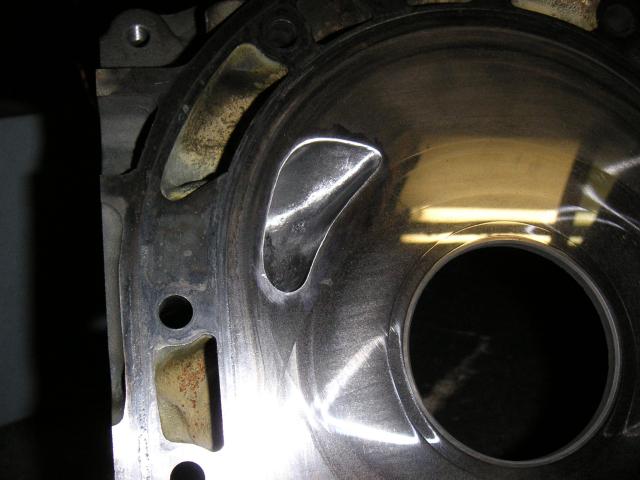
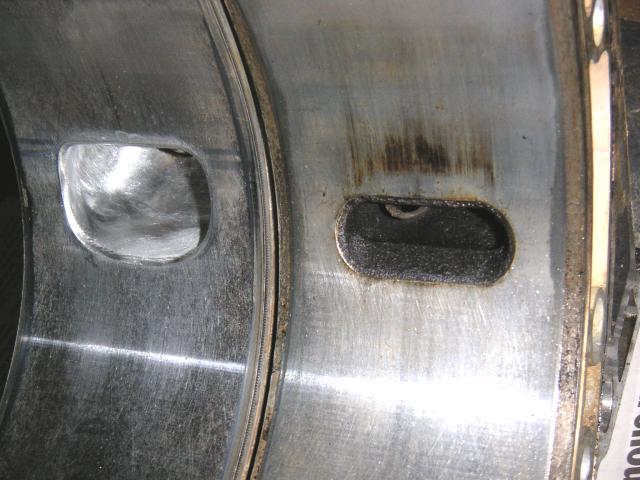
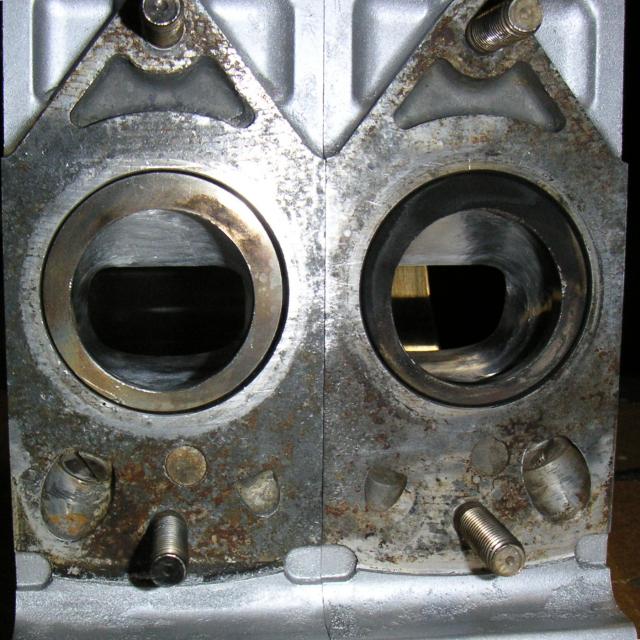
Here's the front port. I left a smooth but not glass-like surface in there. Then I polished the closing edge. Hmm, it shows up better in real life.
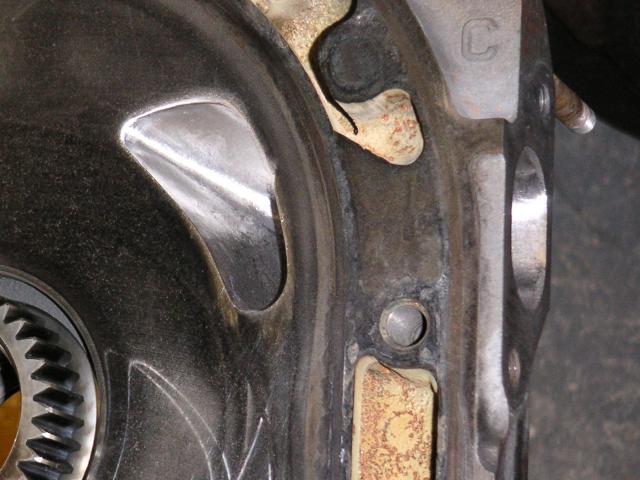
I also added an Ito 2mm bevel to the exhaust ports. Think it's big enough? It's missing some chrome (less than peejay's lol) but notice how it's missing it in the usual spot adjacent to the port? If you think that's bad, you should see the other one that came from that engine.
Stock
Not so stock.
Here's the front port. I left a smooth but not glass-like surface in there. Then I polished the closing edge. Hmm, it shows up better in real life.
I also added an Ito 2mm bevel to the exhaust ports. Think it's big enough? It's missing some chrome (less than peejay's lol) but notice how it's missing it in the usual spot adjacent to the port? If you think that's bad, you should see the other one that came from that engine.
 03-19-05, 03:47 AM
#2
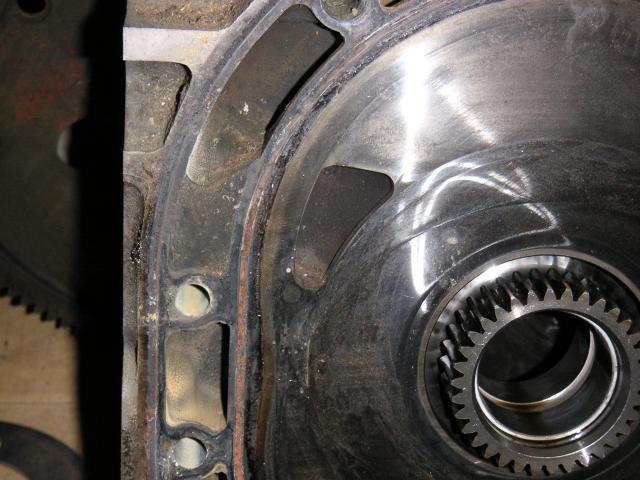
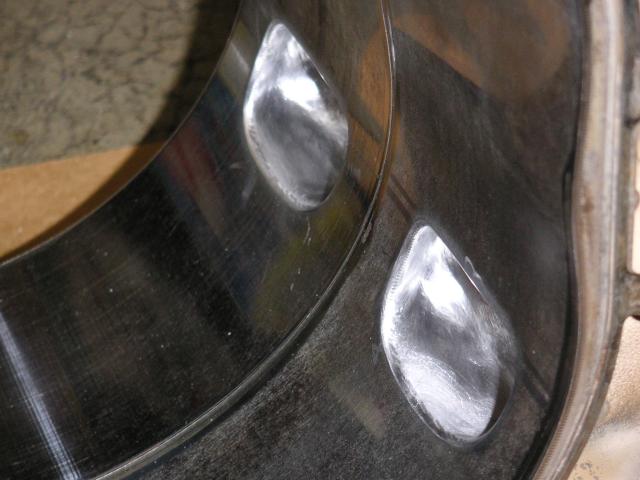
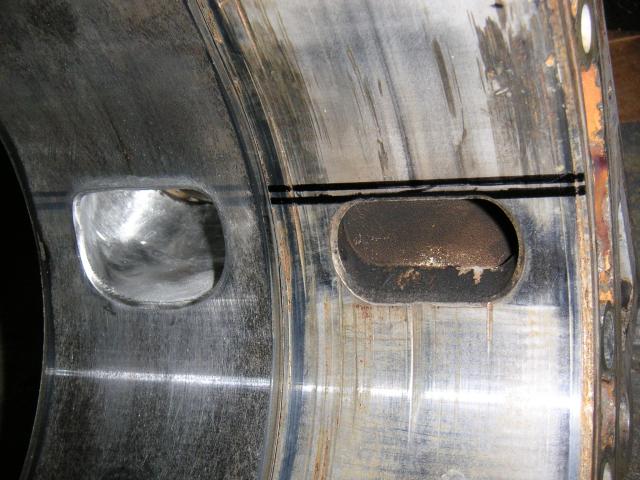
Here you go. Nice, huh? See those two sets of marker lines? The lower level represents a stock T2 port. The upper level is where I ported to. I also opened the port a tad sooner than stock with the addition of a slight rounded edge for that wonderful D shape rotarygod is such a fan of.
Ugly!
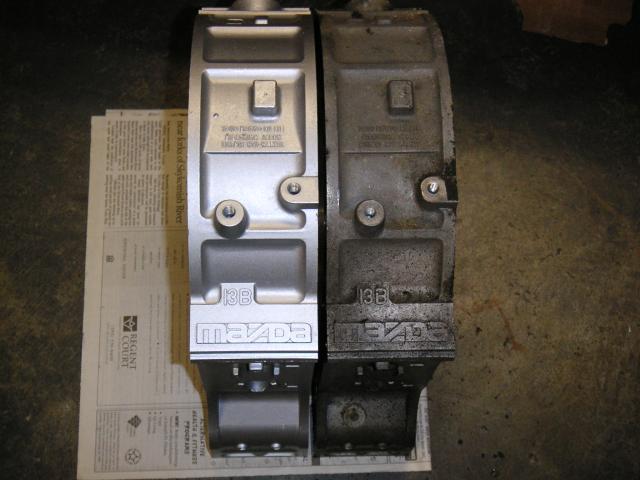
Aside from the obvious differences a paint job can make, I knew I needed to mate the relatively good rotor housing with my nearly crushed one from an overheated engine. It's only down to .06mm, which is spec, so I'm happy. It's also missing a lot less chrome. Some chatter marks though.
Another comparison shot.
See those two sets of marker lines? The lower level represents a stock T2 port. The upper level is where I ported to. I also opened the port a tad sooner than stock with the addition of a slight rounded edge for that wonderful D shape rotarygod is such a fan of.Ugly!
Aside from the obvious differences a paint job can make, I knew I needed to mate the relatively good rotor housing with my nearly crushed one from an overheated engine. It's only down to .06mm, which is spec, so I'm happy. It's also missing a lot less chrome. Some chatter marks though.
Another comparison shot.
03-19-05, 04:13 AM
#3
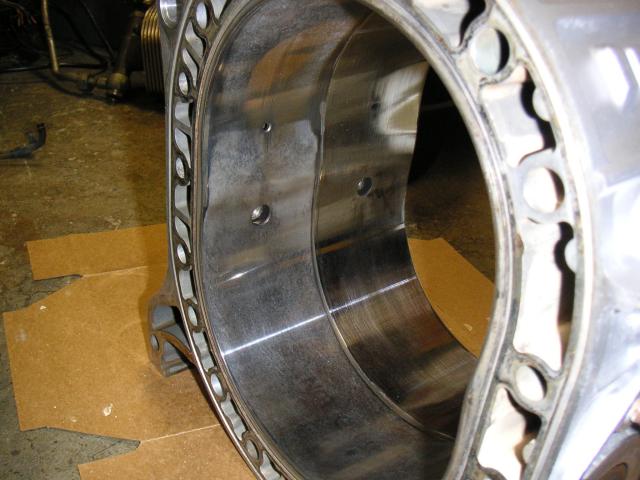
The other rotor housing from the overheated engine was crushed .09-.10mm which is well beyond spec. The funny thing that it's missing the same amount of chrome as the first one I ported (with the still visible marker lines seen above), so I got kinda lucky, I guess. Oh, lots of chatter marks too, which the one above doesn't have.
Just a shot of what the header will see. I had to replace the bottom exhaust studs on both housings. One was broken off in the middle and the other was stuck to the nut with severe thread damage. Previous owners.
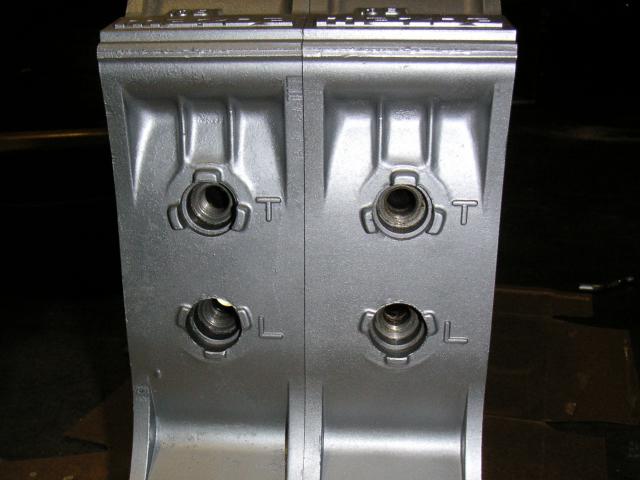
Have any of you ever seen spark plug holes with three aluminum protrusions like this before? I've only seen it on some nitrided R5 13Bs. Others have a semi-circle like 1st gen RX-7s. I bet it's a way to tell what year the engine was manufactured. These engines didn't have thermal reactors, but had exhaust manifolds instead (I've got one of them, and it lacks an O2 sensor, which is rare on a 13B manifold), so that narrows it down a bit.
Yep, it's a genuine nitrided R5 13B. If you have one of these or can get one, you da man!
A quick shot to wrap things up before it goes together. What are my plans for this engine you ask? What indeed. Try to guess.
Just a shot of what the header will see. I had to replace the bottom exhaust studs on both housings. One was broken off in the middle and the other was stuck to the nut with severe thread damage. Previous owners.
Have any of you ever seen spark plug holes with three aluminum protrusions like this before? I've only seen it on some nitrided R5 13Bs. Others have a semi-circle like 1st gen RX-7s. I bet it's a way to tell what year the engine was manufactured. These engines didn't have thermal reactors, but had exhaust manifolds instead (I've got one of them, and it lacks an O2 sensor, which is rare on a 13B manifold), so that narrows it down a bit.
Yep, it's a genuine nitrided R5 13B. If you have one of these or can get one, you da man!
A quick shot to wrap things up before it goes together. What are my plans for this engine you ask? What indeed. Try to guess.
 03-19-05, 12:28 PM
#6
Bimmer *****
Originally Posted by Jeff20B
Have any of you ever seen spark plug holes with three aluminum protrusions like this before? I've only seen it on some nitrided R5 13Bs. Others have a semi-circle like 1st gen RX-7s. I bet it's a way to tell what year the engine was manufactured. These engines didn't have thermal reactors, but had exhaust manifolds instead (I've got one of them, and it lacks an O2 sensor, which is rare on a 13B manifold), so that narrows it down a bit.
and when i took it to atkins, they had 1 there that was missing some chrome, told me it was a 76-78 Jap 13B
03-19-05, 03:46 PM
#7
I'll take the first stab. Let's see, nitrited, 4-port, exhaust ports larger that the TII's, headers, sounds to me like it may be supercharged.
As a side note, I have a set of the early 13b housings, and was thinking of building a 4-port with 12a plates. The part that stumped me was what to do for intake. I'm not that familiar with the older 13b intake setups, especially what was availible for the aftermarket. Perhaps you could shed some light on that, or what are you going to be using?
Nice job btw one the ports. Painting looks good too.
Trending Topics
03-19-05, 07:10 PM
#9
Thanks for the positive feedback!
Elysian, that can't be right. Exhaust manifold instead of a thermal reactor, '80 style dizzy with BR7EQ spark plugs instead of the more familiar BR8EQ-14 (it's a luxury car engine so it needs a hotter plug), the nitrided surface which came out in '78 or '79, the EGR port below the TALL intemediate intake ports; practically identical to an '81-'85 12A intermediate plate, a 'high volume' 17.5mm oil pump which we didn't get until the GSL-SE and '84-'85 12A... and all the R5s I've ever torn down have had these features, plus an auto rear counterweight in stock form (just install a pilot bearing and seal for easy aftermarket flywheel action). The list of oddities goes on. I guess it can be summed up by saying it's a JDM engine, so who knows.
Oh yeah, the oil pans are basically the same shape as RX-4, Cosmo and REPU and can fit in the older chassis without modification. The only differences are the oil drain plug has been repositioned slightly at a diagonal for easier oil draining (and it doesn't pee all over the frame like a genuine REPU pan does) and the gasket surface is flat and uses the same bolts as a 1st gen pan instead of the funky old school pan setup (the old schoolers here will know what I'm talking about).
trochoid wins the guessing game. It's going into my REPU. It'll be broken in NA and then I'll drop in a supercharger when I can afford it. For this reason, I left the primary ports a little smaller than the secondaries, for some kind of driveability in the mean time. My other REPU with milder ports has excellent driveability on a rejetted Hitachi carb and REPU manifold. Infact, it was tons better than a dellorto that was jetted specifically for a stock ported engine. The Hitachi runs out of breath at around 7k, so it's alright for break-in purposes. I have an identical setup for this larger ported engine so I'm curious how it will do with everything else being equal.
Any REPU or RX-4 intake manifold will work (I think). It's also a good idea to use an Hitachi carb or go with an aftermarket maniold and carb setup. The Cosmo's manifold has reversed runners and no EGR blockoff so you'd need to use some devcon or something in the intermediate plate while the engine is disassembled if you wanted to take advantage of the long primary and ultra short secondary runners, and their effect on performance. I guess you could also block the air tubes in the exhaust ports too.
More pics are coming. I'll try to get a shot of my REPU style intake manifold.
Elysian, that can't be right. Exhaust manifold instead of a thermal reactor, '80 style dizzy with BR7EQ spark plugs instead of the more familiar BR8EQ-14 (it's a luxury car engine so it needs a hotter plug), the nitrided surface which came out in '78 or '79, the EGR port below the TALL intemediate intake ports; practically identical to an '81-'85 12A intermediate plate, a 'high volume' 17.5mm oil pump which we didn't get until the GSL-SE and '84-'85 12A... and all the R5s I've ever torn down have had these features, plus an auto rear counterweight in stock form (just install a pilot bearing and seal for easy aftermarket flywheel action). The list of oddities goes on. I guess it can be summed up by saying it's a JDM engine, so who knows.
Oh yeah, the oil pans are basically the same shape as RX-4, Cosmo and REPU and can fit in the older chassis without modification. The only differences are the oil drain plug has been repositioned slightly at a diagonal for easier oil draining (and it doesn't pee all over the frame like a genuine REPU pan does) and the gasket surface is flat and uses the same bolts as a 1st gen pan instead of the funky old school pan setup (the old schoolers here will know what I'm talking about).
trochoid wins the guessing game. It's going into my REPU. It'll be broken in NA and then I'll drop in a supercharger when I can afford it. For this reason, I left the primary ports a little smaller than the secondaries, for some kind of driveability in the mean time. My other REPU with milder ports has excellent driveability on a rejetted Hitachi carb and REPU manifold. Infact, it was tons better than a dellorto that was jetted specifically for a stock ported engine.
The Hitachi runs out of breath at around 7k, so it's alright for break-in purposes. I have an identical setup for this larger ported engine so I'm curious how it will do with everything else being equal. Any REPU or RX-4 intake manifold will work (I think). It's also a good idea to use an Hitachi carb or go with an aftermarket maniold and carb setup. The Cosmo's manifold has reversed runners and no EGR blockoff so you'd need to use some devcon or something in the intermediate plate while the engine is disassembled if you wanted to take advantage of the long primary and ultra short secondary runners, and their effect on performance. I guess you could also block the air tubes in the exhaust ports too.
More pics are coming. I'll try to get a shot of my REPU style intake manifold.
03-20-05, 03:30 AM
#10
Originally Posted by Jeff20B
trochoid wins the guessing game. It's going into my REPU. It'll be broken in NA and then I'll drop in a supercharger when I can afford it. For this reason, I left the primary ports a little smaller than the secondaries, for some kind of driveability in the mean time. My other REPU with milder ports has excellent driveability on a rejetted Hitachi carb and REPU manifold. Infact, it was tons better than a dellorto that was jetted specifically for a stock ported engine. The Hitachi runs out of breath at around 7k, so it's alright for break-in purposes.
More pics are coming. I'll try to get a shot of my REPU style intake manifold.
The Hitachi runs out of breath at around 7k, so it's alright for break-in purposes. More pics are coming. I'll try to get a shot of my REPU style intake manifold.
i can definitely believe that the Hitachi bettered the Dell'Orto (even though i think i'm beginning to edge closer to finding a sweet spot with mine). however, supercharger? that should be VERY interesting! top the kudos i heard of Atkins' truck and you'll not only be the ignition god, but you'll be the supercharger god as well ... i'd kneel 2 ya'!
good luck!
1
03-20-05, 12:22 PM
#11
but you'll be the supercharger god as well
Here's a shot of the front plate firmly bolted to the engine stand with no need for one of those rotary adaptor head units or any special attatchments that I've seen questions about on this forum from time to time.
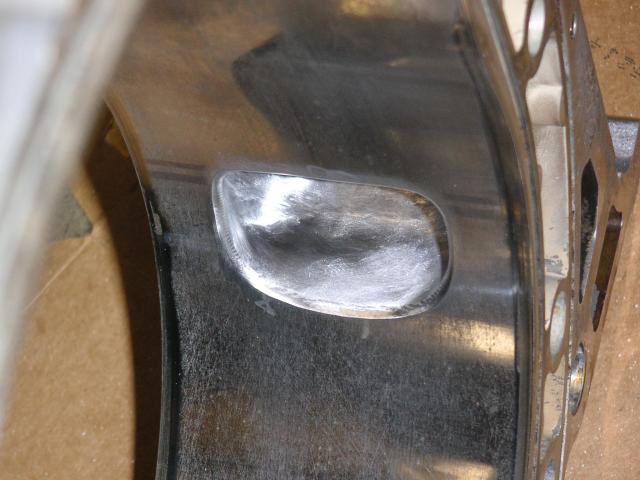
Here's one of the somewhat smaller primary ports. The difference is minor at only a couple mm in height from primary to secondary.
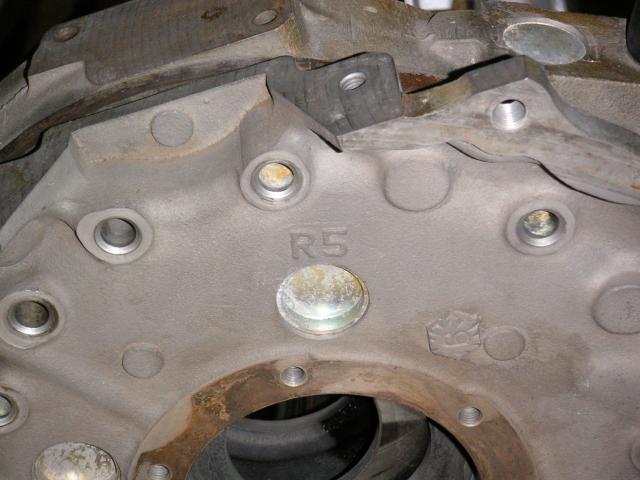
Here's another oddity about this engine. All R5 13Bs have a boss in the casting down at the bottom of the rear plate. Several that I've seen have a small dimple from a center punch to help center a drill. Well, mine happened to have an actual hole there. It had a steel sleeve that was press-fit and looked like it was cut off and the whole thing was gooped up with RTV. Needless to say it leaked. I drilled out the sleeve and cut threads into the iron. Then I installed an NPT pipe plug. It sits slightly below the surface so it won't interfere with the bellhousing. What could it have been for? An oil return from a turbo? Very weird.
A shot from the inside. The casting is very thick there.
Speaking of drilling and cutting threads in a thick casting, all nitrided R5 engines don't have an oil pressure sensor under the oil filter. It's just a blank casting there. I went ahead and cut some NPT threads for a standard mechanical guage. Notice how even the face is unmachined? Go take a look at your 1st gen and if it's an '81-'85, it'll have a machined face with a mushroom sticking out of it. If it's '79-'80, it should be blank like mine was, but there is hope of you plan on rebuilding and would like to take on a little side project.
Last edited by Jeff20B; 03-20-05 at 12:27 PM.
03-20-05, 12:55 PM
#12
Now on to the fun part! Dave Atkins says to add the same amount of thickness in washers to the front regulator as you add to the rear if supercharging with one of his Camden units. The R5 engine has a standard 1st gen 7 style nonadjustable rear pressure reg so I had to swipe one from an old dead 3B rear casting I aquired a while ago. R5 engines also have a short 1st gen style oil filter pedestal. Yet more evidence that these engines are infact '79/'81 or later. The high volume oil pump as standard equipment is also a nice touch.
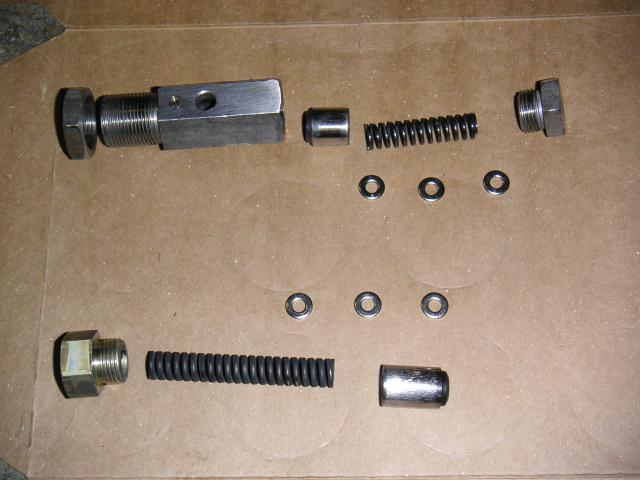
Here we see how thick three washers are. It's a bit over 1/8" so I think I'll get around 90PSI. What do you guys think?

Here's a comparison to the T2 port I copied. That's quite a difference to just sit back and compare. I wonder if I should remove the ring/sleeve things in my housings? R5 exhaust ports don't have a regular sleeve. It's just an iron or steel flow director ring to help aim it into the manifold... I think. I bet they'd be a restriction while flowing into a header, but I'm open to suggestions (I want to build this engine soon so I need to make a decision quickly). Should I remove them? They appear to be held in with one roll pin on each side. What if they're necessary to prevent exhaust heat from entering the rotor housing? Isn't that the usual argument for keeping them?
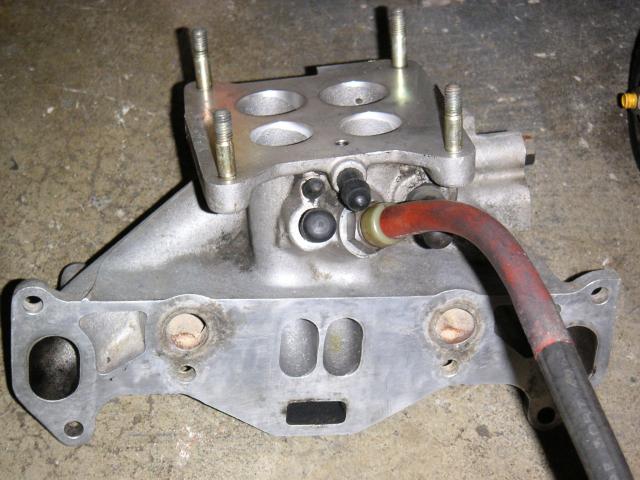
And here's the manifold. I think it's a '74 REPU manifold, but I haven't examined one of those closely enough to know for sure. Notice the short primary ports? They flow fine into tall intermediate ports just like '81-'85 runners do. It's the same type of port mismatch and it seems to work great. Less reversion I guess.
Here we see how thick three washers are. It's a bit over 1/8" so I think I'll get around 90PSI. What do you guys think?
Here's a comparison to the T2 port I copied. That's quite a difference to just sit back and compare. I wonder if I should remove the ring/sleeve things in my housings? R5 exhaust ports don't have a regular sleeve. It's just an iron or steel flow director ring to help aim it into the manifold... I think. I bet they'd be a restriction while flowing into a header, but I'm open to suggestions (I want to build this engine soon so I need to make a decision quickly). Should I remove them? They appear to be held in with one roll pin on each side. What if they're necessary to prevent exhaust heat from entering the rotor housing? Isn't that the usual argument for keeping them?
And here's the manifold. I think it's a '74 REPU manifold, but I haven't examined one of those closely enough to know for sure. Notice the short primary ports? They flow fine into tall intermediate ports just like '81-'85 runners do. It's the same type of port mismatch and it seems to work great. Less reversion I guess.
Last edited by Jeff20B; 03-20-05 at 01:12 PM.
03-20-05, 07:23 PM
#15
Old [Sch|F]ool
Nice. Only things I would have done different were to have left a nice finish on the ports with a 60-80 grit roll, and not worry about the oil pressure. If you have iron seals, it's not a good idea to wing the engine up into the outer reaches for very long anyway, and higher oil pressure is kind of a waste of power. (That's my opinion and I'm stickin' to it - and I run my engines on 5W20 to keep plenty of cooling oil flowing to the bearings too)
Only things I would have done different were to have left a nice finish on the ports with a 60-80 grit roll, and not worry about the oil pressure. If you have iron seals, it's not a good idea to wing the engine up into the outer reaches for very long anyway, and higher oil pressure is kind of a waste of power. (That's my opinion and I'm stickin' to it - and I run my engines on 5W20 to keep plenty of cooling oil flowing to the bearings too)
03-20-05, 09:18 PM
#16
Thanks. The original finish in the ports, after I got done shaping them, was way too smooth so I roughed them up with a small stone on my dremel spun at its lowest speed, and then slowed down some more in use because dremels don't have much power down low. It's not as rough as the stock casting surface but not as smooth as most polish jobs I've seen on nopistons. It's too bad the camera can't really capture the ports very well. Oh well.
Yeah, I'm aware of your stance on oil pressure "if it still runs, it's got enough oil pressure" but I also want to make sure it'll have enough to feed two other bearings in the system (supercharger) as well as still be adequate for my seasoned bearings in the engine. My other engine has probably around 4mm worth of washers and it goes from 20PSI at idle to um... well I don't really pay attention to it when warm, but when it's cold, it'll go up to 100PSI at 2500-3k. I usually try to keep it from exceeding 80-90 when cold. I use 20W50 because western WA only has two seasons; rainy and summer(ish), and when it's rainy, it's above 20�F.
Do you remember the black and white pictures of my broken oil pump rotor? It came from this engine. There was also a piece of gasket material stuck above the front stationary bearing's oil supply hole (the PO of this engine was a really wonderful person). Luckily it had a slight galley mismatch entering the stat gear which caught the chunk. Pretty cool huh?
Yeah, iron seals. I wasn't going to rev this thing past 8k if I could help it (I may even reinstall my MSD 6AL and use the trailing switch to prevent expensive fun). I think a supercharger basically runs out of breath at 8k anyway. Or was it only the 5" that runs out at 6k and the 7" runs out at 7k? Camden has come out with a new design and the Code Blue car has one of their first new 7 inchers. Blah, this engine is going into my REPU and will retain the stock heavy flywheel and reving quick/high isn't one of my goals. I think I'll get the 7" since it's got bigger peanuts and probably boosts more just off idle. I also have nearly enough parts to build another 13B which will get a 5" SC and an aftermarket flywheel. I think I'll finally get a 1st gen to install this next engine into. All I need is an intermediate plate, a set of corner seals, springs and a gasket set. I think I'll go with Y castings this time since I've already got two, they're lighter than R5, will interface with the stock oil pressure guage sender of an FB with its 1/8" BSP hole under the oil filter (if I end up getting an '81+ instead of an '80 or '79), has as much portable material as an R5, and will look cool with a set of early 13B rotor housings with the old school MAZDA in raised letters above the upper dowel pins. They have so little missing chrome that they're actually still in spec!. It's probably what I'll be working on after I get my 20B running... after I get this 13B running.
Hey, I have a picture of a similar engine that my friend did, complete with a 5" SC. Anyway, here's just the basic sandwich. (you'll have to drag and drop or copy and paste since it's hosted on geocities) http://www.geocities.com/cd23c01/black01.jpg Check out those itty bitty exhaust ports. He made them huge on the inside, but I never had a chance to see them. Chances are mine above are actually bigger.
Yeah, I'm aware of your stance on oil pressure "if it still runs, it's got enough oil pressure"
but I also want to make sure it'll have enough to feed two other bearings in the system (supercharger) as well as still be adequate for my seasoned bearings in the engine. My other engine has probably around 4mm worth of washers and it goes from 20PSI at idle to um... well I don't really pay attention to it when warm, but when it's cold, it'll go up to 100PSI at 2500-3k. I usually try to keep it from exceeding 80-90 when cold. I use 20W50 because western WA only has two seasons; rainy and summer(ish), and when it's rainy, it's above 20�F. Do you remember the black and white pictures of my broken oil pump rotor? It came from this engine.
There was also a piece of gasket material stuck above the front stationary bearing's oil supply hole (the PO of this engine was a really wonderful person). Luckily it had a slight galley mismatch entering the stat gear which caught the chunk. Pretty cool huh?Yeah, iron seals. I wasn't going to rev this thing past 8k if I could help it (I may even reinstall my MSD 6AL and use the trailing switch to prevent expensive fun). I think a supercharger basically runs out of breath at 8k anyway. Or was it only the 5" that runs out at 6k and the 7" runs out at 7k? Camden has come out with a new design and the Code Blue car has one of their first new 7 inchers. Blah, this engine is going into my REPU and will retain the stock heavy flywheel and reving quick/high isn't one of my goals. I think I'll get the 7" since it's got bigger peanuts and probably boosts more just off idle. I also have nearly enough parts to build another 13B which will get a 5" SC and an aftermarket flywheel. I think I'll finally get a 1st gen to install this next engine into. All I need is an intermediate plate, a set of corner seals, springs and a gasket set. I think I'll go with Y castings this time since I've already got two, they're lighter than R5, will interface with the stock oil pressure guage sender of an FB with its 1/8" BSP hole under the oil filter (if I end up getting an '81+ instead of an '80 or '79), has as much portable material as an R5, and will look cool with a set of early 13B rotor housings with the old school MAZDA in raised letters above the upper dowel pins. They have so little missing chrome that they're actually still in spec!. It's probably what I'll be working on after I get my 20B running... after I get this 13B running.
Hey, I have a picture of a similar engine that my friend did, complete with a 5" SC. Anyway, here's just the basic sandwich. (you'll have to drag and drop or copy and paste since it's hosted on geocities) http://www.geocities.com/cd23c01/black01.jpg Check out those itty bitty exhaust ports. He made them huge on the inside, but I never had a chance to see them. Chances are mine above are actually bigger.
Last edited by Jeff20B; 03-20-05 at 09:21 PM.
03-20-05, 09:48 PM
#17
Old [Sch|F]ool
Originally Posted by Jeff20B
Yeah, I'm aware of your stance on oil pressure "if it still runs, it's got enough oil pressure" but I also want to make sure it'll have enough to feed two other bearings in the system (supercharger)
but I also want to make sure it'll have enough to feed two other bearings in the system (supercharger)
03-20-05, 10:34 PM
#18
Originally Posted by Jeff20B
Thanks for the info. I'll try to find a couple more washers.
03-21-05, 01:08 PM
#19
The ports look good Jeff. That's how you do an exhaust port!
On the intake manifold, do not match the size of the center runners to the engine runner size. I have a mold I made of the center runner and port. The opening looks large where the manifold bolts up but it gets smaller as it gets to the port. In reality the size of the runners in the manifold are actually very closely matched to the runner size right before the ports. Just leave it alone. It will definitely help reversion. If you hog out the manifold runners to match, you'll kill velocity and create alot more turbulence on the short turn radius. You'd make less power!
As far as the exhaust rings, do whatever will make the least turbulence. If the rings don't have a lip that hurts airflow, leave them in. I can't remember what they look like on those old housings. Just get a nice long primary exhaust on it and that truck is going to have a ton of low end power!
03-21-05, 02:26 PM
#20
I guess as long as my PSI is 85 to 90, it should be ok. If I could find two thinner washers, I'd replace one of the thick ones in each reg.
rg, yeah, I wasn't even going to touch the intake manifold.
Oh thank goodness! You should see the way I screwed up another set of housings by making the D upside down. I don't think the rounded part goes any higher than the squared closing edge of my latest ports, so I should be able to correct them. They're '74-'75 though, so the sleeves are very small and will probably need to be removed.
As for the rings, the top and bottom of the port seem to enter the rings smoothly but there is a change in diameter. The sides have a bit of an edge though. It may have been Mazda's way to quiet the exhaust since these R5 engines came out of Luces and Cosmos in Japan, I think. Luxury car engines, sorta like the 13BRE and 20B. I don't want to remove the rings because then the port would be very large before it enters the header, causing a port mismatch in the wrong direction. I could measure the ID of the rings in a few minutes.
Last edited by Jeff20B; 03-21-05 at 02:29 PM.
03-21-05, 02:41 PM
#21
The ID of the rings is 45mm and the ID of the stock manifold is 50mm. I'm pretty sure the ID of a Racing Beat header is 1 7/8". I was going to use the stock manifold until I can get a header.
The OD of the rings is about 61.25mm or 2.411". I don't think it's a very good idea to remove them. I guess I could try porting the hard material but I honestly don't want to. The housings are already clean, painted and ready to go.
The OD of the rings is about 61.25mm or 2.411". I don't think it's a very good idea to remove them.
I guess I could try porting the hard material but I honestly don't want to. The housings are already clean, painted and ready to go.
03-21-05, 02:49 PM
#22
Go Hawks!
iTrader: (1)
Join Date: May 2004
Location: Cedar Rapids, Iowa
Posts: 1,933
Likes: 0
Received 0 Likes
on
0 Posts
I'm in the process of putting a blower on the 13B 6 port I'm rebuilding. In all the reading and research I've done, this is the first time I've seen it mentioned that oil pressure should be increased when installing a blower. Is it really necessary? I'll just be running 6 psi of boost.
Thanks,
Rich
Thanks,
Rich
03-21-05, 03:49 PM
#23
Originally Posted by Jeff20B
The ID of the rings is 45mm and the ID of the stock manifold is 50mm. I'm pretty sure the ID of a Racing Beat header is 1 7/8". I was going to use the stock manifold until I can get a header.
The OD of the rings is about 61.25mm or 2.411". I don't think it's a very good idea to remove them. I guess I could try porting the hard material but I honestly don't want to. The housings are already clean, painted and ready to go.
The OD of the rings is about 61.25mm or 2.411". I don't think it's a very good idea to remove them.
I guess I could try porting the hard material but I honestly don't want to. The housings are already clean, painted and ready to go.
03-21-05, 04:05 PM
#24
Thanks rg!
64mgb, Camden suggests rasing the oil pressure because there are more bearings in the system. They install enough washers for .200" thickness if using a used reg spring, since one washer is usually enough to bring them back to stock spec. Otherwise, a little less thickness if they're new. I think anything around .160 should be ok. When this engine was running briefly when I was test firing it, the oil pressure guage got up to 80-85, so I think I will try maybe one more washer of the same thickness or more.
64mgb, Camden suggests rasing the oil pressure because there are more bearings in the system. They install enough washers for .200" thickness if using a used reg spring, since one washer is usually enough to bring them back to stock spec. Otherwise, a little less thickness if they're new. I think anything around .160 should be ok. When this engine was running briefly when I was test firing it, the oil pressure guage got up to 80-85, so I think I will try maybe one more washer of the same thickness or more.
03-21-05, 04:38 PM
#25
Staring at the exhaust side pictures a little closer, that ring does scare me a little. It looks like it has a big lip that the gasses have to cross on their way out. That will be bad. Maybe the picture just exaggerates it but I don't like it. Maybe the grinder is the way to go but they do need to be dealt with somehow.
Jeff, I need a slight favor from you. I need the thickness measurement of a 20B front intermediate housing. If possible I am also looking for a close up picture of the center stationary gear out of the housing. Is there a way you can help me out with these?
Jeff, I need a slight favor from you. I need the thickness measurement of a 20B front intermediate housing. If possible I am also looking for a close up picture of the center stationary gear out of the housing. Is there a way you can help me out with these?
Last edited by rotarygod; 03-21-05 at 04:41 PM.