Mefarri's 1995 FD LS3 turbo build
 08-20-12, 08:24 PM
#126
Speed Mach Go Go Go
iTrader: (2)
Join Date: Oct 2001
Location: My 350Z Roadster kicks my RX7's butt
Posts: 4,772
Likes: 0
Received 2 Likes
on
2 Posts
JimLab sold his car? Dang, where have I been. Mine's been on jack stands for a while to. I think i'm at the same point. Everything brand new? I thought he completed the V8 conversion.
Nice work. You're doing it justice.
Nice work. You're doing it justice.

 j/k keep up the good work.
08-20-12, 10:24 PM
j/k keep up the good work.
08-20-12, 10:24 PM
#128
this build is great. i wanna do an ls1 swap when i build my funds. where did you get the swap info at and where did you get the parts from? i've found a few places but wanna make sure i look everywhere and get the best deal and also wanna get the best info.
also, the bracket sitting behind the turbo, the little holes in it, what are they made with? they look almost like they've been punched.
also, the bracket sitting behind the turbo, the little holes in it, what are they made with? they look almost like they've been punched.
 Everything is new. He completed a few V8 swaps, but something better always came along by the time it was done so it got torn back down.
08-22-12, 07:12 PM
Everything is new. He completed a few V8 swaps, but something better always came along by the time it was done so it got torn back down.
08-22-12, 07:12 PM
#130
this build is great. i wanna do an ls1 swap when i build my funds. where did you get the swap info at and where did you get the parts from? i've found a few places but wanna make sure i look everywhere and get the best deal and also wanna get the best info.
also, the bracket sitting behind the turbo, the little holes in it, what are they made with? they look almost like they've been punched.
also, the bracket sitting behind the turbo, the little holes in it, what are they made with? they look almost like they've been punched.
Norotors.com is where all us v8 guys live. Samberg Performance is the only place you should get the swap components.
I just did those holes with a unibit.


 09-06-12, 02:25 PM
#135
I'm a huge rotary fan. But I really dig this build. The level of attention to detail is inspiring. I will be following it closely from here on out. Keep it up dude!
Sent from my iPhone using RX7Club
Sent from my iPhone using RX7Club
09-11-12, 10:01 AM
#136
Junior Member

Join Date: Sep 2007
Location: Cali
Posts: 48
Likes: 0
Received 0 Likes
on
0 Posts
Jim Lab haha he had the longest Thread in forum history. Wow and he never finished the car. Hmm away this is a great build and thank you for the education as I've decide to convert to V8 but no turbo.
 10-22-12, 11:03 PM
#146
The stories of my death are greatly exaggerated. Or something like that.
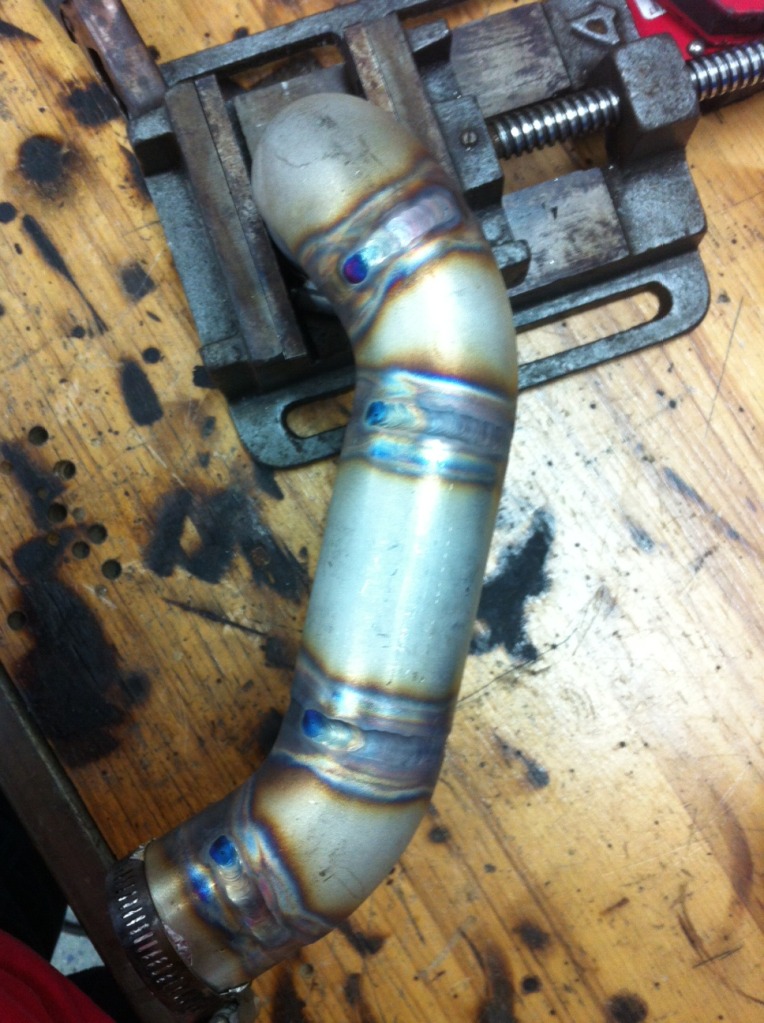
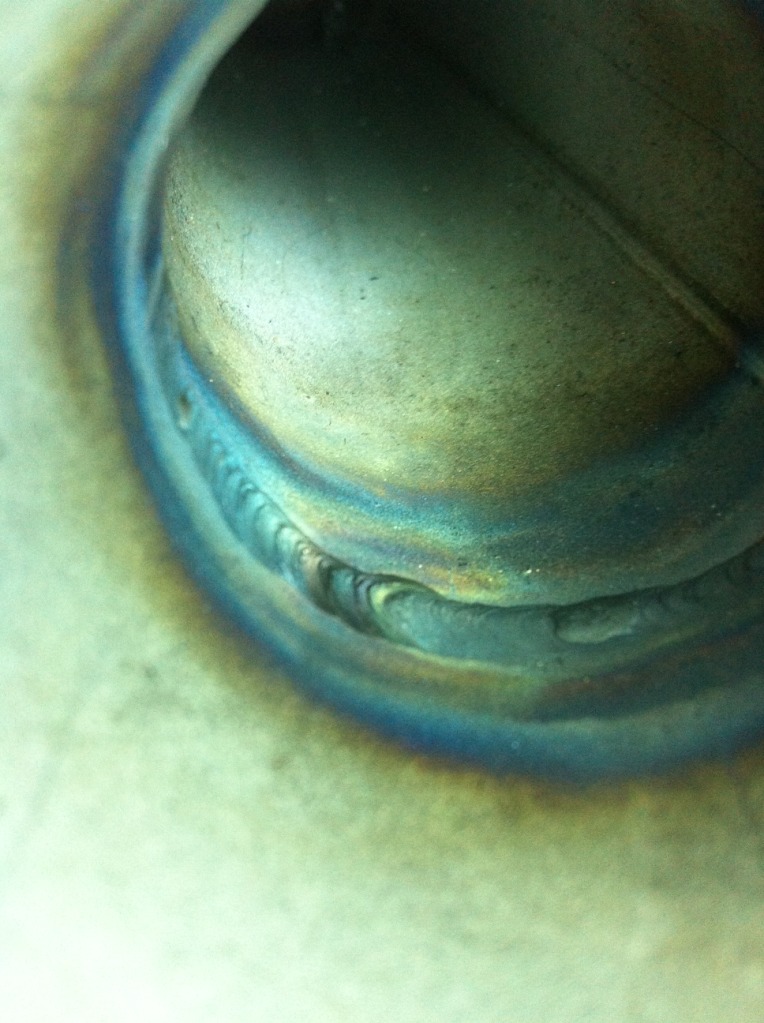
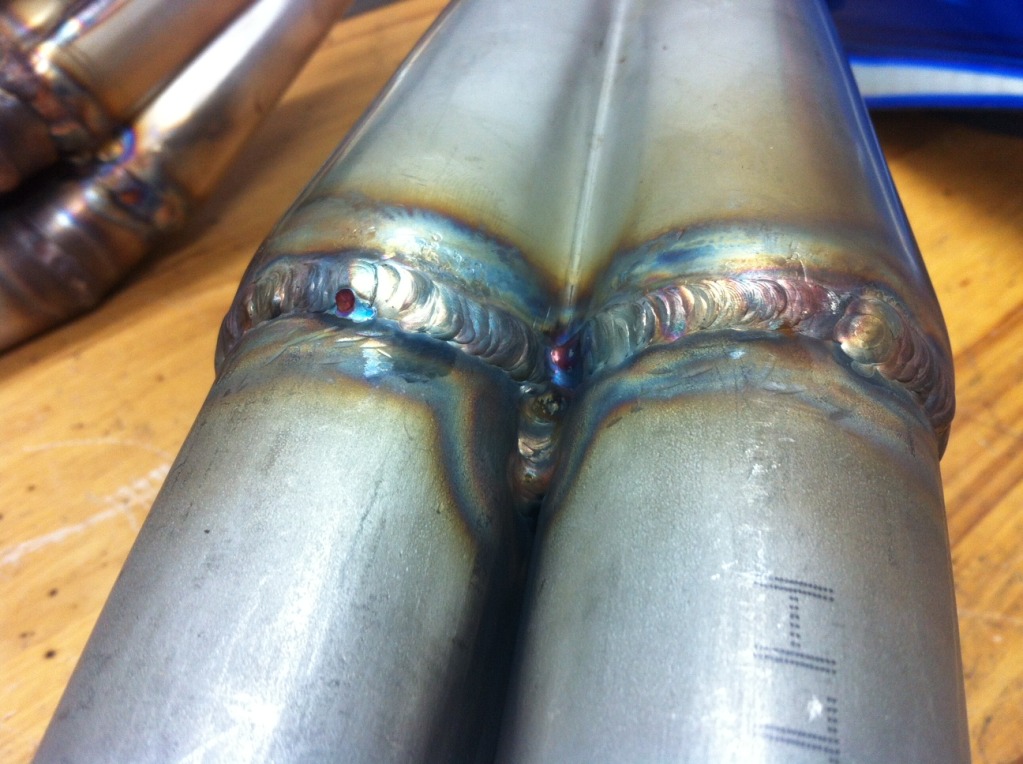
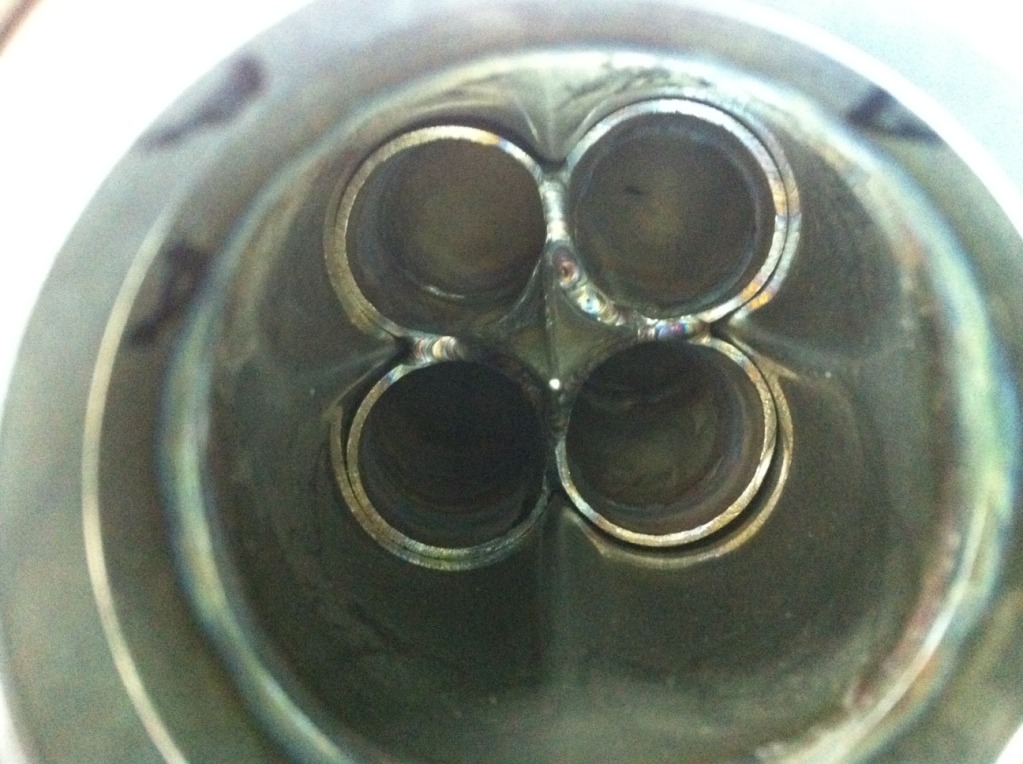
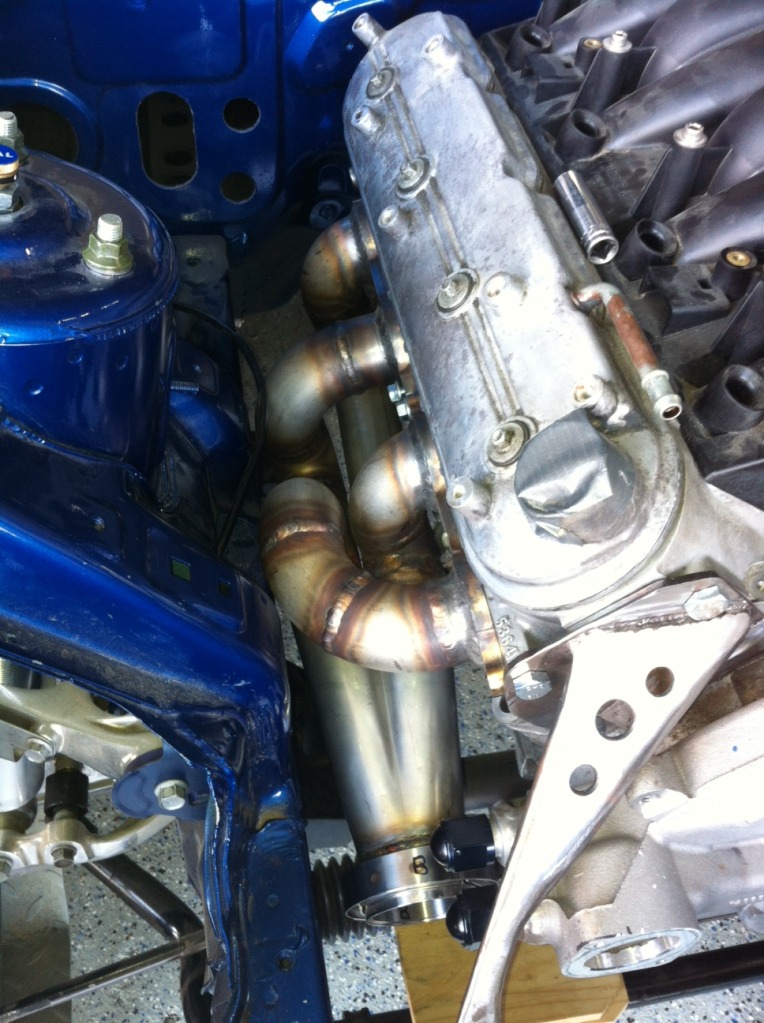
Finally finished the exhaust manifolds. Took a while but they came out great. Especially since this is the first time I've welded stainless. haha Thanks to everybody who helped me on my learning curve.
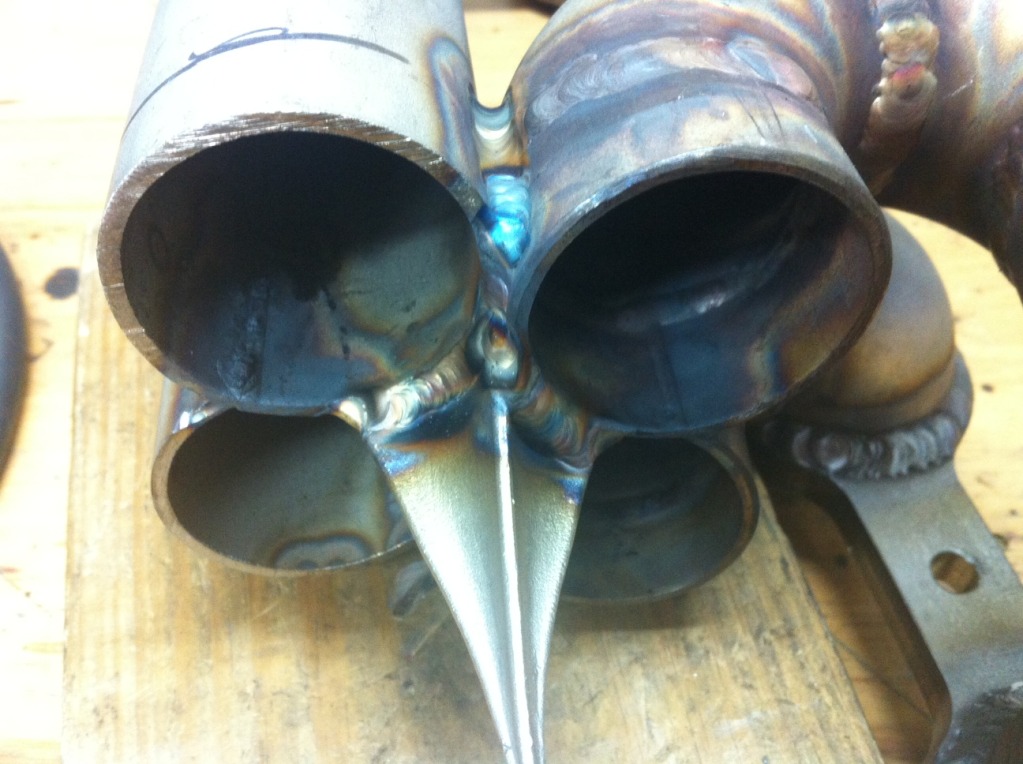
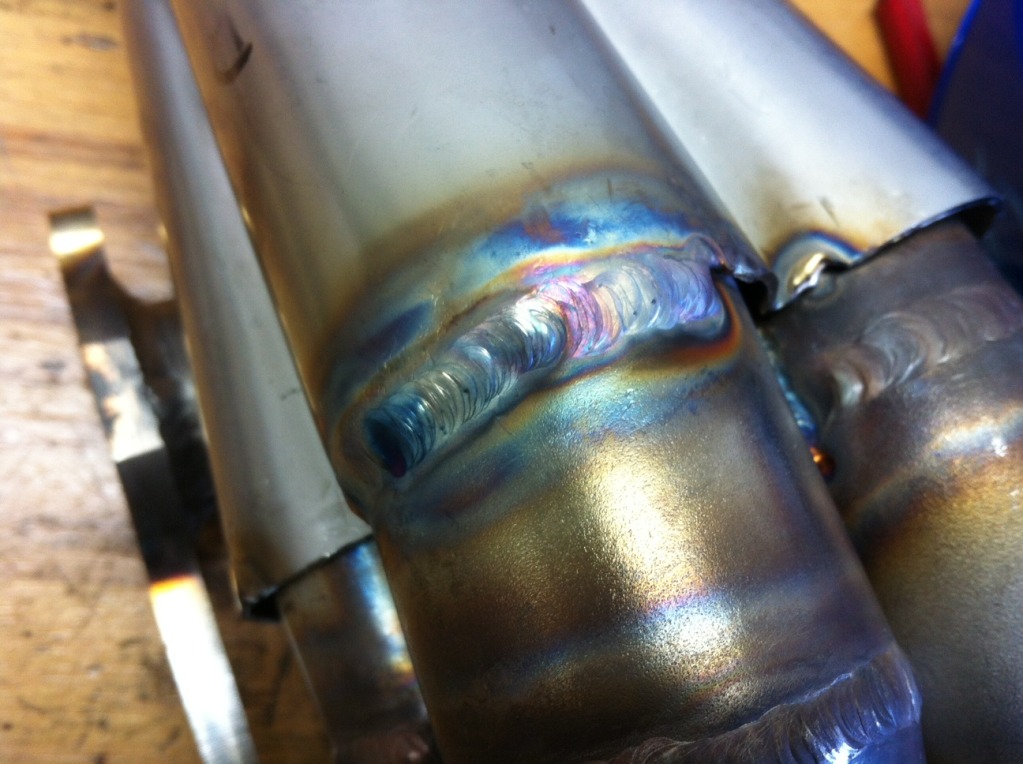
Anyway, everything was argon back purged and has full penetration. Took me a runner or so to dial in the penetration but I got it figured out as you can see in the pic of the inside of the runner. Had to go over certain parts again while just using the torch before making a 2nd pass to add filler back in. In the pics below there's a pic of a runner that's had the fusion passes done. To anyone who's looking to build their own, a proper bevel on each end is mandatory for good penetration without using tons of heat. What comes on the ends of the weld els is perfect so just mirror that on any pieces you cut.
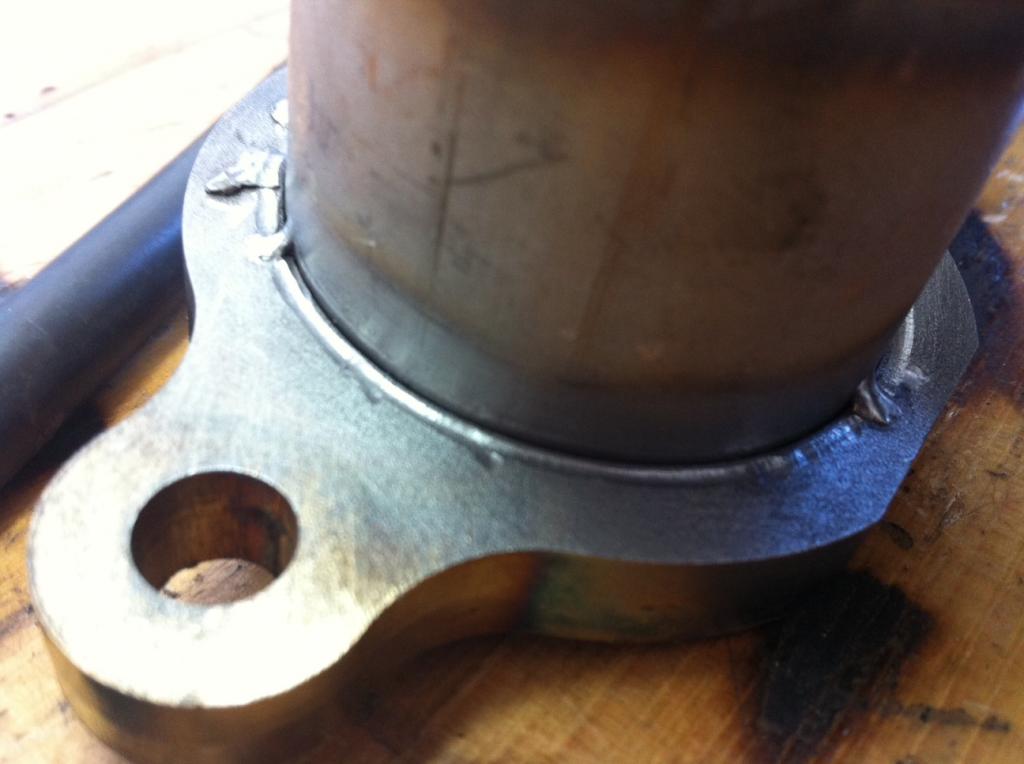
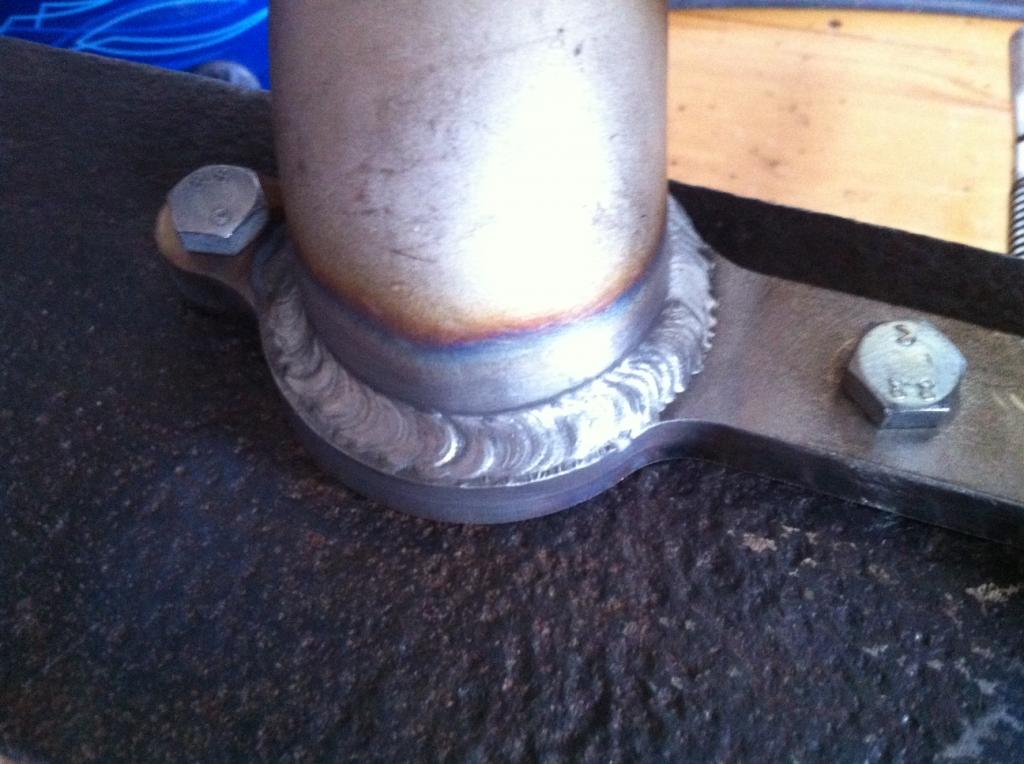
I welded up the runners fully, tacked them to the flange, then tacked them to each other where the collector goes. Then welded them from the inside. Then bolted it to the piece of rail road tie I got from a scrap yard to keep the flanges as flat as possible. I couldn't find I beam anywhere and this was as close as I could get. It worked pretty well actually. Then I took my dremel and ground out a little channel just for ***** to potentially aid in penetration.
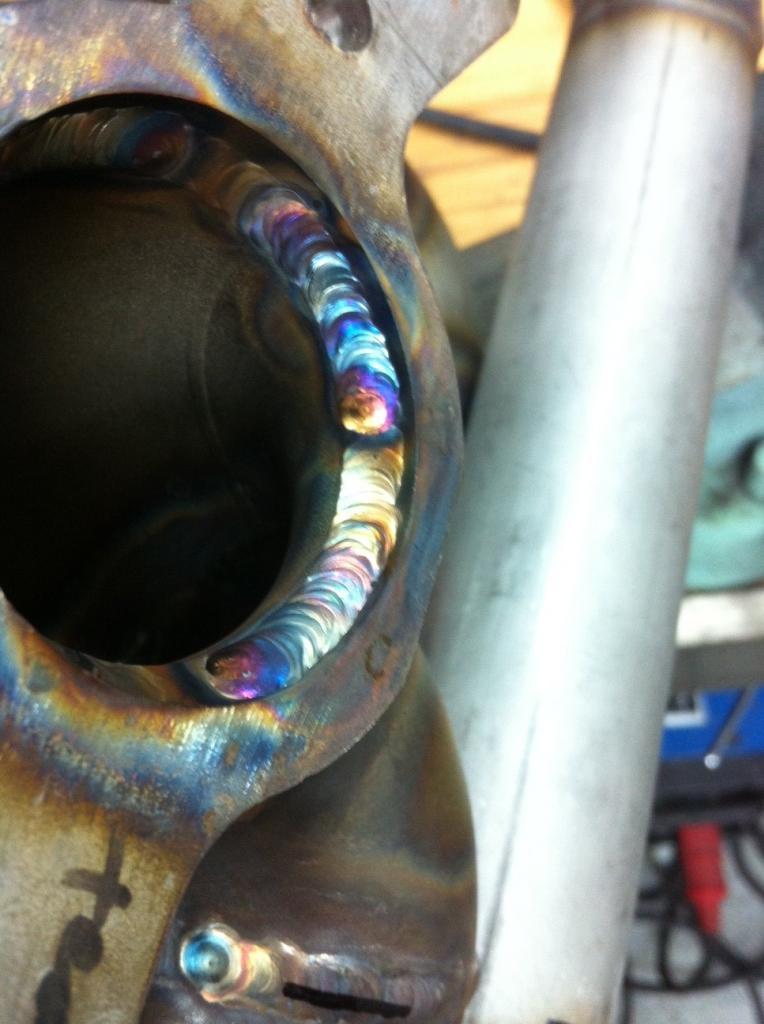
Zac's friend told me to first do a hot filler pass on the flange with filler for penetration and then come back and do a 3/8" or so weave pass with more filler to give a wider bead for strength, so that's what I did. Should work well.
Let's see, then I welded some beads between the runners so the collectes would have someting to seal to. It's easier to do before you put the collector on. Got that from some site online somewhere.
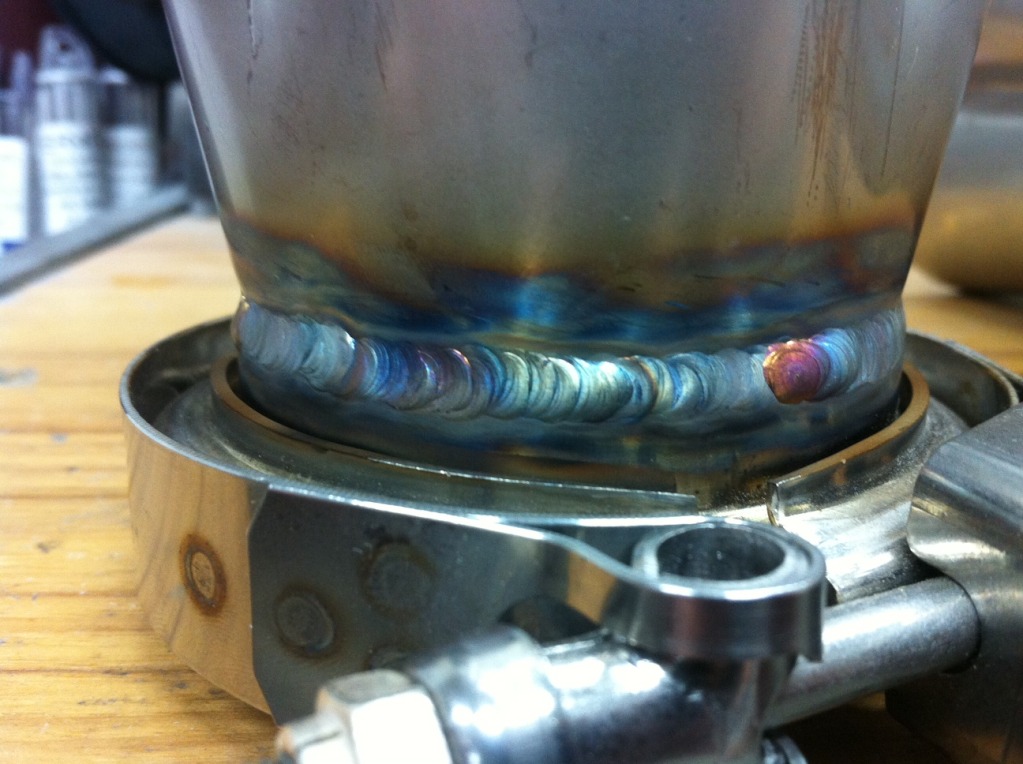
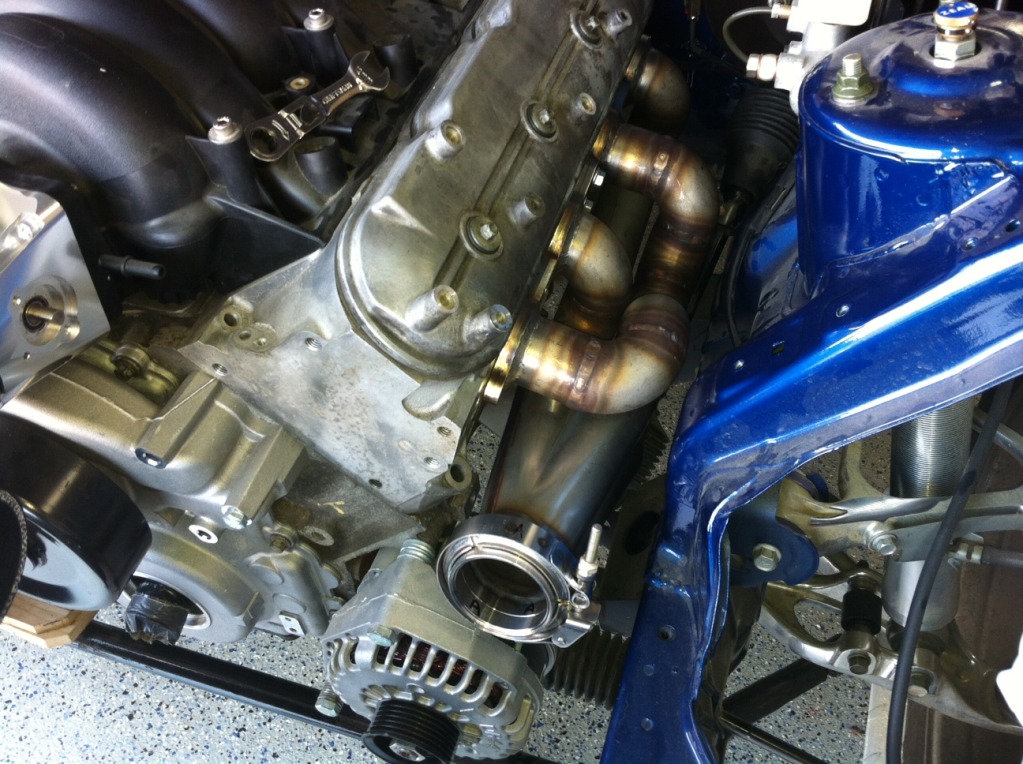
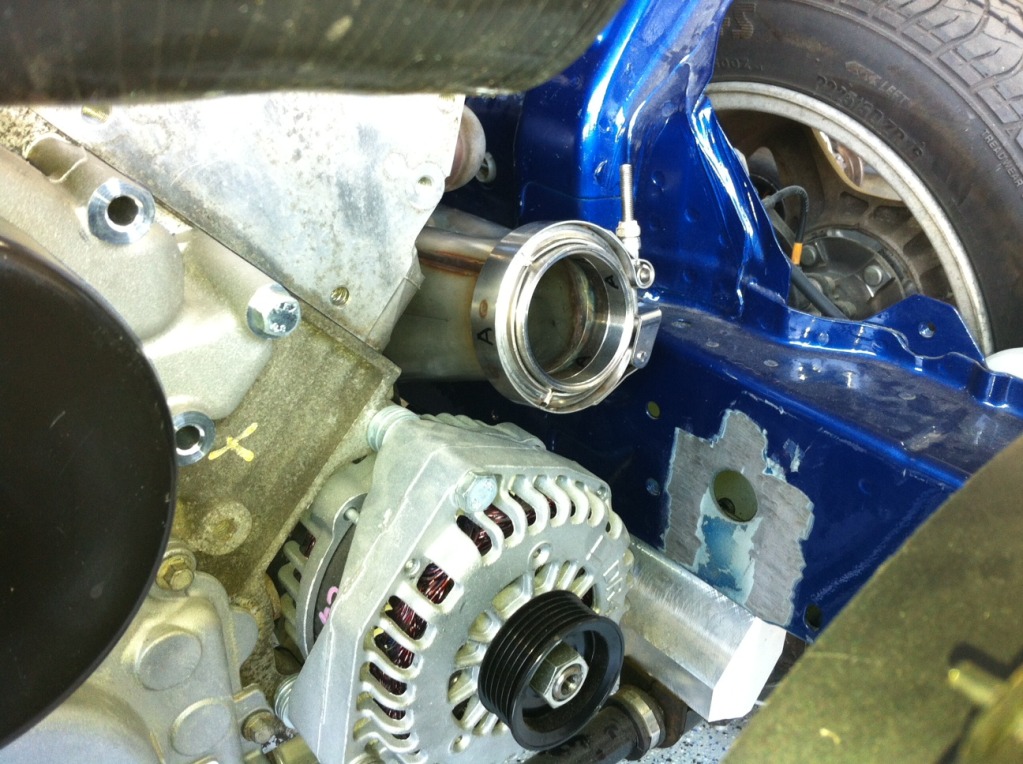
Then modified those merge bullets to fit the weird collector angles and welded all that up. Then the v bands to the collectors making sure to not use to much heat (with the v bands clamped together.) I would do about a 3/4" bead on each collector and then let them cool for 10 or 15 minutes and then do it again. Rinse and repeat like 10 times. Flanges didn't move a bit.
Then welded the collectors to the manifold, which went really well except for the area right below those first runners, especially above the angled collector. If I hadn't bought the stubby -6 collet set up, I don't think I would have done it. I'm sure someone more experienced than me would have some tricks that could have been helpful.
Anyway, it all came out well. Everything is right where it should be. Clearance everywhere (if only 1/4") and the angle on the passenger collector seems like it will lend itself nicely (which is why I made it that way) and fantastic plug access as you can see.
I know that was a lot of explaining but I figured someone might get something out of it.


Finally finished the exhaust manifolds. Took a while but they came out great. Especially since this is the first time I've welded stainless. haha Thanks to everybody who helped me on my learning curve.
Anyway, everything was argon back purged and has full penetration. Took me a runner or so to dial in the penetration but I got it figured out as you can see in the pic of the inside of the runner. Had to go over certain parts again while just using the torch before making a 2nd pass to add filler back in. In the pics below there's a pic of a runner that's had the fusion passes done. To anyone who's looking to build their own, a proper bevel on each end is mandatory for good penetration without using tons of heat. What comes on the ends of the weld els is perfect so just mirror that on any pieces you cut.
I welded up the runners fully, tacked them to the flange, then tacked them to each other where the collector goes. Then welded them from the inside. Then bolted it to the piece of rail road tie I got from a scrap yard to keep the flanges as flat as possible. I couldn't find I beam anywhere and this was as close as I could get. It worked pretty well actually. Then I took my dremel and ground out a little channel just for ***** to potentially aid in penetration.
Zac's friend told me to first do a hot filler pass on the flange with filler for penetration and then come back and do a 3/8" or so weave pass with more filler to give a wider bead for strength, so that's what I did. Should work well.
Let's see, then I welded some beads between the runners so the collectes would have someting to seal to. It's easier to do before you put the collector on. Got that from some site online somewhere.
Then modified those merge bullets to fit the weird collector angles and welded all that up. Then the v bands to the collectors making sure to not use to much heat (with the v bands clamped together.) I would do about a 3/4" bead on each collector and then let them cool for 10 or 15 minutes and then do it again. Rinse and repeat like 10 times. Flanges didn't move a bit.
Then welded the collectors to the manifold, which went really well except for the area right below those first runners, especially above the angled collector. If I hadn't bought the stubby -6 collet set up, I don't think I would have done it. I'm sure someone more experienced than me would have some tricks that could have been helpful.
Anyway, it all came out well. Everything is right where it should be. Clearance everywhere (if only 1/4") and the angle on the passenger collector seems like it will lend itself nicely (which is why I made it that way) and fantastic plug access as you can see.
I know that was a lot of explaining but I figured someone might get something out of it.


 11-01-12, 10:58 AM
#150
Junior Member
iTrader: (1)

Join Date: Sep 2012
Location: El Paso, TX
Posts: 19
Likes: 0
Received 0 Likes
on
0 Posts
What are you going to be using as far as tuning software. I'm doing an all motorbuild but don't know if you can use a handheld tuner just by using the obd2 port like the sct handheld tuner. Or do I have to use a different software, hp tuner, standalone etc. dont mean to go off topic but I've searched for what they use to tune a ls1 fd rx7 but can't find anything.