
My 6 port Turbo update

Thread Starter
Joined: Feb 2005
Posts: 2,012
Likes: 0
From: Dallas, TX
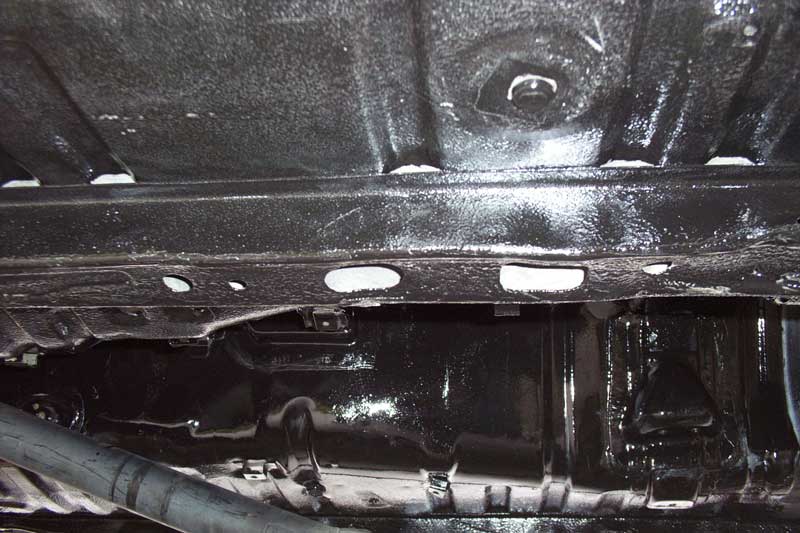
Finished cleaning the underbody last night - at least as far as the rear-end area. I've decided rather than trying to clean and paint around all that stuff, I'll finish that little bit up when I swap in the TII drivetrain later.
I realized that sometimes it sucks doing things the right way - for the last two days I've been on my back laying on wet concrete, dripping water and soap and degreaser on myself, trying to wash all the black grime and oil and sludge off the underside of my car so that it's all white again.
And now that it's all white again, I'll be on my back again on the uncomfortable concrete painting it black.
Other update - the silicone wrap for the new harness, s4 turbo and FD fuel pump are finally on their way - now all I (know about that I) lack is a downpipe, because I'll have to have it custom made to hit my existing exhaust.
After sealing the underside of the car, I need to paint the doorjambs and inside of the trunk - paint the front subframe, then I can start reassembling everything. Since the Capri is for sale, I'm going to put off the exterior repaint for a little while in interest of getting the car running again - I know the driver's door is going to take some work to get those little dents out. It MIGHT be ready for the April meet - it's too soon to tell. :P
I realized that sometimes it sucks doing things the right way - for the last two days I've been on my back laying on wet concrete, dripping water and soap and degreaser on myself, trying to wash all the black grime and oil and sludge off the underside of my car so that it's all white again.
And now that it's all white again, I'll be on my back again on the uncomfortable concrete painting it black.
Other update - the silicone wrap for the new harness, s4 turbo and FD fuel pump are finally on their way - now all I (know about that I) lack is a downpipe, because I'll have to have it custom made to hit my existing exhaust.
After sealing the underside of the car, I need to paint the doorjambs and inside of the trunk - paint the front subframe, then I can start reassembling everything. Since the Capri is for sale, I'm going to put off the exterior repaint for a little while in interest of getting the car running again - I know the driver's door is going to take some work to get those little dents out.
It MIGHT be ready for the April meet - it's too soon to tell. :P
Thread Starter
Joined: Feb 2005
Posts: 2,012
Likes: 0
From: Dallas, TX
Finished the first coat on the underbody today - well, at least to the back wheelwell - soon I'll be needing to swap in the TII drivetrain, so rather than clean and paint around it, I'll do it the right way then.
Bear witness to my crunched frame rails and ph34r the negligent mechanic who did it!
People really oughta know better. I just wish there was a way to pull it back out flush without having to break the welds and redo it, because I'm just not that good a welder. :P After spending about 20 minutes with a great big crescent wrench, the pinch welds are at least closer to where they used to be i.e. not crushed flat against the bottom of the car anymore. What was that I said before about people really oughta know better? :P
Bear witness to my crunched frame rails and ph34r the negligent mechanic who did it!
People really oughta know better.
I just wish there was a way to pull it back out flush without having to break the welds and redo it, because I'm just not that good a welder. :P After spending about 20 minutes with a great big crescent wrench, the pinch welds are at least closer to where they used to be i.e. not crushed flat against the bottom of the car anymore. What was that I said before about people really oughta know better? :P
#include <stdhdr.h>


Joined: Aug 2001
Posts: 375
Likes: 3
From: Allen, Tx
I've often thought of cutting my frame rails off and replacing them with some beefy box steel but I'm not going to worry about it much until I start to show some abnormal chassis flex. Since I can still pick one half of the car up from any given corner I'm not sweating it.
BTW, my GSL-SE is one step closer to actually making it out to the street. It's off the trailer and I'm getting insurance for it post-haste. I'm just going to take a PTO day from work and spend half an hour at the tax office and the rest of the day screwing off.
BTW, my GSL-SE is one step closer to actually making it out to the street. It's off the trailer and I'm getting insurance for it post-haste. I'm just going to take a PTO day from work and spend half an hour at the tax office and the rest of the day screwing off.
Thread Starter
Joined: Feb 2005
Posts: 2,012
Likes: 0
From: Dallas, TX
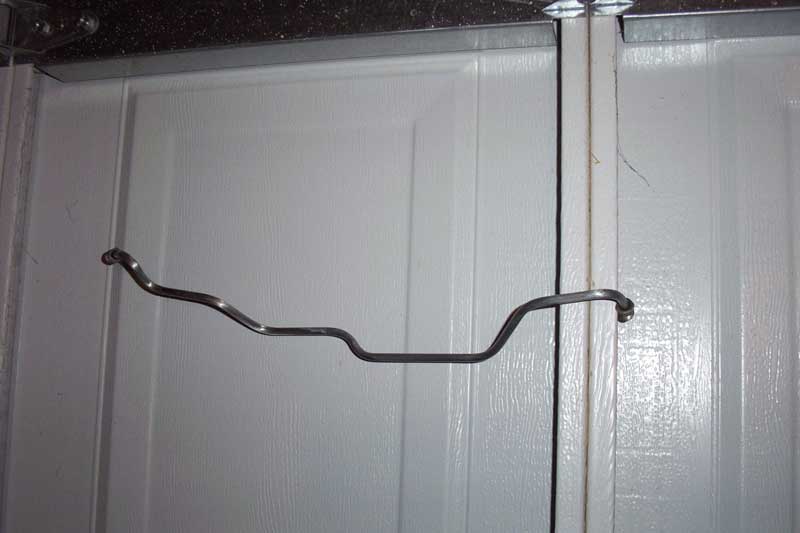
Hopefully mine doesn't take as long as yours has. But it very well could, with this much attention to detail. :P I can't believe I spent 2 hours tonight cleaning, sanding, and clearcoating my metal power steering lines.
These aren't the greatest pictures in the world because of the clearcoat and the flash on the camera, but it kinda shows up. Think of a clearcoated brushed nickel look.
I've gotta say, it makes me a little nervous crawling around under the car when I see it's not touching one of the two jackstands in the front, but lets hear it for chassis rigidity!
But it very well could, with this much attention to detail. :P I can't believe I spent 2 hours tonight cleaning, sanding, and clearcoating my metal power steering lines. These aren't the greatest pictures in the world because of the clearcoat and the flash on the camera, but it kinda shows up. Think of a clearcoated brushed nickel look.
I've gotta say, it makes me a little nervous crawling around under the car when I see it's not touching one of the two jackstands in the front, but lets hear it for chassis rigidity!

Thread Starter
Joined: Feb 2005
Posts: 2,012
Likes: 0
From: Dallas, TX
It depends on where they are and what color I want them to be - the colors are either Duplicolor Engine Cast Coat Iron, Duplicolor Wheel Bronze (also higher heat), or Walmart Colorplace Gloss Black - then whatever it is gets a topcoat of High Heat Engine Clear. I didn't paint the power steering lines at all, I just got all the old paint off, then sanded them with 320 grit sandpaper all the same direction to give it a brushed stainless look - then hit them with engine clear so that they'd wipe off easier and just in case they started to corrode.
For cleaning, I start with either a washing sponge or a scotchbrite pad soaked in water, then add dish soap or purple power degreaser, depending on what they respond to. I usually try the soap first, and it almost always works better than the more expensive degreaser, but for the nappy grime on the underbody, the purple power was awesome. After I'm done I rinse it with clean water and then let it dry. Then I'll sand with 320 until it's all smooth and silky feeling, and paint. If I have to strip paint, I'll break it up with a 60 or 80 grit until the paint's gone, then finish with 320 before painting.
And on the Walmart paint - they do gloss black and gloss white very well, the cans are 99 cents, and they'll outpaint every other rattle can paint I've tried except the Duplicolor, which is 6 times as expensive.
Thread Starter
Joined: Feb 2005
Posts: 2,012
Likes: 0
From: Dallas, TX
Just picked up a new toy today. 
Innovate LC-1 UEGO
http://cgi.ebay.com/ebaymotors/ws/eB...m=270104229414
I was going to wait on the wideband setup, but I saw this and read the PDF of the owner's manual on Innovate's website. It includes the sensor, it's got 2 analog outs for datalogging, and comes with software to monitor with a laptop (until I figure out what I'm going to do for a gauge). It also emulates the narrowband o2 sensor, which is a plus because not only will I not have to run 2 sensors, (which I always thought was retarded), but I'll be able to see exactly what the computer sees for it.
Since I got this for about half the price of paying to have it professionally tuned, now I can use this to tune the SAFC myself, and be able to monitor it afterwards in case something goes wrong later.
There's more if anyone wants them!
Also, made my blockoff plates yesterday, after repairing the blower fan on the BMW. :P I've got to look at my brand new harness that I made when I go home too, because it suddenly dawned on me that it probably matters which injector plug goes on which injector. I'm pretty sure I marked them so I'd know later, but I guess I'll know for sure when I get home.
Innovate LC-1 UEGO
http://cgi.ebay.com/ebaymotors/ws/eB...m=270104229414
I was going to wait on the wideband setup, but I saw this and read the PDF of the owner's manual on Innovate's website. It includes the sensor, it's got 2 analog outs for datalogging, and comes with software to monitor with a laptop (until I figure out what I'm going to do for a gauge). It also emulates the narrowband o2 sensor, which is a plus because not only will I not have to run 2 sensors, (which I always thought was retarded), but I'll be able to see exactly what the computer sees for it.
Since I got this for about half the price of paying to have it professionally tuned, now I can use this to tune the SAFC myself, and be able to monitor it afterwards in case something goes wrong later.
There's more if anyone wants them!
Also, made my blockoff plates yesterday, after repairing the blower fan on the BMW. :P I've got to look at my brand new harness that I made when I go home too, because it suddenly dawned on me that it probably matters which injector plug goes on which injector.
I'm pretty sure I marked them so I'd know later, but I guess I'll know for sure when I get home.
Thread Starter
Joined: Feb 2005
Posts: 2,012
Likes: 0
From: Dallas, TX
Got the steering rack put back together and new urethane tie rod end boots installed, cleaned and painted the subframe top and bottom, so those are all going back on the car first thing in the morning. I've also got the C arms seperated from my front wheels (funny story, that :P ) and cleaned up - I'll be taking them over to my friends house who has a vice so that I can press the old bushings out and put the new urethane bushings in.
Unfortunately, before I do that, I've got to replace all the belts on the BMW. :P I was sitting at the stop light when I heard this loud metallic "Thunk". I said "Aww, ****" :P - let my foot off the brake to make sure the car would still move and ducked off the side when the light turned green, trailing coolant and with no power steering. :P
Apparently BMW used this neat feature that when one belt goes, every one of them goes, because the only thing I found was a tiny shred wrapped around the AC compressor behind the pulley. :P What a neat trick, because there WERE 3 of them, now there was about 1/12th of one.
The greatness continues, I got my friend to come pick me up and had him bring all his metric wrenches 10-19 and he ran me over to O'Reilly's. It was apparently a day for fun there, because when I asked for all the belts for a 1988 BMW, they gave me 2 belts. Unfortunately, this was before I learned there were 3. :P To make matters even more fun, they gave me the two belts not necessary to make the car run. I could have power steering, and I could have AC, but nothing from the alternator and the water pump. :P Needless to say the drive back was a long one. We did manage to finish getting the one main (alternator and water pump) belt on before it started raining TOO much. BMWs suck at teh steering when you have no power, though, even with the car moving.
Oh, I took pictures of the finished steering rack, but since we were on our way to take pictures of the device they used to block off the gutters, the camera is now in the glovebox of the BMW and it's raining like hell outside, so it'll have to wait.
Unfortunately, before I do that, I've got to replace all the belts on the BMW. :P I was sitting at the stop light when I heard this loud metallic "Thunk". I said "Aww, ****" :P - let my foot off the brake to make sure the car would still move and ducked off the side when the light turned green, trailing coolant and with no power steering. :P
Apparently BMW used this neat feature that when one belt goes, every one of them goes, because the only thing I found was a tiny shred wrapped around the AC compressor behind the pulley. :P What a neat trick, because there WERE 3 of them, now there was about 1/12th of one.
The greatness continues, I got my friend to come pick me up and had him bring all his metric wrenches 10-19 and he ran me over to O'Reilly's. It was apparently a day for fun there, because when I asked for all the belts for a 1988 BMW, they gave me 2 belts. Unfortunately, this was before I learned there were 3. :P To make matters even more fun, they gave me the two belts not necessary to make the car run.
I could have power steering, and I could have AC, but nothing from the alternator and the water pump. :P Needless to say the drive back was a long one. We did manage to finish getting the one main (alternator and water pump) belt on before it started raining TOO much. BMWs suck at teh steering when you have no power, though, even with the car moving. Oh, I took pictures of the finished steering rack, but since we were on our way to take pictures of the device they used to block off the gutters, the camera is now in the glovebox of the BMW and it's raining like hell outside, so it'll have to wait.
Thread Starter
Joined: Feb 2005
Posts: 2,012
Likes: 0
From: Dallas, TX
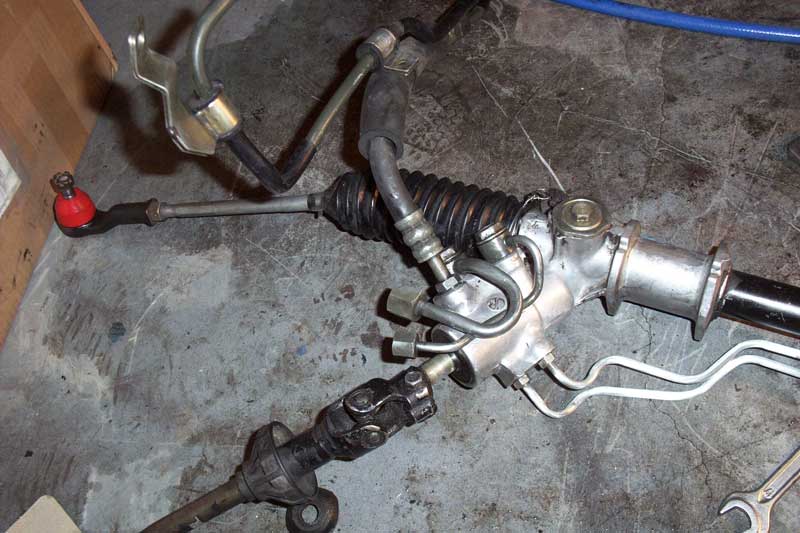
Here are the pictures I promised of the newly cleaned steering rack. I was going to repaint it, but at the last minute decided it might help in the future to keep the Koyo sticker so that I can find a replacement rack if I need too.
And here it is, freshly mounted back in the car.
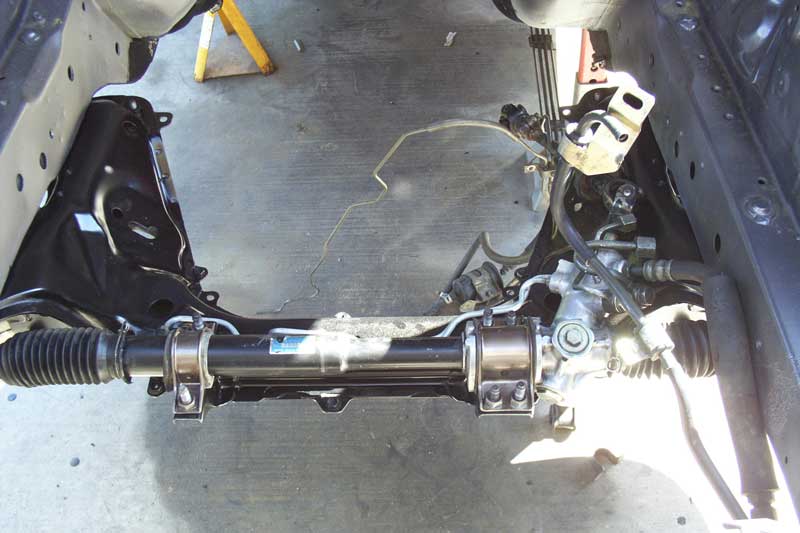
Other than pressing the new bushings in, reassembly's gone quick so far. I've got the front steering rack back in, the front struts in, wheels, and brakes, the subframe and the fenders. Next I'll be reinstalling the headlight motors and lights, the steering column, the clutch cylinders and brake cylinders, and the front brake lines.
Still waiting on the S4 turbo and FD fuel pump, though. :P
And here it is, freshly mounted back in the car.
Other than pressing the new bushings in, reassembly's gone quick so far. I've got the front steering rack back in, the front struts in, wheels, and brakes, the subframe and the fenders. Next I'll be reinstalling the headlight motors and lights, the steering column, the clutch cylinders and brake cylinders, and the front brake lines.
Still waiting on the S4 turbo and FD fuel pump, though. :P
Thread Starter
Joined: Feb 2005
Posts: 2,012
Likes: 0
From: Dallas, TX
Okay, since the ability to attach images is broken, let me try this again.
Here are the pictures I promised of the newly cleaned steering rack. I was going to repaint it, but at the last minute decided it might help in the future to keep the Koyo sticker so that I can find a replacement rack if I need too.

And here it is, freshly mounted back in the car.

Other than pressing the new bushings in, reassembly's gone quick so far. I've got the front steering rack back in, the front struts in, wheels, and brakes, the subframe and the fenders. Next I'll be reinstalling the headlight motors and lights, the steering column, the clutch cylinders and brake cylinders, and the front brake lines.
Still waiting on the S4 turbo and FD fuel pump, though. :P
Here are the pictures I promised of the newly cleaned steering rack. I was going to repaint it, but at the last minute decided it might help in the future to keep the Koyo sticker so that I can find a replacement rack if I need too.
And here it is, freshly mounted back in the car.
Other than pressing the new bushings in, reassembly's gone quick so far. I've got the front steering rack back in, the front struts in, wheels, and brakes, the subframe and the fenders. Next I'll be reinstalling the headlight motors and lights, the steering column, the clutch cylinders and brake cylinders, and the front brake lines.
Still waiting on the S4 turbo and FD fuel pump, though. :P
Thread Starter
Joined: Feb 2005
Posts: 2,012
Likes: 0
From: Dallas, TX
Setback after setback - I finally started working with the turbo I bought off the rx7club classifieds today - the one that took almost a month to get here and arrived without the FD fuel pump I bought with it. Right now I'm giving the sender the benefit of the doubt, but this guy has to have the worst luck in the world. He sent the turbo to the wrong guy, and sent me that guys injectors. I ups'd the guy his injectors, and finally a week and a half later, I got my turbo in, but no fuel pump in the box. He said he's checking with the guy and checking to see if he forgot to put it in.
Now I started with the turbo. I picked it up and tried to turn it by hand like I did with the s5 turbo I just sold (all my fittings and exhaust manifold was for an s4, but my turbo was an s5, so I THOUGHT changing the turbo out would be simpler than trying to locate a new s5 manifold, new s5 oil and coolant lines, etc. Holy **** was I ever wrong )
The first thing I discovered was the wastegate was punched in - the hose barb was pressed flush against the lid of the wastegate. I checked and it still operated the rod, so I thought "Ok, I can probably work with this"
I contacted the guy and told him about the wastegate and that I could deal with it, and asked him why it didn't spin easily by hand. He said it was always that way, but it still boosted fine in the car. Alright, I've never had a turbo car before, maybe this is truth.
I've got the hot side off and everything looks good, but the turbo still won't turn by hand. So I proceed to the intake side. Here's what I found :
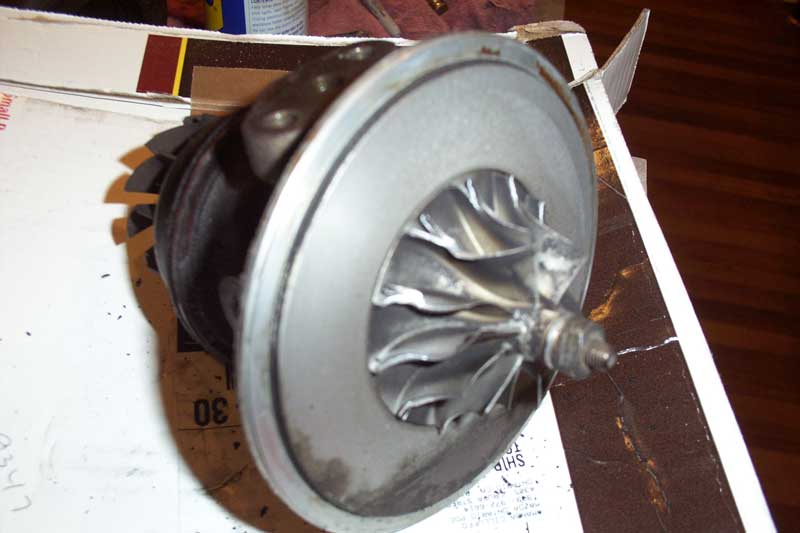
This intake wheel is pretty well trashed. Looking at the rest of it, I'm thinking "Okay, maybe I can get a new intake wheel, Jacqui's turbo just seized, if it's her hot side that's bad, maybe I can pick it up cheap and make one working one from two bad, or maybe I can source a new compressor wheel from the internet." Most of the rest of turbo seems passable, the O-ring on the intake side is a little on the square side, and once I get the rod pushed through the exhaust side is hella crusty under the little dish, which doesn't seem right, but maybe - after all, once I got the intake side loose, it turned fine.
So I snap the above picture and send it to the guy, and I go back in the other room where my wife is asking how I'm going to paint it, and she picks up in the intake side and says "Whoa, how did we both miss this?" In the tradition of great surprises regarding this turbo transaction, the latest and greatest is the stealth crack. Because of where it's located, you can't see it when looking directly at the intake housing - only if you look across it. But it's a monster!
This thing's not even a good paperweight, because it drops carbon everywhere from the hot side. On that note, I'm going to bed and figure out what to do tomorrow, my budget's pretty much depleted, so I can't afford a nice $200-400 s5 setup or whatever. I guess I'll figure it all out later. Maybe I'll just run a new intake pipe and use my NA exhaust manifold. :P That'd be great fun for a while.
Now I started with the turbo. I picked it up and tried to turn it by hand like I did with the s5 turbo I just sold (all my fittings and exhaust manifold was for an s4, but my turbo was an s5, so I THOUGHT changing the turbo out would be simpler than trying to locate a new s5 manifold, new s5 oil and coolant lines, etc. Holy **** was I ever wrong
)The first thing I discovered was the wastegate was punched in - the hose barb was pressed flush against the lid of the wastegate. I checked and it still operated the rod, so I thought "Ok, I can probably work with this"
I contacted the guy and told him about the wastegate and that I could deal with it, and asked him why it didn't spin easily by hand. He said it was always that way, but it still boosted fine in the car.
Alright, I've never had a turbo car before, maybe this is truth.I've got the hot side off and everything looks good, but the turbo still won't turn by hand. So I proceed to the intake side. Here's what I found :
This intake wheel is pretty well trashed. Looking at the rest of it, I'm thinking "Okay, maybe I can get a new intake wheel, Jacqui's turbo just seized, if it's her hot side that's bad, maybe I can pick it up cheap and make one working one from two bad, or maybe I can source a new compressor wheel from the internet." Most of the rest of turbo seems passable, the O-ring on the intake side is a little on the square side, and once I get the rod pushed through the exhaust side is hella crusty under the little dish, which doesn't seem right, but maybe - after all, once I got the intake side loose, it turned fine.
So I snap the above picture and send it to the guy, and I go back in the other room where my wife is asking how I'm going to paint it, and she picks up in the intake side and says "Whoa, how did we both miss this?" In the tradition of great surprises regarding this turbo transaction, the latest and greatest is the stealth crack. Because of where it's located, you can't see it when looking directly at the intake housing - only if you look across it. But it's a monster!
This thing's not even a good paperweight, because it drops carbon everywhere from the hot side.
On that note, I'm going to bed and figure out what to do tomorrow, my budget's pretty much depleted, so I can't afford a nice $200-400 s5 setup or whatever. I guess I'll figure it all out later. Maybe I'll just run a new intake pipe and use my NA exhaust manifold. :P That'd be great fun for a while.
#include <stdhdr.h>
Joined: Aug 2001
Posts: 375
Likes: 3
From: Allen, Tx
Originally Posted by Richter12x2
Just picked up a new toy today.
Innovate LC-1 UEGO
http://cgi.ebay.com/ebaymotors/ws/eB...m=270104229414
I was going to wait on the wideband setup, but I saw this and read the PDF of the owner's manual on Innovate's website. It includes the sensor, it's got 2 analog outs for datalogging, and comes with software to monitor with a laptop (until I figure out what I'm going to do for a gauge). It also emulates the narrowband o2 sensor, which is a plus because not only will I not have to run 2 sensors, (which I always thought was retarded), but I'll be able to see exactly what the computer sees for it.
Originally Posted by Richter12x2
Also, made my blockoff plates yesterday, after repairing the blower fan on the BMW. :P I've got to look at my brand new harness that I made when I go home too, because it suddenly dawned on me that it probably matters which injector plug goes on which injector. I'm pretty sure I marked them so I'd know later, but I guess I'll know for sure when I get home.
I'm pretty sure I marked them so I'd know later, but I guess I'll know for sure when I get home.
Thread Starter
Joined: Feb 2005
Posts: 2,012
Likes: 0
From: Dallas, TX
I got what would have been a good deal if the turbo had been rebuildable and the fuel pump had actually arrived. :P I think it was about $110 for an s4 turbo and FD fuel pump.
There were no survivors
Joined: Aug 2004
Posts: 2,475
Likes: 1
From: Grand Prairie, Texas
http://www.revvinsevens.com/
Give Curtis a ringy-ding..... as a matter of fact I need to go visit his garage and see if he has a subframe for me yet.... and I also need to pick up an outer tie-rod for the right side. He usually gives all the locals a pretty sweet deal on parts. That "beautiful" BLACK S5 bumper you see on my RED car was only $50 through him. He's usually got PLENTY of just about anything you'll need for any gen RX-7.
I need to go bust his chops if his 2nd gen still isn't completely running.
Give Curtis a ringy-ding..... as a matter of fact I need to go visit his garage and see if he has a subframe for me yet.... and I also need to pick up an outer tie-rod for the right side. He usually gives all the locals a pretty sweet deal on parts. That "beautiful" BLACK S5 bumper you see on my RED car was only $50 through him.
He's usually got PLENTY of just about anything you'll need for any gen RX-7.I need to go bust his chops if his 2nd gen still isn't completely running.
Thread Starter
Joined: Feb 2005
Posts: 2,012
Likes: 0
From: Dallas, TX
I'll have to see if I can get in touch with him maybe. Or maybe there's a very slim outside chance that Jacqui's seized s4 turbo has a usable compressor side AND she decides to sell it instead of use it for a door-stop/paperweight . . .
While you're there, see if he'll trade you the black s5 bumper for a red s5 bumper.
While you're there, see if he'll trade you the black s5 bumper for a red s5 bumper.
There were no survivors
Joined: Aug 2004
Posts: 2,475
Likes: 1
From: Grand Prairie, Texas
I would, but he doesn't... I mainly see him pulling in red S4s to part out and the S5s he does get are rarely red. This black one was the only one he had at the time and when i was there a month or so back, he still didn't have a red one. I chopped the middle lip off though so most people wouldn't want it anyway. The car needs/will be getting a full body repaint and dents pulled anyway so being two-toned isn't too big a deal.... poly-toned would bother me though lol
Thread Starter
Joined: Feb 2005
Posts: 2,012
Likes: 0
From: Dallas, TX
Originally Posted by dfwrx7
I have a LM-1 in my autocross car. The Megasquirt can use a wideband without any trouble and is in fact required for autotuning. Teh w1nz0rz!
At least on FB's it doesn't matter. There is no problem at all batch firing them. Most Megasquirt rotary freaks just batch fire all of their injectors unless they're staging or using dual table maps. In that case they batch fire for each map.
At least on FB's it doesn't matter. There is no problem at all batch firing them. Most Megasquirt rotary freaks just batch fire all of their injectors unless they're staging or using dual table maps. In that case they batch fire for each map.
Thread Starter
Joined: Feb 2005
Posts: 2,012
Likes: 0
From: Dallas, TX
Originally Posted by EJayCe996
http://www.revvinsevens.com/
Give Curtis a ringy-ding..... as a matter of fact I need to go visit his garage and see if he has a subframe for me yet.... and I also need to pick up an outer tie-rod for the right side. He usually gives all the locals a pretty sweet deal on parts. That "beautiful" BLACK S5 bumper you see on my RED car was only $50 through him. He's usually got PLENTY of just about anything you'll need for any gen RX-7.
I need to go bust his chops if his 2nd gen still isn't completely running.
Give Curtis a ringy-ding..... as a matter of fact I need to go visit his garage and see if he has a subframe for me yet.... and I also need to pick up an outer tie-rod for the right side. He usually gives all the locals a pretty sweet deal on parts. That "beautiful" BLACK S5 bumper you see on my RED car was only $50 through him.
He's usually got PLENTY of just about anything you'll need for any gen RX-7.I need to go bust his chops if his 2nd gen still isn't completely running.
Thread Starter
Joined: Feb 2005
Posts: 2,012
Likes: 0
From: Dallas, TX
Engine is now IN the car sitting on new mounts, but the transmission shop that rebuilt the tranny apparently decided my solid mount tranny crossbrace was too much cool for me to handle, so they kept it and said they can't find it. More new bits from Mazda, an all-new crossbrace with the Y bracket and performance Y mounts are on the way.
The exhaust manifold and turbo are installed, the LIM is installed, and the oil lines are all modified and ready to go. The water line mounts are provided for, but I've got to find where I put the appropriately sized hose to connect it at the water pump and the top of the rear iron. The new harness has been pulled back into the interior and it's looking pretty sweet. Once the brace comes in I can remove the back hook and finish assembling the intake manifold to the intercooler and back down to the turbo. Then, providing I can get the stock maf to connect to the front of the turbo, I should be able to start it up, (after adding oil, radiator, and such of course.)
In retrospect, I've made this a lot more difficult that it needed to be by doing everything at once. If you just wanted to turbo your NA, you could probably do it for about $400 if you shopped bargains and built your own megasquirt to drive it, and you'd never have to take the engine out of the car. :P