When you click on links to various merchants on this site and make a purchase, this can result in this site earning a commission. Affiliate programs and affiliations include, but are not limited to, the eBay Partner Network.
First rotary car, documenting my experiences. My FD rx7 "CherryBomb"
Hello everyone,
This thread is documenting my experience and mistakes of owning and maintaining my first rotary car. As of this post I've owned the car for about 2 years. Any advice is welcome but do understand I am pretty new to this.
I've had rotary friends in my circle for a while, I had always wanted an rx7 but it wasn't until I babysat my friends FD for about a month that I decided to go shopping for one. I found one Locally and I basically made all the mistakes a first time rotary buyer shouldn't make. I didn't do a compression test, didn't see any shop receipts (although the seller did say the motor was rebuilt) and I totally let my 21 year old emotions get the best of me. (I'd like to think now at 23 I've learned a thing or two)
I went and got myself a 93 fd rx7 touring, originally automatic with a big 67mm journal bearing turbo. Its had about 7 owners and at some point had a manual swap. The odometer burnt out however the last reported mileage was about 76,000 which i'll...say uh...sure. I should have turned and ran but...
Car was not stock by any means
Last edited by mjg1229; Aug 17, 2019 at 11:58 PM.
Reason: Adding info
On the way home, she started overheating so we stopped and had her shipped off to the shop.
Shouts out to my boi Issei for waiting on the tow truck with me
We had her on the truck and on her way to the shop in a couple of hours. I took her to Eric at Rotary werks, turned out t just be air in the system, he hooked me up with an AST delete and we were on our way until she left me stranded again on the way back from the shop.
Fuel Pump was rewired by the previous owner and the fuse had melted Within no time had her on her way to wire everything correctly
So with all that we took her home and gave her a bath
With everything in current working order we took her out to stretch her legs a bit.
Last edited by mjg1229; Aug 17, 2019 at 08:36 PM.
Reason: Adding Pictures and correcting spelling
So next was to tackle the first thing on my list (Before an air filter) and that was moving the battery to the trunk. The reason I did that instead of the rear bin was because I wanted easy access to it and I didn't want to hack up my bins to run the battery I wanted
Hard to see in this pick but we made a makeshift bracket so the fuse box wasn't just floating there.
Then I decided to see what I could do about some of the interior bits. Threw in this wheel as soon as I could, the previous wheel was this tiny knock off Shouts out to Issei again for hooking me up with these 94 door cards out of his FD.
The next major project on my list was to get some decent coilovers. I went with Ohlins road and track DFVs
Before Damn these are pretty! After
I realize now they are pretty high up, but i was really scared of rubbing up against the wiring loom, I've seen horror stories of the loom being damaged and chaos ensued so I played it really safe for now.
I knew from the beginning I wanted to stay pretty OEM as far as the body was concerned. I originally wanted to go 99 spec everything but after seeing pricing I decided just to go OEM S6 front bumper. The smoother more 90's lines grew on me so I traded my replica front bumper with a gentleman here on the forums.
Threw it on to test fit it
Had to clear off some of the mouth part so it would fit the FMIC
While we waited for paint supplies to arrive we tackled some other projects on the car.
/
Heat wrapped the down pipe
The car also got a banzai racing oil pan brace and an aluminium oil filler neck
I was also trying to figure out what I was going to do with my interior, it was in pretty bad shape and we all know how hard/how expensive oem black parts are. Then I found this:
Tried it on the middle pass through and the result was surprising
Last edited by mjg1229; Aug 18, 2019 at 12:04 AM.
Reason: Missing pictures
We had heard good things about the can before so we decided to go full send and try it on the whole interior:
All things considered the interior came out much better than we initially thought, even on the headliner. It's been a couple months since we've done this and so far it's help up
After all the paint supplies finally came in it was time to start getting the paint itself which was easier said than done. We knew from the get go if we did it ourselves it wasn't going to match perfectly especially since we didn't have a paint code. There is a Sherwood Williams by us that specialized in automotive paint so we took a headlight cover to them to analyze. About $200 worth of paint, reducer and clear coat and we were on our way. We set up our own makeshift paint booth. I DO NOT RECOMMEND DOING THIS OUTSIDE.
First we had to prep everything
We found a pretty nasty crack in the bumper so next step was to tend to that
Once everything dried how we likes we kept sanding then we test fitted everything:
Even sanded and cleared the turn lamps for good measure!
Time for fitting
Not exact by any means but better than we thought all things considered. Once we buttoned everything up we took a trip to Miami Subs to clog our arteries in celebration.
The car is by no means finished. It's been a slow two years but slowly she's getting closer to how I want her. Next on the cosmetic list is getting the r1 lip, new wheels and tires (Looking at kansai knp's) and lowering it and eventually painting it back to the original VR. I'm also looking to get my hands on some 99 spec tail lights too. Then all the interior needs is black carpeting and some suede seats (If anyone has I'm in the market lol). The dash trim had this fake carbon fiber stick on stuff all over it and is all cracked and in questionable shape anyways so I'll need to figure something out for that, I'm definitely open to suggestions.
As far as the mechanics are concerned. I've honestly been scared to do a compression test lol. That being said i've never had any start up issues hot or cold and she doesn't hesitate or have any issues up top. But i do need to get around to getting numbers. My turbo right now (which came with the car is a precision journal bearing 67mm turbo, I dont know the specific model. I would love to switch to a borg warner EFR set up one day, but that project is going to have to wait a while if that's the route I decide to take. I may go that route when I inevitably do an full engine rebuild. For now, I'm going to take it to a specialist to see what I can do about rebuilding this current turbo.
Aide from that I also want to upgrade my ignition system just as a preventative step and get the car re tuned.
All that being said Two years later, this is how she sits:
I've noticed that the voltage reads just under 113 volts, averages at about 12.5 if I have my headlights on. I replaced the alternator a few months ago with a 1550 amp Alternator from IRP. I also had a parasitic draw issue from the gauges but we wired them to a switched relay which solved that issue. Next step is to clean the grounds I guess but i'm kind of stumped here.
I can get her up to 14v at cruising but thats the highest I can get it. Not sure how to go about tackling this, should I just throw the whole car away at this point?
This is a great place to document your build. I also am doing the same. I am not going to burn any rotary shops but do your research. Kilo Racing and Pettit Racing is near you. I am from Central FL. Nice build
Thanks! Yeah I was looking at pettit for a while, I haven't heard about kilo racing, I'll look into them
Jesus Padilla of Kilo Racing is a legend in import drag racing and a legend in Rotary cars. His 3 rotor all motor fb with full interior ran a 9 second pass back in 2005. The car even had glass windows. Either way I am not into drag racing but anything engine related including running I go to Kilo. Suspension, brakes and cooling system i go to Pettit. Kilo is drag race stuff and Pettit is Roadrace stuff. Both are great at what they do and do good work. You will pay some money but well worth it.
So yesterday I decided to go ahead and investigate the voltage issue, my first course of action was to check the main post on the alternator and check all the connections on the main fuse box. I went ahead and rearranged the cables on the post so they were as flat as possible. Then I went to investigate the fuse box and noticed this
That doesn't look so good.
So i took a trip to home depot and I got myself some 220 and 320 grit wet dry sandpaper and went to town
Quickly found her way to 14v this morning
A little better, So i tightened everything back up (I disconnected the battery too while I did this) started the car and the car started around 12 volts, the pretty quickly found its way up to 13. Then settle around 13.8. It found that voltage much quicker than before. Things like the brake lights didn't dramatically drop voltage to like 11 like it did before. Today I took it out for a bit and found it idles now at about 14 constantly which is an improvement. I noticed turning the AC or the headlights on drops the voltage to like 12.5. This still has me a bit worried, is that too low? Anyone else have this issue? Or are those numbers normal?
While I was there I noticed my power steering fluid was below the minimum so i topped that off to. I read on here that ATF worked the best and the general consensus was to pick up something like this
Topped her off, didn't see any leaks which was good. I honestly didn't really notice a change in steering feel.
Honestly I've found them to be helpful, The FD was my dream car and getting a clean example wasn't exactly in my budget (or easy to find down here for some reason) so i got one that needed work and i've heavily relied on forums because of that, so I figured since I'd share what my process was like
I installed the oem water pump and idler pulleys and like I suspected it improved the voltage. One thing my friend and I noticed were that both radiator fans run all the time, is that normal? I can imagine that must be a pretty Big draw as well.
I realize that technically I shoooould be running some kind of idler pulley. But this was mainly for testing. I have a feeling I'm going to run into clearance issues with the turbo. But in the meantime this fixed the isue. The belt I used was a 490mm m4.
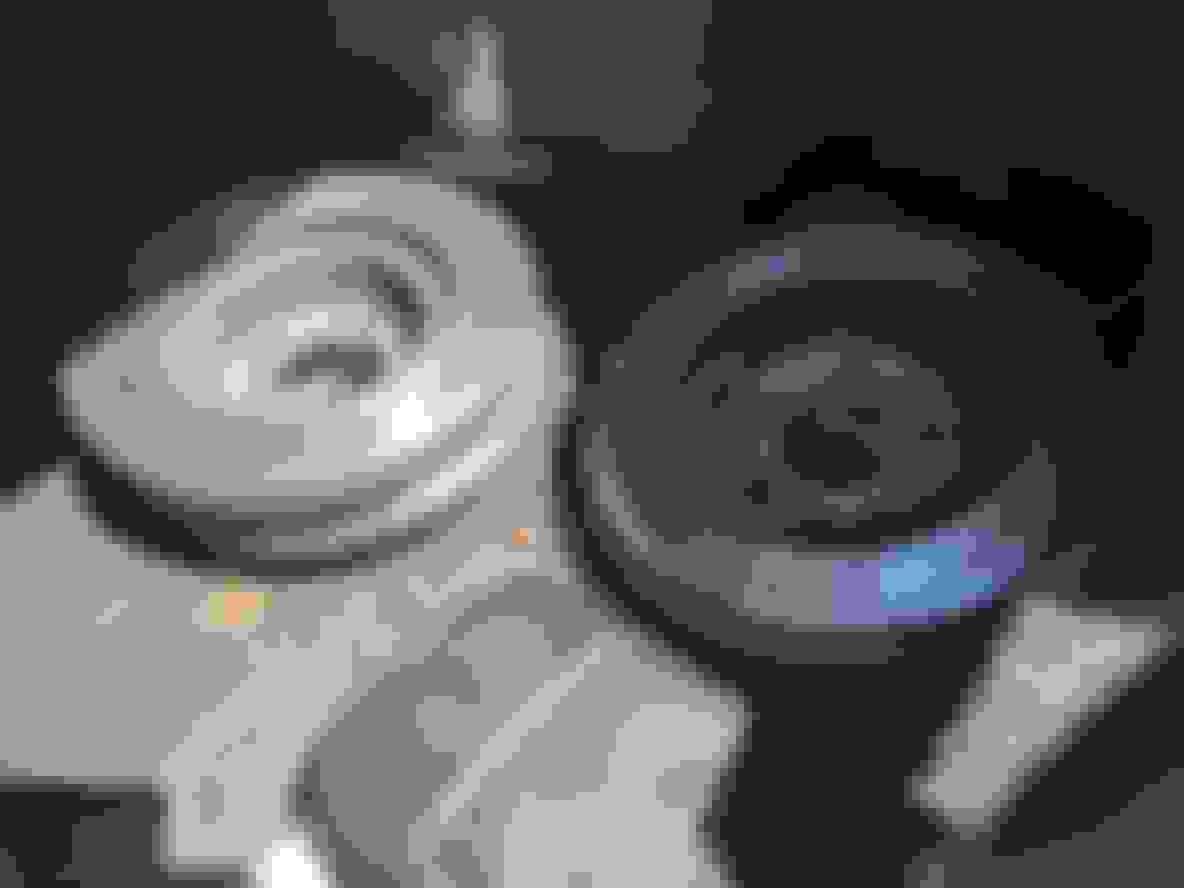
In other news, My power steering pump may need a rebuild or replacement soon. While we looked into that we had the brake rotors resurfaced. I'm looking into getting EBC Redsuff for pads.
Another issue we ran into was the mounts for the crank angle sensors disintegrated, so a new mount with sensors is on its way.
So with the new CAS in we took a look at the power steering pump which had a bad bearing, so $30 worth of new bearings and seals later we were on our way.
New CAS put in Seals and new bearing all from amazon Rebuild took less than 20 minutes, everything fits together like legos thankfully. There's letters on where the housings connect so you can't mess it up. All cleaned up and put back in place, no strange noises or belt squeaks, all is good with the world
Touched these up a bit VERY bad over spray from the previous paint job A little bit of fine grit sandpaper, Plastix and Pinita and the headlights were as good as new