
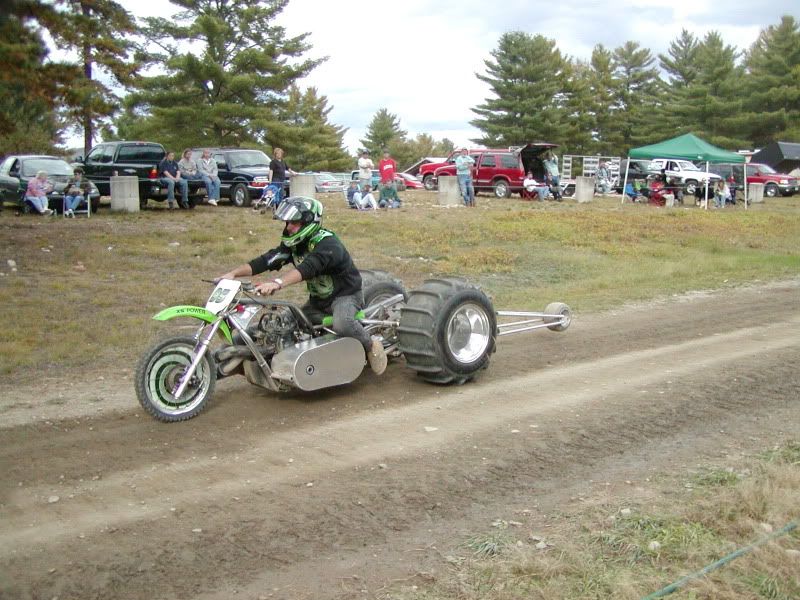
Bike for dirt drags with 13B NA

Thread Starter
Dragons' Breath
Joined: Sep 2010
Posts: 1,129
Likes: 2
From: Pump Handle, SK. Canada
I'm actually referring to the bypass hole in the water pump housing. It's at the bottom of the thermostat neck. The thermostat closes it as it opens up. Generally that hole gets tapped and plugged when eliminating the thermostat or a big bolt gets installed. If it is left open, about 30% of coolant bypasses the rad.
 Are all the 13b water pump housings aluminum both of mine are . but the pumps are cast ..
Thread Starter
Dragons' Breath
Joined: Sep 2010
Posts: 1,129
Likes: 2
From: Pump Handle, SK. Canada
That is quick some of the bigger power stuff goes a little faster but the time is very good 3.85  would be very hard to beat for most anything .. My hat is off to the builder .. I take it he is also running a sno clutch
Thread Starter
Dragons' Breath
Joined: Sep 2010
Posts: 1,129
Likes: 2
From: Pump Handle, SK. Canada

Full Member
Joined: Apr 2011
Posts: 113
Likes: 1
From: Maine
The bikes all run an aluminum cover like that to protect the drivers legs in case the primary clutch comes apart. I run a stock Ski-Doo sheet metal belt guard on mine, but I am not exposed to the clutch the way they are. There is no option of doing any kind of bearing support on the open end of either clutch as the clutch faces move as they shift up. On the secondary you do want a bearing as close to the inside clutch face as you can get it. The belt will pull hard enough to flex the 1" steel shaft quite a bit. that was one of the "adjustments" we worked on last summer and partly why we added a 3rd bearing in the middle of the shaft.
Any flex in that shaft causes clutch face misalignment and results in toasting a $60 belt. It also changes your gearing, sort of like launching between 2nd and 3rd gear instead of 1st gear. Our changes to the secondary shaft support and chain tensioner resulted in taking my Et from an average of 5.1 seconds to 4.7 seconds, a huge improvement.
This video clip was shot before we re-engineered the secondary shaft supports, but gives you an idea of how the clutches move as it shifts.

Junior Member
Joined: Feb 2011
Posts: 26
Likes: 0
From: Alaska
Gerald, thanks, they probably don't as I expect they need to be able to change the belt quicker than an extra bearing would allow. 
Chain reaction, thanks for the vid, I knew the outer part of the drive clutch would move, but I see a portion of it, close to the centerline of the crank, that doesn't; I don't know what you call that part (hub, axle, stub, stub shaft, capstan, mast, ???)
That's what I was wondering about supporting with an extra bearing, and possibly lining up with the hole in the cover in the pic.
I see what you mean about having the driven shaft's support bearing as close to the load as possible, with a 1" shaft you wouldn't expect it to flex like that, but with enough leverage anything is possible.
Thread Starter
Dragons' Breath
Joined: Sep 2010
Posts: 1,129
Likes: 2
From: Pump Handle, SK. Canada
I don't think they have much trouble with the primary pulley it's the secondary that has the pressure on it , As the pulley gets bigger the weight slides out on the shaft making for more weight past the brg.,, I really don't see any problem making the secondary shaft longer and using a flange or pillow type brg. to support the outer shaft end ( but it will take more precious room ).. Being as the chain case is done away with there are no splines on the secondary just a key way would do the job for the sprocket ( I like browning type hubs ) but lots of time there just isn't enough room to use them .. It would take very little to keep the secondary shaft from flexing .. As far as the primary clutch off the engine when it works the weight of the clutch moves in toward the flywheel making for a better balance under load than it has say at half throttle when the weight is out on the stub shaft .. I have also used shafting that just does not break like the pics from chainreaction which is just from the shaft flexing .. I would be using shafting with a very high carbon content , The shaft will not break straight across like in the pics if and when it does fail it will be a long jagged break and that would take extreme pressures to break it even then .. I can't remember the number of the shafting but it will actually get stronger the more the shaft flex's it.s amazing stuff . it was around 9 bucks a ft. a few years back but that is cheap if it helps with the problem and is not bad to machine key ways etc. in fact if you spin the mill cutter a bit faster than recommended for regular work it will do a very nice job, better than average ..
Junior Member
Joined: Feb 2011
Posts: 26
Likes: 0
From: Alaska
Okay, thanks.
That helps, I would likely be able to get the support bearing right next to the driven clutch, as I would still be longitudinal mount.
I might even use a sort of cog belt (Gilmer) to "adjust" the final drive ratio.
That would be cleaner (therefore possibly quicker) than a traditional quick change.
Hmm, now you really have me thinking.
Last edited by Nexxussian; Apr 24, 2011 at 09:36 PM.
Thread Starter
Dragons' Breath
Joined: Sep 2010
Posts: 1,129
Likes: 2
From: Pump Handle, SK. Canada
I would still take chain's suggestion and run the third center brg. at least make room for it if you need it .. As you go through the different phases of the drive system I think the primary sprocket takes more torture than anything , you saw chain's sprocket , it takes a lot of torque and power to rip all the teeth off of a sprocket ... Either that or maybe the same type of deal as the secondary clutch and run a flange brg. out on the end , after the sprocket to stop the flexing what ever works .. If that shaft would run true all the time the belt would last a lot longer and not loose traction ..
Junior Member
Joined: Feb 2011
Posts: 26
Likes: 0
From: Alaska
I would definitely want to run a central stabilizer bearing, I would have to run a bearing that would sustain loads at high shaft speeds over what I suspect to be longer periods of time.
I believe there are several bearings out there that would do the job, I would have to find what one would be appropriate, and available (no point building something with parts that are hard to find ).
).
I believe there are several bearings out there that would do the job, I would have to find what one would be appropriate, and available (no point building something with parts that are hard to find
).
Thread Starter
Dragons' Breath
Joined: Sep 2010
Posts: 1,129
Likes: 2
From: Pump Handle, SK. Canada
Dumbest of the Dumb
I can't believe anyone would do this That dam sand gets in everything !!! http://www.youtube.com/watch?v=wX48z...yer_detailpage
That dam sand gets in everything !!! http://www.youtube.com/watch?v=wX48z...yer_detailpage
Full Member
Joined: Apr 2011
Posts: 113
Likes: 1
From: Maine
A friend told me about a snowmobile 2-speed shift on the fly gear box with reverse. He said I should look at building this into my jack-shaft assembly. I need to find a Ski-doo junk yard in the area to check out the Skandic gear box. This sled is within 50# of what my car weighs and is built for trail grooming, so is intended to deal with drive-train loading. This could address a variety of issues.
http://www.powersportsnetwork.com/en...Code=561&st=BC
http://www.powersportsnetwork.com/en...Code=561&st=BC
Thread Starter
Dragons' Breath
Joined: Sep 2010
Posts: 1,129
Likes: 2
From: Pump Handle, SK. Canada
A friend told me about a snowmobile 2-speed shift on the fly gear box with reverse. He said I should look at building this into my jack-shaft assembly. I need to find a Ski-doo junk yard in the area to check out the Skandic gear box. This sled is within 50# of what my car weighs and is built for trail grooming, so is intended to deal with drive-train loading. This could address a variety of issues.
http://www.powersportsnetwork.com/en...Code=561&st=BC
http://www.powersportsnetwork.com/en...Code=561&st=BC
Full Member
Joined: Apr 2011
Posts: 113
Likes: 1
From: Maine
I pulled the 650 cfm Holley of my 12a on Sunday and mounted an Edelbrock 600 cfm spread-bore on the same intake. It seems to have better throttle response with the new carb. We are going to run it this coming weekend to see what happens.
Thread Starter
Dragons' Breath
Joined: Sep 2010
Posts: 1,129
Likes: 2
From: Pump Handle, SK. Canada
I have never had a Edelbrock carb had a couple of Edelbrock intakes on different big blocks but I have always used Holley, I guess just because I am comfortable with them .. Anyway good luck and let us know how things work out..
Thread Starter
Dragons' Breath
Joined: Sep 2010
Posts: 1,129
Likes: 2
From: Pump Handle, SK. Canada
Video#8 Motorcycle for sand drags with a 13b rotary engine
An update on how things are coming , coils mounted ,oil cooler , ignition , air cleaner , final drive . handle bars , engine mounts finished ,... I will share something really stupid that I did just in the hopes that no one else will do the same thing .. I had been doing a lot of grinding and welding on the bike so I plugged off the carb with the air cleaner and the exhaust ports I plugged with paper towel ,which did a fine job of keeping grinding particles out .. so I carried on and did the ignition switch and starter wiring . when I finished the wiring I wanted to try the the starter so I hooked up a battery and hit the key ,well the paper towel in #2 rotor blew out on the floor and the paper towel in #1 rotor got chopped into 3,658,487 tiny pieces and blew them out on the floor all except 5 tiny little pieces that ended up stuck between the apex seals and the rotor and immediately lost compression on 2 of the three on #1 rotor ... It took me two days to gently worry them dam little pieces of paper out with a dental pick .. So in the future if you want to cover your exhaust to keep things out use duct tape or something and save your self a lot of grief .. Who would have thunked it .. I usually don't rat myself out but I think I deserve it .. http://www.youtube.com/watch?v=NWxv3...yer_detailpage
So in the future if you want to cover your exhaust to keep things out use duct tape or something and save your self a lot of grief .. Who would have thunked it .. I usually don't rat myself out but I think I deserve it .. http://www.youtube.com/watch?v=NWxv3...yer_detailpage
Thread Starter
Dragons' Breath
Joined: Sep 2010
Posts: 1,129
Likes: 2
From: Pump Handle, SK. Canada
Dragon's Breath
Good name I think I will keep it , Well it has been a while since i started this project and it finally has life . I think maybe I have some ignition issues left but I am gaining on it every day .. I will load it on my auto hauler and take it to my chums place in the country so I can tune it a bit ,
The bike still needs brakes and a seat , all the tack welds will be welded and ground down a tad now that it's out of the house . I am uploading a short video of the bike running .. I can't believe how much fuel the thing needs just to even start . I will need to plug the power valve and just use bigger mains.
In the video you can see the amount of fuel vapor going through the air box but if I shut it down and restart which I probably did fifteen times the carb needed to be pumped 3 or 4 times before it would restart and then it would fire up right away so it can't be loading up or the thing would flood and not start . The front rotor seems to be firing hotter than the rear so it is no doubt the way I have the coils wired up ..
Aaron I know you don't like carbs but I am willing to bet that most are surprised that it even runs I got a good shot of the air box when it is running and one huge vapor cloud with a little throttle .. There seems to be fuel every where inside but it seems to need it to run , it doesn't seem to pool until the throttle is returned , pipes and plugs are not wet ... I will do the carb tune and I think it will be fine. As usual comments are welcome . I'm always open to good info.
Anybody got any ear plugs ******* paper don't work so great .. http://www.youtube.com/watch?v=Y81z2...yer_detailpage
The bike still needs brakes and a seat , all the tack welds will be welded and ground down a tad now that it's out of the house . I am uploading a short video of the bike running .. I can't believe how much fuel the thing needs just to even start . I will need to plug the power valve and just use bigger mains.
In the video you can see the amount of fuel vapor going through the air box but if I shut it down and restart which I probably did fifteen times the carb needed to be pumped 3 or 4 times before it would restart and then it would fire up right away so it can't be loading up or the thing would flood and not start . The front rotor seems to be firing hotter than the rear so it is no doubt the way I have the coils wired up ..
Aaron I know you don't like carbs but I am willing to bet that most are surprised that it even runs I got a good shot of the air box when it is running and one huge vapor cloud with a little throttle .. There seems to be fuel every where inside but it seems to need it to run , it doesn't seem to pool until the throttle is returned , pipes and plugs are not wet ... I will do the carb tune and I think it will be fine. As usual comments are welcome . I'm always open to good info.
Anybody got any ear plugs ******* paper don't work so great ..
http://www.youtube.com/watch?v=Y81z2...yer_detailpage
Full Member
Joined: Apr 2011
Posts: 113
Likes: 1
From: Maine
Double check your timing and verify if you don't have your L and T coil wires swapped. Mine has 1 spot where the timing wants to be, 1 or 2 degrees off and it sounds like yours. On the noise, I have a couple of guys at the races that B!tch about the noise mine makes every time I fire it up. I just smile and wack the throttle.
Thread Starter
Dragons' Breath
Joined: Sep 2010
Posts: 1,129
Likes: 2
From: Pump Handle, SK. Canada
I will explain what I have been trying to do with the Ignition .. I am using a 1 st. gen electronic dizzy and am feeding my second gen coils .. I didnt realize the stock dizzy has ignitors screwed to the outside of the housing one for leading one for trailing .. when I bought my dizzy I bought it without ignitors so decided to use the second gen coils and ignitors , I don't care about getting the T coil to fire I am just trying to feed the L coil to fire through the T coil .. I don't know if that makes any sense to anyone but I think what is happening is it is actually running on the trailing dizzy signal somehow I'm not feeding the right wires on the trailing dizzy to make the L coil fire at the proper time .. I have been told it wont work well screw that it has to work I just need too figure out how to wire it to trick the L coil to fire at the proper time .. Now that probably made no sense at all but somehow it does to me .. If it wasn't for the time factor and the GD mail I would just get a ignitor for my first gen dizzy and feed the L coil direct.. I know there are some of the old guys that could make it work but I think they are all having a little nap. But I will go over everything again and make sure my wires aren't as crossed as my brain .. Chain as soon as I started my bike people from all over the village were driving by some stopped and watch some kept going . My neighbor has a real problem with anything I do that makes noise so this should really get his heart rocking ..
somehow I'm not feeding the right wires on the trailing dizzy to make the L coil fire at the proper time .. I have been told it wont work well screw that it has to work I just need too figure out how to wire it to trick the L coil to fire at the proper time .. Now that probably made no sense at all but somehow it does to me .. If it wasn't for the time factor and the GD mail I would just get a ignitor for my first gen dizzy and feed the L coil direct.. I know there are some of the old guys that could make it work but I think they are all having a little nap. But I will go over everything again and make sure my wires aren't as crossed as my brain .. Chain as soon as I started my bike people from all over the village were driving by some stopped and watch some kept going . My neighbor has a real problem with anything I do that makes noise so this should really get his heart rocking ..
Joined: Feb 2001
Posts: 29,798
Likes: 128
From: London, Ontario, Canada
Just to clarify, that's on the leading only using an FC leading coil. The FC trailing coils need a toggle signal as well as a trigger which means they don't lend themselves to this setup. You would really need some kind of ECU to run the trailing coil.
Thread Starter
Dragons' Breath
Joined: Sep 2010
Posts: 1,129
Likes: 2
From: Pump Handle, SK. Canada