When you click on links to various merchants on this site and make a purchase, this can result in this site earning a commission. Affiliate programs and affiliations include, but are not limited to, the eBay Partner Network.
Because i have a hate for lightly built stuff. I realize that its going to add some weight but i dont really care, its not a full on race car. 500hp will make up the difference.
hey I had a question... how do you line up the bell housing adapter center hole to the rear housing and the transmission? I was thinking of doing that but learned that getting it off by 1mm trashes the transmission and the pilot bearing.
hey I had a question... how do you line up the bell housing adapter center hole to the rear housing and the transmission? I was thinking of doing that but learned that getting it off by 1mm trashes the transmission and the pilot bearing.
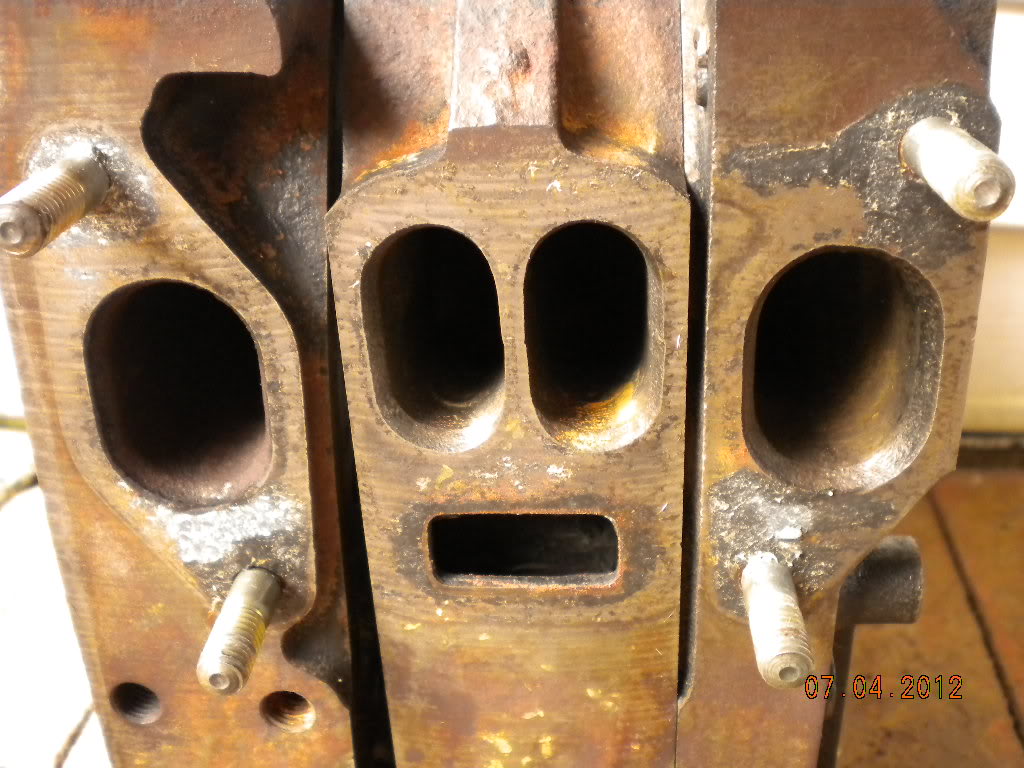
Hi, its fairly simple. So you have 2 known centers, the bore in the bellhousing and the shaft that the throw-out bearing rides on. First step was to bore a hole in the adapter so its a snug fit on the shaft. Next step was to bore out the bellhousing center to accept a bush ( this bush is also a snug fit on the shaft ). Once all the parts are together the mounting holes can be marked and drilled. Hopefully this makes sense, i have included some photos to give you a better idea.
Photo doesn't show it very well, but the adapter is bored out to fit snugly on this shaft.
Bush, this is a press fit into the bellhousing.
I machined a few mm out of the bore on the bellhousing to get a bit more material thickness on the bush.
thanks for the reply. Which bellhousing is that? our fd housings don't have a round hole for the input shaft as you know. it just has the big gaping hole for the fork assembly, etc. I still don't quite understand how you knew where to center the input shaft with respect to the mounting bolt holes with our bellhousing.. or do you need to source a bellhousing with a round hole in the center? I guess I can disassemble my second transmission and take off the front cover off to get that hole.
even the mounting bolt holes.. I realize I may be asking a very basic machining question.. how do you make them perfectly in alignment? I don't know any other way other than sharpie to make the mark and going from smallest drill bit to the correct size bit. My way is always off by little bit because I'm eye balling it and the drill bits do wander little despite my best efforts.. I made my oil pan this way and I had to make more than a few bolt holes larger in size to clear the studs..
Yeah its an FC bellhousing im using. Im not familiar with the FD style so i cant help you there sorry. For marking out the holes there is a proper tool called transfer punches which will mark the hole centers ( google images will give you an idea ) . But i dont have a set of these so i just used a drill the right size and twisted it by hand, this will make a small mark in the center of the hole.
just out of curiosity, why do all 4 rotor guys go with PP? is this due to some technical issue? ease of UIM fabrication? If I did a 4 rotor, it would be street port so I can drive it around town...?
nice to see a few 4r builds nowadays. It used to be once in every 2 or 3 years.
just out of curiosity, why do all 4 rotor guys go with PP? is this due to some technical issue? ease of UIM fabrication? If I did a 4 rotor, it would be street port so I can drive it around town...?
nice to see a few 4r builds nowadays. It used to be once in every 2 or 3 years.
I would go one step further and say to maybe even leave the stock ports. A 4 rotor could be a silky smooth torque monster, if the tune is right, I would imagine. Especially in a car like the Cosmo, I'd be after the luxurious, calm power. But, that's just me.
This is to take absolutely nothing away from the build, which to me is absolutely awesome! Keep it up man!
Motor length, e shaft length. Thick plates are expensive on a 20b and almost unobtanium. I don't know that I have seen anyone advertise a non pp 4 rotor. Easiest way would be to run a combo port primary side port and PP.
Originally Posted by stickmantijuana
just out of curiosity, why do all 4 rotor guys go with PP? is this due to some technical issue? ease of UIM fabrication? If I did a 4 rotor, it would be street port so I can drive it around town...?
nice to see a few 4r builds nowadays. It used to be once in every 2 or 3 years.
just out of curiosity, why do all 4 rotor guys go with PP? is this due to some technical issue? ease of UIM fabrication? If I did a 4 rotor, it would be street port so I can drive it around town...?
nice to see a few 4r builds nowadays. It used to be once in every 2 or 3 years.
The reason i chose a pp is because i want the noise and hp. It does also make the intake fabrication easier. This thing is still going to be driven around town, its just going to upset a few people
Originally Posted by Brilliant7-LFC
I would go one step further and say to maybe even leave the stock ports. A 4 rotor could be a silky smooth torque monster, if the tune is right, I would imagine. Especially in a car like the Cosmo, I'd be after the luxurious, calm power. But, that's just me.
This is to take absolutely nothing away from the build, which to me is absolutely awesome! Keep it up man!
Nick
Thanks Nick. A stock port 4 rotor would be a cool project, it would be super smooth. Also it would make a great sleeper.
just out of curiosity, why do all 4 rotor guys go with PP? is this due to some technical issue? ease of UIM fabrication? If I did a 4 rotor, it would be street port so I can drive it around town...?
nice to see a few 4r builds nowadays. It used to be once in every 2 or 3 years.
Originally Posted by Brilliant7-LFC
I would go one step further and say to maybe even leave the stock ports. A 4 rotor could be a silky smooth torque monster, if the tune is right, I would imagine. Especially in a car like the Cosmo, I'd be after the luxurious, calm power. But, that's just me.
This is to take absolutely nothing away from the build, which to me is absolutely awesome! Keep it up man!
Nick
Scoot made one with side ports, but it's easier to make with peripheral ports because of the primary/secondary port size difference for side ports. That's one reason why a side-port-20b needs a thick plate, it's got a primary and secondary port on the thick plate.
Drilled and threaded some holes in the sump for the pick up points. Im using these cool looking, low profile banjo fittings ( -12AN ) from Radium Engineering.
Got the drive belts sorted and finally installed the sump today. Added 16, m12x1.75 threaded holes to the sump for attaching the engine mounts. Also made up the scavenge hoses which contain an inner support spring to stop the hoses collapsing under vacuum. The hoses will be secured to the sump with some p clamps.
Next step is to sort out the engine and transmission mounts, then start building the intake manifold
I haven't acheived much on the car the past few weeks. My time has been taken up making a powdercoating oven. The oven is made out of an old freezer, it uses 2x 2kw heater elements. Managed to melt an extension cord the first run, so i guess it draws a few amps. All up its probably cost about $300 nzd. Finished it today and the first thing i painted was the bellhousing.