When you click on links to various merchants on this site and make a purchase, this can result in this site earning a commission. Affiliate programs and affiliations include, but are not limited to, the eBay Partner Network.
Oil filter pedestal is mounted. The filter sits out the bottom of the inner guard, makes for easy oil changes with no mess.
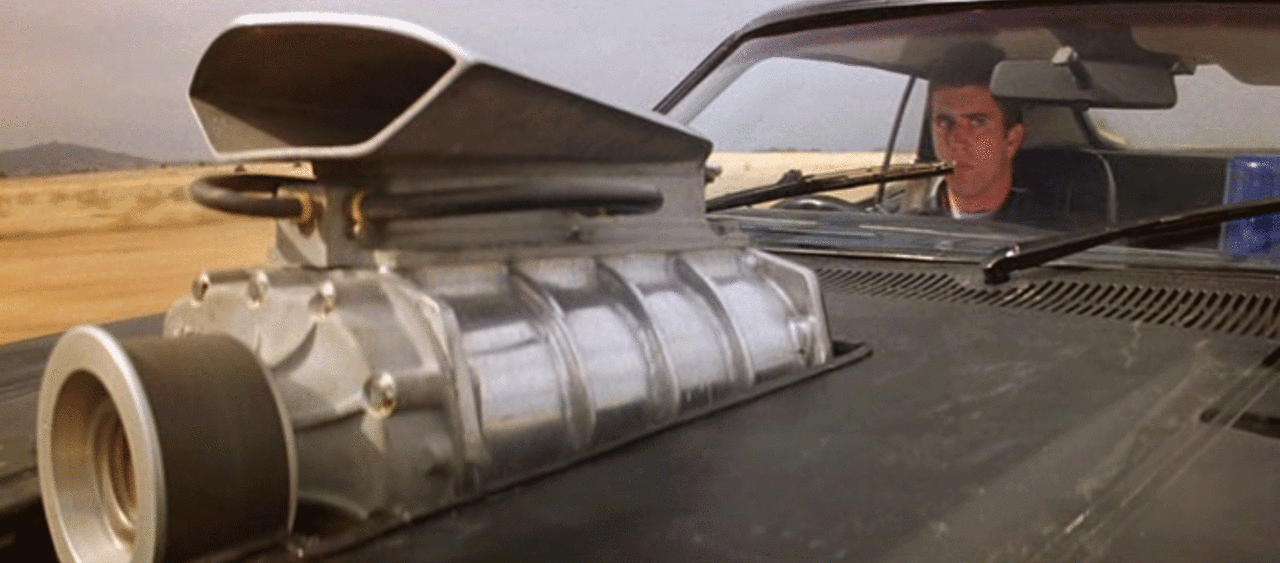
The intake manifold is complete apart from some 1/8 npt fittings for ecu vacuum signal. Thanks to my dad for the welding. Its a simple looking part but has had a huge amount of time spent on it. Machining the flanges after welding was slow going because its not very rigid mounted via the other flange. The o-ring flanges on the pp inserts worked great.
Also the Rx7 is running sweetly now. Making 407hp at the wheels through 205 tyres is great fun.
I was dreading this moment, apart from that this whole build makes my dick hard. Cant you at least angle it down a bit at the front and cover it with a reverse scoop or something lol? Im just thinking, rain, cops, and bugs, lol. Just shitting you though, you obviously know what you are doing and are doing it the way you want. Awesome.
I was dreading this moment, apart from that this whole build makes my dick hard. Cant you at least angle it down a bit at the front and cover it with a reverse scoop or something lol? Im just thinking, rain, cops, and bugs, lol. Just shitting you though, you obviously know what you are doing and are doing it the way you want. Awesome.
I agree with everything said here. What a sick ******* build mate. Ultimately, you�re the man and of course deserve to build the car how you see fit. The rest of us just wish the air cleaner was executed with the same level of amazing that the rest of the car has.
I�d even argue that if you want something protruding from the hood, 4 small individual filters off of each ITB would look better than the massive filter you�re using now.
I can�t stress to you though how much I love this car and this build. I have difficulty providing you any form of critique...it�s awesome no matter what you do with the intake!
I didn't build the car to please anyone else but me, and i like the filter out the bonnet. We would all be driving around in Toyota Corollas if everyone liked the same thing.
The oil tank is mounted now. Very close fit to the bonnet and the front tyre. Just need to order a breather tank then i can start the plumbing.
I�m sorry man I am just the opinionated type. I�ll keep my suggestions to myself and just enjoy the work of art you�re creating. Don�t mean to get on your nerves.
Started making some solid fuel lines. Looking good so far. I'll be using a Magnafuel fuel pressure reg, apparently good for 2000hp.
Ignition coils are done and mounted on the car. Sort of tucked away down low.
Made up 1 of the radiator hoses. The hose is 20AN, if i was to do the radiator plumbing over again i would just use standard hose. The AN hose looks cool but its not worth the hassle and extra cost.
Looks awesome dude. Yes, you�re probably right about the coolant hose but holy hell does it look cool or what!? Something like that makes it all standout that much more. I�m happy you did it, but then again I didn�t pay for it either ;-)
You might have addressed this already, I'm sorry if I didn't read it.
Are those black socket head cap screws located throughout powder coated or somehow otherwise treated?
It's been my experience with the standard black oxide finish, that they'll corrode pretty easily and will be rusted once exposed to humidity.
To clarify, I mention Monsterbox cause you initially said 4 rotor builds, which invokes Monsterbox in my mind and I am merely pointing out that they�re both dealing an extreme amount of fabrication and custom work to achieve their individual goals.
To your point though, I�m struggling to think of another car on these forums that I�d want more than this one...
Thanks for the praise guys. It's very much chalk and cheese compared to monsterbox 4 rotor. Both are cool cars done different ways.
Originally Posted by MK3Brent
You might have addressed this already, I'm sorry if I didn't read it.
Are those black socket head cap screws located throughout powder coated or somehow otherwise treated?
It's been my experience with the standard black oxide finish, that they'll corrode pretty easily and will be rusted once exposed to humidity.
Let me know how you solved this!
Love the build!
The first cap screws I used on this build turned rusty within about 1 week. This just wasn't going to cut it. So now every single cap screw is sandblasted then powdercoated black. Slightly OCD, but is definitely worth the time and effort. I have this process down pat now. Total time to do a batch of maybe 20 screws is about 1 to 1 1/2 hours.
The first cap screws I used on this build turned rusty within about 1 week. This just wasn't going to cut it. So now every single cap screw is sandblasted then powdercoated black. Slightly OCD, but is definitely worth the time and effort. I have this process down pat now. Total time to do a batch of maybe 20 screws is about 1 to 1 1/2 hours.
Ah, thanks for clarifying. That's exactly what I thought.
One last question on that:
Have you found that the PC stands up AFTER you've torqued them? (Meaning, the allen key / socket doesn't crack, scratch, or otherwise compromise the PC finish? It's pretty robust?)
Ah, thanks for clarifying. That's exactly what I thought.
One last question on that:
Have you found that the PC stands up AFTER you've torqued them? (Meaning, the allen key / socket doesn't crack, scratch, or otherwise compromise the PC finish? It's pretty robust?)
Thanks again.
The powdercoat is really tough. I have done a few hex head bolts and they still look freshly painted after being torqued up. The 9 bolts that hold the radiator in place have been in and out about 10 times now, they still look great.
The breather tank is mounted. Its made by Aeroflow, im pretty sure its a copy of the Peterson tank. It came highly polished but i just looked at it the wrong way and it got scratched. So its been painted.
Fuel pressure regulator is in place. The fuel lines running from the tank are Russell full flow. Easy to assemble compared to stainless braided or push lock. Using Honeywell pressure sensors for fuel and oil pressure, bit expensive but they are rather important.
Small update, the plumbing for the fuel system is now complete ( bigger job than i expected ). It has a total of 15 different lines! and each line takes about an hour to do. The fuel filter is a 25 micron Magnafuel, looks big enough to flow plenty of fuel.
Some people might be interested in the price of the lines ( hard vs braided cloth ). To do a straight 1 foot line ( -8AN ), hard line plus fittings is $8.50 usd, a braided cloth line plus fittings is $23.50 usd. Its a big difference when you need to make a whole lot.
Ignition wires are done, just used a Taylor wire kit for a v8 with 90� boots. The short wires look tidy.
Have started to do some of the dry sump plumbing, another big and expensive job.
During the christmas holidays i am aiming to make the transmission mount and start making the exhaust.
Made some 'P-clamp' stand offs for supporting the oil supply hoses on top of the engine. Keeps everything tidy and eliminates chafe damage to the hoses.
I have started cleaning out some of the plumbing and torquing the fittings. Im using a product called Torque Seal to mark the fittings once they have been torqued. This makes sure that no fitting is left loose and also makes it easy to identify a fitting or fastner that has backed off.
It's all in the details and man is this thing detailed! Great idea with the P clamps on stands. I used P clamps in my fuel setup for the same purpose but didn't think to build a pedestal of sorts to elevate them. Instead I tried to find convenient existing bolts to route them with and clamp down. Very clever idea with the stands. Did you mill those stands yourself or is that something off the shelf us mere mortals may be able to replicate?
It's all in the details and man is this thing detailed! Great idea with the P clamps on stands. I used P clamps in my fuel setup for the same purpose but didn't think to build a pedestal of sorts to elevate them. Instead I tried to find convenient existing bolts to route them with and clamp down. Very clever idea with the stands. Did you mill those stands yourself or is that something off the shelf us mere mortals may be able to replicate?
Nick
I made the stands from some 0.500 inch aluminium rod. M8 threads at one end and M6 at the other. Then milled some flats to tighten them with a 10mm spanner. Another way you could do it would be to find some hollow tube the right size, cut it to length and use a longer bolt.
Made a shift lever the other day. There are heaps of aftermarket ones out there but not quite the right fit for how i have the transmission sitting. I have put a 12 degree offset on the shifter to bring it closer to the drivers side. A golfball is the perfect size for a shift ****.