
Tracing the knock sensor wire (FD)

Thread Starter
Full Member
iTrader: (14)
Joined: Oct 2016
Posts: 80
Likes: 12
From: New Braunfels, TX
Tracing the knock sensor wire (FD)
My FD gave me a check engine code for the knock sensor, so I figured I needed to replace it. With the spark plugs removed, the sensor is easy enough to get to, but its wire goes up toward the engine block and into a rats' nest of wires and hoses. Even after the rigorous task of removing the alternator, I can barely see anything of the wire, and it seems like there's no hope of installing the new sensor at the connector (I have no idea where it is and I doubt that I can get to it without removing more stuff). As I had previously planned, I may just splice the replacement sensor onto the part of the existing wire that I can access.
What route is the wire (really 2 wires with an intermediate connection) supposed to take to reach the ECU? I just bought this FD recently, and it had an engine rebuild years ago which could have resulted in improper routing of the wire I'm trying to trace. I'm pretty certain the connectors are still together since pulling on the sensor doesn't provide any slack. Following the wire by hand doesn't lead to anything conclusive.
On another note, when I removed the spark plugs, I noticed that they had been installed incorrectly. The trailing plug was in the bottom socket marked "L" and the leading plug was on top near the knock sensor. Is it possible that this caused irregular knocking and set off the sensor? I have yet to check if the plugs for the rear rotor are mixed up as well.
Thread Starter
Full Member
iTrader: (14)
Joined: Oct 2016
Posts: 80
Likes: 12
From: New Braunfels, TX
Joined: Sep 2005
Posts: 25,581
Likes: 136
From: Smiths Falls.(near Ottawa!.Mapquest IT!)
couple things that other guys should stay away from..
Stay away from my engine bay..stay away from my Girl....my weed..my Beer..and my Cheetos!..lol!
*I'll know if you've been in my Cheetos..your hand prints will be on my girl's ***!
Stay away from my engine bay..stay away from my Girl....my weed..my Beer..and my Cheetos!..lol!
*I'll know if you've been in my Cheetos..your hand prints will be on my girl's ***!


IIRC there is no connector for the knock sensor lead so if it needs replacing you'll have to do some soldering. After you correct the plug issue you might also check the sensor threads and the corresponding hole for any signs of corrosion, dirt etc. that might effect function.
Not my picture, but something I keep in my reference files FWIW....

Not my picture, but something I keep in my reference files FWIW....
Last edited by Sgtblue; Jan 2, 2017 at 07:34 AM.
Member
Joined: Dec 2016
Posts: 16
Likes: 4
From: AZ
IIRC there is no connector for the knock sensor lead so if it needs replacing you'll have to do some soldering. After you correct the plug issue you might also check the sensor threads and the corresponding hole for any signs of corrosion, dirt etc. that might effect function.
Not my picture, but something I keep in my reference files FWIW....
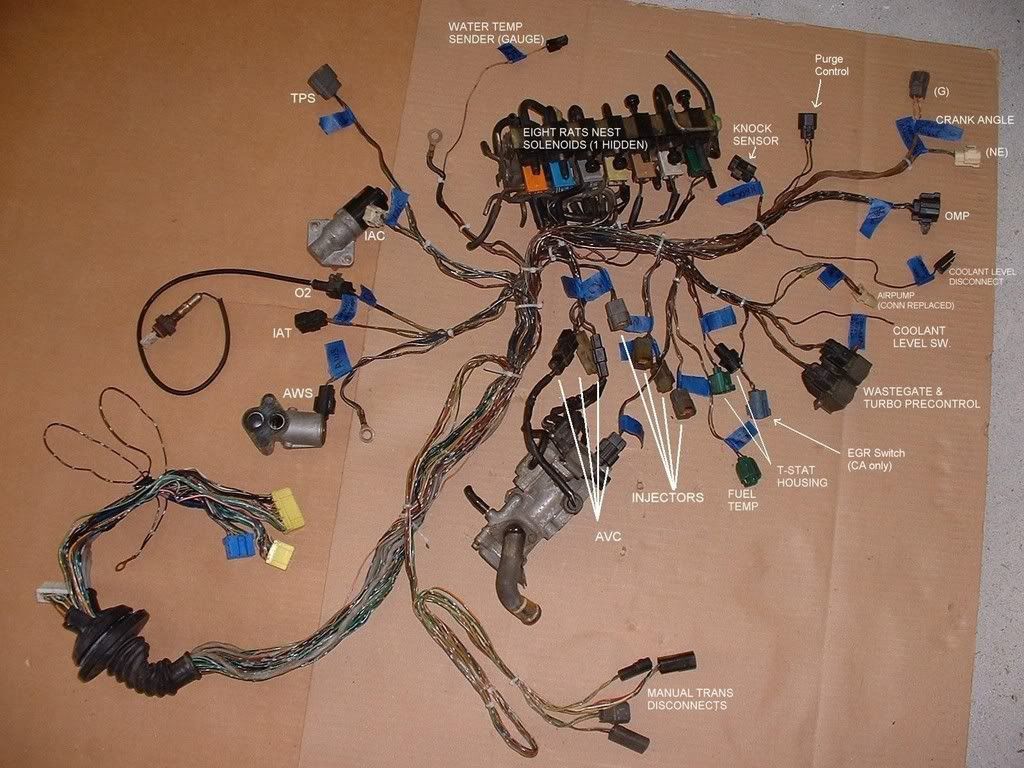
Not my picture, but something I keep in my reference files FWIW....
Very helpful picture. Definitely saving it to my files.
the knock sensor does have a connector about 6 inches from the sensor itself I would say. Even in the picture posted above, you can see there is a knock sensor connector. It is a shielded single wire.
see connector on Knock sensor

see connector on Knock sensor
Trending Topics
Thread Starter
Full Member
iTrader: (14)
Joined: Oct 2016
Posts: 80
Likes: 12
From: New Braunfels, TX
Spoiler
Spoiler
TpCpLaYa, thanks for the correction. Last time I had to mess with it was about 8 years ago during a rebuild. I also didn't remember it being shielded. Guess I oughta look at that picture closer...again.
Thread Starter
Full Member
iTrader: (14)
Joined: Oct 2016
Posts: 80
Likes: 12
From: New Braunfels, TX
Correctly installing the new spark plugs didn't get rid of the code, so yesterday I cut off the old sensor and spliced the replacement onto the existing wire. No dice. Either my second sensor is also bad (although I did test it beforehand for continuity and resistance), or there's a problem in the wiring.
One complication is that my rat's nest doesn't look like the one posted above, so at the very least I would need to remove the UIM to have any chance of finding the rest of the wire.
One complication is that my rat's nest doesn't look like the one posted above, so at the very least I would need to remove the UIM to have any chance of finding the rest of the wire.
Spoiler

