
13B t2 teardown


Thread Starter
Junior Member
Joined: Aug 2016
Posts: 6
Likes: 0
From: Alabama
13B t2 teardown
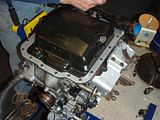
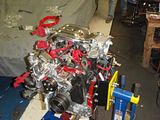
Pulled the engine from my t2 and gonna tear it down. Oil was drained before i pulled it. First timer, so what is the best way to tear it down without an engine rotisserie? Can someone link a guide?

Joined: Sep 2005
Posts: 25,581
Likes: 136
From: Smiths Falls.(near Ottawa!.Mapquest IT!)
lots of videos on Youtube.
Look up one of our Famous Moderators...AARON CAKE.he has some great Youtube videos on his teardowns.
The only thing I can suggest is to get the pulley hub and Flywheel nuts off then start taking it down.You have to lock the flywheel(as in make it NOT MOVE) in order to get the nuts off of either one...and they are ON there good.


Have experience both ways and understand a tight budget. But a traditional engine stand and rotary engine adaptor will make it WAY WAY easier IMO...and well worth the $100 or so for both. Just a thought.
1000 lb. Capacity Engine Stand
Rotary Engine Stand Adaptor
Also as a former first timer digital pictures as you tear-down are worth their weight in gold during re-assembly... and you can't take enough.
1000 lb. Capacity Engine Stand
Rotary Engine Stand Adaptor
Also as a former first timer digital pictures as you tear-down are worth their weight in gold during re-assembly... and you can't take enough.


Last edited by Sgtblue; Jan 14, 2017 at 09:09 AM.
Thread Starter
Junior Member
Joined: Aug 2016
Posts: 6
Likes: 0
From: Alabama
lots of videos on Youtube. Look up one of our Famous Moderators...AARON CAKE.he has some great Youtube videos on his teardowns. The only thing I can suggest is to get the pulley hub and Flywheel nuts off then start taking it down.You have to lock the flywheel(as in make it NOT MOVE) in order to get the nuts off of either one...and they are ON there good.
Joined: Sep 2005
Posts: 25,581
Likes: 136
From: Smiths Falls.(near Ottawa!.Mapquest IT!)
Yep..lock the flywheel to the engine using a Flywheel stopper or make a bar to go onto the bolts on one side of the flywheel.Use a 2-1/8 or 54 mm socket and IMPACT the damn thing off!
You should be able to get some info on how to get the flywheel off in the SEC GEN SPECIFIC Section..I think Racing Beat carries a flywheel stopper or as I said make one..(my home made bar is the Cat's ***..stops flywheel AND removes it too..also has a 19mm socket for front hub.Sorry no PICS!)
The front 19mm hub pulley is a real snot bag too and may need heat..unless you got a real good gun or a socket and breaker bar at least 4 feet long~!
I've had to put the bar/socket in a fence post and use that extra length as leverage to Crack the Pulley bolt loose.
The key to getting the Nuts off either side is making sure that the E shaft doesn't move when you put power to the socket,so the power being given to take it off is not wasted and absorbed as springed force.
Joined: Sep 2005
Posts: 25,581
Likes: 136
From: Smiths Falls.(near Ottawa!.Mapquest IT!)
BTW Racing Beat has a video on Flywheel removal... a chick is shown removing one..yay..look a Girl!..(Beavis laugh!)..heh,heh,heh,heh!
Trending Topics
I used an electric impact , flywheel stopper they made it easy, but noisy. I recomend the engine stand too. Gather all your tools first, that way you can disassemble the engine in one shot.

