
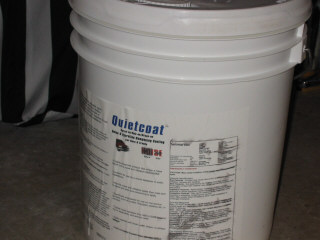
QuietCoat Sound Dampening


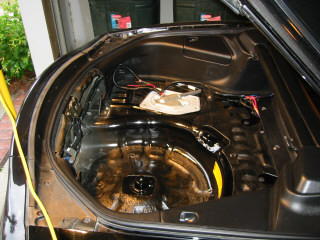
Picture of painted trunk lip. Note I also applied the material to the inside of the plastic trim piece. Don't know if this helps any but I thought what the heck!

Last edited by David Hayes; Jul 5, 2003 at 02:58 PM.
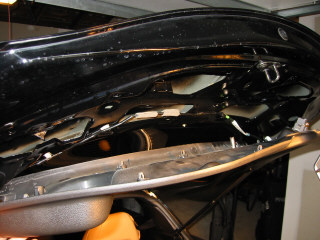
Picture of hood after application. I only applied material to the sections covered by the thermal shield. Also note the paint drop cloth. I heavily recommend you use one of these when applying over the engine bay.

Last edited by David Hayes; Jul 5, 2003 at 02:57 PM.
Lives on the Forum
Joined: Dec 2001
Posts: 14,716
Likes: 10
From: San Lorenzo, California
Nice pics David. To get them to show up, you have to insert an image (IMG) with the controls above the typing window. Reference the urls of the pics you've posted, like this....
BEFORE QUIET COAT
AFTER QUIET COAT
BEFORE QUIET COAT
AFTER QUIET COAT
Lives on the Forum
Joined: Dec 2001
Posts: 14,716
Likes: 10
From: San Lorenzo, California
Hmm...3 dBA (2 dBC) at 60 mph from just doing the trunk and hood? Not too shabby....you should have noticed a small improvement in noise levels on the highway.
Is that with three coats?
Your time and effort is well appreciated, there is no substitute for well documented real world results.
Is that with three coats?
Your time and effort is well appreciated, there is no substitute for well documented real world results.
Thanks rynberg. Just learned to post pics like the above so then next time they'll be better.
Yes, this is with three coats applied so that's the best it will be for the trunk and the hood. Too much work to try to measure each coat as it is applied.
As for the noise reduction, it sounds a little better but not significant yet. Maybe I'm getting old, but I'd rather not have the sound levels currently in the car. I would have thought 3 dBA wasn't very good but what do I know!
Anyway, am going outside to put back together my passenger door - I've applied three coats to this side and then am working on the driver's door. Hope to be finished with this by tomorrow.
Lives on the Forum
Joined: Dec 2001
Posts: 14,716
Likes: 10
From: San Lorenzo, California
Great, can't wait to see the results.
3 dB is equal to a HALVING of the sound energy, so....
You won't notice a significant reduction until about 6 dB or so. If you acheive a 10 dB reduction, that will seem to be about half as loud as the original noise level.
3 dB is pretty good for this sort of thing, although I do admit I was hoping for more from treating the trunk AND hood. I am guessing you will get a large improvement from treating the doors and floor of the passenger compartment.
David: just to clarify, when you move to the undercoat phase, are you going to apply it literally as an undercoating, or are you removing the interior, and applying under the carpets, etc.?
BTW, I'm just curious, but when this stuff dries, what does it feel like? And how's the texture? I'm guessing a rubbery feel with rough texture.
BTW, I'm just curious, but when this stuff dries, what does it feel like? And how's the texture? I'm guessing a rubbery feel with rough texture.
Artowar: The material is applied as an undercoating. I'm taking it to a shop (found an undercoating shop that will do it) for this phase as I need the car off the ground and the wheels taken off. We'll also remove the exhaust system. It will take three coats so I'll leave it at the shop overnight.
You could remove the carpeting and apply that way but it seems like more work and I don't want to have to strip the interior.
When the material is dry, it becomes hardened and bonds to the metal. It's not rubbery like you might expect, just hard. It's also an uneven surface.
BTW, I did finish up phase two yesterday (the doors) and I now have everything reassembled. I'll try to measure the sound and report the results ASAP.


Finally have been able to measure the results of phase two. Rush hour killed my ability to do this quickly as I had a difficult time hitting 60 mph for the top end measurement.
Will post over the weekend!
Will post over the weekend!
Adrenaline
Joined: Feb 2001
Posts: 1,261
Likes: 0
From: Long Island, NY
Originally posted by David Hayes
Artowar: The material is applied as an undercoating. I'm taking it to a shop (found an undercoating shop that will do it) for this phase as I need the car off the ground and the wheels taken off. We'll also remove the exhaust system. It will take three coats so I'll leave it at the shop overnight.
Artowar: The material is applied as an undercoating. I'm taking it to a shop (found an undercoating shop that will do it) for this phase as I need the car off the ground and the wheels taken off. We'll also remove the exhaust system. It will take three coats so I'll leave it at the shop overnight.
Hopefully there will be pics when this part of the task is completed. This thread is extremely helpful. Thanks for posting all this information on the forum.

Blow up or win
Joined: May 2001
Posts: 2,014
Likes: 3
From: Altezzaville
Wow, this is a lot of work you've gone to.
I remember reading *somewhere* that the most noise actually comes through the windshield!
Here's a great site to check for technical details - I use their memory foam in seats that my company fabricates but have not had a chance to use their soundproofing materials - it is VERY high tech - WAY beyond Dynamat et al. http://www.earsc.com/applications.as...38&parentid=37
and here: http://www.earsc.com/applications.as...38&parentid=37
The more I get into this the more I realize that it's the details that add up when trying to reduce db's in a car.
Nice to see someone actually make a determined effort! Good luck!
Last edited by RonKMiller; Jul 11, 2003 at 07:30 PM.
Lives on the Forum
Joined: Dec 2001
Posts: 14,716
Likes: 10
From: San Lorenzo, California
Originally posted by RonKMiller
I remember reading *somewhere* that the most noise actually comes through the windshield!
I remember reading *somewhere* that the most noise actually comes through the windshield!
BTW, I didn't know you worked for EAR composites! Cool, I've worked with some of your products before - combo products like the loaded vinyl/foam, etc.
Blow up or win
Joined: May 2001
Posts: 2,014
Likes: 3
From: Altezzaville
[QUOTE]Originally posted by rynberg
Hey Ron, I just replaced my windshield with an aftermarket one (I refused to pay over $650 for a OEM one). I think the aftermarket one is slightly thicker and heavier. Anyway, I estimate the cabin noise has decreased by 3 dB or so. This would tend to indicate that the aftermarket replacement weighs a good deal more. It could also indicate that my 8 year old windshield seals weren't 100% anymore.....hard to tell which had the greater effect.
BTW, I didn't know you worked for EAR composites! Cool, I've worked with some of your products before - combo products like the loaded vinyl/foam, etc. [/QUO".T
E]
Ya know, that's interesting cause I could swear my car was quieter with a new windshield, and it was aftermarket. Wierd.
Nah, I don't work for EAR. I just spec their CF45 and CF 47 visco elastic "memory" foam for KonTour Seat. Read all about it at:
www.KontourSeat.com.
It's a new company I started last year.
EAR has been great to work with, and one of these days when I am REALLY bored I'll get ahold of some of their good stuff and do my car right! I still think 10db reduction is possible......Actually I am pretty happy with just the ghetto foil tape I used on the doors.
What's even more interesting is that since I put the Ultrasuede on interor panels I could swear the cabin seems more "hushed". It's 1mm thick. I think it may have helped with what I call "echo". Geez, it's hard to describe this stuff without knowing the tech terms...
The results are in for phase 2! I worked over last weekend to sound proof the doors and have now had the opportunity to measure the results. The bottom line - sound has decreased by 6dBA and by 3dBC at 60 MPH. Rynberg, I'd like for you to let me know what you think of the results so far.
Phase 2 of the project involved coating the doors. To begin, I removed the inside panels from each door. This was actually pretty easy. I first removed the plastic trim pieces that are in the door handle area:

Each door has one piece that is held on by one screw. These provide the trim around the door handle and have to be removed so the panel can be taken out. To hold the door panel on, each door has three screws holding the panel in place and several clips that have to be "popped" out:

My only difficulty in removing the panels dealt with the small, triangular plastic pieces that are located on top of the panels (on the inside of the rear view mirrors):

The pieces have to be removed to remove the door panel. I've heard these are notorious for breaking and I proved the theory correct as I broke the right one when prying it loose (cost me $11 bucks to replace from Mazdaformance). Evil plastic pieces and bad Mazda for a poor design!
After removing the panels, I unplugged and unscrewed the speaker mounts and set aside the door speakers. I then peeled off the plastic protection sheet from each door and put them aside for reinstallation. The plastic sheet is held on with a "tar like" adhesive. Because I live in Florida and the temp is now 90+ degrees, it was extremely easy to remove the plastic without heating the adhesive. It just peeled off, leaving the tar adhesive behind for reinstallation. My doors looked like this at this point:

Note the styrofoam block screwed to the inside door beam. It's visible in the upper right portion of the inside door panel. I unscrewed this so I could have easier access to applying the sound proofing material.
Phase 2 of the project involved coating the doors. To begin, I removed the inside panels from each door. This was actually pretty easy. I first removed the plastic trim pieces that are in the door handle area:
Each door has one piece that is held on by one screw. These provide the trim around the door handle and have to be removed so the panel can be taken out. To hold the door panel on, each door has three screws holding the panel in place and several clips that have to be "popped" out:
My only difficulty in removing the panels dealt with the small, triangular plastic pieces that are located on top of the panels (on the inside of the rear view mirrors):
The pieces have to be removed to remove the door panel. I've heard these are notorious for breaking and I proved the theory correct as I broke the right one when prying it loose (cost me $11 bucks to replace from Mazdaformance). Evil plastic pieces and bad Mazda for a poor design!
After removing the panels, I unplugged and unscrewed the speaker mounts and set aside the door speakers. I then peeled off the plastic protection sheet from each door and put them aside for reinstallation. The plastic sheet is held on with a "tar like" adhesive. Because I live in Florida and the temp is now 90+ degrees, it was extremely easy to remove the plastic without heating the adhesive. It just peeled off, leaving the tar adhesive behind for reinstallation. My doors looked like this at this point:
Note the styrofoam block screwed to the inside door beam. It's visible in the upper right portion of the inside door panel. I unscrewed this so I could have easier access to applying the sound proofing material.
Last edited by David Hayes; Jul 13, 2003 at 11:00 AM.
Phase 2 - Applying Quiet Coat
I then proceeded to paint on three coats of Quiet Coat keeping in mind that I wanted to make the coats as thick as possible yet not so thick that the outside of the material would dry and "skin over" so the inside would never dry. As I stated earlier, applying Quiet is like doing a bad paint job because you apply thick coats instead of thin. I applied Quiet Coat to both the inside metal panel (the portion to which the plastic film is attached) and to the inside of the outer metal door panel (the inside of the outer door panel - the part that has the structural beam welded to it). I used halogen lights to expedite the drying process and waited about 3 hours between each coat. Because the material is painted on, I didn't have to worry about covering up wires or attachment holes, I just painted around these as well as I avoided the tar adhesive on the doors. After three coats, the doors looked like this:


While the doors where drying, I also removed the back speakers and applied Quiet Coat to the metal surfaces behind the speakers:

I also applied the material to the inside of the door panel. Don't know if this helped, but I had some time on my hands so I thought why not?

I then reassembled the doors and speakers working in a reverse order from the above. Again, this was much easier than expected and only took me a few minutes to accomplish.
The doors have a very nice, solid "thud" sound to them. More importantly, the sound reduction is now noticeable. The car just seems quieter and is less of an ear "beater" to drive. I also now don't have to turn my stereo up so loud. Curiously, though, I now hear the road noise that is coming from my wheel wells and underbody of the car. This noise must have been masked by all the other sounds I have now dampened. Interesting!
It's now on to the phase 3 of the project, undercoating the body and wheel wells of the car. Quiet Coat tells me that this is where I'll get the best results for the project so I'm kind of interested in seeing how it turns out. In addition to the underbody and wheel wells, it has been recommended that I also coat the transmission case as well as the oil pan. I'm scheduled to start this on Tuesday (Auto Preservation in Jacksonville FL is going to do this phase for me) and I'll do my best to get pictures of everything. Will keep you updated although I probably can't post any results until next Sunday. I'm headed to Pettit Racing on Friday to have Cameron Worth check out the work on my car!
While the doors where drying, I also removed the back speakers and applied Quiet Coat to the metal surfaces behind the speakers:
I also applied the material to the inside of the door panel. Don't know if this helped, but I had some time on my hands so I thought why not?
I then reassembled the doors and speakers working in a reverse order from the above. Again, this was much easier than expected and only took me a few minutes to accomplish.
The doors have a very nice, solid "thud" sound to them. More importantly, the sound reduction is now noticeable. The car just seems quieter and is less of an ear "beater" to drive. I also now don't have to turn my stereo up so loud. Curiously, though, I now hear the road noise that is coming from my wheel wells and underbody of the car. This noise must have been masked by all the other sounds I have now dampened. Interesting!
It's now on to the phase 3 of the project, undercoating the body and wheel wells of the car. Quiet Coat tells me that this is where I'll get the best results for the project so I'm kind of interested in seeing how it turns out. In addition to the underbody and wheel wells, it has been recommended that I also coat the transmission case as well as the oil pan. I'm scheduled to start this on Tuesday (Auto Preservation in Jacksonville FL is going to do this phase for me) and I'll do my best to get pictures of everything. Will keep you updated although I probably can't post any results until next Sunday. I'm headed to Pettit Racing on Friday to have Cameron Worth check out the work on my car!
Last edited by David Hayes; Jul 13, 2003 at 10:58 AM.

Alaskan7: about 3 gallons remain: used 2 for the trunk, hood, and doors. I did order another gallon just to make sure that I have enough to do the undercoating.
SanJoRX7: thanks! Thought this might be helpful to those that want to sound dampen their cars. Modified RX7s are great, but way too noisy. I guess I'm trying to have it all with speed and no noise...
SanJoRX7: thanks! Thought this might be helpful to those that want to sound dampen their cars. Modified RX7s are great, but way too noisy. I guess I'm trying to have it all with speed and no noise...
Lives on the Forum
Joined: Dec 2001
Posts: 14,716
Likes: 10
From: San Lorenzo, California
Outstanding, David. Great pics and write-up!
Did you achieve a 6dBA reduction from your original starting point or did you achieve 6dBA more than with just the trunk and hood treated (9dBA total)?
Either way, I think 6 dBA is a significant improvement and it certainly sounds like it is. I'll be very interested in seeing the reduction from the underbody and wheel wells.
Thanks to the attention in detail for this! This thread should be archived.

