
Painting my fd

Painting my fd
Well the process of painting my fd has started. I had paintless dent removal take out as many door dings as possible, and than had the rest of my dents pulled and primed. Hopefully we'll get the car de-trimmed and ready to paint next weekend and paint it the week after that. Im very anxious so I figured I would start a thread for everyone to see the progress.
paintless dent removal did a very good job

now I get to run around looking like a cheetah till the weekend
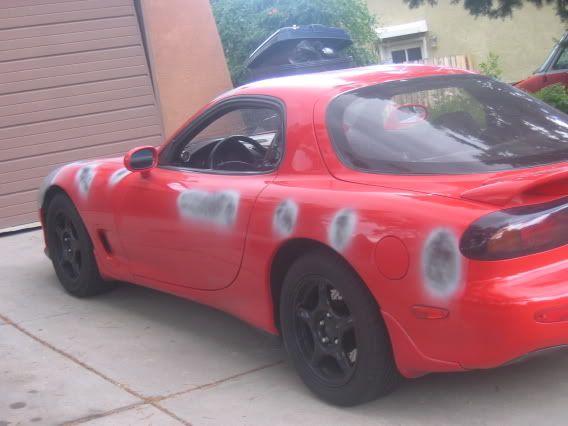
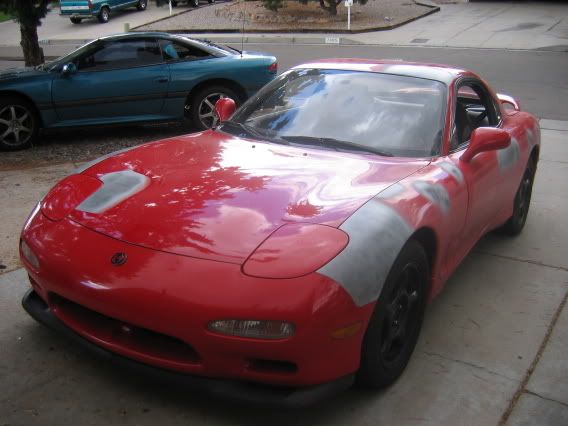
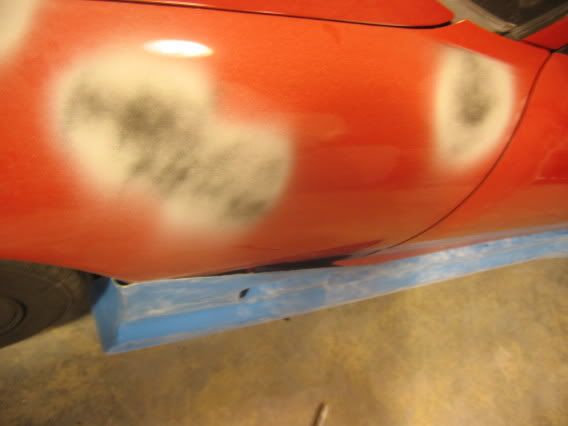
front fenders were sanded and primed from rock chips that were down to the metal
here is a before picture of the dent in the side before the rear tire

here it is now


I can't wait to have her painted.
paintless dent removal did a very good job
now I get to run around looking like a cheetah till the weekend
front fenders were sanded and primed from rock chips that were down to the metal
here is a before picture of the dent in the side before the rear tire
here it is now
I can't wait to have her painted.

Originally Posted by 1sicsol
Are you painting it too? I also painted and prepped my FD. Lots of work, but it turned out graet.
 what color did you paint your fd?

Insane Burning Diarrhea
Joined: Apr 2005
Posts: 1,796
Likes: 0
From: Noo Yawk City / San Diego
ohh finally repainting your single stage paint FD eh? what color? whos probe, rx8, and riced out RSX? oh yeah and ask them to dye your black front lip to black again.
Trending Topics
he doesnt want to prime the whole car?
Im not a bog fan of all that spot priming
basecoats can have a tendency to shrink in around all that spot priming and leave a scratchy outline down the road
Im not a bog fan of all that spot priming
basecoats can have a tendency to shrink in around all that spot priming and leave a scratchy outline down the road
Originally Posted by Rob XX 7
that sounds good then if he wanted to coat the bodywork then figured on blocking it later on and applying some more primer-carry on then!

Originally Posted by Kaotic Dan
Looks good! I didn't know your BF was a painter. where does he work? wanna do my FD? I'm poor though. I need a "Dan's FD Relief Fund"
 Its expencive though even just paying for supplies. And when you paint your car you want everything to be perfect so you end up replacing this and replacing that and it ends up being a huge friggin' project
Lookin' good!
lol it is so true. Quality paints are expensive and I just HAD to get a '99 spec front.
Originally Posted by Candy3s
Its expencive though even just paying for supplies. And when you paint your car you want everything to be perfect so you end up replacing this and replacing that and it ends up being a huge friggin' project
lol it is so true. Quality paints are expensive and I just HAD to get a '99 spec front.
Originally Posted by afterburn27
Lookin' good!
lol it is so true. Quality paints are expensive and I just HAD to get a '99 spec front.
lol it is so true. Quality paints are expensive and I just HAD to get a '99 spec front.
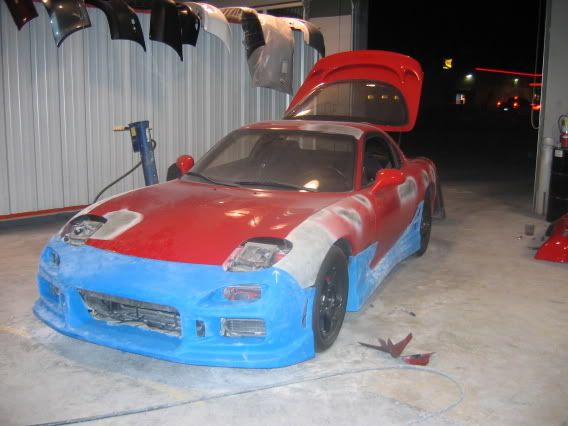
what a weekend. So the plan was to get the body kit fitted and prepped. So we start by cutting the front bumper reinforcement so the new front bumper will fit.
 (sorry for the blurry picture it was a little dusty if you cant tell)
and after a looongg day of trying 100different ways to get the darn thing to fit we end up with this
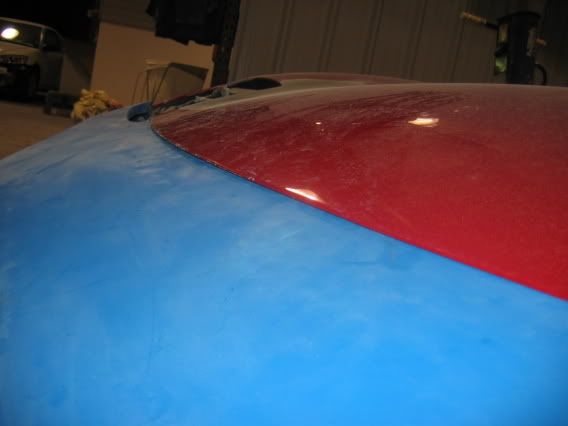
hood overlapped front bumper by almost an inch

back bumper looks cherry
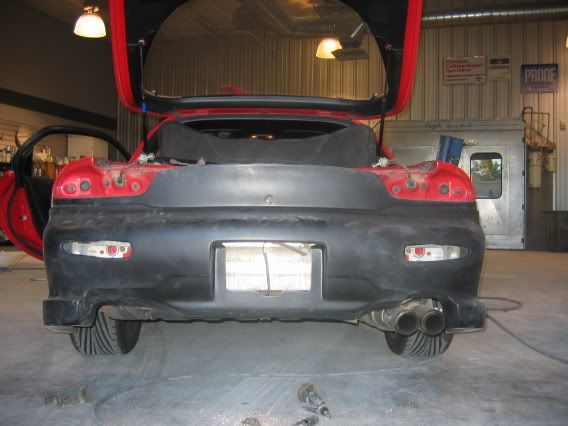
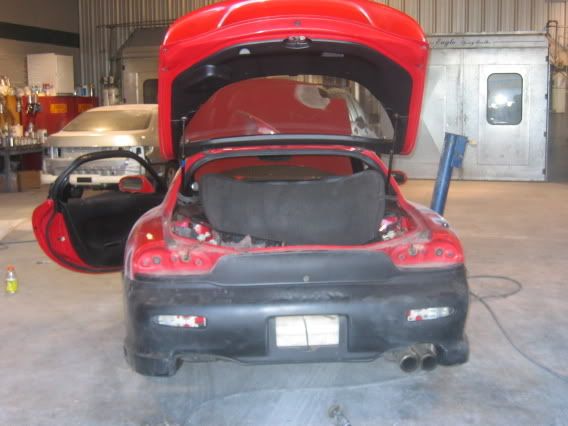
here is the thing. the website advertised the whole kit as fiberglass reinforced plastic. Well the front bumpers and sideskirts are just fiberglass. the back bumper (which it looks like they ordered from someone else) is fiberglass reinforced plastic and fit pretty darn good. so I'm trying to get them to either refund my money or send me a front bumper and sideskirts from the same people they got the rear bumper from.
so after a 9am-12am sat and a 10am-2pm sunday my car is back to stock and we accomplished nothing. What a set-back
(sorry for the blurry picture it was a little dusty if you cant tell)and after a looongg day of trying 100different ways to get the darn thing to fit we end up with this
hood overlapped front bumper by almost an inch
back bumper looks cherry
here is the thing. the website advertised the whole kit as fiberglass reinforced plastic. Well the front bumpers and sideskirts are just fiberglass. the back bumper (which it looks like they ordered from someone else) is fiberglass reinforced plastic and fit pretty darn good. so I'm trying to get them to either refund my money or send me a front bumper and sideskirts from the same people they got the rear bumper from.
so after a 9am-12am sat and a 10am-2pm sunday my car is back to stock and we accomplished nothing. What a set-back
Originally Posted by afterburn27
Yeah, looks like the front bumper and sideskirts have terrible fitment issues.
if you push the bottom of the bumper up towards the fenders that would probably take away alot of that 1" overlap by the hood
it looks like its sitting on there pointing up
it looks like its sitting on there pointing up
Originally Posted by Rob XX 7
if you push the bottom of the bumper up towards the fenders that would probably take away alot of that 1" overlap by the hood
it looks like its sitting on there pointing up
it looks like its sitting on there pointing up
1" just seems so out of line quality wise, that sucks and I feel your pain
urethane bumpers tend to give more
I may also suggest you fully bolt the bumper up when fitting it, I made the mistake of just holding it tight up against the car with finger tight bolts to hold it on the car, when I tightened everything up after paint the bumper didnt want to cooperate all at once and gave me alot of last minute grief after it was all painted.

Junior Member
Joined: Aug 2005
Posts: 8
Likes: 0
From: TEXAS
what grit sand paper did you begin with? i just started prepping my fd and began w. 220 grit, then move up to 600, finish with 1200 grit
did you wet sand or just dry sand it with paper?
even using the rough 220 grit seems to hardly make any progress. not too much dust at all, and i can't get through to the primer coat under the paint. any suggestions?? or am i in the right track?
did you wet sand or just dry sand it with paper?
even using the rough 220 grit seems to hardly make any progress. not too much dust at all, and i can't get through to the primer coat under the paint. any suggestions?? or am i in the right track?
Originally Posted by Rob XX 7
1" just seems so out of line quality wise, that sucks and I feel your pain
urethane bumpers tend to give more
I may also suggest you fully bolt the bumper up when fitting it, I made the mistake of just holding it tight up against the car with finger tight bolts to hold it on the car, when I tightened everything up after paint the bumper didnt want to cooperate all at once and gave me alot of last minute grief after it was all painted.
urethane bumpers tend to give more
I may also suggest you fully bolt the bumper up when fitting it, I made the mistake of just holding it tight up against the car with finger tight bolts to hold it on the car, when I tightened everything up after paint the bumper didnt want to cooperate all at once and gave me alot of last minute grief after it was all painted.
Originally Posted by medusa
what grit sand paper did you begin with? i just started prepping my fd and began w. 220 grit, then move up to 600, finish with 1200 grit
did you wet sand or just dry sand it with paper?
even using the rough 220 grit seems to hardly make any progress. not too much dust at all, and i can't get through to the primer coat under the paint. any suggestions?? or am i in the right track?
did you wet sand or just dry sand it with paper?
even using the rough 220 grit seems to hardly make any progress. not too much dust at all, and i can't get through to the primer coat under the paint. any suggestions?? or am i in the right track?
What paint system are you (planning) on using? The tech manual for the paint system you're using should recommend what grit each layer needs. Example, Dupont Chroma systems calls for 180-240 for most of its undercoatings.