
My Long Awaited Interior/Exterior Re-New!

My Long Awaited Interior/Exterior Re-New!
Since the beginning of last summer I had undergone a slight interior revamp. I started out doing an Amber to White gauge color mod. In the process of doing this I broke my speedometer. By the time I had gotten to the cluster I realized I had removed the majority of my interior plastics so I decided I needed to repaint my plastics. The process has taken forever because I tried so many paints and didn't like any of them. At this time I decided I wanted to change all the interior lighting with LED's (hence the LED Interior Lighting Sticky). I also decided to try to reinforce my driver side door panel since the plastic kept breaking from trying to close the door. I realized many of the screw holes were broken on my center console and door panel plastics so everything was flimsy and cracking. Then I moved to Florida for the semester and left my FD in storage in Nashville so everything was pretty much at a standstill. By this point I had tried Plastidip paint, Duplicolor Bumper Coating, Graphite paint, and Gunmetal paint. Each time I changed the color I had to strip the paint and start fresh. When it was in storage the gunmetal paint was still on the plastics and everything was still in pieces in a storage container. As I planned the pickup of my FD to drive it to Florida I made the final decision just to stick with the stock look and use the Duplicolor Bumper Coating again. I got everything back here 2 weeks ago and since then I got alot of good work done. I bought a new gauge cluster and decided I wanted to go all Red lighting instead of White.
I started by prepping all the plastics again. So removing the previous paint, 320 grit sanding, 600 grit, 800 grit, then 1000 grit wet. I painted all my plastics and as I would let these dry I tried to rethink my door panel reinforcement idea.
I had used ABS Cement to fix my door panel plastic and reinforce it. I just painted the stuff all over the inside of the plastic. I thought it might be a good idea to use it on everything else like the broken screw holes in the center console piece.
For the center console I had only about 3 screw holes that were still completely fine. All the others were half way broken. So to fix this I had a brilliant idea. I got a plastic BIC pen. Fit it over the broken screw hole and cut it to size. Then removed it. Painted the ABS Cement around the screw hole. Pushed the cut plastic back over this screw hole then filled it with the ABS Cement. Did this to all the broken screw holes then painted the ABS cement around the pen plastic so it would seal to the console plastic. Once it dried I drilled a small hole (smaller than the screw) through the newly formed screwhole. I also painted the ABS Cement around the screw holes that were still in tact. The end result was amazing. A very reinforced center console plastic with new screw holes that will not crack.
Then I moved onto the door panel. After having so much success with the ABS Cement I opted to use it on the foam side of the door panel. I coated the entire area surrounding where the plastic lays in with 3 coats of the ABS Cement. This stuff basically dries as a plastic. When you apply it to the foam, it slightly melts the foam and gets some really good adhesion. Once this done tried pulling on the open area (like where the door cup would be pulled against) and it was very solid. Barely any flexing. Next, the middle pieces that the plastic lays on were basically gone. One was still there (the front one) but it was broken in half. So I cut it out and made a bracket out of some thick aluminum. I drilled holes into it and lined it up where the foam was. I screwed through the foam to get a test fit and it worked great. I did another pull type test and it was even more firm now. I removed my bracket and filled the holes that were left from the screws with the ABS Cement. Then screwed the bracket back into the door panel. I put my dried door panel plastic in the panel along with the cup and did a final pull test. Solid as a rock. It has the least amount of flexing. Now I don't have to worry about cracking any plastics anymore or worrying about how hard I pull, YAY!!
While I was at it making brackets I had another replacement idea I saw that my console arm rest piece (vinyl wrapped) had broken front tabs. These are the tabs that are closest to the HVAC plastic. Well I got some more aluminum and got to bending. I was back and forth to my car trying to get the curves right but finally got it. I didn't think the ABS Cement would get this job done so I decided on a rivet. I placed the aluminum bracket in place, lined up the holes and marked the area that I was about to drill into on the plastic piece. To get this right I had to pull back the vinyl and drill it. Once it was drilled I lined up the holes and put a pretty good size rivet in. End result. The piece is solid as a rock. This stuff isn't going to break. I am thinking about coating it with some ABS Cement to displace any force that the rivet takes.
For my final reinforcement idea, this same center console arm rest was broken right where I lay my elbow down when I get in the car. ABS Cement to the rescue. I painted some in the crack, fit it back together, walah!. It got it nice and stiff. But just for added security I put 2 more coats on top if that and also put 2 coats of ABS Cement on the entire underside of the arm rest area.
I got done with all that on Monday and since then I have been waiting on more LED's. I have one more I'm waiting on because of my stupidity when I forgot to order the correct amount. While I was waiting I decided to start the wire rerouting of my stereo system. I kept getting some "whining" feedback but I had already moved the speaker wire. I realized it was because the head unit ground wire wasn't even attached to a grounding point. I am tackling this tomorrow. One channel on my head unit is actually out. Luckily its the one of the rears. So I am about to remove both of those speakers and just keep the fronts. It will make the wiring a tad easier. While I am doing this I am also going to make some brackets for my Alpine KCA iPod adapter box so it can bolt to the center console arm rest bracket. I had the adapter box underneath my head unit behind the HVAC plastic. The area back there was super cluttered. Glad I got a new place to put the box. Once the LED comes in tomorrow and I have all the wiring done. The interior is going back in.
We are having a meet in Ocala Saturday but after the meet I am going to start on the passenger side door panel. I'll be reinforcing it with the ABS Cement and also be fixing the handle like StaticGuitar did in his thread. While I have that door panel removed I'll be trying to troubleshoot why my window won't roll up straight.
I hope this sparks some ideas for people and get's ya'll to reinforce these brittle mazda oem parts we got.
(PICS OF COMPLETED INTERIOR AND LIGHTING COMING SOON)
Last edited by DMoneyRX-7; Nov 23, 2009 at 10:44 PM.

I feel for ya. Im going through the same thing with my plastics. I havent re-done them as many times as you, but have countless hours into getting them just right. Great idea on the cement around the driver plastics. I will most likely do the same.
Here are some pics of the LED lighting now. Everything is actually a dark red and the gauges on the dash are amber. The color difference isn't shown that well in the pictures from an iPhone.
Last edited by DMoneyRX-7; Nov 23, 2009 at 07:04 PM.
Trending Topics
If you have any questions about using the ABS cement just shoot me a pm


Ya it feels amazing. I love getting into the car now. My door panel didn't have any clips either so I just bought some. Once those go in the driver side it will be completed.
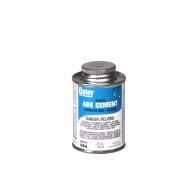
Here is a link and picture of the cement I used on some of the plastics. I left it in Nashville but I used the ACE Hardware brand of the stuff when I got to Florida. Both do the same thing
http://www.lowes.com/lowes/lkn?actio...99D&lpage=none
One more thing to add to my reinforcement project. I found one major problem with closing the door is that the door panel cup becomes loose in time and gets sloppy. The plastic there also just can break in time. So I got a SS washer and grinded it to fit perfectly in that little slot. I then cut a small piece off a vacuum line nipple and fit it in the door cup screw hole. I used a SS Screw with a lock washer on top of that and screwed that bad boy in. I'll be doing the same to my passenger side.
I'm going to start working on my passenger side (repainting the plastic, reinforcing the handle, and reinforcing the foam) this weekend. I just bought a new window motor actuator assembly so while everything is out I can get this done.
After this I will be getting new trunk plastics to replace all the broken ones in the back. My goal is to get my interior done by the time I move back to Florida. This means new 6 1/2 component speakers in the doors and 10' sub. Then fiberglassing a subwoofer box.
I'm also going to start thinking about putting lights in the footwells. So I'm finding the right LED lighting to use and where I would hook them up to. Im thinking I'll splice into the dome lights so I can turn them on and off as I please or have them turn on when I open the doors.
After that I'll just have to get interior upgrades.
Last edited by DMoneyRX-7; Nov 23, 2009 at 10:04 PM.
Thanks for the link, and btw, good idea on the bic pen.
While you're in there with the door panels off, if you dynomat the inside of the door skins, the doors will close with a nice thunk. Road noise will also decrease in the cabin. I used some stuff from Mcmaster which is dirt cheap, but I forget what it's for at the moment.
Edit: I think it was this stuff. 9709T39
http://www.mcmaster.com/#9709t39/=4mx1td
Thanks for the link, and btw, good idea on the bic pen.
While you're in there with the door panels off, if you dynomat the inside of the door skins, the doors will close with a nice thunk. Road noise will also decrease in the cabin. I used some stuff from Mcmaster which is dirt cheap, but I forget what it's for at the moment.
While you're in there with the door panels off, if you dynomat the inside of the door skins, the doors will close with a nice thunk. Road noise will also decrease in the cabin. I used some stuff from Mcmaster which is dirt cheap, but I forget what it's for at the moment.
Ya I'm going to do sound dampening but am going to use Quiet Coat. It's the sound dampening that you paint on. I'm going to do it all at the same time because I am going to coat the trunk, door panels, and the area underneath the rear bins. I'm not exactly sure when I'm going to do it.
curious what you use to wipe off the painted plastics after doing the steel wool or sanding between coats? All I have is plastic prep with a lot of alcohol and I have a metallic paint so I dont want to strip anything while cleaning between the coats. Soap and water? And yes, I have some little lint that got on and was planning on sanding again but will give the steel wool a shot. Any certain kind? thanks for the help.
Last edited by DMoneyRX-7; Nov 24, 2009 at 03:15 PM.
Pictures definitely don't do it justice, looks incredible in person. I plan on reinforcing my door panels the same way. Looks like you got some great light coverage on the cluster, do you mind sending me a link to the LED's that you used?
BTW, time for a 2002 steering wheel!
BTW, time for a 2002 steering wheel!
curious what you use to wipe off the painted plastics after doing the steel wool or sanding between coats? All I have is plastic prep with a lot of alcohol and I have a metallic paint so I dont want to strip anything while cleaning between the coats. Soap and water? And yes, I have some little lint that got on and was planning on sanding again but will give the steel wool a shot. Any certain kind? thanks for the help.
Pictures definitely don't do it justice, looks incredible in person. I plan on reinforcing my door panels the same way. Looks like you got some great light coverage on the cluster, do you mind sending me a link to the LED's that you used?
BTW, time for a 2002 steering wheel!
BTW, time for a 2002 steering wheel!
These are the LED's I used. http://www.superbrightleds.com/cgi-b...259101858-5030. For my red lighting I used the Red colored LED's. If you want the stock amber or if remove the amber film from the back of the gauges for the White lighting mod. Get the Cool White colored LED's.
Ya I really want that wheel. When I was holding it I knew I had to get one. I'm going to be spending alot on new bushings and some work that will be getting done on the car. But after that I'll be saving up for that wheel.
Last edited by DMoneyRX-7; Nov 24, 2009 at 04:46 PM.
Well thanks dude. But you're right, it does look much better in person. Ya the cluster lighting is amazing. Are you going to change you're interior to all black? If so you can just do a dying job like Static did. Save you some money. Check it out here https://www.rx7club.com/showthread.php?t=823903&page=2
These are the LED's I used. http://www.superbrightleds.com/cgi-b...259101858-5030. For my red lighting I used the Red colored LED's. If you want the stock amber or if remove the amber film from the back of the gauges for the White lighting mod. Get the Cool White colored LED's.
Ya I really want that wheel. When I was holding it I knew I had to get one. I'm going to be spending alot on new bushings and some work that will be getting done on the car. But after that I'll be saving up for that wheel.
B
Not sure at the moment, either going to get new panels or dye them like you mentioned previously. Trying to put some capital back together before I start spending money again. Those led's look interesting, did you only buy 3 194 bulbs or what did your entire order consist of that produced that even light output that you achieved?
B
B
Ya the LED's are kinda...different.
It takes 4x194's and 1x74 to just light the gauges. I also did a Red LED in the Odometer. So that's another 1x74.
So my order for everything on my all Red gauge cluster
4x194 (WLED-RHP6)
2x74 (74-RHP3)
If you are going for stock Amber or White conversion
4x194 (WLED-CWHP6)
1x74 (74-CWHP3)
1x74 (74-RHP3) <<<I recommend that everyone change their odometer bulb to a Red LED. Looks amazing even on an all amber lighting
Last edited by DMoneyRX-7; Nov 24, 2009 at 06:20 PM.
not part of my interior but I finally refinished my Garfinkle Torque brace. It was very rusted and looked like ****. I gave it a nice wire brushing then went over it with a light abrasion wheel. Once everything was cleaned up I clearcoated it all. I also painted the allen screw black. It looks fantastic now.
Tomorrow I am refinishing the cowl and also my rusted strut bar bracket
Tomorrow I am refinishing the cowl and also my rusted strut bar bracket
got the cowl painted and the strut bar painted. Tomorrow I am going to re-new my 99 spec lip. The thing always gets faded and I'm tired of spending so much money on Mother's Back to Black. Here's some pics though of the engine. Notice the fresh torque brace, cowl, and strut bar.
Update. I finally did the passenger side plastic. What I did was make a bracket that went on the inside of the handle, similar to staticguitar's handle fix. Then coated it with this ABS Cement. I got a larger SS screw and used that to screw the handle into the door. Everything turned out great.
I also replaced my hood latch cable. Oh what a dream. I have been running around for 4 years without a proper hood latch cable.
But the greatest thing of all was my bushing upgrade. I got in all 6 OEM Pillowballs and dust shields, as well as the Nylon rx7.com Differential Bushings. Got them installed yesterday and picked the car up today. WHAT A DREAM. No more clunk from gear to gear. No more hopping around every time I go from one lane to another. The rear end is just solid now. Feels like a brand new car. I am very happy with the Nylon Differential Bushings as well. They transfer little to no more differential gear noise. I can't tell a different. These made the rear end so solid and it feels great. I daily drive my car and I have no issues with the solid Nylon for differential bushings. I have a long drive up to Nashville in a few days so I will know more after that.
Haha, thanks mar3. I was going to say something to the dude about raising his post count but it didn't bother me too much.
On another note. I just bought an old Pettit Short Shifter for $80. Talk about a steal. Can't wait to get it in and see how I like it. I tried a B&M replica short shifter and loved the shortness of the throw but thought the notchyness might have been too much. Hopefully with the Pettit I get the same short throw without the notchyness. I've heard mixed opinions but what some people consider notchy, I consider 'racey' and perfect for the FD.
On another note. I just bought an old Pettit Short Shifter for $80. Talk about a steal. Can't wait to get it in and see how I like it. I tried a B&M replica short shifter and loved the shortness of the throw but thought the notchyness might have been too much. Hopefully with the Pettit I get the same short throw without the notchyness. I've heard mixed opinions but what some people consider notchy, I consider 'racey' and perfect for the FD.


Thanks Rich. I want to make it to Deals Gap this year but I don't know how my class work load is going to be like this semester.
Thanks Al, but what brackets? The ones on the driver side door panel seen in the first post? Check out the first picture in the thumbnails on the first post. The bracket I did is between the door cup and the window switches.
Thanks Al, but what brackets? The ones on the driver side door panel seen in the first post? Check out the first picture in the thumbnails on the first post. The bracket I did is between the door cup and the window switches.
Last edited by DMoneyRX-7; Jan 7, 2010 at 06:52 PM.