
Lets see some pics of the FD Pettit Rear fender flares!


 ^
^


Junior Member
Joined: Dec 2006
Posts: 22
Likes: 0
From: macon ga.
my car has 19x10 rear -115 offset and front are 18x10 +50. with 285s all the way. it looks great and is very streetable. i also have the gas door cut out and it looks good as well. the sideskirts are re style which have also been reworked and widend to match the flares. i plan on reworking the vent, adding a diffuser, and more carbon definatly. i just added a carbon hood and built a pillar carbon inserts that are perfect fit. ill post more as the car comes along.


Originally Posted by gray628
some molded pics of my car. i did the work, i am also a custom painter so it wasnt that  difficult
difficultNice looking car! I met you at the nopi last year and admired your work.
Anyhow, great looking car! If you can, come out to DGRR..
PHIL


Originally Posted by gray628
some molded pics of my car. i did the work, i am also a custom painter so it wasnt that difficult
difficultDamn u! That was the exact molding combination I'm going for. Much props in doing the work yourself. It's also my goal to do the same except need to get the 20b installed first.

I'd love to see mor pics from other angles. Also, any thought on the stability/longevity of molding the fenders in? Won't they crack at the "seam" over time? Am I overly worried about this or isn't metal the way to go?
Love the look though...
Love the look though...
Originally Posted by David Hayes
I'd love to see mor pics from other angles. Also, any thought on the stability/longevity of molding the fenders in? Won't they crack at the "seam" over time? Am I overly worried about this or isn't metal the way to go?
Love the look though...
Love the look though...
Junior Member
Joined: Dec 2006
Posts: 22
Likes: 0
From: macon ga.
ipersonally didi the work on my car and it has been done for almost one year. if the prep is done correct there should be zero issues with the work.
my steps were......cut two inches out of the outer quarter leaving the inner quarter panel there. then i straightend the inner out to wrap the new outer and slit it to roll correctly, i welded it all together to keep body stregth and seam sealed all the gaps which were very few. after that i sprayed gatorguard bedliner up to where the flares bolt to keep the elements from damaging or rusting the new modifications. next i ground the body where the flare touched and glued with 3m two part epoxy. i riveted the flares while the epoxy was wet so i got great squeeze and then smeared the rest with a puddy spreader. after the expoxy dried for a couple of days i ground it smooth and applied fiberglass mat to eliminate straight line cracking. next applied the kitty hair fiberglass and then regrind. last is body filler for the finish look. after i primed the car and blocked three times. then paint. i also built the lower to be part of the side skirt . i like it removable not fully molded, and eventually thr car will have damage to the sideskirt and i dont want to paint half of the car or blend. i can just pull it off and repair.
hope this helps if there was any quality questions.
Junior Member
Joined: Dec 2006
Posts: 22
Likes: 0
From: macon ga.
i personally did the work on my car and it has been done for almost one year. if the prep is done correct there should be zero issues with the work.
my steps were......cut two inches out of the outer quarter leaving the inner quarter panel there. then i straightend the inner out to wrap the new outer and slit it to roll correctly, i welded it all together to keep body stregth and seam sealed all the gaps which were very few. after that i sprayed gatorguard bedliner up to where the flares bolt to keep the elements from damaging or rusting the new modifications. next i ground the body where the flare touched and glued with 3m two part epoxy. i riveted the flares while the epoxy was wet so i got great squeeze and then smeared the rest with a puddy spreader. after the expoxy dried for a couple of days i ground it smooth and applied fiberglass mat to eliminate straight line cracking. next applied the kitty hair fiberglass and then regrind. last is body filler for the finish look. after i primed the car and blocked three times. then paint. i also built the lower to be part of the side skirt . i like it removable not fully molded, and eventually thr car will have damage to the sideskirt and i dont want to paint half of the car or blend. i can just pull it off and repair.
hope this helps if there was any quality questions.

Originally Posted by gray628
i also built the lower to be part of the side skirt . i like it removable not fully molded, and eventually thr car will have damage to the sideskirt and i dont want to paint half of the car or blend. i can just pull it off and repair.
That was a genius idea!


Great minds think alike! That's exactly my setup! I did this about 3 years ago when I started the 20B conversion. Pettit right? I should charge Pettit money for the rims and flares combo.
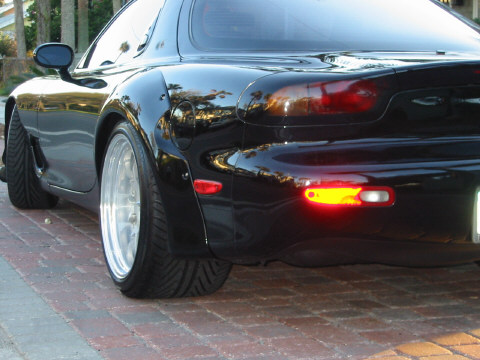
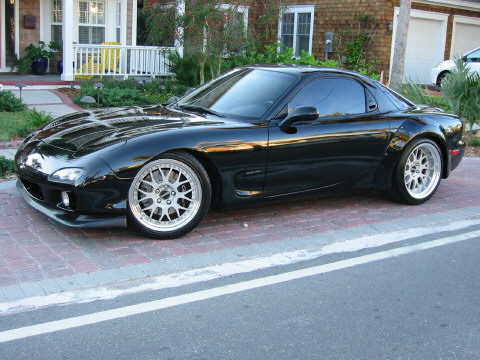

The cool thing that Pettit Racing did on mine is they carried through the new flares the "rock chip" paint protectent (they matched on the fender the pebble-like paint that runs the length of the car). This helps to protect the new flares and gives it a sort of OEM look.
The cool thing that Pettit Racing did on mine is they carried through the new flares the "rock chip" paint protectent (they matched on the fender the pebble-like paint that runs the length of the car). This helps to protect the new flares and gives it a sort of OEM look.
rajah and david - Im curious, what wheel size/offset are you using? Im molding my pettit flares in right now (its a pretty tedious and time consuming project) and your wheel offset looks exactly like what im after.