
Free Rear speaker bracket template


Thread Starter

Joined: Oct 2005
Posts: 3,495
Likes: 169
From: Torrance, ca.
I wanted to add rear speakers to my FD and couldn't see paying the price for people were asking for something so simple. The stock brackets look nice and complicated in pictures but when you hold them in your hands you realize how cheap they are and easy to replicate. So if you're like me and want to cheap out on parts that aren't crucial to your baby then this is for you. Also, if you want to add 6x9's instead of the factory 6x8's that is not an issue. You just have to be careful on the speaker depth. You can adjust the template yourself for that if you so desire.
You will need a 11 x 17 printer for this to print it out full size. Right click and save the image. When you print it full size, the measurement from the tip of the longest point to speaker outside is 12 15/16", length wise.
This was my first try at making a set and it took me about an hour and a half once I had the template made.
You will need a few tools, I used:
Manila folder to print the template on, nicer for transferring onto the aluminum
Speed square and an angle finder, or a protractor can work as well
Scissors to cut out the template
Jigsaw and 3 or 4 metal cutting blades ( when the blades get warm the aluminum starts to gum up the teeth and it gets hard to cut.
A good pair of metal snips to cut away material quickly( go back and clean up with the jig saw and for compound cuts
Drill and bits to make your first holes for the jigsaw in the center of the piece etc
Materials:
Small sheet of 1/16" or slightly thicker aluminum
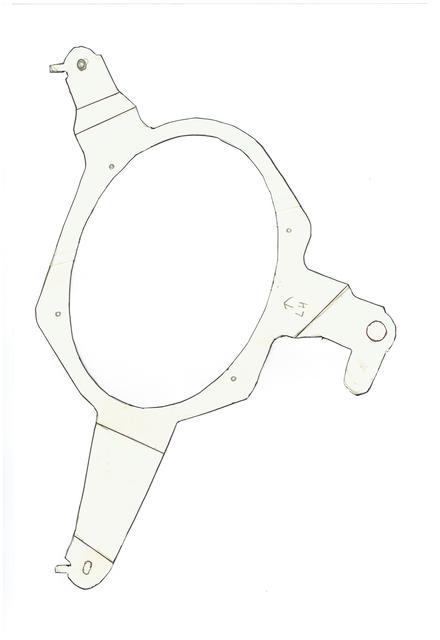
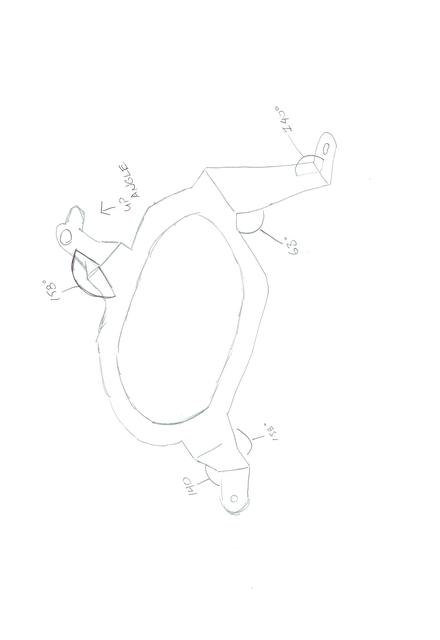
Pay close attention to the angles on the template, the lines that locate the bends. This is what will make the biggest difference on fitment, a couple degrees off can move the arm of the bracket off away from the hole.
You'll see the degree measurements in the next pic
Dont worry about the angles of the bends too much, try to get them close and that will be fine. The thin aluminum will go where it needs to when you tighten down the 10mm bolts.
You will need a 11 x 17 printer for this to print it out full size. Right click and save the image. When you print it full size, the measurement from the tip of the longest point to speaker outside is 12 15/16", length wise.
This was my first try at making a set and it took me about an hour and a half once I had the template made.
You will need a few tools, I used:
Manila folder to print the template on, nicer for transferring onto the aluminum
Speed square and an angle finder, or a protractor can work as well
Scissors to cut out the template
Jigsaw and 3 or 4 metal cutting blades ( when the blades get warm the aluminum starts to gum up the teeth and it gets hard to cut.
A good pair of metal snips to cut away material quickly( go back and clean up with the jig saw and for compound cuts
Drill and bits to make your first holes for the jigsaw in the center of the piece etc
Materials:
Small sheet of 1/16" or slightly thicker aluminum

Pay close attention to the angles on the template, the lines that locate the bends. This is what will make the biggest difference on fitment, a couple degrees off can move the arm of the bracket off away from the hole.
You'll see the degree measurements in the next pic

Dont worry about the angles of the bends too much, try to get them close and that will be fine. The thin aluminum will go where it needs to when you tighten down the 10mm bolts.
Last edited by silverTRD; Feb 28, 2016 at 10:30 AM.
Thread Starter
Joined: Oct 2005
Posts: 3,495
Likes: 169
From: Torrance, ca.
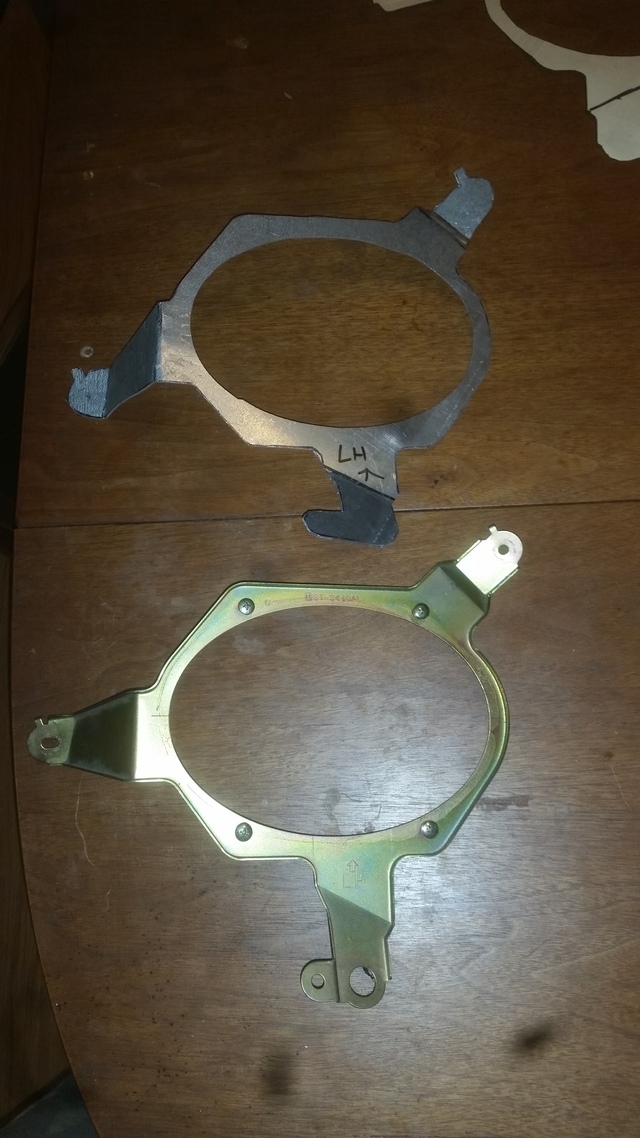
This isa pic comparing the stock to my copy of the brackets
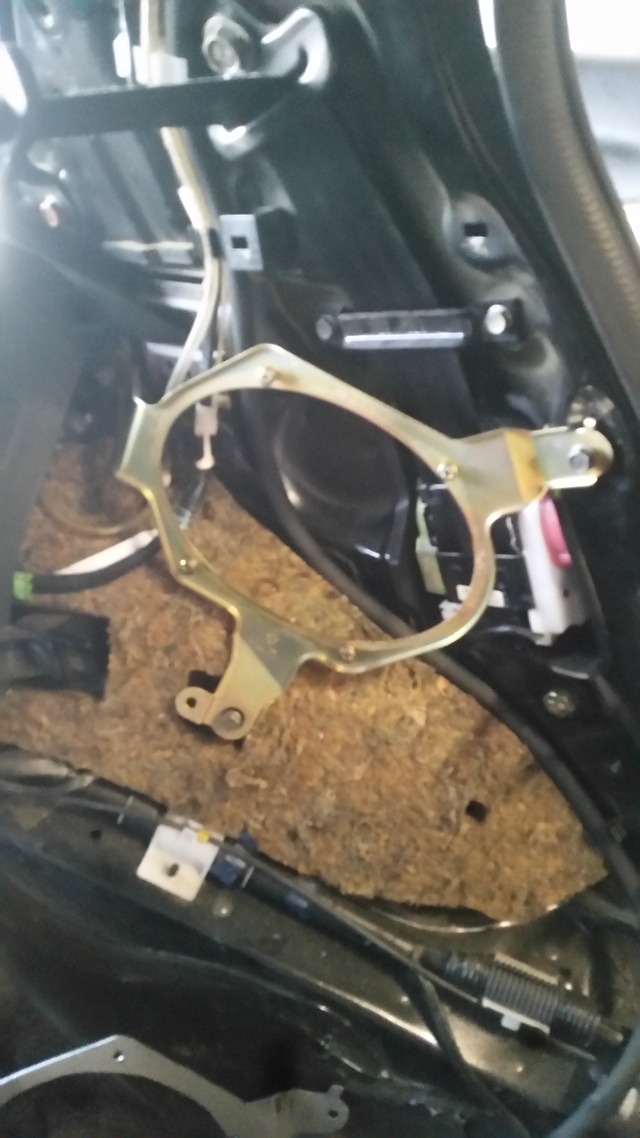
Here is the stock bracket installed, you can see that the little holes and alignment tabs arent even used.
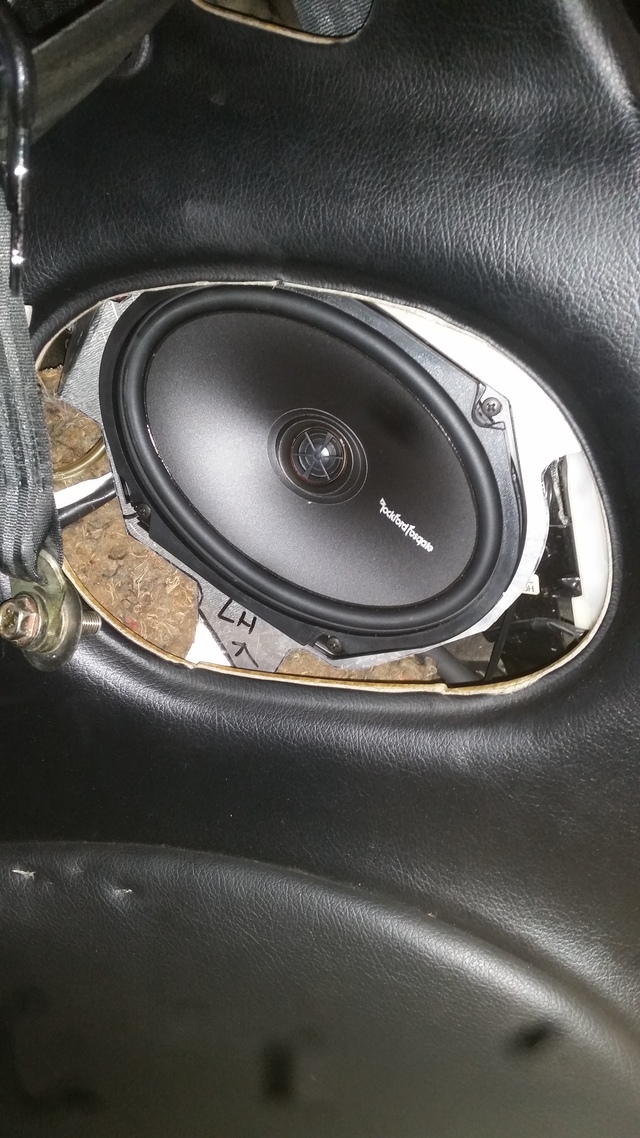
Installed in my aluminum bracket
Can you tell the difference?


Here is the stock bracket installed, you can see that the little holes and alignment tabs arent even used.

Installed in my aluminum bracket

Can you tell the difference?
DRFTRX7
Joined: Sep 2003
Posts: 600
Likes: 0
From: South Lyon, MI
So were these brackets for replacing the factory 6 x 8 brackets or were these for 6 x 9 speakers?
Great idea, by the way.
Great idea, by the way.
Last edited by WHIPSrx7; Jun 29, 2016 at 09:10 AM. Reason: Added compliment. :-)
Thread Starter
Joined: Oct 2005
Posts: 3,495
Likes: 169
From: Torrance, ca.
I haven't tried yet but I believe there is enough space for 6x9s as long as they're not too deep. You would just need to widen the bracket accordingly.
Trending Topics
DRFTRX7
Joined: Sep 2003
Posts: 600
Likes: 0
From: South Lyon, MI

Junior Member
Joined: Oct 2017
Posts: 17
Likes: 0
From: Frankfurt
Hello!
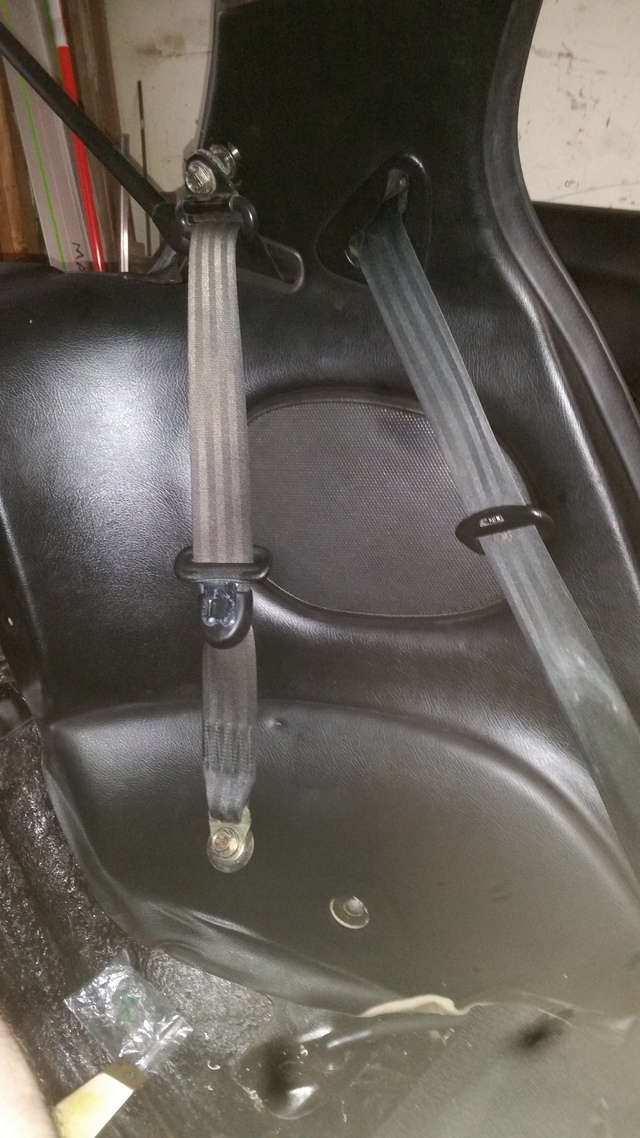
This might be a dumb quesiton but how did you get rid of the rear side panels to get access to the speakers? I already pried off the speaker mesh but there is no way to get to the upper speaker screw like that. I have a '96 model with rear seats, do the rear seat belts have to come off? does the rear seat have to go out aswell?
This might be a dumb quesiton but how did you get rid of the rear side panels to get access to the speakers? I already pried off the speaker mesh but there is no way to get to the upper speaker screw like that. I have a '96 model with rear seats, do the rear seat belts have to come off? does the rear seat have to go out aswell?

I've been wanting to play around with Fusion 360's 'new' sheet metal functionality so if anyone happens to have a factory bracket and wouldn't mind giving me a bunch of measurements (or hell, let me borrow an OEM bracket?) I'd be more than willing to share the file.


Thread Starter
Joined: Oct 2005
Posts: 3,495
Likes: 169
From: Torrance, ca.
I don't really like the Rockfords tbh. They are definitely lower on the sound quality. My car is a little loud though, so I have to turn it up a fair amount so I am sure some distortion is at play.
Unfortunately nobody has jumped on allowing me to borrow brackets. If I need to I'll make these using the cardboard template that was posted then rebuild them in F360 but unfortunately I haven't even begun to think about the audio portion of my project. I'll keep this thread updated though since it seems like there might be interest. Having them printed if you've got a bed thats large enough actually seems interesting though.

Junior Member
Joined: May 2018
Posts: 40
Likes: 1
From: California
My car is in the shop so I, unfortunately, can't test it, but I modeled the bracket off of measurements in this thread, if you want to try it you'll need a massive print bed. I hope to have enough time soon to model some attachment pieces to allow it to be printed in pieces.
Ok, this website won't let me upload the file here, so I posted it to Thingiverse. Here is the link if you want to check it out.
https://www.thingiverse.com/thing:3002921/zip
Ok, this website won't let me upload the file here, so I posted it to Thingiverse. Here is the link if you want to check it out.
https://www.thingiverse.com/thing:3002921/zip
Last edited by Cloveh; Jul 13, 2018 at 04:30 PM.

I wanted to add rear speakers to my FD and couldn't see paying the price for people were asking for something so simple. The stock brackets look nice and complicated in pictures but when you hold them in your hands you realize how cheap they are and easy to replicate. So if you're like me and want to cheap out on parts that aren't crucial to your baby then this is for you. Also, if you want to add 6x9's instead of the factory 6x8's that is not an issue. You just have to be careful on the speaker depth. You can adjust the template yourself for that if you so desire.
You will need a 11 x 17 printer for this to print it out full size. Right click and save the image. When you print it full size, the measurement from the tip of the longest point to speaker outside is 12 15/16", length wise.
You will need a 11 x 17 printer for this to print it out full size. Right click and save the image. When you print it full size, the measurement from the tip of the longest point to speaker outside is 12 15/16", length wise.
silverTRD,
Looking at making this bracket soon. When I save the image picture, it resorts to a very small size. You mentioned that the total height is 12 15/16", do you have the total width as well? When I upload this to print at the local shipping store it is very very small. If I get the width I can manually edit the picture to fit the specs and then print from there.
Thanks in advance!
-milly
Thread Starter
Joined: Oct 2005
Posts: 3,495
Likes: 169
From: Torrance, ca.
I'm not sure what the width is. I saved the template but i'm not sure where I put it. If you save the file as a pdf you can download foxit pdf reader for free and there is a measurement tool on there you can measure everything very easily.
Silver,
Thanks for the response. Unfortunately I cannot save the image as a PDF and once I change it to a PDF format the FoxIt program will not read the file as it is corrupted.
I will get to the bottom of it or just schwack it with cardboard and create rough template.
-milly
Ok I was able to export the image as a PDF, however when I upload it into Foxit Phantom, it is still a small size. The height is 1.81 inches and the width is 1.22 inches when uploaded in Foxit. Since the actual height of the bracket reported earlier is 12 and 15/16", that equals roughly 12.938 inches. 1.81/12.938 means that 1.81 (as shown in Foxit) is roughly 14% of the actual height size of the bracket. Taking that same multiplier (14%) to the width would be 1.22inches/.14 = 8.71 inches as a width of the bracket.
Now there are some assumptions in this, first that the width multiplier of a scaled down image is the same as the height (no clue if it is). But if so, then the height of the bracket would be 12.938 inches and the width would be 8.71 inches. I'm going to most likely print this scale off and see how it roughly matches up in the vehicle on paper. I shall report back with my findings.
** Feel free to sanity check and/or blast any of my math or findings here....by no means am I an expert! **
-milly

I've been reading up and thinking about making some of these for my car. Here's a first attempt at a template pdf, hopefully the size is correct.
It will be a while before I try this out to verify the scale (I have other things to fix on the car first), so no guarantees; just thought I'd put it out there if it helps anyone else.
It will be a while before I try this out to verify the scale (I have other things to fix on the car first), so no guarantees; just thought I'd put it out there if it helps anyone else.