
Enhancing Interior Dome Lighting


His idea of aluminum tape would be just as effective, with one less step, and no mess.
Superbrightleds.com
Alum tape from ace hardware.. took me 5 min totall.. i'll take pictures later..
its kinda expensive but is well worth it if you want an update bright interior.
Alum tape from ace hardware.. took me 5 min totall.. i'll take pictures later..
its kinda expensive but is well worth it if you want an update bright interior.


not too shabby. id like to upgrade alot of the FD bulbs (exterior as well) to LED as they take substantially less power, and are brighter... its just the light dispersion which is a problem with them. i searched for some reviews etc awhile back but came up (somewhat) empty handed.
nice Azcamel. I wish my clear covering on the dome would be as clean as yours. Mine has some brown discoloration. The LED's with that aluminum tape really work nice. I think with the LED's you might have to have aluminum foil to get the same effect as what I am getting from the bulbs. It might depend on what LED. However, the LED's you have Azcamel should be producing a 360 degree angle of light. Do they?

No it's not Turbo'd
Joined: Jun 2002
Posts: 2,511
Likes: 2
From: Los Angeles, Ca
Just for reference, Blue / White light tends to impair your (Night) vision, as opposed to orange / red light, which does not alter it as much.
A Link for those that want to read more on the topic http://www.militaryphotos.net/forums....php?p=3659814
Quote:
anyone know what the deal is with the red light consoles on the american ships? Looks fantastic but is there a real function behind it?
Red colour artifical light effects natural human night vision the least. If you are wanting to navigate in the dark without night vision equipment, or even with it and you still want to be able to read a map and retain your night vision a pure red light will effect you night vision the least. The opposite colour is green which has the most effect on your vision. If you flash a red light in someones face at night in the dark their night vision will return quicker than if you flashed a light green light, or a white light in their eyes.
In practical terms if the main lights are out is it is dim then having red information means you can see unlit or printed stuff better than if the lights were white or green... when you looked from the lit up information to say a printed sheet of text you will have trouble reading that text till your vision comes back from looking at the bright light.
And there is no mess, unless wiping your finger off on a paper towel counts.


just do it Rich. Order the bulbs, thats pretty much all you have to do.
I can't wait to fix my glovebox and put a LED in there, then put the LED's in the footwell.
I can't wait to fix my glovebox and put a LED in there, then put the LED's in the footwell.
Last edited by DMoneyRX-7; Dec 10, 2008 at 10:37 PM.
Thought I would post what I did for brighter dome lights. It's very very very bright now. I went to walmart looking for some kind of bulbs in the automotive section that would be brighter and fit in the stock location... I found none. Just stock replacement, and some amber ones. PASS.
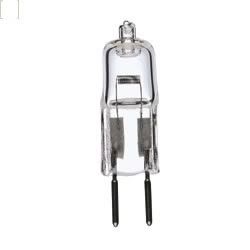
Went to go get chrome tape, and on my way walked through the home lighting section. While looking through I found some 12v GE Outdoor "halogen 10" bulbs. $6 (part # 71494) they are the exact same shape as the stock bulbs except the connection on back has 2 straight probes instead of folding back over the bulb. I thought hmm I'll just fold those probes over the bulb and see what happens. Well the theory was sound, the results not quite what i had in mind. the first little probe bent over just as i had hoped. The 2nd probe on the other hand broke right close to the bulb taking a small piece of glass with it. F**K!! oh well, have a spare, tried more carefully with some small pliers and supporting it close to the glass... same stupid result, one bent tab and one broken tab WTF! well then i tried soldering the broken tab of one, uh not happening. So i took a small piece of copper stranded wire, twisted it nice and tight, and pinched it onto the broken tab side of the bulb and plugged it in. Amazingly it worked! and quite well. Ii was immediately blinded by a super bright light. So I finished it off with the chrome tape. $3
I only have the one halogen light in right now with the stock in the other side. when i turn the stock light on you barely even notice it came on cause the other is so bright. It puts off slightly more heat, but not enough to cause any problems with the lense. Its a 10 watt bulb compared to the stock 5v. I pushed a piece of latex against it to see if it would melt it and it did nothing so it must not get that hot.
If you can figure out a good way to make the probes work i highly recommend this method. i think in the future i will pass on trying to bend them and just solder some wire to the probes then cut them off or twist some wire real tight then stab it through the probes. If you can keep the wires straight as you plug it in the fixture will hold them in place.
http://electricalsupplies4less.store...chalag4b1.html <--- specs on the bulbs
here is what the bulbs i used look like. it's a g4 base and you can get them from 5- 35 watts. i have 10 watt bulbs.
And here is another place where you can order 20 watt if someone wanted to try an even higher wattage. Or if you're too lazy to go to walmart.
http://www.expresslighting.com/12vollowhalb.html
Some other bulbs i found that should actually fit in the stock location xenon 10watt bulbs $1.60
http://store.bulbstock.com/40109.html
Last edited by Dudemaaanownsanrx7; Dec 13, 2008 at 12:01 AM.
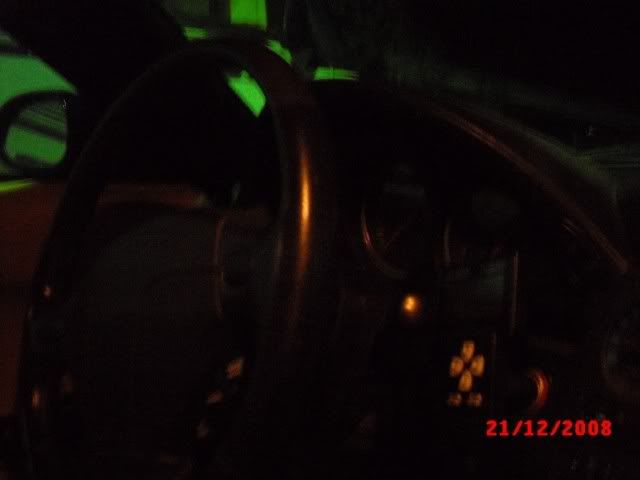
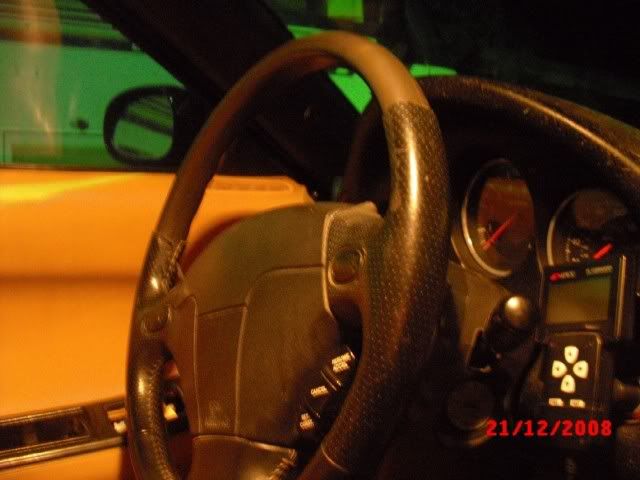
Ok a little late but I took some pics. I decided to keep the stock bulb in the passenger fixture and the bright bulb on the driver side so that when I'm driving I'm not Blinded by all the light.
Picture with just the stock bulb on
Same shot with the halogen bulb.
Stock

Halogen

Stock

Halogen
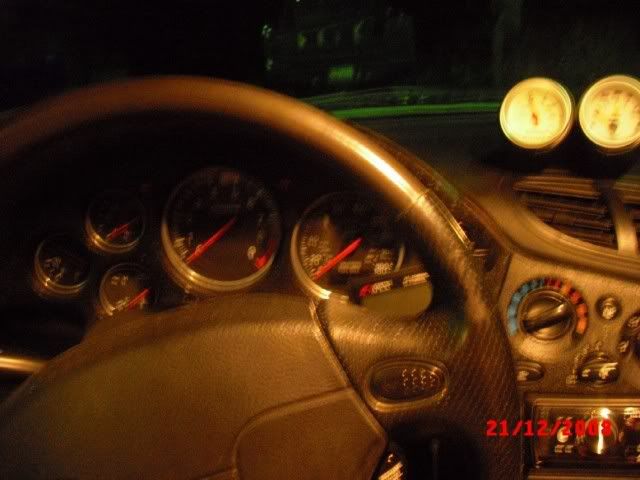
Halogen
Stock
Picture with just the stock bulb on
Same shot with the halogen bulb.
Stock
Halogen
Stock
Halogen
Halogen
Stock
I think we have a winner! Nice work. Maybe those 10w xenon bulbs you linked would be significantly brighter also. Are you happy with the color? They look pretty yellow like incandescent, but it may just be the picture.
That last picture looks creepy.
That last picture looks creepy.
Yeah i think it's the way the picture turned out, they look very bright and white in the car. It's like going into a very well lit room. The xenon lights would probably be a good option, they are the same wattage as the halogen I have, so I would think they would be pretty bright as well. Plus they are a direct replacement which is nice. They aren't very expensive so i'll probably get a couple to try out. I'm happy with the halogen ones though.
I just got done putting in the aluminum tape. Took about 30 minutes to get everything nice and clean. It makes a really big difference in the lighting so far. I'm gonna check it out more when sun goes down. It should be a really big improvement.
looking at these pictures of those halogen bulbs. that looks way to bright man. If i was driving and turned those on it would take away all road vision.
I love this setup I got. The aluminum tape really does the trick. If anyone just wants to stay with their stock bulbs but just get them brighter, add aluminum tape.
A lil trick to it is...put 4 small pieces at base on the corners of the bulb socket. Then lay down 4 longer strips on top of those to surround the base. After that you can add 4 large pieces to the sides. To apply use tweezers. This really helps you place the pieces of aluminum properly. To get it nice and smooth use a pencil's eraser. You can get it to stick nice and smooth out the wrinkles in the aluminum.
guys, I found a cheaper alternative than PIAA's that look exactly the same
http://autolumination.com/194.htm
Last row of bulbs. Either the 194 168 W5W 2825 Stealth Silver Chrome or the 194 168 W5W 2825 (Super White) Xenon
will do.
http://autolumination.com/194.htm
Last row of bulbs. Either the 194 168 W5W 2825 Stealth Silver Chrome or the 194 168 W5W 2825 (Super White) Xenon
will do.