
99 spec light retrofit

Thread Starter
Joined: Apr 2006
Posts: 937
Likes: 0
From: wilmington, NC
Good to meet you Ruben. Come on up for a drive. I think I missed you guys last time because I was snowed in.
There ought to be some way you can fit in a bracket that has aiming screws on it. The bracket I posted up comes with 3 aiming screws that provide total aiming capabilities. Besides the trick of getting something like that to fit, you are also faced with the problem of how to aim the unit once you tuck it inside the 99 spec turn assembly - once mounted on the car, how do you get to it to ensure it's adjusted properly?
My immediate thought is for your to mount the light first, aim it, and then slide the 99 spec assembly over it. In this way, you can then remove the 99 unit and still get at the lights. If you permanently mount it inside the unit, then you'll have no adjustability.
Food for thought.
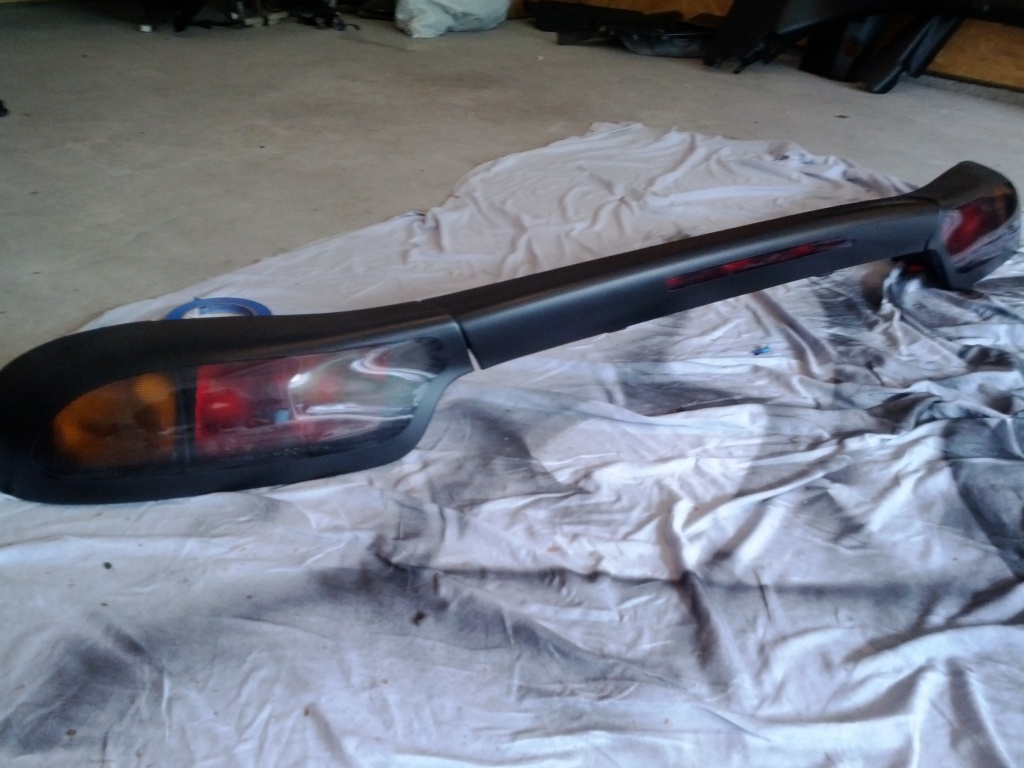
On the taillights, I like your design. It's very easy to open them up. A heat gun makes the job simple so that's a great investment. You remove the screws from the back of the housing and then heat up the edges of the unit. Then start gently pulling to separate. You might have to hit again spots that have not heated up yet, but take your time and it's a snap. If you have troubles, bring it up to Asheville with you and I'll help you.
As for the new "slant" in the design, I think what you describe will work. Once you open it up, you'll see the separate amber and red pieces.
Keep up the good work!
There ought to be some way you can fit in a bracket that has aiming screws on it. The bracket I posted up comes with 3 aiming screws that provide total aiming capabilities. Besides the trick of getting something like that to fit, you are also faced with the problem of how to aim the unit once you tuck it inside the 99 spec turn assembly - once mounted on the car, how do you get to it to ensure it's adjusted properly?
My immediate thought is for your to mount the light first, aim it, and then slide the 99 spec assembly over it. In this way, you can then remove the 99 unit and still get at the lights. If you permanently mount it inside the unit, then you'll have no adjustability.
Food for thought.
On the taillights, I like your design. It's very easy to open them up. A heat gun makes the job simple so that's a great investment. You remove the screws from the back of the housing and then heat up the edges of the unit. Then start gently pulling to separate. You might have to hit again spots that have not heated up yet, but take your time and it's a snap. If you have troubles, bring it up to Asheville with you and I'll help you.
As for the new "slant" in the design, I think what you describe will work. Once you open it up, you'll see the separate amber and red pieces.
Keep up the good work!
On your mounting the projector first idea..do you mean making a mount on the backside of the bumper?...Hmmm..you got the gears turning. My main areasthat need addressing is weatherproofing and stabilizing it...unless you mean mounting it to another structue behind the bumper.
The taillights...after a few speedbumps with this projector thing its gotten to the point where Im like "its fine right now, dont mess with it" lol. I have a heat gun which Ive never used but Im always afraid Im going to melt something when I think about breaking headlight/taillight seals. I know Im going to do it, I just say these things so I can tell myself "I told you so" when something goes wrong lol.
The taillights...after a few speedbumps with this projector thing its gotten to the point where Im like "its fine right now, dont mess with it" lol. I have a heat gun which Ive never used but Im always afraid Im going to melt something when I think about breaking headlight/taillight seals. I know Im going to do it, I just say these things so I can tell myself "I told you so" when something goes wrong lol.
I guess if everything was sealed up and you had adjustment screws coming out of the back then you could adjust that way? Thinking thru this, I guess you can reach thru the headlight bucket area for adjustments. Won't have to do this often so a little difficulty might be okay.
As for the taillights, it really it really is easy with a heat gun. I remember the first time doing it I was on edge but I've now done it so many times it's a no brainer.
Happy to help with either project when you are in Asheville. I also have the 99 spec lights so I could be a tester car also

Great thread!
Thank you for taking the time to document the process.
Few questions, do the shrouds have any adjustment built into them?
Or is this just how they are bolting together?
Is there a chance to take good photos of the full perimeter of the lights? With rough dimensions?
I think Davids spot on, making a bracket that would rise up from the bumper support, and have access to adjustments seems to be the best way to conquer this issue of adjustability.
Adjust to hearts content, and slip the 99 winker over the pre adjusted lighting, and tighten the 2 8mm nuts to hold the existing shroud in place.
Did you end up trying the 55w ballasts, or 35w? And if so did you see any difference in lighting?
How are people operating these lights?
Deleting stock popup functionality?
Or augmenting the system with a auxiliary button?
Would it work to run a switch that could toggle between stock functionality, new projectors and perhaps combined, so that stock controls could work for both?
Do you have any pics with the lenses on?
Seems like those are going to be just about maxed out for how close they are going to be to the lenses?
Will there be a heat issue at that proximity to the lens?
Would love some dimensions or the relevant clearance issues.
Also wondering which bulbs you ended up using?
Which ballast did you end up using? Brand/power rating?
Where is the ballast mounted?
Would it be advantageous to get the extended harness length for mounting?
How are these lights typically mounted for adjustability?
Do they have a plate similar to the one David has posted with springs and screw ballcup mechanisms that adjust lateral and horizontal positioning?
From something like this it wouldn't be hard to fab and weld some bracketing for the existing chassis to make a solid mounting point for the lighting to retain adjustability.
How close is the MORIMOTO MINI D2S to the stock lens popup lighting when it is mounted roughly where it needs to be?
Thread Starter
Joined: Apr 2006
Posts: 937
Likes: 0
From: wilmington, NC
I think Davids spot on, making a bracket that would rise up from the bumper support, and have access to adjustments seems to be the best way to conquer this issue of adjustability.
Adjust to hearts content, and slip the 99 winker over the pre adjusted lighting, and tighten the 2 8mm nuts to hold the existing shroud in place.
Adjust to hearts content, and slip the 99 winker over the pre adjusted lighting, and tighten the 2 8mm nuts to hold the existing shroud in place.
I only know of one other one and he operates them just fine.
I believe he has
Can be done.
attached
Doesnt seem to be. Other guy is running them just fine. They dont burn as hot as normal bulbs and the actual bulb is inside its own housing that deals with that heat.
Not too sure what youre asking. Its the same as regular 99 combo lights...just has about 4 inches of projector coming out the back where theres usually about 2-3 inches of plastic holding the other regular bulb.
Thread Starter
Joined: Apr 2006
Posts: 937
Likes: 0
From: wilmington, NC
I havent gotten to that point yet. I have this BNIB Mini D2S kit here but now that I wont be using the mini projector I have to figure that out but thats the easy part. Im just focusing on Mounting the projectors in the housing, securing/sealing them and on vehicle adjustment...everything else is pretty much legos.
I trust TRS so Ill more than likely use the morimoto 35w that came with the kit.
Right now in a box. Wont know that until the build progresses more. My first guess will be on the front support somewhere. There always a place to find.
Thats up to you...Ive never needed an extended harness for mounting any of the HID systems Ive put on my cars but Ive never done this to an FD before so idk.
I dont think there is any typical about it unless youre talking about factory then its usually a screw adjuster built into the housing itself that controls the direction of the beam pattern. Youll get no such ease here. Someones gonna have to McGuyver this and Im afraid it might be me lol.
see above
Now youre asking questions from WAY down the line. It may be better to reference the other member who has already done this and ask him. Hes very helpful.
I trust TRS so Ill more than likely use the morimoto 35w that came with the kit.
Right now in a box. Wont know that until the build progresses more. My first guess will be on the front support somewhere. There always a place to find.
I dont think there is any typical about it unless youre talking about factory then its usually a screw adjuster built into the housing itself that controls the direction of the beam pattern. Youll get no such ease here. Someones gonna have to McGuyver this and Im afraid it might be me lol.
Now youre asking questions from WAY down the line. It may be better to reference the other member who has already done this and ask him. Hes very helpful.


Thank you for sharing the information so others can see what does work and does not.
Could you talk for a moment and expound on your choice to abandon the TRS units?
The ones used are the Morimoto Mini units correct? But which specific model?
Are the ones you used the 2.0 model with a 2.5” front lens or the “1st gen” with the 3.0” lens?
You say they were too big, in what respects?
Because I have all but purchased these units thinking they should work quite well from all the dimensions and small mockup I made to fit it into the existing space provided.
And from what I can tell they should work quite well, and AFAICT would not require any cutting except for the housing itself, and cause no clearancing issues with the stock popup, which I was hoping to keep while testing the lightings capability and useability.
But clearly you have been to this point and came to the conclusion that this is not going to work.
In regards to the mounts for adjustability, I am certain I can come up with a very feasible logical way to adjust the housing, I feel very confident in this area.
It looks like there are ample choices for hard screw points in the area, and should not require any tapping of the existing structure or extravagant bracketry that could make this implausible for others to repeat.
My only issue is I really dont know the lighting world enough to feel comfortable with my choices.without the items right in front of me I am quite tentative of my selections, and am really relying on others to lead in this department.
The dimensions I was requesting are that of any clearancing issues with other parts in the area.
Ex. The bumper reinforcement,skin, the stock popups, ect.
Wondering if any compromises must be made to fit these in the allotted area.
If the housing assembly where to be pushed into its intended position, with the popup lights top body cap removed, how close is your lighting to the stock popup lens in the down position? (this is the main clearance issue I am concerned about after everything is said and done)
From the measurement and mockup templates I made, I dont see an issue yet, save for perhaps some slight trimming if necessary when the whole assembly is fitted together.
ran out of time to edit ^ (Just read your PM seems you are using the 2.5")
Just from the new pictures and visualizing what the allotted area is, it looks like those ...should work with the stock popups, as the diameter of the rear section is fairly small.
But I bet they are fairly close when opening and closing, assuming you want this functionality.
May I ask where you are purchasing your 99 housing from?
They have chrome face sets on ebay ~60
And the black turn cover but again w/chrome face ~70
Cheapest black face set ~ 86
Was really hoping to pick up a cheap black face set, to practice on, so I dont have to slice up the set that is in there now.
Not 100% sure at this point, but I think these are still in the fabrication phase?
Diligently researching the feasibility of using the Mini D2S still......
Can anyone supply any reasons why these will not physically work with the space provided?
It looks like a tight fit, but I believe there is enough room to make them work, as well as supply enough room for proper adjustment.
Diligently researching the feasibility of using the Mini D2S still......
Can anyone supply any reasons why these will not physically work with the space provided?
It looks like a tight fit, but I believe there is enough room to make them work, as well as supply enough room for proper adjustment.

Hopefully Ruben does not mind me simply adding to his thread...
Still a lot to do yet, but the main components are in place.
There is still the job of proper wiring and bracketry to accommodate the components, but everything looks to be in working order, as well as supplies the necessary room to allow both the HIDs to coexist with the OEM lighting while I test the viability of using a setup like this.
Thread Starter
Joined: Apr 2006
Posts: 937
Likes: 0
From: wilmington, NC
ran out of time to edit ^ (Just read your PM seems you are using the 2.5")
Just from the new pictures and visualizing what the allotted area is, it looks like those ...should work with the stock popups, as the diameter of the rear section is fairly small.
But I bet they are fairly close when opening and closing, assuming you want this functionality.
May I ask where you are purchasing your 99 housing from?
They have chrome face sets on ebay ~60
And the black turn cover but again w/chrome face ~70
Cheapest black face set ~ 86
Was really hoping to pick up a cheap black face set, to practice on, so I dont have to slice up the set that is in there now.
Just from the new pictures and visualizing what the allotted area is, it looks like those ...should work with the stock popups, as the diameter of the rear section is fairly small.
But I bet they are fairly close when opening and closing, assuming you want this functionality.
May I ask where you are purchasing your 99 housing from?
They have chrome face sets on ebay ~60
And the black turn cover but again w/chrome face ~70
Cheapest black face set ~ 86
Was really hoping to pick up a cheap black face set, to practice on, so I dont have to slice up the set that is in there now.
I bought the housings from EBay, cheapest DEPO brand lights which seem fine to me. Im not a fan of the chrome and they look gaudy....to me anyway..personal taste.
Not 100% sure at this point, but I think these are still in the fabrication phase?
Diligently researching the feasibility of using the Mini D2S still......
Can anyone supply any reasons why these will not physically work with the space provided?
It looks like a tight fit, but I believe there is enough room to make them work, as well as supply enough room for proper adjustment.
Diligently researching the feasibility of using the Mini D2S still......
Can anyone supply any reasons why these will not physically work with the space provided?
It looks like a tight fit, but I believe there is enough room to make them work, as well as supply enough room for proper adjustment.
Uhhh..yeah, kinda doing other car stuff...took my dash brace out, cleaned and primed it but Im sure thats not what youre interested in lol. Ill post up as soon as get back to this project but Ill entertain any questions as they come about
Thread Starter
Joined: Apr 2006
Posts: 937
Likes: 0
From: wilmington, NC
Hopefully Ruben does not mind me simply adding to his thread...
Still a lot to do yet, but the main components are in place.
There is still the job of proper wiring and bracketry to accommodate the components, but everything looks to be in working order, as well as supplies the necessary room to allow both the HIDs to coexist with the OEM lighting while I test the viability of using a setup like this.
Thread Starter
Joined: Apr 2006
Posts: 937
Likes: 0
From: wilmington, NC
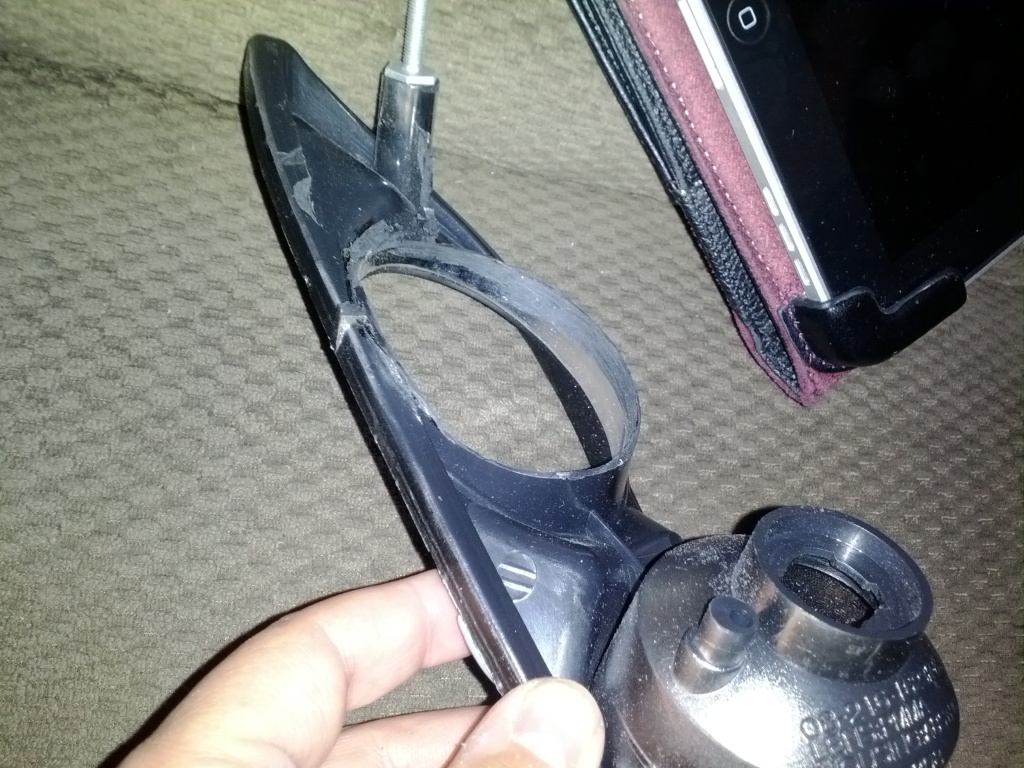
Here is the reason I didnt think I could use the TRS projectors...the portions of the housing I had to remove to fit the light VERY snugly..too snug for what I felt comfortable with in making them one piece and adjustable.
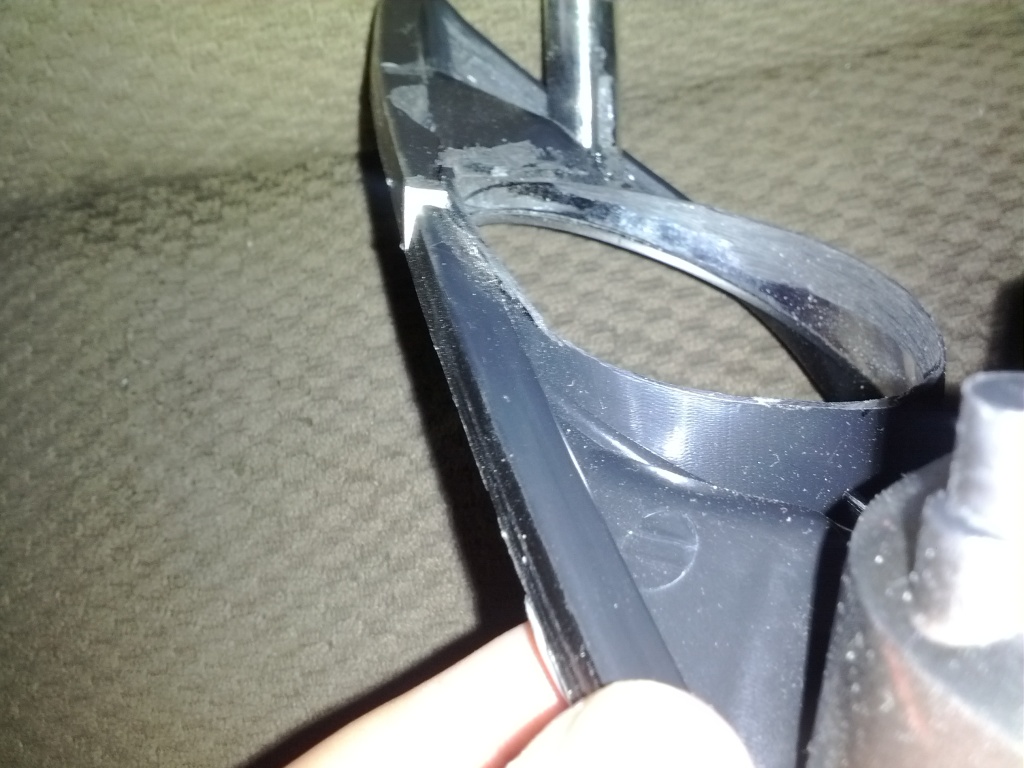
The chrome are Fing hideous....
I have no intention of using them in there present state and quite agree!
The idea was to get the cheapest housings I could, and test fit the concept.
However the idea now is to actually use them, and sandblast the chrome off and leave a very nicely finished matte black surface.
I did come up with a technique to extend the barrel of the housing so that they are still usable for the main body of the housing.
The only reason for allowing the popups is to technically be 100% legal in every respect at the push of a button.
As well as to be able to immediately compare lighting and have a usable system assuming I find these wanting....
As if that could happen in comparison to the stock popups, but it was a goal I had, and believe I have accomplished it.
Thread Starter
Joined: Apr 2006
Posts: 937
Likes: 0
From: wilmington, NC
I did come up with a technique to extend the barrel of the housing so that they are still usable for the main body of the housing.
The only reason for allowing the popups is to technically be 100% legal in every respect at the push of a button.
As well as to be able to immediately compare lighting and have a usable system assuming I find these wanting....
As if that could happen in comparison to the stock popups, but it was a goal I had, and believe I have accomplished it.
I can understand the want for maintaining popups. Can you confidently say you can use the mini d2s trs projectors? You're going to have to mount them to the bumper via adjustable bracket then put the housing over it, yes?
I like the idea of retrofitting bi-xenon's or even low beam HID's into the combo lights, but IMO it's more of a DRL/fog light mod as opposed to a full headlight replacement mod.
We played with the idea of doing something similar and as you've found there is no way to adjust the projector once it's mounted to the combo light housing unfortunately. I was also concerned with the beam length as the projector is mounted significantly lower then stock and our cars are already low as it is lol. I think Heath still has the prototype laying around somewhere
-Dan
^ I agree with Dan on this one. You've got to have a way to adjust the lights properly or they'll not be very good as headlights. Even with proper adjustment they'll probably sit too low to be used effectively so I'd also be concerned about that. Different states specify legal minimum height requirements with the minimum usually being 24 inches as measured from the bottom of the light. NC has no such law that I can find though so you might be good to go here.
For proper adjustment you'll need a 3 point adjustment mechanism, something like this:
http://www.rallylights.com/detail.aspx?ID=2596
This mounting bracket comes with a three-way adjuster which gives you full adjustment capabilities. I originally advised to devise a bracket that was bumper mounted for this and then you'd slide the light cover over this, but maybe there is a way to designed the bracket so it mounts to the back of the light assembly? For example, make some arms that extend off the bracket and screw into the back of the light housing? Thinking thru this I am not sure how you'd then be able to adjust the lights and it seems to me you'd have to do this before final installation which would make it a pain. With the above bracket you can adjust from either the front or the rear and the brackets come in 50mm, 60mm, and 90mm sizes. Don't know if they would fit what you are using.
Leads me back to the idea of mounting the lights into the bracket and affixing to the bumper somehow. You could then adjust the lights and when done, slide the light cover over the assembly.
Mine work fantastic!
One of the Best changes I ever added!
Works in every way they need to, dual functionality, or each set individually, all without chopping up stock harnesses. Built a interface harness to make it plug and play and transferable should I ever need to. Dual element LED running lights and turns, frees up the other bucket for the HIDs. Fully adjustable and tunable, cutoff works fantasticly .
I dont see any updated photos in that album, but they are working wonderfully, and look even better!
Last edited by rotarypower101; May 2, 2017 at 08:01 PM.

Thread
Thread Starter
Forum
Replies
Last Post
David Hayes
3rd Generation Specific (1993-2002)
13
Sep 5, 2022 12:45 PM