
modification list with pictures - lots off stuff


modification list with pictures - lots off stuff
well, i torn the entire top off again this winter to redoe the silicone hose job in hopes that it would fix my sloppy transition problem, while I was at I also did:
went from purple to yellow silicone hose
http://www.myrx7.com/images/pages/DSC00331.html
http://www.myrx7.com/images/pages/DSC00498.html
http://www.myrx7.com/images/pages/hose_comp.html
added the hyper ground system
http://www.myrx7.com/images/pages/DSC00284.html
http://www.myrx7.com/images/pages/DSC00337.html
http://www.myrx7.com/images/pages/DSC00378.html
http://www.myrx7.com/images/pages/DSC00451.html
http://www.myrx7.com/images/pages/DSC00494.html
http://www.myrx7.com/images/pages/DSC00496.html
http://www.myrx7.com/images/pages/DSC00497.html
http://www.myrx7.com/images/pages/hgs_vs_stock_uim.html
added the s2000 start button (info from http://iluvmyrx7.com and help from jim labreck, thanks guys)
http://www.myrx7.com/images/pages/DSC00384.html
http://www.myrx7.com/images/pages/DSC00389.html
polished the intake manifold and throttle body (thanks to twinturboteddy on the rx7 forum)
http://www.myrx7.com/images/pages/DSC00471.html
http://www.myrx7.com/images/pages/DSC00479.html
polished alternator shell (thanks to twinturboteddy on the rx7 forum)
http://www.myrx7.com/images/pages/DSC00470.html
polished metal intake pipes (thanks to twinturboteddy on the rx7 forum)
http://www.myrx7.com/images/pages/DSC00481.html
removed the double throttle control system
(sorry, forgot to take a pic, i used a bold to plug the butterfly shaft hole.)
removed the automatic warm up system (AWS)
http://www.myrx7.com/images/pages/DSC00484.html
had my tail lights modified to the j-spec type circles, but silver instead of black (thanks to ryan wolf)
http://www.myrx7.com/images/pages/DSC00453.html
installed widefoot aluminum gas pedal and deadpedal and passsenger foot rest (thanks to sled driver of the rx7 forum)
http://www.myrx7.com/images/pages/DSC00275.html
http://www.myrx7.com/images/pages/DSC00277.html
http://www.myrx7.com/images/pages/DSC00281.html
replaced the solenoid rack crappy 'strip happy' screws with hardened allen head bolts
http://www.myrx7.com/images/pages/DSC00316.html
http://www.myrx7.com/images/pages/DSC00334.html
replaced the stock check valves with heavy duty viton seal check valves
http://www.myrx7.com/images/pages/DSC00293.html
http://www.myrx7.com/images/pages/DSC00332.html
replaced some turbo oil return gaskets (was leaking a bit) (good advice from jeff)
http://www.myrx7.com/images/pages/leak-detection.html
http://www.myrx7.com/images/pages/DSC00448.html
new downpipe and cat and catback gaskets
http://www.myrx7.com/images/pages/DSC00440.html
unorthodox pully set, waterpump, alternator, powersteering (have not installed the main pully yet)
http://www.myrx7.com/images/pages/DSC00498.html
new 02 sensor
http://www.myrx7.com/images/pages/DSC00398.html
http://www.myrx7.com/images/pages/DSC00444.html
new stant 16psi radiator cap (will become obsoleet soon, moving to evans coolant)
http://www.myrx7.com/images/pages/DSC00367.html
made a bracket for the temp gage mod black box, now its nice and secure
http://www.myrx7.com/images/pages/DSC00370.html
http://www.myrx7.com/images/pages/DSC00375.html
http://www.myrx7.com/images/pages/DSC00372.html
http://www.myrx7.com/images/pages/DSC00374.html
widefoot swaybar mounts (thanks to David Breslau)
http://www.myrx7.com/images/pages/DSC00487.html
http://www.myrx7.com/images/pages/DSC00490.html
http://www.myrx7.com/images/pages/DSC00493.html
changed boost control to manual bleed valves and eliminated the ecu/solenoids from the loop (thanks to Kahren)
http://www.myrx7.com/images/pages/DSC00422.html
http://www.myrx7.com/images/pages/DSC00421.html
removed the stock air box and went with 2 k&n tube filters
http://www.myrx7.com/images/pages/DSC00339.html
http://www.myrx7.com/images/pages/DSC00498.html
fabricated a heat sheild for the K&N airfilters (still finishing it up)
http://www.myrx7.com/images/pages/DSC00514.html
http://www.myrx7.com/images/pages/DSC00515.html
http://www.myrx7.com/images/pages/DSC00513.html
modified the open oil cooler to be a fresh air ram to the K&n filters
http://www.myrx7.com/images/pages/DSC00500.html
http://www.myrx7.com/images/pages/DSC00503.html
http://www.myrx7.com/images/pages/DSC00506.html
I just got it all back together so i have only test drove it a few times, with boost controllers totoally closed, but the transition was very quick, a solid 7-6-7 pattern, but its too early to make conclusions yet, I still need to tweak the boost up to 10 and see how well i can get the transition. Im still with the stock ecu, so i'll be keeping boost at around 9.5~10 since im running dp, catback, and intake.
I love the fact that it does not rev up to 3K at a cold start anymore, and it seems to idle just fine with the aws and double throttle removed (i was worried about the stories of sporatice idle after these mods), in fact it purrs like a kitten, maybe better than before because of the new HGS grounds. There is only once thing I have to 'debug' and that is after idling a while the ACV will switch and relief air out to atmosphere, when it does this (infamous moo sound) the idle goes to hell (hunts around realy heavily), however if I put my hand in front of the air tube and block the air coming out, it goes back to normal, or if it ACV switches back (not relieving the air out) it goes back to normal, so I still have to figure that one out.
No real power mods so no HP gains, the intake might add some but im dialing down the boost so its a wash. I am going to focus on adjusting my camber and seeing how it handles before i try to push up power. I am not a good enough driver to take on more power ...yet (heheheh...MUAHAHAHHAHAH!!!!).
When i am ready for a power push, the power FC and ASP medium intercooler (and then moving to 12lbs boost)...is not far behind.
I can't wait till the racin season starts :-)


Originally posted by af908
wow thats alot of work looks great i love the ram air idea... was that a lot of work?
wow thats alot of work looks great i love the ram air idea... was that a lot of work?
Trending Topics
 and a little creativity
  .
.
Originally posted by apneablue
thanks for sharing !
thanks for sharing !
by the way, i like ur Defi Link System Boost...are you happy with it? accuracy, et...
Wow thats really nice. I hope to do some of that stuff like that sometimes soon. How much did that polish job run you. I was thinking of doing it myself but don't think it would turn out as good as I want it to. Keep it up.
Originally posted by Pherrus1
Where did you route the ram air, i cant seem to find a good hole. And where did you buy you check valves? Looks Good man!
Where did you route the ram air, i cant seem to find a good hole. And where did you buy you check valves? Looks Good man!
the ram air tube i routed by making a hard right angle then bending it up into the spot where the foam seal used to be (i removed the foam)...i can post a pic if you want
Rotary Enthusiast
Joined: Feb 2002
Posts: 828
Likes: 0
From: Frisco, Texas
nice work, and thanks for all the pics.
keep us posted or PM me on the Hyper Ground system results. I have the dreaded 3K hesitation, and I'm thinking of trying to upgrade all the ground wires.
keep us posted or PM me on the Hyper Ground system results. I have the dreaded 3K hesitation, and I'm thinking of trying to upgrade all the ground wires.
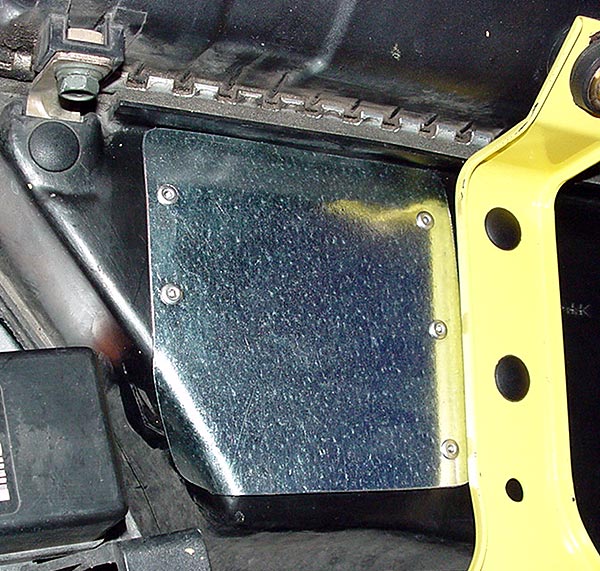
just wanted to add to my list....here is a cover I fabricated for the hole that shows up in the stock intercooler duct when you remove the stock airbox and front plastic thing that connects them. I used some sheetmetal and a rivits
Originally posted by jg937
very nice job on your fd,turned out great,question for you what is the part# for those k&n intake filters or what size are they thanks damian.
very nice job on your fd,turned out great,question for you what is the part# for those k&n intake filters or what size are they thanks damian.
these are the summitracing part numbers:
part number on the K&N filters is:
KNN-RD-0720
part number for small airpump k&n filter:
KNN-62-1370