
Mercury Marine Coil Mounting

Thread Starter
Senior Member
Joined: Aug 2001
Posts: 271
Likes: 0
From: Santa Barbara, CA
Mercury Marine Coil Mounting
Any of you guys that are running them, where are you mounting them? I'm thinking of putting them where my FC's trailing coils are, mounted in a quad configuration, with the spark plug wire sockets pointing out into the engine bay (per the factory configuration).
To do this I was going to use the cylindrical ferrites, and ground them through the chassis. Is anyone else running this type of configuration?
To do this I was going to use the cylindrical ferrites, and ground them through the chassis. Is anyone else running this type of configuration?


Trending Topics

Thread Starter
Senior Member
Joined: Aug 2001
Posts: 271
Likes: 0
From: Santa Barbara, CA
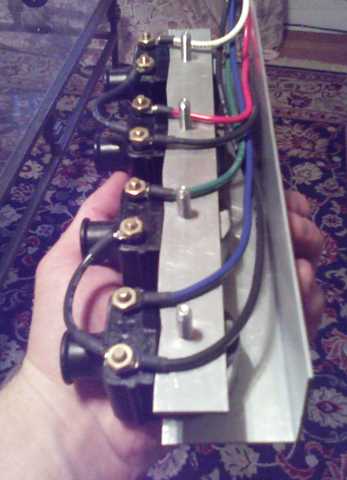
I haven't mounted permanently yet, but this is what I built:
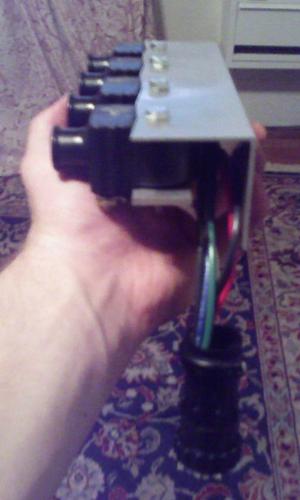
... and an upside-down shot:
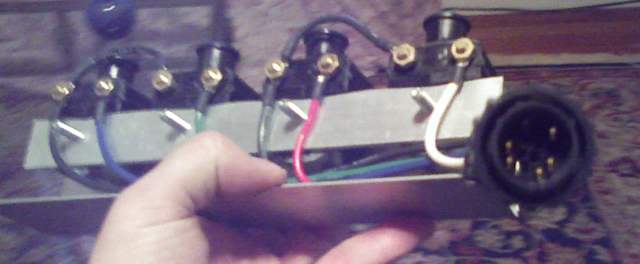
You can see I used an inch wide piece of aluminum stock, tapped with 4 holes, to retain the coils.
... and an upside-down shot:
You can see I used an inch wide piece of aluminum stock, tapped with 4 holes, to retain the coils.

Rotary Enthusiast
Joined: May 2002
Posts: 1,205
Likes: 0
From: Tallahassee, FL
Wow that's a great idea, I used washers and nuts and ended up breaking a piece of one of the ferrite cores from over-torquing. I also see you shared grounds that's a good idea too.
Probably the most striking thing of those pictures though is the connector you used for the 'sub-harness'. May I ask why you selected that kind, and what CDI you're using?
I will post pictures of what I ended up doing, though it's not quite as nice as your setup.
Edit: Also, mine are in the stock location, and I used the tapped holes on the block of the motor that were for the original coil bracket.
Thread Starter
Senior Member
Joined: Aug 2001
Posts: 271
Likes: 0
From: Santa Barbara, CA
Originally Posted by YayeR
Wow that's a great idea, I used washers and nuts and ended up breaking a piece of one of the ferrite cores from over-torquing. I also see you shared grounds that's a good idea too.
Originally Posted by YayeR
Probably the most striking thing of those pictures though is the connector you used for the 'sub-harness'. May I ask why you selected that kind, and what CDI you're using?
I'm using the Autronic 500R.
Originally Posted by YayeR
I will post pictures of what I ended up doing, though it's not quite as nice as your setup.
Edit: Also, mine are in the stock location, and I used the tapped holes on the block of the motor that were for the original coil bracket.
Edit: Also, mine are in the stock location, and I used the tapped holes on the block of the motor that were for the original coil bracket.
Joined: Mar 2002
Posts: 1,618
Likes: 502
From: The Elysian Fields (Texas)
Nice job YayeR. I'm sorry I didn't take pictures of the finished product before I left on this deployment. I do like the connector at the coils assembly, so I suspect that may be in the works for me as well. Thanks for the idea.
BTW. what was your source for the AMP connectors?
BTW. what was your source for the AMP connectors?
