
CCTCC Build Update #23 RX7

Thread Starter
Rotary Freak
Joined: Jul 2003
Posts: 2,199
Likes: 9
From: Oakville, Ontario
I normally give you guys race reports, but it has been a very long time since I was on track in my car. Therefore I was thinking over the weekend that it might be interesting for some of you guys to understand the amount of work that goes in to building and preparing my RX7 for this years Castrol Canadian Touring Car Championship. This may be helpful in understanding the efforts and troubles a small team goes through in preparing a somewhat quick car for competition.
My plan is to discuss each step from this past weekend, to the first race in approximately 2 months. It may be very interesting to some (like Balzz and my other competitors) as I plan to discuss all the nitty gritty issues and resolutions that we discover. Keep in mind that I have been building and preparing cars for well over 20 years and my crew chief/race engineer Dave Salt is a true "McGyver" in finding solutions. As well I will try to show how I fit my car prep into my regular life of raising a 5 year old, taking care of my house and more than patient wife and handling a job that requires more than a bit of travel. I am very lucky in that I have most of the tools I need in my shop and a ton of experience to draw from. In no way should this be assumed to be the best way to go racing, but it works for us.
Anyways on to the issues from this past weekend.
Friday Night (I have no real life). 9:00 P.M. My son has just gone to sleep and my wife is watching the food channel (she loves food ****,LOL) and the dogs have been walked. I started by cleaning up the shop from the efforts of the last week. I have way too much stuff in a 2 car garage and need to find homes for it all.
The 2 center tubes for my ITB manifold just don't fit right. The tubes don't seat properly into the rubber sleeves for the throttle bodies. I decide to try to make new ones out of 2" OD thinwall alum tubing. I use a vise to crimp down the tubes to a better oval shape to fit the center ports. It is very easy to bend the tubes to an oval shape but the sides of the tube want to fold inwards too much and the ends want to split at the tightest point of the radius. Try it on 3 different pipes and decide its not going to work and decide to think up a better solution. Into the scrap pile for those parts.
Then go to work on the front control arms. I noticed that the control arms really didn't want to move after I pulled the struts out to get them ready to machine out the tierod spindle taper to accept the bump steer correction studs. Anyways, the driver arm with nothing attached just the pivot bushings, required at least 80 lbs of pressure to move. The passenger arm required about 50 lbs to move. So I pulled out the arms to check the arm bushings. The passenger arm rear urethane pillow block barely would turn using a big pair of slip lock pliers and the front steel sleeve would not turn at all in its urethane bushing. I pulled out all the bushings and relubed using Mobil 1 synthetic grease. I also lubed the rear pillow block using a spray moly lube and cleaned out the space between the front of the bushing and the arm.
I also replaced the ball joints with new ones and generally cleaned the arms back up.
Sunday afternoon. Dave came over with part of the mocked up dash assembly. We spent a good half hour laying out the gauges, switches and radio based on the new seating position. Dave also figured out the routing of the battery cables to the starter, kill switches, battery jumper port and battery box location. He crimped on the ends and cut the wires/cables. He also showed me the wild threaded insert (like a combination metric, SAE helicoil) that he made up from a fine thread 5/8" bolt) to adapt the 12 mm rack arm threads to the 5/8" Rod Ends we need to use for the bump steer correcting studs. He got some of the other engineers to do the stresses and it looks like it will work. Yahoo, one big problem overcome.
I spent another 30 minutes re-installing the control arms and cleaning up the front wheel wells. After installation the arms still were stiff, but better than before. I decided to look at the AWR needle bearing front control arms as the stock arms were adding unwanted and uncontrolled damping to suspension movement. The un-controlled bushing stiction would definately give weird/unpredictable bump steer issues as well.
Later Sunday night, again after my son was asleep I spent an hour mocking up the support to the patch I needed to add to one front corner of the AWR nose I bought from Al Balinsky at Scarboro Mazda. I also spent some time fabricating the cold air box for the ITB's. Figured out that the best way might be to make a foam mold and do a wet layup of the fibreglass over the top. Need to get some more resin and hardener now.
I also tried making the inner ITB runners from a short piece of 1.5" aluminum pipe that would be welded in at an angle to the piece of 2" coming out of the throttle bodies. HMMMMMMM..... looks like it will work. I will try to cut it all up tomorrow to see if it fits. About 10:30 Q107 played "Baby Don't fear the Reaper" by Blue Oyster Cult and I decided that was a signal and I went inside to go to bed.
Need to find a really good aluminum welder who has experience in thin wall welding. Need to find someone with a 7.15 degree tapered reamer to bore out the tie rod holes in the spindles as the reamer costs about $150 Cdn. and go out to buy some more fibreglass resin and hardener.
Just another weekend at Nummelin Motorsports, until next time.
Eric


Thread Starter
Rotary Freak
Joined: Jul 2003
Posts: 2,199
Likes: 9
From: Oakville, Ontario
Only about 4 million times Joe, LOL.
We will be putting the whole thing together shortly. Just waiting to finish the wiring first and I still need to find a very good aluminum welder to stich the pieces together.
Terrh, we change the ball joints only rarely. In fact the only reason I replaced the ones on the car was because the boots ripped, the joints were still good and they were the ones Mazda installed.
I plan on finishing up the manifold fabrication tonight so that the whole thing can go to the welder. Dave spent last night on a metal lathe making up 6 tie rod end to rack arm threaded adjusters.
If I fab up the pieces fast enough I am going to spend an hour or so chipping away some remaining sound deadening that was hidden under the pedal box on the firewall. I want to have the interior fully painted by the end of this weekend. Then we can start re-assembling the car. WOO HOO.
I also bought some more fibreglass and resin/hardener today so that I can finish off the nose adjustments and I am planning on going to Grisdales Thursday morning or Friday morning to buy some Dzus Fastener plates to weld onto the front of the car so that I can get the nose finally installed.
Whew, this is just this weeks chores.
A race car is an expensive and demanding mistress.
Eric
p.s. I wonder what is going to be on Q107 tonight. I bet a bit of Hendrix, some Zeppelin and Doors. May need to listen to some classical tonight to stay, "Centered".
Full Member
Joined: Jul 2002
Posts: 161
Likes: 0
From: Waterloo/Niagara, Ontario, Canada
Hey,
Awesome write up, just wondering, what class is the 7 in?
I was wanting to build a car to enter into the CTCC as well, infact all I needed was a cage but then things didn't work out so well with my time in school and (lack of) funds.
Also, reading the rules for this year, 200 lbs handicap just because I drive an AWD car didn't seem justifiable either, that's a lot of extra weight, since the Impreza is in the ST class, 300hp limit, 200lbs is huge! In the USTCC it's only a 50lbs handicap for awd cars.
Now I'm thinking of turning the impreza into a RWD car and seeing if I can weezle my way around the 200lbs handicap. But this is just dream talk for now.
Awesome posts, it's like reading what I wish I was doing! Please post pics if you can!
Thread Starter
Rotary Freak
Joined: Jul 2003
Posts: 2,199
Likes: 9
From: Oakville, Ontario
Weellll, last week was a bit of a bust. I had to spend a ton of time actually working for a living. I hate it when real life gets in the way. Then I came down with the Black Plague on Wednesday night. From a slightly scratchy throat to a 102 degree fever and every joint in my body aching to massive headaches to a slightly runny nose and a light cough in less than 48 hours. It was a trip.
Anyways did get some work done on the car, but not as much as I wanted to.
Decided to once and for all finish all the intake piece creation. So I spent about 3 hours last night basically whittling compound angled pipes out of aluminum tubing. Finished with 6 pieces of tubewhere the outers are 50 mm in diameter chocking down and ovaling to meet the outer exhaust ports. They angle inwards slightly and upwards at about a 45 degree angle. They also have an inner lip that extends into the mounting plate. I had to do this as the plate I am using was designed for an REW motor and the ports don't exactly line up.
The inner tubes are just beastly. They have to angle outwards from the mounting plate at about a 40 degree angle and upwards at about a 45 degree angle. Then they have to turn the pipe about 40 degrees again to meet up with the ITB's. All of this has to occur in a runner length of about 5 inches. The pipe diameter also has to change from a round 2 inch pipe to an oval 1 1/2 inch pipe. YIIKES!!!!
After a good 1/2 dozen attempts, I finally hit the ticket. I made the runners out of thin wall 1 1/2 inch pipe. The metal is easy to manipulate and cut / file to shape. The primary runner then enters the 2 inch pipe at a bit of an angle (about 40 degrees, LOL) and through some careful bending and trimming got it all to fit.
FINALLY!!!!! Let me say that again because I really had to sweat this piece out, FINALLY!!!!! LOL.
Now I just have to find somebody who is great at welding aluminum to stitch it all together. Anybody a aluminum welding DaVinci out there? I think that I will become great friends with JB weld to smooth out some of the piece joints to maximize airflow.
Other things I got done yesterday. Started stripping the old series decals off the car. G@d d@mn, I hate stripping the old race stuff off the piant. I use a heat gun and everything, but it seems like the vinyl is getting thinner and thinner all the time. I also think that the glues adhere better to the paint than they adhere to the vinyl, so for at least 50% of the decals I end up using some kind of solvent to loosen up the glue. Anybody with any tips?
I also spent some time under the car with degreaser and rags and cleaned up last season's worth of rubber booger marks, rubber booger nests and oil/grease overspray. I finished the front wheel wells, the front subframe, the rad support area and as far back in the tunnel to the end of the transmission. It won't make the car much faster, other than loosing about 5 lbs of rubber booger nests, but it makes me feel so much more confident knowing that everything is clean and fresh down below without any embarrassing stains, smells or drips.
I got so frustrated after about 3 decals that I went out front and raked the lawn and used the lawn blower on the driveway. Dave came over at about this time to try out his new concept dash board setup for fit and ease of use. His new idea is to use a flat area behind the dash to install the Megasquirt and radio. This makes it more accessable to to service. I must say that the mock up looks interesting and should ease a lot of the maintanence issues as all the wiring will be out in the open.
But anyways, Dave being Dave, as soon as he saw my son riding his bike around and me with the leaf blower all race car issues stopped. As quick as a flash he was trying to rig up an air powered jet bike for Mika. My son (5) was laughing and ready to give it a whirl, I stood and watched until it looked like life and limb may be brought into question and stopped the tomfoolery. I then tried to refocus McGyver into less death defying activity.
Just another week at Nummelin Motorsports.
Eric
Trending Topics
Will work for tires
Joined: Oct 2005
Posts: 355
Likes: 0
From: Toronto
Originally Posted by 23Racer
But anyways, Dave being Dave, as soon as he saw my son riding his bike around and me with the leaf blower all race car issues stopped. As quick as a flash he was trying to rig up an air powered jet bike for Mika. My son (5) was laughing and ready to give it a whirl, I stood and watched until it looked like life and limb may be brought into question and stopped the tomfoolery. I then tried to refocus McGyver into less death defying activity.

Thread Starter
Rotary Freak
Joined: Jul 2003
Posts: 2,199
Likes: 9
From: Oakville, Ontario
I would love to, but of what? I can post pictures of the car from last year. I could take pictures of the aluminum pipe, but that aint to much fun. I have posted shots of the itb's before.
Tell you guys what. I will take some shots this week after I get back from Montreal of some of the stuff, but I have to warn you that it doesn't look too exciting yet. It will after we start assembling. Right now everything is just a bunch of bits in a crowded shop, LOL.
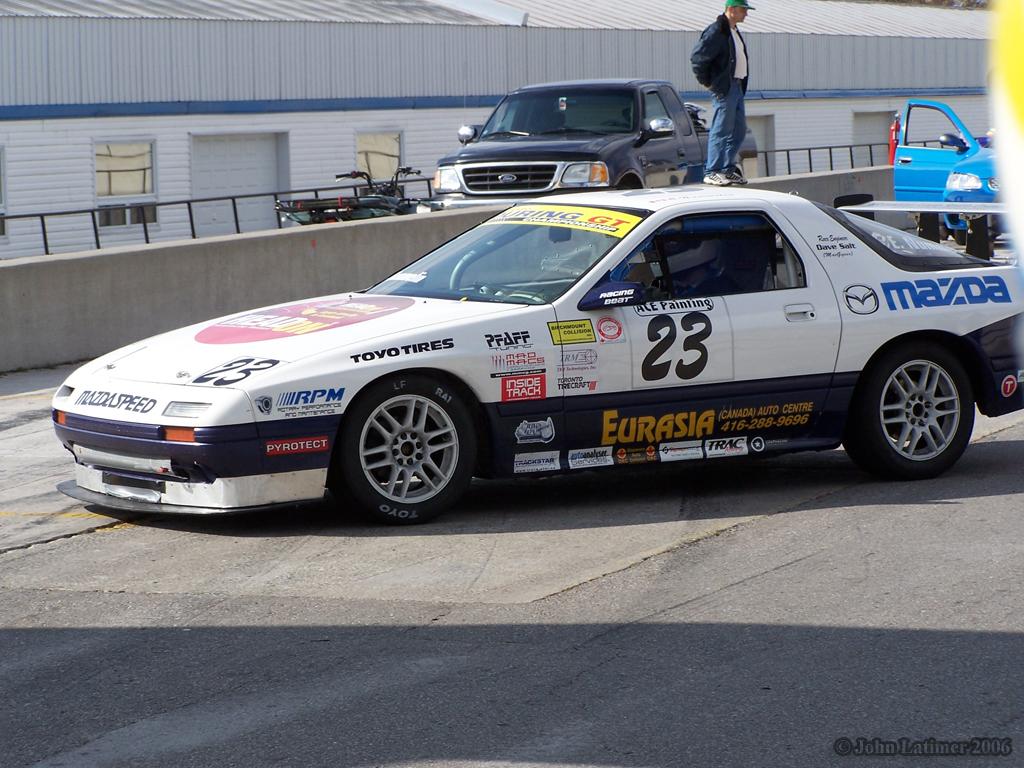
Here are some shots from last year to tide all of you over. Look at the drivers side shot. The new driving position has my head back almost inside the sail panel and my shoulders below the door. As well the car is now an inch lower with a totally different nose/splitter arrangement.
Eric
Tell you guys what. I will take some shots this week after I get back from Montreal of some of the stuff, but I have to warn you that it doesn't look too exciting yet. It will after we start assembling. Right now everything is just a bunch of bits in a crowded shop, LOL.
Here are some shots from last year to tide all of you over. Look at the drivers side shot. The new driving position has my head back almost inside the sail panel and my shoulders below the door. As well the car is now an inch lower with a totally different nose/splitter arrangement.
Eric
Thread Starter
Rotary Freak
Joined: Jul 2003
Posts: 2,199
Likes: 9
From: Oakville, Ontario
Thats my new co-driver, "George Shrinks". I needed to get the weight out some where.
Seriously though, I bought a new 7.15 degree tapered reamer and 10 Dzus fastener mounting plates yesterday at Grisdale's. The place is great for hardcore racing stuff (stock car based) and they are a Toyo R dealer who can get tires shaved for a great price. The best thing is that they have tons of inventory. You pay a bit more, but it is right there with no duty and shipping b.s.. They are also great to deal with.
Going to try to mock up my nose fitment tonight with these plates. They are over 2 inches wide and 2 inches deep and all the holes are predrilled. Freakin great pieces and at $3.00 a throw cheaper than the material and labour cost to make them yourself.
The tapered reamer was over $120.00. It turns out that the tierod bumpsteer correctors I purchased are designed for a 1974 Mustang II spindle and use a different taper than a Mazda spindle. I searched around for over 2 weeks for a machine shop or front end shop that had this tool with no luck. Finally bit the bullet and bought the tool. Therefore, in only monetary terms, the cost to reduce the bumpsteer in the front of a lowered FC is as follows:
2-5/8" Female Rod Ends $49.00 each $98.00
2-5/8" to 12 mm thread adaptors $5.00
2-AllStar Tie Rod Extended Mounting Bolts $88.00
1-7.15 degree Tapered Reamer $120.00
1-4'x4' 7/8" sheet of plywood (to make bumpsteer gauge) $35.00
Assorted screws, hinges, bolts to make gauge $10.00
Total Cost $356.00
All this is to correct a twitchiness in control over the top of Turn 2, Turn 4 and underbraking in Turns 8,9,10. Should potentially lower my lap times by a consistent 1/2 a second a lap.
It is tons of these small things that if you add them up shortly makes your investment in a race car exceed $35,000, LOL. This is why it makes far more sense to buy a car already built as you can usually buy the used race car for $0.50 on the dollar spent and get the labour thrown in for free.
This is also why I now longer keep printed records of my expenditures. First my better half would brain me if she knew how much money I have efficiently converted into noise. Secondly I don't want to recognize that instead of an almost 20 year old pile of parts in my garage, I could have spent far less in time and money and had a late model vette in there that would smoke my rex in every way.
Oh well, it still gets my blood pumping and feeling like I am 17 every spring when I fire the car up for the first time. Surprisingly I still get butterflies before every race, after over 25 years on track. It really does makes me feel alive, though sometimes in fear for my life (LOL), and I can't get that many other places.
Thats why racing is a passion, not a hobby to me. It actually makes no sense at all.
Till next time,
Eric
Last edited by 23Racer; Mar 27, 2007 at 09:57 AM.
Thread Starter
Rotary Freak
Joined: Jul 2003
Posts: 2,199
Likes: 9
From: Oakville, Ontario
Weeelllll, I haven't spent to much time on the car. As you can see in my other thread I was busy finalizing the deal on my XJR and taking delivery of my new (to me) street car. Anyways I got really busy on the car last night. First though, I had to put my son to bed. Read 2 stories last night and we spoke about his favorite cartoon' " Fairly Odd Parents" for awhile. I really like the show as well. It has Adam West (Cat Man) and Jay Leno (Chrimson Chin) on it and it is way better than some of the stuff we watched a couple of years ago, LOL. It usually takes about an hour with him at night, but too soon he will think I am stupid and a jerk (like his mother does, ROFL) and won't want to hang out, so I treasure every moment I get with him while he thinks I am a hero.
Anyways, started out by turning on the shop radio, hmmmm BTO "Taking Care of Business. I wonder if that was a clue as to what was going to transpire. Started out by taking the nose support outside to paint black. Then decided to paint the cowl shroud black to freshen it up again. Came back into the shop and started to use my freakin expensive reamer to change the angle of the tie-rod mounting point to that of the Mustang II. Started out using the recommended method which was to use cutting oil and turning the reamer by hand.
After 15 minutes of this I had only just started removing metal. This wasn't going to work so I went over to get my hand drill. Nooope, that won't work as the chuck was 3/8's of an inch and the shank of the reamer is a 1/2 inch. The reamer needs to go into the drill press. So into the chuck with the reamer and I reduced the speed of the drill by changing pulley ratios. Over an hour gone by this time. Not really going well like I thought it was going to.
Then to get the spindle under the drill press I needed to remove the spindle from the strut. Well that took over 30 minutes as the bolts were put on by Hercules and had frozen a bit with rust as well. Broke my Mastercraft 1/2" drive 17mm socket trying to break it free using my Breaker Bar. Hmmm, what can I use now.....
Decided to try my 11/16th Impact Socket on the 1/2" drive. Locked the spindle into my vise. ensured a tight fit with the socket and pulled as hard as I could. The handle of the breaker bar was at least 1 1/2" out of line and the bolt still refused to turn. Kept the pressure on the bar and started tapping witha 2 lb sledge and the bolt started to turn a crack. Nope that was the whole bench turning..............
G@D D@MN what a pain............(scratching chin)................... Okay Dave isn't here to screech so onto the end of the breaker bar I put the jack handle. I heated up the bolt with a propane torch and reefed. WOOOOW, the bolt just spun off like it was butta. Did the same thing on the other one and it spun right off as well.
Took the spindle over to the press and started reaming it good, baby. Used lots of lube and took my time cleaning everything after each reamer insertion. Sorry getting very crude here, but I was very tired by this point and Billy comes out when I am tired. After opening up the hole to match the spindle stud I cleaned off the spindle, painted it black and then spent the next hour cleaning up the hub, bearings, bolts, caps and other small pieces in my wash tank. As well I cleaned up the strut and touched up the paint on the lower end.
By this time I had been out in the shop for over 3 hours and everything was finally nice and clean ready for re-assembly on the right front corner. My one eye was looking at the other one and I decided that I had done enough for one night. Okay, clean up a bit and lets close it down for the night. Went into the house and everyone was asleep, including my pack of dogs. Well it was after midnight
Had a shower, ate a bowl of Cheerios with a delightful glass of OJ reading an US magazine and went to bed. Took a while to fall asleep, but after I went to sleep I had this really strange dream with William Shatner, the old Rat Patrol TV show and for some bizarre reason Al Balinsky's fantasy girl Heather Locklear (by the way isn't that home wrecker Denise Richards just a tramp, uh nevermind) was dressed up like a french maid and wanted to give me some raisin buttertarts. I woke up in a cold sweat. Soothed myself back to sleep by doing imaginary laps around the Toronto Indy Circuit. Visualisation can take place anywhere and at any time.
Anyways, till next time and I promise to be more rational.
Eric
Thread Starter
Rotary Freak
Joined: Jul 2003
Posts: 2,199
Likes: 9
From: Oakville, Ontario
No Time For A Lot of Words Just Some Pictures
Build shots from Friday. We are getting there and Dave is most of the way done with the wiring. Once the wiring is complete I can assemble the rest of the car.
Pain in the butt on the front suspension. Worked out the bump steer on one front wheel. Matched it to the other side, then found out my tie rod / rod ends are too short. Need to make new extenders. Also need to get the fuel rail changed. Need to find a good Aluminum welder. May be out to see your next door neighbour Joe.
Everything else is just bolt together and if I can find somebody to paint the nose, hint hint..... It can all go together. Hope to be on the dyno early the week after the long weekend.
Its all a bit messy right now but going together nicely.
Eric
Thread Starter
Rotary Freak
Joined: Jul 2003
Posts: 2,199
Likes: 9
From: Oakville, Ontario
More Shots.
Like I said, we need to create a fuel rail and bolt everything together but we are over 75% of the way there. Need to be ready for the June 2/3 rd Shannonville Long Track CCTCC Race.
It will be a race just to get there in decent shape.
This is what I was doing today instead of lapping around Mosport, but it looks like everyone had a great time.
As always,
Eric

these stories are great. 
so race car drivers can't get those 17mm strut bolts off either. glad to see that's not just me! i hate those bolts (hitting them with the torch didn't do it for me).
oh, and how long are your primary exhaust lengths before it collects? seems pretty long.
so race car drivers can't get those 17mm strut bolts off either. glad to see that's not just me! i hate those bolts (hitting them with the torch didn't do it for me).
oh, and how long are your primary exhaust lengths before it collects? seems pretty long.
Thread Starter
Rotary Freak
Joined: Jul 2003
Posts: 2,199
Likes: 9
From: Oakville, Ontario
As you can see from the pictures, Dave started the weekend only having the heavy cables routed. He worked for about 4 hours Sunday and routed about 80% of the smaller wires. It looks great. Everything is routed through shielded cable, when it needs to be, it uses Mazda connectors and silver coated wires. Awesome stuff.
I spent some time fabbing on the throttle bodies. I installed 2 vacuum ports into the 2 center injector ports. I am going to pull vacuum from both of those ports to use for the brake booster. I may need to add an accumulator to get a consistent pedal. I am also going to create a new throttle cable mount as the ITBs pull a little further towards the rear. I still need to get some alum welding done to extend the stock fuel rail by about 2 inches.
Dave and I decided ages ago to use stock Mazda stuff where possible as it adds some reliability and bolts together well. The best part is if we have a failure we can get some spares from a dealer. I have tons of spares, but you never know when you may need something at the track.
I am going this afternoon to buy a proper tap so that I can make the tie rod extenders and finally bolt the front end together. The rear suspension is pretty much done and we can now run the rear of the car about 1 inch lower than last year. We had to make new upper strut mounts that locate the upper part of the spring. Based on the upper locator hole, they should be noisy, but do the job very well. We also saved about 4 pieces so the time to change springs has bee reduced a ton. It should only take the removal of 1 nut and everything else should fall away.
Regarding the exhaust, we reduced the diameter of the collector by about 2 inches. This has allowed us to move the pipes closer to the rear subframe and increase ground clearance by 2 inches. As well the reduction of the area inside the collector should improve exhaust velocity and improve exhaust scavenging versus last year. Downside is going to be a sharper exhaust note. The exhaust length is based on the information I got out of Australia to improve torque. We will have to get it on a dyno to see how good it actually will be. Oh well pluses and minuses.
The only thing I have no idea about is the airbox and filter setup. I may have to run at Shannonville with some kind of cobbled together filtering element. Just need the time to fibreglass up the airbox around the mold. Before the next race I guess. One concern Dave and I have is the noise from the throttle bodies. When you open the butterflies and shine a flashlight down the ports you can see right into the motor. It should be really, really responsive, but bark really good off throttle. Not much I can do now but the intake sounds should be spectacular. It is a bit tough putting it all together as nobody else, that we are aware of, is using this type of setup in North America for road racing, so we are breaking new ground.
Anyways, we will see how it all runs.
Till next time,
Eric
Thread Starter
Rotary Freak
Joined: Jul 2003
Posts: 2,199
Likes: 9
From: Oakville, Ontario
Oh yes I forgot. The really cool thing is all of the specialized electronic stuff we have in the car. Everything from data loggers, programable ECU, radios, remote starter batteries and for the second race a lowered, side mounted alternator. It all is looking really aircraft like thanks to Dave.
Also, did anybody notice what type of oil filter I have on the car? I did it just for all of you on the other thread, LOL.
Again
Eric
Also, did anybody notice what type of oil filter I have on the car? I did it just for all of you on the other thread, LOL.
Again
Eric

Full Member
Joined: Jul 2003
Posts: 66
Likes: 0
From: Oshawa, Ontario, Canada
Yes nice motormaster filter you have there Eric, lol I also read that thread on filters. Were you out at mosport this weekend? I didnt see you there at all. Let me know when your racing and I can help out if needed.
Thread Starter
Rotary Freak
Joined: Jul 2003
Posts: 2,199
Likes: 9
From: Oakville, Ontario
No I wasn't out this past weekend. I was building the car!!!!
We have made a ton of changes since last year and refreshed the whole car to try to make it more reliable and to race with "Mucho Gusto".
The first weekend for the car will be Shannonville on the June 2nd weekend, followed by the Toronto Steelback GP weekend, then the remaining races at Mosport.
Dave and I have a whole list of upgrades, staged and ready to go on and the car will be developed race by race from this base point. Based on the last race results, I have to be in the 1:32's to be competitive. FREEEEEEK, thats fast. Thats a WCGT time from 4 years ago.
Eric