
August 2008 Pics and Updates On Project Tina

Thread Starter
Joined: Feb 2001
Posts: 29,798
Likes: 128
From: London, Ontario, Canada
August 2008 Pics and Updates On Project Tina
What would the summer be without at least one post regarding my ongoing Project Tina? I'm sure at least two of you are wondering how the car is doing after the GT40R install, tuning and dyno runs of last summer, the details of which can be found in this thread. Here's the latest update on the project and set of pictures, covering the first half of the summer.
Now that the major mechanical work is done, the first half of this update deals with suspension and brakes. The second half gets into dealing with the interior restoration. Along the way there are a few other tasks thrown in but as the engine bay is basically complete, there's none of that stuff this time.
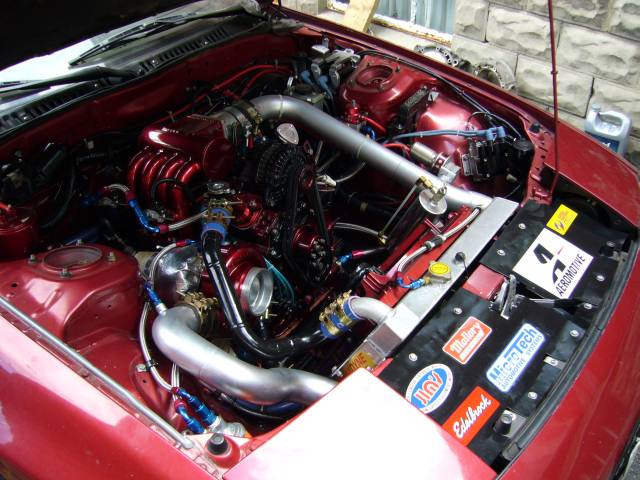
Leaving off from the last thread, we ended on a passenger side shot of the completed engine bay. Through the rest of last summer the car was tuned, driven, taken to the track and just plain enjoyed. However with it's new found power, the worn out suspension became even more obvious. During the winter while the car rested happily in the garage it was time to go shopping.
An order to Mazdatrix resulted in a wonderfully large box showing up at the door a week later. Contained within was a set of Racing Beat springs, KYB AGX shocks, new clutch slave and master cylinder, stainless brake and clutch lines, an a set of Hawk HPS brake pads. A trip to the local auto parts store to pick up a set of 4 piston front calipers and 5 lug rotors completed the pile. Always nice to have a stack of parts to stare at while watching TV in the cold of winter.

As soon as spring came, it was time to get right down to work on the car. After pushing it out of storage it was prepped to drive and then taken on a short journey to make sure everything was as it should be. Immediately after, the real work started. The short drive had reminded me of an annoyingly intermittent sticking front caliper. Additionally, the single piston brakes were becoming a safety hazard. They are simply not adequate to rein in 400 HP. This became obvious during some 1/4 mile runs, and even before that when tuning out at the airport. Something had to be done and a new set of single piston calipers would not do the job.
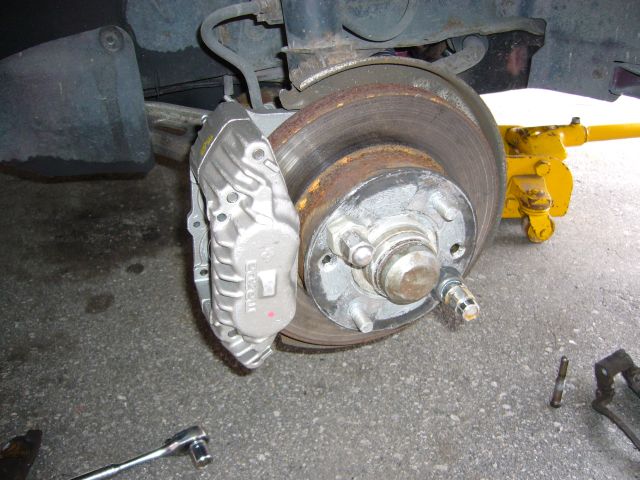
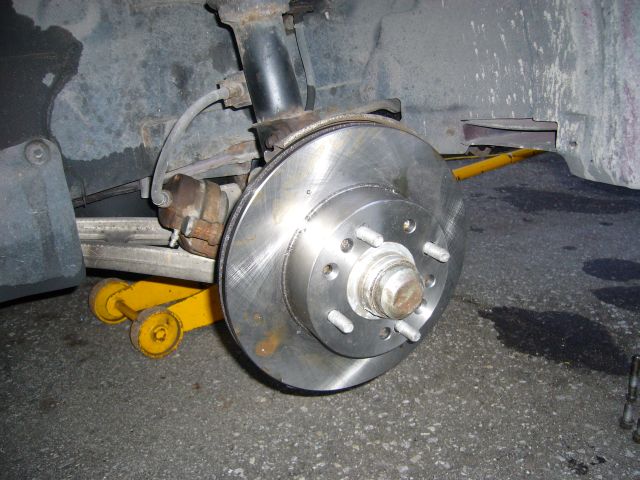
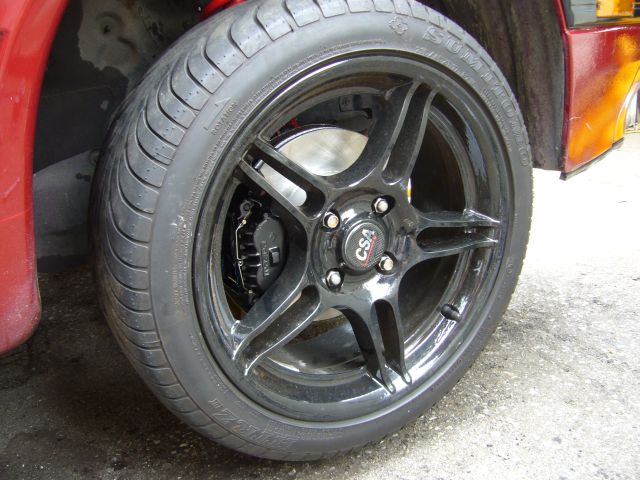
Everyone knows that a 5 lug swap gets you the 4 piston calipers, which is all fine and dandy if you have a set of gross stock wheels. But what if you already have an investment in a nice set of aftermarket wheels? I'm perfectly happy with the split 5 spoke CSA wheels I've had on this car for years and can't imagine a wheel style that fits the 2nd gen any more perfectly. Moving to a 5 lug setup would get me the big brakes, but mean I would also have to swap wheels. Unacceptable. Knowing that the spindle setup for both 4 and 5 lug are the same, I figured there would have to be a way to mount the 4 piston calipers on a 4 lug car with a minimum of fuss. As it turns out, the calipers bolt right on after you remove the bracket for the single piston unit.
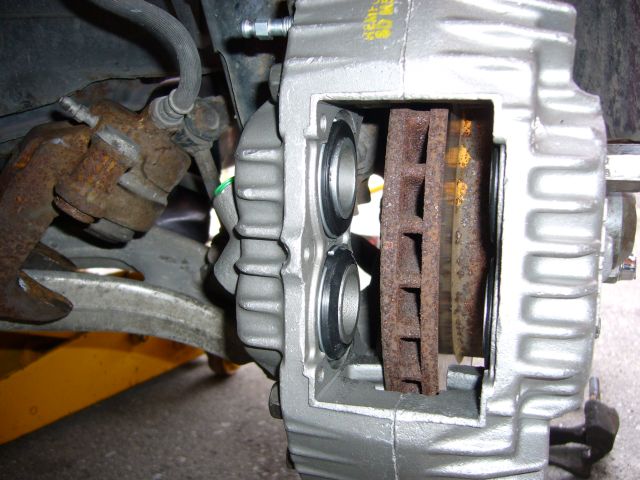
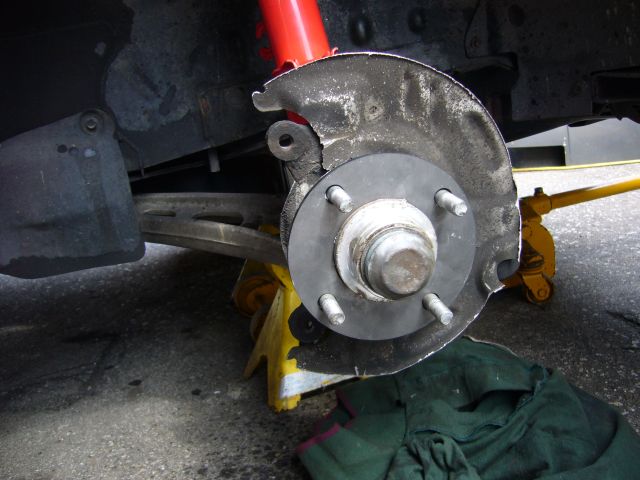
The calipers fit fine, but we all know the 4 lug rotor is much smaller then the 5 lug. Just putting on the 4 piston calipers is pointless as half the pad area is hanging off the rotor.
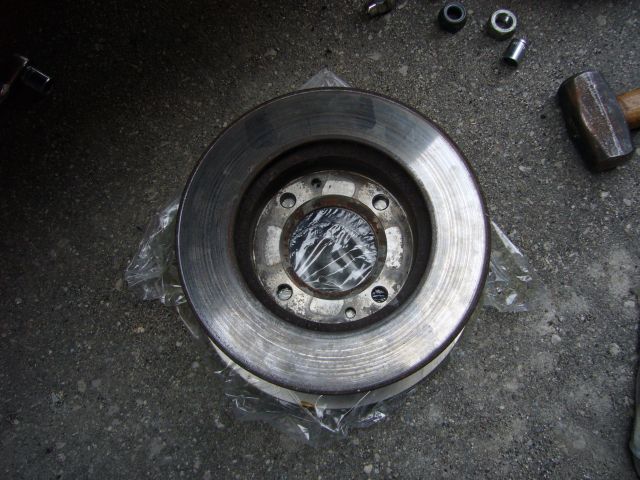
I figured it would be easy to redrill the 5 lug rotors to fit the 4 lug hub, and I was mostly correct. The 4 lug rotor was placed on top of the 5 lug rotor to decide where to place the new holes. As you can see, the center locating hole is the same on both rotors. This means the hub-centric rotor will stay centered on the hub even with a set of hand drilled holes.
Now that the major mechanical work is done, the first half of this update deals with suspension and brakes. The second half gets into dealing with the interior restoration. Along the way there are a few other tasks thrown in but as the engine bay is basically complete, there's none of that stuff this time.
Leaving off from the last thread, we ended on a passenger side shot of the completed engine bay. Through the rest of last summer the car was tuned, driven, taken to the track and just plain enjoyed. However with it's new found power, the worn out suspension became even more obvious. During the winter while the car rested happily in the garage it was time to go shopping.
An order to Mazdatrix resulted in a wonderfully large box showing up at the door a week later. Contained within was a set of Racing Beat springs, KYB AGX shocks, new clutch slave and master cylinder, stainless brake and clutch lines, an a set of Hawk HPS brake pads. A trip to the local auto parts store to pick up a set of 4 piston front calipers and 5 lug rotors completed the pile. Always nice to have a stack of parts to stare at while watching TV in the cold of winter.
As soon as spring came, it was time to get right down to work on the car. After pushing it out of storage it was prepped to drive and then taken on a short journey to make sure everything was as it should be. Immediately after, the real work started. The short drive had reminded me of an annoyingly intermittent sticking front caliper. Additionally, the single piston brakes were becoming a safety hazard. They are simply not adequate to rein in 400 HP. This became obvious during some 1/4 mile runs, and even before that when tuning out at the airport. Something had to be done and a new set of single piston calipers would not do the job.
Everyone knows that a 5 lug swap gets you the 4 piston calipers, which is all fine and dandy if you have a set of gross stock wheels. But what if you already have an investment in a nice set of aftermarket wheels? I'm perfectly happy with the split 5 spoke CSA wheels I've had on this car for years and can't imagine a wheel style that fits the 2nd gen any more perfectly. Moving to a 5 lug setup would get me the big brakes, but mean I would also have to swap wheels. Unacceptable. Knowing that the spindle setup for both 4 and 5 lug are the same, I figured there would have to be a way to mount the 4 piston calipers on a 4 lug car with a minimum of fuss. As it turns out, the calipers bolt right on after you remove the bracket for the single piston unit.
The calipers fit fine, but we all know the 4 lug rotor is much smaller then the 5 lug. Just putting on the 4 piston calipers is pointless as half the pad area is hanging off the rotor.
I figured it would be easy to redrill the 5 lug rotors to fit the 4 lug hub, and I was mostly correct. The 4 lug rotor was placed on top of the 5 lug rotor to decide where to place the new holes. As you can see, the center locating hole is the same on both rotors. This means the hub-centric rotor will stay centered on the hub even with a set of hand drilled holes.
Thread Starter
Joined: Feb 2001
Posts: 29,798
Likes: 128
From: London, Ontario, Canada
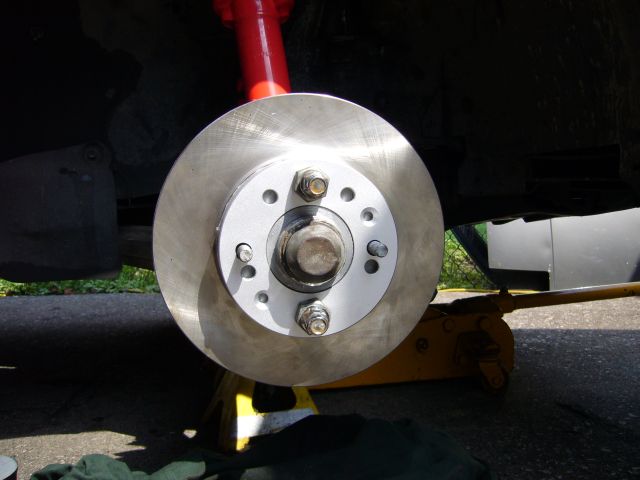
I drilled the holes out to 13MM, just a bit bigger then the factory holes. This allows a bit of wiggle room since when hand drilling, things can move a little bit.  At this point the 5 lug rotor is now a hybrid 4/5 lug, and will fit either hub. You see this often in aftermarket brake kits. It thus mounted to the 4 lug hub without any drama.
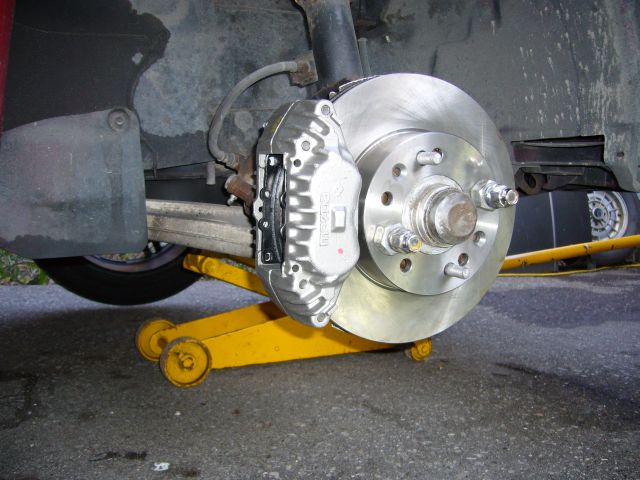
It was time to bolt up the caliper, and it's here I ran into a small snag. It seems that Mazda decide to make the cast face of the 4 lug rotor a lot thicker then the 5 lug. Placing the redrilled 5 lug rotor onto the 4 lug hub made it seem as if it fits, but this is not so. Once the caliper was bolted in place, the back of the rotor scrapped the caliper. Confused, I measured the thickness front to back of both rotors. It turned out the same so that was not the cause. I then measured the thickness of the face of the hat on both rotors and found my issue. It seems the face of the 4 lug rotor is about 4MM thicker then the face of the 5 lug rotor. Thus, the 5 lug rotor sat further back off of the hub and smacked the caliper. To overcome this I stacked washers behind the rotor to move it back out to the center of the caliper. Below is a mockup of the brake setup using the washers as a spacer.
I then drew up a spacer in CAD and sent the drawing off to the local laser cutter to have some made in 4MM steel.
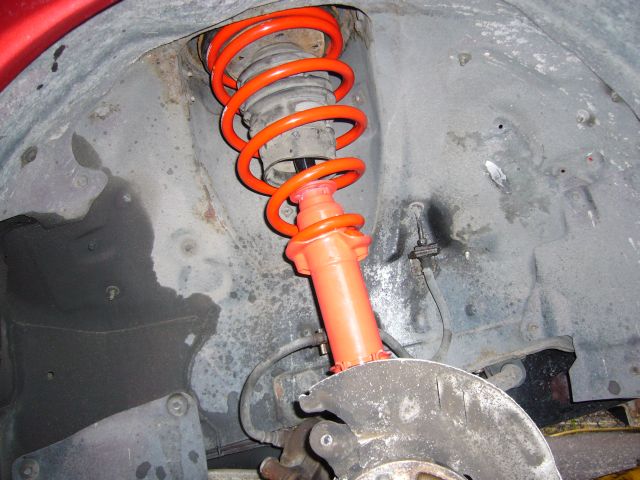
While the spacers were getting cut, I turned my attention to the suspension. A new set of KYB AGX shocks and RB springs were installed front and rear. I also replaced the supper strut mounts at the same time as the originals were 22 years old and well past their useful life.
No pictures of the rears as I only had the spring compressor for the weekend and ran into s small snag. The driver swapped out with no issues, but the passenger was another story. The lower strut mount (located on the control arm) was totally mangled due to a past "mechanic" over tightening the bolt. The mount was ballooned out, which also destroyed the bottom of the strut. Attempting to remove the bolt promptly snapped it, and the strut then had to be forcibly removed with a pry bar. The result was that a replacement mount was needed. Unfortunately the Mazda dealer could not get that bolt as the parts catalog showed NLA; No Longer Available. Luckily Joe of RPM Motorsports had a replacement on hand from a J-spec clip. A bit of heating and impacting removed the broken mount, then the new mount and strut was installed. For the record, the hex on these mounts is a weird sized metric...It doesn't exist. However a 1 1/8" deep well impact socket will fit it as long as the hex is undamaged.
A few days later the machine shop was finished with the 4 lug 4 piston spacers. I ended up having 8 cut as it would have been the same price for two. So if you want to make the same setup yourself, send me a PM and I'll sent a set out to you for the price of shipping.
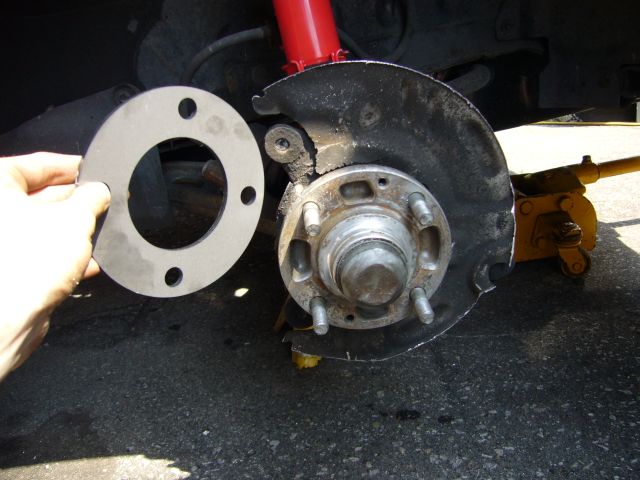
The inner radius of the spacer needed a bit of grinding to fit flush on the hub as the factory hub casting has a little bit of a taper to it. A few minutes with the grinding wheel it fit perfectly. I anti-seized it up and then placed it on the hub.
At this point the 5 lug rotor is now a hybrid 4/5 lug, and will fit either hub. You see this often in aftermarket brake kits. It thus mounted to the 4 lug hub without any drama.It was time to bolt up the caliper, and it's here I ran into a small snag. It seems that Mazda decide to make the cast face of the 4 lug rotor a lot thicker then the 5 lug. Placing the redrilled 5 lug rotor onto the 4 lug hub made it seem as if it fits, but this is not so. Once the caliper was bolted in place, the back of the rotor scrapped the caliper. Confused, I measured the thickness front to back of both rotors. It turned out the same so that was not the cause. I then measured the thickness of the face of the hat on both rotors and found my issue. It seems the face of the 4 lug rotor is about 4MM thicker then the face of the 5 lug rotor. Thus, the 5 lug rotor sat further back off of the hub and smacked the caliper. To overcome this I stacked washers behind the rotor to move it back out to the center of the caliper. Below is a mockup of the brake setup using the washers as a spacer.
I then drew up a spacer in CAD and sent the drawing off to the local laser cutter to have some made in 4MM steel.
While the spacers were getting cut, I turned my attention to the suspension. A new set of KYB AGX shocks and RB springs were installed front and rear. I also replaced the supper strut mounts at the same time as the originals were 22 years old and well past their useful life.
No pictures of the rears as I only had the spring compressor for the weekend and ran into s small snag. The driver swapped out with no issues, but the passenger was another story. The lower strut mount (located on the control arm) was totally mangled due to a past "mechanic" over tightening the bolt. The mount was ballooned out, which also destroyed the bottom of the strut. Attempting to remove the bolt promptly snapped it, and the strut then had to be forcibly removed with a pry bar. The result was that a replacement mount was needed. Unfortunately the Mazda dealer could not get that bolt as the parts catalog showed NLA; No Longer Available. Luckily Joe of RPM Motorsports had a replacement on hand from a J-spec clip. A bit of heating and impacting removed the broken mount, then the new mount and strut was installed. For the record, the hex on these mounts is a weird sized metric...It doesn't exist. However a 1 1/8" deep well impact socket will fit it as long as the hex is undamaged.
A few days later the machine shop was finished with the 4 lug 4 piston spacers. I ended up having 8 cut as it would have been the same price for two. So if you want to make the same setup yourself, send me a PM and I'll sent a set out to you for the price of shipping.
The inner radius of the spacer needed a bit of grinding to fit flush on the hub as the factory hub casting has a little bit of a taper to it. A few minutes with the grinding wheel it fit perfectly. I anti-seized it up and then placed it on the hub.
Thread Starter
Joined: Feb 2001
Posts: 29,798
Likes: 128
From: London, Ontario, Canada
Next, the rotor was installed. Nothing annoys me more then rusted brake rotors so I sprayed the hat and outer edge with some VHT silver caliper enamel to help keep them looking fresh. You'll also notice that the stock dust shield was cut in order to fit the larger diameter rotors. I could have used the 5 lug shield, but this was far easier and will allow more cooling air to the rotors.
Finally the calipers were installed after being painted with VHT black caliper enamel. Funny, I purchase this paint constantly and have for years yet this is the first time I have ever used it on an actual brake caliper. The caliper bolted right up aside from one annoyance. For some odd reason my 4MM spacers moved the rotor closer to the outer side of the caliper then the inner. Functionally this is no problem, but it does look odd when the wheel is removed and you are looking directly at the end of the caliper. If you are going to have your own spacers cut, use steel closer to 3MM. The stainless DOT approved lines from Mazdatrix fit up fine. Note that they are the single piston lines.
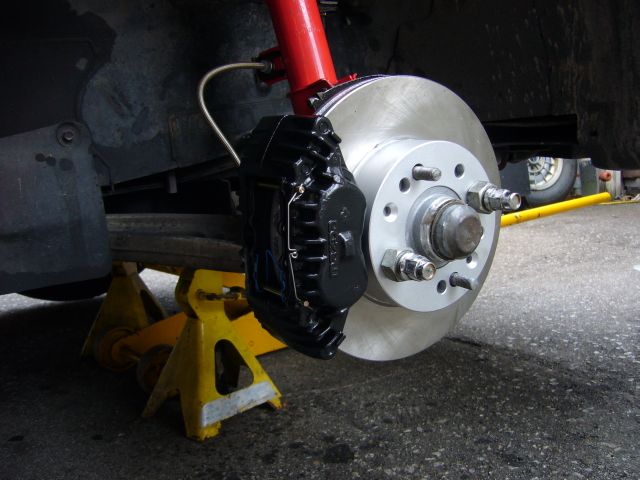
The complete 4 piston 4 lug setup. I wonder how many people would notice what's wrong with this picture?
With the brakes complete it was time to fix another annoyance with the car; the e-fan. Controlling the e-fan relay with the Microtech works just fine, but the fan cycles on and off annoyingly. The temp of the car goes up, so the fan comes on. Then it cools back down and the fan shuts off. Rinse and repeat for as long as you are driving slowly. It got on my nerves and was nowhere near as transparent as the stock clutch fan. After reading about the SPAL FAN-PWM on this forum, I decided to give it a try.
On a rainy Saturday afternoon I wired it into the car. I made a small mounting plate to located the FAN-PWM near the stock front relays.
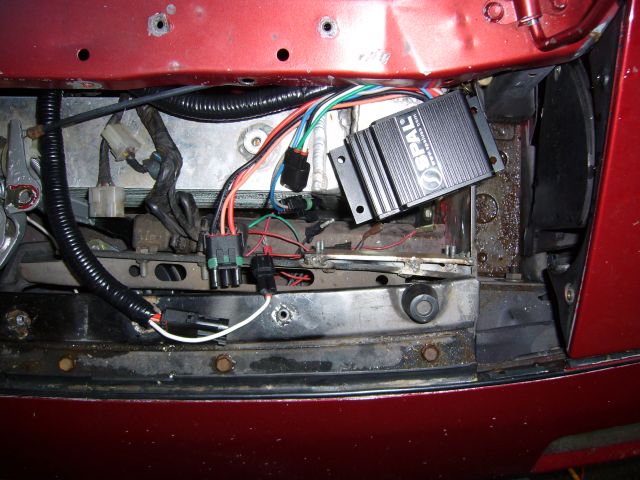
I then modified my harness with the harnesses included with the FAN-PWM, tying into the stock engine coolant temp sensor with the white wire as per the instructions. The harness was then loomed up and secured into place.

The idea of this controller is that it turns your electric fan (on/off) into a clutch fan (continuously variable) by reading engine temperature and adjusting the fan speed to match. In theory it's a wonderful idea, but in practice I'm torn as to loving the unit, or hating it. There are problems with the unit's construction and design.
I applaud SPAL for trying to build a quality product by using WeatherPack connectors. However the connectors they used are clearly made in China and of inferior quality. The plastic feels weak and shows casting flash, and the silicone seals are poorly molded and very transparent.
The unit itself seems to mostly work as advertised. I have my fan set to low speed around 78C and high speed around 92 C. Thus at thermostat temp of about 84C it is at half speed. However this was very difficult to achieve. Because the circuit itself is poorly designed it was a real pain getting this thing to work. SPAL combined the signal and power ground in the circuit, something even a 1st year electrical engineering student knows not to do. The temp sensor input is also not isolated. This in combination with the ground setup means that a voltage offset can form when the fan draws high currents. The poor quality WeatherPack connector introduced a bit of resistance into the ground line, which totally messed up the voltage the unit was seeing from the temp sensor. This caused the unit to misread the temperature and be unsettable. It basically ran the fan high all the time. It was only after a week's worth of tech support emails to SPAL that I was told to cut the ground line off of the WeatherPack and ground directly to the chassis. Once I did, it behaved for the most part.
The other design issues are with the control algorithm. It's totally linear, which anyone versed in electronic control systems knows is almost never an appropriate method for a closed loop system. For example, if the fan is set to run half speed at 84 degrees and full speed at 94 degrees, it runs at 55% at 85C, 60% at 86C, 70% at 87C, etc. The issue is that this linear approach means the car can "stick" at a temperature. Even though the fan is running faster, there is more heat to remove so they cancel each other out. What's needed is a "gain" setting. The fan needs to overshoot the target speed for a little bit. Using the example above, the fan should run at 80% at 87C until the temp drops to 86C and then resume it's normal 60%. The higher off the target temp of the vehicle, the faster the fan should run to bring it down. That's now closed loop control is properly done in this case.
Additionally, setting the unit is confusing. If you accidentally set the low speed and high speed temps too close, the fan simply won't run. This is not an acceptable fail safe. The fan should either run at high speed until the situation is corrected, or a medium like 80%.
Those faults aside, the unit does seem to be working for me now. After tweaking the high and low settings for a week or so I've got the fan adjusted properly. Another bit of good news is that in speaking with the SPAL engineers, they have told me the new version of the circuit fixes the ground issue. They didn't isolate the input, nor did they implement a gain control, but they did add a signal ground. That should go a long way to solving the problem.
Finally the calipers were installed after being painted with VHT black caliper enamel. Funny, I purchase this paint constantly and have for years yet this is the first time I have ever used it on an actual brake caliper. The caliper bolted right up aside from one annoyance. For some odd reason my 4MM spacers moved the rotor closer to the outer side of the caliper then the inner. Functionally this is no problem, but it does look odd when the wheel is removed and you are looking directly at the end of the caliper. If you are going to have your own spacers cut, use steel closer to 3MM. The stainless DOT approved lines from Mazdatrix fit up fine. Note that they are the single piston lines.
The complete 4 piston 4 lug setup. I wonder how many people would notice what's wrong with this picture?
With the brakes complete it was time to fix another annoyance with the car; the e-fan. Controlling the e-fan relay with the Microtech works just fine, but the fan cycles on and off annoyingly. The temp of the car goes up, so the fan comes on. Then it cools back down and the fan shuts off. Rinse and repeat for as long as you are driving slowly. It got on my nerves and was nowhere near as transparent as the stock clutch fan. After reading about the SPAL FAN-PWM on this forum, I decided to give it a try.
On a rainy Saturday afternoon I wired it into the car. I made a small mounting plate to located the FAN-PWM near the stock front relays.
I then modified my harness with the harnesses included with the FAN-PWM, tying into the stock engine coolant temp sensor with the white wire as per the instructions. The harness was then loomed up and secured into place.
The idea of this controller is that it turns your electric fan (on/off) into a clutch fan (continuously variable) by reading engine temperature and adjusting the fan speed to match. In theory it's a wonderful idea, but in practice I'm torn as to loving the unit, or hating it. There are problems with the unit's construction and design.
I applaud SPAL for trying to build a quality product by using WeatherPack connectors. However the connectors they used are clearly made in China and of inferior quality. The plastic feels weak and shows casting flash, and the silicone seals are poorly molded and very transparent.
The unit itself seems to mostly work as advertised. I have my fan set to low speed around 78C and high speed around 92 C. Thus at thermostat temp of about 84C it is at half speed. However this was very difficult to achieve. Because the circuit itself is poorly designed it was a real pain getting this thing to work. SPAL combined the signal and power ground in the circuit, something even a 1st year electrical engineering student knows not to do. The temp sensor input is also not isolated. This in combination with the ground setup means that a voltage offset can form when the fan draws high currents. The poor quality WeatherPack connector introduced a bit of resistance into the ground line, which totally messed up the voltage the unit was seeing from the temp sensor. This caused the unit to misread the temperature and be unsettable. It basically ran the fan high all the time. It was only after a week's worth of tech support emails to SPAL that I was told to cut the ground line off of the WeatherPack and ground directly to the chassis. Once I did, it behaved for the most part.
The other design issues are with the control algorithm. It's totally linear, which anyone versed in electronic control systems knows is almost never an appropriate method for a closed loop system. For example, if the fan is set to run half speed at 84 degrees and full speed at 94 degrees, it runs at 55% at 85C, 60% at 86C, 70% at 87C, etc. The issue is that this linear approach means the car can "stick" at a temperature. Even though the fan is running faster, there is more heat to remove so they cancel each other out. What's needed is a "gain" setting. The fan needs to overshoot the target speed for a little bit. Using the example above, the fan should run at 80% at 87C until the temp drops to 86C and then resume it's normal 60%. The higher off the target temp of the vehicle, the faster the fan should run to bring it down. That's now closed loop control is properly done in this case.
Additionally, setting the unit is confusing. If you accidentally set the low speed and high speed temps too close, the fan simply won't run. This is not an acceptable fail safe. The fan should either run at high speed until the situation is corrected, or a medium like 80%.
Those faults aside, the unit does seem to be working for me now. After tweaking the high and low settings for a week or so I've got the fan adjusted properly. Another bit of good news is that in speaking with the SPAL engineers, they have told me the new version of the circuit fixes the ground issue. They didn't isolate the input, nor did they implement a gain control, but they did add a signal ground. That should go a long way to solving the problem.
Thread Starter
Joined: Feb 2001
Posts: 29,798
Likes: 128
From: London, Ontario, Canada
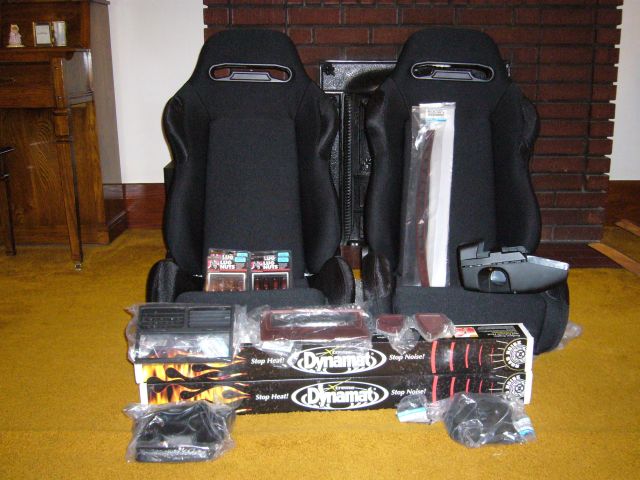
With the fan nonsense behind me it was time to turn my attention to the interior. The existing interior of the car, aside from being half ripped out, was in terrible shape. The maroon carpet had faded to green, the seats were covered in stains of unknown biological origin, and most of the plastic had long since cracked. Again, it was time to spend some money at Mazdatrix. I ordered much of the commonly broken trim: idiot light surround, demister grills, front defroster grills, shifter surround and boot, steering column cover, heater vents and rubber shifter boots. From the local speed shop came a few rolls of Dynamat. As it turns out, I would need a LOT more Dynamat. The seats are just some made in China sport seats that I literally purchased out of the back of a van in a Petro Canada parking lot in Scarborough (Toronto's ghetto). The quality and comfort of these seats surprised me. Will the last 20 years? Probably not. But for the price and the 5 years I will get out of them I'm not worried. Also I grabbed a set of red anodized lug nuts, just because.
Not shown in the picture is the Auto Custom Carpets carpet set, purchased from Black Dragon. We'll talk about that later.
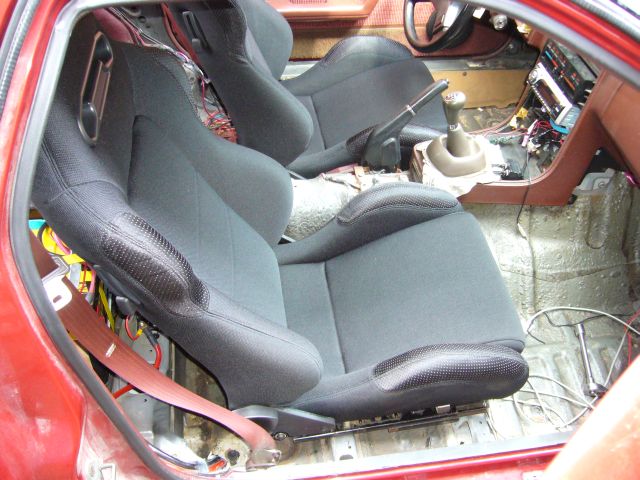
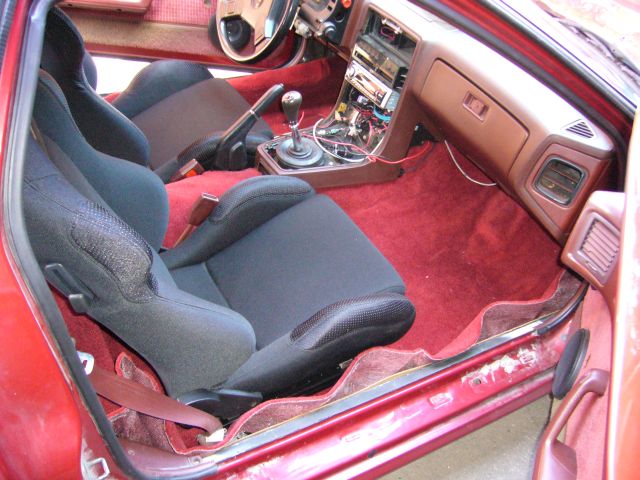
Fitting the driver side seat was easy. All it took was redrilling the stock seat rails and elongating the mounting holes a bit. The seat almost dropped right in.
The seat fits fine on the stock brackets but is a bit higher then stock. I'm torn between really liking the new driving position (it allows much easier heel-toe) and thinking it's too high. There are half in spacers on the seat rails so I can always lower the seat later if I feel it's too high.
The passenger seat was a bit more complicated. Mazda designed the passenger seat and rail very oddly. The outer mount (closest to the door) is standard. However the inner mount on the transmission tunnel is mounted at an angle and up quite high. The seat then has a matching depression and angled mounts to bolt up. This means that an aftermarket seat with a flat bottom doesn't even come close to fitting. It would have been an easy affair to make a set of spacers to match everything up but that would have raised the seat at least an inch. That was unacceptable as the stock seat is already high enough.
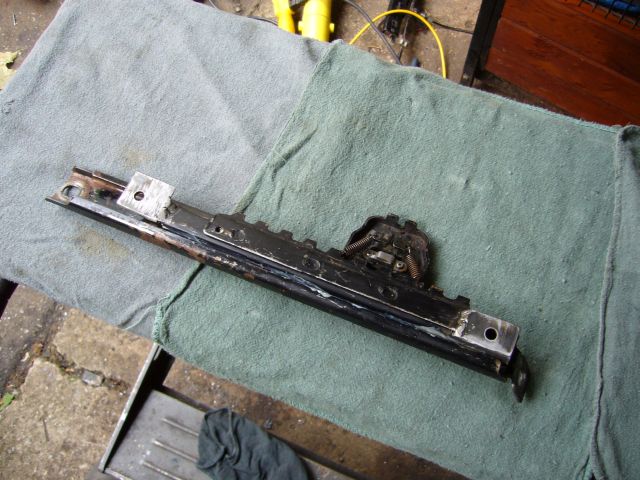
Redrilling the outer rail in the same way the driver side was done took care of one side. I then fit the seat in using the single rail and figured out the angle needed to make a set of tabs. Then, the ends were cut off of the stock inner rail.
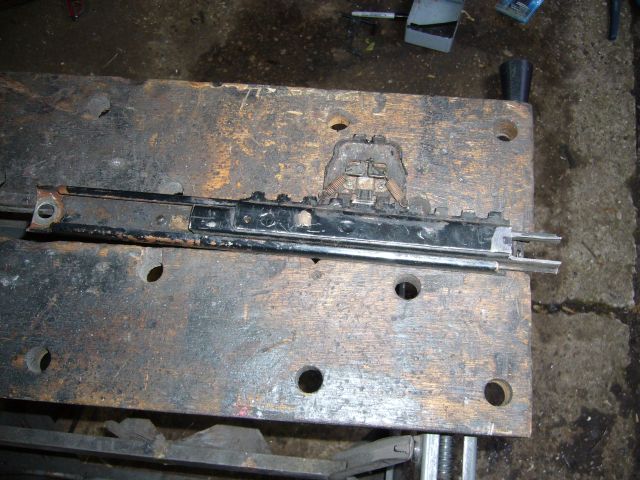
I then made a set of tabs using 1/8" plate.
Not shown in the picture is the Auto Custom Carpets carpet set, purchased from Black Dragon. We'll talk about that later.
Fitting the driver side seat was easy. All it took was redrilling the stock seat rails and elongating the mounting holes a bit. The seat almost dropped right in.
The seat fits fine on the stock brackets but is a bit higher then stock. I'm torn between really liking the new driving position (it allows much easier heel-toe) and thinking it's too high. There are half in spacers on the seat rails so I can always lower the seat later if I feel it's too high.
The passenger seat was a bit more complicated. Mazda designed the passenger seat and rail very oddly. The outer mount (closest to the door) is standard. However the inner mount on the transmission tunnel is mounted at an angle and up quite high. The seat then has a matching depression and angled mounts to bolt up. This means that an aftermarket seat with a flat bottom doesn't even come close to fitting. It would have been an easy affair to make a set of spacers to match everything up but that would have raised the seat at least an inch. That was unacceptable as the stock seat is already high enough.
Redrilling the outer rail in the same way the driver side was done took care of one side. I then fit the seat in using the single rail and figured out the angle needed to make a set of tabs. Then, the ends were cut off of the stock inner rail.
I then made a set of tabs using 1/8" plate.
Thread Starter
Joined: Feb 2001
Posts: 29,798
Likes: 128
From: London, Ontario, Canada
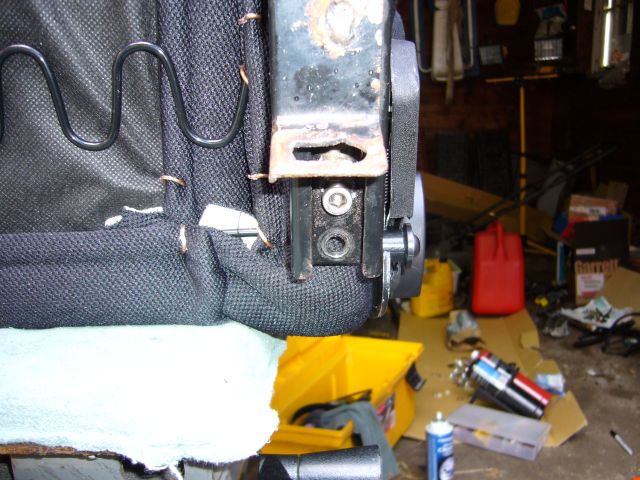
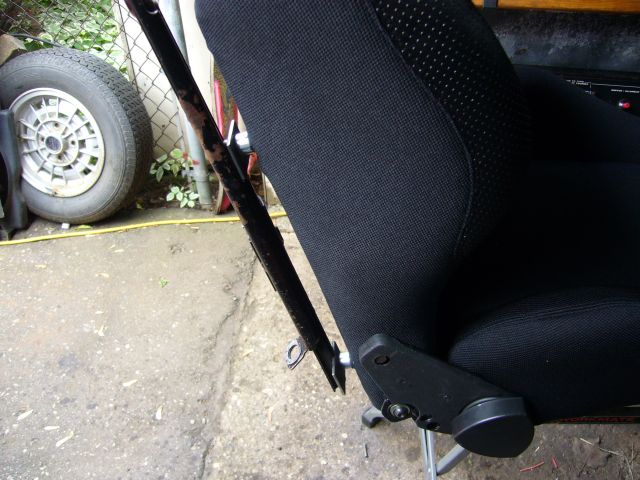
The seat was then installed into the car with the outer rail, while the tabs rested on the inner rail. A bit of careful tack welding secured them. Plenty of wet cloth was wrapped around the area during welding to avoid setting the new seat on fire.
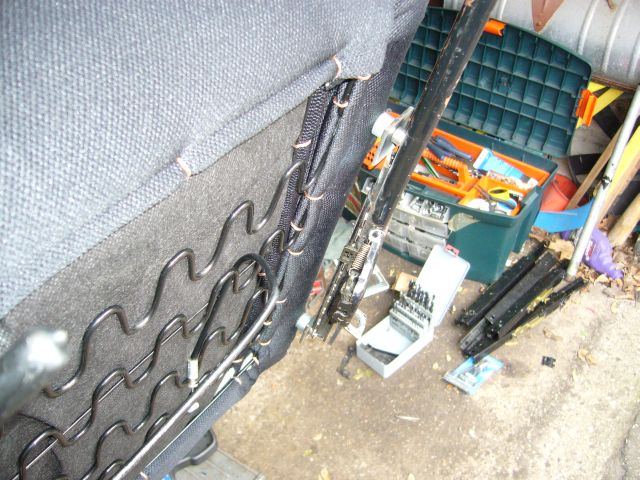
Here's the bottom view of the mounting tabs. You can see the angle of the inner passenger mount.
The rail was then removed from the seat and the mounting tabs fully welded and trimmed. While the fitting was very time consuming and tiring (lifting the seats in and out and in and out and in and out), it really wasn't that hard.
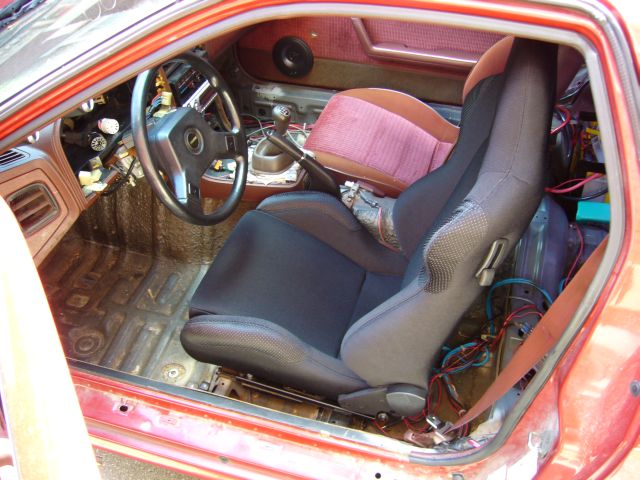
After all the welding, the seat fit quite well in the car. Two pieces of 1.5" square tubing were used as spacers on the outer rail to level the seat. Still needs a bit of tweaking to get it perfect, but for now it's fine. The rails still slide and both seats have full adjustment.
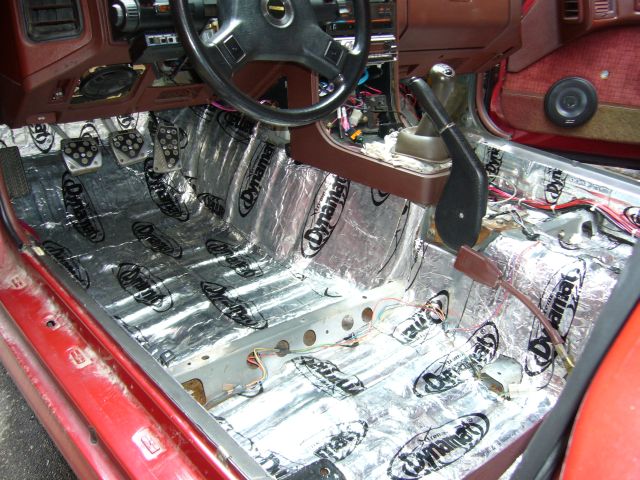
Time to quiet the car down a bit. Long trips in this car have always been very tiring due to road noise, exhaust noise, drivetrain noise and general rattles and squeaks. The factory sound deadening does a good job, but with the tar undercoating removed for the POR-15, the car was far noisier then before. I decided to cover the entire floor pan in Dynamat, so I purchased two 12 square foot rolls of the stuff and started applying to the floor pan and hatch area. I was surprised at how little coverage 12 square feet actually provided. Then again, when I drove the car with the floor and hatch partly covered, I was amazed at the difference it made. It sounded like a whole new car.
Here's the bottom view of the mounting tabs. You can see the angle of the inner passenger mount.
The rail was then removed from the seat and the mounting tabs fully welded and trimmed. While the fitting was very time consuming and tiring (lifting the seats in and out and in and out and in and out), it really wasn't that hard.
After all the welding, the seat fit quite well in the car. Two pieces of 1.5" square tubing were used as spacers on the outer rail to level the seat. Still needs a bit of tweaking to get it perfect, but for now it's fine. The rails still slide and both seats have full adjustment.
Time to quiet the car down a bit. Long trips in this car have always been very tiring due to road noise, exhaust noise, drivetrain noise and general rattles and squeaks. The factory sound deadening does a good job, but with the tar undercoating removed for the POR-15, the car was far noisier then before. I decided to cover the entire floor pan in Dynamat, so I purchased two 12 square foot rolls of the stuff and started applying to the floor pan and hatch area. I was surprised at how little coverage 12 square feet actually provided. Then again, when I drove the car with the floor and hatch partly covered, I was amazed at the difference it made. It sounded like a whole new car.
Thread Starter
Joined: Feb 2001
Posts: 29,798
Likes: 128
From: London, Ontario, Canada
Since I ran out of Dynamat and the store was closed for the weekend, I installed a new set of door seals. The original set had disappeared 8 years ago when the car was painted and a lot of road noise and dust entered the car as a result. These new seals work well enough to make it hard to close the door due to air pressure and are well worth the investment. In addition to the plastic retaining clips I also used weatherstrip adhesive in the areas subject to sag.
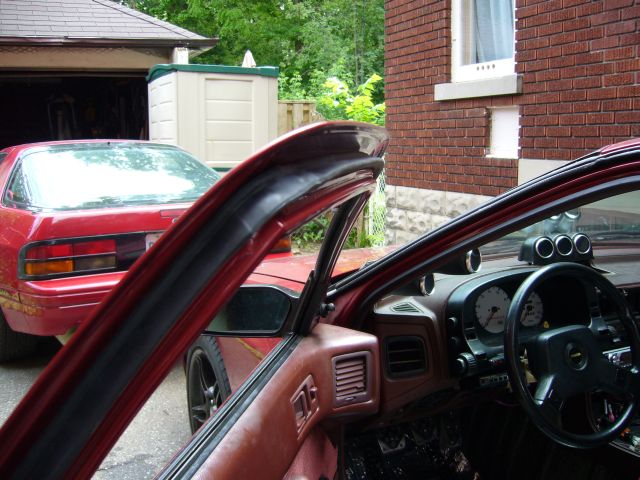
I also decided that I had lived long enough under the oppression of standard chrome wheel lug nuts, so I installed the anodized red replacements. Say what you will, I like them and they match the car. Also my original nuts were well past the point of worn out and appeared to be randomly salvaged from other cars as no two matched.

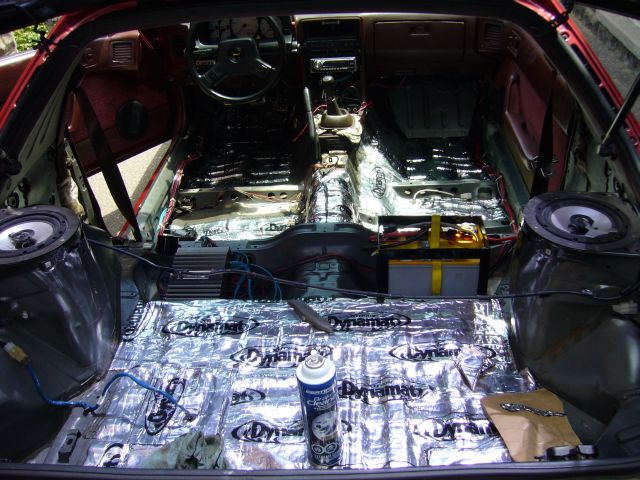
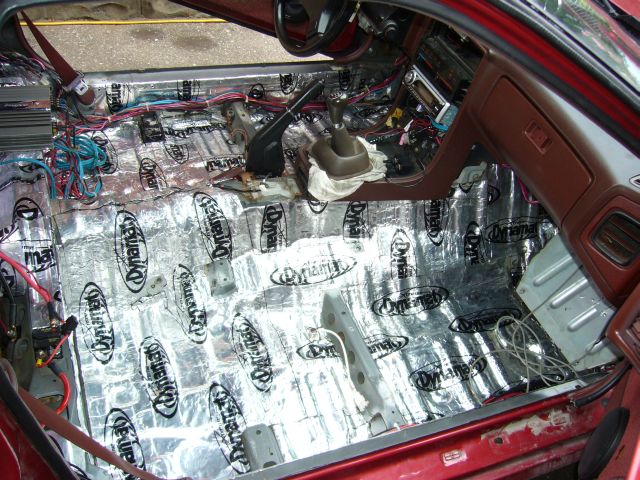
A big box of 36 square feet of Dynamat arrived for me at Jim's Speed a few days later. Continuing with the installation, I began covering the rest of the floor pan. This is actually very time consuming. To do a good job each piece must be carefully measured, cut, and then slowly laid onto a clean surface. Overlaps add a lot of thickness so I worked carefully and slowly to avoid them. All in all, this took about a week and a half.
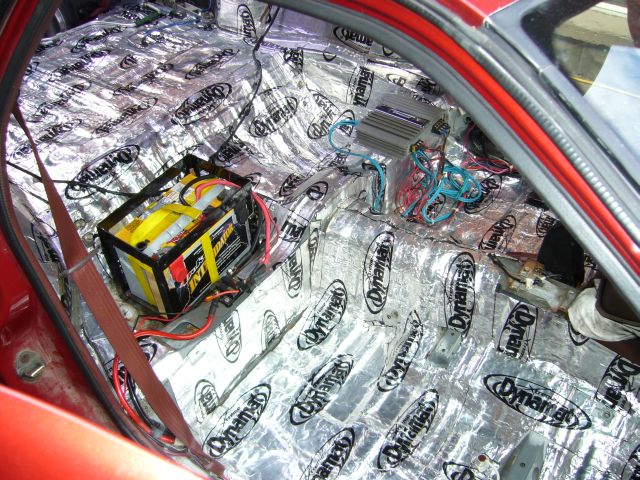
I covered the rear wheel wells completely including the shock towers, the rear storage bin area, and the full rear hatch floor.

The entire passenger area was covered as well.
I also decided that I had lived long enough under the oppression of standard chrome wheel lug nuts, so I installed the anodized red replacements. Say what you will, I like them and they match the car. Also my original nuts were well past the point of worn out and appeared to be randomly salvaged from other cars as no two matched.
A big box of 36 square feet of Dynamat arrived for me at Jim's Speed a few days later. Continuing with the installation, I began covering the rest of the floor pan. This is actually very time consuming. To do a good job each piece must be carefully measured, cut, and then slowly laid onto a clean surface. Overlaps add a lot of thickness so I worked carefully and slowly to avoid them. All in all, this took about a week and a half.
I covered the rear wheel wells completely including the shock towers, the rear storage bin area, and the full rear hatch floor.
The entire passenger area was covered as well.
Thread Starter
Joined: Feb 2001
Posts: 29,798
Likes: 128
From: London, Ontario, Canada
How much Dynamat did I use? Approximately 52 square feet. That is considerably more then I thought I would need. This stuff is expensive, but it is worth it. I probably added 50 LBs to the car and I must say that besides the turbo system, this is the best 50 LBS ever. I'm not exaggerating when I say that the car feels like a totally different vehicle. Gone is all the road noise, transmission noise, random rattles and shoe melting heat from the transmission tunnel. The car is now comfortable and far less tiring to drive, staying much cooler in operation. My only regret is that the stuff works so well that some of the wonderful turbo noise has been muffled. It's a worthwhile tradeoff though.
If you are going to do this I have one very important tip: poke all your bolt holes and upholstery clip holes as you lay the Dynamat. Hunting for them later with a pin really sucks.
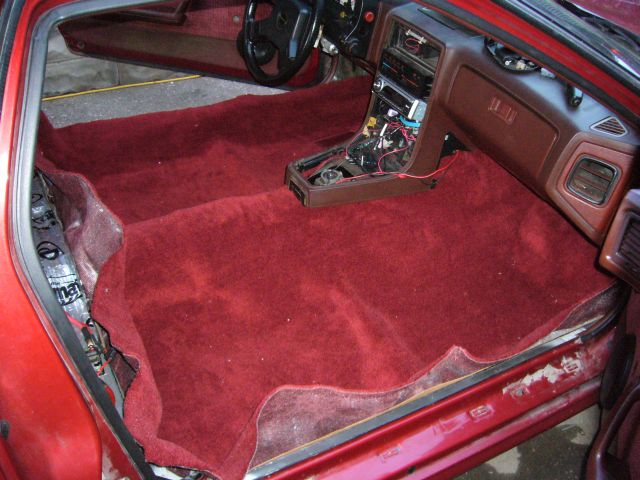
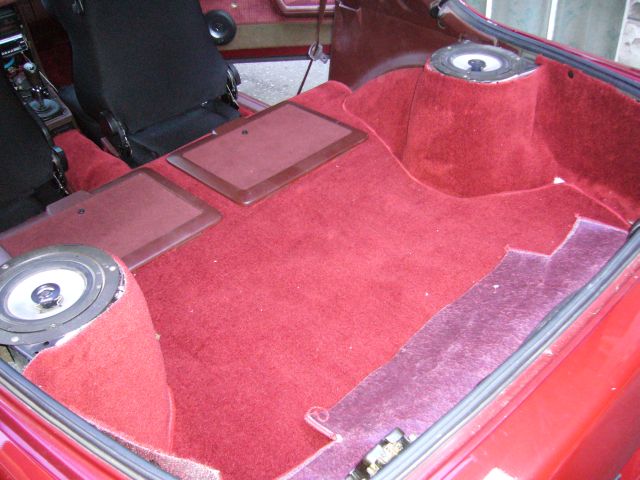
As I could have purchased several 2nd gens for the price of buying a new dealer carpet set, I decided to go with the ACC replacement carpet offered by Black Dragon. ACC advertises their products as "The highest quality aftermarket replacement carpet set in the industry". This may be true, but only because there are no other aftermarket carpet sets for the 2nd gen. Consider this: If the OEM carpet is a "10" on the quality scale, the ACC carpet is a "2". The major problem is fit. It doesn't! All aftermarket carpet sets are shipped folded in a box so they need time to stretch back out, so the lack of moulding didn't initially worry me. They also all need to be trimmed, so I didn't worry about th excessive amount of material (better to have more then not enough). However as I began fitting the carpet I realized that there were some issues. First and most importantly, the moldings (for things like seat crossmembers, corners, etc.) were not distinct/deep enough. The seat crossmember moldings were far too shallow. This meant that the carpet had to be stretched to fit, creating massive wrinkles and bunching elsewhere. At first glance, the carpet looks great. I decided to do some trimming around the shifter area to avoid having to remove the dash. This worked out well.
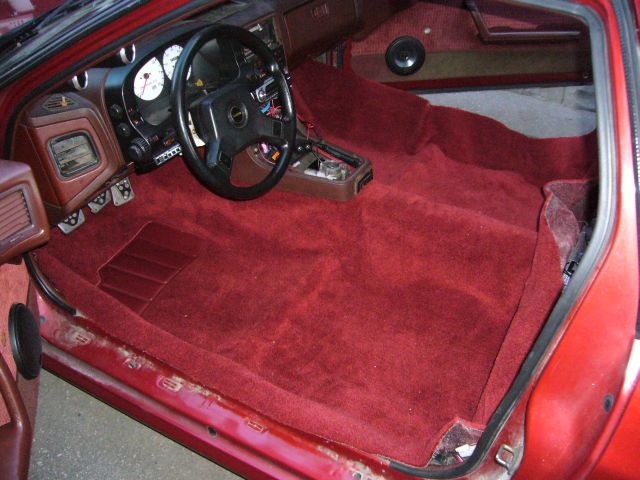
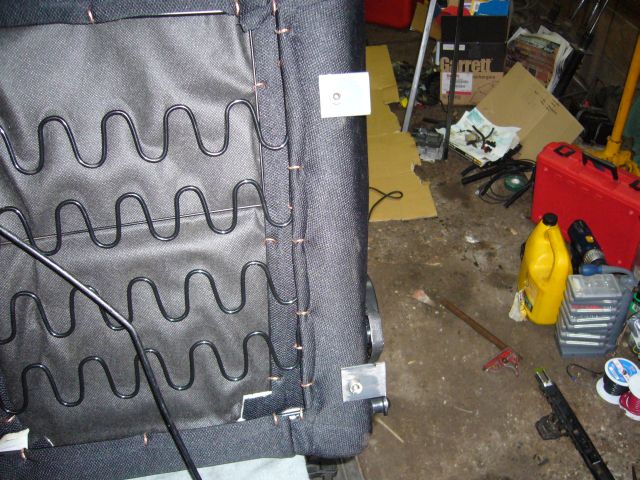
However take a look at it from the passenger side. See how flat everything is? Notice how the rear seat mounts disappear? Because they were not molded the carpet had to be bunched and folded to lay flat. This pulled some areas very tight, and left others very loose. The end result is that it is just plain a bad fit. I think ACC is far to used to molding carpets for flat muscle car floors. A floor with contours like ours is out of their league.
After a lot of fitting and trimming, I was able to get the fit into the "acceptable" category. Still nowhere near OEM, but it's much better then the stained and faded carpet I removed.
Here are a few other issues I noticed with this carpet set:
1. Rear speaker/wheel well areas did not have enough extra material. They fell several inches short at the end and needed a lot of stretching.
2. The colour was several shades too light. The OEM carpet matches the trim perfectly. It looks like ACC just pulled the colour out of their existing stock instead of bothering to match it. However I do actually like the brighter shade. It brightens up the interior and bit and brings in a little contrast.
3. Several blemishes were on the carpet right out of the box. Not a huge deal, but a new carpet should not have missing tufts.
4. Did I mention it doesn't bloody fit?
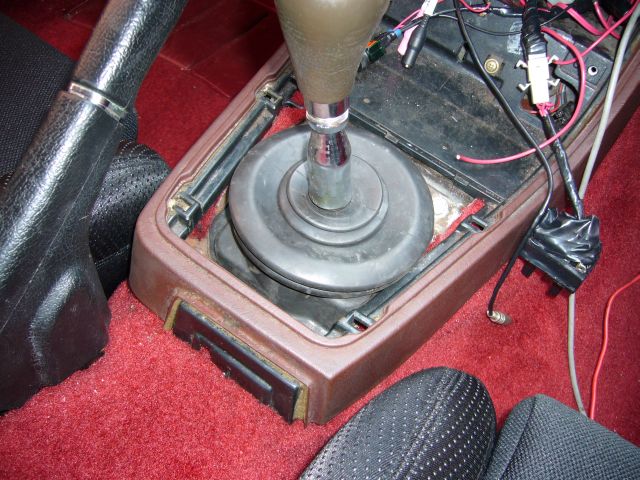
To protect my new carpet and deal with all the shifter air leaks I installed new rubber boots around the shifter. This is a worthwhile fix for probably 90% of 2nd gens out there as I have never seen one with the boots in tact that this point. A new set of boots stops all the hot air pushed up from the transmission tunnel from baking your hands, hugely cuts down on road noise, and quiets the transmission greatly. Awesome way to spend $30. If you have an exhaust leak, these boots also prevent you from stepping out of the car wearing that "rotary perfume" that the ladies love so much.
If you are going to do this I have one very important tip: poke all your bolt holes and upholstery clip holes as you lay the Dynamat. Hunting for them later with a pin really sucks.
As I could have purchased several 2nd gens for the price of buying a new dealer carpet set, I decided to go with the ACC replacement carpet offered by Black Dragon. ACC advertises their products as "The highest quality aftermarket replacement carpet set in the industry". This may be true, but only because there are no other aftermarket carpet sets for the 2nd gen. Consider this: If the OEM carpet is a "10" on the quality scale, the ACC carpet is a "2". The major problem is fit. It doesn't! All aftermarket carpet sets are shipped folded in a box so they need time to stretch back out, so the lack of moulding didn't initially worry me. They also all need to be trimmed, so I didn't worry about th excessive amount of material (better to have more then not enough). However as I began fitting the carpet I realized that there were some issues. First and most importantly, the moldings (for things like seat crossmembers, corners, etc.) were not distinct/deep enough. The seat crossmember moldings were far too shallow. This meant that the carpet had to be stretched to fit, creating massive wrinkles and bunching elsewhere. At first glance, the carpet looks great. I decided to do some trimming around the shifter area to avoid having to remove the dash. This worked out well.
However take a look at it from the passenger side. See how flat everything is? Notice how the rear seat mounts disappear? Because they were not molded the carpet had to be bunched and folded to lay flat. This pulled some areas very tight, and left others very loose. The end result is that it is just plain a bad fit. I think ACC is far to used to molding carpets for flat muscle car floors. A floor with contours like ours is out of their league.
After a lot of fitting and trimming, I was able to get the fit into the "acceptable" category. Still nowhere near OEM, but it's much better then the stained and faded carpet I removed.
Here are a few other issues I noticed with this carpet set:
1. Rear speaker/wheel well areas did not have enough extra material. They fell several inches short at the end and needed a lot of stretching.
2. The colour was several shades too light. The OEM carpet matches the trim perfectly. It looks like ACC just pulled the colour out of their existing stock instead of bothering to match it. However I do actually like the brighter shade. It brightens up the interior and bit and brings in a little contrast.
3. Several blemishes were on the carpet right out of the box. Not a huge deal, but a new carpet should not have missing tufts.
4. Did I mention it doesn't bloody fit?
To protect my new carpet and deal with all the shifter air leaks I installed new rubber boots around the shifter. This is a worthwhile fix for probably 90% of 2nd gens out there as I have never seen one with the boots in tact that this point. A new set of boots stops all the hot air pushed up from the transmission tunnel from baking your hands, hugely cuts down on road noise, and quiets the transmission greatly. Awesome way to spend $30. If you have an exhaust leak, these boots also prevent you from stepping out of the car wearing that "rotary perfume" that the ladies love so much.
Trending Topics
Thread Starter
Joined: Feb 2001
Posts: 29,798
Likes: 128
From: London, Ontario, Canada
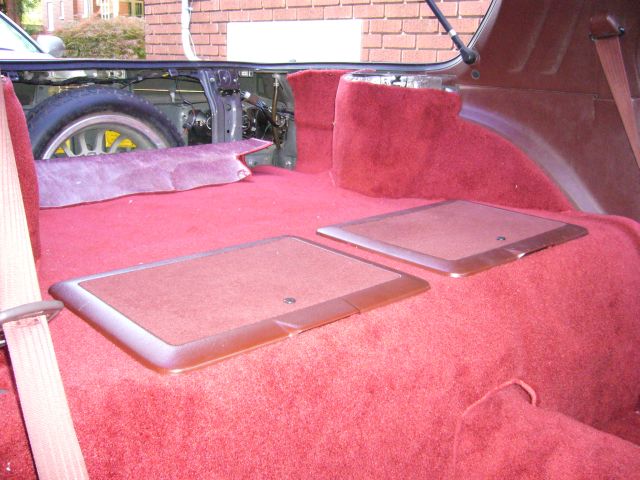
I then trimmed the rear of the carpet and secured it to the rear bulkhead using the stock fir trees. It looks a bit wrinkled in the picture but actually lays fairly flat. Some of the wrinkles will disappear as the carpet molds itself to the contour of the car over time. Once the carpet was in place, the rear fiberglass deck was reinstalled.
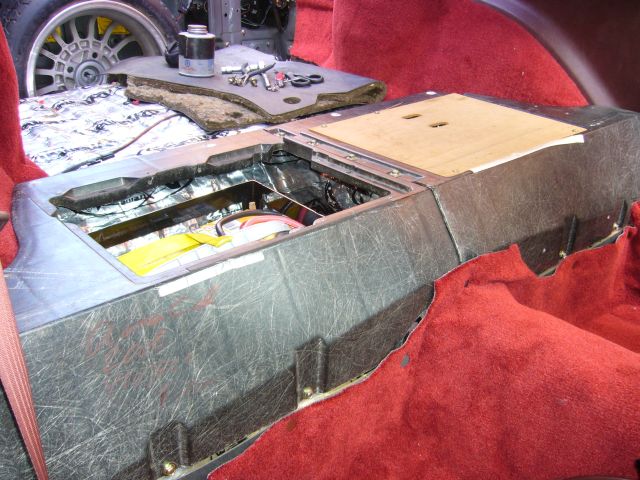
The rear main carpet was put into position and it actually fit quite well. Much better then all the other pieces of this carpet set. It included pre-cut holes for the storage bins and required only a little trimming around the storage bin hinges and screws. The stitching around the edges is of acceptable quality. My car didn't come with storage bins originally. Years ago I added a single bin, but this time I needed both (the battery sits under the passenger lid).
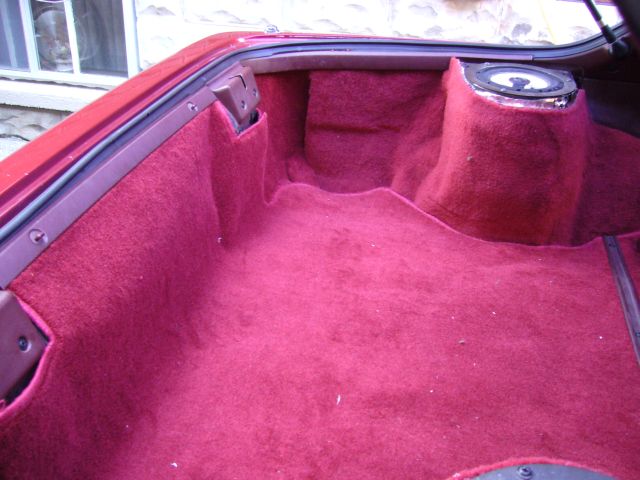
Here's another view of the rear carpet. See that little hint of silver in the top right corner? That's an area of exposed Dynamat caused by not enough carpet. It was cut this way from the factory. I'll glue a piece of scrap carpet down underneath to camouflage the spot, but I find it annoying and odd that ACC did not include any extra material in the two pieces they shipped to cover the shock towers.
I transferred the rear carpet retaining trim from the old carpet to the new. It actually is fairly simple to do. The teeth were folded up, which allowed the plastic backing to be removed. Then the trim simply slid out of the old carpet. I laid the old carpet over the new and then traced for the slots, cutting them with a razor blade. The trim then just slides into the slots and at that point, installation is reverse of the removal (don't you love it when they say that?). I'm still undecided about the square vents. Without them the rear of the hatch area looks clean and sterile. But having them is more authentic. I can install them at any time, but once the carpet is cut to fit them I can't uninstall...
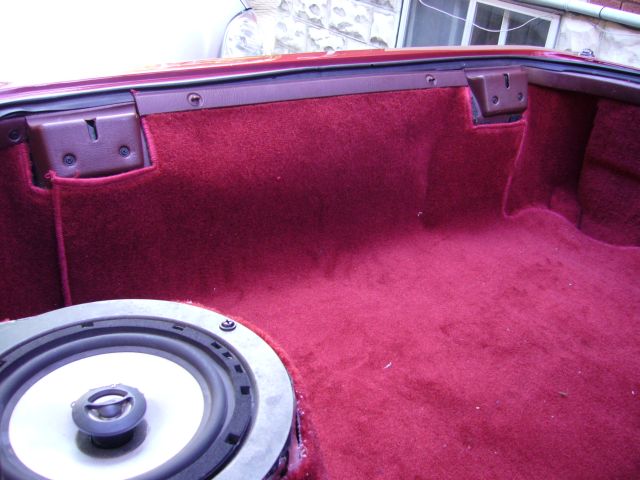
The kit includes two small pieces that fit between the rear carpet and the shock tower carpet. They fit miserably. Again, not enough material was left for a decent overlap so you can see the gaps that have formed. I'm going to glue a backing board in place to tie them together and add a bit of structure.
The rear main carpet was put into position and it actually fit quite well. Much better then all the other pieces of this carpet set. It included pre-cut holes for the storage bins and required only a little trimming around the storage bin hinges and screws. The stitching around the edges is of acceptable quality. My car didn't come with storage bins originally. Years ago I added a single bin, but this time I needed both (the battery sits under the passenger lid).
Here's another view of the rear carpet. See that little hint of silver in the top right corner? That's an area of exposed Dynamat caused by not enough carpet. It was cut this way from the factory. I'll glue a piece of scrap carpet down underneath to camouflage the spot, but I find it annoying and odd that ACC did not include any extra material in the two pieces they shipped to cover the shock towers.
I transferred the rear carpet retaining trim from the old carpet to the new. It actually is fairly simple to do. The teeth were folded up, which allowed the plastic backing to be removed. Then the trim simply slid out of the old carpet. I laid the old carpet over the new and then traced for the slots, cutting them with a razor blade. The trim then just slides into the slots and at that point, installation is reverse of the removal (don't you love it when they say that?). I'm still undecided about the square vents. Without them the rear of the hatch area looks clean and sterile. But having them is more authentic. I can install them at any time, but once the carpet is cut to fit them I can't uninstall...
The kit includes two small pieces that fit between the rear carpet and the shock tower carpet. They fit miserably. Again, not enough material was left for a decent overlap so you can see the gaps that have formed. I'm going to glue a backing board in place to tie them together and add a bit of structure.
Thread Starter
Joined: Feb 2001
Posts: 29,798
Likes: 128
From: London, Ontario, Canada
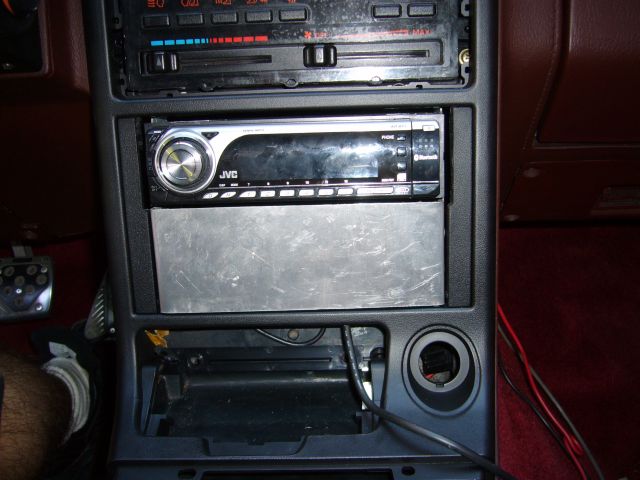
Sometime long before I purchased this car, a previous owner had installed a low end AM/FM/Cass stereo in place of the AM radio the car came with. This install was a real hack job, amounting to nothing more then cutting the factory harness to pieces, poorly crimping on the new harness, and then jamming the unit into the center console, grinding until it fit. The result was as expected. The first mod I did after I took delivery of the car was to replace the awful unit with a less awful unit and then correct the wiring nightmare. As the stock stereo bracket had disappeared previous to my ownership I also mounted my slightly less crappy Pyramid tape deck to the center console. We all know that the S4 center console is not really a very strong piece of plastic. 20 years of sun exposure turns into a brittle mess. The result is that at least once a year the weight of the stereo would crack the console, and I was off to the wreckers to replace it.
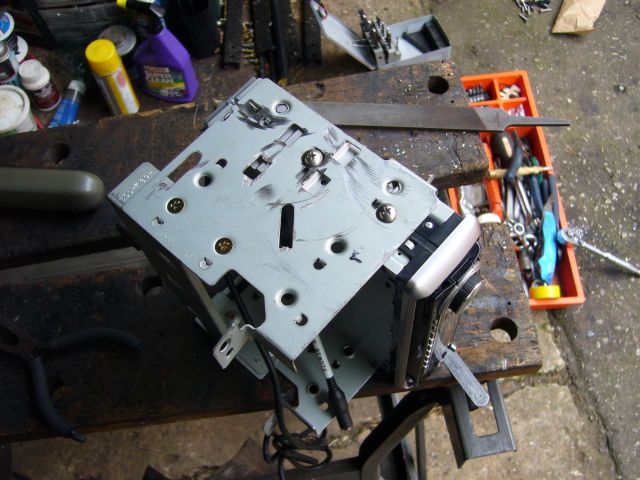
This time around I did things correctly. According to Mazda, the stock FC stereo mounting brackets are no longer available. A quick trip to the wreckers and $20 later, I had what I needed. Since almost all OEM stereos are of a standard DIN width, the only thing required to fit the new JVC KD-BT1 (AM/FM/CD/MP3/USB/Bluetooth) stereo into the FC stereo bracket was a bit of trimming to flatten out the inside of the bracket. After that it bolted right in with some M5 stainless screws. Finally I'll have a stereo that doesn't move around when buttons are pressed!
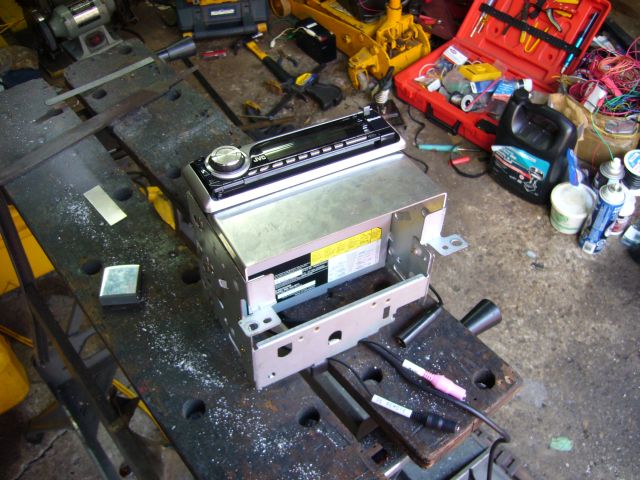
Some tested. Yeah, it still fits. I had actually wired the unit into the car at the beginning of the summer and zip tied it in place temporarily. Listening to the engine is great, but I got kind of tired of having no other options.
OK, here's the thing. I had originally intended to use the carbon fibre stereo surround produced by FIBREMAZ, but after two units he shipped me didn't fit, I bought a new surround from the dealer. I don't blame FIBREMAZ. For whatever reason, his consoles don't seem to fit my car. After sending back the original due to 1/4" gaps at the top, the replacement had a slightly smaller gap but still didn't fit. Others have used his consoles in the past and had no problems. Though for whatever reason, they don't fit my car at all. However the new console I purchased from the dealer fit perfectly.
Anyone battling with cracking stock consoles should consider just buying a new one at the dealer. The cost was $101 exactly and it arrived next day. Not only was it in perfect condition, but it is actually flexible! It's a sobering reminder that FC trim is not crappy, just old. I can bend and twist this console with no fear of cracks.
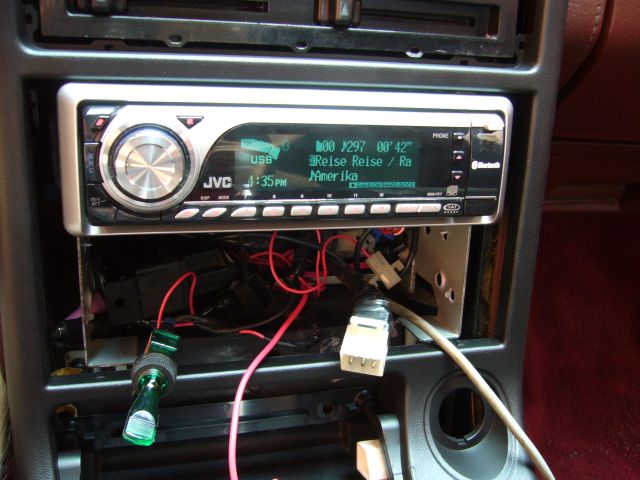
I temporarily installed it with a brand new set of vents and new shifter surround/boot to check the fit of the stereo, making sure it was level and at the correct height.
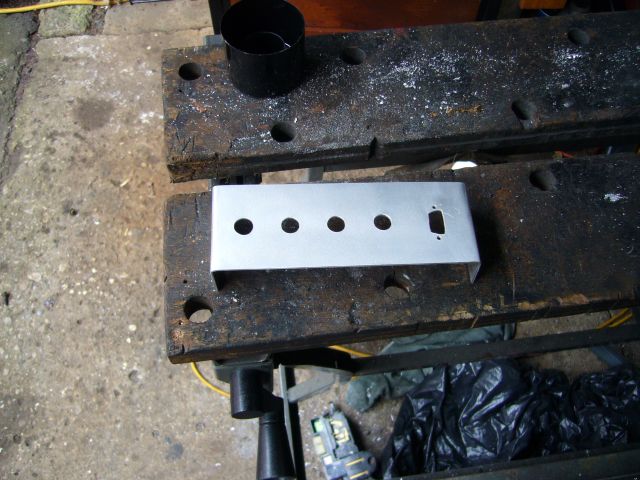
The ugly space underneath the stereo needs to be filled. Additionally I need somewhere to mount my switches (daytime running lights, windows, fog lights). Previously I had a black Lexan panel mount to the backside of the center console. It worked, though did have a tendency to crack the 20 year old console after about a years worth of use. This time the switch panel would be made of aluminum and mounted solidly to the stereo bracket. I simply cut a piece of 2MM aluminum to size, then bent each end to 90 degrees. Took two tries to get the correct distance between bends though.
Seems to fit well in the stereo surround. Notice that I also trimmed the two side pieces to allow a little more clearance to install the console over the stereo frame. I then found out that the frame detaches from the stereo. Doh.
Next I drilled the appropriate holes in the panel to actually mount the switches. Additionally I added a cutout for a DB9 serial port. The port connects to the serial cable coming from the Microtech LT8s and provides a convenient spot to connect without having to dig around in the carpet or have a tonne of cable tied up under the dash.
This time around I did things correctly. According to Mazda, the stock FC stereo mounting brackets are no longer available. A quick trip to the wreckers and $20 later, I had what I needed. Since almost all OEM stereos are of a standard DIN width, the only thing required to fit the new JVC KD-BT1 (AM/FM/CD/MP3/USB/Bluetooth) stereo into the FC stereo bracket was a bit of trimming to flatten out the inside of the bracket. After that it bolted right in with some M5 stainless screws. Finally I'll have a stereo that doesn't move around when buttons are pressed!
Some tested. Yeah, it still fits. I had actually wired the unit into the car at the beginning of the summer and zip tied it in place temporarily. Listening to the engine is great, but I got kind of tired of having no other options.
OK, here's the thing. I had originally intended to use the carbon fibre stereo surround produced by FIBREMAZ, but after two units he shipped me didn't fit, I bought a new surround from the dealer. I don't blame FIBREMAZ. For whatever reason, his consoles don't seem to fit my car. After sending back the original due to 1/4" gaps at the top, the replacement had a slightly smaller gap but still didn't fit. Others have used his consoles in the past and had no problems. Though for whatever reason, they don't fit my car at all. However the new console I purchased from the dealer fit perfectly.
Anyone battling with cracking stock consoles should consider just buying a new one at the dealer. The cost was $101 exactly and it arrived next day. Not only was it in perfect condition, but it is actually flexible! It's a sobering reminder that FC trim is not crappy, just old. I can bend and twist this console with no fear of cracks.
I temporarily installed it with a brand new set of vents and new shifter surround/boot to check the fit of the stereo, making sure it was level and at the correct height.
The ugly space underneath the stereo needs to be filled. Additionally I need somewhere to mount my switches (daytime running lights, windows, fog lights). Previously I had a black Lexan panel mount to the backside of the center console. It worked, though did have a tendency to crack the 20 year old console after about a years worth of use. This time the switch panel would be made of aluminum and mounted solidly to the stereo bracket. I simply cut a piece of 2MM aluminum to size, then bent each end to 90 degrees. Took two tries to get the correct distance between bends though.
Seems to fit well in the stereo surround. Notice that I also trimmed the two side pieces to allow a little more clearance to install the console over the stereo frame. I then found out that the frame detaches from the stereo. Doh.
Next I drilled the appropriate holes in the panel to actually mount the switches. Additionally I added a cutout for a DB9 serial port. The port connects to the serial cable coming from the Microtech LT8s and provides a convenient spot to connect without having to dig around in the carpet or have a tonne of cable tied up under the dash.
Thread Starter
Joined: Feb 2001
Posts: 29,798
Likes: 128
From: London, Ontario, Canada
When painted with DupliColor black automotive trim paint the new switch plate is almost a perfect match to the OEM plastic. Prior to painting I aggressively attacked the aluminum with the wire wheel to give it a rough texture. After painting the texture shows through and looks like the OEM wrinkle finish. 4 light coats of this paint should stand up to years of wear.
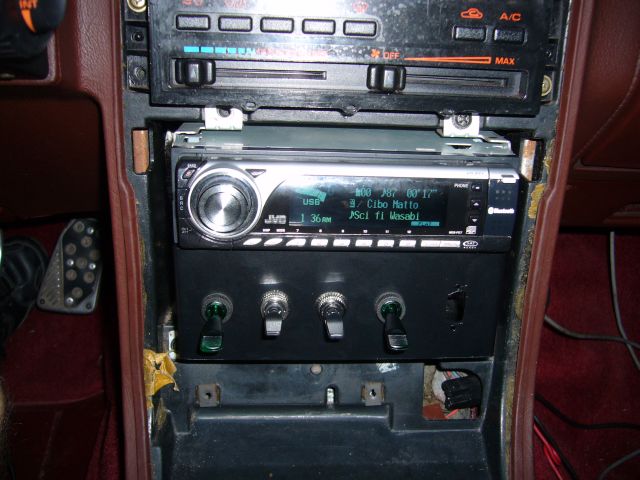
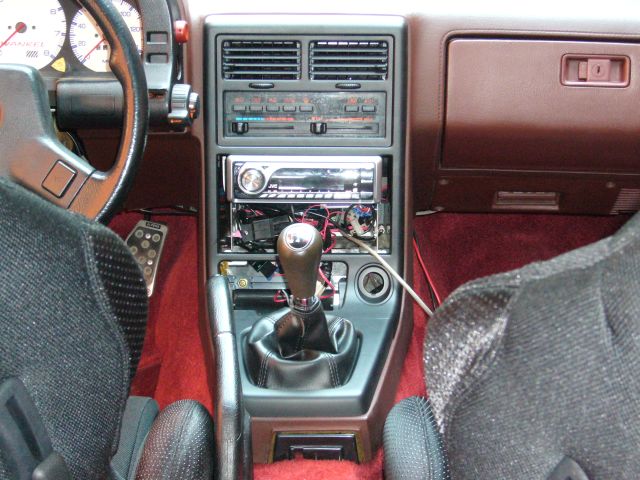
Finally, the whole mess was permanently installed. Everything still fit and any gaps were small and even. New trim really is a joy. None of it is brittle, scratched, dirty or worn. All of it just fit and can be removed without concern over breakage. The colour between pieces is a bit uneven, probably due to manufacturing differences. A bit of Armor All will even things up.
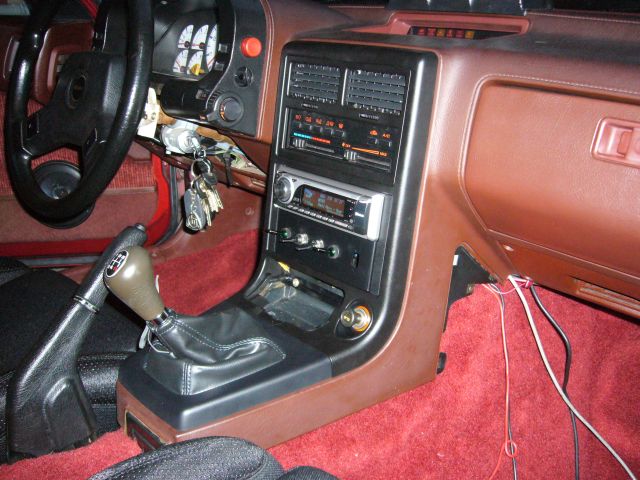
You'll notice there are still a few bits of trim to be installed. I'm still trying to find my ash tray. It's in the shed somewhere...somewhere. If I can't find it or it's not in good shape I'll just order a new one. I have a new steering column surround waiting to be installed. The only question mark is the console between the seats. I'm trying to decide whether to go maroon or carry the black through. I've also got to send the door panels out for re-upholstering as soon as I decided on how I want it done.
I think that's enough for now. The car is getting very close to being done. As far as fabrication goes, I think that's the bulk of it. There are still a few nagging issues: the oil leak at the front hub is driving me crazy, I need to fix my metering oil pump lines and actuator cable, and some kind of LSD is required to actually have a hope of getting traction. Oh, and a boost controller so I can really have some fun.
Finally, the whole mess was permanently installed. Everything still fit and any gaps were small and even. New trim really is a joy. None of it is brittle, scratched, dirty or worn. All of it just fit and can be removed without concern over breakage. The colour between pieces is a bit uneven, probably due to manufacturing differences. A bit of Armor All will even things up.
You'll notice there are still a few bits of trim to be installed. I'm still trying to find my ash tray. It's in the shed somewhere...somewhere. If I can't find it or it's not in good shape I'll just order a new one. I have a new steering column surround waiting to be installed. The only question mark is the console between the seats. I'm trying to decide whether to go maroon or carry the black through. I've also got to send the door panels out for re-upholstering as soon as I decided on how I want it done.
I think that's enough for now. The car is getting very close to being done. As far as fabrication goes, I think that's the bulk of it. There are still a few nagging issues: the oil leak at the front hub is driving me crazy, I need to fix my metering oil pump lines and actuator cable, and some kind of LSD is required to actually have a hope of getting traction. Oh, and a boost controller so I can really have some fun.
Fantastic write up! That about covers everything I want to do with my unit, and has earned a permanant place in my bookmarks. The dynamat part was incredibly helpful, as I was wondering if I was about to make a wise investment in the product. Sounds like it
Do you mind telling me how you went about removing the sound deadening tar? I was told dry ice was the way to go, but thats in short supply for me unfortunately, I dont know anyone that would carry that.
I think she looks great mate, the engine is gorgeous. The attention to detail is perfect, and I respect and appreciate something of this quality. This is how our cars SHOULD be restored. You havent skipped out on anything, no corner cutting nor cost cutting. This is great, the end results show.
Thread Starter
Joined: Feb 2001
Posts: 29,798
Likes: 128
From: London, Ontario, Canada
Thank you for the compliments! I would recommend Dynamat any day. I'm sure there are other brands that work just as well too.
As for removing the tar, I tried several methods. Scraping, prying, grinding and freezing all worked but were far too slow. Snrub mentioned that had read of race builders using kerosene so I gave that a try and it worked brilliantly. Kerosene totally dissolves the tar almost on contact and then you just wipe it away with a cloth. Took all of 20 minutes to totally de-tar the undercarriage.
As for removing the tar, I tried several methods. Scraping, prying, grinding and freezing all worked but were far too slow. Snrub mentioned that had read of race builders using kerosene so I gave that a try and it worked brilliantly. Kerosene totally dissolves the tar almost on contact and then you just wipe it away with a cloth. Took all of 20 minutes to totally de-tar the undercarriage.


Joined: Feb 2001
Posts: 4,003
Likes: 379
From: Aurora, Ontario, Canada
Aaron,
Always impressed with your work! So detailed and you explain every step you take.
If only more people would be as thorough as yourself!
It's been forever since I've seen Tina. When are you going to bring it out again?
Always impressed with your work! So detailed and you explain every step you take.
If only more people would be as thorough as yourself!
It's been forever since I've seen Tina. When are you going to bring it out again?

interior is definatly getting there ... i need to swing by sometime to check out the new beast ....
PS: I'm finally fine tuning my car properly, i tried using alpha-n only and it just wasn't working out. Or atleast I couldn't get it working properly, i needed more Acceleration adjustment slots in the wizard to make it run smoother so i opted to a hybrid map. And basically using the MAP sensor readings as my Acceleration enrichments. Its actually working pretty good like that.
.... PS: I'm finally fine tuning my car properly, i tried using alpha-n only and it just wasn't working out. Or atleast I couldn't get it working properly, i needed more Acceleration adjustment slots in the wizard to make it run smoother so i opted to a hybrid map. And basically using the MAP sensor readings as my Acceleration enrichments. Its actually working pretty good like that.
You think the carpet you bought fits poorly?? That's nothing!!!! I bought some from an ebay seller (first mistake) that is far worse fit than that!!! It was a bitch to install, I had to cut slits in it so it could get around the seat mounting spots, and there isn't enough to actually get under the kick panels or the door sills!!! Needless to say I have scrapped the idea and I am going to clean (as best I can) the stock carpet out of my parts car. It's not in bad condition, but the car sat in the woods for about 6 years not properly sealed up so it will take some cleaning.
Good luck with the rest of the restoration.
Craig
Good luck with the rest of the restoration.
Craig
Thread Starter
Joined: Feb 2001
Posts: 29,798
Likes: 128
From: London, Ontario, Canada
Thank you.
interior is definatly getting there ... i need to swing by sometime to check out the new beast ....
PS: I'm finally fine tuning my car properly, i tried using alpha-n only and it just wasn't working out. Or atleast I couldn't get it working properly, i needed more Acceleration adjustment slots in the wizard to make it run smoother so i opted to a hybrid map. And basically using the MAP sensor readings as my Acceleration enrichments. Its actually working pretty good like that.
.... PS: I'm finally fine tuning my car properly, i tried using alpha-n only and it just wasn't working out. Or atleast I couldn't get it working properly, i needed more Acceleration adjustment slots in the wizard to make it run smoother so i opted to a hybrid map. And basically using the MAP sensor readings as my Acceleration enrichments. Its actually working pretty good like that.
You think the carpet you bought fits poorly?? That's nothing!!!! I bought some from an ebay seller (first mistake) that is far worse fit than that!!! It was a bitch to install, I had to cut slits in it so it could get around the seat mounting spots, and there isn't enough to actually get under the kick panels or the door sills!!! Needless to say I have scrapped the idea and I am going to clean (as best I can) the stock carpet out of my parts car. It's not in bad condition, but the car sat in the woods for about 6 years not properly sealed up so it will take some cleaning.
As for your stock carpet, you'd be surprised what a steam cleaner does. I rent the Rug Doctor once a year to clean the Insight. While not exactly a steam cleaner, what it's able to do with the carpet is amazing.
RotorHead
Joined: May 2004
Posts: 182
Likes: 0
From: Guelph
Great write up Aaron . You should re-write the Haynes Manual for Rx7's! Your description and photos are easier how to's than most of the ones I've read in the manual.
Thanks for sharing and taking the time to write your latest update. Always interesting to see your work and re-engineering to fix headaches that arise with parts that don't quite fit or work without a bit of ingenuity.
How do you like the ride with the new suspension?
Ace IIB
Thanks for sharing and taking the time to write your latest update. Always interesting to see your work and re-engineering to fix headaches that arise with parts that don't quite fit or work without a bit of ingenuity.
How do you like the ride with the new suspension?
Ace IIB
Joined: May 2002
Posts: 5,972
Likes: 37
From: Ottawa, Soviet Canuckistan
Another awesome chapter in Project Tina, good job Aaron
I love the attention to detail in your build. I try to achieve the same with my car though right now I'm thoroughly enjoying a crazy budget build on my parts car (Project Keiko, in the 1st Gen NonTech section). It's actually kind of refreshing to have a car that you don't feel you *have* to be so **** on after you've spent so many years striving for perfection on your DD, *laugh*
And I was definitely thinking of Dynamat when I strip my car down for paint, now I definitely will be. The noise has been getting to me, especially with the extra vibration translated into the body now by the engine mount on the ReSpeed Rack and Pinion conversion kit. I didn't expect that it would increase vibration noise that much, it's like a halfway point between stock engine mounts and solid ones. If I could eliminate even a little road, exhaust, drivetrain noise that would be good.
Jon
Thread Starter
Joined: Feb 2001
Posts: 29,798
Likes: 128
From: London, Ontario, Canada
How do you like the ride with the new suspension?
The car still needs bushings in most areas. I'll probably go with the Energy Suspension poly bushings. The kit is cheap, but the effort to install it is large.
And I was definitely thinking of Dynamat when I strip my car down for paint, now I definitely will be. The noise has been getting to me, especially with the extra vibration translated into the body now by the engine mount on the ReSpeed Rack and Pinion conversion kit. I didn't expect that it would increase vibration noise that much, it's like a halfway point between stock engine mounts and solid ones. If I could eliminate even a little road, exhaust, drivetrain noise that would be good.
Jon
Jon
Joined: Feb 2006
Posts: 3,162
Likes: 1
From: London, Ontario, Canada
Hey Aaron, any chance you have a couple centre caps for the stock + wheels lying around? I'm missing two and would like my wheels to look a little better. If not I'll just head to the pick-a-part and see if I can't find some. Cars looking great, keep it up.
PM me.
Thanks
Chris
Thread Starter
Joined: Feb 2001
Posts: 29,798
Likes: 128
From: London, Ontario, Canada
True, Dynamat adds a bit of weight. I probably put 50 LBs of the stuff into my car. However it was totally worth it.
You can get away with a LOT less Dynamat then I used. If you just put a few big sheets down on the front floor, over the transmission tunnel and then a few in the rear hatch area the difference is still huge. And at that point you've probably only added 10-15 LBs.
What year wheels do you need the caps from?