
my build Google taught me


Thread Starter
Full Member
Joined: Apr 2012
Posts: 114
Likes: 3
From: ottawa ontario
my build Google taught me
i decide to start a build thread seeing as im always waiting on parts gives me something to do.
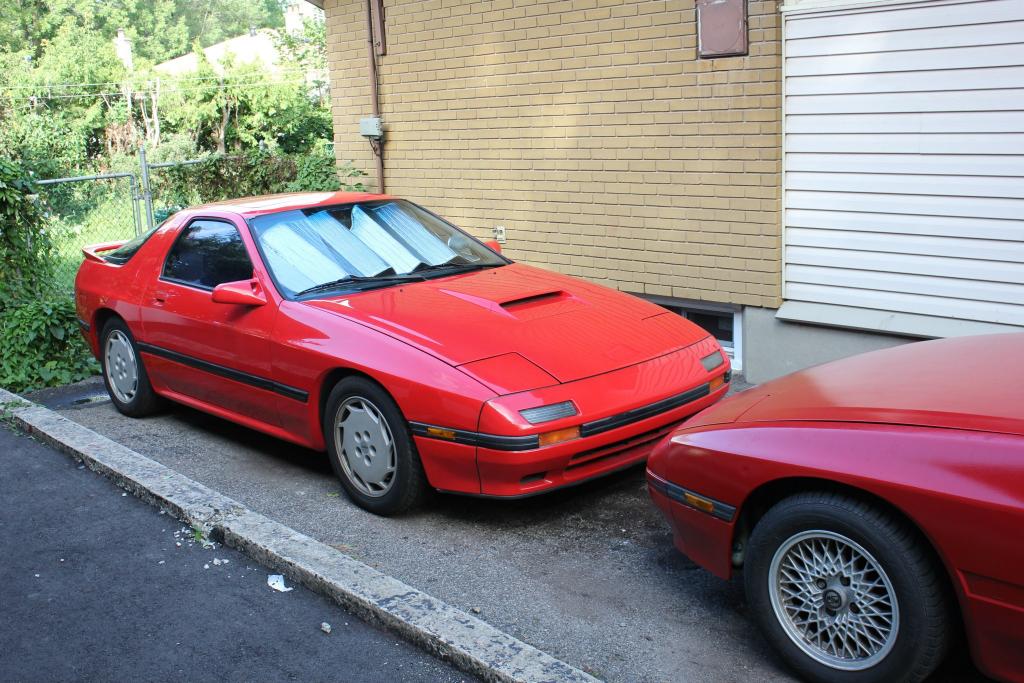
so my car started off as a mostly stock s4 t2 with a cracked rear iron.
thats the start of my build. i came into this build with enough knowledge to change brakes and the oil thus my title "Google taught me".
anytime i ran into an issue i would spend some time in front of a computer until i felt i had relatively enough knowledge to tackle my issue and 99% of the time it worked the other 1% i did something so silly Google couldn't even help me.
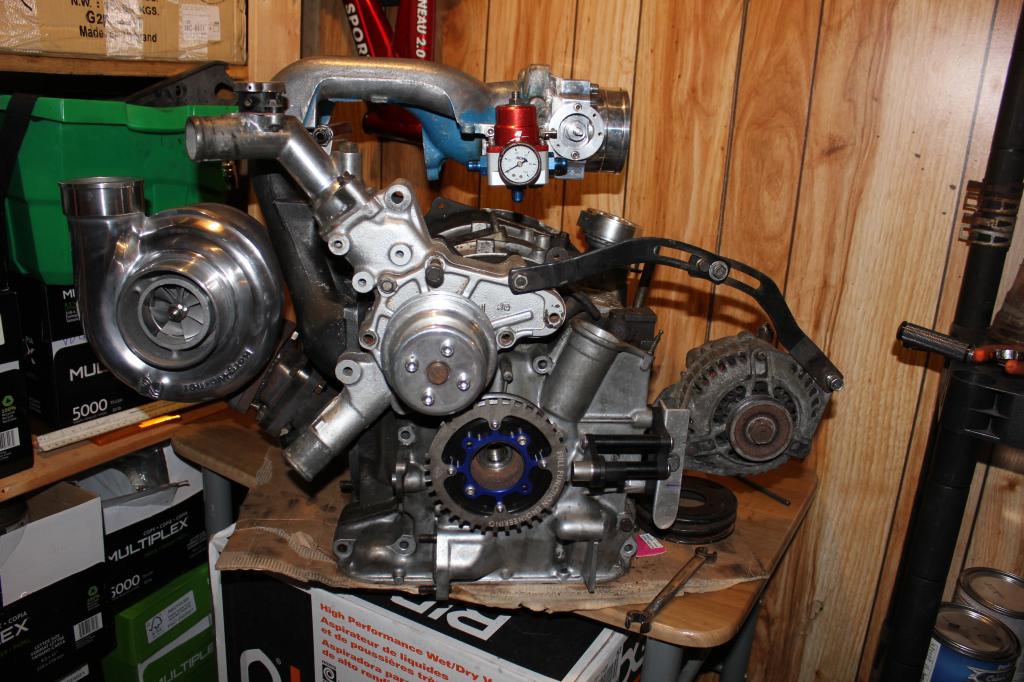
so first things first was pulling the motor out to get it rebuild. so i disassembled everything with lots of masking tape tags and many pictures. all went very smooth even pulling the motor out wasnt a huge hassle.

so i got bruno whos on this forum to rebuild the motor seeing as it was a mazda reman it was in great shape aside from some neglect from the previous owner.
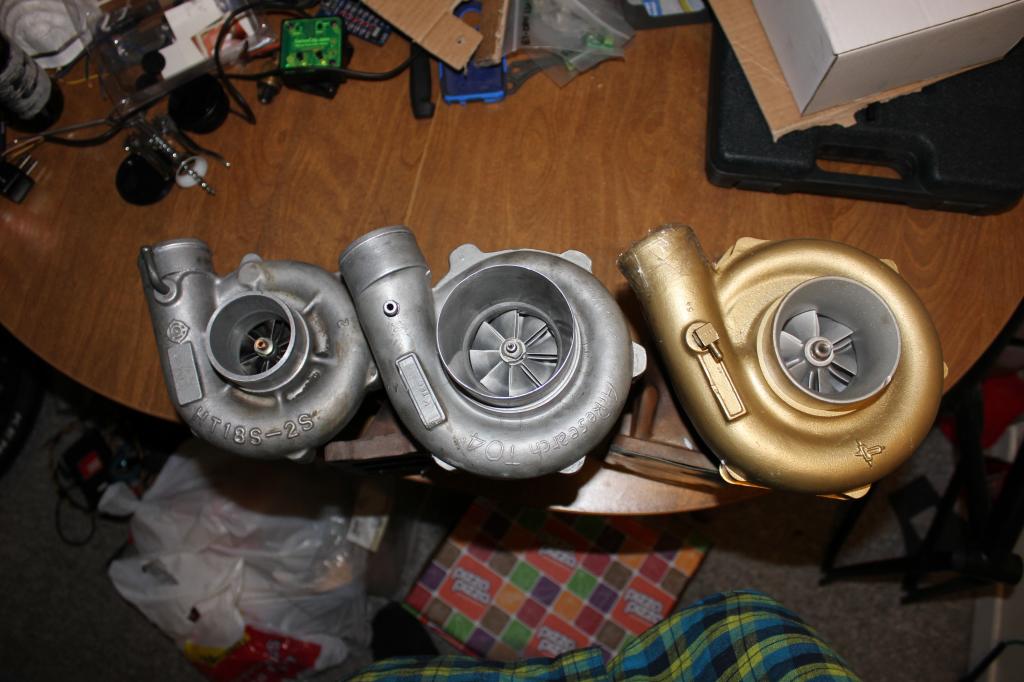
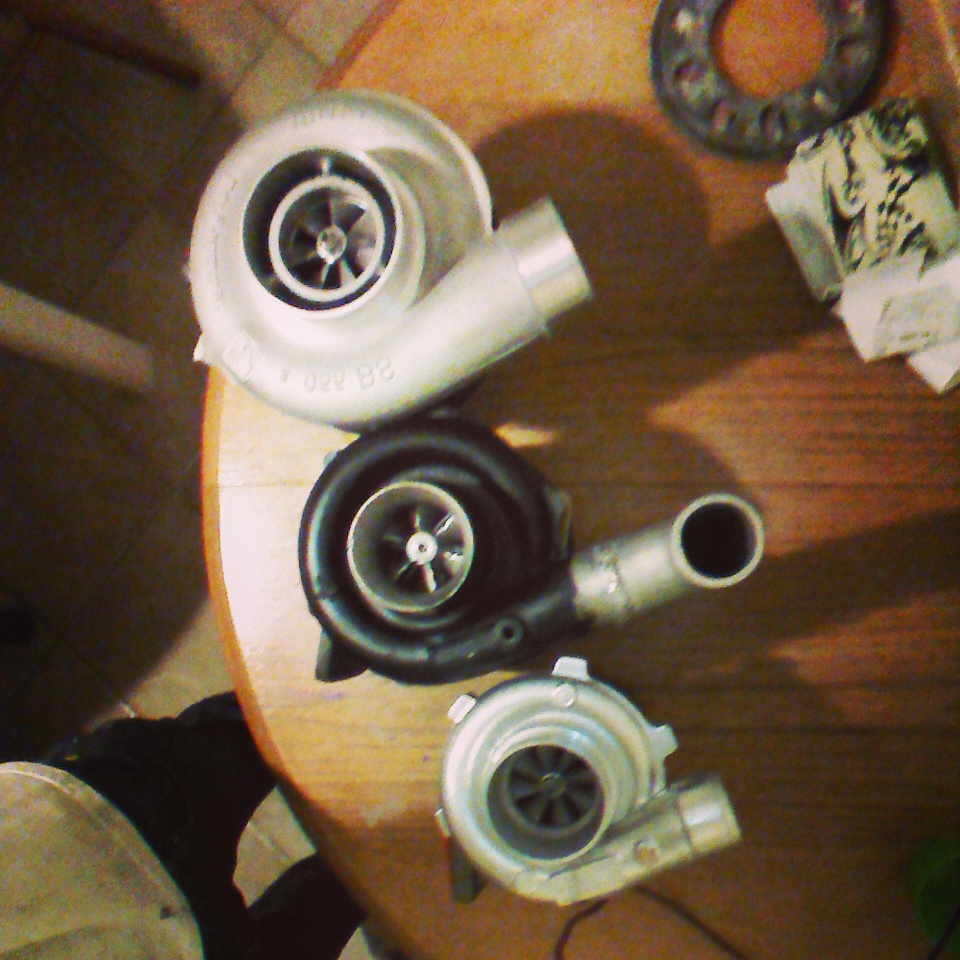
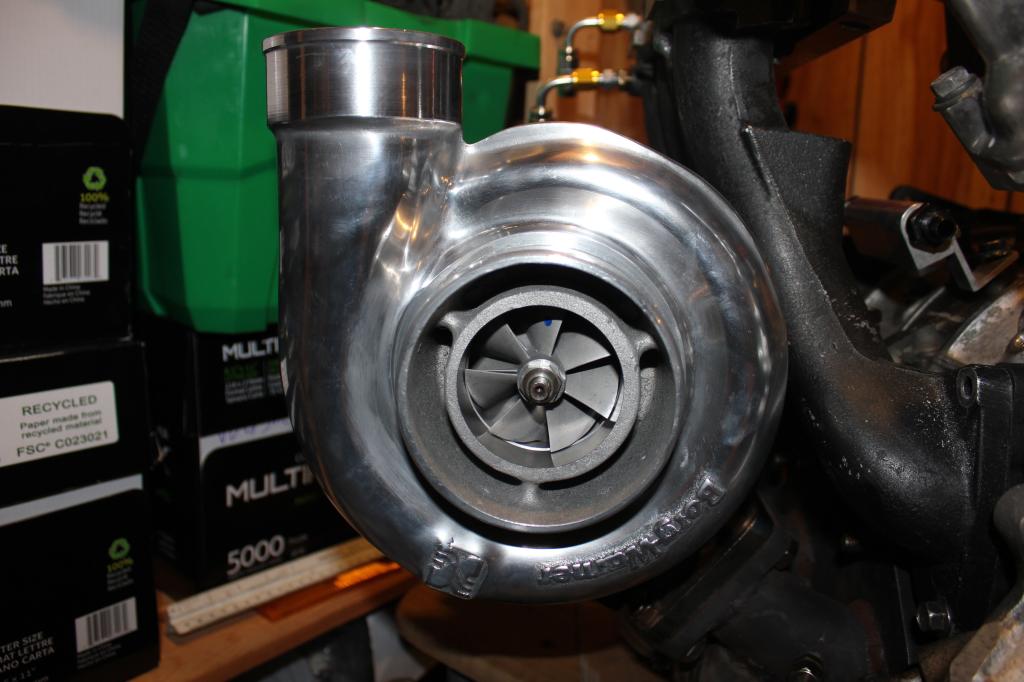
but i also needed a turbo and a good condition stock turbo is hard to find. so i bought a turbo off this forum. it was a hybrid stock s5 rear housing airsearch chra and compressor side. its the center one stock far left the right one will come in later.
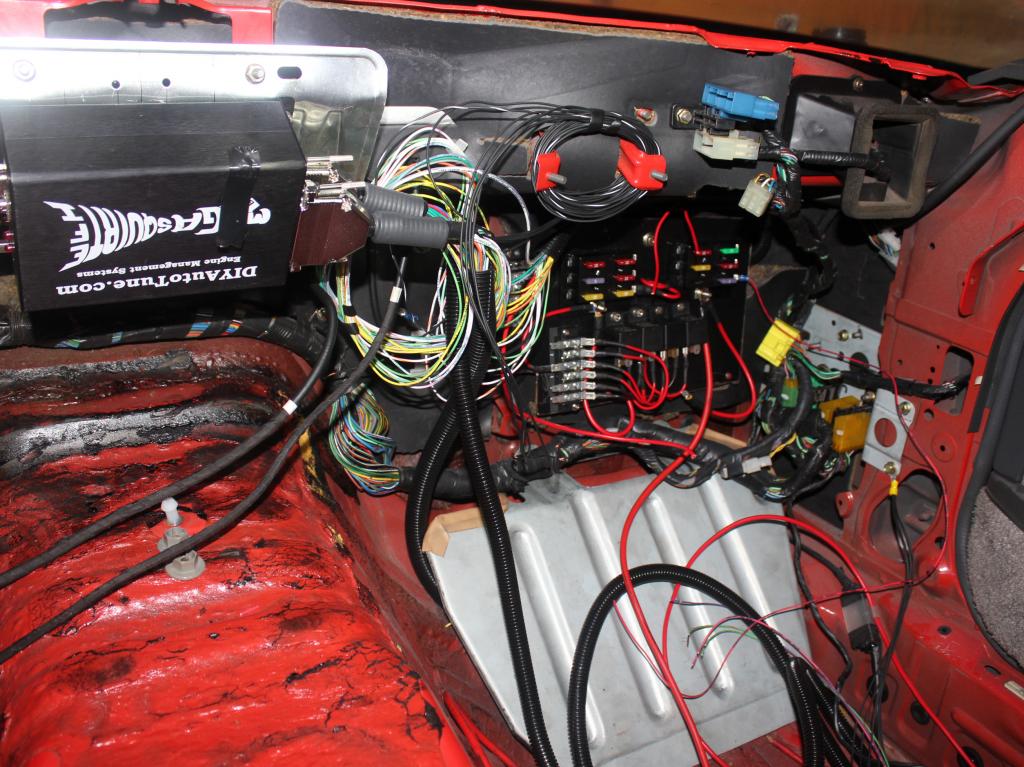
then the issue was to controll the engine the stock ecu just wouldnt be enough. so a megasquirt was found on one of the online classifieds. what fun was that to install.
i have some knowledge of electrical and wiring enough to solder and so on but at the time not really enough to tackle this project but i did anyways.
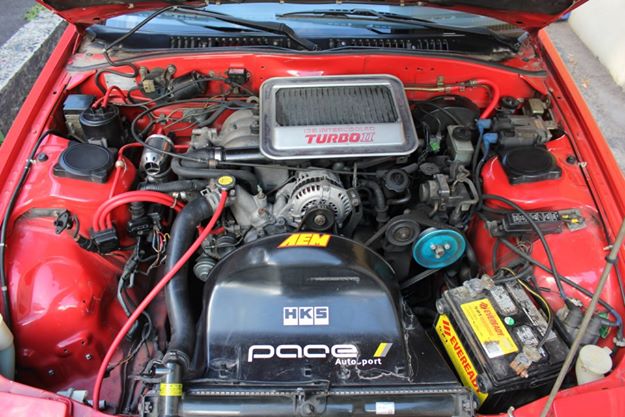
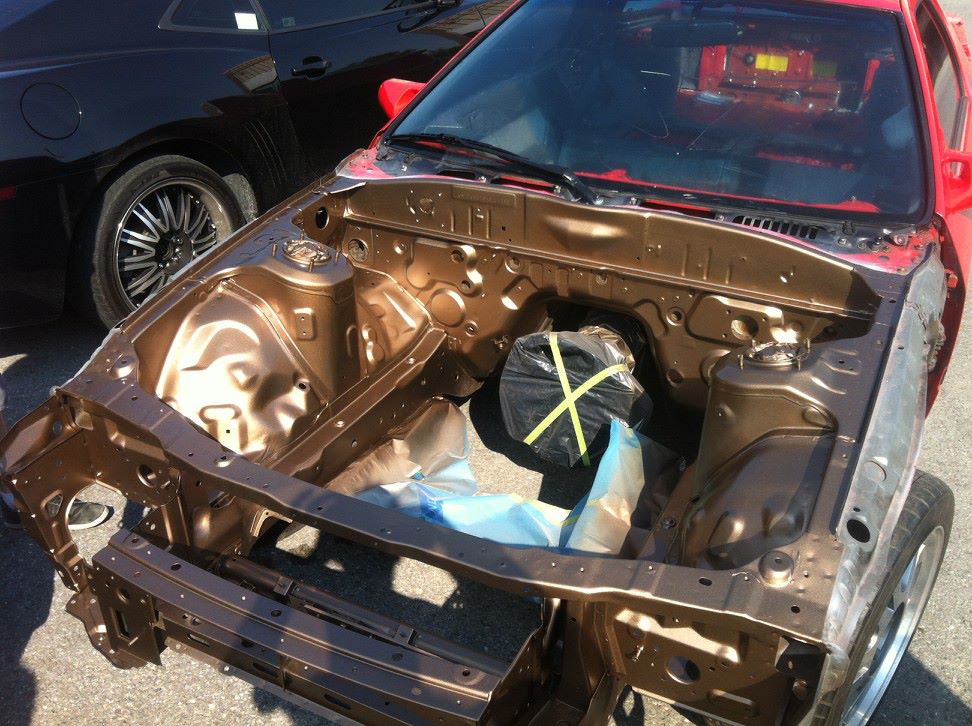
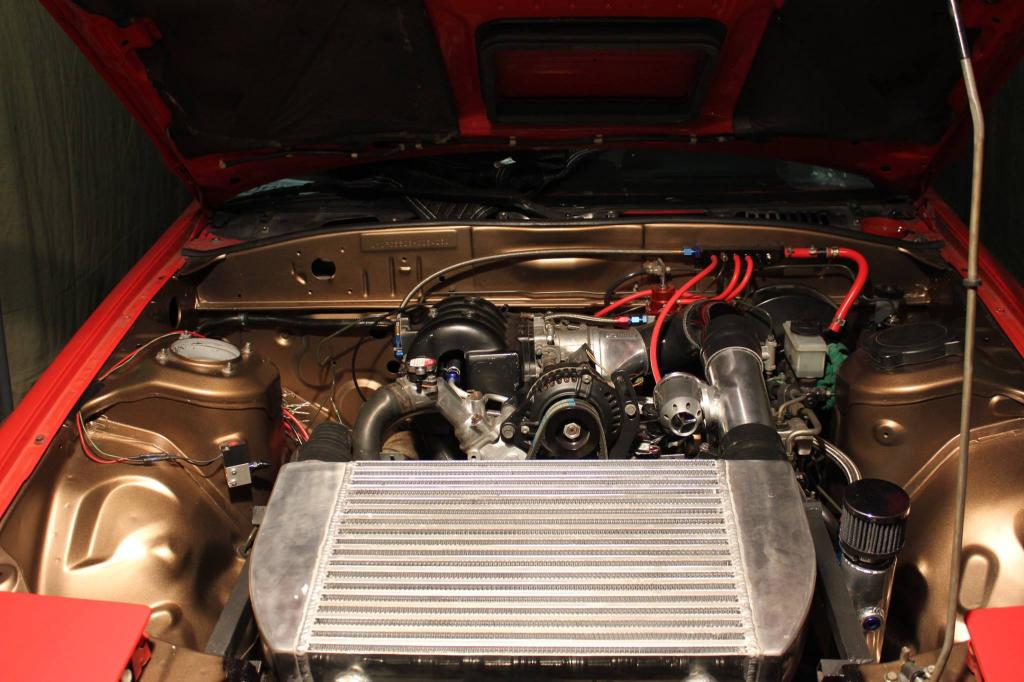
the i wanted to tend to the battle scars this engine bays seen it was on its 3rd motor. from the few work orders i have the previous owner had sunk over 25,000$ into this thing crazy.
some mounting holes were welded up and i got a friend to paint it. in my backwards logic instead of painting it red so that the miss matched colors would be off just enough to drive me nuts i painted it a totally different color. i purchased a welder and learned to weld while building this car as well, all in the name of doing everything i can by myself.
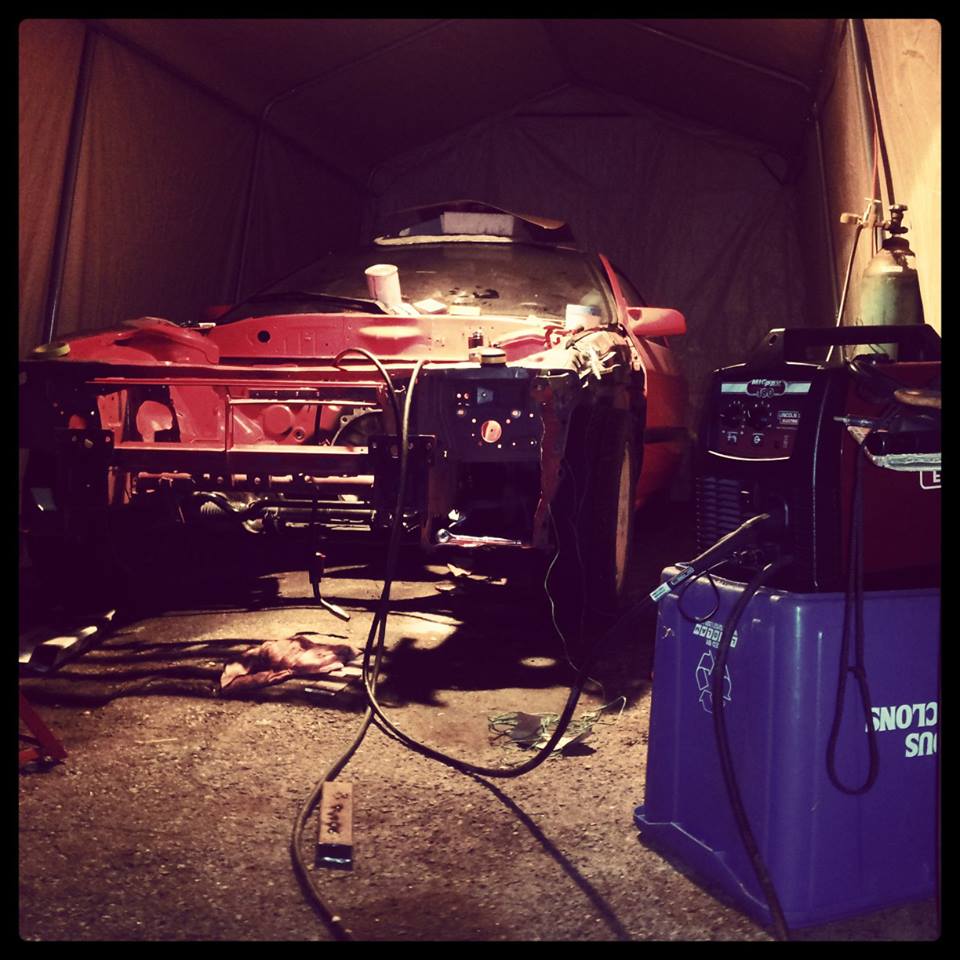
and with the motor in i start wiring the car.

then shes all together and i try and start it. and amazing it doesn't start right of the bat surprised?
believe it or not from everything i did from installing the ecu re-wire the pump to run full power fulltime and mounting the motor turbo etc the reason it doesn't start is because i mixed up the feed and return lines for the fuel.
so then it start awesome but she smoke out the exhaust something fierce and there oil leaking from every crack around that fresh turbo i bought. so i check everything and its all good so it must be the turbo.
i didnt have the money or time before winter to send it off to get rebuilt before the snow hit. so i pulled it apart marking were the the wheels went as precisely as possible. turns out it was missing an oil seal completely so i pulled one from a stock turbo i purchased that the bladed were damaged and put that one in. with plans to send it off for a rebuild over the winter i just went with it. so off it drove to my parents house for the winter to hide out in there garage.
so my car started off as a mostly stock s4 t2 with a cracked rear iron.
thats the start of my build. i came into this build with enough knowledge to change brakes and the oil thus my title "Google taught me".
anytime i ran into an issue i would spend some time in front of a computer until i felt i had relatively enough knowledge to tackle my issue and 99% of the time it worked the other 1% i did something so silly Google couldn't even help me.
so first things first was pulling the motor out to get it rebuild. so i disassembled everything with lots of masking tape tags and many pictures. all went very smooth even pulling the motor out wasnt a huge hassle.
so i got bruno whos on this forum to rebuild the motor seeing as it was a mazda reman it was in great shape aside from some neglect from the previous owner.
but i also needed a turbo and a good condition stock turbo is hard to find. so i bought a turbo off this forum. it was a hybrid stock s5 rear housing airsearch chra and compressor side. its the center one stock far left the right one will come in later.
then the issue was to controll the engine the stock ecu just wouldnt be enough. so a megasquirt was found on one of the online classifieds. what fun was that to install.
i have some knowledge of electrical and wiring enough to solder and so on but at the time not really enough to tackle this project but i did anyways.
the i wanted to tend to the battle scars this engine bays seen it was on its 3rd motor. from the few work orders i have the previous owner had sunk over 25,000$ into this thing crazy.
some mounting holes were welded up and i got a friend to paint it. in my backwards logic instead of painting it red so that the miss matched colors would be off just enough to drive me nuts i painted it a totally different color. i purchased a welder and learned to weld while building this car as well, all in the name of doing everything i can by myself.
and with the motor in i start wiring the car.
then shes all together and i try and start it. and amazing it doesn't start right of the bat surprised?
believe it or not from everything i did from installing the ecu re-wire the pump to run full power fulltime and mounting the motor turbo etc the reason it doesn't start is because i mixed up the feed and return lines for the fuel.
so then it start awesome but she smoke out the exhaust something fierce and there oil leaking from every crack around that fresh turbo i bought. so i check everything and its all good so it must be the turbo.
i didnt have the money or time before winter to send it off to get rebuilt before the snow hit. so i pulled it apart marking were the the wheels went as precisely as possible. turns out it was missing an oil seal completely so i pulled one from a stock turbo i purchased that the bladed were damaged and put that one in. with plans to send it off for a rebuild over the winter i just went with it. so off it drove to my parents house for the winter to hide out in there garage.
Thread Starter
Full Member
Joined: Apr 2012
Posts: 114
Likes: 3
From: ottawa ontario
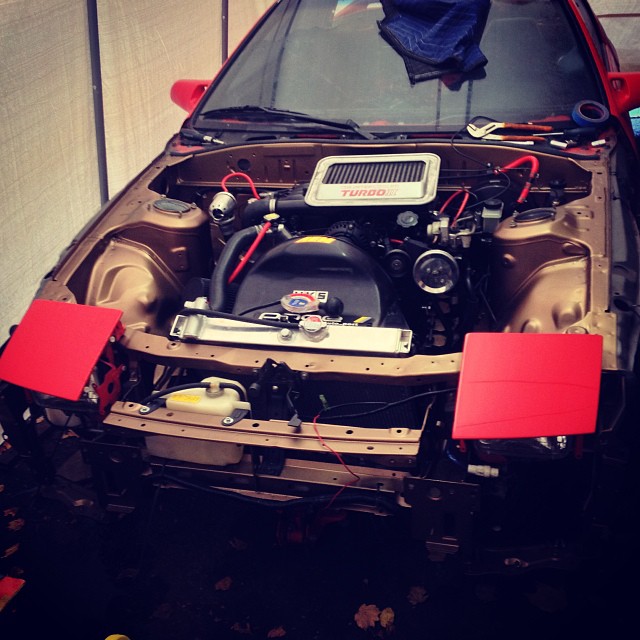
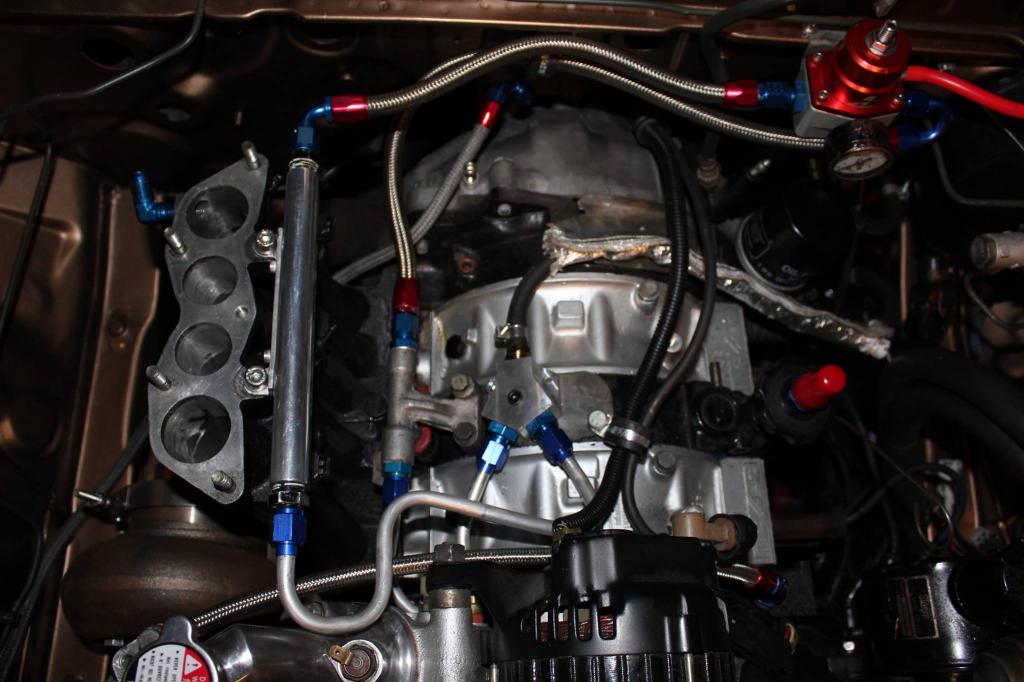
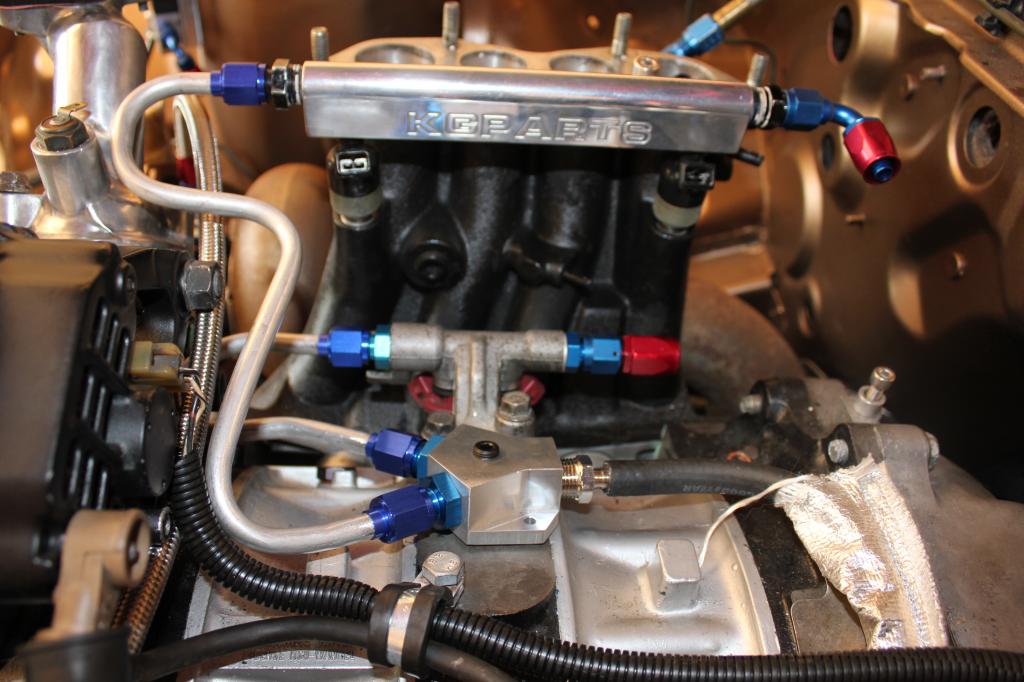
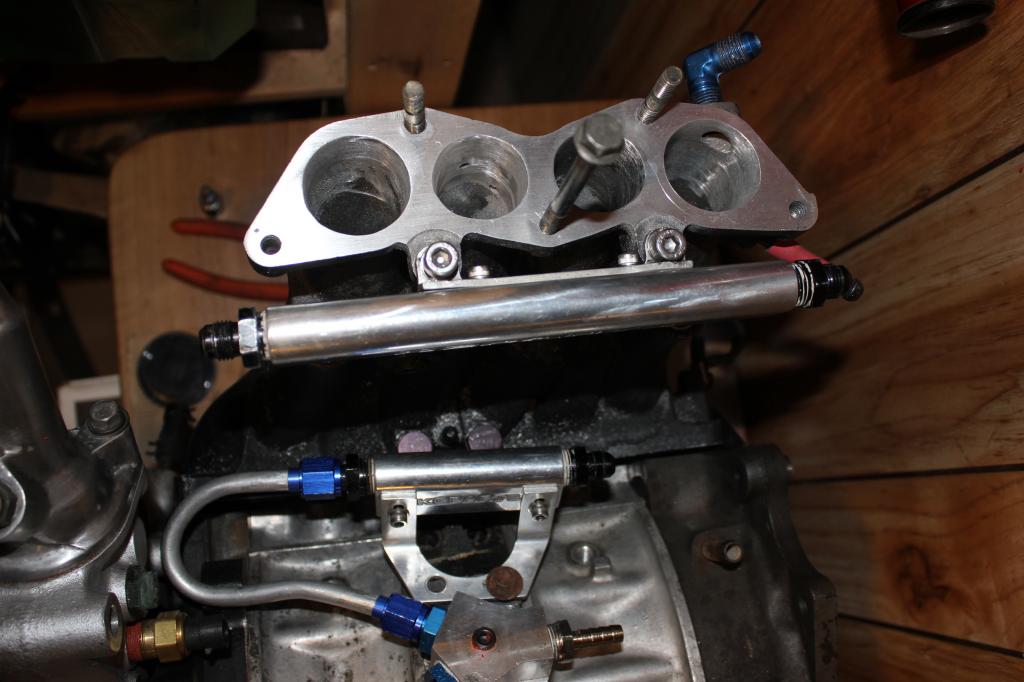
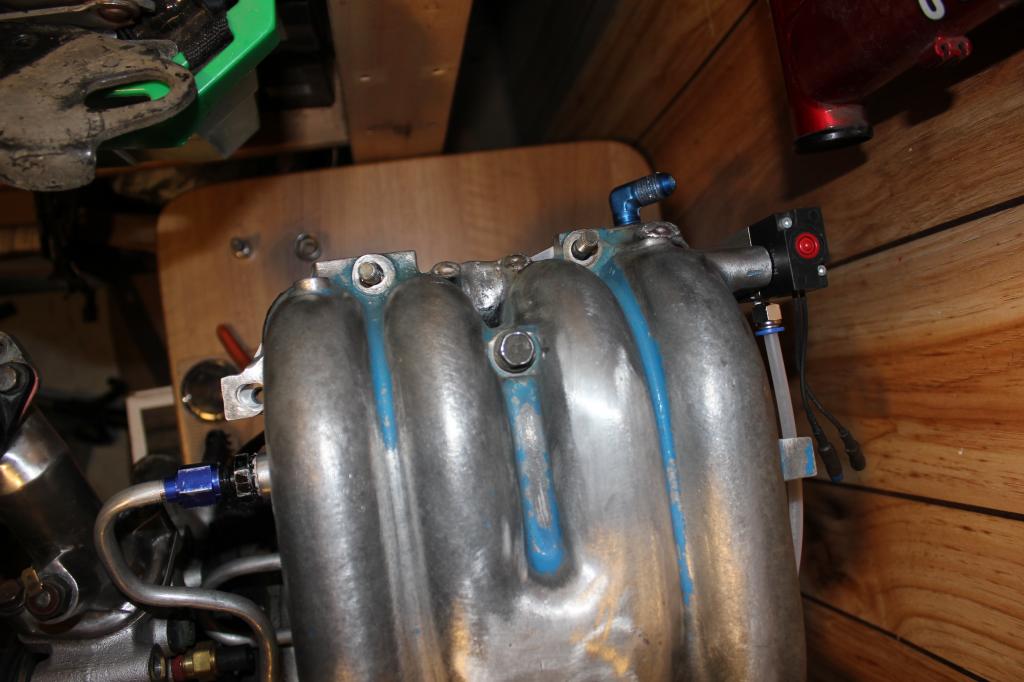
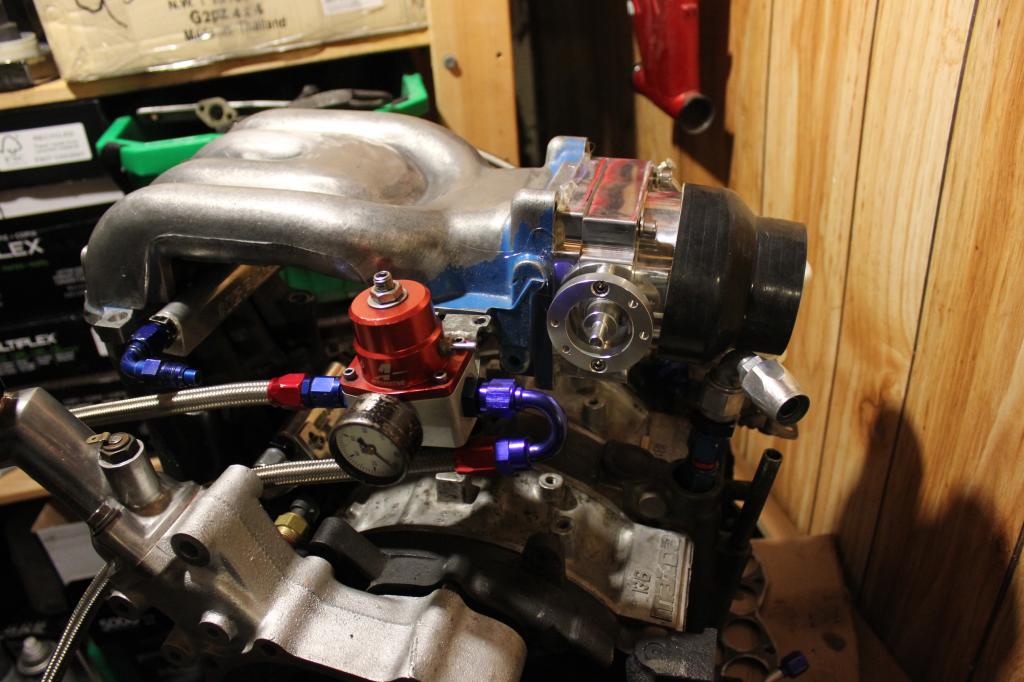
so during the winter i bought a new turbo and manifold the new turbo needed more fuel that ment bigger injectors and a better regulator and the new rails just look cool. and some dragster guy had a lot of an fitting for 100$ so i bought that and that was my best buy yet all the fitting you see ive purchased 3 or 4 new ones.
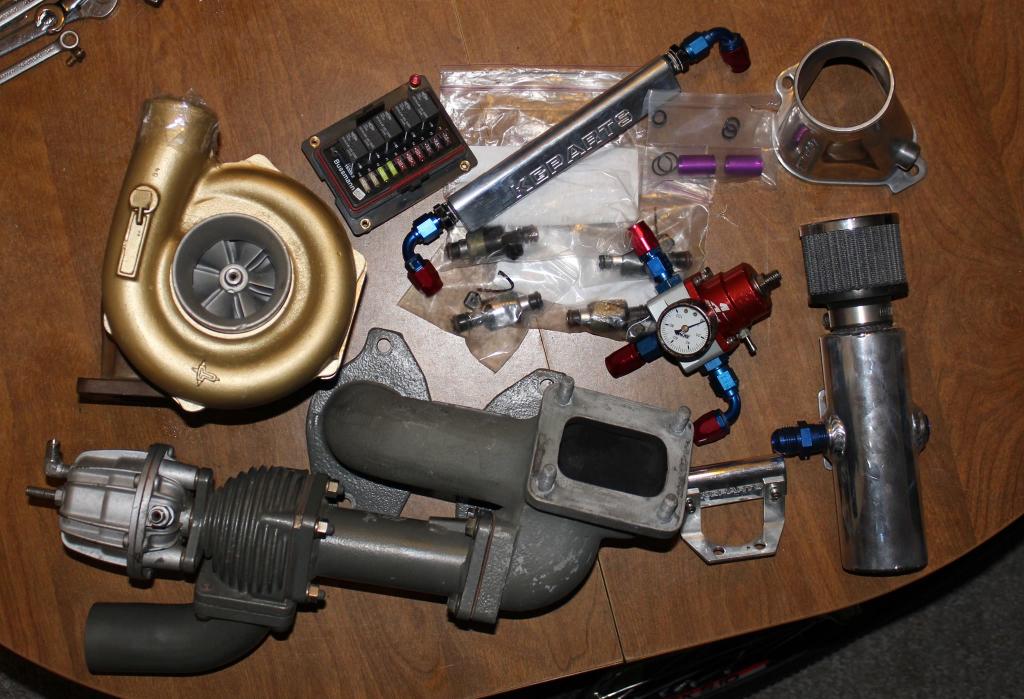
so the rails regulator and trubo went on.
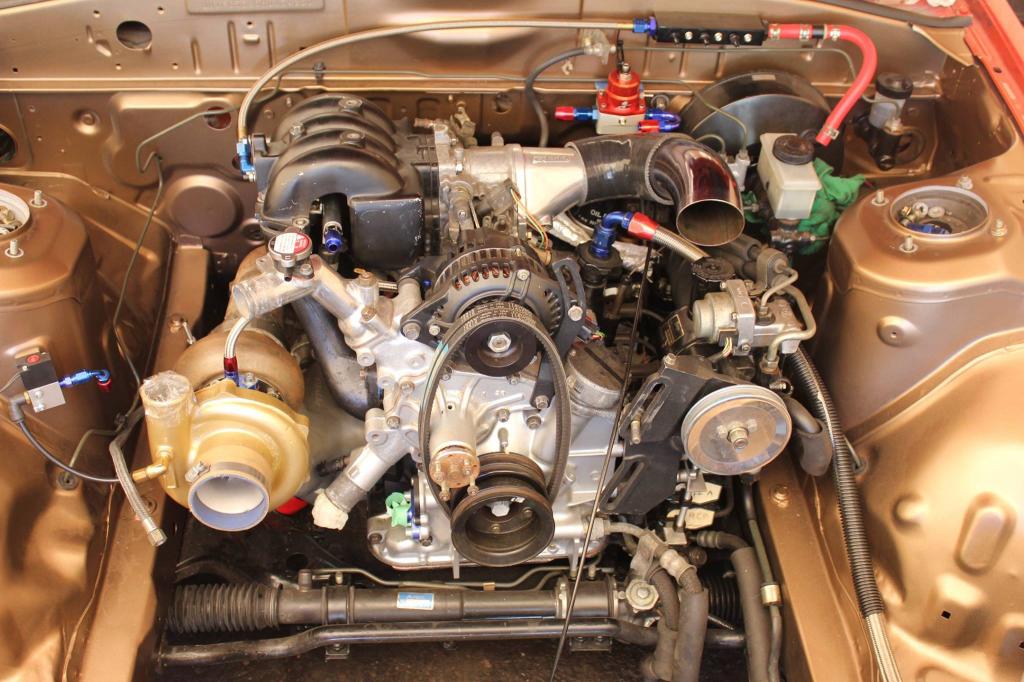
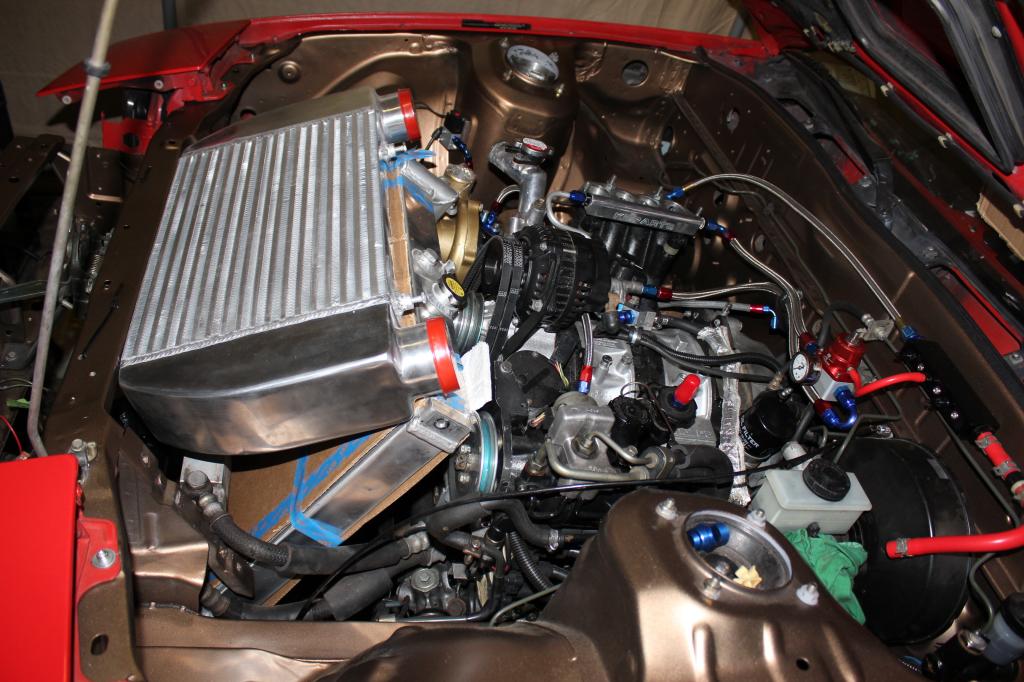
then i needed a new intercooler and i hate fmic. so vmount it is testing my welding skills. and with a tig acquired at the store i work at aluminium welding is now possible.
that all went together very smoothly so with everything installed its time to tune this thing with megasquirt auto-tune feature that helped me keep my map smooth while i did the larger value changes. so after driving that for part of the summer slowly faster and faster it was running great. and iwas getting ready to plan i trip to th dyno to ensure the tuning is spot on.
then the nut holding the compressor wheel on came undone.
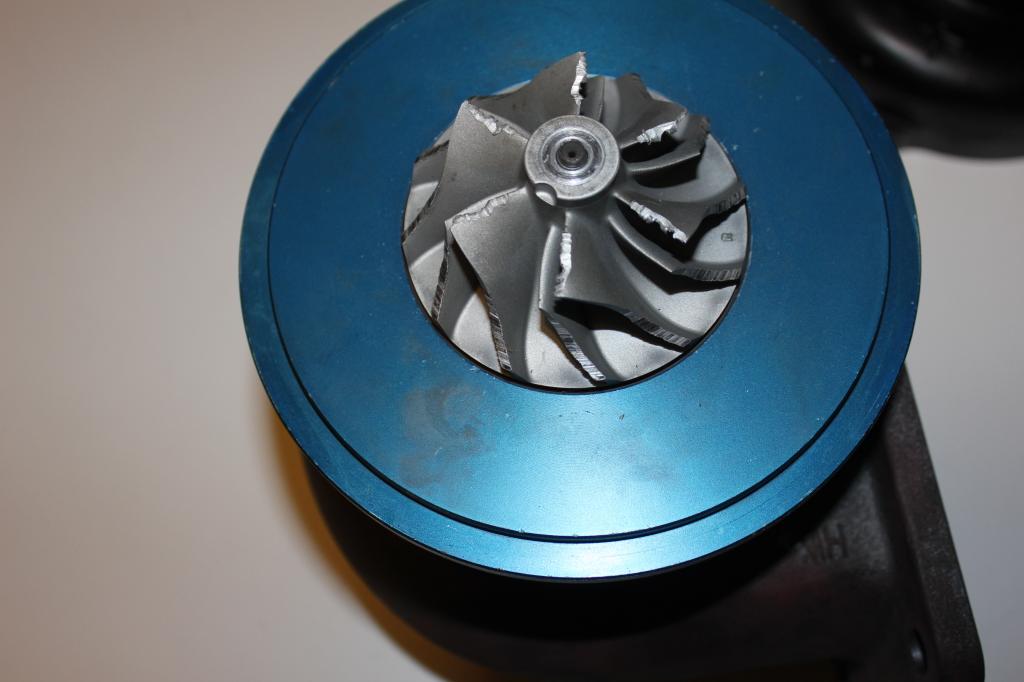
so that was the most discouraging part of this whole build all the time and money put into ruined by a nut but i continue trying to get it going once more before the end of the year. so rebuild the turbo or replace. so i search for a new turbo and stumble across a great deal on a bw s360 that a forum member is making 450whp on and i figure my setup should handle that.
boy was that thing bigger then i expected and of course it didnt fit. so a new manifold was purchased and modified so it fit with a custom spacer.

and it just barely fits so that's now all installed whoopee time to go for a drive with the lightest of the wastegate spring and some adjustments to the map so it a little rich in boost of we go slowly working our way up. so up to about 8psi it works well and my father who was driving could resist so he gave it a go and it raised right to 21psi.
so after that scare and me trying to figure out what was wrong and a few more passes at above wastegate pressure i re weld the runner to be larger and pull off of both turbo runner and no luck. turns out i had the vacuum line switched around.
then my biggest fear my self built self tuned car wasnt up to bar so the engine decided to split.
not sure if it was my coils or plugs not being strong enough. plugs had alot of km but for whatever reason worked well when the two sets of near new ngk's just couldnt even get the car started. there was a lean spike in my data log of the run but theres no indication the fuel map had a low spot in that area or a correspond spike in my injector duty cycle. so how it happened or my next course of action is unclear.
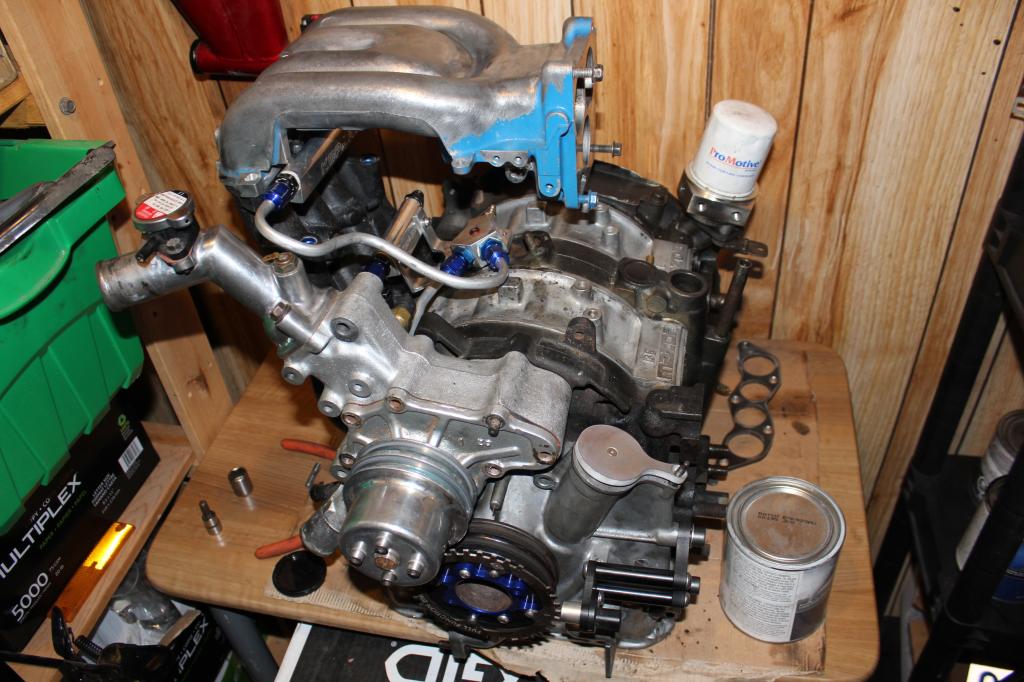
this is my current setup
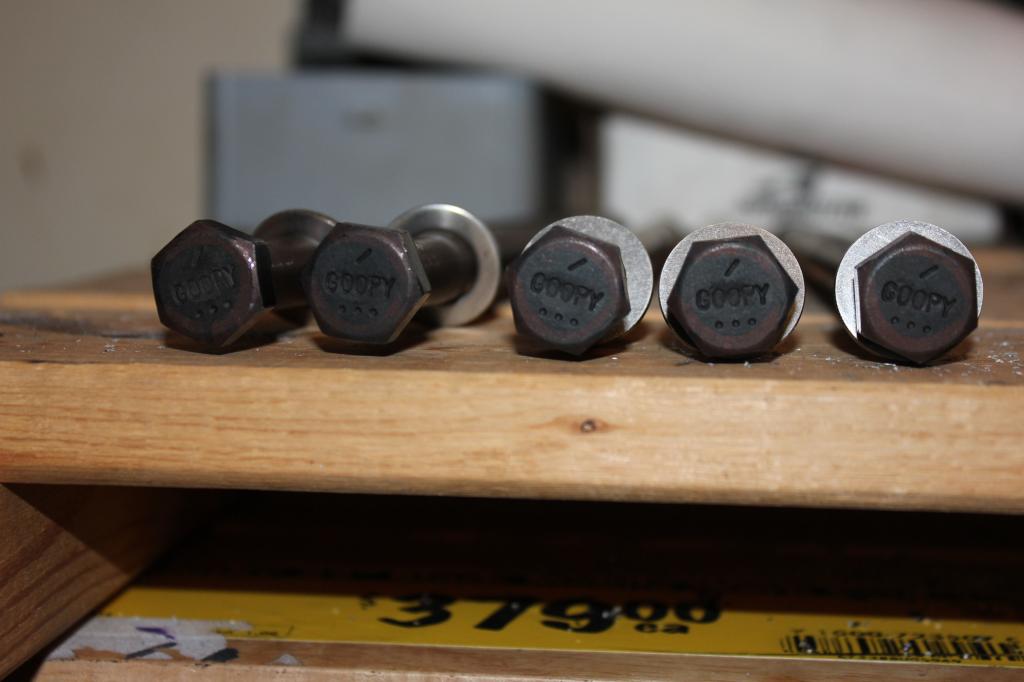
stock s4 turbo block goopy seals no porting at all.
ECU -- megasquirt ms3x
plugs -- 7eq 9eq
coils LS1 coils
fuel shell 91 v-power
base FPR 38 psi rising rate 1:1 with boost
fuel pump aeromotive 340lph
rc 1000cc 14mm tops
marren 1000cc 14mm tops
parallel with aeromotive a1000 regulator
borg warner s360 .88 undivided jgs 40mm spring ~1bar spring
so i started this thread to document my build looking for any criticism or help escecialy as to possibilities as to how i lost this motor.
so the rails regulator and trubo went on.
then i needed a new intercooler and i hate fmic. so vmount it is testing my welding skills. and with a tig acquired at the store i work at aluminium welding is now possible.
that all went together very smoothly so with everything installed its time to tune this thing with megasquirt auto-tune feature that helped me keep my map smooth while i did the larger value changes. so after driving that for part of the summer slowly faster and faster it was running great. and iwas getting ready to plan i trip to th dyno to ensure the tuning is spot on.
then the nut holding the compressor wheel on came undone.
so that was the most discouraging part of this whole build all the time and money put into ruined by a nut but i continue trying to get it going once more before the end of the year. so rebuild the turbo or replace. so i search for a new turbo and stumble across a great deal on a bw s360 that a forum member is making 450whp on and i figure my setup should handle that.
boy was that thing bigger then i expected and of course it didnt fit. so a new manifold was purchased and modified so it fit with a custom spacer.
and it just barely fits so that's now all installed whoopee time to go for a drive with the lightest of the wastegate spring and some adjustments to the map so it a little rich in boost of we go slowly working our way up. so up to about 8psi it works well and my father who was driving could resist so he gave it a go and it raised right to 21psi.
so after that scare and me trying to figure out what was wrong and a few more passes at above wastegate pressure i re weld the runner to be larger and pull off of both turbo runner and no luck. turns out i had the vacuum line switched around.
then my biggest fear my self built self tuned car wasnt up to bar so the engine decided to split.
not sure if it was my coils or plugs not being strong enough. plugs had alot of km but for whatever reason worked well when the two sets of near new ngk's just couldnt even get the car started. there was a lean spike in my data log of the run but theres no indication the fuel map had a low spot in that area or a correspond spike in my injector duty cycle. so how it happened or my next course of action is unclear.
this is my current setup
stock s4 turbo block goopy seals no porting at all.
ECU -- megasquirt ms3x
plugs -- 7eq 9eq
coils LS1 coils
fuel shell 91 v-power
base FPR 38 psi rising rate 1:1 with boost
fuel pump aeromotive 340lph
rc 1000cc 14mm tops
marren 1000cc 14mm tops
parallel with aeromotive a1000 regulator
borg warner s360 .88 undivided jgs 40mm spring ~1bar spring
so i started this thread to document my build looking for any criticism or help escecialy as to possibilities as to how i lost this motor.


Looks like you have a healthy setup and just need to step back and slow down. you arent a professional tuner. take your time, 1psi at a time. put a 5psi spring in it and slowly work your way up. better safe than sorry.
Thread Starter
Full Member
Joined: Apr 2012
Posts: 114
Likes: 3
From: ottawa ontario
a few more updates:
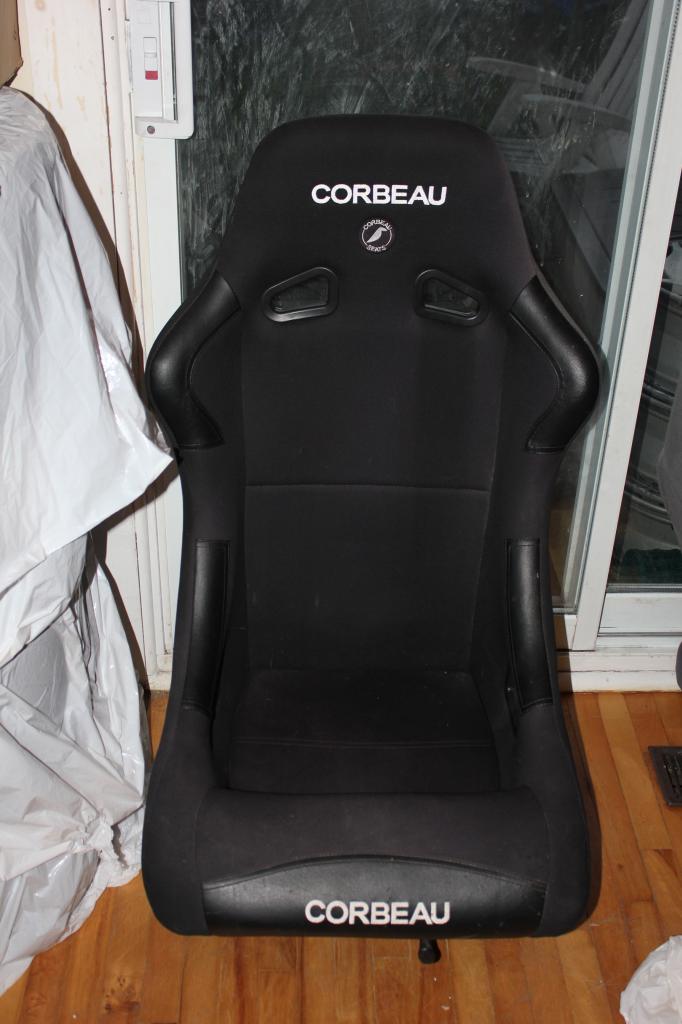
i picked up a corbeau seat for a good price
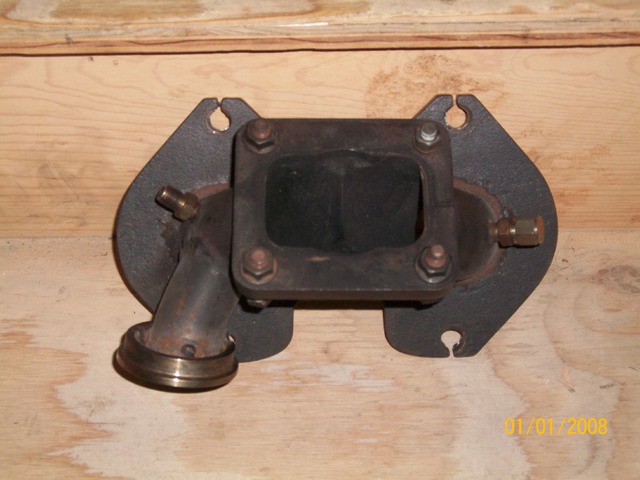
also got an fd3s UIM from misterstyx69
which i ported to match my shaved fc3s LIM.
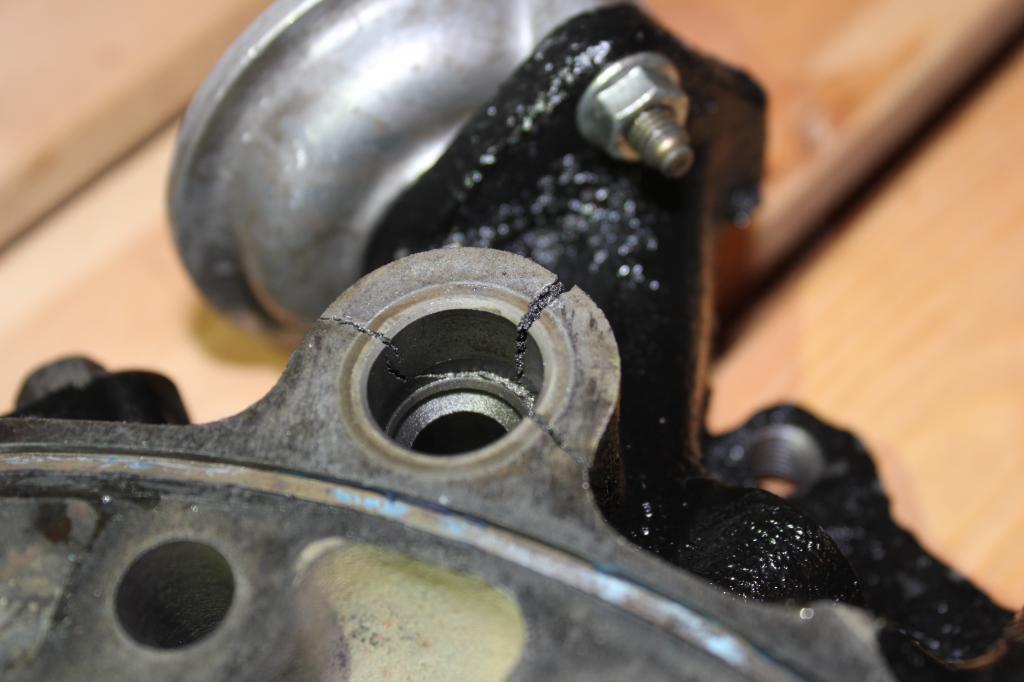
for the 2 studs at the back instead grinding the holes on the UIM i welded the LIM bolts holes up drilled and tapped the new holes in the LIM to line up with the fd3s UIM.
also added some material to make sure theres no leaks.

i tapped some new holes for my boost control.
not sure if i will use the push to connects or not.
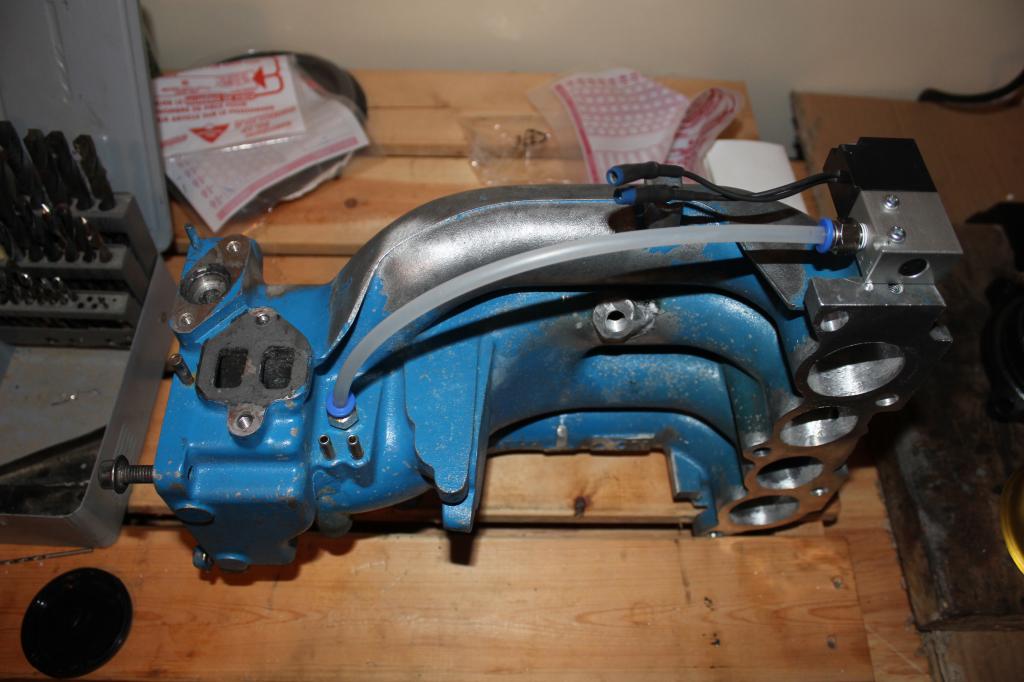
also got a FFE trigger wheel to hopefully make my motor as reliable as possible.
i picked up a corbeau seat for a good price
also got an fd3s UIM from misterstyx69
which i ported to match my shaved fc3s LIM.
for the 2 studs at the back instead grinding the holes on the UIM i welded the LIM bolts holes up drilled and tapped the new holes in the LIM to line up with the fd3s UIM.
also added some material to make sure theres no leaks.
i tapped some new holes for my boost control.
not sure if i will use the push to connects or not.
also got a FFE trigger wheel to hopefully make my motor as reliable as possible.

Trending Topics
Thread Starter
Full Member
Joined: Apr 2012
Posts: 114
Likes: 3
From: ottawa ontario
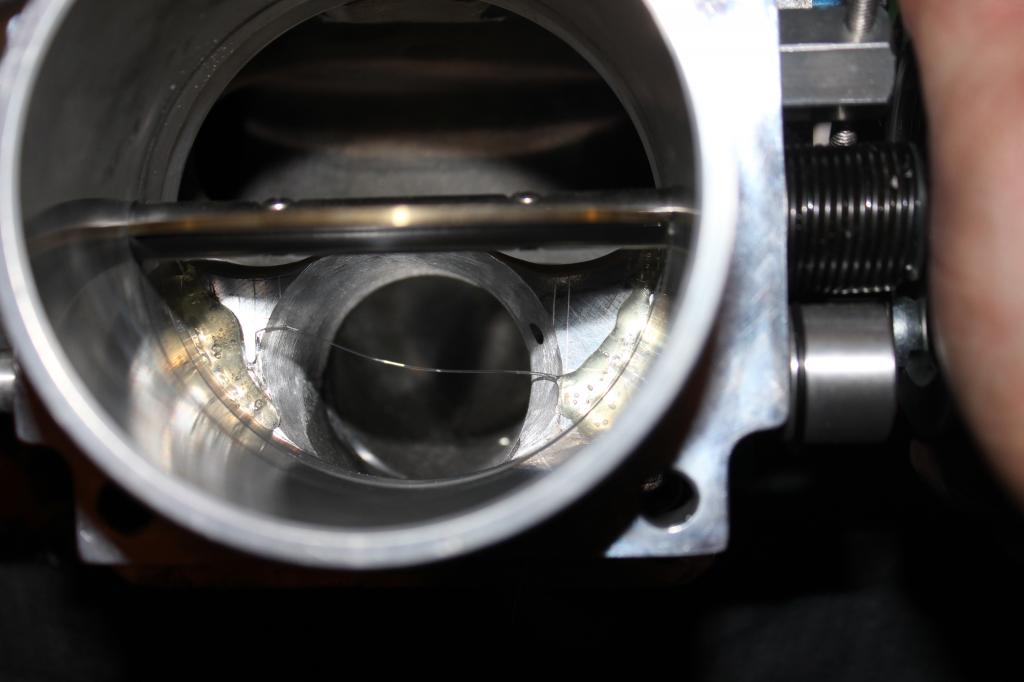
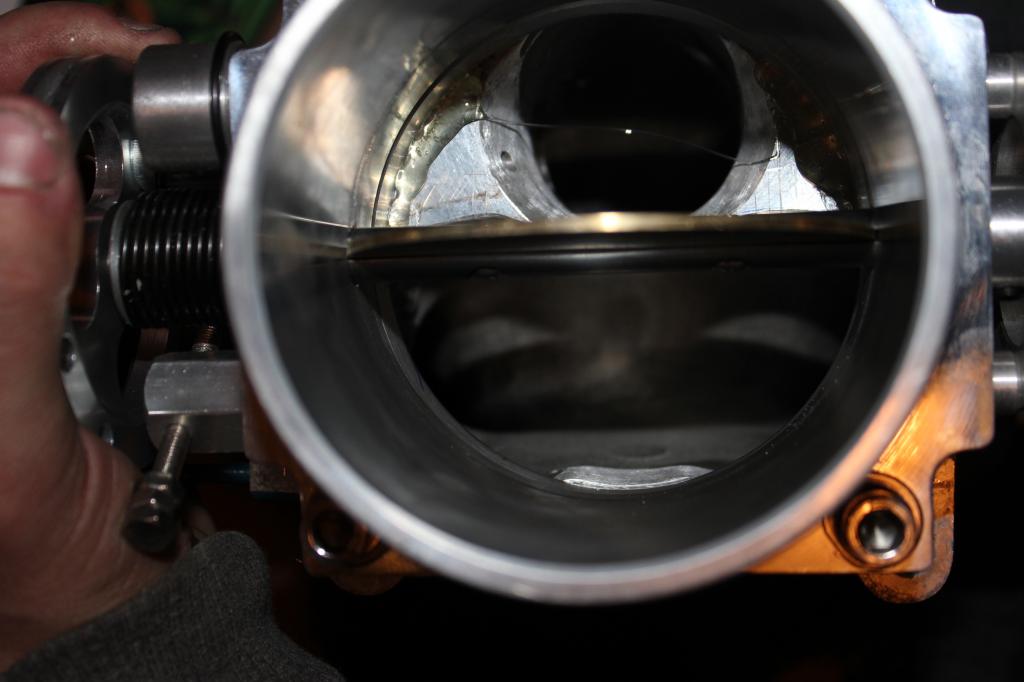
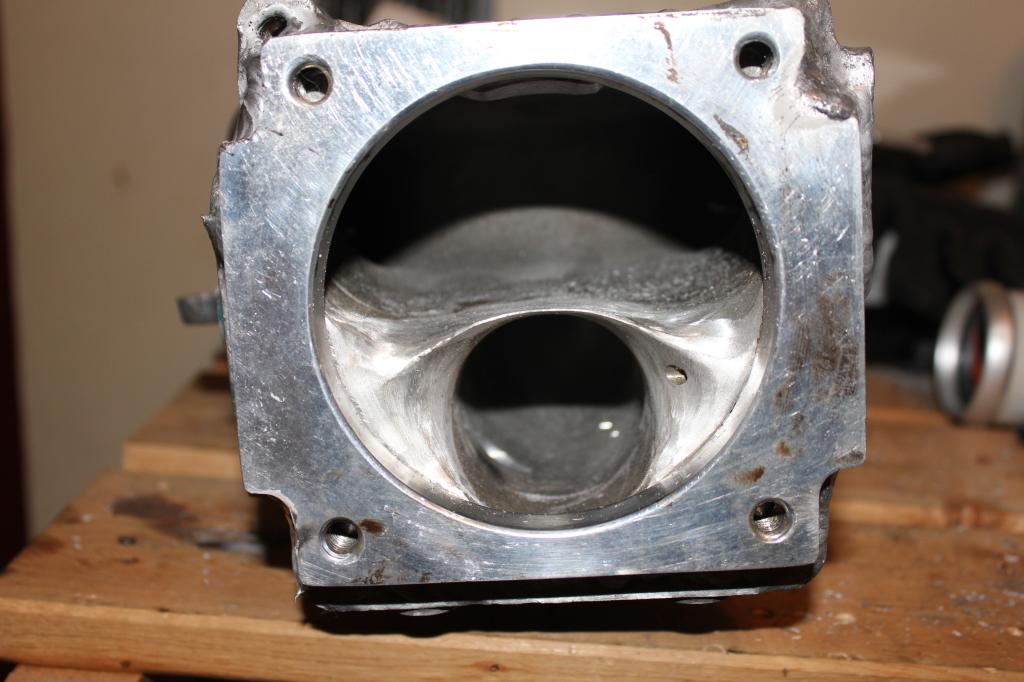
more updates o ordered a ebay 90mm throttle body to see if i can keep the as clean as simple as possible.
the issue i have is with the single 90mm plate is it cover the runners slightly a spacer may have to be made so air run threw smoothly but its a work in progress.
i may just try and find an fd throttle body.
alos pardon marker on the intake manifold.


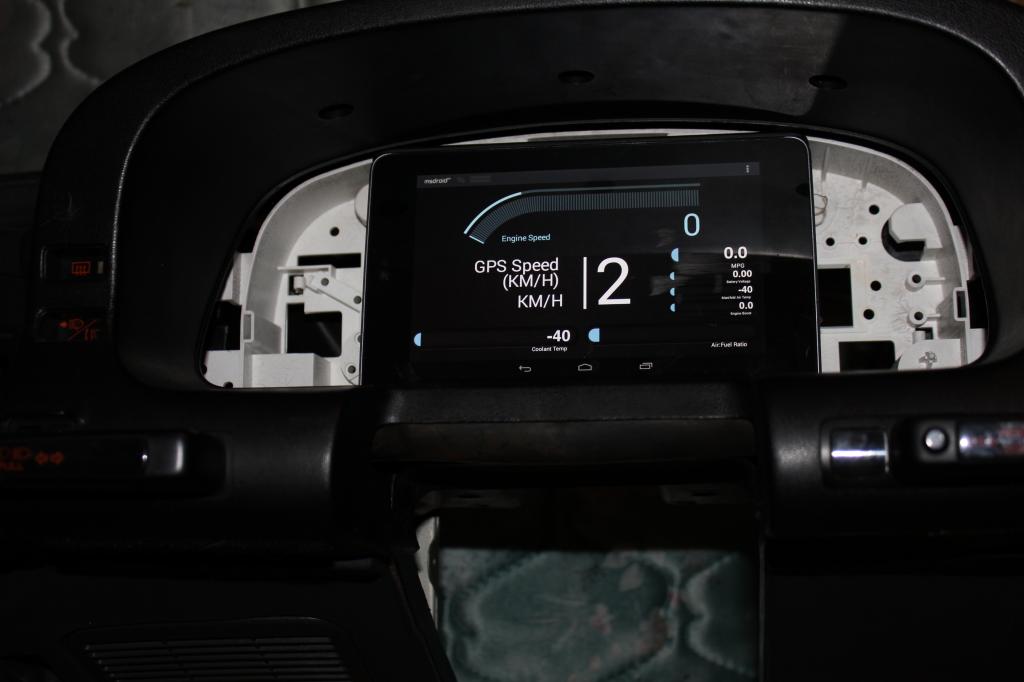
i also plan on using a nexus 7 tablet as my gauge cluster as it is hooked directly to the megasquirt. I can also change the dash i see fit if engine temps are my concern i can be sure its large and very visible.
the issue i have is with the single 90mm plate is it cover the runners slightly a spacer may have to be made so air run threw smoothly but its a work in progress.
i may just try and find an fd throttle body.
alos pardon marker on the intake manifold.
i also plan on using a nexus 7 tablet as my gauge cluster as it is hooked directly to the megasquirt. I can also change the dash i see fit if engine temps are my concern i can be sure its large and very visible.
Joined: Sep 2005
Posts: 25,581
Likes: 136
From: Smiths Falls.(near Ottawa!.Mapquest IT!)
..ya dun yet??
(hey,check out the 102mm tb's on Ebay.It may cover everything.The Rotaryworks single butterfly for the FD was 100mm so it wouldn't be off by much.)
(hey,check out the 102mm tb's on Ebay.It may cover everything.The Rotaryworks single butterfly for the FD was 100mm so it wouldn't be off by much.)
Joined: Sep 2005
Posts: 25,581
Likes: 136
From: Smiths Falls.(near Ottawa!.Mapquest IT!)
Thread Starter
Full Member
Joined: Apr 2012
Posts: 114
Likes: 3
From: ottawa ontario
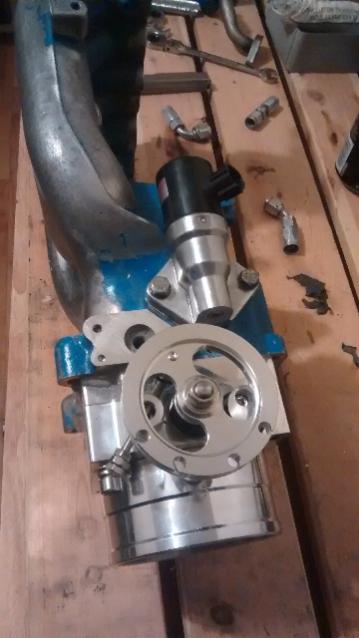
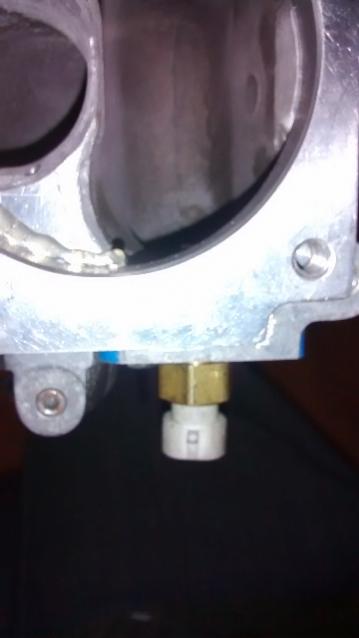
trying to decide on what where is most beneficial to mount my fuel pressure regulator.
either on the firewall but that leaves my feed crossing the block into the y-block all getting very warm. just as it was before.
i could also mount the FPR onto the intake and have my y-block mounted to the firewall
i dont know if i want to run braided line or hard line to the FPR hardline is a bit of a pain but will look a little less crazy i think.

i ported the intake and hot glued it on so i can see how it fits and look to see how the porting looks.
the porting still needs more done and a clean up and i may go a little further with it not sure if its necessary tho.
either on the firewall but that leaves my feed crossing the block into the y-block all getting very warm. just as it was before.
i could also mount the FPR onto the intake and have my y-block mounted to the firewall
i dont know if i want to run braided line or hard line to the FPR hardline is a bit of a pain but will look a little less crazy i think.
i ported the intake and hot glued it on so i can see how it fits and look to see how the porting looks.
the porting still needs more done and a clean up and i may go a little further with it not sure if its necessary tho.
Thread Starter
Full Member
Joined: Apr 2012
Posts: 114
Likes: 3
From: ottawa ontario
Thread Starter
Full Member
Joined: Apr 2012
Posts: 114
Likes: 3
From: ottawa ontario

Put it in the charge pipe. If your ECU can control idle valve, definitely keep it. It's been in the 20s F recently in Connecticut and my poorly tuned by me Megasquirt'd FC has started right up, idles around 2000 and tapers down to a calm 1000 once warm. Without it, i have to feather the throttle and hope it doesn't stall. Seeing that you live in Canada, I would definitely keep the IAC if you can control it.
Thread Starter
Full Member
Joined: Apr 2012
Posts: 114
Likes: 3
From: ottawa ontario
Put it in the charge pipe. If your ECU can control idle valve, definitely keep it. It's been in the 20s F recently in Connecticut and my poorly tuned by me Megasquirt'd FC has started right up, idles around 2000 and tapers down to a calm 1000 once warm. Without it, i have to feather the throttle and hope it doesn't stall. Seeing that you live in Canada, I would definitely keep the IAC if you can control it.

Joined: Sep 2005
Posts: 25,581
Likes: 136
From: Smiths Falls.(near Ottawa!.Mapquest IT!)
Thread Starter
Full Member
Joined: Apr 2012
Posts: 114
Likes: 3
From: ottawa ontario
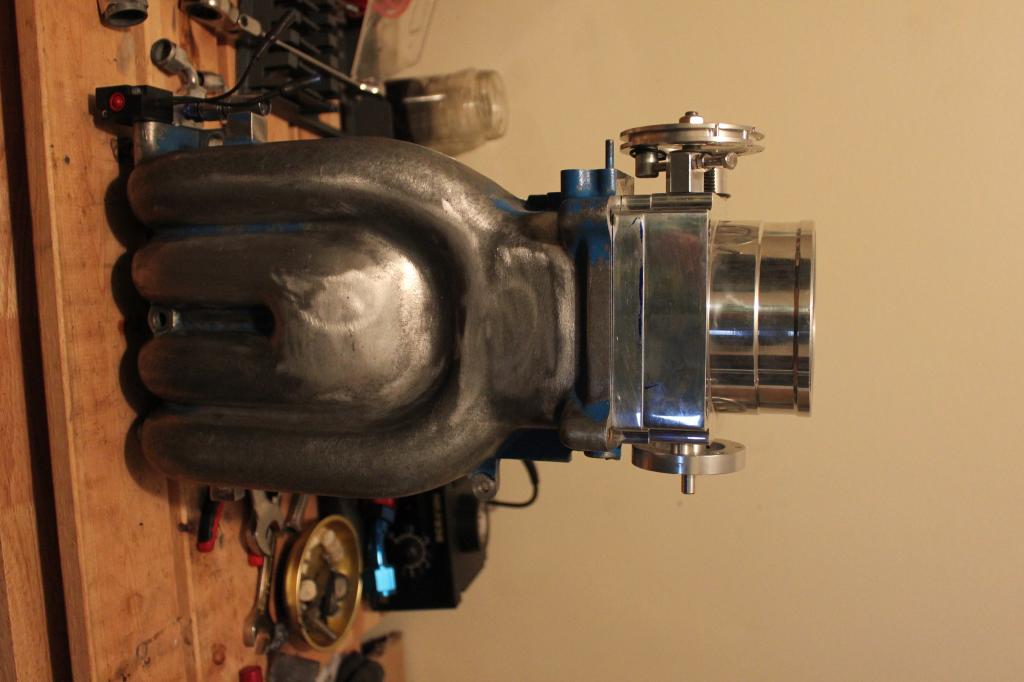
just a few small updates of some parts i have picked up.
The throttle body flange and intake manifold are now welded and ground down any extra material.
I also polished the turbo compressor housing.
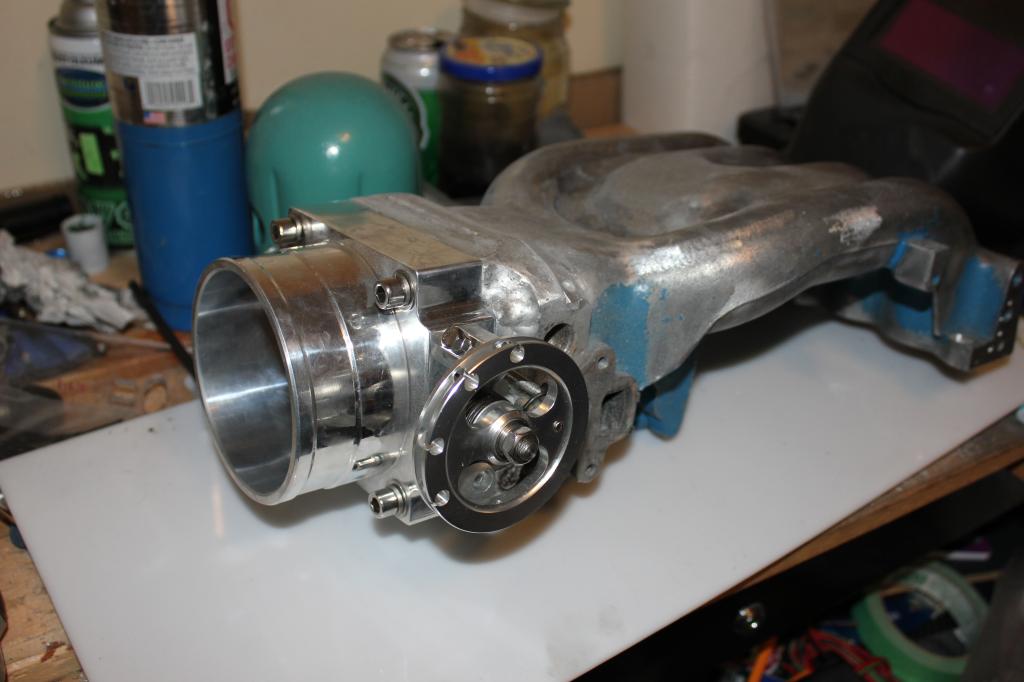
The throttle body flange and intake manifold are now welded and ground down any extra material.
I also polished the turbo compressor housing.