Jap Spec Series 5 FC3S - Twin turbo rew conversion!
 01-17-15, 03:02 AM
#76
Full Member
Thread Starter

Yeah its good like that every sub system can be separated,
The water line however does incorprate one of the mounting points, and i dont see the purpose of blocking off the thermowax anyway. but the fuel lines were annoying as hell to get on and off and also the fuel lines were due for replacement.
Also im not sure how much of it would have to remain for the coils to mount back there.
Im going to get the engineering company to make those last bracket pictured the bends are too close for me to do them myself, and ill get back a much better piece.
 02-09-15, 05:46 AM
#77
Full Member
Thread Starter
Back at it with great results this weekend. Pictures and descriptions will do the talking.
Had to cut a section out for the outlet and test fitting

was very happy with the height and everything

Making up the last parts of the bracket.

Last test and then marking the holes for the rivnuts


Painted up the brackets

Bam!


Had to cut a section out for the outlet and test fitting
was very happy with the height and everything
Making up the last parts of the bracket.
Last test and then marking the holes for the rivnuts
Painted up the brackets
Bam!
02-09-15, 05:51 AM
#78
Full Member
Thread Starter
Making up the -10an oil lines
For those playing at home
3m of nylon braided -10an hose
4 x 90 degree fittings
1 x straight
1 x 45 degree
4 x m22x1.5 to -10an
2 x m18x1.5 to -10an
Never understood why people put an angled fitting here straight works perfect

Just hanging

Secured with matching P-Clips

Looking tough!!!

Removed the passenger fender bracket as it was fingered like the drivers side


Still fits the reo bar

The front bar isnt too far off from fitting now, just needs to be notched a little for the oil fittings, its going to look super tough with the red fittings poking out


Clearance certainly wont be an issue

For those playing at home
3m of nylon braided -10an hose
4 x 90 degree fittings
1 x straight
1 x 45 degree
4 x m22x1.5 to -10an
2 x m18x1.5 to -10an
Never understood why people put an angled fitting here straight works perfect
Just hanging
Secured with matching P-Clips
Looking tough!!!
Removed the passenger fender bracket as it was fingered like the drivers side
Still fits the reo bar
The front bar isnt too far off from fitting now, just needs to be notched a little for the oil fittings, its going to look super tough with the red fittings poking out
Clearance certainly wont be an issue
The following users liked this post:
fc3schick87 (08-14-18)
02-09-15, 10:49 AM
#79
Moderator
iTrader: (3)
Join Date: Mar 2001
Location: https://www2.mazda.com/en/100th/
Posts: 30,829
Received 2,597 Likes
on
1,845 Posts
nice work!
03-10-15, 06:40 AM
#82
Full Member
Thread Starter
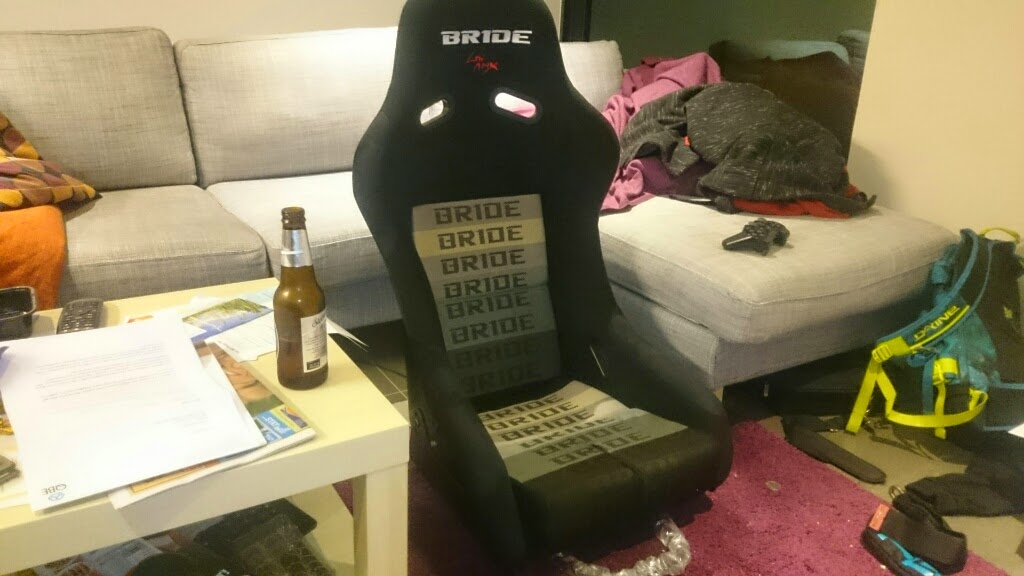
Every build needs beer! In my case lots of beer...
Im not fussy with what i drink usually just go by whats on sale.
Yeah i like the cleaning and painting looking back the green was pretty lame thou, I've got a fair few parts, tools and supplies awaiting installation. Just trying to get together some time but should have some updates coming soon!
Im not fussy with what i drink usually just go by whats on sale.
Yeah i like the cleaning and painting looking back the green was pretty lame thou, I've got a fair few parts, tools and supplies awaiting installation. Just trying to get together some time but should have some updates coming soon!
 03-21-15, 05:39 AM
#85
Full Member
Thread Starter
Cheers mate,
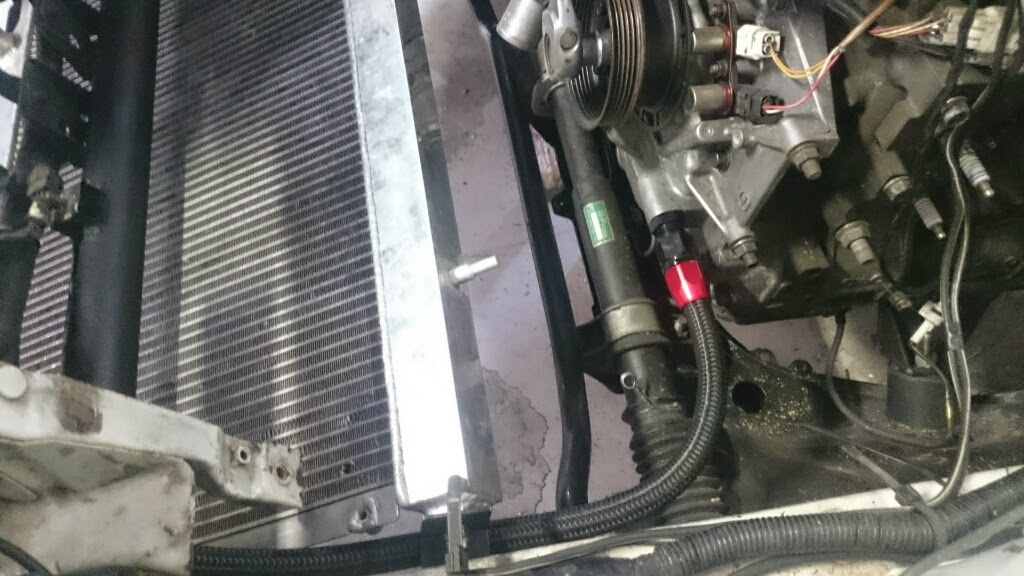
Would have fouled with the reo bar with the coolers up the other way.
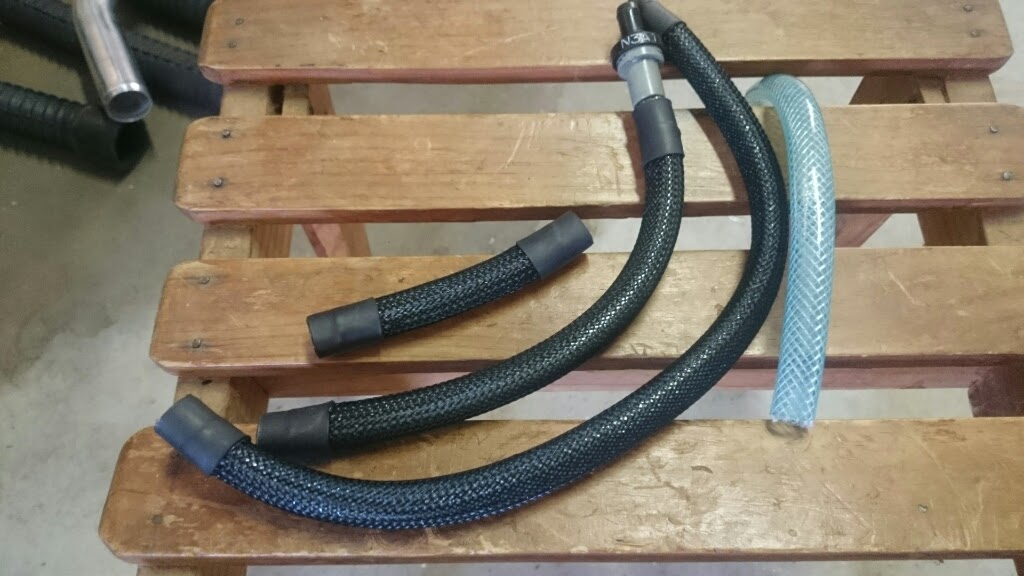
Soo some parts came in!
About $100 of T-bolts
Cheap catch can with fuel foam for baffling
Sheet metal folder for ducting
Hoses and elbow for radiator plumbing
Some vinyl got some white carbon coming for the bonnet.
My prized near new window switch!
Huge vent for the NA bonnet


Dont know what you guys pay for the window switches but they're usually stupid expensive here that one was however not!
Got started on the catch can first,
Baffled with fuel foam

Then got a hose that near screwed into back of the outlet, then rtv'd the hoses in there, this feeds bit over half way down the can and through the foam.


Cheep mans braided hose! looks maaad!!
Bashed up a bracket while the rtv while drying

Done!

Would have fouled with the reo bar with the coolers up the other way.
Soo some parts came in!
About $100 of T-bolts
Cheap catch can with fuel foam for baffling
Sheet metal folder for ducting
Hoses and elbow for radiator plumbing
Some vinyl got some white carbon coming for the bonnet.
My prized near new window switch!
Huge vent for the NA bonnet
Dont know what you guys pay for the window switches but they're usually stupid expensive here that one was however not!
Got started on the catch can first,
Baffled with fuel foam
Then got a hose that near screwed into back of the outlet, then rtv'd the hoses in there, this feeds bit over half way down the can and through the foam.
Cheep mans braided hose! looks maaad!!
Bashed up a bracket while the rtv while drying
Done!
03-21-15, 05:48 AM
#86
Full Member
Thread Starter
******* cheap sandwhich plate was supplied with metric bungs for 1/8npt fittings,
Soo npt threads suck!

pretty sure the other weld has like semi welded it self in their soo not going to touch it at the moment.

For those of you with sensitive stomachs and weak hearts turn away now, this **** is not pretty!
But aye it works...... i hope


Soo npt threads suck!
pretty sure the other weld has like semi welded it self in their soo not going to touch it at the moment.
For those of you with sensitive stomachs and weak hearts turn away now, this **** is not pretty!
But aye it works...... i hope
04-07-15, 01:10 AM
#87
Full Member
Thread Starter
Soo I found some rust,
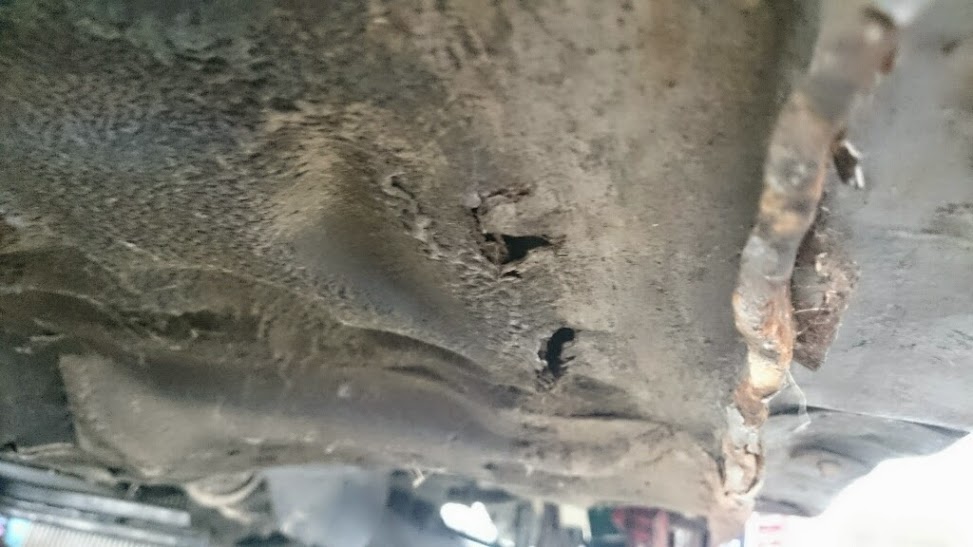
Opened it up with a wire wheel.

Hit it with the flappy disk and was very surprised to see it didn't get any bigger, even the metal between the two holes was good, you can even see in the picture it hadn't effected the other vertical panel. I think it was created from someone jacking the car badly and not from water sitting in the floor pan.

There was no rust apparent from the other side either, still treated it with rust converter.

So for now decided id just fill it, metal fibre stuff.

Sanded it back a bit, also sealed the panel line with rust converter and sealer.

Rubberized underbody paint is nasty stuff!

I'm satisfied with the result, given how good the metal still was I really didn't see the point in trying to cut and weld it for such a small hole. if it comes back then it will be.

Opened it up with a wire wheel.
Hit it with the flappy disk and was very surprised to see it didn't get any bigger, even the metal between the two holes was good, you can even see in the picture it hadn't effected the other vertical panel. I think it was created from someone jacking the car badly and not from water sitting in the floor pan.
There was no rust apparent from the other side either, still treated it with rust converter.
So for now decided id just fill it, metal fibre stuff.
Sanded it back a bit, also sealed the panel line with rust converter and sealer.
Rubberized underbody paint is nasty stuff!
I'm satisfied with the result, given how good the metal still was I really didn't see the point in trying to cut and weld it for such a small hole. if it comes back then it will be.
 04-26-15, 09:21 AM
#89
Full Member
Thread Starter
Went on a parts bing once again and here is the take,
Not pictured:
Aeromotive 340lph
Delrin gearbox mounts
sohn omp adapter
clamps and other bullshit.
Pictured
diff cradle and parts
Super now camber arm
Super now trailing arms
Parts by max Subframe risers
PBM Spherical aluminium bushing
PBM camber links
delrin DTSS eliminators
s4 welded diff with drive shaft for a s5


Stoked on this steal its possibly a perfect rear end setup for an fc, weirdly was still using a rubber front diff mount but sourced a PBM solid unit.
Have a few other trick bits in the mail too.
Not pictured:
Aeromotive 340lph
Delrin gearbox mounts
sohn omp adapter
clamps and other bullshit.
Pictured
diff cradle and parts
Super now camber arm
Super now trailing arms
Parts by max Subframe risers
PBM Spherical aluminium bushing
PBM camber links
delrin DTSS eliminators
s4 welded diff with drive shaft for a s5
Stoked on this steal its possibly a perfect rear end setup for an fc, weirdly was still using a rubber front diff mount but sourced a PBM solid unit.
Have a few other trick bits in the mail too.
04-26-15, 08:48 PM
#90
Full Member
Thread Starter
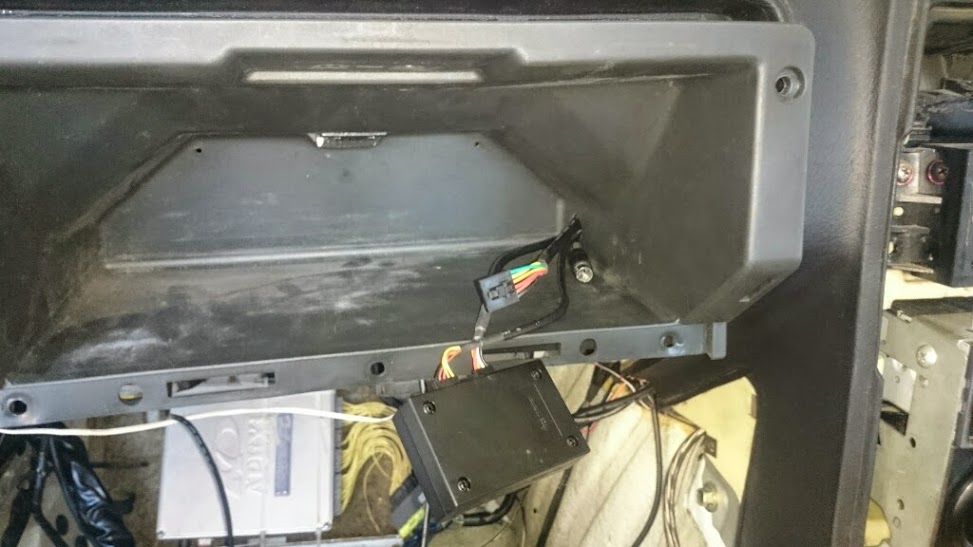
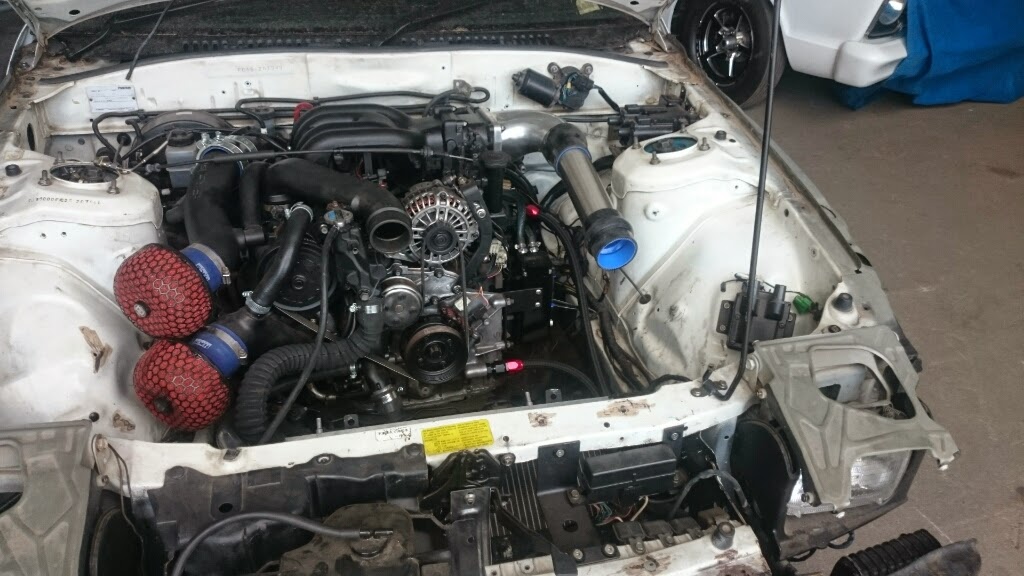
Finally decided to get my act together and finalize the engine wiring.
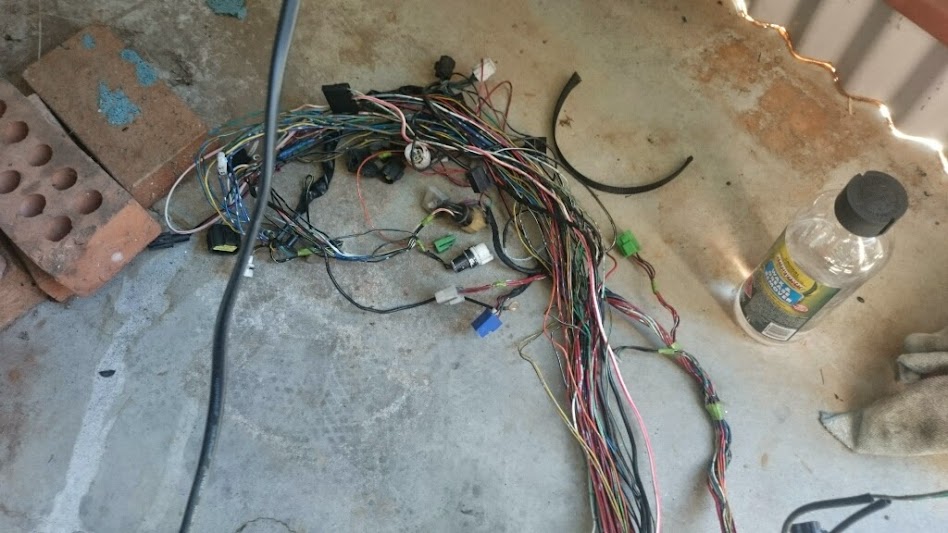
Its going back quite some time now but I have used the original s5 wiring loom for my s6 engine, the original motor was also heavily covered in oil and grease. which wasn't terrible at the time as it made the loom rather flexible.
Anyway was able to pull the loom out in about 5mins this time a quick couple of before shots


I didn't really take any pictures of actually constructing the new loom but did get some photos of the built up oil and crap that the loom was covered in.


Also drilled and tapped mounting points for my pressure sensors to the UIM seen this done before and love how neat it keeps everything. I also don't mind the clear hose it fits incredibly snuggly and will be sure not to leak.


This is the job nearly done, all the plugs are back in and braided sleeves are all ready for heat shrink and a little taping.

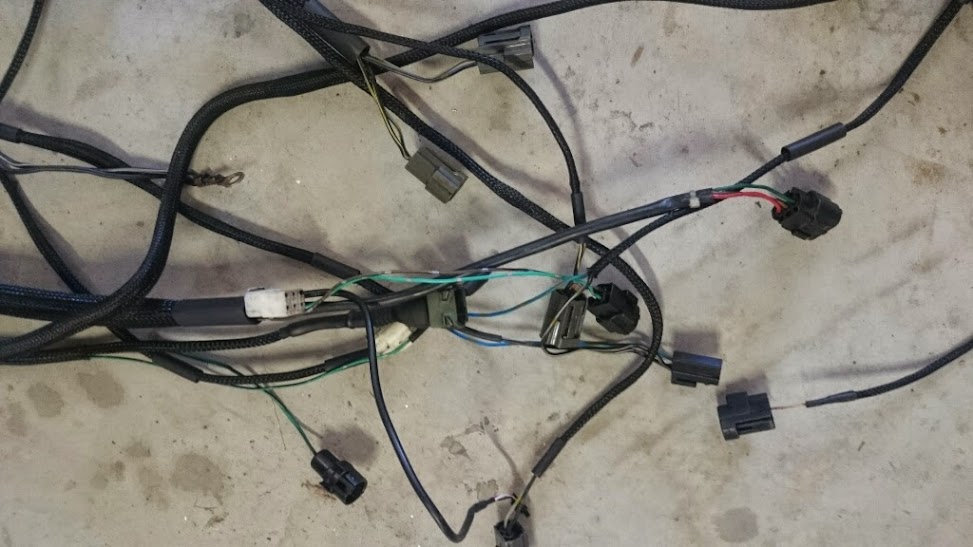

All sealed up and ready to be put back in.

Its going back quite some time now but I have used the original s5 wiring loom for my s6 engine, the original motor was also heavily covered in oil and grease. which wasn't terrible at the time as it made the loom rather flexible.
Anyway was able to pull the loom out in about 5mins this time a quick couple of before shots
I didn't really take any pictures of actually constructing the new loom but did get some photos of the built up oil and crap that the loom was covered in.
Also drilled and tapped mounting points for my pressure sensors to the UIM seen this done before and love how neat it keeps everything. I also don't mind the clear hose it fits incredibly snuggly and will be sure not to leak.
This is the job nearly done, all the plugs are back in and braided sleeves are all ready for heat shrink and a little taping.
All sealed up and ready to be put back in.
04-26-15, 08:59 PM
#91
Full Member
Thread Starter
And routed, keep in mind it looks a little messy because I didn't re-size of the wires the knock sensor and front secondary injector were the only two that were overly long.
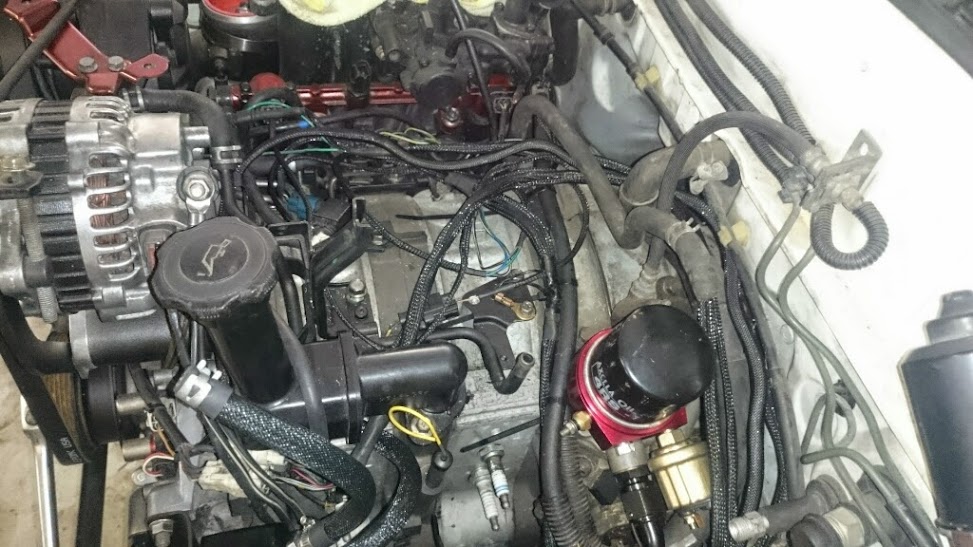

I always found it really annoying trying to get the UIM off with the wires being so short so I deliberately left everything UIM together and kept it really long, this is how far away the UIM can get now while still being plugged in


Then back inside the car, I decided to keep the original wrapping cover on this part as it is very well insulated with copper tape and earthed.
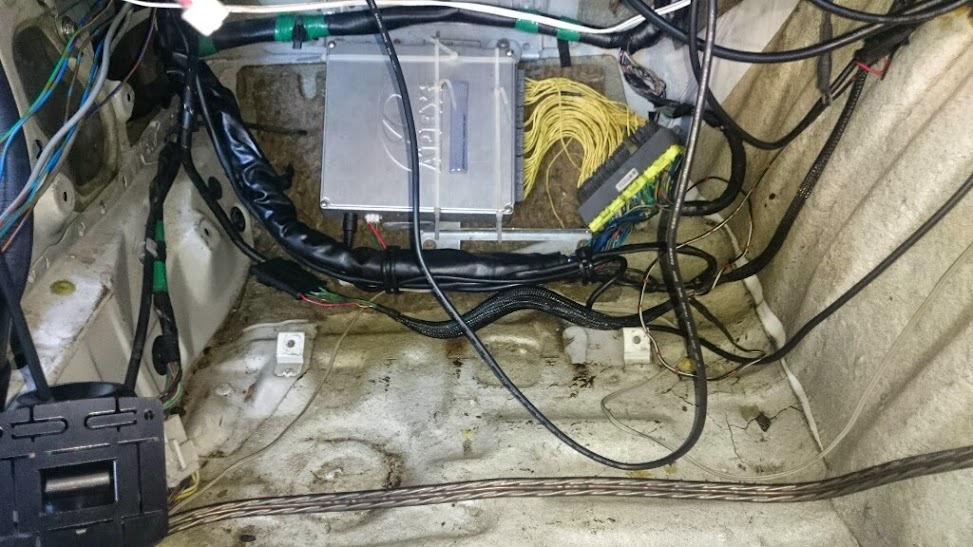
This is where my wideband controller and FC-Hako will live makes plugging in a laptop or re-calibrating the wideband super easy.
That then made this super easy and just using the daisy chains to get power to the EGT and Boost gauges, huge fan of these gauges I also think they match the fc perfectly

Had to change one pin on my gauge harness to accommodate the oil pressure gauge, also the harness I made perfectly fitted back under the cd player too. Sorry this picture is soo blurry the prosport gauges were flashing because they had no input.

And for those playing at home from right to left,
Ebay spec digital:
Water temperature
Oil Pressure
Oil temperature
Prosport premium
Boost pressure
Wideband air/fuel
Exhaust gas temprature
I always found it really annoying trying to get the UIM off with the wires being so short so I deliberately left everything UIM together and kept it really long, this is how far away the UIM can get now while still being plugged in
Then back inside the car, I decided to keep the original wrapping cover on this part as it is very well insulated with copper tape and earthed.
This is where my wideband controller and FC-Hako will live makes plugging in a laptop or re-calibrating the wideband super easy.
That then made this super easy and just using the daisy chains to get power to the EGT and Boost gauges, huge fan of these gauges I also think they match the fc perfectly
Had to change one pin on my gauge harness to accommodate the oil pressure gauge, also the harness I made perfectly fitted back under the cd player too. Sorry this picture is soo blurry the prosport gauges were flashing because they had no input.
And for those playing at home from right to left,
Ebay spec digital:
Water temperature
Oil Pressure
Oil temperature
Prosport premium
Boost pressure
Wideband air/fuel
Exhaust gas temprature
05-08-15, 06:31 AM
#92
Full Member
Thread Starter
Soo much has been happening and I have some time off soo stuff will continue to happen,
First up the parts that came in,
Aeromotive 340
Titanium exhaust wrap
delrin transmission mounts
HKS airfilters
RDA dimpled and slotted discs


Old airfilters

had to trim them up a bit

Job done

Disc brake installed, the rotors that were on it mustn't have been stock as they didnt have the screws that hold the rotors in?
Neither do the rears, luckily the rear end had the screws so i just used them

Gearbox mounts, these were a huge pain to get out!
And my centre mount was fingered!!!

Delrins on the upper mount
Cut out as much as the old rubber as possible and cleaned up the bottom mount

Up in there

I then used some larger washers i had to keep it looking proper

First up the parts that came in,
Aeromotive 340
Titanium exhaust wrap
delrin transmission mounts
HKS airfilters
RDA dimpled and slotted discs
Old airfilters
had to trim them up a bit
Job done
Disc brake installed, the rotors that were on it mustn't have been stock as they didnt have the screws that hold the rotors in?
Neither do the rears, luckily the rear end had the screws so i just used them
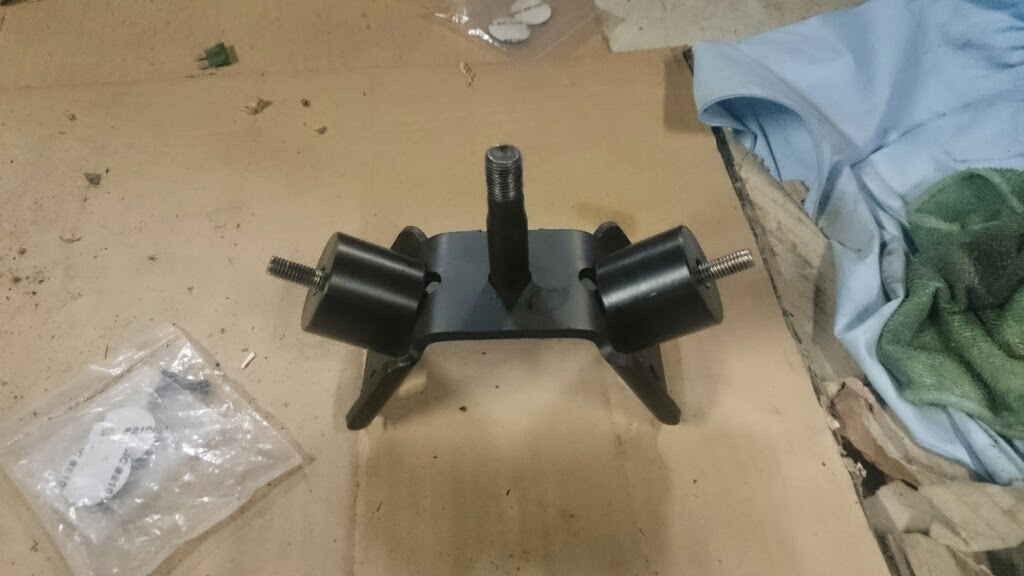
Gearbox mounts, these were a huge pain to get out!
And my centre mount was fingered!!!
Delrins on the upper mount
Cut out as much as the old rubber as possible and cleaned up the bottom mount
Up in there
I then used some larger washers i had to keep it looking proper
05-08-15, 06:50 AM
#93
Full Member
Thread Starter
Then i remembered i had these just sitting there idle,

Marked out and pulled off the sound deadener ****


Snip snip

Needed to cut a bit of the support out too

Just ground off the spot welds and removed that peice completely

After a bit of love from a hammer got it sitting pretty good

Found a good sized drill bit then got stuck into some speed holes!

Bit of matte black

Looks the goods, i was going to get some of that mesh stuff but dont think i will anymore,


Marked out and pulled off the sound deadener ****
Snip snip
Needed to cut a bit of the support out too
Just ground off the spot welds and removed that peice completely
After a bit of love from a hammer got it sitting pretty good
Found a good sized drill bit then got stuck into some speed holes!
Bit of matte black
Looks the goods, i was going to get some of that mesh stuff but dont think i will anymore,
05-08-15, 07:09 AM
#94
Full Member
Thread Starter
I've ordered some new front control arm and sway bar bushings, still waiting for them to come in so i've only been able to pull off the sway bar and prep it,
24mm on jap s5 turbo for those playing at home

My new drive shaft for the s4 diff was pretty beaten and was developing some decent surface rust, so it got some paint too.

Vinyl covered my speaker mounts, came up alright dont think i like that version of carbon wrap thou i think its 4d


24mm on jap s5 turbo for those playing at home
My new drive shaft for the s4 diff was pretty beaten and was developing some decent surface rust, so it got some paint too.
Vinyl covered my speaker mounts, came up alright dont think i like that version of carbon wrap thou i think its 4d
05-08-15, 07:10 AM
#95
Full Member
Thread Starter
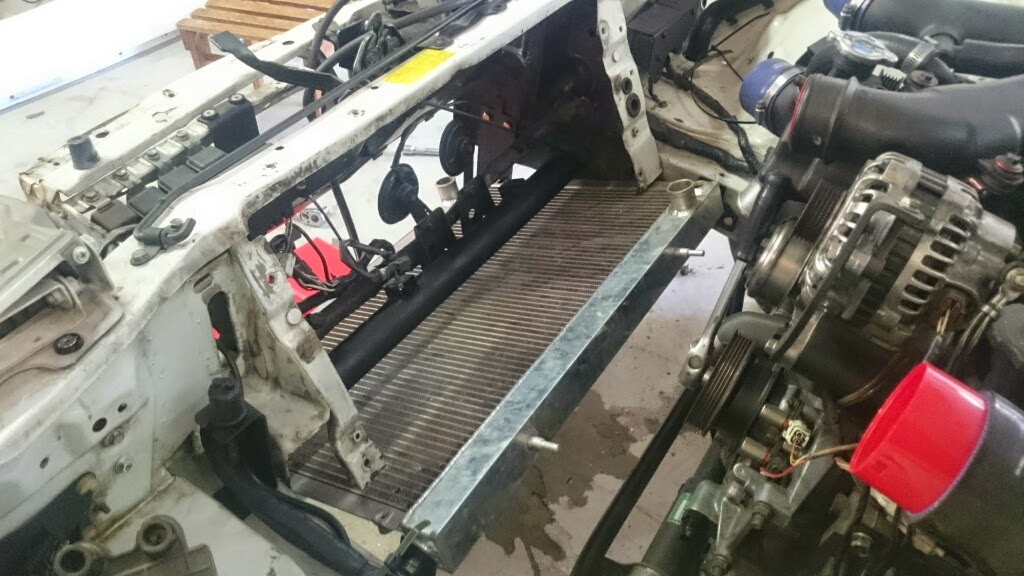
Installed the thermo fans, still need to wire them up but i want to wait till its running

Clearance is still not an issue

Picked up a plug for the hole in the radiator

And got my intercooler back with the bungs welded on,
Unfortunately i later realised that i ordered the wrong the thread which has meant finding the fastner setup i wanted impossible for those playing at home m8x1 is a **** thread pitch get x1.25!!

But regardless i got doing the intercooler mounts!
I was going to make the bottom in 2 parts first up simply as it involved less cutting and material.

This quickly became apparent as a bad idea as it was never going to hold the intercooler properly,
Soo i started at a one piece bottom mount.

Roughly done, its tight enough on the studs but im still going to tap threads on the studs and get some m12 bolts to keep it there

Wanted to test out this spray putty i got to try and get rid of what you could call maching marks haha, you can also see the very basic but highly practical top mounts there too.

Painted

Mounted!!!!

Needs nutserts done up top

Measures at a 50degree angle

Clearance is still not an issue
Picked up a plug for the hole in the radiator
And got my intercooler back with the bungs welded on,
Unfortunately i later realised that i ordered the wrong the thread which has meant finding the fastner setup i wanted impossible for those playing at home m8x1 is a **** thread pitch get x1.25!!
But regardless i got doing the intercooler mounts!
I was going to make the bottom in 2 parts first up simply as it involved less cutting and material.
This quickly became apparent as a bad idea as it was never going to hold the intercooler properly,
Soo i started at a one piece bottom mount.
Roughly done, its tight enough on the studs but im still going to tap threads on the studs and get some m12 bolts to keep it there
Wanted to test out this spray putty i got to try and get rid of what you could call maching marks haha, you can also see the very basic but highly practical top mounts there too.
Painted
Mounted!!!!
Needs nutserts done up top
Measures at a 50degree angle
05-09-15, 07:33 AM
#96
Full Member
Thread Starter
This is how far the exhaust is short, i was trying to measure it and then take the dump to an exhaust place to get altered.
But its way too hard to measure and it will need a slight bend also as there is no mount, hence the rope, i figure ill just take the car to someone and get the exhaust completely sorted.

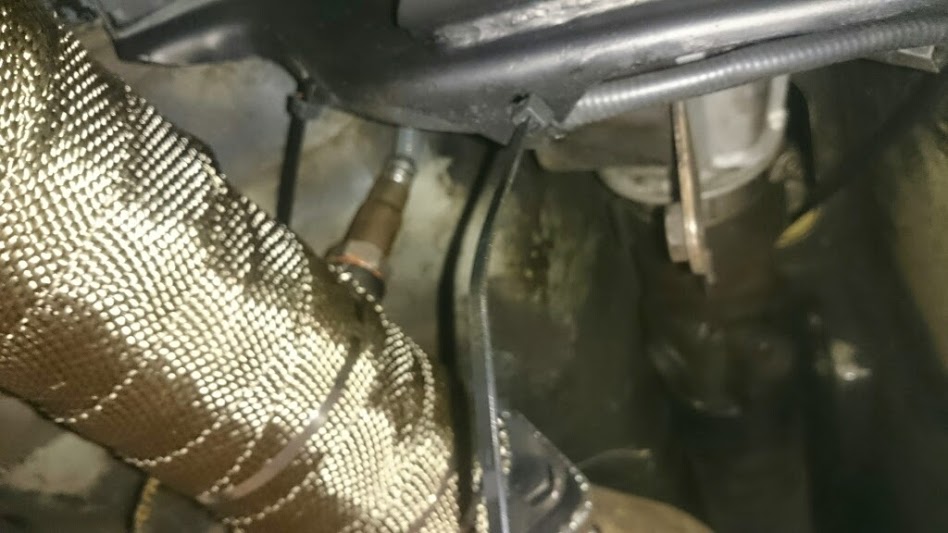
My rig for drilling out the wideband bung for the temporary location of the EGT probe.

I can't believe i nailed this first go was super worried about it for a while, the cast aluminium is super thin and there is barely any room anyway, Boom!! radiator overflow


Then got a bit happy with the tin snips,
hacked up my undertray...

But aye it fits and should work really well with the v-mount

And put it back together, with a few happy snaps of course.


It is busy on this side of everything but is still functional and im happy with the result.

And a closing photo

But its way too hard to measure and it will need a slight bend also as there is no mount, hence the rope, i figure ill just take the car to someone and get the exhaust completely sorted.
My rig for drilling out the wideband bung for the temporary location of the EGT probe.
I can't believe i nailed this first go was super worried about it for a while, the cast aluminium is super thin and there is barely any room anyway, Boom!! radiator overflow
Then got a bit happy with the tin snips,
hacked up my undertray...
But aye it fits and should work really well with the v-mount
And put it back together, with a few happy snaps of course.
It is busy on this side of everything but is still functional and im happy with the result.
And a closing photo
05-13-15, 07:05 AM
#97
Full Member
Thread Starter
For the first time in like 4 years she left the shed!!

Mazda Power!

Its at a local racecar builder great bloke stoked i've taken it to him, heres his 900hp v8 drag car, fc does even care.

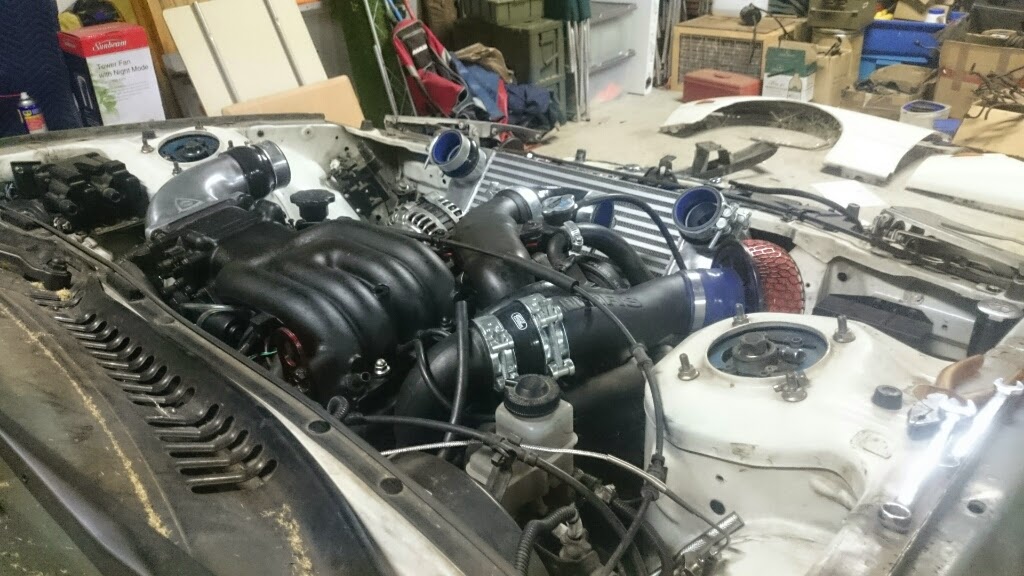
Piecing together the intake pipes, I hadnt checked bonnet clearances and unfortunately there are some haha
So decided to chop and remake the intercooler outlets, i was hoping for lobster joins but this aproach meant there wasnt a need to bend pipes at all.

Unfortunately dont have any pics of that but will get some together once i polish up the pipe work and clamp everything down, I was lucky enough to be able to work on the fc myself while its at the shop, so i fitted my aeromotive fuel pump.
Stock pump

The size difference is crazy!

Cut the original pipe catch thing off

Job done, used a small part of the rubber undermount to secure the bottom then hose clamps as shown.

I was able to just re-crimp the conection with the weatherproof pins i have.

Also had the dump pipe altered to mate with the rest of my exhaust

Told him not to worry about making it look pretty cause i was going to do this, fd exhaust are a ******* pain to wrap!!!

Mazda Power!
Its at a local racecar builder great bloke stoked i've taken it to him, heres his 900hp v8 drag car, fc does even care.
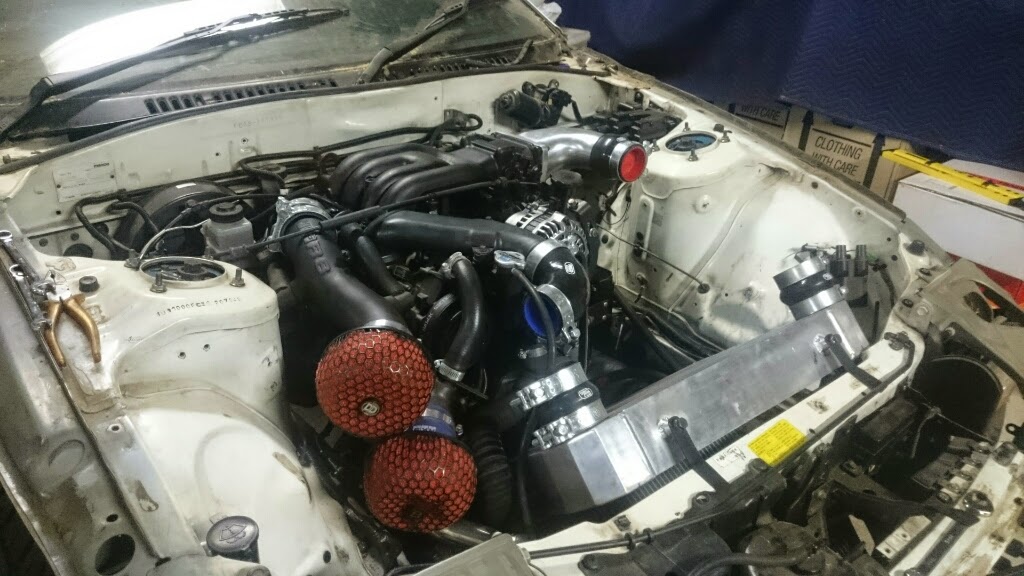
Piecing together the intake pipes, I hadnt checked bonnet clearances and unfortunately there are some haha
So decided to chop and remake the intercooler outlets, i was hoping for lobster joins but this aproach meant there wasnt a need to bend pipes at all.
Unfortunately dont have any pics of that but will get some together once i polish up the pipe work and clamp everything down, I was lucky enough to be able to work on the fc myself while its at the shop, so i fitted my aeromotive fuel pump.
Stock pump
The size difference is crazy!
Cut the original pipe catch thing off
Job done, used a small part of the rubber undermount to secure the bottom then hose clamps as shown.
I was able to just re-crimp the conection with the weatherproof pins i have.
Also had the dump pipe altered to mate with the rest of my exhaust
Told him not to worry about making it look pretty cause i was going to do this, fd exhaust are a ******* pain to wrap!!!
05-13-15, 11:38 AM
#98
NA-BOOSTIN
So when you installed your trans mounts did you replace that center bushing or gutted it out and used the washers to tighten down solid to the crossmember ? My center is busted also and I'm installing solid mounts .
05-16-15, 07:07 AM
#99
Full Member
Thread Starter
Its my belief that center mount is pushed into the subrframe from factory, thus a new one from mazda would have to purchase,
Althou the supernow aluminium ones appear to include the center mount but ive never seen it installed.
The original center mount allows the most movement and is often quickly destroyed while the outer mounts due to their orientation provide most of the support for the transmition. when you put solid mounts in their location all possible movement is negated and therefore a center mount is no longer required.
I'm about to get my car registered for road use and need to keep it looking like everything is there hence the washers.
05-16-15, 07:31 AM
#100
Full Member
Thread Starter
Soo i was able to work on the car a little more while it was at the fabricators shop, he charged me very little and had no need for the hoist so i was able to reinstall the dump pipe my self and check all the bolts. one of my clutch bolts was a little loose so this has proven invaluable.
Dump pipe,

wideband fits perfectly near straight up, and the gearbox subframe has some perfect holes for cable ties haha.
And a few more shots of the pipe work, i have to clean up and polish the welds and new pipes myself but im happy with that.


Then tried all day to try and get it to fire up,
Had no luck at the guys shop it wasnt sparking, i had relocated the fuse box and was worried that i had done something wrong then so this happened.

I did find a slightly dodgy join where one wire was had poken through the heatshrink but it should not have effected anything, anyway got the car back to my place and tried to crank it over once more, the only thing i changed was back to my old spark leads. and it freaken worked!
Unfortunately i now had to clean up the wiring, which i wanted to do anyway just not right now haha
Semi nice day in the sun,
First bits of braid sealed in place
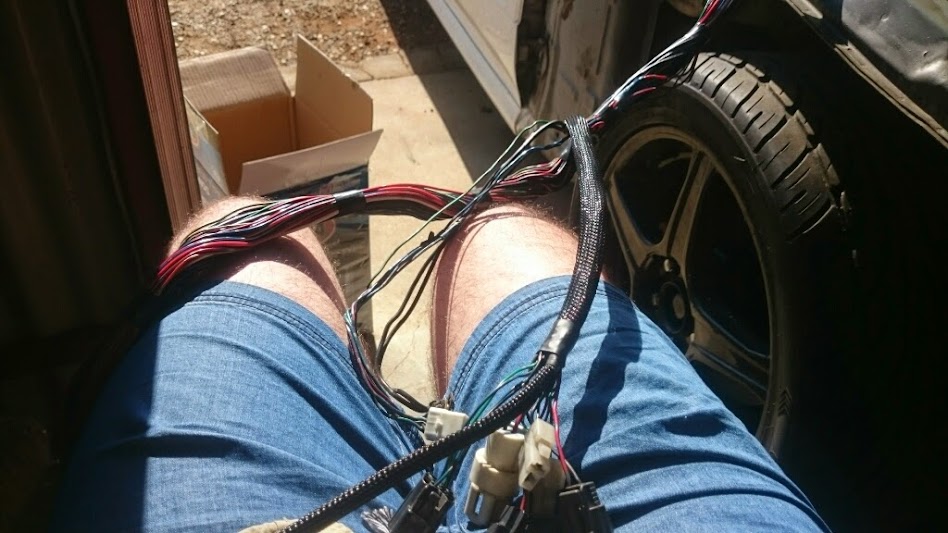
Just a bit to go, fml!
Dump pipe,
wideband fits perfectly near straight up, and the gearbox subframe has some perfect holes for cable ties haha.
And a few more shots of the pipe work, i have to clean up and polish the welds and new pipes myself but im happy with that.
Then tried all day to try and get it to fire up,
Had no luck at the guys shop it wasnt sparking, i had relocated the fuse box and was worried that i had done something wrong then so this happened.
I did find a slightly dodgy join where one wire was had poken through the heatshrink but it should not have effected anything, anyway got the car back to my place and tried to crank it over once more, the only thing i changed was back to my old spark leads. and it freaken worked!
Unfortunately i now had to clean up the wiring, which i wanted to do anyway just not right now haha
Semi nice day in the sun,
First bits of braid sealed in place
Just a bit to go, fml!