Another, "Hey look at my car's rebuild journey" attention deprived thread.

Update: I ran into ANOTHER problem, ha ha.
My Jegs push loc hose is NOT compatible with FUEL! I feel somewhat stupid because i did not read the fine print but in my defense(and to justify myself feeling like a complete ***) Jegs sells the hose in their ******* FUEL SECTION. WTF right?
Reason I looked again was because I kept finding residual fuel/pre-mix near my AN fittings a few days after a fuel pressure test. Funny thing was it wasn't leaking from the base off the push lock barbs/fittings but looked to be sweating through the lines. Never the less I am really HAPPY i found this mistake and it would have been devastating if my FC caught fire. Man i feel silly
Anyway I ordered NHRA approved push lock hose from Russell called "Twist Lok". Rated to work with fuel and has a 250 psi MAX. As for the color it only comes in blue and looks identical to the Jegs blue color.
As for the Power FC, they should get it on their doorstep tomorrow.
I did buy the Corksport modded FC fan shroud. It is very good qaulity! I pick up my Koyo from the post office tomorrow and I will test the fitment. Looks identical to stock except without the indent.
will keep posted.
My Jegs push loc hose is NOT compatible with FUEL! I feel somewhat stupid because i did not read the fine print but in my defense(and to justify myself feeling like a complete ***) Jegs sells the hose in their ******* FUEL SECTION. WTF right?
Reason I looked again was because I kept finding residual fuel/pre-mix near my AN fittings a few days after a fuel pressure test. Funny thing was it wasn't leaking from the base off the push lock barbs/fittings but looked to be sweating through the lines. Never the less I am really HAPPY i found this mistake and it would have been devastating if my FC caught fire. Man i feel silly
Anyway I ordered NHRA approved push lock hose from Russell called "Twist Lok". Rated to work with fuel and has a 250 psi MAX. As for the color it only comes in blue
and looks identical to the Jegs blue color. As for the Power FC, they should get it on their doorstep tomorrow.
I did buy the Corksport modded FC fan shroud. It is very good qaulity! I pick up my Koyo from the post office tomorrow and I will test the fitment. Looks identical to stock except without the indent.
will keep posted.

So I picked up my Koyo today I bought from ccfc3s(thanks buddy) and decided to test fit my CS shroud. The shroud fits nice BUT not as nice as stock given the Koyo has some features that inhibit it from mounting completely flush with the radiator.
I had to do some minor cutting and was by no means a big deal.
I still have to adjust it to get the proper clearence from the shroud to the edge of the fan blades. I want about .5 inch of clearence.
I also was able to fabricate my TID with these two installed. Tight fit as well but I like the look. I hast cutting aluminum, messy ****!
update ya all soon!
So I have everything installed besides the PFC. It is a bit cluttered but that is what I expected given I decided to use a fan shroud instead of a E-Fan. I fixed the fan/shroud clearence with some washers and got it to about .89 inch all around. My polyurethane engine mounts raise the engine just a bit and made it a bitch getting everything aligned with the radiator.
The Russell Twist Lok was "fun" to install. I was very happy to own a heat gun. No leaks after 2 pressure tests up to 65psi. Good stuff!!
Just need to add coolant and oil, get the PFC back from Japan and start it up.
Apexi still is bench testing the PFC and my patience is growing short. Either way I know I have at least another 2 1/2 week wait before the start up because they will send it to Japan to fix it.
The Russell Twist Lok was "fun" to install. I was very happy to own a heat gun.
No leaks after 2 pressure tests up to 65psi. Good stuff!!Just need to add coolant and oil, get the PFC back from Japan and start it up.
Apexi still is bench testing the PFC and my patience is growing short. Either way I know I have at least another 2 1/2 week wait before the start up because they will send it to Japan to fix it.
Last edited by FC3S Murray; Jul 24, 2008 at 02:15 PM.
626 lip.
Well Apexi called me today with the news and......NOTHING is wrong with the unit. ??? So I am stumped. I guess when I get it back I will just continue to troubleshoot the problem. I do know it is in the #3 connector and has to do with the Fuel injector wires only, just confused on why they didn't heat up on my other two ECU's.
Maybe it is the Banzia adapter that has some wires cris-crossed when it was assembled at their shop(highly doubt BUT it could be my luck).
**** me man!!

A BEAUTIFUL site(pic).
Got the SOB working. It was a grounding issue. I had 3 of the 4 grounds and long story short ,found the 4th ground I needed(thanks evryone for the concern and help).
more to come now...................
Got the SOB working. It was a grounding issue. I had 3 of the 4 grounds and long story short ,found the 4th ground I needed(thanks evryone for the concern and help).
more to come now...................
Holy ****, welcome back Mr. Carter!
I don't know where to begin..
Last time I posted I just got my PFC up and running. Since then I have been studying how to tune with help from Chuck Westbrook, ARGHX and some other credible rotor heads. I did get the FC to start and even got it on the road for some AFR tuning in vaccum. It runs great and I am amazed on how much better an 16-bit ECU reacts compared to the old 8-bit P.O.S ECU. HOWEVER, I have been having some throttle tip-in issues and have put it back in the garage until I can test it for boost leaks. I BELIEVE I have a vac leak that seals as the engine gets warm, either from the injector grommets OR the OMP injector holes I plugged.
So all in all my tuning so far has been in vain if this leak is for sure present. I really only have about 5 more weeks until the weather here in Montana gets horrible and most likely won't get into boost until this upcoming spring. It blows but will give me time this winter to hit up my suspension and maybe some body work....
I did add some more goodies though. I installed a TCSportline rear strut tower bar. Man this bar rocks! absolutely NO CUTTING required and you keep your speakers. **** yeah!! I also fabricated my own heat shields around my LIM to help keep it from becoming a air temp dangerzone. I got inspiration from a 3rd gen owner on this forum. .32 alum with DEI 2000* reflective material on both sides. I also put another layer of wrap on my DP. So far it works great and the mani is cool to the touch after a long drive. We will see if that stays true when I am boosting this engine around. If it doesn't work well then I guess asthetics will be it's main purpose.
Other then that I have been very busy with work and preparing to start training on my units new F-15's. My leak tester should be in tomorrow so I will update you on what I find.
Bet your *** I will be out tuning as much as possible as long as this 80 degree weather holds up.
stay tuned...
Last edited by FC3S Murray; Sep 17, 2008 at 01:11 AM.
Some more pics on when I first started to fabricate the heat shields. Made sure to keep the proper clearence between the LIM and turbo/DP so airflow could get between there and dissipate some heat.
also some more pics of her on jack stands. I just this evening washed and hand glazed her so I will take some pics of it on the ground this weekend.
also some more pics of her on jack stands. I just this evening washed and hand glazed her so I will take some pics of it on the ground this weekend.
Last edited by FC3S Murray; Sep 17, 2008 at 01:14 AM.


glad to see the heat shield turned out. i wish i could better record my IAT (hard to since the sensor is on the TB elbow) when i get around to making mine. ive had the DEI reflective stuff for over a month...just been busy doing other stuff is all....
even doubling up the DP wrap....i wish i could record the difference on that also.
anyway, looks great!
even doubling up the DP wrap....i wish i could record the difference on that also.
anyway, looks great!
Took her out today for a little AFR tuning at vacuum and boost transition. She is running great with exception of a couple little issues here and there.
The last couple weeks I spent a **** load of time fixing boost leaks with the boost tester that ARGHX recommends. I had **** leaking that I sealed up just less then two years ago on the previous engine. Little leaks from block off plates but main vac leak was coming from the primary injectors. Strange thing was I changed nothing on my primary injector set up from last year and the injectors sealed fine then. In order to fix my current leak I had to eliminate the plastic spacer on the pri fuel rail, not to mention get rid of my Marren 720cc and replace them with some Denso 720cc's. The Marren inj's have a broader tip and are an overall "fatter" injector which caused fitment issues when installing. They just didn't seal great into the plastic diffussers that sit in the intermediate housing. I also replaced all the O-RINGs on those difussers as well.
I also got rid of that UGLY AMBER on my tail lights with the help of good old Lamin-x products. They make a red film now that is damn near identical to our factory red lighting. Was some what difficult to instal since I didn't want to remove the lens. You can tell it is just a hair lighter red but all in all it is un-noticable.
She is going into the garage for winter now, supposed to actually snow next week. I have some training starting for my career and really just need a ******* break from the car! I plan on doing suspension upgrades this winter. I want a more aggresive stance and CAN'T STAND the postive camber on the front wheels!! I will add; RB springs, RB sway bars and front camber plates.
I might do some body work but am pretty pleased with the outcome and personally like the stock body lines.
The rest of the time I will be studying tuning and PFC related info. I have a feeling I have a long way til i get this PFC all weeded out!
Will update in the gargage soon....possibly from a heated garage with our new house.
Last edited by FC3S Murray; Oct 7, 2008 at 04:30 PM.

Hi all! It has been a long time coming since I have updated this thread. The FC is running strong and scares the living **** out of me. Since my last post I have been busy home shopping and cross training for a new job BUT that doesn't mean the FC was left in the dust.
Engine mods lately have been simple.
- I added a Greddy relief valve set to 19 psi for over boost protection. Switched to a 50MM HKS style waste gate that holds at about 14.8 psi. My .81 hot side just beat the **** out of the 40mm WG so this 50MM handles it better. BUT I will say for anyone in the future who is considering purchasing the HKS cast log mani should either; 1) get a turbo with no smaller then a hot side of .90 or 2) GET A TOP NOTCH WG that is 50mm or larger. Just a poorly designed manifold.
-In addition, I ceramic coated my HKS manifold then wrapped it and the DP in heat wrap. I am also waiting on a heat adhesive sheet that I will apply to my LIM. I think between my turbo blanket, heat shields, ceramic coating, heat wrap and sheet, heat protection and saturation is under control. The under hood temps were next to nothing yesterday when WOT tuning PLUS I never went above 29* C when tuning yesterday. Air temp outside was 66* F.
- I also switched from worm clamps to T bolt clamps. I personally don't like how they look (clutter engine bay more) plus they were a bitch to install but they do hold and I will never have to worry about popping an IC pipe again.
- HAD to install an Optima red top. I wanted a blue top or even a blue cover BUT they only sell top covers in different colors for side mount terminal batteries. I think my next little project will be battery relocation.
- I had my S4 alternator re-wound to 130 amps and also ditched the alt underdrive pulley and installed a OEM size dual alt pulley that is shinny and has a fancy rotor engraved on it. My voltage is MUCH better at cruising speeds BUT idle still suffers @ 12.9 volts due to re-wound alternators having horrible voltage drop at low rpm
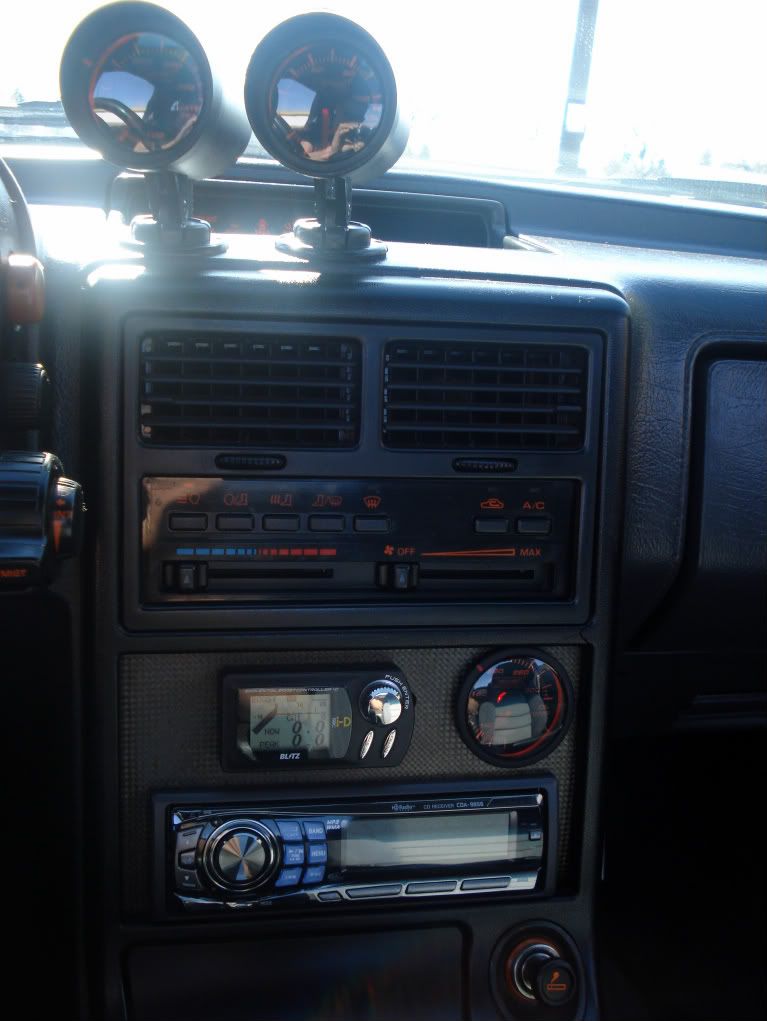
As for the interior I switched out my AEM UEGO to an Innovate LC-1/XD-16 set up. I went this route for many reasons. Reason 1 was because the UEGO wouldn't sync with my datalogit for the life of me. 2nd- because the innovate has a free air calibration and will also let you know when your sensor is bad...AEM does not. PLUS the innovate is programmable to whatever spectrum of AFR you want to display. I also installed a NARDI wheel and NRG QR hub. Looks sick! I also installed a new Alpine deck that I got in the 3rd gen 4sale forum for 50 BUCKS! Stole it and it is in perfect shape.
I also lowered the FC with some Tanabe GF210's and replaced my Tokico blues with brand new ones. Car feels tight and is just tolerable enough on these shitty Montana roads. Still up in the air if I want to get sway bars OR just replace all bushings instead.
As for the exterior I removed the rear wiper and RE sticker. I had to remove my front bumper mesh to get to an IC pipe leak from a clamp. I DON'T like my IC exposed completely naked but man is it shiny when outside. I am testing my luck with having it exposed to all this loose gravel on the road as well.
As for tuning, it is going well but going slow. FINALLY did WOT pulls in 3rd and 4th gear. She is damn fast! I kept my boost at 14.9 psi and my AFR was 10.8 to 11.0
I know I have some more power to squeeze out of her especially in the mid range and boost transition due to rich conditions. I want to push 17/18 psi BUT will need to get some better quality gas since all we have is 91 octane up here. I still am SO impressed how much a good quality turbo feels at WOT. It is like hitting warp speed about 4500 rpm all the way to redline
I plan on hitting the dyno mid May so I will post my numbers. I am expecting around 350-360 RWHP at 15 psi and HOPEFULLY 400RWHP at 18 psi. Wish me luck. That is it for now I will keep you all posted. Cheers!
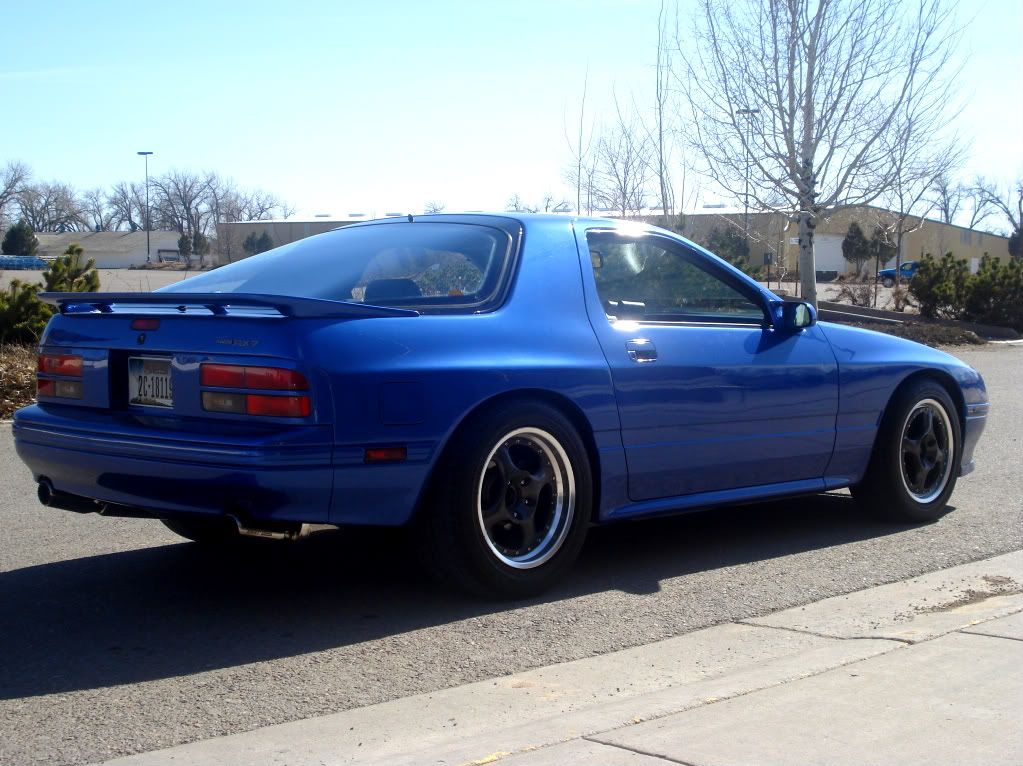
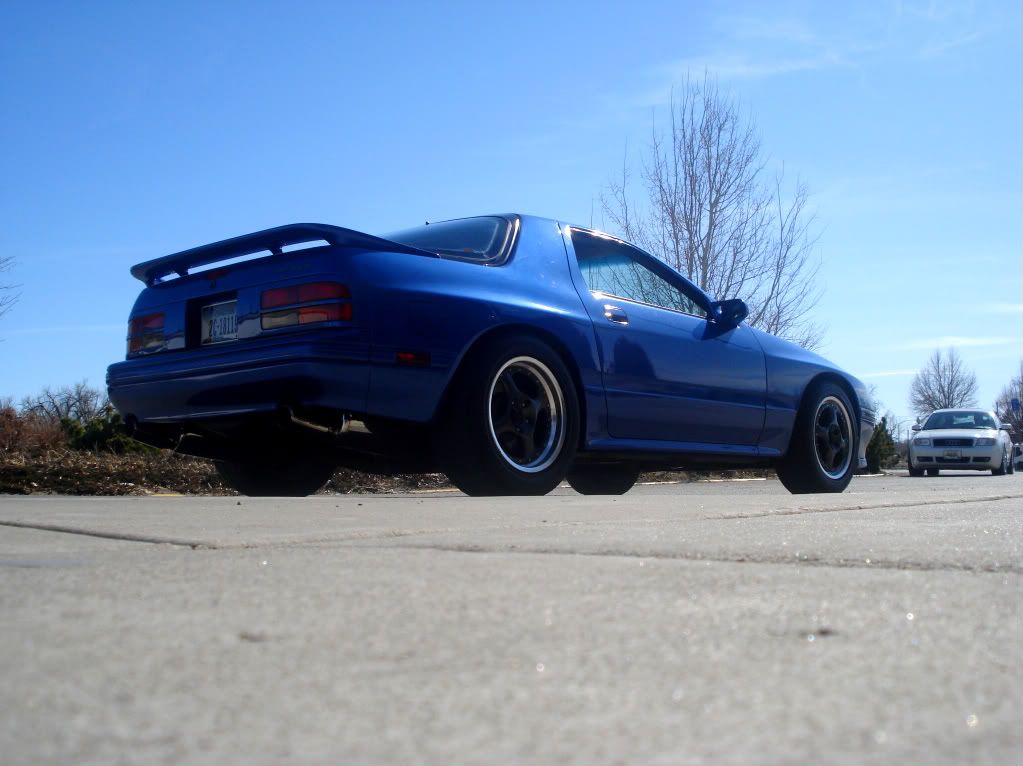
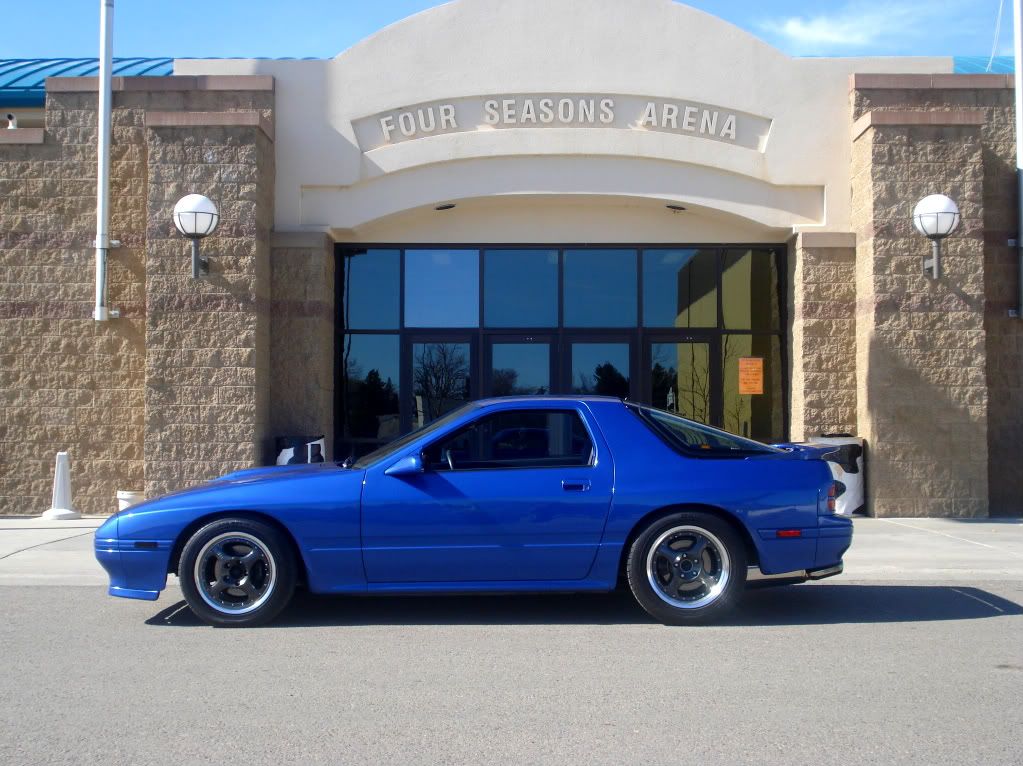
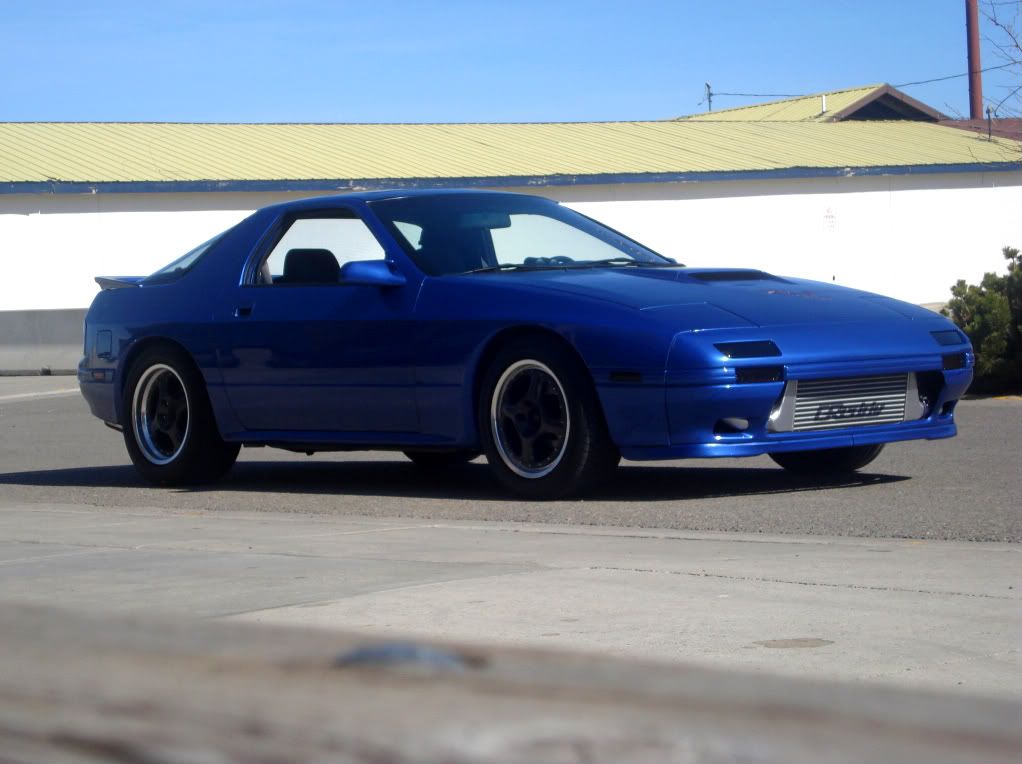
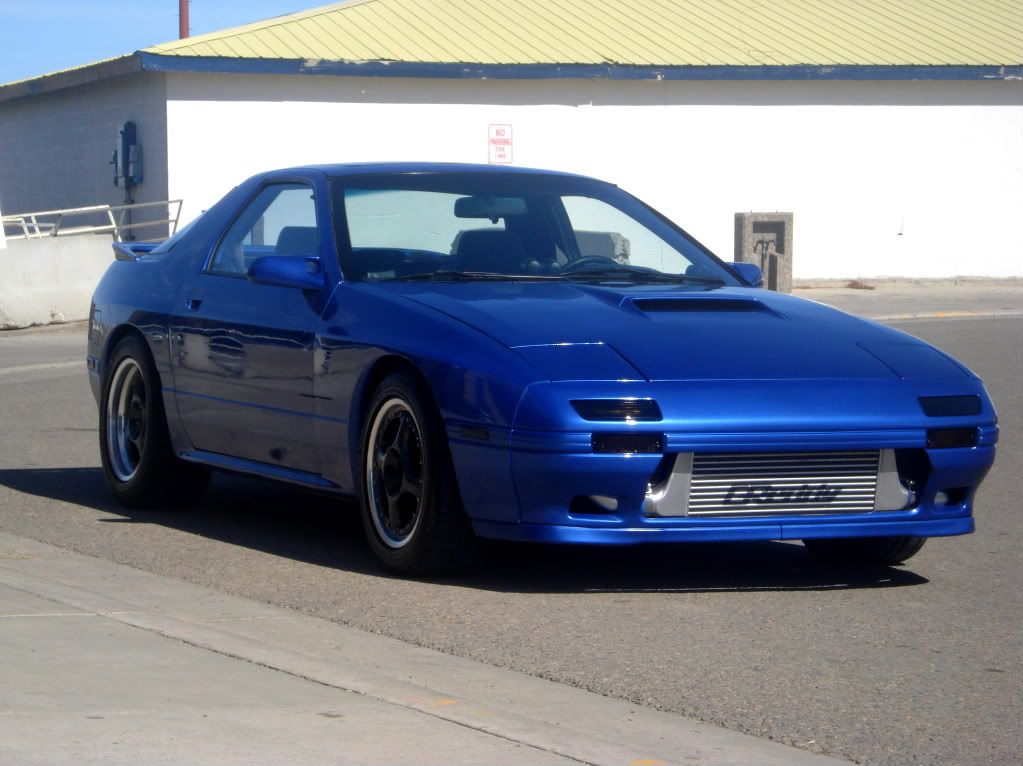
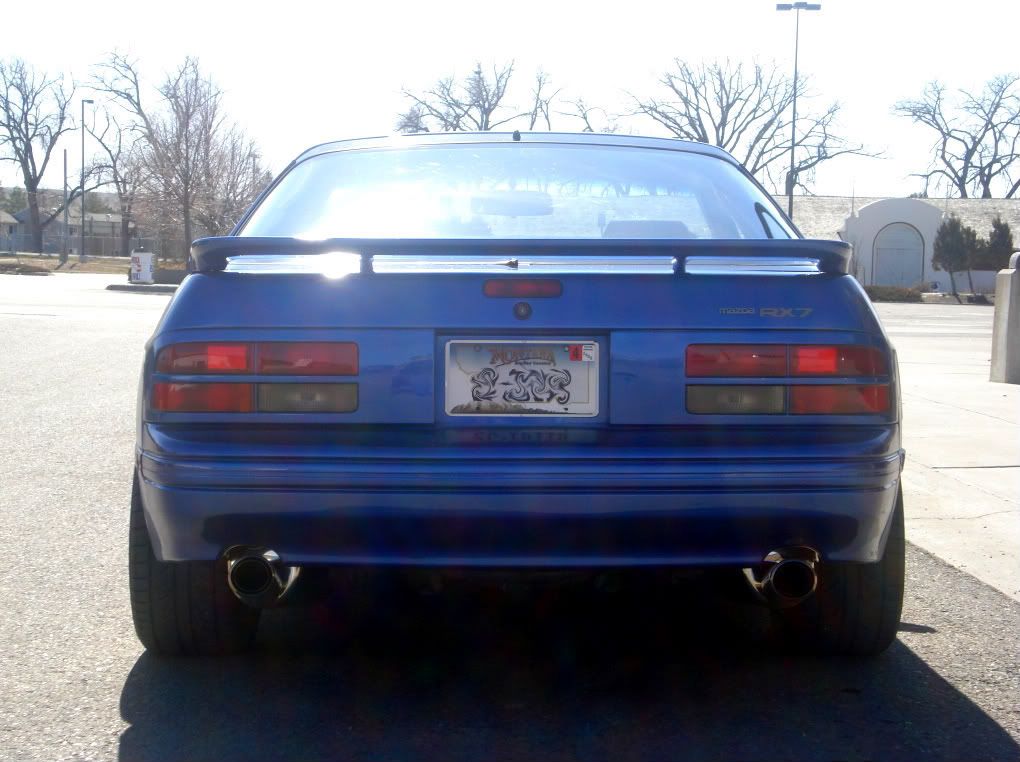
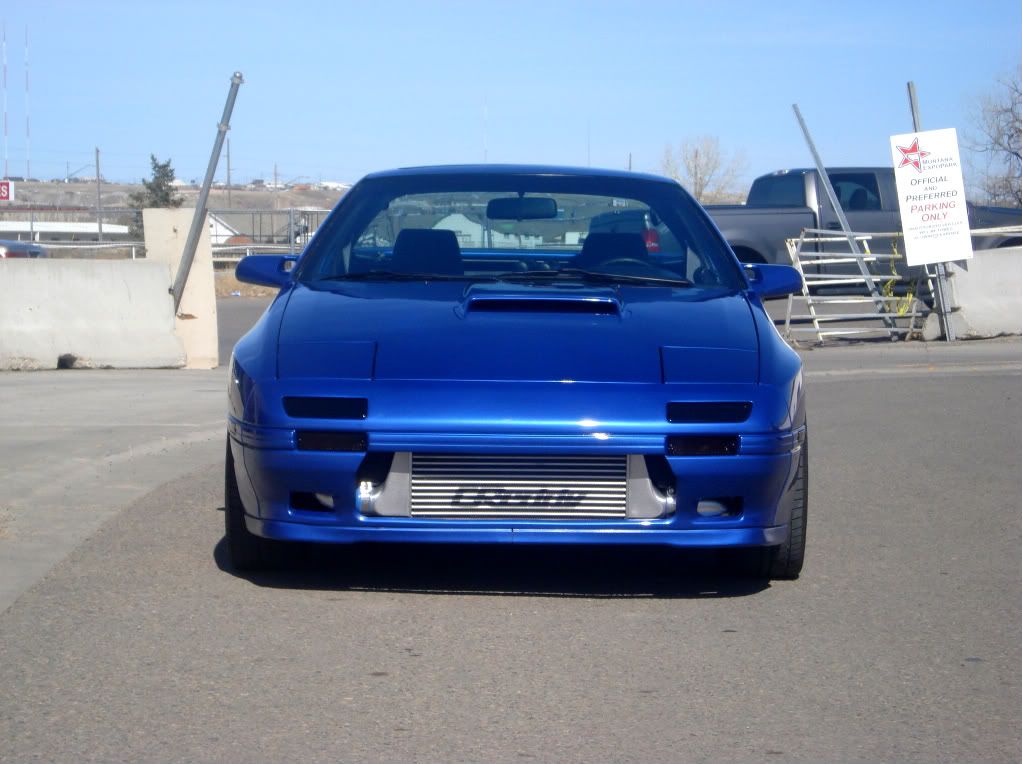
Also did a little photo shoot yesterday after hand glaze and wax. Enjoy.....


Since my last post I have been busy home shopping and cross training for a new job BUT that doesn't mean the FC was left in the dust. Engine mods lately have been simple.
- I added a Greddy relief valve set to 19 psi for over boost protection. Switched to a 50MM HKS style waste gate that holds at about 14.8 psi. My .81 hot side just beat the **** out of the 40mm WG so this 50MM handles it better. BUT I will say for anyone in the future who is considering purchasing the HKS cast log mani should either; 1) get a turbo with no smaller then a hot side of .90 or 2) GET A TOP NOTCH WG that is 50mm or larger. Just a poorly designed manifold.
-In addition, I ceramic coated my HKS manifold then wrapped it and the DP in heat wrap. I am also waiting on a heat adhesive sheet that I will apply to my LIM. I think between my turbo blanket, heat shields, ceramic coating, heat wrap and sheet, heat protection and saturation is under control. The under hood temps were next to nothing yesterday when WOT tuning PLUS I never went above 29* C when tuning yesterday. Air temp outside was 66* F.
- I also switched from worm clamps to T bolt clamps. I personally don't like how they look (clutter engine bay more) plus they were a bitch to install but they do hold and I will never have to worry about popping an IC pipe again.
- HAD to install an Optima red top. I wanted a blue top or even a blue cover BUT they only sell top covers in different colors for side mount terminal batteries. I think my next little project will be battery relocation.
- I had my S4 alternator re-wound to 130 amps and also ditched the alt underdrive pulley and installed a OEM size dual alt pulley that is shinny and has a fancy rotor engraved on it.
My voltage is MUCH better at cruising speeds BUT idle still suffers @ 12.9 volts due to re-wound alternators having horrible voltage drop at low rpmAs for the interior I switched out my AEM UEGO to an Innovate LC-1/XD-16 set up. I went this route for many reasons. Reason 1 was because the UEGO wouldn't sync with my datalogit for the life of me. 2nd- because the innovate has a free air calibration and will also let you know when your sensor is bad...AEM does not. PLUS the innovate is programmable to whatever spectrum of AFR you want to display. I also installed a NARDI wheel and NRG QR hub. Looks sick! I also installed a new Alpine deck that I got in the 3rd gen 4sale forum for 50 BUCKS! Stole it and it is in perfect shape.
I also lowered the FC with some Tanabe GF210's and replaced my Tokico blues with brand new ones. Car feels tight and is just tolerable enough on these shitty Montana roads. Still up in the air if I want to get sway bars OR just replace all bushings instead.
As for the exterior I removed the rear wiper and RE sticker. I had to remove my front bumper mesh to get to an IC pipe leak from a clamp. I DON'T like my IC exposed completely naked but man is it shiny when outside.
I am testing my luck with having it exposed to all this loose gravel on the road as well.As for tuning, it is going well but going slow. FINALLY did WOT pulls in 3rd and 4th gear. She is damn fast! I kept my boost at 14.9 psi and my AFR was 10.8 to 11.0
I know I have some more power to squeeze out of her especially in the mid range and boost transition due to rich conditions. I want to push 17/18 psi BUT will need to get some better quality gas since all we have is 91 octane up here. I still am SO impressed how much a good quality turbo feels at WOT. It is like hitting warp speed about 4500 rpm all the way to redline
I plan on hitting the dyno mid May so I will post my numbers. I am expecting around 350-360 RWHP at 15 psi and HOPEFULLY 400RWHP at 18 psi. Wish me luck. That is it for now I will keep you all posted. Cheers!
Also did a little photo shoot yesterday after hand glaze and wax. Enjoy.....