4-Rotor FC Build
 09-25-12, 01:01 PM
#1001
EFI Tech Wannabe
iTrader: (1)
Join Date: Sep 2003
Location: D.R., USA, the world...
Posts: 2,405
Likes: 0
Received 4 Likes
on
4 Posts
Wow, this is an amazing build project, i have to tip my hat to John for doing all the work he has done and for simply doing it to the level of quality you just dont see anywhere!
Congratulations and keep it up! Looks awesome!
Congratulations and keep it up! Looks awesome!
 09-30-12, 01:55 PM
#1003
is plotting your doom!

Join Date: Sep 2012
Location: NE Ohio
Posts: 42
Likes: 0
Received 0 Likes
on
0 Posts
Amazing build can't wait to see the finished car. I like the new wheel choice, imo 16"s look better and you can run a less expensive tire with a little more sidewall, at least for on the street. I know the stretched/flush look is popular and I'm all for it, cause it keeps my dad busy, he welds all the busted wheels for a local shop, but I like something a little more practical. You know a wheel/tire combo that says "I can actually drive fast enough on the street to get a speeding ticket without fear of breaking a rim."
Anyway keep up the great work, looking forward to seeing more updates
Anyway keep up the great work, looking forward to seeing more updates
09-30-12, 02:46 PM
#1004
No sorry, still busy with prepping a lot of parts for paint. Most of the parts need a lot of work to get everything nice and straight, and there are just soo much extra little parts to prep, like trimmings, headlight parts and such. I was planning to shoot some paint this weekend, but decided to spend some time prepping everything a bit better, and paint it next weekend.
Amazing build can't wait to see the finished car. I like the new wheel choice, imo 16"s look better and you can run a less expensive tire with a little more sidewall, at least for on the street. I know the stretched/flush look is popular and I'm all for it, cause it keeps my dad busy, he welds all the busted wheels for a local shop, but I like something a little more practical. You know a wheel/tire combo that says "I can actually drive fast enough on the street to get a speeding ticket without fear of breaking a rim."
Anyway keep up the great work, looking forward to seeing more updates
Anyway keep up the great work, looking forward to seeing more updates
10-07-12, 01:08 PM
#1010
Painted some stuff this weekend, crappy job which took me wayyy to long, looks ok though.  , Still need to do some trimmings and stuff next week, and hopefully I can start doing something mechanical after that , the last 6 weeks have just been prepping, painting and wiring so I'm itching to pick up a wrench and start getting the mechanicals together.

, Still need to do some trimmings and stuff next week, and hopefully I can start doing something mechanical after that , the last 6 weeks have just been prepping, painting and wiring so I'm itching to pick up a wrench and start getting the mechanicals together.


 10-07-12, 06:18 PM
#1014
What the Hell?
Join Date: Jul 2011
Location: Houston, TX
Posts: 96
Likes: 0
Received 0 Likes
on
0 Posts
This is probably the best build I have ever seen. This is my first look at the thread...the e-shaft made my day man. I'm very impressed with the professional quality that I've never seen anywhere else except from mazda itself. You just earned yourself a subscriber.
 10-11-12, 12:14 PM
#1018
Junior Member

Join Date: Nov 2008
Location: TX
Posts: 23
Likes: 0
Received 0 Likes
on
0 Posts
Hi John,
I like the black and white as well, for some reason I'm reminded of a stormtrooper when I look at the body panels you've completed. How did you spray them? It looks like you got some orange peel going on, are you going to keep working with it?
I like the black and white as well, for some reason I'm reminded of a stormtrooper when I look at the body panels you've completed. How did you spray them? It looks like you got some orange peel going on, are you going to keep working with it?
10-11-12, 04:51 PM
#1019

But those trimmings are molded with the bumpers, so there's no way to take them off to paint them a different colour. So I painted everything with a basecoat first, then painted the bumpers in metallic black, let that dry for about 4 hours or so, Masked the trimmings and the bottom grill, and then painted everything white. With the white still a little bit wet I removed the maskings, waited a bit, and then painted everything a 2k clear coat. The clearcoat really makes it flow together and look good.
Your right about the orange peel, I got a little bit of that going on. Probably because I don't have an actual proper paint booth. I just god some good paint, and a proper paint gun, but the paintbooth was made in the middle of the workshop using scrap pieces of metal and tons of plastic sheets
Not being able to get the temperature and humidity perfect is probably what caused the slight peel. The fact that I'm not a painter probably also helps a lot The paint layer is pretty thick though and it's not that bad, so I should be able to polish it out but I think I'll have to wait for the paint to harden a bit before that though.
10-12-12, 09:03 AM
#1020
rotary!!

Join Date: Nov 2004
Location: The Netherlands
Posts: 145
Likes: 0
Received 0 Likes
on
0 Posts
Your right about the orange peel, I got a little bit of that going on. Probably because I don't have an actual proper paint booth. I just god some good paint, and a proper paint gun, but the paintbooth was made in the middle of the workshop using scrap pieces of metal and tons of plastic sheets Not being able to get the temperature and humidity perfect is probably what caused the slight peel. The fact that I'm not a painter probably also helps a lot The paint layer is pretty thick though and it's not that bad, so I should be able to polish it out but I think I'll have to wait for the paint to harden a bit before that though.
Not being able to get the temperature and humidity perfect is probably what caused the slight peel. The fact that I'm not a painter probably also helps a lot The paint layer is pretty thick though and it's not that bad, so I should be able to polish it out but I think I'll have to wait for the paint to harden a bit before that though.btw, love your work and reminds me of my FC i regretfully sold a few years ago
10-12-12, 10:56 AM
#1021
Junior Member
Join Date: Nov 2008
Location: TX
Posts: 23
Likes: 0
Received 0 Likes
on
0 Posts
I'm not one to judge on paint, but I've picked up a lot of ideas over the years and I feel pretty confident I could come up with something decent given the right tools.
I will never have access to a true booth either, and I will be at the mercy of the environment when I shoot my car. I'm hoping the prep work and finishing will be enough to compensate for that. Marx is right, some wetsanding on the panels should bring that right out.
I'm really glad you went with white, and you picked a good code too.
I showed this thread to my brother, who is about to get his degree in mechanical engineering. I have always been mechanically inclined, he has the book smarts to explain the theory behind the stuff that interests me. So this thread definitely has us both very impressed.
10-20-12, 12:08 PM
#1022
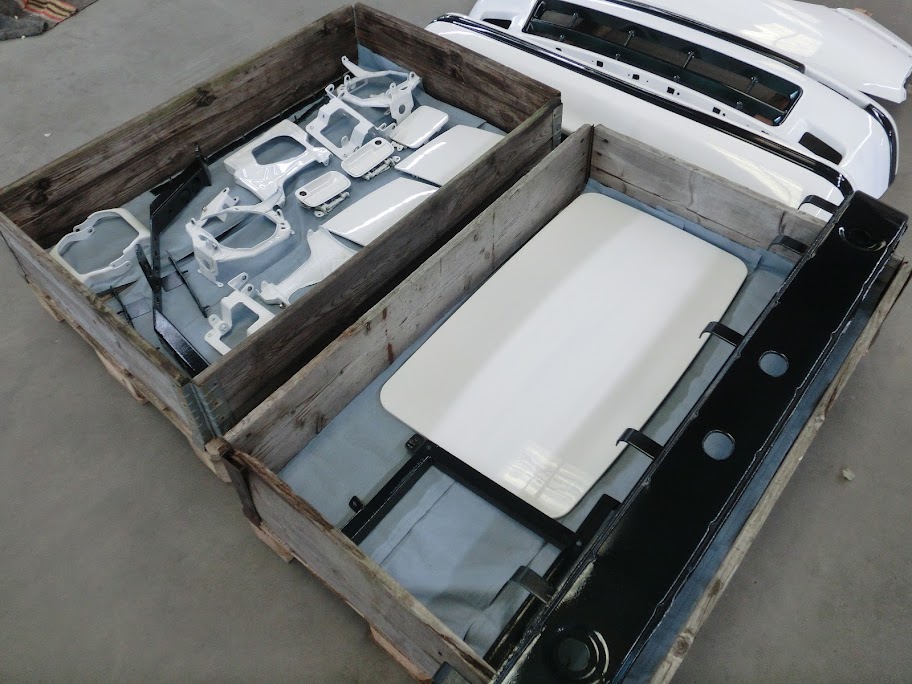
Spend last week painting small stuff like the trimmings, subframe, drive axles, and brackets and such. This week I started getting the inside of the car back together.

Dashboard had to be notched to fit with the rollcage, but it works. Still need one of those center gauge pod's though, maybe I'll fab one up myself tomorrow
Dashboard had to be notched to fit with the rollcage, but it works. Still need one of those center gauge pod's though, maybe I'll fab one up myself tomorrow
 10-20-12, 06:46 PM
#1024
Full Member
Join Date: Nov 2009
Location: Tasmania, Australia
Posts: 99
Likes: 0
Received 0 Likes
on
0 Posts
Just spent the last few days reading through this thread from start to finish and I must say it is a truly inspirational build. I wish I had the skills and the knowledge (and the access the the tools ) that you have. Look forward to seeing the completion of your build.
I don't know if I missed it in the thread but what transmission are you planning to use?
I was going to use the FC turbo box to begin with (mainly because it's cheap) but now I'm leaning towards a Tremac 5 speed and doing it properly first time. Green Brothers in New Zealand make a belhousing to convert to the rotary engine so that's easy for me.
) that you have. Look forward to seeing the completion of your build. I don't know if I missed it in the thread but what transmission are you planning to use?
I was going to use the FC turbo box to begin with (mainly because it's cheap) but now I'm leaning towards a Tremac 5 speed and doing it properly first time. Green Brothers in New Zealand make a belhousing to convert to the rotary engine so that's easy for me.