Project Resurrection: Running Log
 02-23-12, 06:19 PM
#351
Junior Member
iTrader: (1)
Join Date: Jan 2011
Location: North Eastern Wv
Posts: 38
Likes: 0
Received 0 Likes
on
0 Posts
Useful cross reference info:
20mm expansion plugs
Dorman products
# 565-101.1 brass, 20mm nom.; $1.99 each at O'reilly
# 555-101 steel 20mm nom.; $0.49 each
I'm gonna go with the brass, working under the premise that they are less likely to damage aluminum on removal. Should be more than strong enough, esp. since there will still be a sealed gasket passage in place whenever the manifold's on.
 02-24-12, 07:54 AM
#352
I've never had a problem getting them at my local auto parts store. Good to know some part numbers though in case we need them. Not a bad idea on the brass ones, I'm sure they will hold up fine, its only ~15psi in the system anyway.
As for removal you can usually just punch a hole in them with a punch and just pry them out. I'm sure there is an "official" method or tool for the job but that's what we always did at the shop I used to work at... It's been a while since I had to actually remove one though lol.
You only set them in right at the front of the coolant passage so they are still easy to get to and they aren't in there super tight. Just to be safe I usually put the o-rings in place too although that's personal preference.
02-24-12, 09:20 AM
#353
Digging around on the net revealed that there's a tool specifically for removing freeze plugs (big shock - - there's a tool specifically for everything, right?) that is basically a bridge support with a hardened self-threading screw on it. The bridge reaches across the outside of the bore, you punch a hole in the plug, thread the screw into it, and jack the plug out by tightening the screw.
I must admit I never would have thought of perforating the old plug with a punch; my natural tendency would have been to reach for a drill, but I was concerned about where the chips would go.
I must admit I never would have thought of perforating the old plug with a punch; my natural tendency would have been to reach for a drill, but I was concerned about where the chips would go.
02-24-12, 10:35 AM
#354
The biggest potential issue you'll face with using a punch is that it can push the freeze plug further in, it's certainly not the perfect way of doing it, but it works 
That tool you're talking about sounds like a really good solution as long as its not overly expensive. Honestly though I doubt you'll ever remove them, it should be fine.
If you used a small drill bit there wouldn't be much shavings, you could also coat it in grease so the chips stick to the bit..
That tool you're talking about sounds like a really good solution as long as its not overly expensive. Honestly though I doubt you'll ever remove them, it should be fine.
If you used a small drill bit there wouldn't be much shavings, you could also coat it in grease so the chips stick to the bit..
 02-27-12, 12:06 AM
#356
Day 1226
Disaster...
As mentioned briefly in the "what did you do today" thread, I thought today was going to see me completing basic engine construction, mating up the trans, and dropping said assembly back into the chassis.
Instead, I'm now back to about square one-half; the engine is once again completely disassembled, and it looks like I'm in need of a new midplate and rear plate.
I finished off basic keg assembly last night around 11:30; I'd nee at it all day since about 9am, so once all was torqued nicely together, I turned off the lights and headed to bed.
This being my fourth 12A build, I hadn't encountered any surprises along the way, outside of realizing that I hadn't bolted the rear stat gear into the housing when it came time to add that plate, & so I had to get the new o-ring and sealant on the rear gear and seat it PDQ. Otherwise, it was a very linear build. Far as I could tell, it had gone clean.
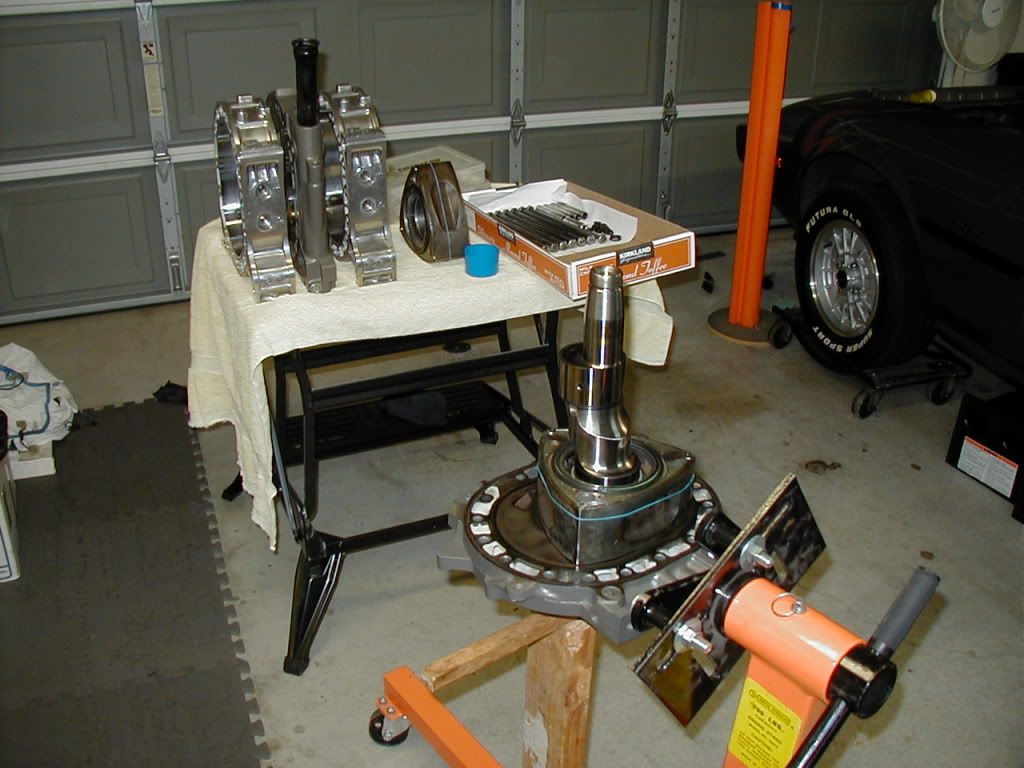
After I woke up this AM, I spent an hour or 90 inutes getting a bunch of external parts (oil pan, pulleys, flywheel, etc) that I'd need for the day nicely cleaned, and then set about putting the flywheel on, as the first step of setting the stack up and checking end clearance.
I was surprised to note that I didn't have any real free play to speak of; without the front stack, you should have a lot of free end-to-end movement of the shaft - - like a quarter inch or so.
I pushed harder, and the shaft slid rather grudgingly in and out... so I thought I was jusst dealing with a combination of tightness and lube.
Then I went to turn the shaft... even from the flywheel rim, it felt too hard to turn. I spun it around three times with happy whooshes, and then... it stopped. My heart sank, as there's no reason why a bare keg with no plugs in should not turn by hand.
Nothing for it but to tear down all of the previous days work... and hope that the soft seals could be salvaged.
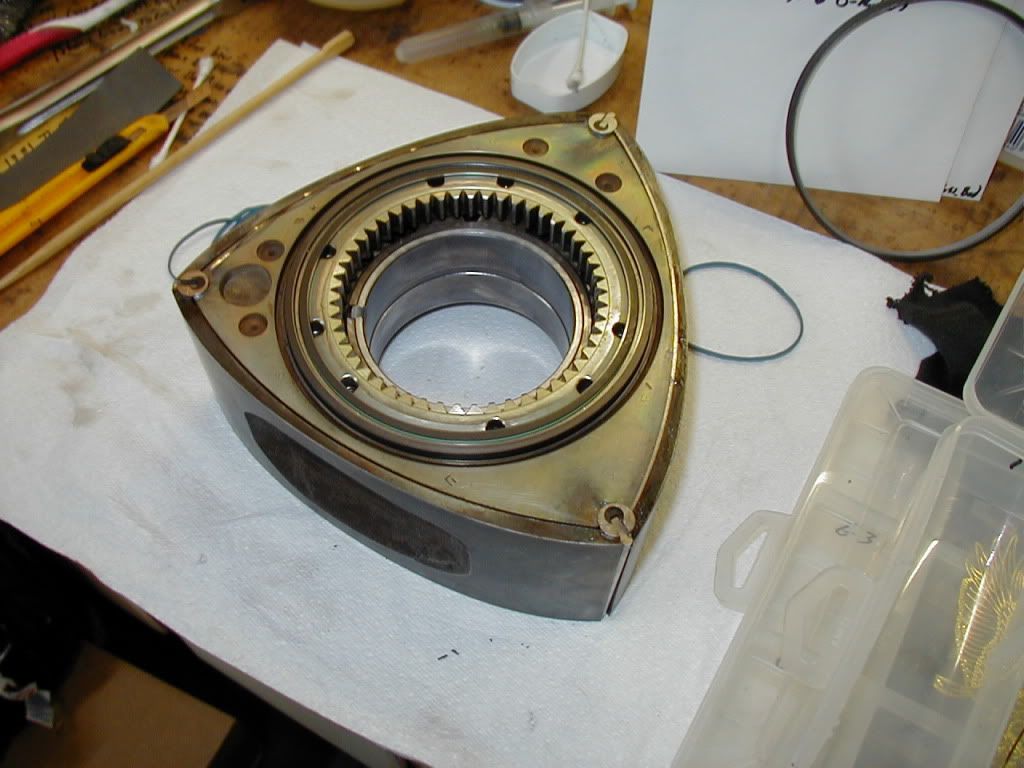
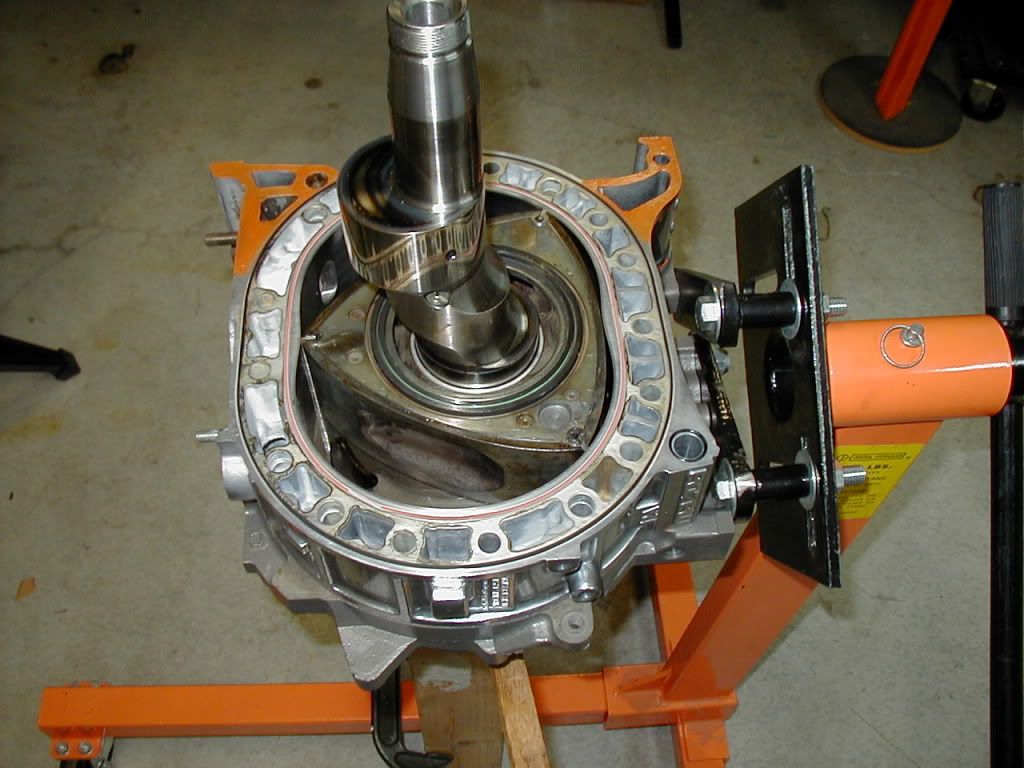
I pulled the rear chamber down without noticing anything odd - - I was expecting maybe a seal out of place, or maybe being a tooth off from dropping in the stat gear - - and so popped the midplate and took a look in the front chamber.
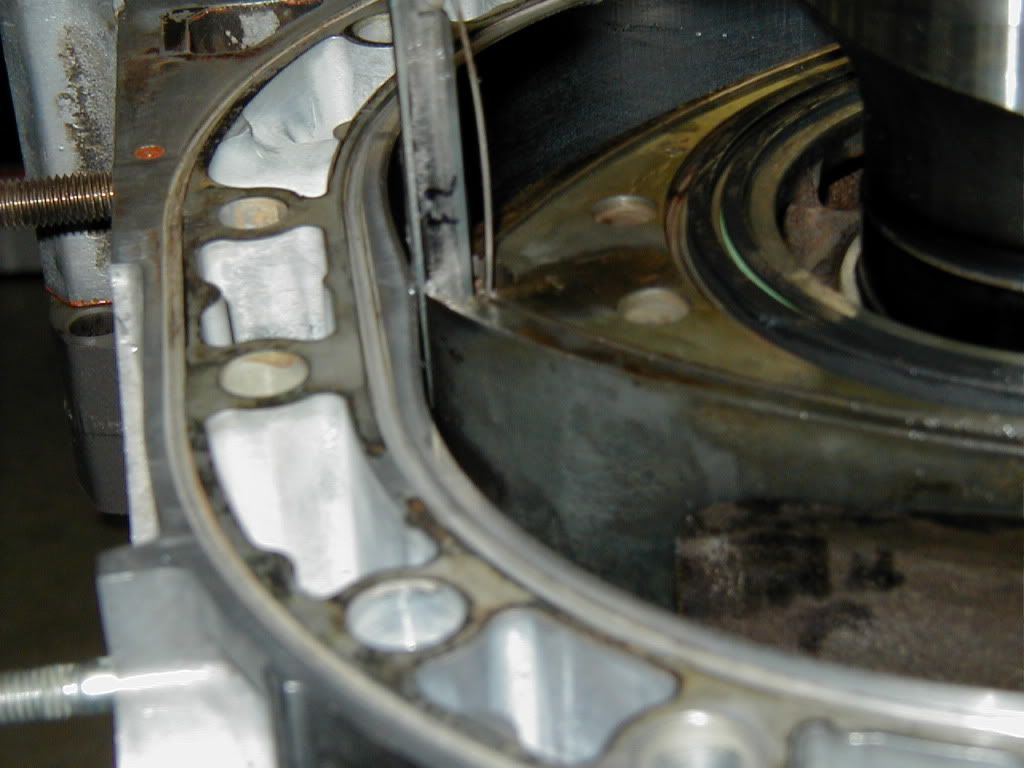
First thing I notice is this:

A fresh pile of iron filings on top those damned-expensive, just-replaced hardseals. And nowhere they could have come from other than my cherished EGR midplate...
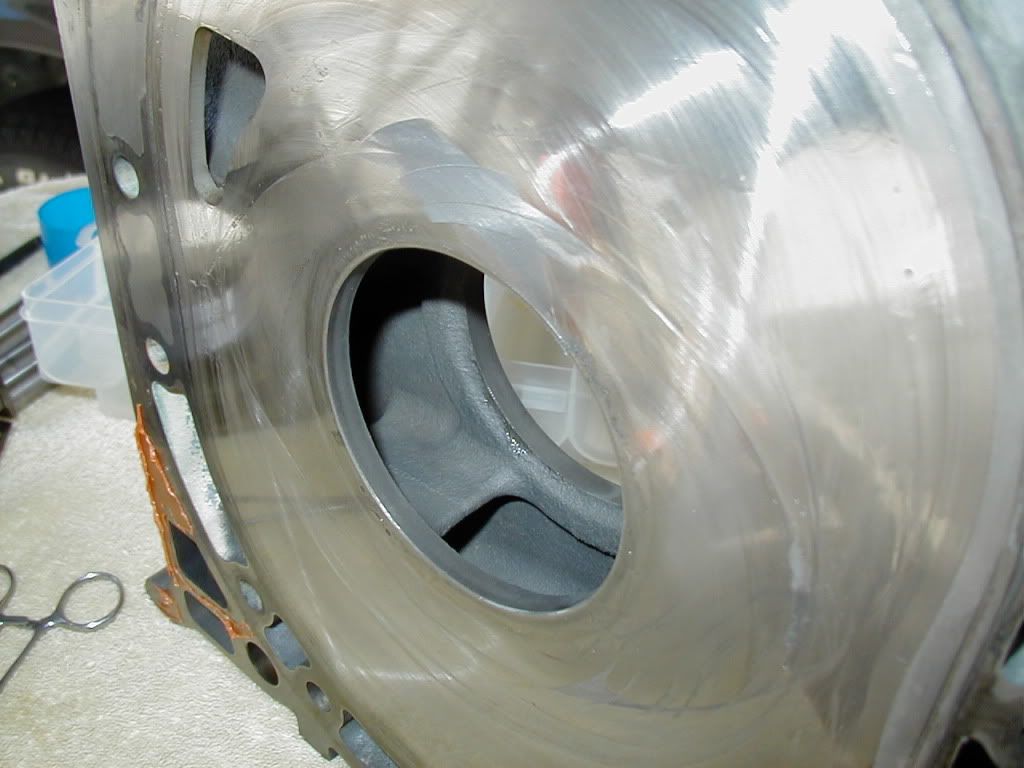
Look here:
The inner oil hardseal has literally planed down and dug into the surface of the plate. Nitrided cast iron, and it carved it like brass.
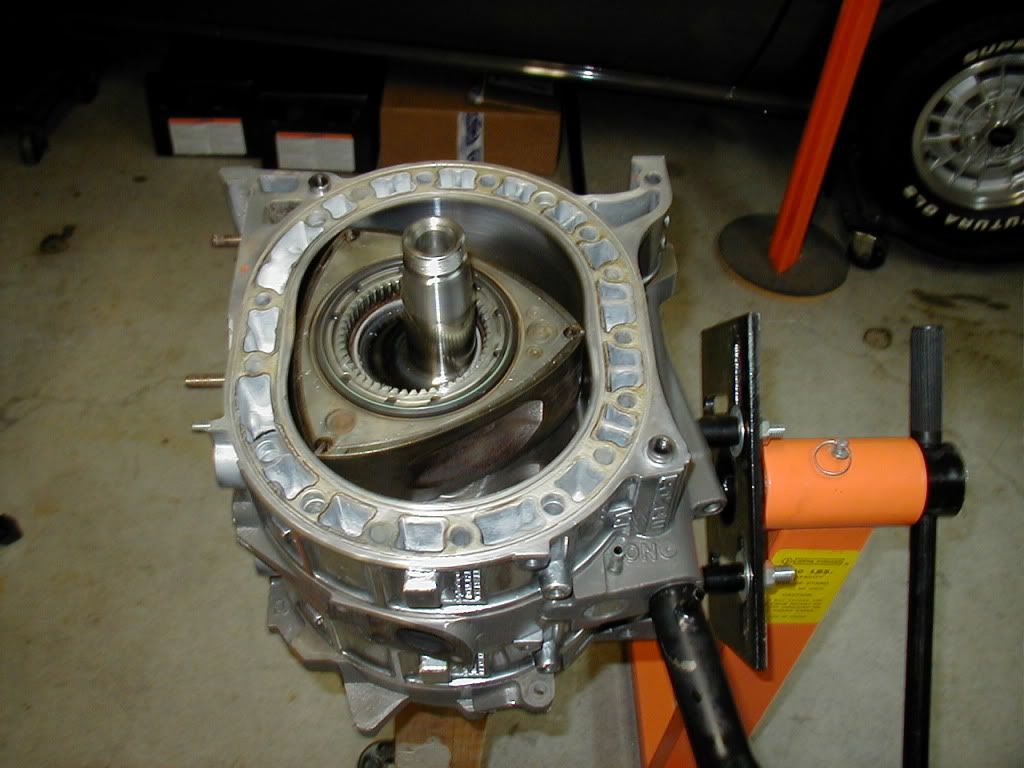
Closer inspection of the rear rotor revealed a tiny pile of filings clinging to the rear inner hard seal there, too:

And a corresponding but much smaller shaved area on the rear plate:

I'm not 100% sure what went wrong here yet, though it seems clear that something was preventing the inner hard seal from being able, at least at some points, to move fully into it's housing. Left nowhere else to go, it carved into the plates.
What I know for sure so far:
1) The seal springs were installed the right way: blue-tagged springs on the rear rotor faces, round tangs down in the retention holes, square tangs engaging the slots in the bottom of the seal.
2) I didn't notice anything wrong with the seal travel when pressing the seals into the rotors... It seemed as if they went down adequately per the manual.
3) Both of the offending areas were directly over the end-points of the seal springs, which seems like a damned big coincidence.
4) I did re-use (first time ever) my oil o-rings, after having had them inspected & it having been determined that they ahd not flattened, swelled, or otherwise degraded. Done to save money.
5) The seal springs were likewise inspected & re-used... and you'd think that wear on a spring would make it likely to be weak, not stronger, so I don't think my problem was there. The springs showed standard height when inspected.
6) I'm going to probably have some trouble finding a useable EGR midplate. The rear plate is a standard R5 but the 12A EGR plates were used only on SAs and only on those sold in California. It's a must-have for a smog build.
So, there things will sit for the week. I'll be out on a business trip Tuesday-Friday, which means packing tomorrow.
Bit of a bummer of a Sunday, all things considered.
Oh, and a neighbor found a dead 20-lb raccoon in his garage. Probably not related.
Disaster...
As mentioned briefly in the "what did you do today" thread, I thought today was going to see me completing basic engine construction, mating up the trans, and dropping said assembly back into the chassis.
Instead, I'm now back to about square one-half; the engine is once again completely disassembled, and it looks like I'm in need of a new midplate and rear plate.
I finished off basic keg assembly last night around 11:30; I'd nee at it all day since about 9am, so once all was torqued nicely together, I turned off the lights and headed to bed.
This being my fourth 12A build, I hadn't encountered any surprises along the way, outside of realizing that I hadn't bolted the rear stat gear into the housing when it came time to add that plate, & so I had to get the new o-ring and sealant on the rear gear and seat it PDQ. Otherwise, it was a very linear build. Far as I could tell, it had gone clean.
After I woke up this AM, I spent an hour or 90 inutes getting a bunch of external parts (oil pan, pulleys, flywheel, etc) that I'd need for the day nicely cleaned, and then set about putting the flywheel on, as the first step of setting the stack up and checking end clearance.
I was surprised to note that I didn't have any real free play to speak of; without the front stack, you should have a lot of free end-to-end movement of the shaft - - like a quarter inch or so.
I pushed harder, and the shaft slid rather grudgingly in and out... so I thought I was jusst dealing with a combination of tightness and lube.
Then I went to turn the shaft... even from the flywheel rim, it felt too hard to turn. I spun it around three times with happy whooshes, and then... it stopped. My heart sank, as there's no reason why a bare keg with no plugs in should not turn by hand.
Nothing for it but to tear down all of the previous days work... and hope that the soft seals could be salvaged.
I pulled the rear chamber down without noticing anything odd - - I was expecting maybe a seal out of place, or maybe being a tooth off from dropping in the stat gear - - and so popped the midplate and took a look in the front chamber.
First thing I notice is this:
A fresh pile of iron filings on top those damned-expensive, just-replaced hardseals. And nowhere they could have come from other than my cherished EGR midplate...
Look here:
The inner oil hardseal has literally planed down and dug into the surface of the plate. Nitrided cast iron, and it carved it like brass.
Closer inspection of the rear rotor revealed a tiny pile of filings clinging to the rear inner hard seal there, too:
And a corresponding but much smaller shaved area on the rear plate:
I'm not 100% sure what went wrong here yet, though it seems clear that something was preventing the inner hard seal from being able, at least at some points, to move fully into it's housing. Left nowhere else to go, it carved into the plates.
What I know for sure so far:
1) The seal springs were installed the right way: blue-tagged springs on the rear rotor faces, round tangs down in the retention holes, square tangs engaging the slots in the bottom of the seal.
2) I didn't notice anything wrong with the seal travel when pressing the seals into the rotors... It seemed as if they went down adequately per the manual.
3) Both of the offending areas were directly over the end-points of the seal springs, which seems like a damned big coincidence.
4) I did re-use (first time ever) my oil o-rings, after having had them inspected & it having been determined that they ahd not flattened, swelled, or otherwise degraded. Done to save money.
5) The seal springs were likewise inspected & re-used... and you'd think that wear on a spring would make it likely to be weak, not stronger, so I don't think my problem was there. The springs showed standard height when inspected.
6) I'm going to probably have some trouble finding a useable EGR midplate. The rear plate is a standard R5 but the 12A EGR plates were used only on SAs and only on those sold in California. It's a must-have for a smog build.
So, there things will sit for the week. I'll be out on a business trip Tuesday-Friday, which means packing tomorrow.
Bit of a bummer of a Sunday, all things considered.
Oh, and a neighbor found a dead 20-lb raccoon in his garage. Probably not related.
02-27-12, 01:24 AM
#357
That's a new one. Never seen anything like that before. I wish I still had a nice low mile NO to send you. Maybe contact slammed gsl because I think he got it from me. Or maybe Atkins got it when I traded for a Y.
Hmm, the problem could have been from the used o-rings. They get stiff and don't go in as easily. I was about to reuse a set in mine but thought better of it. Glad I pulled 'em and swapped in new ones. New went in SO much easier.
As they sit, do they stick out further than the others? Are they like super stiff? A couple of thumbs should push them in/out no problem. The inners tend to be easier to push in because I like to use competition outer springs in all my builds (it reduces or prevents smoke at startup, even with reused oil seals, which I always use).
02-27-12, 08:47 AM
#360
Day 1226
Disaster...
As mentioned briefly in the "what did you do today" thread, I thought today was going to see me completing basic engine construction, mating up the trans, and dropping said assembly back into the chassis.
Instead, I'm now back to about square one-half; the engine is once again completely disassembled, and it looks like I'm in need of a new midplate and rear plate.
I finished off basic keg assembly last night around 11:30; I'd nee at it all day since about 9am, so once all was torqued nicely together, I turned off the lights and headed to bed.
This being my fourth 12A build, I hadn't encountered any surprises along the way, outside of realizing that I hadn't bolted the rear stat gear into the housing when it came time to add that plate, & so I had to get the new o-ring and sealant on the rear gear and seat it PDQ. Otherwise, it was a very linear build. Far as I could tell, it had gone clean.
After I woke up this AM, I spent an hour or 90 inutes getting a bunch of external parts (oil pan, pulleys, flywheel, etc) that I'd need for the day nicely cleaned, and then set about putting the flywheel on, as the first step of setting the stack up and checking end clearance.
I was surprised to note that I didn't have any real free play to speak of; without the front stack, you should have a lot of free end-to-end movement of the shaft - - like a quarter inch or so.
I pushed harder, and the shaft slid rather grudgingly in and out... so I thought I was jusst dealing with a combination of tightness and lube.
Then I went to turn the shaft... even from the flywheel rim, it felt too hard to turn. I spun it around three times with happy whooshes, and then... it stopped. My heart sank, as there's no reason why a bare keg with no plugs in should not turn by hand.
Nothing for it but to tear down all of the previous days work... and hope that the soft seals could be salvaged.
I pulled the rear chamber down without noticing anything odd - - I was expecting maybe a seal out of place, or maybe being a tooth off from dropping in the stat gear - - and so popped the midplate and took a look in the front chamber.
I'm not 100% sure what went wrong here yet, though it seems clear that something was preventing the inner hard seal from being able, at least at some points, to move fully into it's housing. Left nowhere else to go, it carved into the plates.
What I know for sure so far:
1) The seal springs were installed the right way: blue-tagged springs on the rear rotor faces, round tangs down in the retention holes, square tangs engaging the slots in the bottom of the seal.
2) I didn't notice anything wrong with the seal travel when pressing the seals into the rotors... It seemed as if they went down adequately per the manual.
3) Both of the offending areas were directly over the end-points of the seal springs, which seems like a damned big coincidence.
4) I did re-use (first time ever) my oil o-rings, after having had them inspected & it having been determined that they ahd not flattened, swelled, or otherwise degraded. Done to save money.
5) The seal springs were likewise inspected & re-used... and you'd think that wear on a spring would make it likely to be weak, not stronger, so I don't think my problem was there. The springs showed standard height when inspected.
6) I'm going to probably have some trouble finding a useable EGR midplate. The rear plate is a standard R5 but the 12A EGR plates were used only on SAs and only on those sold in California. It's a must-have for a smog build.
So, there things will sit for the week. I'll be out on a business trip Tuesday-Friday, which means packing tomorrow.
Bit of a bummer of a Sunday, all things considered.
Oh, and a neighbor found a dead 20-lb raccoon in his garage. Probably not related.
Measure the rotors width, and the rotor housings width at the top, and 3 places along the spark plugs holes. it's very likely that your housings are warped and are thinner then the rotor, causing the rotor to press against the iron. Look in the FSM where they talk about measuring point A of the rotor housing to points B C and D.
02-27-12, 10:26 AM
#362
It's one possiblity; I'm going to get some new inners for comparison. A full set of o-rings was around $120; As I was trying to do this build on a budget, and since the previous build had very few miles (but a number of years) on it, when the o-rings came out looking new (no discoloration, no flat spots, no apparent swelling) I took them to a professional rotary engineer to be looked at. He adjudged them to be within spec, though he did frown on the idea of re-using o-rings ever.
May have been penny-wise and pound-foolish.
As they sit, do they stick out further than the others? Are they like super stiff? A couple of thumbs should push them in/out no problem. The inners tend to be easier to push in because I like to use competition outer springs in all my builds (it reduces or prevents smoke at startup, even with reused oil seals, which I always use).
I've seen this before... on my own engine once...
Measure the rotors width, and the rotor housings width at the top, and 3 places along the spark plugs holes. it's very likely that your housings are warped and are thinner then the rotor, causing the rotor to press against the iron. Look in the FSM where they talk about measuring point A of the rotor housing to points B C and D.
Measure the rotors width, and the rotor housings width at the top, and 3 places along the spark plugs holes. it's very likely that your housings are warped and are thinner then the rotor, causing the rotor to press against the iron. Look in the FSM where they talk about measuring point A of the rotor housing to points B C and D.
Front Rotor Housing:

Rear Rotor Housing:
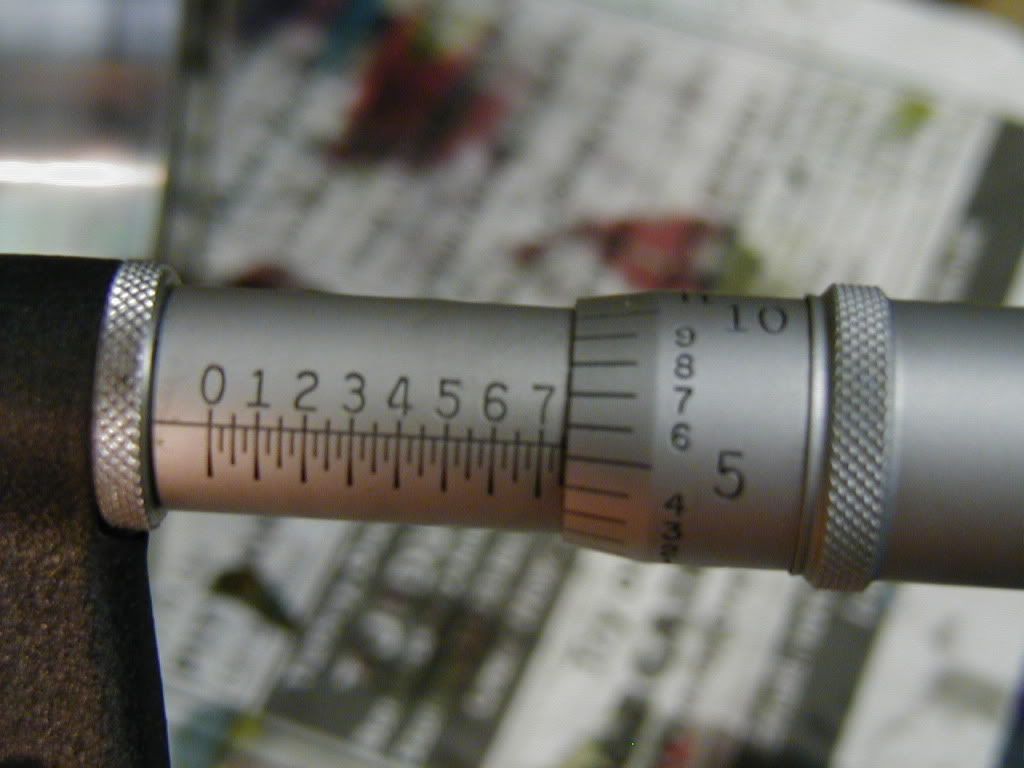
Nominal for new rotor housings for 12A's is 70mm or 2.7559"; I'm showing 2.7554" a difference from nominal of 5/10,000ths of an inch. I don't have my numbers for variation around the housings handy, but I remember them as being far below the limit of 0.0024" - almost unmeasurable.
The thing that makes me suspect the rings or their springs more than housing clearance was the notable tightness in e-shaft end-play.
Insufficient housing clearance would bind the rotors from turning freely, but it doesn't seem like it would interfere with longitudinal movement of the e-shaft. Without the front stack in place, and all buttered up with Vaseline on the bearings, it should have slid like silk. Instead, it took a forceful shove to move it lengthwise.
If the rings/springs were causing a high spot on one side of the rotor, this would torque the rotor and it's bearing out of line as the keg was torqued down, and would bind up the shaft.
Still and all, I'll be re-checking all my clearances as I try to figure out WTH went wrong here.
Keep up the suggestions, folks; I'm ruling nothing out until I have a chance to go over it all.
At least it appears that my new water seals are still OK; I don't use Vaseline to tack them up (as he FSM recommends) because Vaseline can make them swell up. I use a tiny amount of Hylomar (AKA Smurf Snot) instead, which is sticky as hell & impervious to water, oil, and gas, but which doesn't make make the seals swell up or soften.
Current suspects:
Swelled o-rings that caused hard rings to bind
Issues with the ring springs themselves
Missed engagement of the ring notch and the spring (was careful, but...)
Insufficient pre-seating of rings
Inadequate rotor-to-rotor-housing clearance
Shrunken or warped rotor housings
Haunted by vengeful raccoon spirit
 02-27-12, 12:51 PM
#364
Questions: Did you replace the oil seals but not the o-rings? All in the name of saving some money?
I do it the other way around. I reuse my oil seals from low mile nitrided engines because they always outlive apex seals. If they're within spec, back in they go.
I've had fine results using Atkins' Viton o-rings. Load them up with engine oil and press them in with another used seal on top and a block of wood. Vaseline never touches my engines.
By the way, as I was trying to install a set of used o-rings, it cracked the pusher seal I was using. No loss as it was high mileage and the good one was not damaged. I never had this happen with new o-rings.
I often reuse my inner oil springs and just change out the outers to the competition type. No smoking at startup is the result. Well, the first couple of fire ups do smoke a little (duh), but after that, I never notice a puff of smoke (then again I don't actively search for it in my mirrors or wait for the perfect lighting conditions and crane my neck around while squinting lol).
So what I think happend on your engine is probably a combination of things. Firstly you used new oil seals which may have had a very sharp edge. This edge would not have caused any issues had the seals/o-ring gone in properly. Secondly the reason the seals did not go in properly or rather "all the way in" is because of your used o-rings. As mentioned earlier, used o-rings are stiffer than new and gave me lots of trouble during installation. I was worried about their longevity and that they just didn't "feel right" so I swapped in some new ones and all went well. That engine is together now and is stiff as heck but that's because there's four complete sets. Anyway I don't think your springs are to blame. The little notch isn't going to apply enough pressure to shave nitrided material from a side plate. If it could, a simple razor blade would be too aggressive for cleaning coolant seal crud off of side plates (it's just about the best tool I've found for this).
In conclusion I believe new oil seals improperly seated due to used o-rings are to blame.
Then again, what caused the e-shaft to be so stiff? The rotor was cocked? By the way, I always make sure the rear stat gear is installed before beginning the stacking process. Peace of mind and you know it'll drop onto the rotor gear with no fuss. Installing it after the rear plate is on just asks for trouble.
I do it the other way around. I reuse my oil seals from low mile nitrided engines because they always outlive apex seals. If they're within spec, back in they go.
I've had fine results using Atkins' Viton o-rings. Load them up with engine oil and press them in with another used seal on top and a block of wood. Vaseline never touches my engines.
By the way, as I was trying to install a set of used o-rings, it cracked the pusher seal I was using. No loss as it was high mileage and the good one was not damaged. I never had this happen with new o-rings.
I often reuse my inner oil springs and just change out the outers to the competition type. No smoking at startup is the result. Well, the first couple of fire ups do smoke a little (duh), but after that, I never notice a puff of smoke (then again I don't actively search for it in my mirrors or wait for the perfect lighting conditions and crane my neck around while squinting lol).
So what I think happend on your engine is probably a combination of things. Firstly you used new oil seals which may have had a very sharp edge. This edge would not have caused any issues had the seals/o-ring gone in properly. Secondly the reason the seals did not go in properly or rather "all the way in" is because of your used o-rings. As mentioned earlier, used o-rings are stiffer than new and gave me lots of trouble during installation. I was worried about their longevity and that they just didn't "feel right" so I swapped in some new ones and all went well. That engine is together now and is stiff as heck but that's because there's four complete sets.
Anyway I don't think your springs are to blame. The little notch isn't going to apply enough pressure to shave nitrided material from a side plate. If it could, a simple razor blade would be too aggressive for cleaning coolant seal crud off of side plates (it's just about the best tool I've found for this).In conclusion I believe new oil seals improperly seated due to used o-rings are to blame.
Then again, what caused the e-shaft to be so stiff? The rotor was cocked? By the way, I always make sure the rear stat gear is installed before beginning the stacking process. Peace of mind and you know it'll drop onto the rotor gear with no fuss. Installing it after the rear plate is on just asks for trouble.
02-27-12, 12:58 PM
#365

My mic is a combination 0-4", with 4 interchangeable anvils. The set (from Craftsman, bought new in the early 90's - - no longer made) includes three calibrated standards bars, at 1", 2", and 3". All are kept in their fitted wooden storage case.
I calibrate against the standards every time I use it, and every time I swap anvils. I'm pretty comfortable with it. It has a clutch vernier at the tip for consistent tensions on measurements, too.
It's one of the sweeter tools I own, and I remember it costing near $200 in 1990's dollars. Never been dropped or abused.
Found a pic of the same set on e-bay:

(one in sale now, in fact... at a bargain price, too.)
I measured the rotors and the housings at roughly the same time, same day, and with the same mic setup... so even if the mic is out of cal, the difference measurement (delta) between housing and rotor should be generally unaffected by any cal issues. Or so it seems to me.
02-27-12, 01:20 PM
#366
This is the first time I've ever re-used any seals in a build. But I don't have the scratch to sink $1500 plus into a build just now.

I'd heard mixed reviews on the Atkins rings WRT long-term wear. Hindsight says they might have been a wiser choice than re-using. Hindsight needs a slap in the chops.
So what I think happend on your engine is probably a combination of things. Firstly you used new oil seals which may have had a very sharp edge. This edge would not have caused any issues had the seals/o-ring gone in properly. Secondly the reason the seals did not go in properly or rather "all the way in" is because of your used o-rings. As mentioned earlier, used o-rings are stiffer than new and gave me lots of trouble during installation. I was worried about their longevity and that they just didn't "feel right" so I swapped in some new ones and all went well. That engine is together now and is stiff as heck but that's because there's four complete sets. Anyway I don't think your springs are to blame. The little notch isn't going to apply enough pressure to shave nitrided material from a side plate. If it could, a simple razor blade would be too aggressive for cleaning coolant seal crud off of side plates (it's just about the best tool I've found for this).
In conclusion I believe new oil seals improperly seated due to used o-rings are to blame.
Anyway I don't think your springs are to blame. The little notch isn't going to apply enough pressure to shave nitrided material from a side plate. If it could, a simple razor blade would be too aggressive for cleaning coolant seal crud off of side plates (it's just about the best tool I've found for this).In conclusion I believe new oil seals improperly seated due to used o-rings are to blame.
I explained unclearly; I put the rear gear in before mounting the plate, but had forgotten it was not in until I needed the plate. Had to race against the drying time on my inter-housing lower section sealant, but it was in and level before the housing went on.
02-27-12, 03:50 PM
#367
Moderator
iTrader: (3)
Join Date: Mar 2001
Location: https://www2.mazda.com/en/100th/
Posts: 30,829
Received 2,597 Likes
on
1,845 Posts
that's horrible. i don't really have any bright ideas, although it would seem like the oil seals ended up too wide? or had too much force...
you have options with the irons. the front iron is easy to get/find, in fact i probably have one i'd cut you a deal on.
the center iron could be lapped, if the damage is even that bad. its probable you could fix it with some lapping compound or a sander.
you have options with the irons. the front iron is easy to get/find, in fact i probably have one i'd cut you a deal on.
the center iron could be lapped, if the damage is even that bad. its probable you could fix it with some lapping compound or a sander.
02-27-12, 05:46 PM
#368
The front iron (which I just bought used from another forumer) appears to be unscathed. It was also in the best condition flatness-wise of the four faces.
It was the front face of the mid iron, and the rear iron, that took it in the shorts. The rear not so badly.
I need to check iron thicknesses and measure the depth of the damage before I can even know if lapping's an option. There is a minimum thickness, and it's possible the mid iron has been lapped before.
& of course I have to be out of town Tue-Fri.
Running thru my work list from Saturday, it's possible that I may have installed the o-rings dry; I don't specifically remember oiling them. I don't know if that was the deciding factor or not.
I will try to squeeze in some monkeying time tonight, before packing. Results to be posted as they are discovered.
02-28-12, 12:03 AM
#369
OK, fair amount of info gathered tonight:
1) I dont think there's any issue with rotor housing or rotor clearance. After careful rechecking (and calibration checks of the mic along the way), My rotor housing widths are as follows:
Front Housing:
2.7554 to 2.7559 - total variation of 0.0005
Rear Housing:
2.7550 to 2.7554 - total variation of 0.0004
Allowed variation is 0.0024, so I'm well within tolerance
Front rotor width:
2.7495 to 2.7496 - total variation of 0.0001 (within margin of error)
Rear rotor width:
2.7493-2.2494 - total variation of 0.0001 (again, within margin of error of measurement method.
Front rotor to housing clearance: 0.0059-0.0063
Rear rotor to housing clearance: 0.0056-0.0061
Standard: 0.0047-0.0071
So, rotor clearance was not the issue.
Some things I did notice:
1) when did the oil hard ring design change? The old rings (including those I bought in 2003) have a straight bore through the center of the ring, but the new ones I received do not; they are undercut on the inner bore, so that there's a protruding lip around the top and bottom of the bore, thicker at the top:
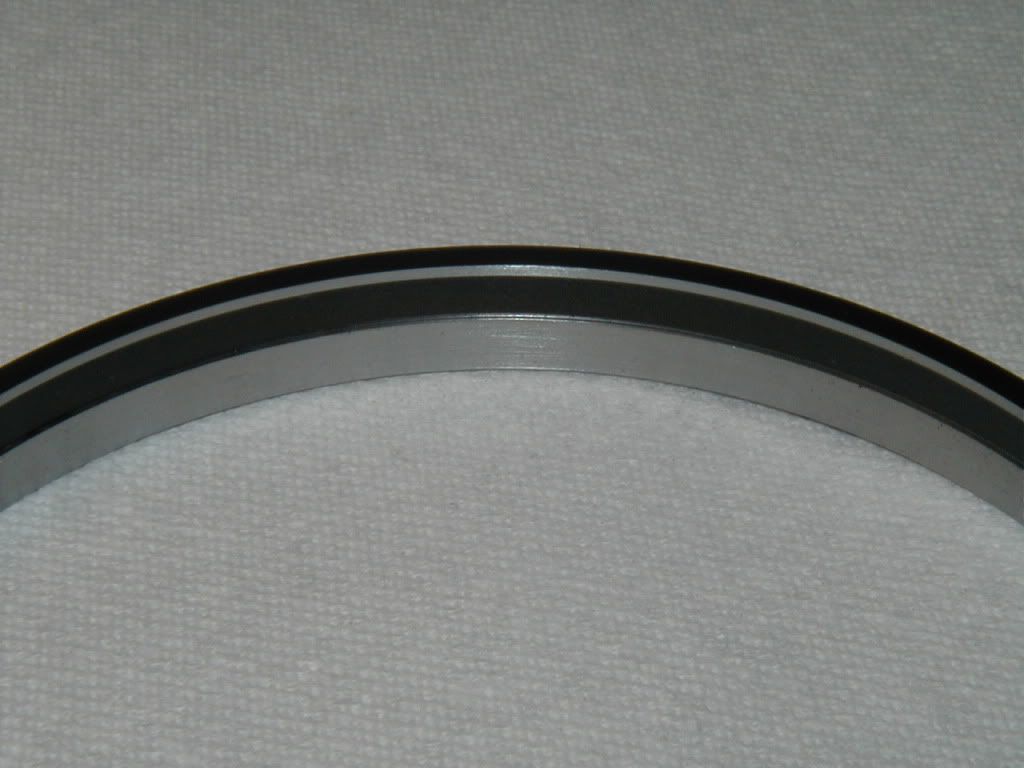
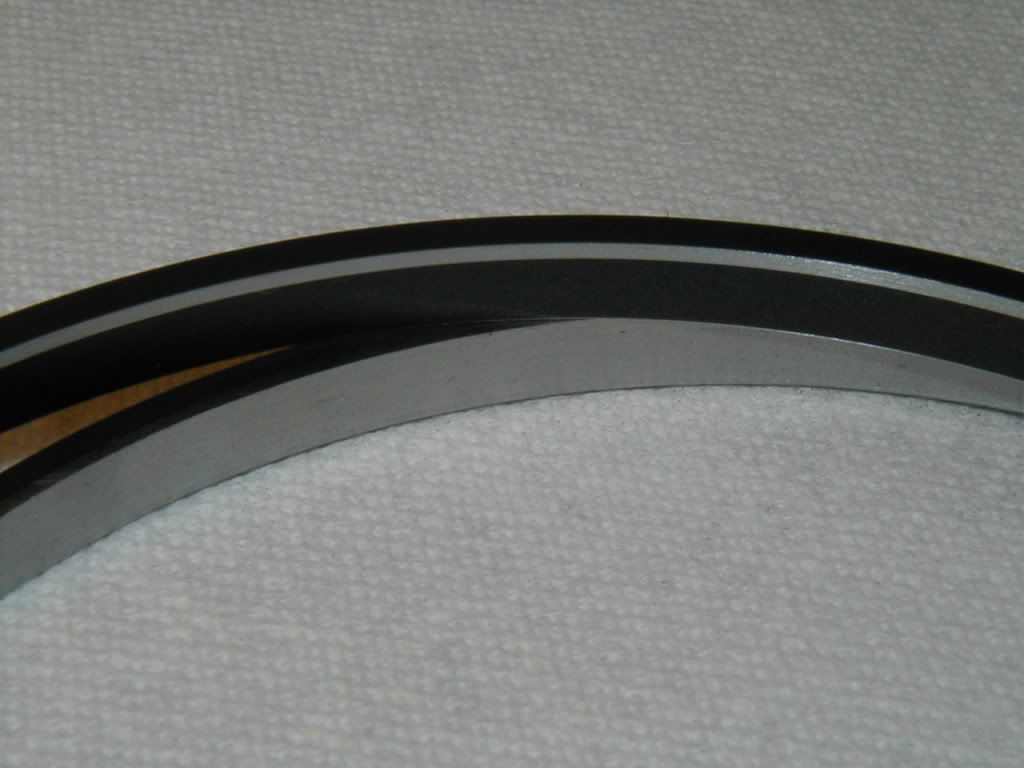
Looks like it was done to minimize friction as the ring moves vertically. But it also means if the ring doesn't seat squarely as it goes in the bore, & doesn't sit deep enough, the top lip of the ring could catch on the upper edge of the slot it rides in on the rotor. That would prevent the ring from retracting into the slot.
Now, notice this extreme closeup of the rear rotor, rear face inner ring slot... right where the filings were found (I marked the spot with a sharpie).
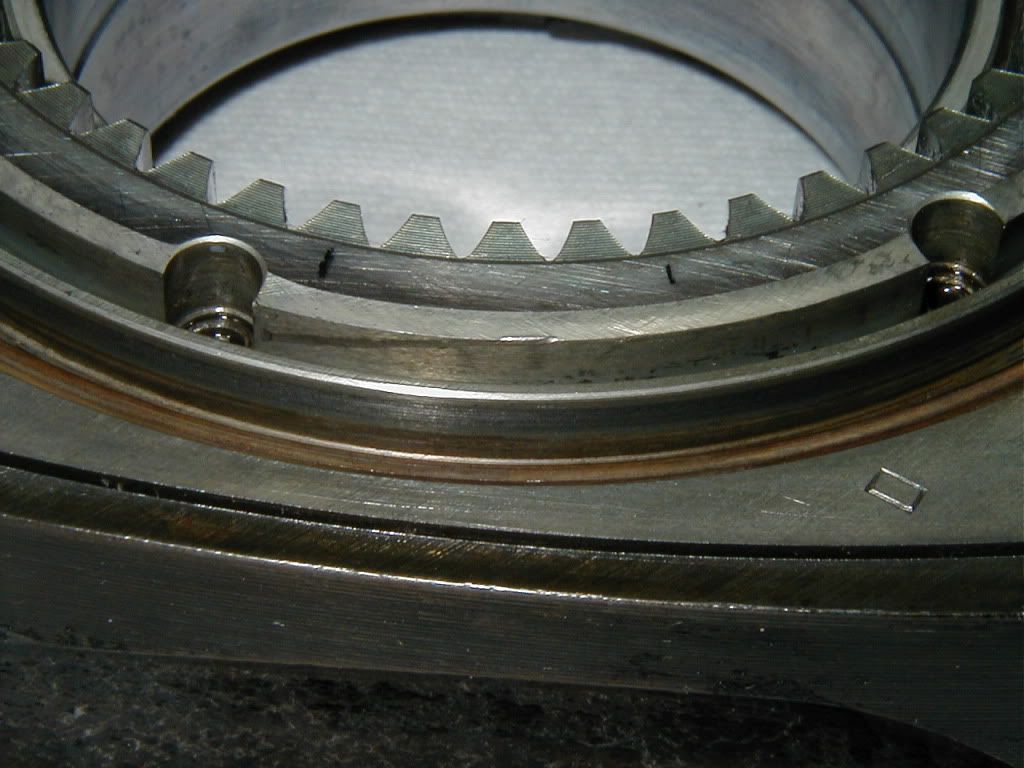
See that chip in the edge? If the hardened upper lip of a new-style ring's inner face got hung up on top of the rotor slot, and then the keg got torqued down, pincing the ring between the end housing and the rotor gear, it might leave a mark like that when it eventually popped into the bore under rotation.
I found no similar mark on the front rotor's rear face. but that may just mean that the front ring never seated in. Which could explain why the damage is so much more severe in the front chamber than in the rear chamber.
In addition, Jeff20B's comment earlier about lubricating the o-rings got me to thinking hard about my assembly steps, and I'm now virtually certain that I did NOT lube the o-rings before installing them. Hard to judge from their current condition as I did a wipe down as I disassembled everything, but they seem awful dry for just having been wiped down.
I tried an experiment tonight, first drying off the old rings and reinstalling them, then dry installing a new o-ring, and then finally installing both old and new rings which had been lubed with motor oil.
The dry installed rings were a lot harder to get to seat in, and did not seem to sit down as far after being pressed in. which would make sense if the elastic rings were not sliding in the rotor grooves.
Wet-installed rings, both old and new, went in with much less force and seemed to remain further down in the grooves after proper compression.
Finally, I noticed these pictures from my assembly sequence:
Ring looks awful dry to me... And in the following shots, I seem to see a lot of green o-ring visible:
Rear rotor, also seems to show a lot of green:
1) I dont think there's any issue with rotor housing or rotor clearance. After careful rechecking (and calibration checks of the mic along the way), My rotor housing widths are as follows:
Front Housing:
2.7554 to 2.7559 - total variation of 0.0005
Rear Housing:
2.7550 to 2.7554 - total variation of 0.0004
Allowed variation is 0.0024, so I'm well within tolerance
Front rotor width:
2.7495 to 2.7496 - total variation of 0.0001 (within margin of error)
Rear rotor width:
2.7493-2.2494 - total variation of 0.0001 (again, within margin of error of measurement method.
Front rotor to housing clearance: 0.0059-0.0063
Rear rotor to housing clearance: 0.0056-0.0061
Standard: 0.0047-0.0071
So, rotor clearance was not the issue.
Some things I did notice:
1) when did the oil hard ring design change? The old rings (including those I bought in 2003) have a straight bore through the center of the ring, but the new ones I received do not; they are undercut on the inner bore, so that there's a protruding lip around the top and bottom of the bore, thicker at the top:
Looks like it was done to minimize friction as the ring moves vertically. But it also means if the ring doesn't seat squarely as it goes in the bore, & doesn't sit deep enough, the top lip of the ring could catch on the upper edge of the slot it rides in on the rotor. That would prevent the ring from retracting into the slot.
Now, notice this extreme closeup of the rear rotor, rear face inner ring slot... right where the filings were found (I marked the spot with a sharpie).
See that chip in the edge? If the hardened upper lip of a new-style ring's inner face got hung up on top of the rotor slot, and then the keg got torqued down, pincing the ring between the end housing and the rotor gear, it might leave a mark like that when it eventually popped into the bore under rotation.
I found no similar mark on the front rotor's rear face. but that may just mean that the front ring never seated in. Which could explain why the damage is so much more severe in the front chamber than in the rear chamber.
In addition, Jeff20B's comment earlier about lubricating the o-rings got me to thinking hard about my assembly steps, and I'm now virtually certain that I did NOT lube the o-rings before installing them. Hard to judge from their current condition as I did a wipe down as I disassembled everything, but they seem awful dry for just having been wiped down.
I tried an experiment tonight, first drying off the old rings and reinstalling them, then dry installing a new o-ring, and then finally installing both old and new rings which had been lubed with motor oil.
The dry installed rings were a lot harder to get to seat in, and did not seem to sit down as far after being pressed in. which would make sense if the elastic rings were not sliding in the rotor grooves.
Wet-installed rings, both old and new, went in with much less force and seemed to remain further down in the grooves after proper compression.
Finally, I noticed these pictures from my assembly sequence:
Ring looks awful dry to me... And in the following shots, I seem to see a lot of green o-ring visible:
Rear rotor, also seems to show a lot of green:
02-28-12, 12:38 AM
#370
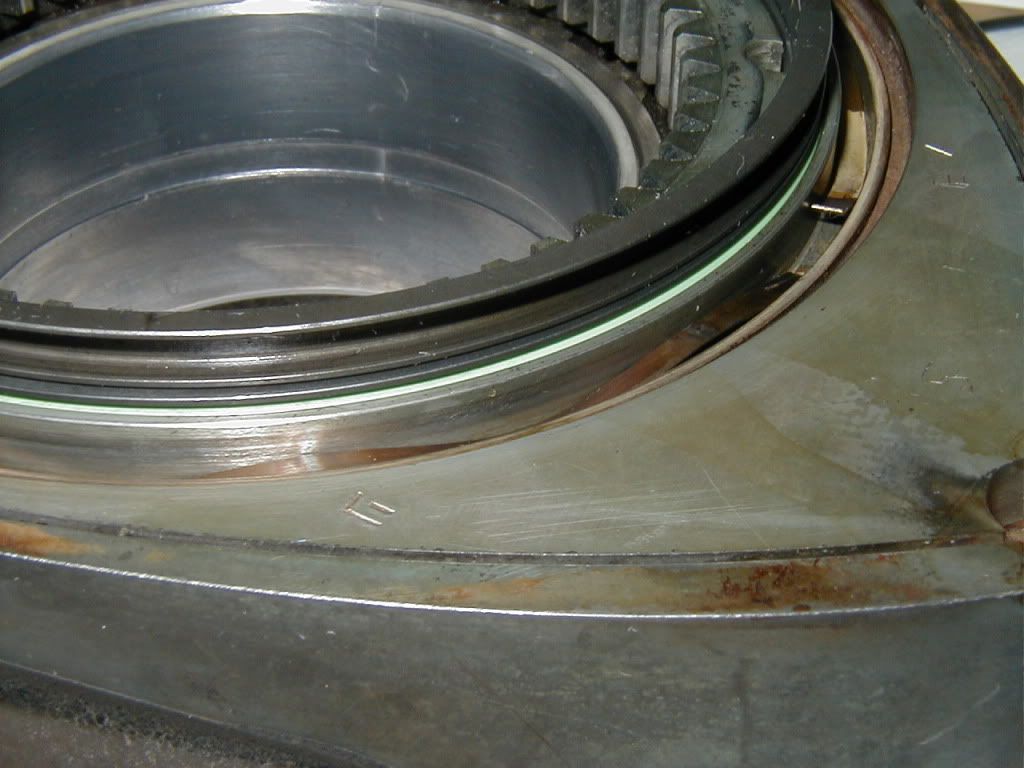
Now, these pictures are from disassembly:
Front rotor. Notice where the filings are; inside the inner ring. Some even seem to be under the lip on the seal, but that could have happened when the spring relaxed during disassembly. The inner lip of the seal is well above top edge of the rotor groove, though...
This picture (front rotor) could have told us a lot, if it hadn't been out of focus. Ring does seem high to me, though.

Rear rotor; you can see the gall mark just below the filings... and look how low that ring is sitting in comparison to the front ring in the previous picture. Kind of supports my theory that the rear rotor was almost able to correct itself & pop back in the groove.
The relatively minor damage to the rear plate... it looks like it did not rub for very long. Maybe just one pass.
I get the feeling what happened here is a confluence of two things:
1) A newer ring design that gives less lateral support and doesn't 'self-guide" into the rotor slot if not set adequately low into the groove before the keg is torqued. The older seal design did not have a top lip that could be pinched, and it's smooth bore left the ring nowhere to go but into it's slot.
2) A failure on my part to lubricate the o-rings before assembly, which casued them to 'spring back' the hard rings too far out of their slots due to elastic friction, and may have led to misalignment of one or two rings.
Proposed sequence of failure:
a) Rear inner rings (and possibly others) on both rotors were set too high due to dry-installed o-rings.
b) On torque-down, the front and rear rotor's inner rear rings cocked just enough to catch the hard ring's lip between the end housing faces and the rotor slot edges. This may have been more severe on the front rotor since it's non-gear face's slot is less beveled than is the gear-faced slot on the rear rotor.
c) because the seal was wedged on one side of the rotor, this canted the rotor on the shaft, which would account for the lack of easy end play noted.
d) turning the engine by hand allowed the seal's sharp inner edge to dig into the end housing face, which in turn pushed the seal even further out of line while sliding.
e) eventually the shaving buildup and the depth of the cuts on the face were enough to jam rotation.
I'm not ABSOLUTELY SURE this is what happened, but it's my current working theory. I'm tying to think of ways to test it without damaging any more expensive or scarce parts.
The weird coincidences still bother me, though: Most of the damage was at the top of the housing, it was the rear inner seal in both cases that caused it, and the filings were accumulated by both rotors at the point where the gap in the ring spring is.
Well, that's where it has to rest until next weekend. Please feel free to offerup discussion, counter-argument, or bright ideas.
The top-located damage (also on the bottom inthe front chamber), is probably indicative of where the motion of the seal in the eccentric path forced the pinched edge to dig in, rather than sliding sideways or backwards. The other things, no clue as yet.
One thing for sure to take away fromthis; if you don't have proper loose end play on a built engine, do NOT rotate it; just bite the bullet and disassemble it, and find out why.
Front rotor. Notice where the filings are; inside the inner ring. Some even seem to be under the lip on the seal, but that could have happened when the spring relaxed during disassembly. The inner lip of the seal is well above top edge of the rotor groove, though...
This picture (front rotor) could have told us a lot, if it hadn't been out of focus. Ring does seem high to me, though.
Rear rotor; you can see the gall mark just below the filings... and look how low that ring is sitting in comparison to the front ring in the previous picture. Kind of supports my theory that the rear rotor was almost able to correct itself & pop back in the groove.
The relatively minor damage to the rear plate... it looks like it did not rub for very long. Maybe just one pass.
I get the feeling what happened here is a confluence of two things:
1) A newer ring design that gives less lateral support and doesn't 'self-guide" into the rotor slot if not set adequately low into the groove before the keg is torqued. The older seal design did not have a top lip that could be pinched, and it's smooth bore left the ring nowhere to go but into it's slot.
2) A failure on my part to lubricate the o-rings before assembly, which casued them to 'spring back' the hard rings too far out of their slots due to elastic friction, and may have led to misalignment of one or two rings.
Proposed sequence of failure:
a) Rear inner rings (and possibly others) on both rotors were set too high due to dry-installed o-rings.
b) On torque-down, the front and rear rotor's inner rear rings cocked just enough to catch the hard ring's lip between the end housing faces and the rotor slot edges. This may have been more severe on the front rotor since it's non-gear face's slot is less beveled than is the gear-faced slot on the rear rotor.
c) because the seal was wedged on one side of the rotor, this canted the rotor on the shaft, which would account for the lack of easy end play noted.
d) turning the engine by hand allowed the seal's sharp inner edge to dig into the end housing face, which in turn pushed the seal even further out of line while sliding.
e) eventually the shaving buildup and the depth of the cuts on the face were enough to jam rotation.
I'm not ABSOLUTELY SURE this is what happened, but it's my current working theory. I'm tying to think of ways to test it without damaging any more expensive or scarce parts.
The weird coincidences still bother me, though: Most of the damage was at the top of the housing, it was the rear inner seal in both cases that caused it, and the filings were accumulated by both rotors at the point where the gap in the ring spring is.
Well, that's where it has to rest until next weekend. Please feel free to offerup discussion, counter-argument, or bright ideas.
The top-located damage (also on the bottom inthe front chamber), is probably indicative of where the motion of the seal in the eccentric path forced the pinched edge to dig in, rather than sliding sideways or backwards. The other things, no clue as yet.
One thing for sure to take away fromthis; if you don't have proper loose end play on a built engine, do NOT rotate it; just bite the bullet and disassemble it, and find out why.
03-07-12, 12:56 PM
#371
Day 1236
Progress:
I managed to secure a NOS pre-79 EGR mid-plate that will work beautifully, at a price so reasonable that I only fainted for around 30 seconds & coughed up just a tiny bit of blood. Might be the last new-in-the-box one left in the country; it was last inventoried by Mazda in 1983 before being shipped to where I bought it. 19 years in inventory... wow. It's not nitrided & I may need to enlarge the EGR passages via drilling, but it's got ZERO wear, which puts it ahead of any used nitrided part I might find in terms of expected lifespan.
I spent the better part of an hour poking at my pile of parts and discussing causes and errors with one of the more experienced rotary engineers alive, by the name of Jim Mederer. He was frankly amazed by the damage to the midhousing - - and lack of any reciprocal damage to the oil rings or rotor - - when considering the forces required. Having verified clearances and such, he was at a loss to definitively name a cause, having never seen exactly this problem come up in his multiple decades of building & doing development on Wankels. Failure to lube & properly seat the o-rings he considered to be a possible cause, or at least a contributing factor, but no for-sure verdict was forthcoming.
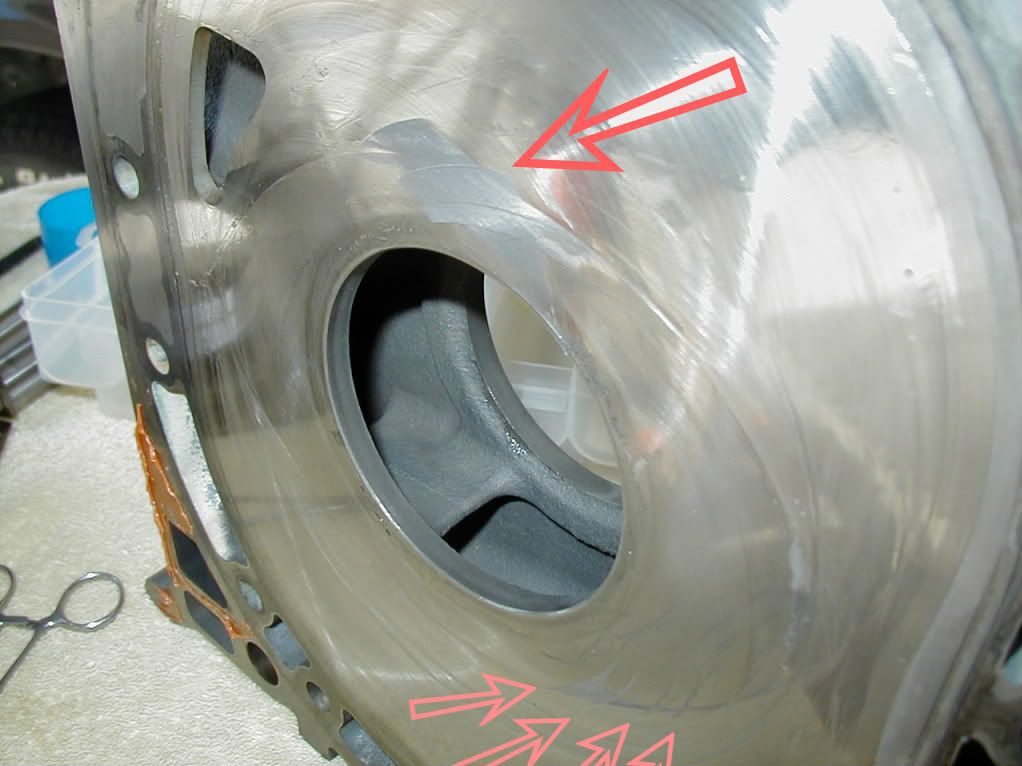
He noticed something immediately that I had not; the four parallel gouges in the bottom half of the front face of the mid-housing are spaced exactly at the interval of the oil-control rings, so it was not only the inside ring that 'bit.'
So I'm in the unenviable position of having been unique. He did give me some valuable pointers in what to look for on next assembly to catch any developing issues before it's too late.
I decided to go ahead and have my front and rear housings lightly lapped, since my schedule and budget for this build are now firmly in the trash. Both were well within FSM rebuild tolerances (the front, which I bought for this build, had less than a thousandth of stepped wear) but I really wanted to get rid of the unmeasurably shallow but still 'touchable' scuff mark left on the rear housing by the 'ring' incident, and the front housing, though low miles, had clearly come from an engine that sat for years un-run, and had the telltale etching of having been long exposed to damp conditions inside the engine. A light lapping will bring it back to perfection. Coupled with a brand-new mid plate, I'll have no issues with free play length.
So, for now I'm waiting for the lapping to get done, and I'll be picking up some shiny bits coming back from the plating shop today.
It being entirely impossible that I'll have everything together AND my carb issues resolved in time to do a smog check this month, I'll likely just give in and go PNO on the registration, rather than risk the horrors of presenting an incomplete registration to the DMV and having them 'forget' themselves into collecting some penalties.
Progress:
I managed to secure a NOS pre-79 EGR mid-plate that will work beautifully, at a price so reasonable that I only fainted for around 30 seconds & coughed up just a tiny bit of blood. Might be the last new-in-the-box one left in the country; it was last inventoried by Mazda in 1983 before being shipped to where I bought it. 19 years in inventory... wow. It's not nitrided & I may need to enlarge the EGR passages via drilling, but it's got ZERO wear, which puts it ahead of any used nitrided part I might find in terms of expected lifespan.
I spent the better part of an hour poking at my pile of parts and discussing causes and errors with one of the more experienced rotary engineers alive, by the name of Jim Mederer. He was frankly amazed by the damage to the midhousing - - and lack of any reciprocal damage to the oil rings or rotor - - when considering the forces required. Having verified clearances and such, he was at a loss to definitively name a cause, having never seen exactly this problem come up in his multiple decades of building & doing development on Wankels. Failure to lube & properly seat the o-rings he considered to be a possible cause, or at least a contributing factor, but no for-sure verdict was forthcoming.
He noticed something immediately that I had not; the four parallel gouges in the bottom half of the front face of the mid-housing are spaced exactly at the interval of the oil-control rings, so it was not only the inside ring that 'bit.'
So I'm in the unenviable position of having been unique. He did give me some valuable pointers in what to look for on next assembly to catch any developing issues before it's too late.
I decided to go ahead and have my front and rear housings lightly lapped, since my schedule and budget for this build are now firmly in the trash. Both were well within FSM rebuild tolerances (the front, which I bought for this build, had less than a thousandth of stepped wear) but I really wanted to get rid of the unmeasurably shallow but still 'touchable' scuff mark left on the rear housing by the 'ring' incident, and the front housing, though low miles, had clearly come from an engine that sat for years un-run, and had the telltale etching of having been long exposed to damp conditions inside the engine. A light lapping will bring it back to perfection. Coupled with a brand-new mid plate, I'll have no issues with free play length.
So, for now I'm waiting for the lapping to get done, and I'll be picking up some shiny bits coming back from the plating shop today.
It being entirely impossible that I'll have everything together AND my carb issues resolved in time to do a smog check this month, I'll likely just give in and go PNO on the registration, rather than risk the horrors of presenting an incomplete registration to the DMV and having them 'forget' themselves into collecting some penalties.
03-08-12, 02:39 PM
#373
Moderator
iTrader: (3)
Join Date: Mar 2001
Location: https://www2.mazda.com/en/100th/
Posts: 30,829
Received 2,597 Likes
on
1,845 Posts
i think you're on the right track with your diagnosis. the oil seals changed part numbers with the Rx8, but there was enough of the old style ones that the new number didn't make it to the USA until maybe 2008-2009.
the old number is 8871-23-180 and the new number is an N3Z1 something something
the old number is 8871-23-180 and the new number is an N3Z1 something something
03-08-12, 03:33 PM
#374
Yeah... I'm told by those-that-know that many dozens of known older rotors have run these newer rings without issue. I think the new-type with lip was a contributing factor to the type of damage incurred, rather than the proximate cause.
I continue to wonder at the cause... and hopefully I don't accumulate any additional 'evidence,' if you know what I mean.
One thing's for sure; I'm going to take Jim Mederer's advice with regard to a check procedure he's been doing for the last dozen or so years, not covered in any rebuild manual I'm aware of.
When he gets to the point of being ready to install the tension bolts, he tightens them only enough to lightly load the seal springs - - not even enough to close the housing gaps down - - and carefully gives the e-shaft a slow turn in the correct direction by temporarily sliding the counterweight and key onto the front shaft, & using the side of it as a handle.
He says this gives him a good feel for the smoothness of motion & alignment of all the parts, and ensures nothing got mis-indexed or fell out of it's recess (like a side seal or corner on the bottom of a rotor) during stacking, while at the same time so little load is placed on the parts that anything being wrong is unlikely to cause any damage.
Sage advice, I think; I intend to use it from this point going forward. Very well might have saved me several hundred dollars and many hours this time around, had I done this.