My 83 GS "pandafb" gets restored - Again! (lots of rust/metal work)
 10-15-13, 07:13 PM
#126
i honestly don't know what else to say other than the car looks awesome! - with a fat exclamation point! 
your work is impeccable and while i will probably focus on my inadequacies in a minute, for right now - brother to brother - i must say pat yourself on the back.
your work is impeccable and while i will probably focus on my inadequacies in a minute, for right now - brother to brother - i must say pat yourself on the back.
 10-16-13, 08:34 AM
#127
Thanks!! Man you guys are really making me blush lol, it's just an old junkyard rat that I tried my best to resurrect...
Small update, got my order from yourcarpart.com in yesterday - new oem window channels and seals (the ones that go at the base of the door windows on inside and outside), new plastic clips that attach the window to the regulator, and a new throttle cable.
For those following this thread you might recall I was going back and forth on what cable to use with my modified TB linkage, well it turns out that without redoing the cable retaining bracket I am unable to use the S5 NA cable, and after some more minor tweaking I got the 12a cable to fit well enough to call it acceptible. The old 12a cable I had was in rough shape though so I bought a new one.
Hoping to get the doors mostly reassembled tonight so the car is weather tight again. The tap I ordered for that oddball 11mm size should be in soon too, hoping I can repair the threads for the seat belt bolt, but if I can't there's always a plan B.
Updates might slow down a bit over the next few weeks, money and time are both rather tight right now with this silly wedding thing coming up lol I also might start digging into that flared 85 this weekend, most of the body work has been done for me already, if weather cooperates I might be able to lay some paint down on that thing
10-31-13, 02:15 PM
#129
Nothing really picture worthy to show, but I am slowly making progress on this. I took a long weekend two weeks ago to paint my latest FB purchase (that flared 85 in the background of some of the pics) before it got too cold to do so - came out good for old leftover paint and what was basically a "scuff and shoot" type job - expect a new thread about that one at some point soon.
With my wedding fast approaching (less than 2 weeks!) money is tight so I haven't bought the new brake parts I need for this one or the few other bits needed to finish it.
Last night I got the door handles, wiper arms, and windshield trim painted (rustolium primer and rustolium gloss black, both rattle cans - didn't feel like mixing and cleaning out the paint gun for the small stuff) so tonight I should get all that on and hopefully finish putting the doors back together and the panels back on etc. All the window seals are new, but I can't afford new window regulators right now. They are definitely on the winter to-buy list though. Old ones sucks!
With no brakes I haven't driven the car, but it starts and idles better than my Red Fb lol so I'm optimistic that it shouldn't need a whole lot of find tuning once I am able to get it on the road.
Hopefully the next time I update this I'll have some pics of what is basically a complete car... Slowly getting there...
11-19-13, 03:25 PM
#131
Ah yes the quintessential Jersey guido mobile there  It's an 88 IROC, actually it's my Dad's toy although it's been sitting unloved for a few years. Still registered/insured so it moves from time to time, but only up the road and back if that. As long as the battery isn't dead it fires right up and actually runs great, but it's been sitting so long (both before he got it, and lately) that rust has really taken hold. I had considered buying it off of him as a parts car for my Trans Am (also been sitting north of a decade) but I doubt I'll ever really work on that when I have the 3 FB's, the AE86 and my Impreza - all of which I'd rather spend time and money on
I'm sure he'd sell it though if you were interested lol
One of these days I'll request a username change on here, the old F-Bodies don't really mean much to be anymore I'm afraid...
It's an 88 IROC, actually it's my Dad's toy although it's been sitting unloved for a few years. Still registered/insured so it moves from time to time, but only up the road and back if that. As long as the battery isn't dead it fires right up and actually runs great, but it's been sitting so long (both before he got it, and lately) that rust has really taken hold. I had considered buying it off of him as a parts car for my Trans Am (also been sitting north of a decade) but I doubt I'll ever really work on that when I have the 3 FB's, the AE86 and my Impreza - all of which I'd rather spend time and money on I'm sure he'd sell it though if you were interested lol
One of these days I'll request a username change on here, the old F-Bodies don't really mean much to be anymore I'm afraid...
11-19-13, 07:08 PM
#133
Ah yea sorry should have mentioned, they have almost nothing listed if you search by year/make/model. You will need to get the part numbers and search that way. Kinda cumbersome but not terrible. I dl'd the parts manual from foxed.ca and searched through for everything I could think of then divided it up into lists of stuff I could afford to get at the same time etc.
They usually reply within an hour or so if there is something they can't get for whatever reason, although their site is fairly up to date and will come back with "no results found"if it's a part that's NLA
They usually reply within an hour or so if there is something they can't get for whatever reason, although their site is fairly up to date and will come back with "no results found"if it's a part that's NLA
11-21-13, 03:54 PM
#134
I just noticed that you painted over the trim on the bumper at the front and rear, never thought of doing that. Looks good with the deleted side moldings.
Also, are you doing the FC subframe swap again or modifying the struts I'm sending you? I assume you're just redrilling the rear and mounting the calipers yourself?
Also, are you doing the FC subframe swap again or modifying the struts I'm sending you? I assume you're just redrilling the rear and mounting the calipers yourself?
11-25-13, 09:06 AM
#137
lindahlish - Yeah I don't really care for the look of the side molding so I remove it, but to me the removal looks incomplete if the bumper still has the black strip. Ideally I'd "remove" it from the bumper as well but it's molded into the bumper so you'd need to do a ton of work for that to look correct so I find it easier to just paint over it. Not ideal but not bad either, at least in my eye This car will retain the FB steering/brakes/4x110 wheels for the foreseeable future. Those FC struts you sent me are for the 85 I will be working on soon - that's getting an FC subframe
highnitro12187 - Thanks man! It's really coming together now. Glad I could inspire you
mazrx2man - Thanks! It's been a ton of work but it's nearly done so it's been worth it. Once I'm done I'll be diving right into your old 85. I'll be sure to start a new thread once I do
This car will retain the FB steering/brakes/4x110 wheels for the foreseeable future. Those FC struts you sent me are for the 85 I will be working on soon - that's getting an FC subframe highnitro12187 - Thanks man! It's really coming together now. Glad I could inspire you
mazrx2man - Thanks! It's been a ton of work but it's nearly done so it's been worth it. Once I'm done I'll be diving right into your old 85. I'll be sure to start a new thread once I do
11-25-13, 10:02 AM
#138
Question for you 82transam, and my apologies up front if I missed it in this thread earlier. What type of joint did you use to weld up your floor sections and the frame sections? Did you do a lap joint or a butt joint? Also, what type of weld thru primer did you use?
I've drilled out all the spot welds in the drivers footwell area I have to replace and have begun to cut a large section out from the firewall back to the seat anchors, and from the inside of the rocker to the driveshaft tunnel. I've never welded but have very similar rust issues you've fixed here in this (very excellent) thread.
Thanks for the assist!
11-25-13, 10:47 AM
#139
Typically for stuff on the floor pan or frame rails I'll do a slight overlap - like 1/16-1/8" because it makes it a lot easier to fit and weld since it gives you a little room for error - especially true if you are making the patch panel yourself. If you are cutting the patch out from a donor car you could spend the extra time to make it fit perfectly and butt weld it, but in my opinion this is overkill for something that's covered by carpet and undercoating/seam sealer etc. The key though is to not make the overlap too large, and to seal it all up immediately with good primer and seam sealer so moisture doesn't creep in and ruin it.
I'll confess, I don't use weld through primer. After I make a patch I'll scuff it and coat the whole thing in a heavy coat of rustolium professional primer (rattle can from Lowes - real tough stuff, at least for a rattle can) When I'm ready to weld it in I'll just remove the primer at the very edge so i can easily weld, once I'm done welding for the day I'll clean the area and get the weld covered in primer. I'm sure weld through primer would be better, but I've been using these methods for many years and it seems to hold up really well. It's cheap and easy to find/buy too lol. Again though, make sure all seams are covered in seam sealer to keep dirt/water etc from getting in there, doesn't matter what primer you use, if water gets in there it'll rust eventually.
Got any pics of your floor pan? I could give you some pointers. Are you making your patch or did it come from a parts car?
Also, for any external body repair, like the quarter panels and lower door skins etc, I always take the time to fit the panels so I can butt weld them. It's a pet peeve of mine lol
Hope that helps, I'm glad to see others tackling rusty first gens Like I've said before, all of my experience is just from messing around over the last 15 years or so, no professional training, and much of what I do is subject to a relatively strict budget (hence the use of rustolium and other stuff from Lowes) - There are certainly other ways of doing it
Good luck!
I'll confess, I don't use weld through primer. After I make a patch I'll scuff it and coat the whole thing in a heavy coat of rustolium professional primer (rattle can from Lowes - real tough stuff, at least for a rattle can) When I'm ready to weld it in I'll just remove the primer at the very edge so i can easily weld, once I'm done welding for the day I'll clean the area and get the weld covered in primer. I'm sure weld through primer would be better, but I've been using these methods for many years and it seems to hold up really well. It's cheap and easy to find/buy too lol. Again though, make sure all seams are covered in seam sealer to keep dirt/water etc from getting in there, doesn't matter what primer you use, if water gets in there it'll rust eventually.
Got any pics of your floor pan? I could give you some pointers. Are you making your patch or did it come from a parts car?
Also, for any external body repair, like the quarter panels and lower door skins etc, I always take the time to fit the panels so I can butt weld them. It's a pet peeve of mine lol
Hope that helps, I'm glad to see others tackling rusty first gens
Like I've said before, all of my experience is just from messing around over the last 15 years or so, no professional training, and much of what I do is subject to a relatively strict budget (hence the use of rustolium and other stuff from Lowes) - There are certainly other ways of doing it Good luck!
11-25-13, 12:52 PM
#140
Thanks! That's excellent info! I think I'm gonna have a hard time sealing/priming the back side of the weld along the rocker panel (inside the rocker panel) and will have to think on that one before I do much more cutting. I have a donor car section I'm using for rust free patches, and you can see what I'm up against in my "My 79 barn find" thread. I'm faced with a lot of the same issues you had.
Last edited by woodmv; 11-25-13 at 01:01 PM.
12-09-13, 10:58 AM
#141
Well, I'm at that bitter sweet part of the build on this one. The part where it's finally back together for the most part and you can finally drive it again, only to find a bunch of random things that still need attention. The more you drive it the longer that list seems to get.
I spent quite a bit of time last week getting a bunch of the little details done - aligning the headlights, putting the side marker lights on, putting the remaining interior panels back in etc etc and took it out on it's maiden voyage - 2 miles to the gas station lol. Filled it up with 93 and no apparent leaks so that's a relief and put a few miles on it taking the long way home. After spending some time fiddling with the TPS and idle adjustments I went on a longer drive (15 miles or so) and while I'm happy that it's moving under it's own power it's definitely not done. The brake pedal is a bit mushy (need to bleed again I guess) and the trans mount is making quite a bit of noise. I will have to revisit that to see what it's hitting. As such I did not push the car very hard but the engine runs well, no hesitations and linear power. I'll have to wait until the trans mount issue is resolved before I push it into boost too hard, but this engine ran very well when it was in my FC so I'm sure it'll be fine.
Anyway, there are other things left to do as well, like windshield trim, figure out why my autometer gauges aren't working (wiring issue of course) and why my fog lights keep popping the fuse (another wiring issue) but those are fairly minor in the scheme of things.
Honestly though after pushing hard on this build for a year I need a break from it. In fact I parked it outside this weekend and brought that flared 85 into the shop and started working on that. It is a much quicker simpler build and I'm hoping to knock it out in a month or two - it'll be a nice change of scenery so to speak. I'll start a thread on that very shortly - really looking forward to getting that thing on the road.
Anyway, that's all for now, once the mood strikes me to work on the Panda again I'll be sure to get some pics and update this
01-28-14, 10:53 AM
#142
mutt
Join Date: Dec 2007
Location: DETROIT
Posts: 686
Likes: 0
Received 0 Likes
on
0 Posts
Love this build man! After seeing this thread, you've convinced me that my car still has hope. My car has rust in the same locations in the earlier half of this thread, and I'm confident now that i can pull this thing off.
Cant wait to see the next update!
Cant wait to see the next update!
01-29-14, 09:04 AM
#143
Thanks, hopefully this will inspire you to save yours I haven't really touched this car in a few months other than starting it every few weeks. Once my 85 is done I'll get back to this. I'm actually not satisfied with how this one came out mechanically and am planning some changes. More to come...
I haven't really touched this car in a few months other than starting it every few weeks. Once my 85 is done I'll get back to this. I'm actually not satisfied with how this one came out mechanically and am planning some changes. More to come...
01-30-14, 10:22 AM
#145
Yeah it's a car again in that i could go out, start it and drive it around - but in my opinion it's not "done" at least not to a point that I'm happy with it. I haven't decided 100% what direction to go with this one to "finish" it yet, but I do know that I'll be transferring the registration off of it and onto my 85 once the 85 runs (very soon!), and will be storing this away for a few months while I think about it.
I'm being intentionally vague, I'll share more details once I get back into this...
I'm being intentionally vague, I'll share more details once I get back into this...
 02-28-14, 08:18 AM
#147
Thanks! Yeah she was a real mess... Well as my post above indicates, the registration is now off of this car, and transferred to my flared red one. That car is nearly done so I'll be turning my attention back to the blue one very soon, I hope... lol
04-15-14, 01:53 PM
#148
Alrighty, it's been too long without an update on this one so here we go. My flared 85 is more or less "done", at least the major stuff for now so I've turned my attention back to this. As incidated in posts above, I have decided to change directions with this car and go for a much more stock restoration type build. I'm not going for completely stock (Has to have at least some minor changes ) but this will be much more in line with something I would have had back 10 years ago, before all the big fancy builds took over my life lol. I love me some T2 swaps, but I miss having a carb'd car to tinker with...
The plan for now is to get this back into 12a trim and get it running and driving. The engine shown below is the 12a that came out of this car a year and a half ago when I began all the rust repair. It is a decent engine, but it burns too much oil. Crud on the front plug would lead me to believe it's the oil control rings on the front rotor. To keep the amount of yard art (that is, non functioning cars) to a minimum I decided to simply give it a very quick cleanup and simply reinstall it. I have another 12a (from my 83 S) that has been sitting in a damp shed since 2006, but ran great prior, that I will be taking apart soon and rebuilding for this car. Before I do that though I really want to get this thing back together completely and on the road.
What's left? Well, mechanically I need to finish reinstalling the exhaust, reinstall the carb fuel pump, buy a radiator and hoses, fill with fluids and hopefully fire it up without too much drama. I've been slowly plugging away at getting this thing back to stock - I had to remove the FC wiring, reinstall some of the 12a related wiring that I have removed - specifically the wires for the coils and large gang plug that goes to the rats nest.
Body wise I need to repaint the hood (looks terrible) as well as paint the metal sun roof. Also need to paint and install the windshield trim and a few other bits and pieces.
I'll have to get some pics, but interior wise it's mostly done. I actually removed all my Autometer gauges (they went to the flared 85) and put the stock stereo surround back in. The only "mod" is a new head unit, otherwise it's all back to stock there.
Here's a few pics, don't mind the dirty air box, or dirty engine in general - or the mess of wiring laying on the strut tower, that has since been removed. Like I said I'll be rebuilding an engine for this, and will be sure to paint and detail that one nicely...
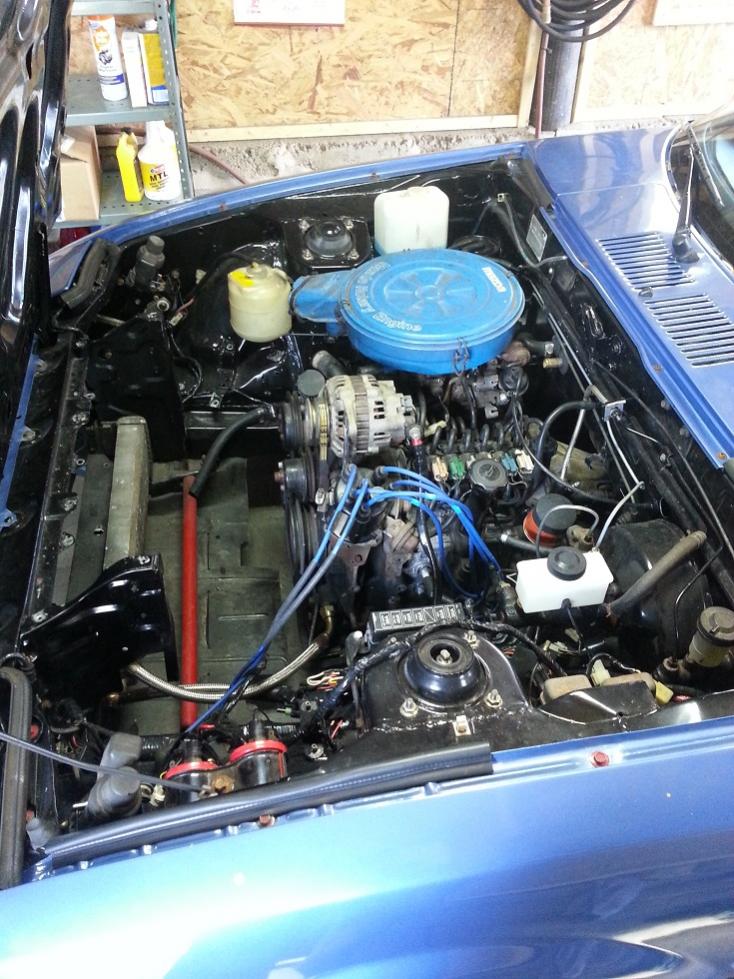
) but this will be much more in line with something I would have had back 10 years ago, before all the big fancy builds took over my life lol. I love me some T2 swaps, but I miss having a carb'd car to tinker with...The plan for now is to get this back into 12a trim and get it running and driving. The engine shown below is the 12a that came out of this car a year and a half ago when I began all the rust repair. It is a decent engine, but it burns too much oil. Crud on the front plug would lead me to believe it's the oil control rings on the front rotor. To keep the amount of yard art (that is, non functioning cars) to a minimum I decided to simply give it a very quick cleanup and simply reinstall it. I have another 12a (from my 83 S) that has been sitting in a damp shed since 2006, but ran great prior, that I will be taking apart soon and rebuilding for this car. Before I do that though I really want to get this thing back together completely and on the road.
What's left? Well, mechanically I need to finish reinstalling the exhaust, reinstall the carb fuel pump, buy a radiator and hoses, fill with fluids and hopefully fire it up without too much drama. I've been slowly plugging away at getting this thing back to stock - I had to remove the FC wiring, reinstall some of the 12a related wiring that I have removed - specifically the wires for the coils and large gang plug that goes to the rats nest.
Body wise I need to repaint the hood (looks terrible) as well as paint the metal sun roof. Also need to paint and install the windshield trim and a few other bits and pieces.
I'll have to get some pics, but interior wise it's mostly done. I actually removed all my Autometer gauges (they went to the flared 85) and put the stock stereo surround back in. The only "mod" is a new head unit, otherwise it's all back to stock there.
Here's a few pics, don't mind the dirty air box, or dirty engine in general - or the mess of wiring laying on the strut tower, that has since been removed. Like I said I'll be rebuilding an engine for this, and will be sure to paint and detail that one nicely...
Last edited by 82transam; 04-15-14 at 01:56 PM.