
FrankenRex Will Rise: stuffing a GSL-SE into a'79 SA

Thread Starter


Joined: Feb 2004
Posts: 1,204
Likes: 101
From: Euless, TX
Jun 18, 2018, also, but a different post
Now on to Saturday.
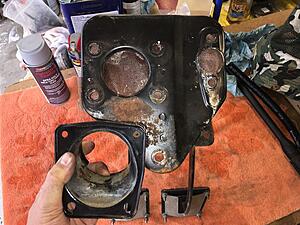
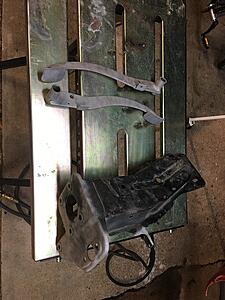
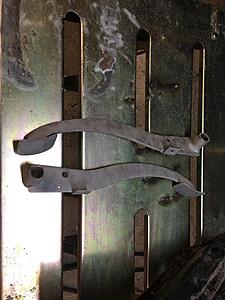
Gotta measure about where those tabs were before I can put them in the other car:

About 5/8" down from the AC drain hole. Horizontal location to be determined by the mounting holes in the plate.
Locations marked out by bolting the tabs to the cover plate and lining it up with the vertical mark.

Remove oversized chunk of asphalt sound deadener. This chunk came off remarkably cleanly.

The others were pretty clean, but required a bit more lacquer thinner to remove the remains.

A little whizzing with the wire wheel on a die grinder:

Little bit of extra rust up at the top, so I hit that with the wire wheel while I was at it. Then we re-mark the tab locations.

Tabs were bolted back to the cover plate, then the exposed ends were tacked. Remove cover plate, then tack the other end, and viola!


My welds are still **** (but solid). Only caught the asphalt on the lower left tab on fire once - the tab got a little askew, and closer than it should have been to the sound deadener.
Gotta measure about where those tabs were before I can put them in the other car:
About 5/8" down from the AC drain hole. Horizontal location to be determined by the mounting holes in the plate.
Locations marked out by bolting the tabs to the cover plate and lining it up with the vertical mark.
Remove oversized chunk of asphalt sound deadener. This chunk came off remarkably cleanly.
The others were pretty clean, but required a bit more lacquer thinner to remove the remains.
A little whizzing with the wire wheel on a die grinder:
Little bit of extra rust up at the top, so I hit that with the wire wheel while I was at it. Then we re-mark the tab locations.
Tabs were bolted back to the cover plate, then the exposed ends were tacked. Remove cover plate, then tack the other end, and viola!
My welds are still **** (but solid). Only caught the asphalt on the lower left tab on fire once - the tab got a little askew, and closer than it should have been to the sound deadener.
Thread Starter
Joined: Feb 2004
Posts: 1,204
Likes: 101
From: Euless, TX
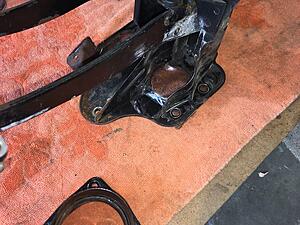
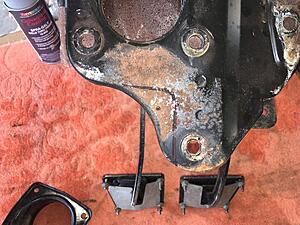
Part 2
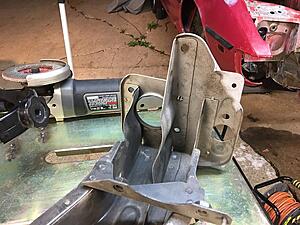
Same procedure for the ECU mounts:


It fits!:


I gave all the exposed metal the Rust Off phosphate treatment, etching primer, then a coat of semi-gloss black.

It fits!:
I gave all the exposed metal the Rust Off phosphate treatment, etching primer, then a coat of semi-gloss black.
Thread Starter
Joined: Feb 2004
Posts: 1,204
Likes: 101
From: Euless, TX
Also originally posted Jun 18, 2018
Sunday, after Father's Day stuff, I got a little ambitious.
The rust that I couldn't reach or wouldn't come off easily with a wire wheel was coming off.
As it happens, I have a Harbor Freight pressure-pot media blaster.
Here we go.
This is our starting point:


I think I've highlighted the trouble areas before, but to recap, there's a rust colony at the top of the driver's door in the cowl, and surface rust in pockets where the bumper and the sway bar attach that I can't reach with a wire brush, and the area under the battery tray doesn't want to brush down to clean metal. I could just hit it all with the phosphate treatment to kill the rust and seal it, but if I can get the rust off, I want to. And with a media blaster and Black Beauty (coal slag) I can.
I forgot how incredibly messy, dirty, and generally annoying blasting without a cabinet is. Well, not forgot, exactly, but cognitively distanced myself from how nasty it *feels*. I put down a tarp to collect what I could. The **** still went everywhere. I might should have use a little less pressure. This was after spending some time and effort tot get the blaster working correctly. It was set up for glass bead (you can see a pile where I made a mess emptying the pot.) I needed a larger orifice, and that meant swapping the nice dead-man style gun out for the original ball-valve gun, because I didn't have a large tip for the dead-man, for some reason. Will have to stop by HF and rectify that at some point. It still like to clog up, but only at the tip, which was fairly easy to remove and clear. Thankfully, coal slag isn't near as sensitive to moisture as glass bead, because there was a lot of moisture even with water traps at the hose reel and on the blaster itself.

That was about a gallon of media collected on the tarp, which was under the car at the time I was blasting.
**** went everywhere


But the rust is gone.


I'm not happy about that spot. I'm going to have to epoxy those holes up - that's straight into the passenger cabin, and probably assisted with the rust hole in the floorboard, along with the dead door seals.
The rust that I couldn't reach or wouldn't come off easily with a wire wheel was coming off.
As it happens, I have a Harbor Freight pressure-pot media blaster.
Here we go.
This is our starting point:
I think I've highlighted the trouble areas before, but to recap, there's a rust colony at the top of the driver's door in the cowl, and surface rust in pockets where the bumper and the sway bar attach that I can't reach with a wire brush, and the area under the battery tray doesn't want to brush down to clean metal. I could just hit it all with the phosphate treatment to kill the rust and seal it, but if I can get the rust off, I want to. And with a media blaster and Black Beauty (coal slag) I can.
I forgot how incredibly messy, dirty, and generally annoying blasting without a cabinet is. Well, not forgot, exactly, but cognitively distanced myself from how nasty it *feels*. I put down a tarp to collect what I could. The **** still went everywhere. I might should have use a little less pressure. This was after spending some time and effort tot get the blaster working correctly. It was set up for glass bead (you can see a pile where I made a mess emptying the pot.) I needed a larger orifice, and that meant swapping the nice dead-man style gun out for the original ball-valve gun, because I didn't have a large tip for the dead-man, for some reason. Will have to stop by HF and rectify that at some point. It still like to clog up, but only at the tip, which was fairly easy to remove and clear. Thankfully, coal slag isn't near as sensitive to moisture as glass bead, because there was a lot of moisture even with water traps at the hose reel and on the blaster itself.
That was about a gallon of media collected on the tarp, which was under the car at the time I was blasting.
**** went everywhere
But the rust is gone.
I'm not happy about that spot. I'm going to have to epoxy those holes up - that's straight into the passenger cabin, and probably assisted with the rust hole in the floorboard, along with the dead door seals.
Thread Starter
Joined: Feb 2004
Posts: 1,204
Likes: 101
From: Euless, TX
Part 2 (sigh)
did find some crash damage ont he right side frame horn:


Not surprising given that the bumper, hood and the panel between the hood and bumper are different colors under the red. It's not enough to throw the bumper off kilter.
I forgot to tape the AC drain hole back up after I painted the mounting tabs inside, and even got some grit inside the car as well:

I did make a mistake. I wore a long sleeve shirt, gloves, and blasting hood. I did not, however, wear long pants, and friends, let me tell you, coal slag is *sharp* and bounces off sheet metal at high velocity. I had little blood spots all over my legs. Burned like nobody's business later in the shower, too. In retrospect, I also should have used my welding gloves. The shorter cuffs on my work gloves still let a bunch of grit into my sleeves. That shower after was lovely.
I hit all the newly-bare areas with Rust-Off to keep them from rusting up, and called it a night. I need to hit all the remaining paint with 320-400 grit sandpaper to rough it up, and smooth out some of the transitions, then I can spray everything with epoxy urethane primer, after which I can spray the engine compartment areas with the catalyzed urethane color coat. Should only take a couple moredays weeks months, right?
Not surprising given that the bumper, hood and the panel between the hood and bumper are different colors under the red. It's not enough to throw the bumper off kilter.
I forgot to tape the AC drain hole back up after I painted the mounting tabs inside, and even got some grit inside the car as well:
I did make a mistake. I wore a long sleeve shirt, gloves, and blasting hood. I did not, however, wear long pants, and friends, let me tell you, coal slag is *sharp* and bounces off sheet metal at high velocity. I had little blood spots all over my legs. Burned like nobody's business later in the shower, too. In retrospect, I also should have used my welding gloves. The shorter cuffs on my work gloves still let a bunch of grit into my sleeves. That shower after was lovely.
I hit all the newly-bare areas with Rust-Off to keep them from rusting up, and called it a night. I need to hit all the remaining paint with 320-400 grit sandpaper to rough it up, and smooth out some of the transitions, then I can spray everything with epoxy urethane primer, after which I can spray the engine compartment areas with the catalyzed urethane color coat. Should only take a couple more
Thread Starter
Joined: Feb 2004
Posts: 1,204
Likes: 101
From: Euless, TX
Jun 25, 2018
Sunday I got back on the RX-7.
More de-rusting. Just wire wheels and sandpaper this time.
Started with the front fenders - there was some rust on the bottoms, and inside. I think a lot of what was on the inside was mainly just staining, but I want to be certain. Just surface rust at the worst, though.


After some quality time with a wire wheel and a roll-lock abrasive pad:


I guess there's a little bondo on the other side of this. Looks like a wrinkle from the accident that claimed the hood, bumper, and header panel:

There's also a pulled crease further back on that same fender:

More de-rusting. Just wire wheels and sandpaper this time.
Started with the front fenders - there was some rust on the bottoms, and inside. I think a lot of what was on the inside was mainly just staining, but I want to be certain. Just surface rust at the worst, though.
After some quality time with a wire wheel and a roll-lock abrasive pad:
I guess there's a little bondo on the other side of this. Looks like a wrinkle from the accident that claimed the hood, bumper, and header panel:
There's also a pulled crease further back on that same fender:
Thread Starter
Joined: Feb 2004
Posts: 1,204
Likes: 101
From: Euless, TX
Jun 25, 2018 Part duex
Oh, look, more blasting abrasive:

<sigh>
I decided I didn't want to work around this bracket for the windshield washer bottle, so I decided to make it bolt-on, like on the '84 I'm using for parts. No idea why they decided it needed to be spot welded on, given the obvious bolt holes. Still less, why it needed four spot welds at varying heights.


Missed one of the spot welds when I center punched them the first time. Also punched locations for the threaded inserts to be added after the bracket is removed.
And off!

Got a little too aggressive with the cutter on one weld, and still somehow missed part of the actual weld. Had to chisel that one loose:

Good thing I pulled it off. There was some rust hiding back there.
De-rusted, and threaded inserts installed:
<sigh>
I decided I didn't want to work around this bracket for the windshield washer bottle, so I decided to make it bolt-on, like on the '84 I'm using for parts. No idea why they decided it needed to be spot welded on, given the obvious bolt holes. Still less, why it needed four spot welds at varying heights.
Missed one of the spot welds when I center punched them the first time. Also punched locations for the threaded inserts to be added after the bracket is removed.
And off!
Got a little too aggressive with the cutter on one weld, and still somehow missed part of the actual weld. Had to chisel that one loose:
Good thing I pulled it off. There was some rust hiding back there.
De-rusted, and threaded inserts installed:
Thread Starter
Joined: Feb 2004
Posts: 1,204
Likes: 101
From: Euless, TX
Jun 25, 2018 Part tres
And now we're caught up.
Next post, I'll do both here and there at the same (approximate) time.
This is probably going to take a while.
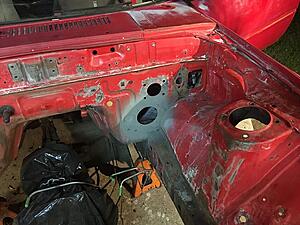
The fruits of my labor for the day, besides the fenders. The right half of the engine bay is smoth and rust removed:


I still need to do the core support, and get more down into the transmission tunnel, as well as the other half, of course.
To finish up for the day, I applied Rust Off phosphate solution to all the bare-metal areas.
Shortly after I finished up for the day and had a shower and some food, I realized that I could have probably used my oscillating tool for a bunch of this.
The engine bay is too lumpy and convoluted to use a disk/DA or jitterbug sander, so I was doing all this by hand. I can cut triangles from the rolls of PSA sandpaper I'm using easily enough. I was cutting strips and folding them in half, sticking them to themselves as it was. Will try the oscillating tool next time.
Man, I just want to paint the thing, but I know if I don't do a good job with prep, it'll suck, and I'll hate it (and myself for doing it.)
Next post, I'll do both here and there at the same (approximate) time.
This is probably going to take a while.

Banned. I got OWNED!!!
Joined: Aug 2012
Posts: 1,666
Likes: 88
From: San Jose, CA
What else do you need for the build? I can dig around the garage and see what I still have left for a 1st Gen for sale. Most of it already went to Texas (carb, ignition, emissions equipment, etc). I'm sure I have something that could help though.
Thread Starter
Joined: Feb 2004
Posts: 1,204
Likes: 101
From: Euless, TX
Right now, nothing, really. I have 5 of these things, of varying years, and several storage totes of spare parts besides.
 I've had this one (the one that got me started on rotaries) for almost 25 years.
I'll let you know if I come up short for anything.
Thread Starter
Joined: Feb 2004
Posts: 1,204
Likes: 101
From: Euless, TX
Nothing new this weekend, I'm afraid. I had to work on the daily driver, and spread a little love on my '87 Corolla AE86 that I've been neglecting recently. I'll get back on the SA this week. Probably do some more sanding on the 4th.

Wow! Just read through your thread and it looks all too familiar!! My 79 was a NE car and I did basically the same thing - started with blasting the front end of the car in a tent I built in my garage and used the black beauty also. I didn't experience the painful cuts on my legs tho - I wore a cheap tyvek suit. It was hot as mess tho! You may find that sand blast grit everywhere as I did. It was in the frame rails and inside the cabin and came out literally everywhere. Bad thing was that it got into my first layer of POR-15 that I painted my engine bay with after treating it with the metal prep. I was determined to not have anymore rust issues, or try like hell to prevent them. Had to sand that mess down so it was a bunch of rework. Crazy how similar your build is to mine with the body work (just sent a shiver down my spine thinking of all the work involved). Keep it up - you're gonna love the results! Can't wait to see how it ends up.
Thread Starter
Joined: Feb 2004
Posts: 1,204
Likes: 101
From: Euless, TX
Thanks!
Thankfully, 90% of mine is surface rust only, since I'm in North Texas. The rust in the floorboard is my fault, I think, for not keeping water out while it was parked. I've no idea why it got so much rust at the top of the cowl near the door hinge. That's just weird.
I'll be laying on epoxy urethane primer, so it shouldn't ever rust again, in theory.
Thread Starter
Joined: Feb 2004
Posts: 1,204
Likes: 101
From: Euless, TX
Sorry for the lack of updates. It's been stupid hot and humid here in the Dallas area for the last week or two, and it's hard to motivate myself to get out there and sweat my keister off.
Thread Starter
Joined: Feb 2004
Posts: 1,204
Likes: 101
From: Euless, TX
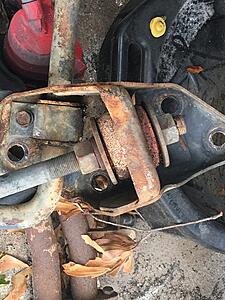
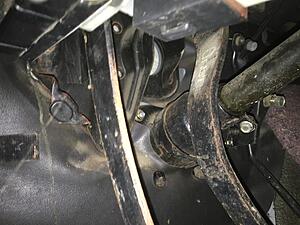
Didn't really do anything to the '7 this weekend, but I noticed something while puttering around with other stuff:
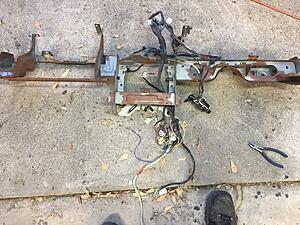
Entire front suspension, plus bonus exhaust:
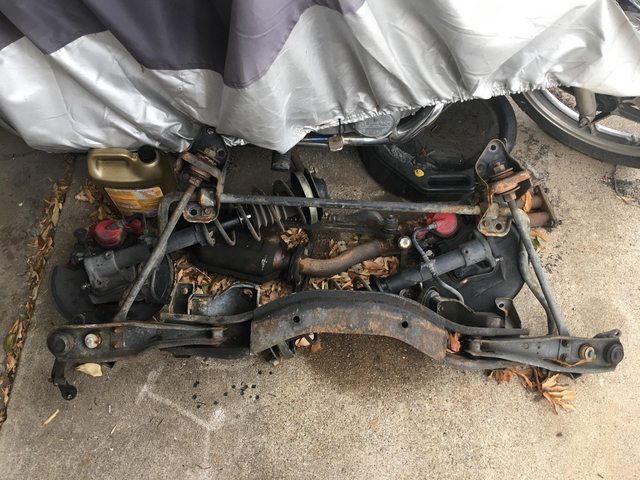
(The crossmember is upside down, BTW)
Hmmmm.

HMMMMMM.
DAMMIT.
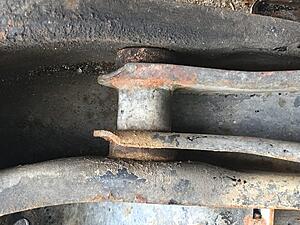
Those *were* polyurethane bushings. I don't know if that's a normal thing that happens or mine were just crap. They're over 20 years old at this point.
Guess those will need to be replaced along with everything else.
Entire front suspension, plus bonus exhaust:
(The crossmember is upside down, BTW)
Hmmmm.

HMMMMMM.

DAMMIT.

Those *were* polyurethane bushings. I don't know if that's a normal thing that happens or mine were just crap. They're over 20 years old at this point.
Guess those will need to be replaced along with everything else.
Thread Starter
Joined: Feb 2004
Posts: 1,204
Likes: 101
From: Euless, TX
A tiny bit of progress!
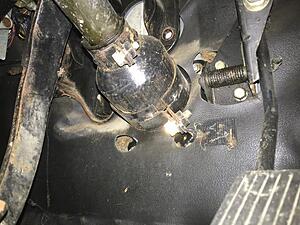
I want to move the power steering from the donor GSL-SE to the '79, not least of which because I'm tired of "armstrong", but also because I believe that the newer box is in better shape, and it's getting almost impossible to find parts or rebuilds for these things. I also need the jointed steering shaft if I convert to rack and pinion. I'm not sure why Mazda put a jointed shaft on the power steering GSL-SEs, but they did, despite everything being in the same spot and orientation as the manual-steering cars. It may be that the power steering box was not available with the straight one-piece shaft.
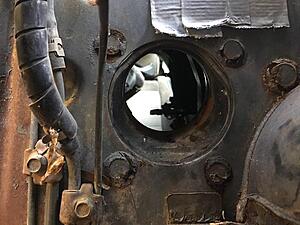
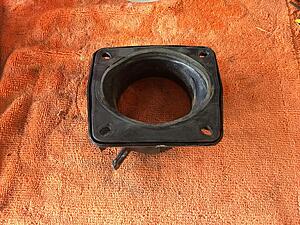
The '79 column and tube just goes straight through the firewall and is gasketed to the box
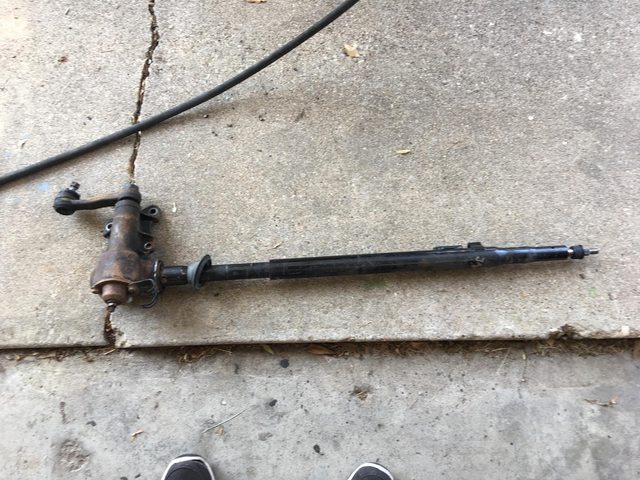
That grommet down at the box end seals up the firewall hole.
The hole for the column and shaft is the circular one covered by the orange plastic bit from the inside at the right of the picture:
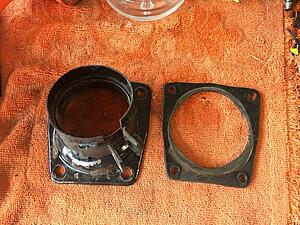
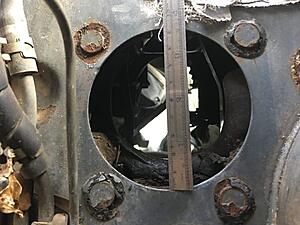
By comparison, the '84 has a larger round hole:
which has a mounting plate with a recess, and bell on the end of the column tube:

That recess and bell contain the flex joint.
To get the stupid thing out, I had to loosen the clamps on the bell end of the column tube, remove the bolts for the box, which then let me slide the whole assembly forward far enough to expose the flex joint so I could unbolt one of the shaft retaining bolts and remove said bolt, which then allowed the column to come out via the interior side. Helpfully, there was a spring to push out the column end of the shaft from the flex joint. An odd setup.
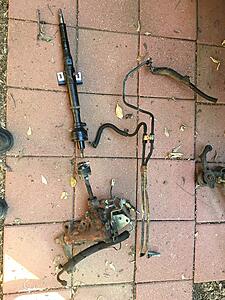
The whole assembly, plus the cooler loop:
I ran out of day and f*cks, so the mounting plate is still in the car. The mounting nuts are removed, but it's still solidly in place. I suspect that whatever gasketing it has is well-stuck.
So I will need to enlarge the hole in my '79, and weld in some 6mm studs.
OK. Maybe next weekend.
I want to move the power steering from the donor GSL-SE to the '79, not least of which because I'm tired of "armstrong", but also because I believe that the newer box is in better shape, and it's getting almost impossible to find parts or rebuilds for these things. I also need the jointed steering shaft if I convert to rack and pinion. I'm not sure why Mazda put a jointed shaft on the power steering GSL-SEs, but they did, despite everything being in the same spot and orientation as the manual-steering cars. It may be that the power steering box was not available with the straight one-piece shaft.
The '79 column and tube just goes straight through the firewall and is gasketed to the box
That grommet down at the box end seals up the firewall hole.
The hole for the column and shaft is the circular one covered by the orange plastic bit from the inside at the right of the picture:

By comparison, the '84 has a larger round hole:


which has a mounting plate with a recess, and bell on the end of the column tube:


That recess and bell contain the flex joint.
To get the stupid thing out, I had to loosen the clamps on the bell end of the column tube, remove the bolts for the box, which then let me slide the whole assembly forward far enough to expose the flex joint so I could unbolt one of the shaft retaining bolts and remove said bolt, which then allowed the column to come out via the interior side. Helpfully, there was a spring to push out the column end of the shaft from the flex joint. An odd setup.
The whole assembly, plus the cooler loop:

I ran out of day and f*cks, so the mounting plate is still in the car. The mounting nuts are removed, but it's still solidly in place. I suspect that whatever gasketing it has is well-stuck.

So I will need to enlarge the hole in my '79, and weld in some 6mm studs.
OK. Maybe next weekend.
Thread Starter
Joined: Feb 2004
Posts: 1,204
Likes: 101
From: Euless, TX
Moved a tiny bit forward on the RX-7. A week ago, it rained most of the weekend, and I attended a funeral (brother-in-law's wife's father - I only met him like twice, but family, you know?) out of town, and was lazy, so Sunday evening was my only window.
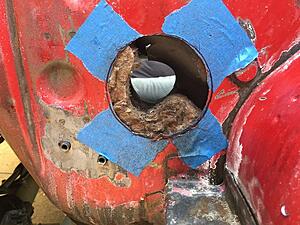
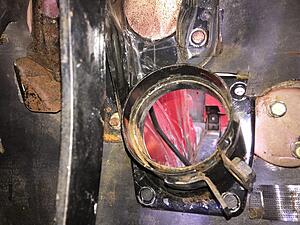
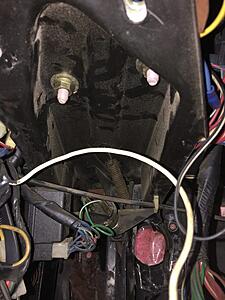
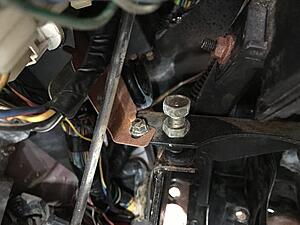
Last time, I had gotten the steering column and box out of the donor. I still needed to get the firewall mount out. The bit inside the whole in this picture:

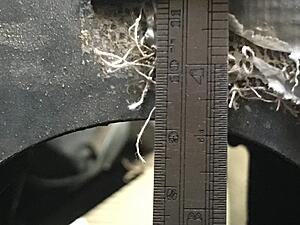
I had the nuts removed from the studs that you can see welded to the sheet metal, but the mount was being stubborn. Turns out it has a rubber gasket, and the gasket was just pretty stuck on there after 34 years. A little working at it with a gasket scraper got it off, finally.
Then I needed to measure the hole in the donor, since it's a bit larger than the one in the '79.
...and then I remembered I had an actual tool designed to measure things like that.
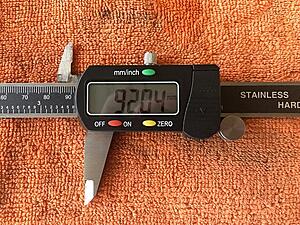
Both instruments agreed, and the measurement lined up with marks on the gasket
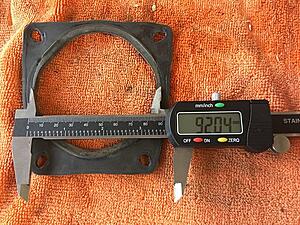
so full speed ahead.
A little CAD work:
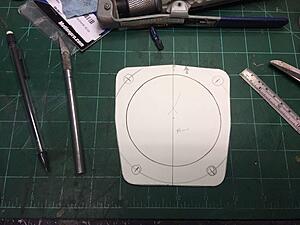
The bolt holes were 15mm away from the hole. The top pair were 90mm apart, and the bottom pair 70mm, with the bottom pair 90mm from the top pair, so I just laid out a 15mm (radius) larger circle then marked the respective distances starting at a largely arbitrary point. The holes for the center points lined up with the actual holes in the mount, so I guess I did it right.
Marked out the outside perimeter from the actual part, then cut it all out.
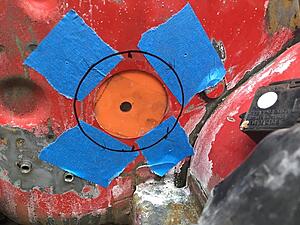
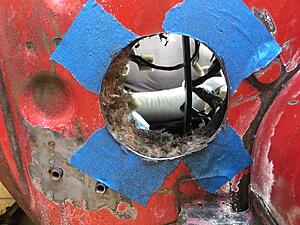
The hole in the '79 is 62mm, and the hole in the '84 is 92mm, so I marked 15mm out in several location s to help center the template, and stuck it down.
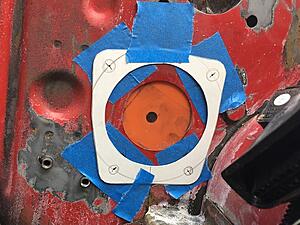
It's actually level, aligned with the tab from the frame rail there at the bottom of the template. The picture is from an angle due to a wiring harness in the way.
All marked up and holes center punched:
Was starting to lose daylight at that point, and was tired, so cutting will waited until the past weekend. I'm got an air nibbler from Harbor Freight to deal with this one. Been meaning to get one for a while, anyway.
Last time, I had gotten the steering column and box out of the donor. I still needed to get the firewall mount out. The bit inside the whole in this picture:

I had the nuts removed from the studs that you can see welded to the sheet metal, but the mount was being stubborn. Turns out it has a rubber gasket, and the gasket was just pretty stuck on there after 34 years. A little working at it with a gasket scraper got it off, finally.


Then I needed to measure the hole in the donor, since it's a bit larger than the one in the '79.


...and then I remembered I had an actual tool designed to measure things like that.

Both instruments agreed, and the measurement lined up with marks on the gasket

so full speed ahead.
A little CAD work:

The bolt holes were 15mm away from the hole. The top pair were 90mm apart, and the bottom pair 70mm, with the bottom pair 90mm from the top pair, so I just laid out a 15mm (radius) larger circle then marked the respective distances starting at a largely arbitrary point. The holes for the center points lined up with the actual holes in the mount, so I guess I did it right.
Marked out the outside perimeter from the actual part, then cut it all out.
The hole in the '79 is 62mm, and the hole in the '84 is 92mm, so I marked 15mm out in several location s to help center the template, and stuck it down.

It's actually level, aligned with the tab from the frame rail there at the bottom of the template. The picture is from an angle due to a wiring harness in the way.
All marked up and holes center punched:

Was starting to lose daylight at that point, and was tired, so cutting will waited until the past weekend. I'm got an air nibbler from Harbor Freight to deal with this one. Been meaning to get one for a while, anyway.
Last edited by Frankenrex; Aug 20, 2018 at 11:53 AM. Reason: Have I mentioned how annoying and stupid this number of pictures limitation is?
Thread Starter
Joined: Feb 2004
Posts: 1,204
Likes: 101
From: Euless, TX
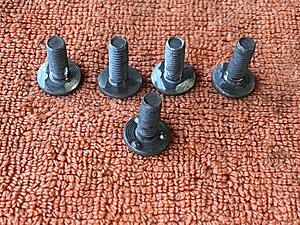
I've discovered that there is such a thing as a "weld stud", deigned to be spot-welded in similar to what's in the donor car. I measured the ones in the donor:
About 15mm long. Really, anything 10mm or longer would likely be fine, possibly less.
Rough cut on the hole with the nibbler:
Opened up and cleaned up with a rotary (heh) file and stone:
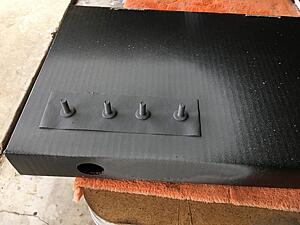
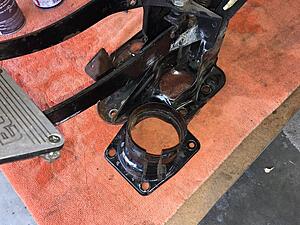
Holes drilled to 6mm (15/64", actually.) Lines up nicely with the gasket:
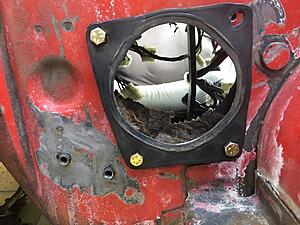
The reason there is no bolt in the upper right is that part of the brace for the brake master cylinder extends over that area:

I'll need to trim off that bit. It should not affect function. The '84 bracket has that corner cut away:
The annoying bit is that to cut that properly, I'll need to remove it from the car, and that's the bit that supports the upper end of the steering column, and the brake and clutch pedals. Fortunately, it doesn't look like there are that many bolts holding it in there.
Now off to order the appropriate length weld studs, and hopefully do those and trim the bracket next weekend.

About 15mm long. Really, anything 10mm or longer would likely be fine, possibly less.
Rough cut on the hole with the nibbler:

Opened up and cleaned up with a rotary (heh) file and stone:

Holes drilled to 6mm (15/64", actually.) Lines up nicely with the gasket:

The reason there is no bolt in the upper right is that part of the brace for the brake master cylinder extends over that area:


I'll need to trim off that bit. It should not affect function. The '84 bracket has that corner cut away:

The annoying bit is that to cut that properly, I'll need to remove it from the car, and that's the bit that supports the upper end of the steering column, and the brake and clutch pedals. Fortunately, it doesn't look like there are that many bolts holding it in there.
Now off to order the appropriate length weld studs, and hopefully do those and trim the bracket next weekend.
Thread Starter
Joined: Feb 2004
Posts: 1,204
Likes: 101
From: Euless, TX
This past weekend, I continued with the steering column mounting project.
We left off with a gaping hole in need of studs (awwwww, yeah.)
I discovered that there was such a thing as "weld studs." They have little raised points to facilitate them being spot-welded on by a special stud welder. I f I had one of those, I would have used it. Since I don't, I ground off the points.
And then hit them with weld-through primer to prepare for traditional welding:
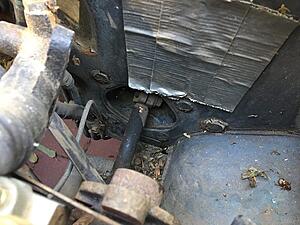
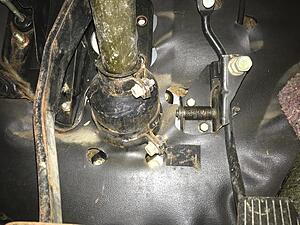
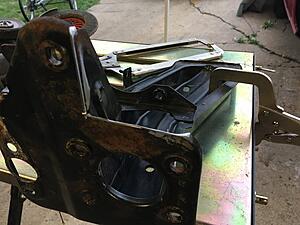
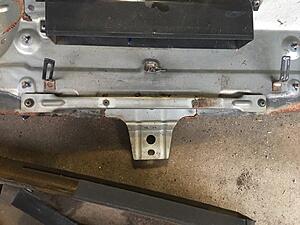
As you may recall, the pedla hanger bracket in my '79 fouled with one of the mounting holes for the column lower mount.
So this thing has to come out:
Took a bit to figure out where it was hanging up once I got the three big nuts off. It was this little bracket for some relays still tying it in to the dash structure. The rusty bit attached via a stud and M5 nut.
Pedal hanger and hanging pedals (heh) out:
This is where the column bracket is supposed to go:
Just need that curve cut into an inside corner:
Had a handy drill spot from drilling the hole in the actual firewall to line everything up.
We left off with a gaping hole in need of studs (awwwww, yeah.)

I discovered that there was such a thing as "weld studs." They have little raised points to facilitate them being spot-welded on by a special stud welder. I f I had one of those, I would have used it. Since I don't, I ground off the points.

And then hit them with weld-through primer to prepare for traditional welding:

As you may recall, the pedla hanger bracket in my '79 fouled with one of the mounting holes for the column lower mount.
So this thing has to come out:

Took a bit to figure out where it was hanging up once I got the three big nuts off. It was this little bracket for some relays still tying it in to the dash structure. The rusty bit attached via a stud and M5 nut.

Pedal hanger and hanging pedals (heh) out:


This is where the column bracket is supposed to go:


Just need that curve cut into an inside corner:


Had a handy drill spot from drilling the hole in the actual firewall to line everything up.
Thread Starter
Joined: Feb 2004
Posts: 1,204
Likes: 101
From: Euless, TX
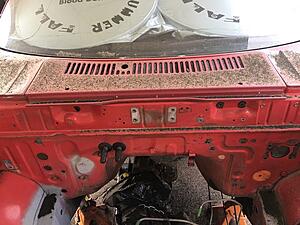
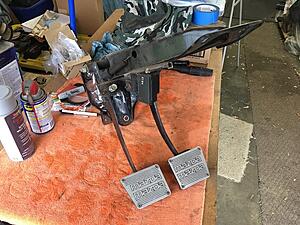
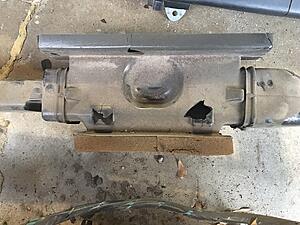
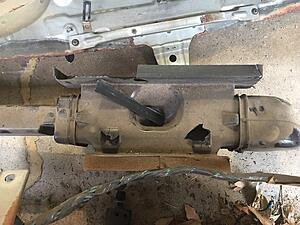
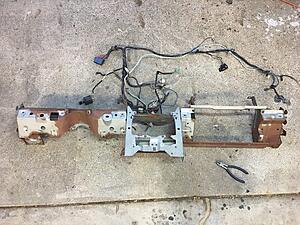
Pedal hanger/column area without the pedal bracket:
First: remove pedals and any other hangers-on:
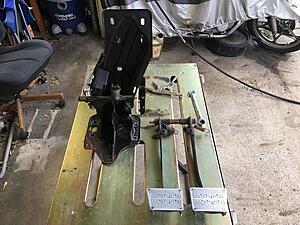
Reference photo for order of parts on the long bolt that the pedals hand from.
How my custom pedal covers are mounted. Covers and brackets were cut when I worked at a waterjet cutting service.

Bit of corrosion from moisture in the car over the last 10 years.
Wish I still had access to a waterjet.
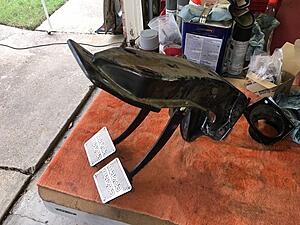
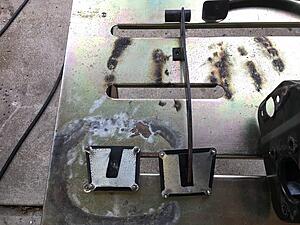
Pedal hanger cut:

And then smoothed with a flap wheel.

I'm not a fan of sharp edges in tight areas, so that was a must.
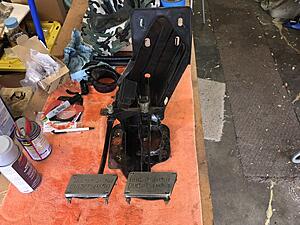
Test fit of the bracket (again) with the studs just taped in place:
Looks like it lines up OK.

First: remove pedals and any other hangers-on:


Reference photo for order of parts on the long bolt that the pedals hand from.
How my custom pedal covers are mounted. Covers and brackets were cut when I worked at a waterjet cutting service.


Bit of corrosion from moisture in the car over the last 10 years.
Wish I still had access to a waterjet.
Pedal hanger cut:

And then smoothed with a flap wheel.


I'm not a fan of sharp edges in tight areas, so that was a must.
Test fit of the bracket (again) with the studs just taped in place:


Looks like it lines up OK.
Thread Starter
Joined: Feb 2004
Posts: 1,204
Likes: 101
From: Euless, TX


Thread Starter
Joined: Feb 2004
Posts: 1,204
Likes: 101
From: Euless, TX
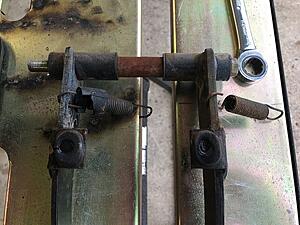
Sandblasted the pedal hanger and pedal arms to get rid of some rust that was scattered about on them:
I didn't completely blast the entire pedla hanger, since most of the original paint was fine. I just scuffed it up with sandpaper, and then primed with etching primer, and painted with appliance epoxy enamel gloss black:
I'll let those harden for about a week before I touch them.
The epoxy gloss black is super shiny, and stays that way, because epoxy. I have a tendency to use it in under-chassis stuff because it's tough and easy to clean because it's glossy. Here, I just had it on hand, and was almost out of satin black.
Nuts. I just remembered that I need to blast and pain the return springs for the pedals. They were rusty. Guess I will need to run a couple screws into a board to stretch the springs a little so I can get in between the coils.


I didn't completely blast the entire pedla hanger, since most of the original paint was fine. I just scuffed it up with sandpaper, and then primed with etching primer, and painted with appliance epoxy enamel gloss black:

I'll let those harden for about a week before I touch them.
The epoxy gloss black is super shiny, and stays that way, because epoxy. I have a tendency to use it in under-chassis stuff because it's tough and easy to clean because it's glossy. Here, I just had it on hand, and was almost out of satin black.
Nuts. I just remembered that I need to blast and pain the return springs for the pedals. They were rusty. Guess I will need to run a couple screws into a board to stretch the springs a little so I can get in between the coils.
Thread Starter
Joined: Feb 2004
Posts: 1,204
Likes: 101
From: Euless, TX
Had a few hours free this weekend.
Just as a sanity check, I compared the two steering columns, to make sure it would come out in the right place and the combination switch and ignition cylinder would fit.
If it's not obvious, to top one is the '84 power steering column. Looks good. Only issue I see is that the locating pin for the combination switch is on the top of the column on the '84 (see the little hole in the tube about an 1-1/2 from the top) and on the right side on the '79 (actually '81, since I converted it to the FB combination switch many years ago. The '79 switch arrangement made no sense to me at all. For those that don't know, on '79s and '80s, the wipers are a twist **** on the turn signal stalk, and the lights are the left stalk. Except for high beam switching, which is still on the turn signal stalk. See what I mean?)
All I need to do is drill a little hole in the right side of the '84 tube, and all will be well.
Actual test fit:
Oof, Potato phone.
Looks good.
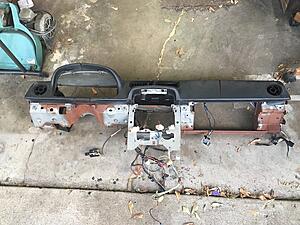
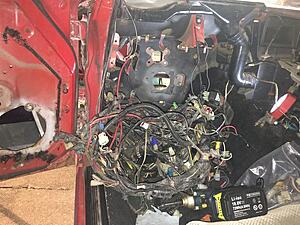
Mind at ease, I set out to remove the dash. I decided to do that because a) the dash pad is in dire need of repair, and b) I really wanted the wiring harness out of the engine compartment, and to do that I needed to get it loose from all the cable ties and such, up inside the dash.
Instrument cluster out.
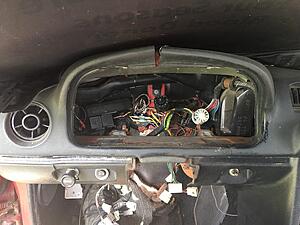
Oh, hello, *that's* where I put the alarm brain.
Lower bits removed.
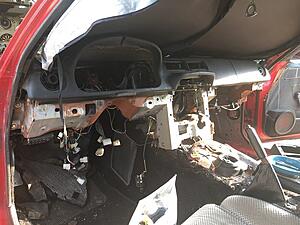
That **** was crispy as F. Going to be doing quite a bit of repair when that stuff goes back in. The surface rust on the sheetmetal is annoying me.
Mirror crumbled when I pulled down the window shade a while back.

Going to have to look for a replacement.
Just as a sanity check, I compared the two steering columns, to make sure it would come out in the right place and the combination switch and ignition cylinder would fit.


If it's not obvious, to top one is the '84 power steering column. Looks good. Only issue I see is that the locating pin for the combination switch is on the top of the column on the '84 (see the little hole in the tube about an 1-1/2 from the top) and on the right side on the '79 (actually '81, since I converted it to the FB combination switch many years ago. The '79 switch arrangement made no sense to me at all. For those that don't know, on '79s and '80s, the wipers are a twist **** on the turn signal stalk, and the lights are the left stalk. Except for high beam switching, which is still on the turn signal stalk. See what I mean?)
All I need to do is drill a little hole in the right side of the '84 tube, and all will be well.
Actual test fit:


Oof, Potato phone.
Looks good.
Mind at ease, I set out to remove the dash. I decided to do that because a) the dash pad is in dire need of repair, and b) I really wanted the wiring harness out of the engine compartment, and to do that I needed to get it loose from all the cable ties and such, up inside the dash.
Instrument cluster out.

Oh, hello, *that's* where I put the alarm brain.
Lower bits removed.

That **** was crispy as F. Going to be doing quite a bit of repair when that stuff goes back in. The surface rust on the sheetmetal is annoying me.
Mirror crumbled when I pulled down the window shade a while back.


Going to have to look for a replacement.
Thread Starter
Joined: Feb 2004
Posts: 1,204
Likes: 101
From: Euless, TX
WHAT HAVE I DONE?!
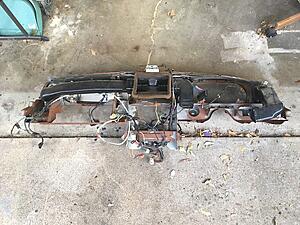
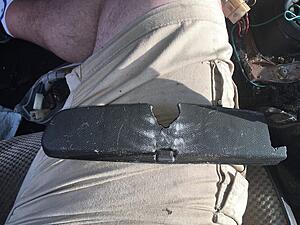
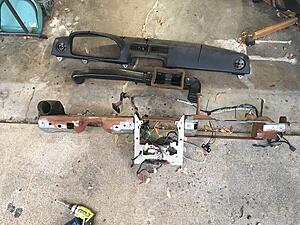
Dash pad removed:
Air ducts are a bit crispy, too:
That's supposed to be riveted to a metal bit that screws to the dash pad:
Then this bit broke of when I grabbed the piece to move it (sigh):
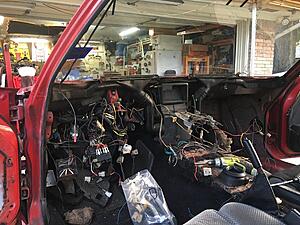
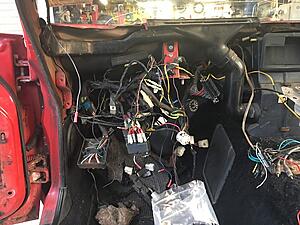
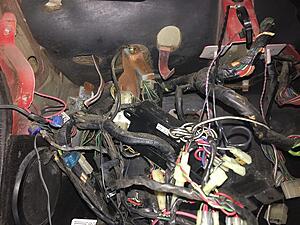
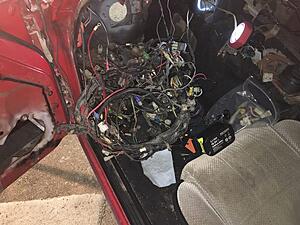
Dash wiring harness:
Dash wiring removed:
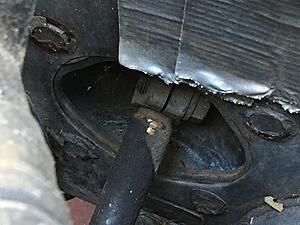
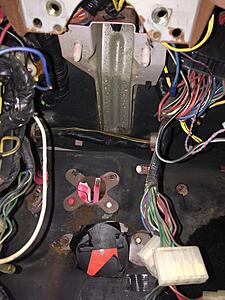
Back in the car, I need slack to pull the harness in. Mostly a bunch of thos bent metal tabs, and a few cable ties. I could unplug these relays, but there's only one nut holding that bracket up there:
This bracket was also connected to the pedla hanger earlier, keeping it from coming out, the little ****.


Dash pad removed:

Air ducts are a bit crispy, too:

That's supposed to be riveted to a metal bit that screws to the dash pad:

Then this bit broke of when I grabbed the piece to move it (sigh):

Dash wiring harness:

Dash wiring removed:

Back in the car, I need slack to pull the harness in. Mostly a bunch of thos bent metal tabs, and a few cable ties. I could unplug these relays, but there's only one nut holding that bracket up there:

This bracket was also connected to the pedla hanger earlier, keeping it from coming out, the little ****.
Thread Starter
Joined: Feb 2004
Posts: 1,204
Likes: 101
From: Euless, TX
(Holy COW that 12-picture limit is frustrating.)
Had to remove the driver's kick panel, which meant the dead pedal had to come out. Both bolts sheared:
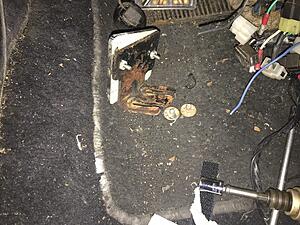
Dang it.
ALL CLEAN AND BARE:
But:
The mess just moved.
So now I can get on with sanding that side of the engine bay, tape up all of those holes, and paint away.
I do still need to patch that one bit of rust at the top of the cowl under the driver's fender, but that should just be a little epoxy, and possibly some seam sealer.
Now I'm debating how to handle the wiring harness.
I could strip out the emissions stuff I don't need, along with some additional wiring related to the choke, and external voltage regulator, and such, and add a few circuits to make wiring in a modern stereo and such easier (I had to pull power for the radio memory from the cigarette lighter, for example, and tie into the radio switched lead for the added power mirrors and gauges, not to mention grounds for all of that.) As an alternative, I could buy an aftermarket "hot rod" style wiring harness and rewire the whole car. Brand new wiring and connectors, and a modern ATC fuse box is tempting, not to mention the possibility of a bulkhead connector rather than the entire harness going through the firewall in one piece. Not sure which way I'll go on that. The '84 may get it's harness pulled and scavenged, or some other mid-'80s or '90s Mazda if I find something in the wrecking yard (to try and keep similar colors to factory, and OEM connectors.) I'll settle this after I get the engine bay painted, but a little thinking about it beforehand is probably a good idea. Going to spend some quality time with wiring diagrams to confirm what is necessary for my needs. I will also likely eliminate most of the tape wrap and use split looming instead. I like the easier maintenance and troubleshooting, not to mention changeability with split loom. I discovered that there is such a thing as a split loom version of the mesh looming, so I'm going to look into that as well.
Progress!
Had to remove the driver's kick panel, which meant the dead pedal had to come out. Both bolts sheared:


Dang it.
ALL CLEAN AND BARE:

But:


The mess just moved.
So now I can get on with sanding that side of the engine bay, tape up all of those holes, and paint away.
I do still need to patch that one bit of rust at the top of the cowl under the driver's fender, but that should just be a little epoxy, and possibly some seam sealer.
Now I'm debating how to handle the wiring harness.
I could strip out the emissions stuff I don't need, along with some additional wiring related to the choke, and external voltage regulator, and such, and add a few circuits to make wiring in a modern stereo and such easier (I had to pull power for the radio memory from the cigarette lighter, for example, and tie into the radio switched lead for the added power mirrors and gauges, not to mention grounds for all of that.) As an alternative, I could buy an aftermarket "hot rod" style wiring harness and rewire the whole car. Brand new wiring and connectors, and a modern ATC fuse box is tempting, not to mention the possibility of a bulkhead connector rather than the entire harness going through the firewall in one piece. Not sure which way I'll go on that. The '84 may get it's harness pulled and scavenged, or some other mid-'80s or '90s Mazda if I find something in the wrecking yard (to try and keep similar colors to factory, and OEM connectors.) I'll settle this after I get the engine bay painted, but a little thinking about it beforehand is probably a good idea. Going to spend some quality time with wiring diagrams to confirm what is necessary for my needs. I will also likely eliminate most of the tape wrap and use split looming instead. I like the easier maintenance and troubleshooting, not to mention changeability with split loom. I discovered that there is such a thing as a split loom version of the mesh looming, so I'm going to look into that as well.
Progress!
Thread Starter
Joined: Feb 2004
Posts: 1,204
Likes: 101
From: Euless, TX
OK, got some stuff done! (whoop!)
...and found more stuff that needs to be done (ugh.)
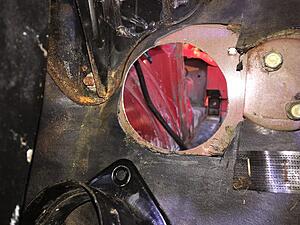
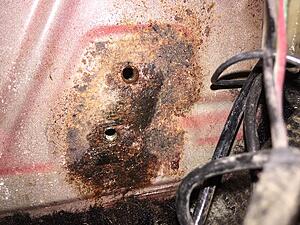
The targets for the weekend were the rust holes in the cowl, and the hole in the firewall for the EFI wiring.
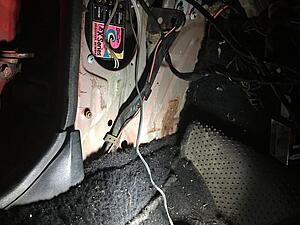
With the fender off, the back side of the broken off bolts for the dead pedal were revealed, so I took that as a target of opportunity.
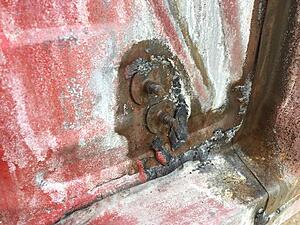
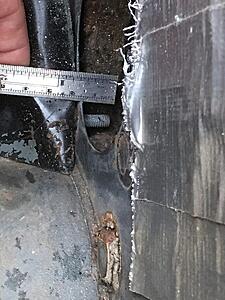
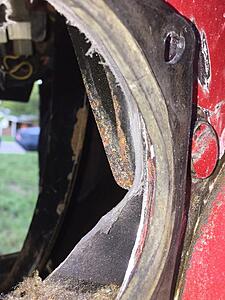
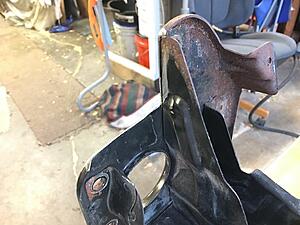
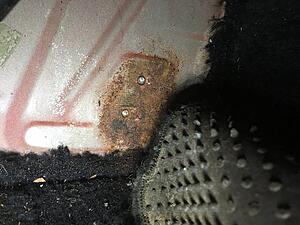
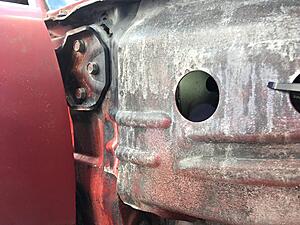
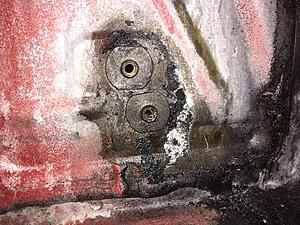
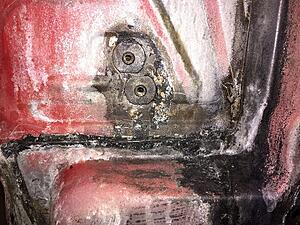
also hadn't noticed this rust hole near the door hinge:
This thing is rusting in the weirdest places. That one may be due to the reinforcing just below it on the other side:
But it's not even right up to it...
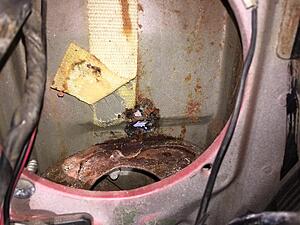
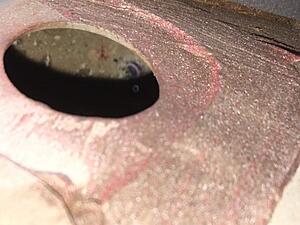
Close up of the aforementioned rust in the upper cowl:
Several penetrations, plus the vertical bit there should be solid. We shouldn't even be able to see in there at all!
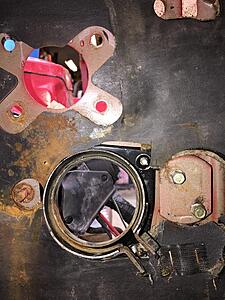
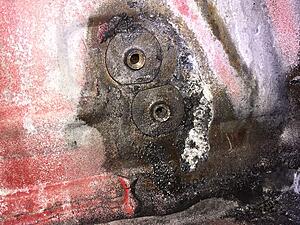
This is the same area on the other side (above the hinge, which also has some rust. More on that later.)
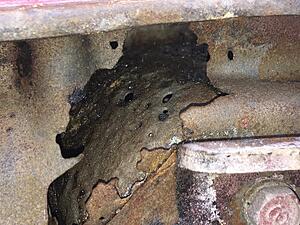
Inside of the cowl dust (up through the round hole. You can just see the penetrations. Must get a snake camera some day...)
I can't just stick the phone into the speaker hole, because there's another reinforcing bit above the speaker:
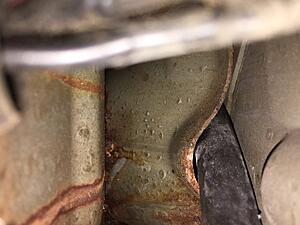
That black tube is the drain for the sunroof, going up into the A-pillar.
Needless to say, all of this got a coat of rust converter, and I'll probably slather POR15 all around, since I have a 6-pack of the little tins.
I attacked the stubs of the dead pedal bolts with vice-grips. One came out, one decided to be a bastard.
Fine. I ground it flat and flush with my Dremel, then drilled it out. Got a little off center. I tried to chip it out, but not lucky:
So I got it closer with a round file and a rotary file on the Dremel:
Then tapped it:
Done!
That rust there got wire brushed and converted, as well.
...and found more stuff that needs to be done (ugh.)
The targets for the weekend were the rust holes in the cowl, and the hole in the firewall for the EFI wiring.
With the fender off, the back side of the broken off bolts for the dead pedal were revealed, so I took that as a target of opportunity.

also hadn't noticed this rust hole near the door hinge:

This thing is rusting in the weirdest places. That one may be due to the reinforcing just below it on the other side:

But it's not even right up to it...
Close up of the aforementioned rust in the upper cowl:

Several penetrations, plus the vertical bit there should be solid. We shouldn't even be able to see in there at all!
This is the same area on the other side (above the hinge, which also has some rust. More on that later.)

Inside of the cowl dust (up through the round hole. You can just see the penetrations. Must get a snake camera some day...)

I can't just stick the phone into the speaker hole, because there's another reinforcing bit above the speaker:

That black tube is the drain for the sunroof, going up into the A-pillar.
Needless to say, all of this got a coat of rust converter, and I'll probably slather POR15 all around, since I have a 6-pack of the little tins.
I attacked the stubs of the dead pedal bolts with vice-grips. One came out, one decided to be a bastard.

Fine. I ground it flat and flush with my Dremel, then drilled it out. Got a little off center. I tried to chip it out, but not lucky:

So I got it closer with a round file and a rotary file on the Dremel:

Then tapped it:


Done!
That rust there got wire brushed and converted, as well.