
4-Rotor FB Build (side ports!!)


Joined: Mar 2001
Posts: 31,849
Likes: 3,238
From: https://www2.mazda.com/en/100th/
so maybe that means you drill a hole and pry?
 They look good! Great job Jeff!
Thread Starter
Joined: Aug 2001
Posts: 15,725
Likes: 91
From: Near Seattle
You're welcome! And now for some real pictures.
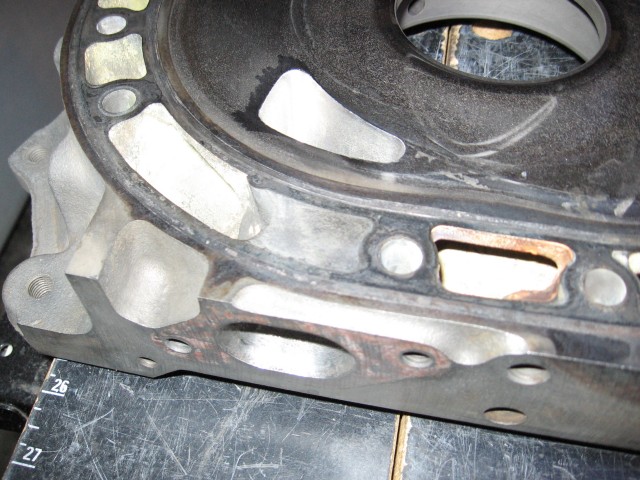
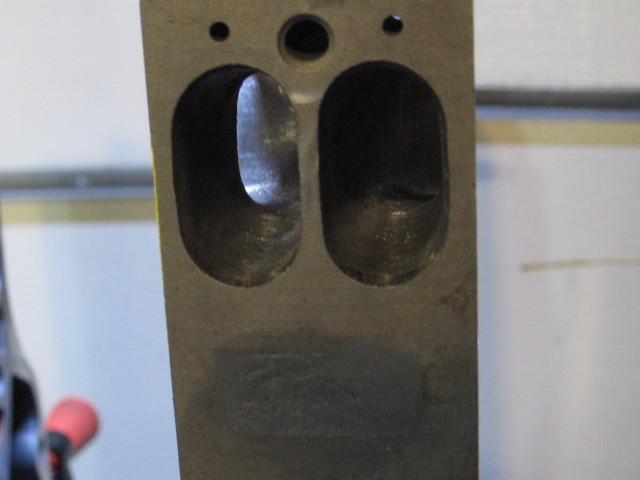
Let's start with the intake ports. Something I'm very proud of because I didn't know you could port GSL-SE primaries to 74 spec! Well not exactly 74 since the bottom won't extend as low due to the casting, but man what a difference in port area from stock!
I wonder if rotarygod... oh nevermind.
Finished port. Nice texture. Judge Ito closing side seal bevel is highlighted by the flash.
Without flash since it's hard to capture ports with my camera.
Fully 74 ported R5 rear iron. Cleaned up casting flash in the runner.

Thread Starter
Joined: Aug 2001
Posts: 15,725
Likes: 91
From: Near Seattle
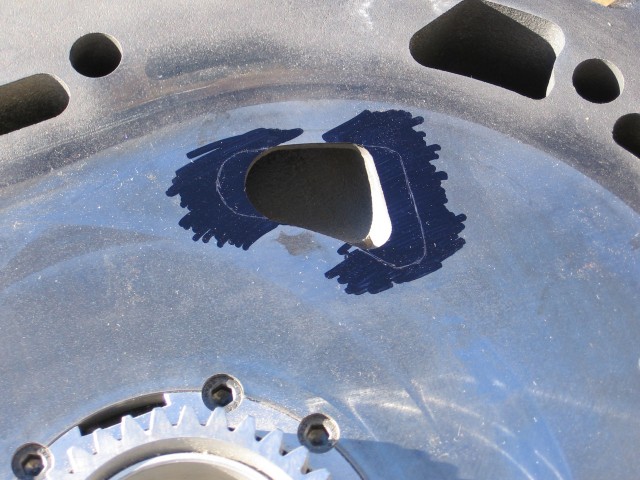
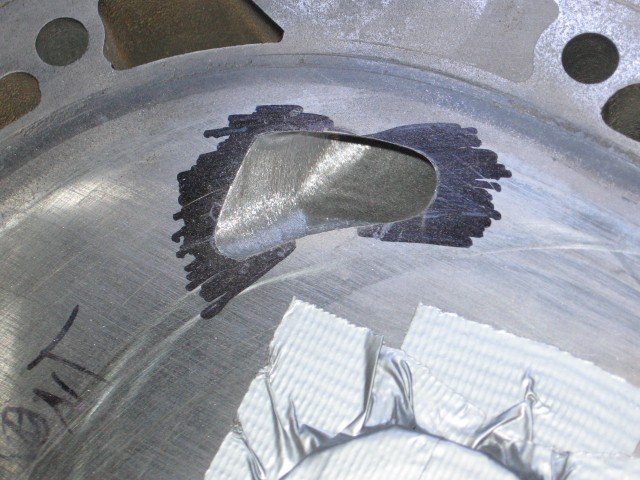
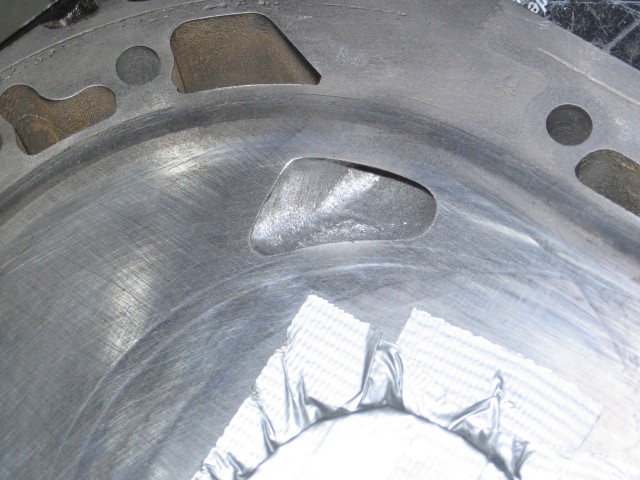
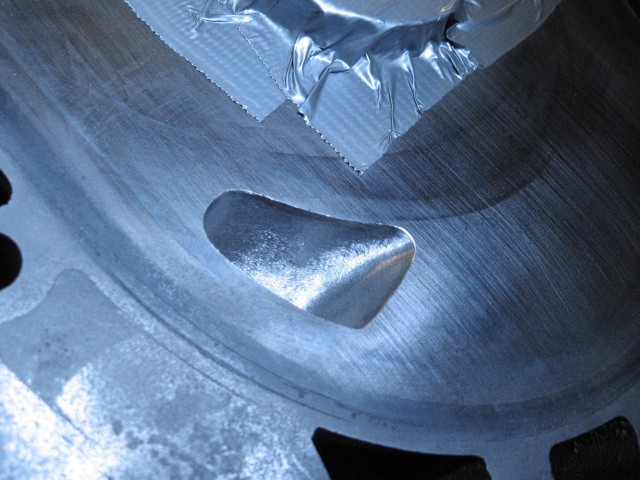
Filled in some pitting with quicksteel. It didn't leak but better to have something there, you know? Karack?
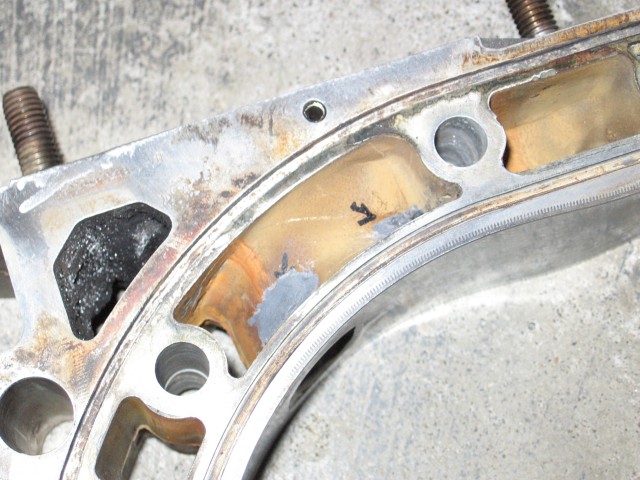
It looks kinda like 12AT spec. The odd shape is actually a reflection. The flash reflected off the clean metal and fresh "aluminum" paint so I had to make do with just LEDs.
Again without flash. That's a Judge Ito 2mm 45� bevel. It looks weird because of the angle. Open timing stayed stock. Closing timing was delayed a few degrees (ported upward until stock bevel was ground away, then recreated).
GSL-SE ACV port filled with quicksteel. Casting flash cleaned from runners, slightly hogged, then roughed. Necessary as these are primaries and need to flow well at low RPM.
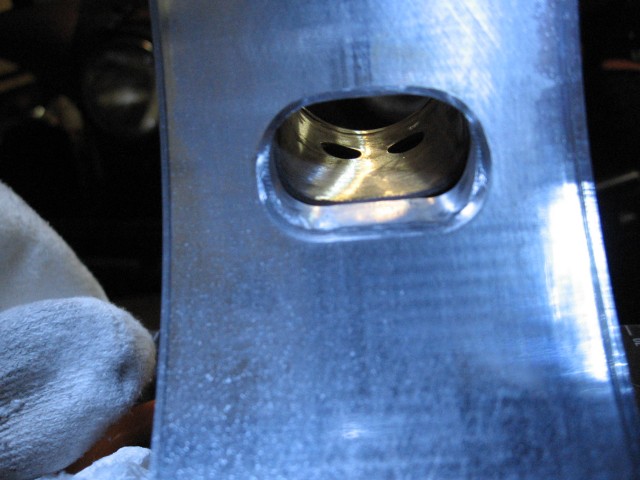
Looking at the plate above, I decided to drill/tap this common Y plate to eventually bolt a manifold to it. I had to drop the size down to 6mm x 1.00 (same as oil pan bolts) due to tall runners and lack of space. I then added two more threaded holes just under the ACV port. This will hold a block off plate until I can get someone to weld the intake manifold.
It looks kinda like 12AT spec. The odd shape is actually a reflection. The flash reflected off the clean metal and fresh "aluminum" paint so I had to make do with just LEDs.
Again without flash. That's a Judge Ito 2mm 45� bevel. It looks weird because of the angle. Open timing stayed stock. Closing timing was delayed a few degrees (ported upward until stock bevel was ground away, then recreated).
GSL-SE ACV port filled with quicksteel. Casting flash cleaned from runners, slightly hogged, then roughed. Necessary as these are primaries and need to flow well at low RPM.
Looking at the plate above, I decided to drill/tap this common Y plate to eventually bolt a manifold to it. I had to drop the size down to 6mm x 1.00 (same as oil pan bolts) due to tall runners and lack of space. I then added two more threaded holes just under the ACV port. This will hold a block off plate until I can get someone to weld the intake manifold.
Thread Starter
Joined: Aug 2001
Posts: 15,725
Likes: 91
From: Near Seattle
Originally Posted by PercentSevenC
Wow, those GSL-SE primary ports look like actual ports now. Instead of vacuum leaks.

Thread Starter
Joined: Aug 2001
Posts: 15,725
Likes: 91
From: Near Seattle
By the way, Percent, these exhaust ports follow the same recipe as the "Nice 12A". I guess the intakes kinda do too.
That engine with a full RB "streetport" exhaust and a light steel flywheel was probably the most fun or best FB setup I've ever driven... so far. I wonder how this 4 rotor will compare.
It's basically the same engine. Just kinda doubled, you know? Soon I can say:

That engine with a full RB "streetport" exhaust and a light steel flywheel was probably the most fun or best FB setup I've ever driven... so far. I wonder how this 4 rotor will compare.
It's basically the same engine. Just kinda doubled, you know? Soon I can say:
Thread Starter
Joined: Aug 2001
Posts: 15,725
Likes: 91
From: Near Seattle
Your GSL-SE already has too much port area! Then again, Mazdatrix says something about porting 6 ports you should read. I ported mine because I'm going carbed and don't have the too-much port area of aux ports.
Follow this link. http://www.mazdatrix.com/faq/port6p.htm
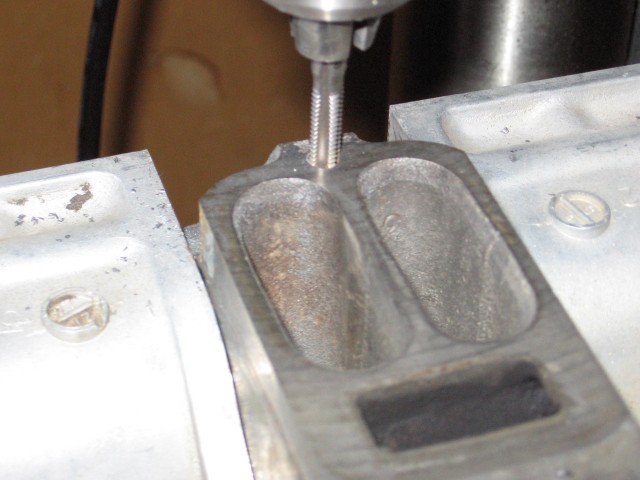
Interestingly, my port looks almost exactly like theirs. I used two templates to create my shape. The top is a normal 74 spec. The bottom is from a stock FD primary. I had to find out how low the curve was supposed to be with a caliper. Then layed the template over it and scribed. I did this four times. I didn't bother making a template as it's easy enough to recreate.
Follow this link. http://www.mazdatrix.com/faq/port6p.htm
Interestingly, my port looks almost exactly like theirs. I used two templates to create my shape. The top is a normal 74 spec. The bottom is from a stock FD primary. I had to find out how low the curve was supposed to be with a caliper. Then layed the template over it and scribed. I did this four times. I didn't bother making a template as it's easy enough to recreate.
Thread Starter
Joined: Aug 2001
Posts: 15,725
Likes: 91
From: Near Seattle
I hogged them lightly. The problem is where the runners start to curve into the port. There is less space than an end plate so it won't flow quite as well. I discovered this issue with the reverse runner manifold. Intermediate ports as secondaries can work, but not quite as well as end plates. Still better than p-ports for my purposes. haha
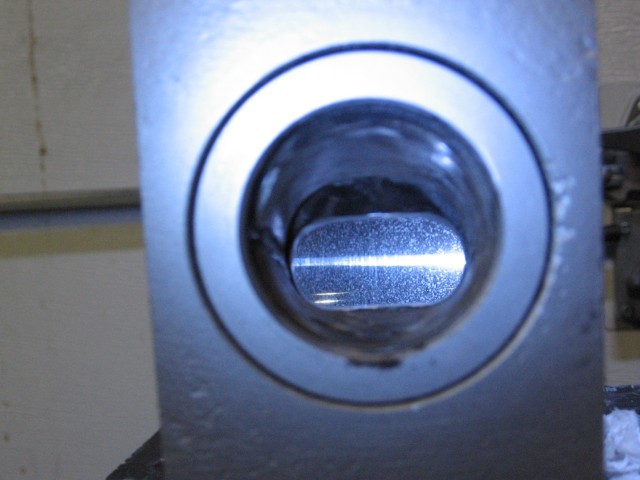
Progress update: front and rear stat gear oil holes have been enlarged and smoothed so the oil doesn't encounter a nasty edge. Front is installed. Rear needs a wash. Also quicksteel was squished into the remaining ACV port.
Progress update: front and rear stat gear oil holes have been enlarged and smoothed so the oil doesn't encounter a nasty edge. Front is installed. Rear needs a wash. Also quicksteel was squished into the remaining ACV port.
Thread Starter
Joined: Aug 2001
Posts: 15,725
Likes: 91
From: Near Seattle
Update: The tension bolts Jeff Bruce sells in these kits are too long! Others have complained of this on 26B kits as well. I had to shorten each one 9 to 10 mm and then make sure the cut end could thread back into the front plate. 18 bolts in all. Rather time consuming.
About 10 are done so far. I aimed for 484mm (243-244 normal 12A bolt length plus 240mm extra length). Some ended up at 383mm and others at 385mm. Most at 484. Good enough. I did ok, just using a sawsall.
Also two "M" bolts were included at like 500mm. Weird. So I chopped one to 494 and called it good. That's just 6mm. Very weird. I'll keep the spare as a curio.
Thread Starter
Joined: Aug 2001
Posts: 15,725
Likes: 91
From: Near Seattle
Sure, I'm well aware of the trick and have had some success with it in the past. But these are 1.00 thread pitch. I didn't have any steel nuts this fine. Only one brass nut from a choke or something. It was not up to the task so I had to just go for it the manual way. When I was done only about 2/5 of the bolt circumference in one thread had to be cleaned up with a tiny file and a box cutter blade. The steel winds up folding over itself within the thread from the grinding/wire wheeling.
Thread Starter
Joined: Aug 2001
Posts: 15,725
Likes: 91
From: Near Seattle
All the bolts are done and test fitted in the front plate. They all thread in well enough.
Next was to swap out the old wire type corner springs for some NF01s. I had one good used set and one practically new set. I hope the drag won't be more than a 20B. The NF01s last forever so they're like a set of new RX-8 springs at this point. Perfect.
Next up is to maybe block off the ACV holes in the rotor housings. I've never done it on a 12A before. Not sure it's necessary as all the ACV ports up under the intake runners have already been blocked with quicksteel. Hmm...
Joined: Mar 2001
Posts: 31,849
Likes: 3,238
From: https://www2.mazda.com/en/100th/
All the bolts are done and test fitted in the front plate. They all thread in well enough.
Next was to swap out the old wire type corner springs for some NF01s. I had one good used set and one practically new set. I hope the drag won't be more than a 20B. The NF01s last forever so they're like a set of new RX-8 springs at this point. Perfect.
Next up is to maybe block off the ACV holes in the rotor housings. I've never done it on a 12A before. Not sure it's necessary as all the ACV ports up under the intake runners have already been blocked with quicksteel. Hmm...
Next was to swap out the old wire type corner springs for some NF01s. I had one good used set and one practically new set. I hope the drag won't be more than a 20B. The NF01s last forever so they're like a set of new RX-8 springs at this point. Perfect.
Next up is to maybe block off the ACV holes in the rotor housings. I've never done it on a 12A before. Not sure it's necessary as all the ACV ports up under the intake runners have already been blocked with quicksteel. Hmm...
Thread Starter
Joined: Aug 2001
Posts: 15,725
Likes: 91
From: Near Seattle
That would be a good experiment to do at some point.
I've been playing with thoughts of how to stack the 4 rotor, lately. Jantore started with the rear int plate on his stand and built the front half, then flipped and added the rear rotor and tension bolts. That might be the way I'll have to build mine. But it's a question of how well I can fab up a cradle or just use the arms that came with my engine stand.
I got away with only two arms and two 10mm bolts on the 20B's thick intermediate. But it was designed for engine stacking. The GSL-SE int plate wasn't. Those were designed as motor mounts for the HB Cosmo and HC Luce. However the 4 rotor will use two arms per two int plates spread out. It could work. The bolts are 12mm, also.
Just gotta fab up some steel bars to lock the rear into to the front iron to allow flipping. Also gotta center the arms so as the plates are added and start to get tight, there's enough clearance. I think if I support the edge corner of the front plate with a 2x4 and a scizzor jack, I can safely loosen one set of engine stand bolts while the tension bolts get torqued. Then tighten up again to flip and start on the front cover stack.
Lots to pay attention to during the build process.
I've been playing with thoughts of how to stack the 4 rotor, lately. Jantore started with the rear int plate on his stand and built the front half, then flipped and added the rear rotor and tension bolts. That might be the way I'll have to build mine. But it's a question of how well I can fab up a cradle or just use the arms that came with my engine stand.
I got away with only two arms and two 10mm bolts on the 20B's thick intermediate. But it was designed for engine stacking. The GSL-SE int plate wasn't. Those were designed as motor mounts for the HB Cosmo and HC Luce. However the 4 rotor will use two arms per two int plates spread out. It could work.
The bolts are 12mm, also.Just gotta fab up some steel bars to lock the rear into to the front iron to allow flipping. Also gotta center the arms so as the plates are added and start to get tight, there's enough clearance. I think if I support the edge corner of the front plate with a 2x4 and a scizzor jack, I can safely loosen one set of engine stand bolts while the tension bolts get torqued. Then tighten up again to flip and start on the front cover stack.
Lots to pay attention to during the build process.
Joined: Mar 2001
Posts: 31,849
Likes: 3,238
From: https://www2.mazda.com/en/100th/
here is how they do the 787B... its not sped up either, they actually rebuilt the car in 3 minutes...
notice please @1:38 where the guy grabs the shaft and moves in and out, jealous? yes
http://www.youtube.com/watch?v=mzJGFBJlJrc
notice please @1:38 where the guy grabs the shaft and moves in and out, jealous? yes
http://www.youtube.com/watch?v=mzJGFBJlJrc