
1984 GS RX-7 12a College Student Build on a Budget

Thread Starter
Joined: Aug 2011
Posts: 3,078
Likes: 42
From: Cambridge, Minnesota
Alright guys, I�ve just passed the 1yr mark on owning the RX-7 so I think it�s time for a build thread.
I�ll try not to be too long-winded here but I want to explain myself well enough to make it interesting. Please post any suggestions and helpful comments � they are welcome. Enjoy!
I will write this in a month-by-month basis, with pictures and stories aplenty. You will notice there are months of absence � those months indicate a lack of funding or build time. I will try to keep this updated as often as possible.
The Purchase
I had been looking into getting a car for a few months, as I had to sell my truck so I could get a laptop for college. My girlfriend�s grandpa likes me, and he heard that I was looking at getting a car. Little did I know�
I first saw pictures of the car on Sunday morning after my girlfriend said her grandpa had picked up �an old Mazda� for me at an auction on Saturday. I couldn�t believe my eyes, I knew that it was an old RX-7 but had never seen one in person.


I freaked out and showed my brother, and went to see the car that day. We decided on a purchase price, a payment agreement, he gave me the title and it was mine!
She had 77,181.2mi on the odometer at time of purchase.
YEAR ONE � IT BEGINS
I�ll try not to be too long-winded here but I want to explain myself well enough to make it interesting. Please post any suggestions and helpful comments � they are welcome. Enjoy!
I will write this in a month-by-month basis, with pictures and stories aplenty. You will notice there are months of absence � those months indicate a lack of funding or build time. I will try to keep this updated as often as possible.
The Purchase
I had been looking into getting a car for a few months, as I had to sell my truck so I could get a laptop for college. My girlfriend�s grandpa likes me, and he heard that I was looking at getting a car. Little did I know�
I first saw pictures of the car on Sunday morning after my girlfriend said her grandpa had picked up �an old Mazda� for me at an auction on Saturday. I couldn�t believe my eyes, I knew that it was an old RX-7 but had never seen one in person.
I freaked out and showed my brother, and went to see the car that day. We decided on a purchase price, a payment agreement, he gave me the title and it was mine!
She had 77,181.2mi on the odometer at time of purchase.
YEAR ONE � IT BEGINS


Thread Starter
Joined: Aug 2011
Posts: 3,078
Likes: 42
From: Cambridge, Minnesota
Thread Starter
Joined: Aug 2011
Posts: 3,078
Likes: 42
From: Cambridge, Minnesota
When I bought it I knew that either the clutch master cylinder or slave cylinder was shot � since the clutch wouldn�t engage. I got lucky in that there was an 85 GS in a junkyard only 20min from my house. My girlfriend�s dad and I went and ripped the master and slave from it, swapped just the master in, and she worked!
Changed the oil to Valvoline 5w-30 Syn-Power full synthetic motor oil (stupid, I know).
Got 4 NGK BR8EQ-14 plugs for the car, since I knew they needed to be changed. Almost went with the Autolites from O�Reilly but I�m glad I didn�t. Bye bye rotary wishes had I put those in.
I took the pictures that follow and had some awesome results...


I landed in the January spot of the RX-7 Club 2012 FB calendar!


Changed the oil to Valvoline 5w-30 Syn-Power full synthetic motor oil (stupid, I know).
Got 4 NGK BR8EQ-14 plugs for the car, since I knew they needed to be changed. Almost went with the Autolites from O�Reilly but I�m glad I didn�t. Bye bye rotary wishes had I put those in.
I took the pictures that follow and had some awesome results...
I landed in the January spot of the RX-7 Club 2012 FB calendar!
Thread Starter
Joined: Aug 2011
Posts: 3,078
Likes: 42
From: Cambridge, Minnesota
===SEPTEMBER 2011===
I knew the tires were getting bad. I didn�t have any idea how bad though.
I ended up at work with a flat tire, which I swapped out for the donut and drove it home. I had my dad bring it to a tire chain that has always given us good business and had to get all 4 new tires. They did a buy 3 get one free deal, which was awesome and very much appreciated.
I got 4 General Altimax 175/70R-13 tires and have been pleasantly impressed with them. Since they are all-season tires, they are not the best in grip or performance. At all. But still a fun set of tires to drive around in.
===OCTOBER 2011===
Didn�t do anything but have my 18th birthday
===NOVEMBER 2011===
Put the car away in the garage at my grandparents� house since my house doesn�t have any place to store it�or any garage at all. Gotta do what ya gotta do.
It had a coolant leak at time of storage, with a pretty good oil leak from the beehive oil cooler area � assuming O-rings.
She had 81,149mi on clock at time of storage � so 2,967mi in a fall. Not bad for a few months.
===DECEMBER 2011===
After Christmas I got an S4 80amp alternator from Rotorhead_Izzy here on the forum. He had it bench tested at 14.7V before he sold it to me and it still works perfectly.
I also purchased an S5 oil filter pedestal from Izzy at the same time, to start getting parts for my beehive FB oil cooler to FC FMOC swap.

===JANUARY 2012===
Purchased a Brake Best rebuild kit for the master clutch cylinder and slave clutch cylinder from O�Reilly
I also got all the stuff necessary to do the rat�s nest removal around the same time.

===FEBRUARY 2012===
This was a big month for the parts hunter in me.
I bought 35% VLT window tint off of eBay. Yes, eBay. I researched it out and bought the best quality tint I could buy. Went on well, looks nice and black (none of that purple nastiness), and still looks awesome to this day. I only did the driver and passenger windows as I couldn�t get the rear hatch down right.


I also got a Haynes manual for 1978 � 1985 Mazda RX-7�s and have been impressed with it. I�m glad that I bought it.


This is essentially what the motor looked like after the alternator swap and GMB water pump install.
I knew the tires were getting bad. I didn�t have any idea how bad though.
I ended up at work with a flat tire, which I swapped out for the donut and drove it home. I had my dad bring it to a tire chain that has always given us good business and had to get all 4 new tires. They did a buy 3 get one free deal, which was awesome and very much appreciated.
I got 4 General Altimax 175/70R-13 tires and have been pleasantly impressed with them. Since they are all-season tires, they are not the best in grip or performance. At all. But still a fun set of tires to drive around in.
===OCTOBER 2011===
Didn�t do anything but have my 18th birthday
===NOVEMBER 2011===
Put the car away in the garage at my grandparents� house since my house doesn�t have any place to store it�or any garage at all. Gotta do what ya gotta do.
It had a coolant leak at time of storage, with a pretty good oil leak from the beehive oil cooler area � assuming O-rings.
She had 81,149mi on clock at time of storage � so 2,967mi in a fall. Not bad for a few months.
===DECEMBER 2011===
After Christmas I got an S4 80amp alternator from Rotorhead_Izzy here on the forum. He had it bench tested at 14.7V before he sold it to me and it still works perfectly.
I also purchased an S5 oil filter pedestal from Izzy at the same time, to start getting parts for my beehive FB oil cooler to FC FMOC swap.
===JANUARY 2012===
Purchased a Brake Best rebuild kit for the master clutch cylinder and slave clutch cylinder from O�Reilly
I also got all the stuff necessary to do the rat�s nest removal around the same time.
===FEBRUARY 2012===
This was a big month for the parts hunter in me.
I bought 35% VLT window tint off of eBay. Yes, eBay. I researched it out and bought the best quality tint I could buy. Went on well, looks nice and black (none of that purple nastiness), and still looks awesome to this day. I only did the driver and passenger windows as I couldn�t get the rear hatch down right.
I also got a Haynes manual for 1978 � 1985 Mazda RX-7�s and have been impressed with it. I�m glad that I bought it.
This is essentially what the motor looked like after the alternator swap and GMB water pump install.
Thread Starter
Joined: Aug 2011
Posts: 3,078
Likes: 42
From: Cambridge, Minnesota
===FEBRUARY 2012 CONTD===
Here’s where my crafty side shows. I bought 2 square yards of red marine vinyl. For what you might ask. To redo the crappy looking upper vinyl on the door panel I would reply. After 30yrs of abuse and misuse, they had warped and looked really crappy.
Then I got a 14” 1800CFM electric fan on eBay with a 180degF thread in probe thermostat.

I got a GMB water pump off of eBay. Again.
Me = happy
Wallet = unhappy
Girlfriend = ….well, you know
===MARCH 2012===
Then I got a Kenwood KDC-MP735U single-din deck with 2 100W 4” speakers to fill out the front of the sound system.
I ended up getting an Autometer Ultra Lite Air/Fuel Ratio gauge from Rotorhead_Izzy on the forum to match the other two gauges I already had. I ended up selling it, as it was darn near pointless on a car with no true O2 sensor.

Autometer Ultra Lite water temp gauge with sender, Autometer Ultra Lite oil pressure gauge from beefhole here on the forum.
Then I had to buy the gauge sensor and copper line on eBay to hook it up, as well as another 10’ role of window tint to try to do the back window.


I finished buying stuff to complete rat’s nest removal on the car.
===APRIL 2012===
Purchased 2 Kenwood 180W 6 �” speakers to fill out the rear. Happy with the selection to this day.


===MAY 2012===
I took her out for a trip to the zoo with the girlfriend as a “getting out and stretching her legs after a long winter drive” and she did just fine
Replaced the fuel filter and thermostat and all belts were new at this point.


Here’s where my crafty side shows. I bought 2 square yards of red marine vinyl. For what you might ask. To redo the crappy looking upper vinyl on the door panel I would reply. After 30yrs of abuse and misuse, they had warped and looked really crappy.
Then I got a 14” 1800CFM electric fan on eBay with a 180degF thread in probe thermostat.
I got a GMB water pump off of eBay. Again.
Me = happy
Wallet = unhappy
Girlfriend = ….well, you know
===MARCH 2012===
Then I got a Kenwood KDC-MP735U single-din deck with 2 100W 4” speakers to fill out the front of the sound system.
I ended up getting an Autometer Ultra Lite Air/Fuel Ratio gauge from Rotorhead_Izzy on the forum to match the other two gauges I already had. I ended up selling it, as it was darn near pointless on a car with no true O2 sensor.
Autometer Ultra Lite water temp gauge with sender, Autometer Ultra Lite oil pressure gauge from beefhole here on the forum.
Then I had to buy the gauge sensor and copper line on eBay to hook it up, as well as another 10’ role of window tint to try to do the back window.
I finished buying stuff to complete rat’s nest removal on the car.
===APRIL 2012===
Purchased 2 Kenwood 180W 6 �” speakers to fill out the rear. Happy with the selection to this day.
===MAY 2012===
I took her out for a trip to the zoo with the girlfriend as a “getting out and stretching her legs after a long winter drive” and she did just fine
Replaced the fuel filter and thermostat and all belts were new at this point.
Trending Topics
Thread Starter
Joined: Aug 2011
Posts: 3,078
Likes: 42
From: Cambridge, Minnesota
Random stuff I thought I'd share
Some random fun pics of things I'd like to share

Pile of parts I pulled from a parts 7 in a salvage yard

Hot Wheels collection

Nikki carb float - bought it on accident and I'm definitely keeping it

Fix for the dimmer light not working haha


Rats nest redone with silicon hose

Install of switch for fan as a failsafe
Pile of parts I pulled from a parts 7 in a salvage yard
Hot Wheels collection
Nikki carb float - bought it on accident and I'm definitely keeping it
Fix for the dimmer light not working haha
Rats nest redone with silicon hose
Install of switch for fan as a failsafe
Thread Starter
Joined: Aug 2011
Posts: 3,078
Likes: 42
From: Cambridge, Minnesota
===JUNE 2012===
Not much was done, just kept driving her and putting time and effort into keeping her clean and happy.
===JULY 2012===
Same as June.
===AUGUST 2012===
Well, I officially started college here at the University of Minnesota � Twin Cities. I�m in the College of Science and Engineering studying Mechanical Engineering with hopes of becoming an engineer for an auto company as it is where my passion is at.
I bought a replacement for the 7 so she doesn�t have to see winter and stay in storage again.
===SEPTEMBER 2012===
Ok, now we�re caught up!


This is what my engine bay looks like right now, pretty satisfied with it
I�m putting the finishing touches on this in a computer lab at college � I know, naughty me! � but it�s so much nicer typing on a true keyboard with a 24� monitor than my little 14� flat-keyboard laptop
Not much was done, just kept driving her and putting time and effort into keeping her clean and happy.
===JULY 2012===
Same as June.
===AUGUST 2012===
Well, I officially started college here at the University of Minnesota � Twin Cities. I�m in the College of Science and Engineering studying Mechanical Engineering with hopes of becoming an engineer for an auto company as it is where my passion is at.
I bought a replacement for the 7 so she doesn�t have to see winter and stay in storage again.
===SEPTEMBER 2012===
Ok, now we�re caught up!
This is what my engine bay looks like right now, pretty satisfied with it
I�m putting the finishing touches on this in a computer lab at college � I know, naughty me! � but it�s so much nicer typing on a true keyboard with a 24� monitor than my little 14� flat-keyboard laptop
Thread Starter
Joined: Aug 2011
Posts: 3,078
Likes: 42
From: Cambridge, Minnesota
Ok, ideas on this??


This is where she sits as of right now. I need some opinions on what to do in this spot. I liked having the triple gauges but I took the Oil Pressure and Oil Temp out as they aren't truly necessary right now, and I'll be getting better gauges in the future for the 7.
The plan is to get a different Auto Meter set of Oil Temp, Oil Pressure, and Water Temp gauges to have in the car while racing.
As the car will become a weekend racer and part time auto-x car next summer, should:
1. I shop for a better set of gauges and install them back where they were?
2. Put a pocket underneath the stereo to house phones, music players, the stereo remote, random crap that gets shoved in there?
3. Put one gauge down there, then mount some others up higher?
4. Put the radio lower with the gauges on the top (where the stereo is now)?
Interested in options, feel free to share!
Full Member
Joined: Apr 2012
Posts: 167
Likes: 0
From: aurora
man nice updates sir. pics of the new rats ness cleaned up and on the car?
my idea would be to cut what you are never going to use . and zip tie togethor what you are, but bundle them
my idea would be to cut what you are never going to use . and zip tie togethor what you are, but bundle them
Last edited by J-LISS; Sep 13, 2012 at 01:03 PM.
Thread Starter
Joined: Aug 2011
Posts: 3,078
Likes: 42
From: Cambridge, Minnesota
 I took some and swore I had them on the computer and I'm just not seeing them right now. I'll find, or take, some and put em up - I love the way it looks after being redone.
But, after this winter and doing a header and exhaust, with possibly a rebuild there will probably be no more rat's nest - again. So it will just be a pretty, ratty nest of hose until I figure out if I should sell it or keep it for the next 7

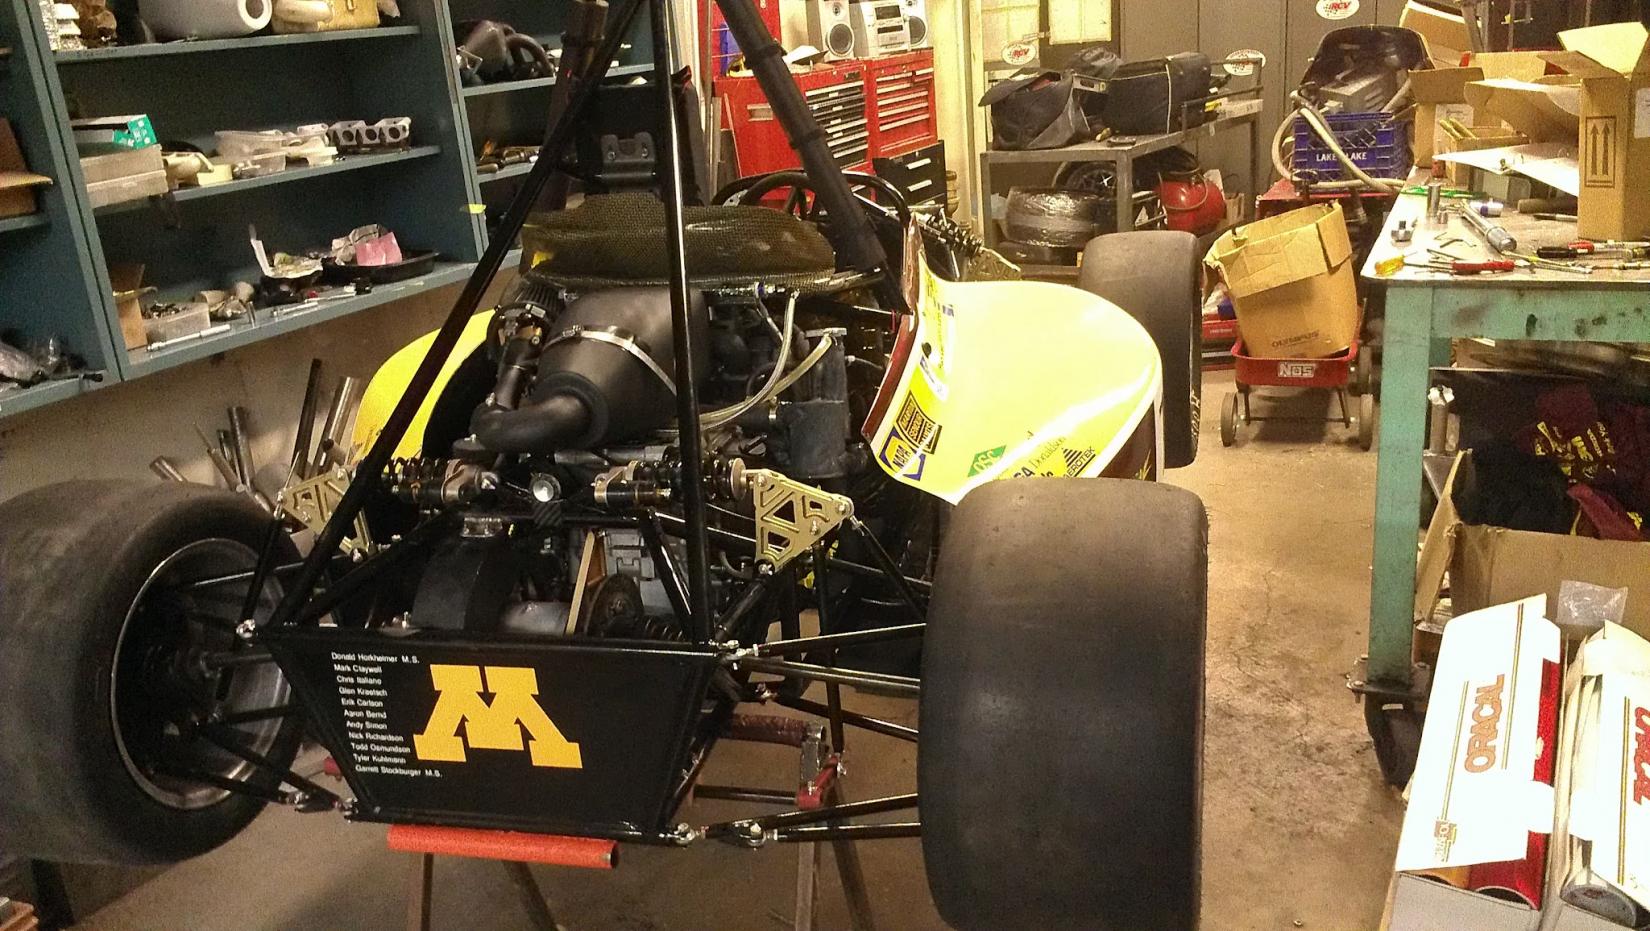
Here's the new project car I'm working on, check her out
University of Minnesota - Twin Cities Formula SAE
Hey, I just saw this thread and I love it! I'm 17 and building my '85 GS (albeit for different purposes) and have owned 4 first gens over the past couple years. Even further, I plan on starting my college career a the University of Alabama for...wait for it... Mechanical engineering. 
Anyway, keep up the good work!
Anyway, keep up the good work!
Thread Starter
Joined: Aug 2011
Posts: 3,078
Likes: 42
From: Cambridge, Minnesota
Hey, I just saw this thread and I love it! I'm 17 and building my '85 GS (albeit for different purposes) and have owned 4 first gens over the past couple years. Even further, I plan on starting my college career a the University of Alabama for...wait for it... Mechanical engineering.
Anyway, keep up the good work!
Anyway, keep up the good work!
Well, here's what I've done recently.
I went to a local salvage yard and saw two 7's sitting there ready for picking. One was an 84 GSL and the other was a 83. The GSL was mostly complete - probably a blown engine or trans.
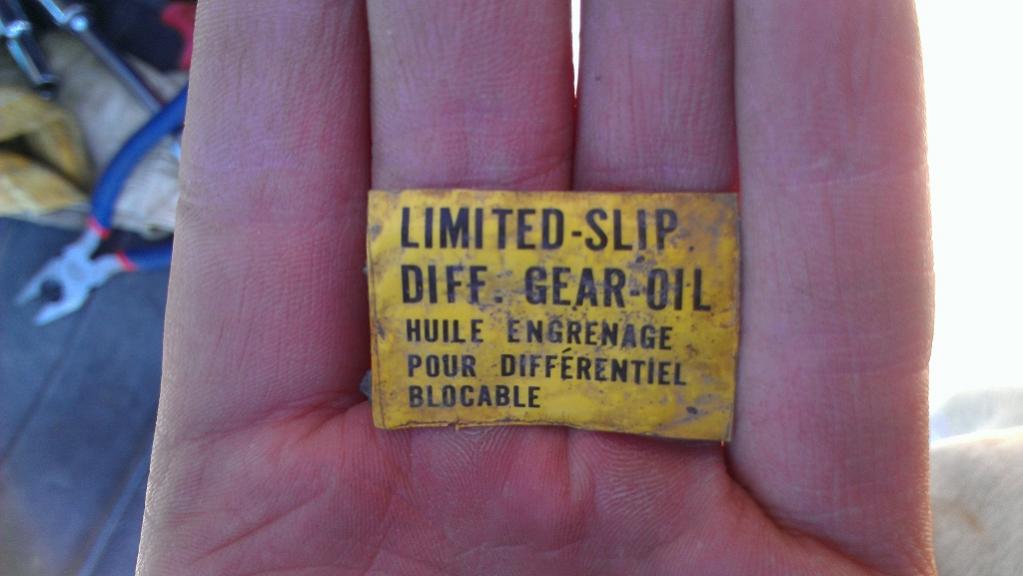
I've always wanted a GSL or SE rear end, SE I would have to swap out the front as well, so I could have an LSD rear axle.
I saw it on Tuesday when I went looking for parts for my current DD and knew I'd be back for the rear axle. I came back on Thursday and spent 3 hours on it and couldn't bust it loose since those ridiculous parking brake lines are somehow crimped to the frame! And, there was one stuck bolt on a control arm on the driver's side. I went back on Friday with my dad and a set of bolt cutters and some other tools I didn't have on Thursday. We got it free
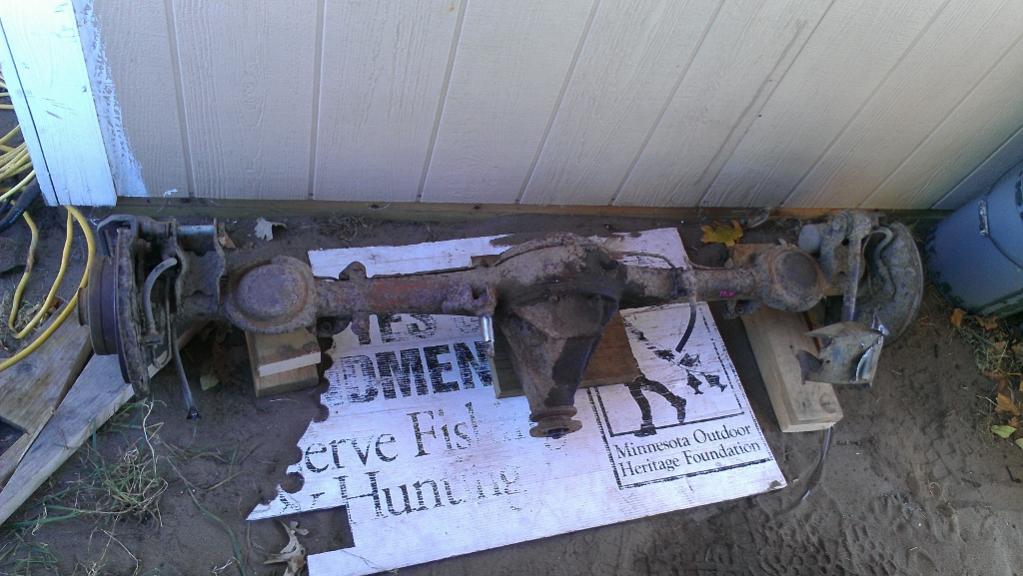
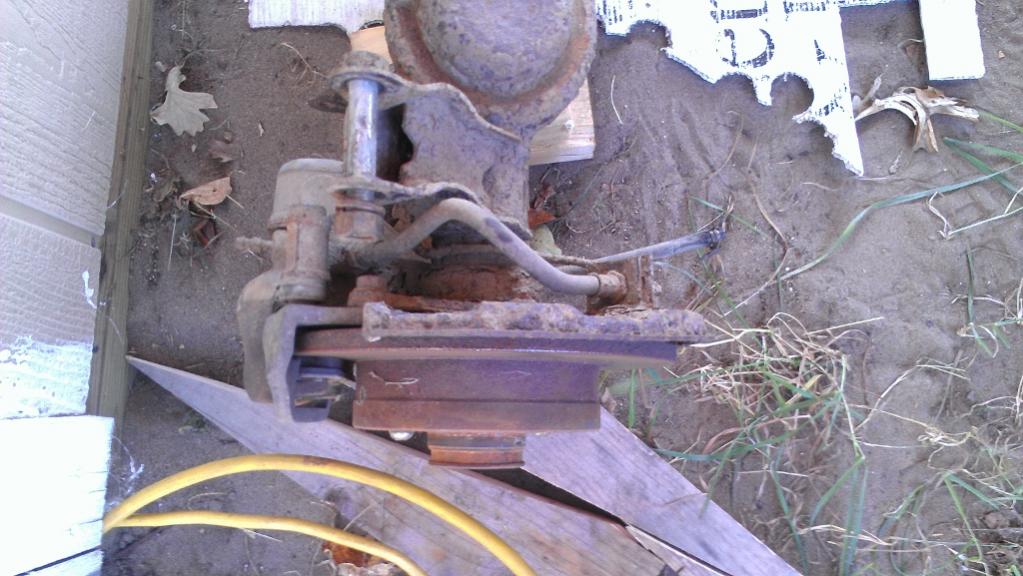
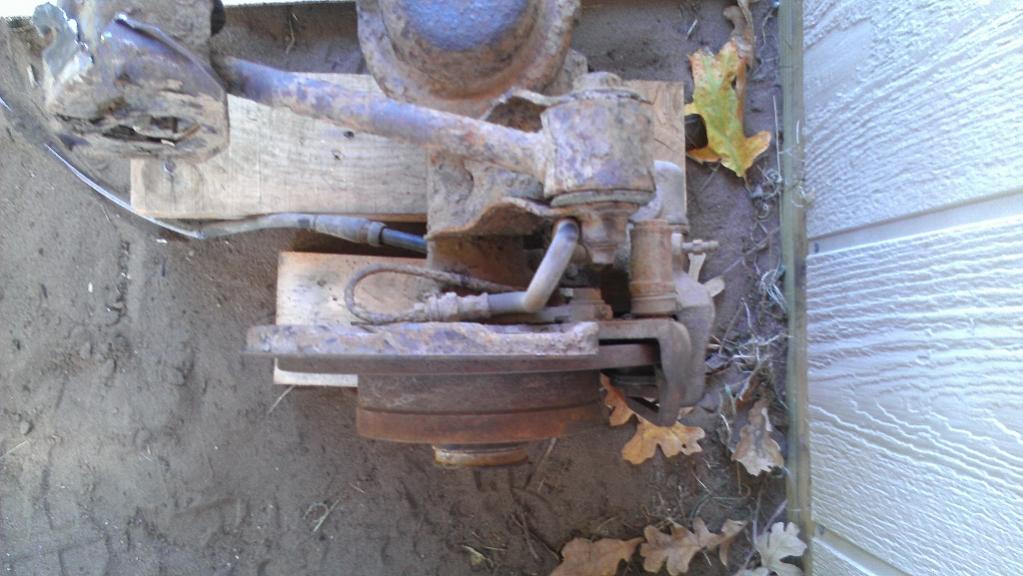
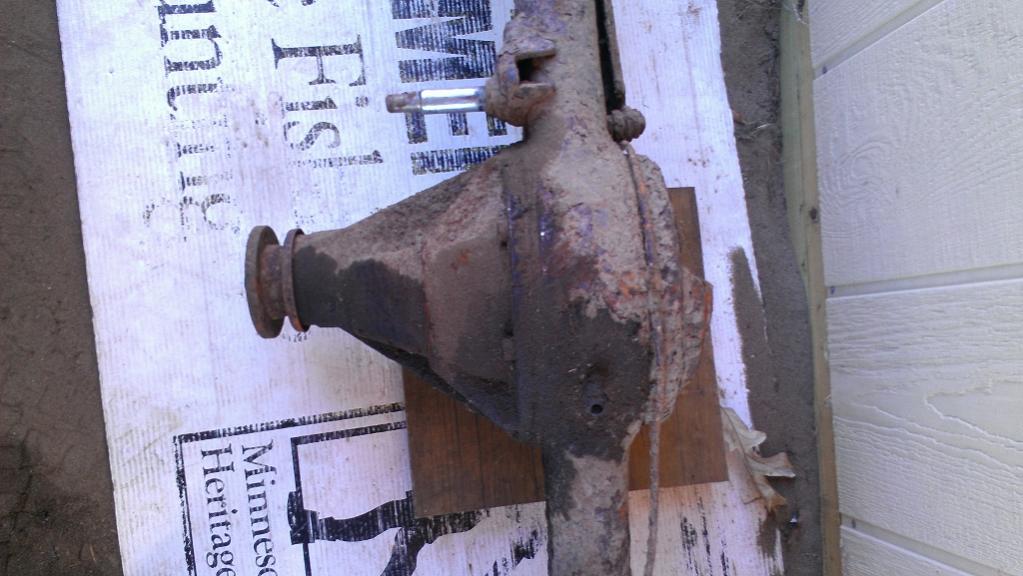
Best part was, when my dad went with on Friday to help me get it out - he ended up buying it for me! My birthday was on Wednesday so he got it for me for my birthday and that was awesome.
Working on a huge list of parts I'll need to put this beast in my car - bushings, brake parts, stuff like that.
Will definitely be worth it

Thread Starter
Joined: Aug 2011
Posts: 3,078
Likes: 42
From: Cambridge, Minnesota
I'm getting some 83 LE rims from Jager with my tax return so I'm stoked about that, and I can keep the full suspension. Hopefully investing in some Tokico blues with RB springs, and some performance 14x6 tires on the LE's - hopefully hit some auto crosses next summer.Nice to hear from ya
FWIW, those e-brake cables that run through the frame rails pass through rubber grommets. Pop the grommets out with a big flathead screwdriver (on both sides of the framerails) and detach the cables from the cables and e-brake handle, and they should come right out. Make sure to mark which side goes to which, because they a different lengths! Don't ask why I know that... 
Thread Starter
Joined: Aug 2011
Posts: 3,078
Likes: 42
From: Cambridge, Minnesota
Dangit! Thanks for the info - it's greatly appreciated. But I cut those darn things so now I have to order new ones  Ah well, new is always nice too I guess. $50 that could be put somewhere else though, that's the part that sucks.
I'm doing some heavy research into my new suspension this winter right now - shocks, springs, bushings, bearings, seals, etc. - which is fun to fantasize about but sucks to do the math.
Ah well, new is always nice too I guess. $50 that could be put somewhere else though, that's the part that sucks.I'm doing some heavy research into my new suspension this winter right now - shocks, springs, bushings, bearings, seals, etc. - which is fun to fantasize about but sucks to do the math.

the parking brake cables never come free from the front section. they are secured to the front section using a metal pin with a cotter pin. the parking brake cables have a pot metal teardrop shaped eyelit that the pin goes through. the pins always seize in the elelit sections. a minor amount of heat and some seafoam or pb blaster helps loosen the metal pin. often times though the pins will refuse to budge.
the cables are held onto the bottom of the car by a series of tabs. the cables run through small plastic cylindrical sections that are then secured to the body by the metal tab.
on the rear end, did you note what model year 7 the rear end came from? if it a pre 83 it will be the small bearing and small flanged unit. where this applies the most is to the size of the flange. your car has the larger flanged differential. if it is in fact from an S2, you will need the smaller falnged driveshaft.
Thread Starter
Joined: Aug 2011
Posts: 3,078
Likes: 42
From: Cambridge, Minnesota
the parking brake cables never come free from the front section. they are secured to the front section using a metal pin with a cotter pin. the parking brake cables have a pot metal teardrop shaped eyelit that the pin goes through. the pins always seize in the elelit sections. a minor amount of heat and some seafoam or pb blaster helps loosen the metal pin. often times though the pins will refuse to budge.
the cables are held onto the bottom of the car by a series of tabs. the cables run through small plastic cylindrical sections that are then secured to the body by the metal tab.
the cables are held onto the bottom of the car by a series of tabs. the cables run through small plastic cylindrical sections that are then secured to the body by the metal tab.
on the rear end, did you note what model year 7 the rear end came from? if it a pre 83 it will be the small bearing and small flanged unit. where this applies the most is to the size of the flange. your car has the larger flanged differential. if it is in fact from an S2, you will need the smaller falnged driveshaft.
Looking at the Kia swap now, thanks alot FunK...
4.78's mmmm..... Always wanted to do that swap on mine, not sure if you would run into issues with them being too short in a street car though?
Always wanted to do that swap on mine, not sure if you would run into issues with them being too short in a street car though?
Last edited by 84 GSL; Oct 17, 2012 at 04:47 PM. Reason: sp.
Thread Starter
Joined: Aug 2011
Posts: 3,078
Likes: 42
From: Cambridge, Minnesota
not sure if it would go in a GSL rear end though..if I did it there would be a necessary s4 or s5 tranny swap to try and get RPMs down while cruising. the car won't get driven too much though - so it could be beneficial to do both swaps for the races