Seth's 94 SSM R2 "Resto-mod" Build Thread

Thread Starter
I Raise Chickens
Joined: Jul 2001
Posts: 1,219
Likes: 35
From: Half Moon Bay, CA
that sucks! i know the feeling of relief though, when you figure out the source of the frustration. are you buying NEW injectors, or remans? also, did you considering a cleaning service? people seem to have good luck with sending the injectors off for cleaning, and most send back flow analysis sheets.
The motor (and injectors) had 90k on it and had turned that brownish color (no longer blueish/purple). For as old as they were, I wanted to replace with new in-lieu of sending them out cleaning. If they had less mileage, would have considered cleaning. However, at the time Mazda was out of stock and every vendor I called had no stock of the denso injectors. So I made my first mistake: bought a set of used low-mileage injectors so I could get the motor done. Then I made my second mistake: did not send them out for cleaning OR bench test them. I threw them in and put the motor in the car. And they were both bad

Lesson (do not do what I did): if you get a used set of injectors, always send them out for cleaning and flow testing (great advice as mentioned by jacobcartmill)
Some silver linings: The injectors are now available from Mazda (around $200 each, not terrible), so I am going that route. P/N N3A1-13-250. Injectors will be here on Monday. I also learned a few tricks, like making some of the vacuum lines a tad bit longer to make the upper intake manifold easier to take on and off. Also feel much more proficient at troubleshooting fuel injection issues after this! Been using the extra downtime to replace all the rear suspension bushings, which is a dirty, time consuming job as many of you already know!
Thanks again for everyone following this thread. Its no-where near as cool as some of the build threads here. Will post up some more pictures and progress this weekend.


Thread Starter
I Raise Chickens
Joined: Jul 2001
Posts: 1,219
Likes: 35
From: Half Moon Bay, CA
In the box sitting in the attic hahaha. I bought a bunch of new oem parts to freshen up the exterior and interior. Been waiting to get this darn thing running first.
Thread Starter
I Raise Chickens
Joined: Jul 2001
Posts: 1,219
Likes: 35
From: Half Moon Bay, CA
Drove it to the gas station last night, was hilariously scary. My quick eyeball alignment was so far off that it felt like the right and left rear tires were playing tug of war with one-another. Was not as bad as when J9FD3S and I did the suspension on the 323GTX and there was so much negative camber and toe in the front that the front tires hopped instead of rolled. lol
Needless to say, not freeway ready. But the engine and transmission felt great. Starts hot and cold, cruised nicely, boosted smooth. Pleasantly surprised with how it runs. Tonight I bring out the string and do a proper DIY alignment.
Needless to say, not freeway ready. But the engine and transmission felt great. Starts hot and cold, cruised nicely, boosted smooth. Pleasantly surprised with how it runs. Tonight I bring out the string and do a proper DIY alignment.
So, obviously you're boosting her right out of the box. Any thoughts on limiting your boost levels for the first 1000 miles or so? Does the OEM shop manual give any "recommendations"?
Thread Starter
I Raise Chickens
Joined: Jul 2001
Posts: 1,219
Likes: 35
From: Half Moon Bay, CA
Gives me plenty of time to freshen up things. Just installed a new (to me) steering wheel, pics soon

Thread Starter
I Raise Chickens
Joined: Jul 2001
Posts: 1,219
Likes: 35
From: Half Moon Bay, CA
Tim's post got my curious, so I pulled together some guidelines around break-in procedures:
Racing Beat's Guidelines
For the first 1000 miles do not accelerate under full throttle.
During the first 1000 miles do not exceed 4000 RPM.
For miles 1000-2000, expand the RPM upwards - but do not accelerate at full throttle.
Over 2000 miles, full throttle and high RPM is acceptable.
In summary, our guidelines offer a progressive method to increase the working loads placed on the engine.
Mazda Motorsports Guidelines
ENGINE BREAK-IN PROCEDURES:
"A proper and careful break-in period for a newly rebuilt engine is extremely important. The break-in procedures listed on the following page may seem excessive. However, an engine that has been broken in properly will see more power across the engine’s rpm range and longer service life than a comparable engine that has not. If using the old bearings, please note the difference in hours and mileage requirements for the break-in period.When breaking in any engine (race or stock), use a low ash content, mineral-based racing oil (20 w or 30 w). After the break-in period, change to a mineral or synthetic racing oil (30 w or 40 w)."
RACE ENGINE BREAK-IN PROCEDURES:
"Using a dynamometer for engine break-in is preferred. If you do not have access to a 'Dyno,' use the mileage break-in figures on the next page. The engine should first be run at idle for 30-45 minutes. During this time, be sure to check for leaks and keep an eye on the gauges. Ideally, for the first 100miles (depending on use of new or used bearings), avoid operating the engine above 5000 rpm or under heavy load.From 100-200 miles, gradually increase rpm, but never allow the engine to approach red line. Beyond 200 miles we recommend only short bursts of power approaching red line for 100 miles. At this point, change the break-in engine oil. The engine break-in period is now complete."
TIME AND MILEAGE RECOMMENDATIONS:
............................DYNO HRS..................................MILEAGE
RPM.......New Bearings.....Old Bearings.........New Bearings.....Old Bearing
1500......0.5....................----......................----....................----
2000......0.5....................0.5.............. ........----....................----
2500......0.5....................----......................----....................----
3000......0.5............. ......----.....................----.....................----
4000......1.0................... 0.5......................----.....................----
5000......1.0................... 0.5......................60......................----
6000......1.5....................0.5.............. ........60.....................25
6500......1.5....................0.5.............. ........----....................----
7000......----................... ----.....................60......................25
8000......----................... ----.....................60......................25
8500......----................... ----.....................60......................25
TOTAL.....7.0................... 2.5.....................300.....................00
Rotary Resurrection's Guidelines
(truncated from Start-Up & Break-In)
9) Breakin should be completed as follows.Keep rpms under 4000, oil changes at 500 and 2000 miles, and no boost above atmospheric(turbo models).
Thread Starter
I Raise Chickens
Joined: Jul 2001
Posts: 1,219
Likes: 35
From: Half Moon Bay, CA
The engine does have new bearings, so I'm going to follow Racing Beat's guidelines and give the motor 2,000 miles on it before I give it any load.
Do oil changes at 200 miles, 500, 1000 and 2000. After that stick to a 2,500 change interval.
Do oil changes at 200 miles, 500, 1000 and 2000. After that stick to a 2,500 change interval.
Thread Starter
I Raise Chickens
Joined: Jul 2001
Posts: 1,219
Likes: 35
From: Half Moon Bay, CA
Drove the car 20+ miles to work today, drove great. Even my DIY alignment is not too bad, drives straight!
Replacing all the rear suspension bushings, new toe control and trailing links made a huge difference compared when I first got the car. But there is a deep 'clunk' when I put the car in gear or abruptly let out the clutch. Which points to the diff bushings. So I guess those will be next. When I'm done with this thing, there won't be any original pieces of rubber on the car!
Replacing all the rear suspension bushings, new toe control and trailing links made a huge difference compared when I first got the car. But there is a deep 'clunk' when I put the car in gear or abruptly let out the clutch. Which points to the diff bushings. So I guess those will be next. When I'm done with this thing, there won't be any original pieces of rubber on the car!
Great progress!!

Thread Starter
I Raise Chickens
Joined: Jul 2001
Posts: 1,219
Likes: 35
From: Half Moon Bay, CA

Thread Starter
I Raise Chickens
Joined: Jul 2001
Posts: 1,219
Likes: 35
From: Half Moon Bay, CA
Wasted 3 hours today trying to get the car smogged. The first smog test station completely wasted my time. Took my paperwork, I waited in line and 1 hour later they finally drove the car into the bay. The technician spent 15 minutes looking through books then finally says "I can't test this car". I was livid. If you don't do RX7s and you see me pull up in an RX7, don't take my money and pretend to test the car!
I drove to another smog inspection shop and they wouldn't test it with a downpipe. At that point, I was too frustrated to drive to another shop 20 miles away, so I went home.
Honestly, I don't know how you single turbo guys are getting by the visual check when my car is stock minus a downpipe catback.

Joined: Mar 2001
Posts: 31,854
Likes: 3,243
From: https://www2.mazda.com/en/100th/
Wasted 3 hours today trying to get the car smogged. The first smog test station completely wasted my time. Took my paperwork, I waited in line and 1 hour later they finally drove the car into the bay. The technician spent 15 minutes looking through books then finally says "I can't test this car". I was livid. If you don't do RX7s and you see me pull up in an RX7, don't take my money and pretend to test the car!
I drove to another smog inspection shop and they wouldn't test it with a downpipe. At that point, I was too frustrated to drive to another shop 20 miles away, so I went home.
Honestly, I don't know how you single turbo guys are getting by the visual check when my car is stock minus a downpipe catback.
I drove to another smog inspection shop and they wouldn't test it with a downpipe. At that point, I was too frustrated to drive to another shop 20 miles away, so I went home.
Honestly, I don't know how you single turbo guys are getting by the visual check when my car is stock minus a downpipe catback.
i had just come from my usual guy who had looked the car over, and then gotten the floor jack out and decided that the downpipe was too shiny, which would have been fair enough, except he had also run the pretest and seen it pass, and the last FD i brought him had a downpipe, and he was fine with it.
the third guy, didn't really look at it, and it passed the tailpipe and evap tests with flying colors, for a 3rd time.
*the funny part, of course is that it just happened to be a 99 spec engine (and ecu) and so the EGR valve was in my toolbox
Thread Starter
I Raise Chickens
Joined: Jul 2001
Posts: 1,219
Likes: 35
From: Half Moon Bay, CA
OMG i took my friends FD to a smog place and they spent 45 minutes looking for the EGR valve and then told me they couldn't find it, that will be $59.95. i told them it would set a code if it was bad*, this didn't help. in the meantime they had run a pretest on the exhaust, and the evap stuff, both of which it passed. so i told them i wasn't paying because they couldn't figure it out.
i had just come from my usual guy who had looked the car over, and then gotten the floor jack out and decided that the downpipe was too shiny, which would have been fair enough, except he had also run the pretest and seen it pass, and the last FD i brought him had a downpipe, and he was fine with it.
the third guy, didn't really look at it, and it passed the tailpipe and evap tests with flying colors, for a 3rd time.
*the funny part, of course is that it just happened to be a 99 spec engine (and ecu) and so the EGR valve was in my toolbox
My downpipe is ceramic coated black, so it looks more oem-ish than a polished stainless one. I'm going to continue driving from station to station until I get it passed. Wasting time testing a car thats clean that will driven less than 1000 miles a year haha.
Joined: Mar 2001
Posts: 31,854
Likes: 3,243
From: https://www2.mazda.com/en/100th/
my local place is all Azerbaijanis, they live in like san rafael and commute down, its really inexplicable.
the charcoal canister is a fun one too, i took them a volvo the other day, and he at first pinched the headlight harness....
the charcoal canister is a fun one too, i took them a volvo the other day, and he at first pinched the headlight harness....
Thread Starter
I Raise Chickens
Joined: Jul 2001
Posts: 1,219
Likes: 35
From: Half Moon Bay, CA
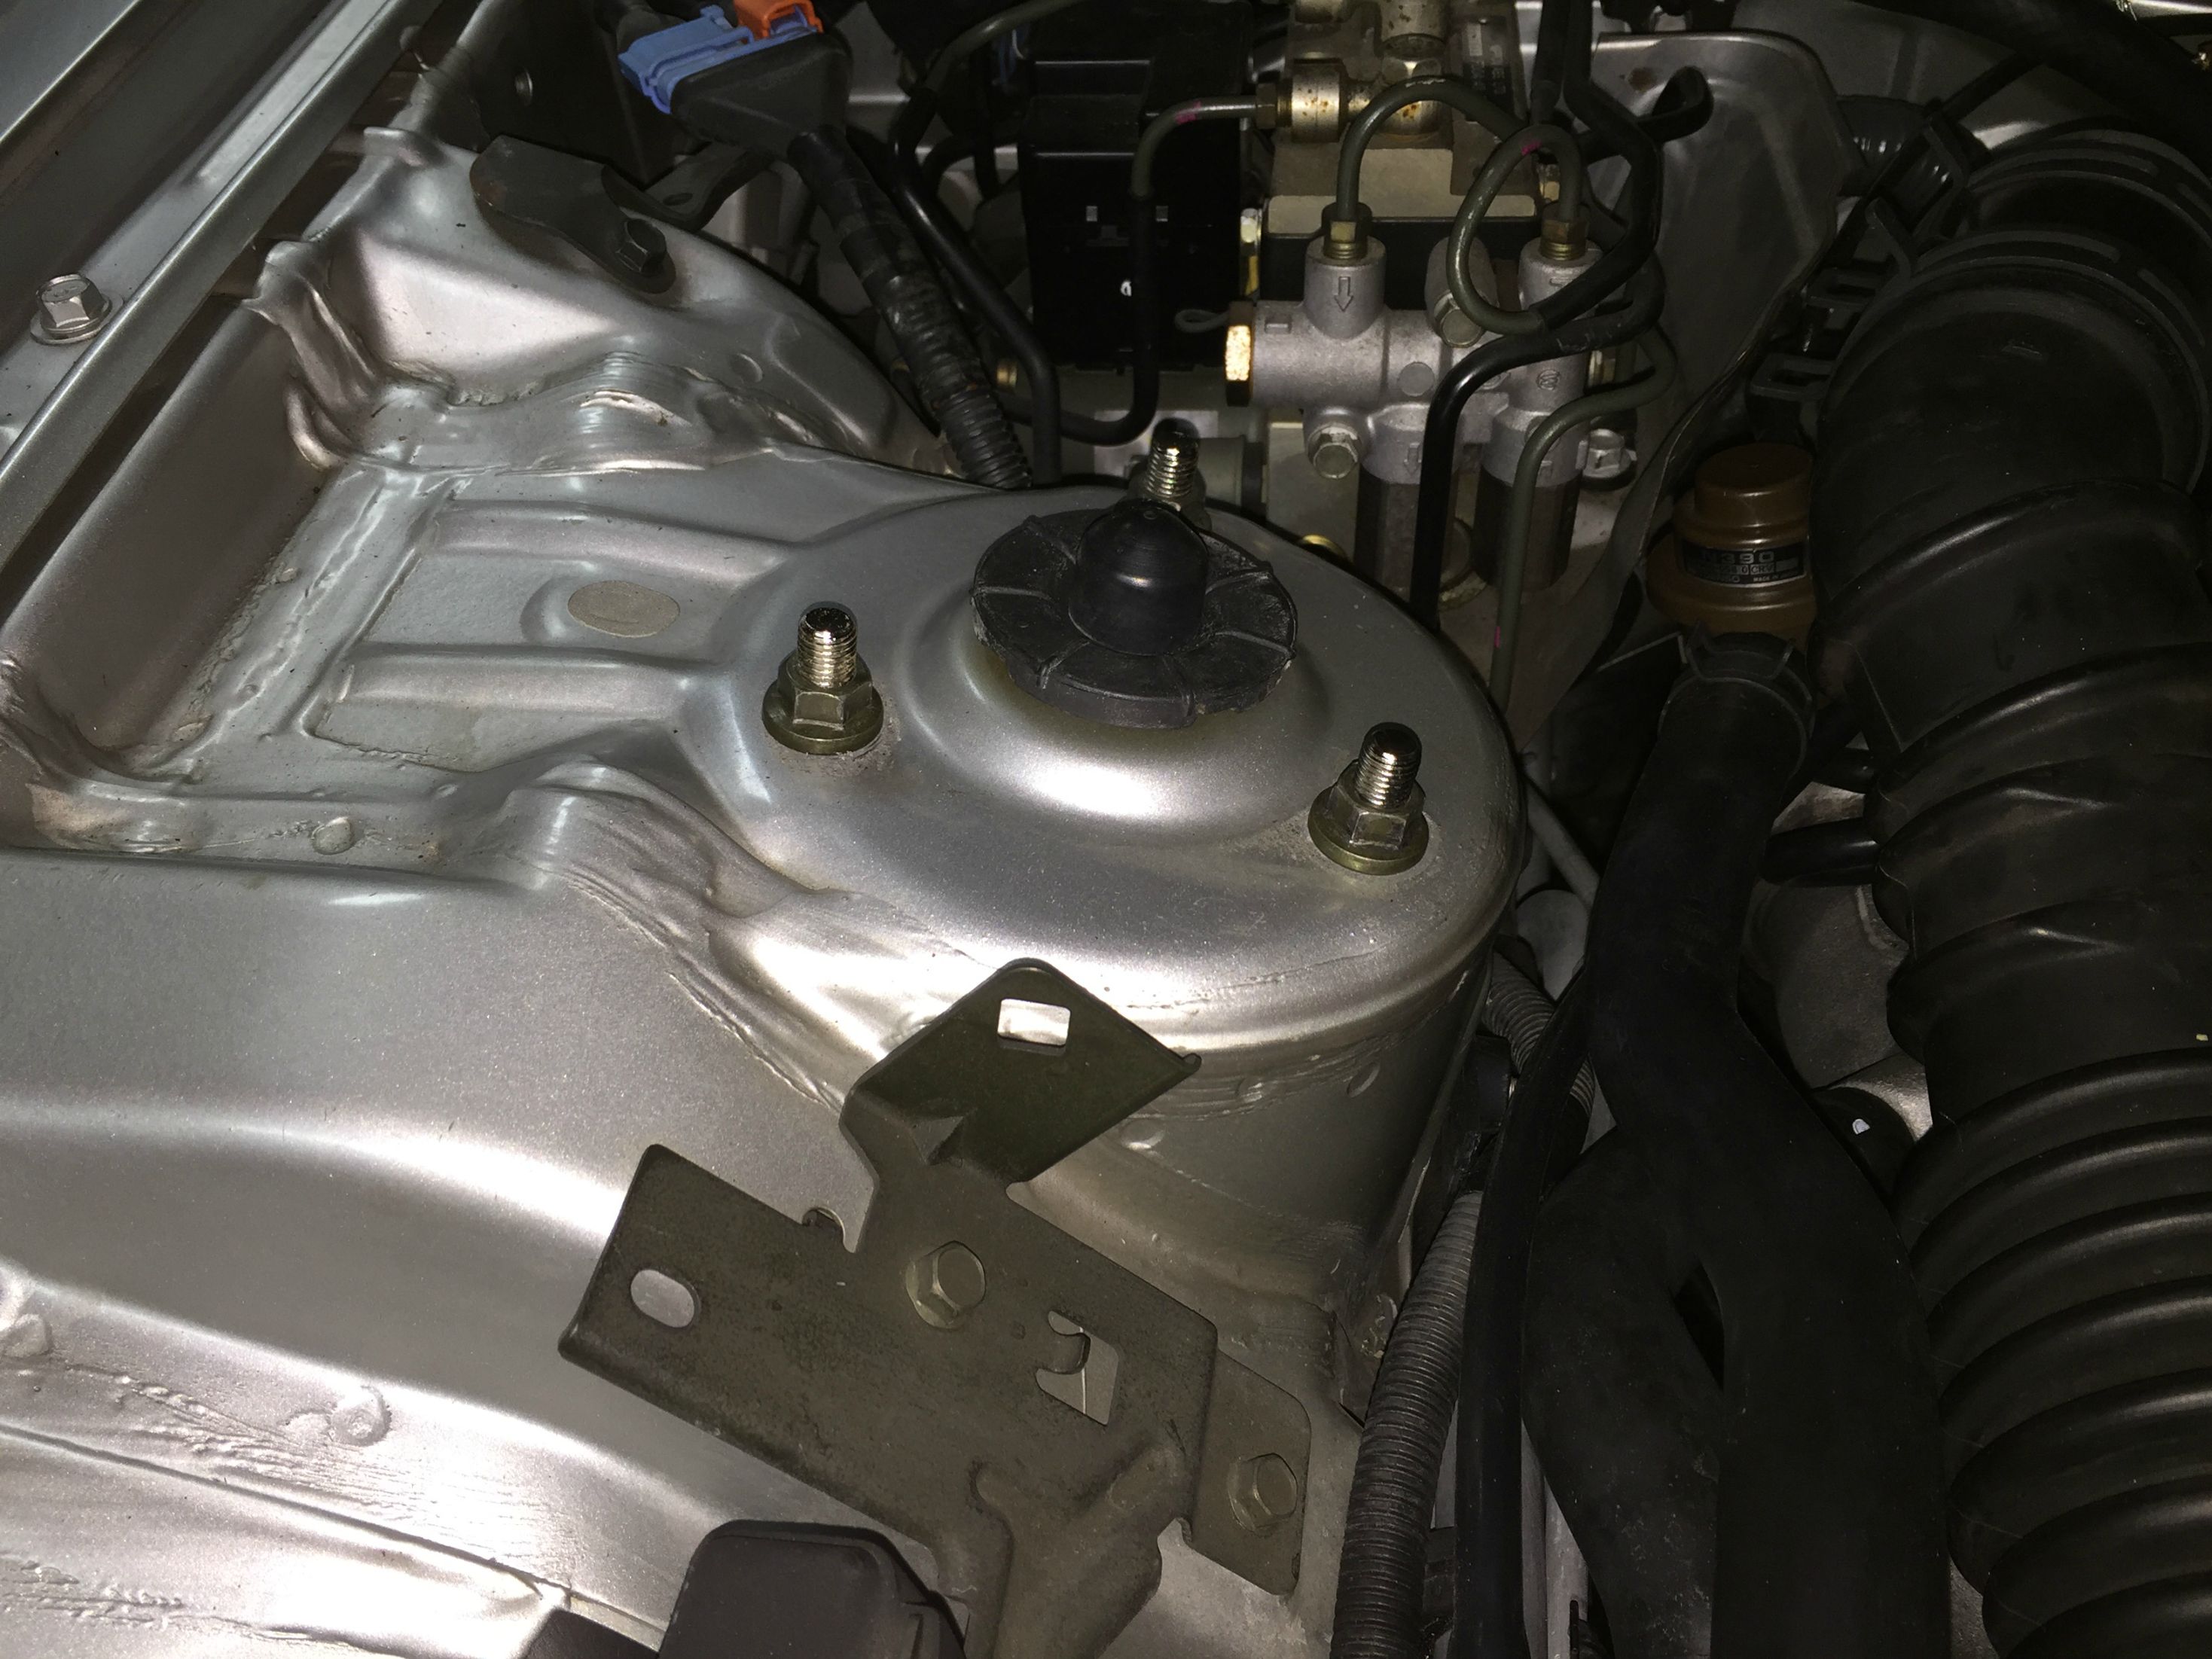
Yesterday was a bad day for the FD. Got stuck in some horrible traffic on HWY 1, passenger window decided to stop working along with the ancient alpine stereo and the passenger side parking light. Also picked up this really annoying intermittent engine rattle at idle that I fear is going to be a huge PITA to troubleshoot. After traffic cleared up a bit, hit a massive pothole on the freeway and one of the front shocks collapsed. Pretty sure that the lower spring perch on the Konis broke. Lucky it drove fine, saved by the factory bump stop. I have a whiteboard of things to fix and the list won't stop growing lol
Yesterday was a bad day for the FD. Got stuck in some horrible traffic on HWY 1, passenger window decided to stop working along with the ancient alpine stereo and the passenger side parking light. Also picked up this really annoying intermittent engine rattle at idle that I fear is going to be a huge PITA to troubleshoot. After traffic cleared up a bit, hit a massive pothole on the freeway and one of the front shocks collapsed. Pretty sure that the lower spring perch on the Konis broke. Lucky it drove fine, saved by the factory bump stop. I have a whiteboard of things to fix and the list won't stop growing lol
SS18 is set for 11/7. Hope you can make it down for the event in Fontana.
Thread Starter
I Raise Chickens
Joined: Jul 2001
Posts: 1,219
Likes: 35
From: Half Moon Bay, CA
Thread Starter
I Raise Chickens
Joined: Jul 2001
Posts: 1,219
Likes: 35
From: Half Moon Bay, CA
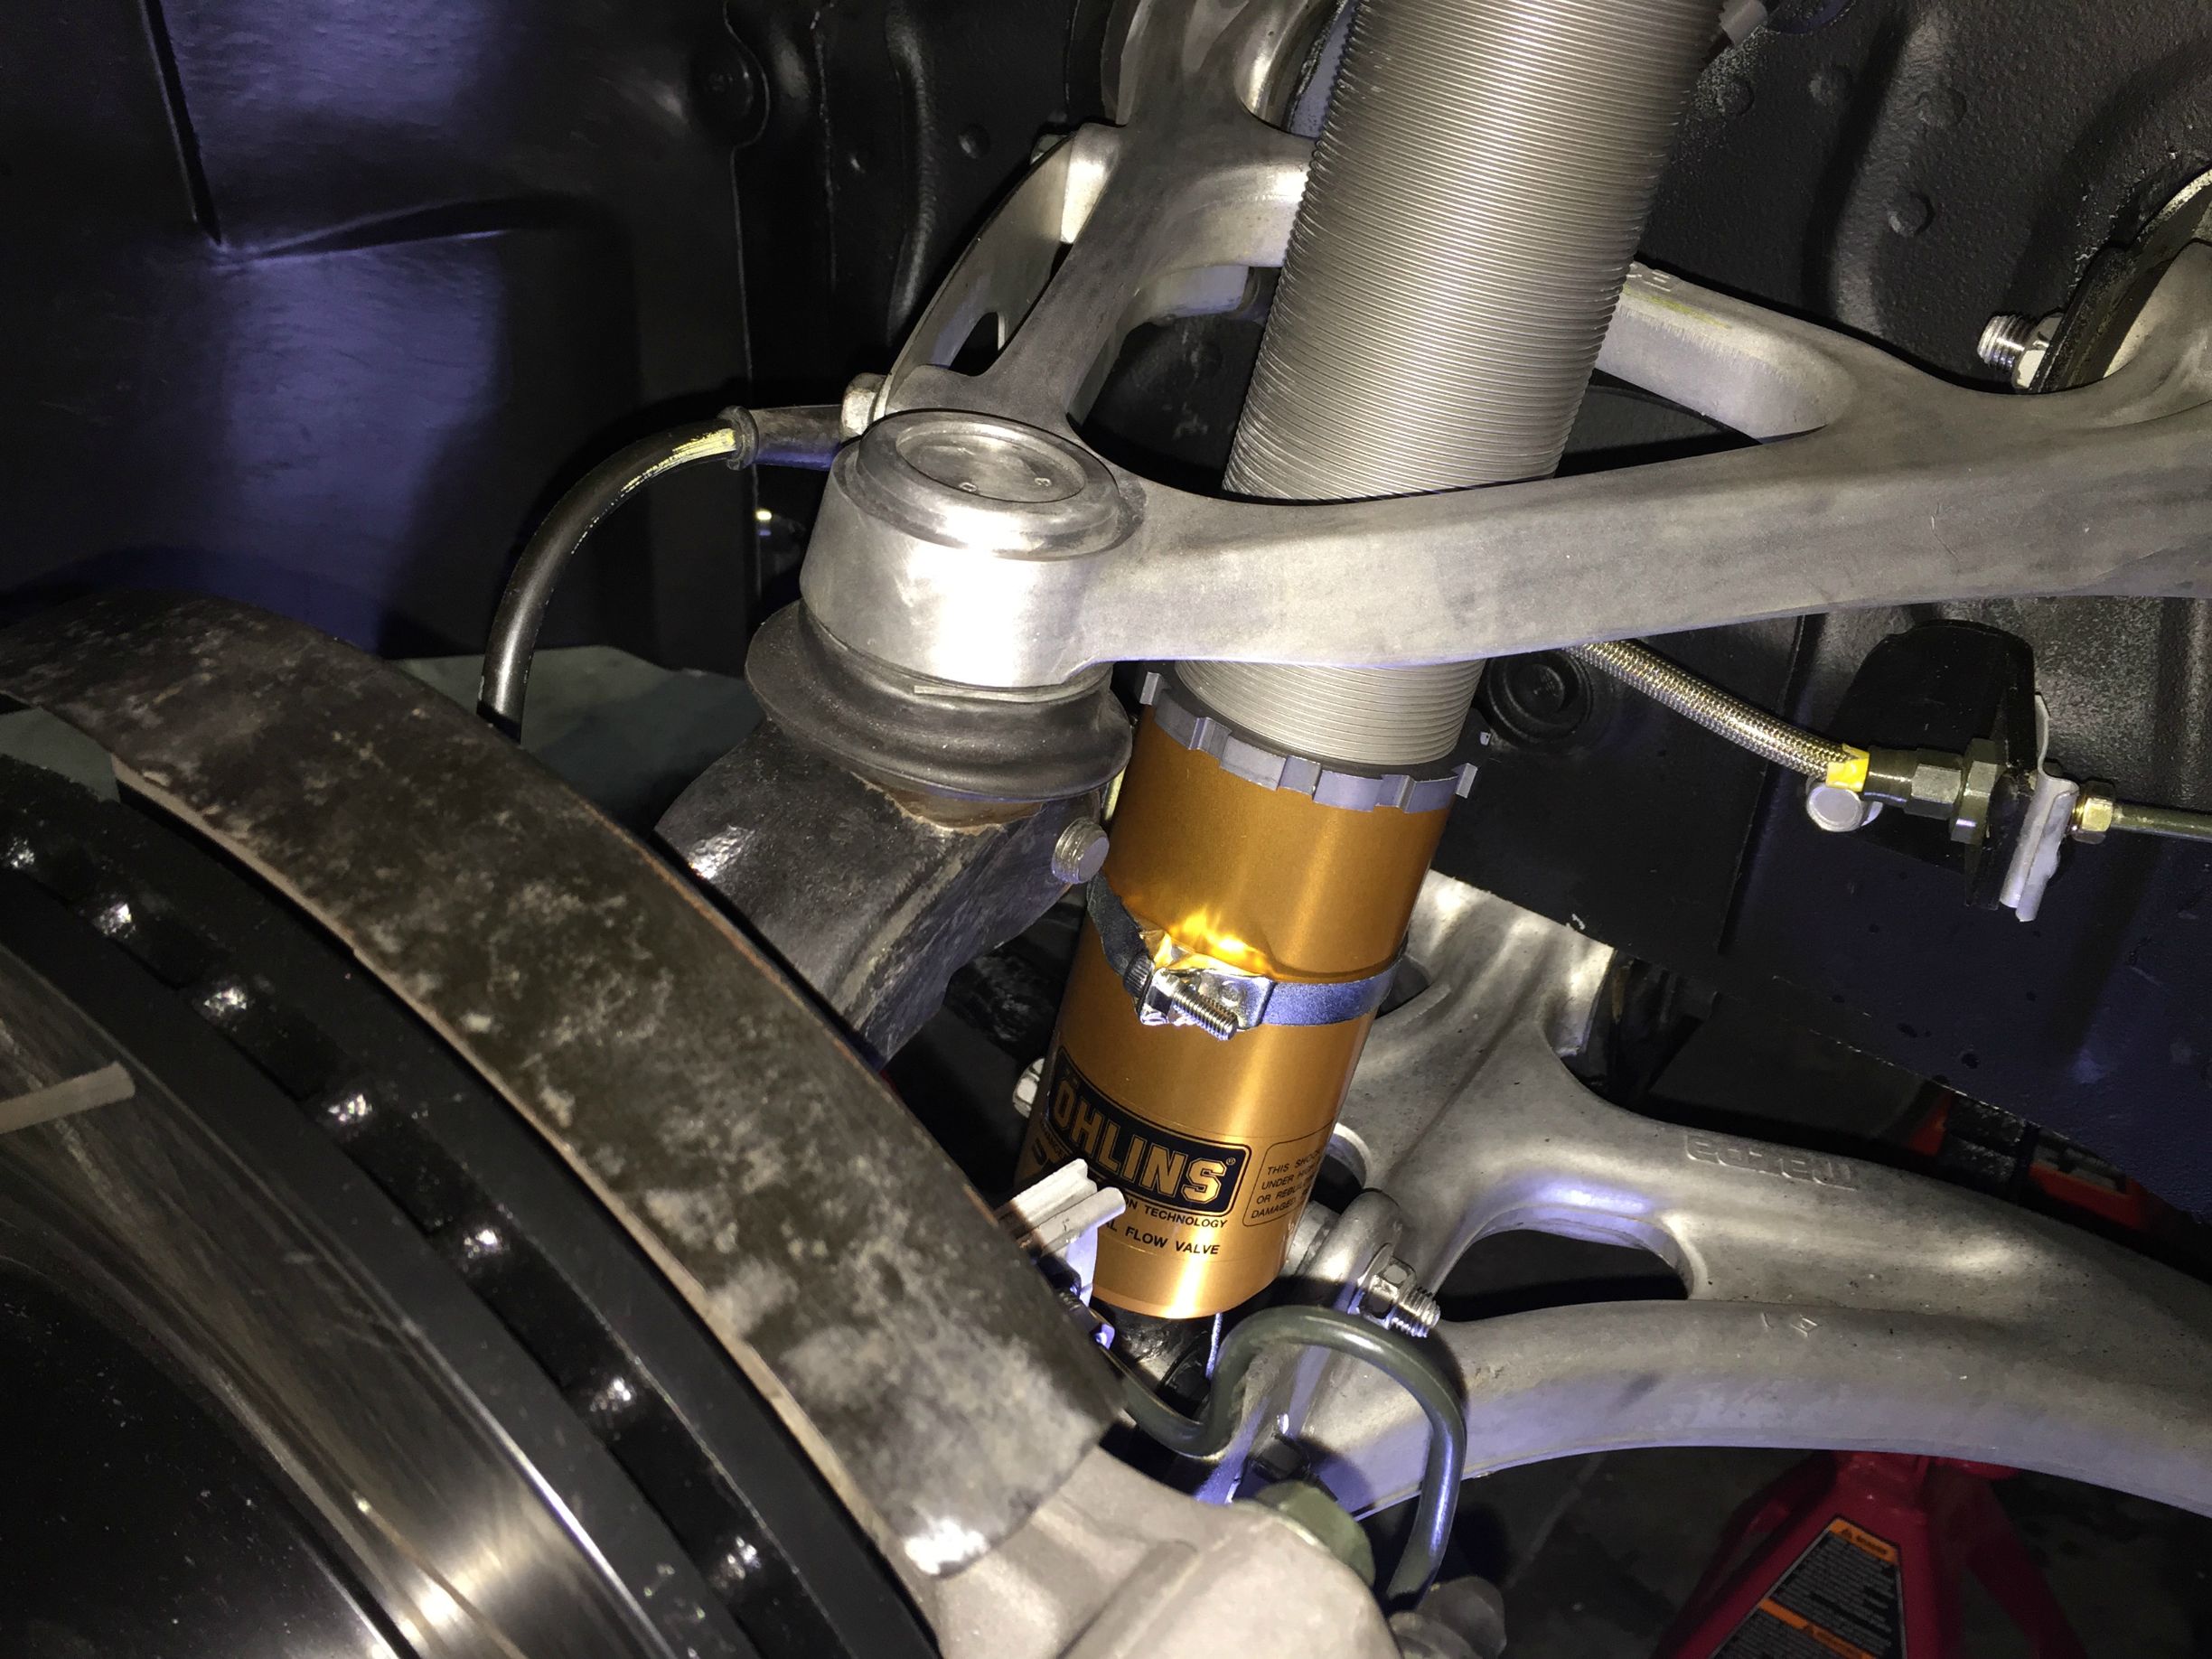
After dealing with the faulty Koni c-clip, I rage quit on the Konis and bought a set of Ohlins Road and Tracks. Not to say the Koni setup was terrible, but dealing with the 1 faulty shock put me over the limit and dove off the deep end. Here is the result:

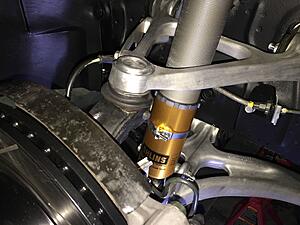
Another cool touch I did was to incorporate the OEM perch washer and rubber top nut. I set the rebound on the shock, removed the Ohlins adjuster and then bolted the washer up. Now it appears factory. Ignore the missing strut brace, I'm still monkeying with the car to get past smog....


Another cool touch I did was to incorporate the OEM perch washer and rubber top nut. I set the rebound on the shock, removed the Ohlins adjuster and then bolted the washer up. Now it appears factory. Ignore the missing strut brace, I'm still monkeying with the car to get past smog....