
My "Blue Devil" matchbox racer build 2.0


Thread Starter


Joined: Feb 2007
Posts: 477
Likes: 3
From: Vancouver, BC, Canada
Thanks, they are APR.
I am not a fan after having them for a while, the hardware is not stainless and even as far inland as I am there is oxidization starting on the nuts holding the mirror arms.
Got a bit of work done while my friend started doing the final welding on the new custom exhaust.


Still have the muffler and rear tubing to complete the look, it will definitely not be for everyone much like the rest of the car.
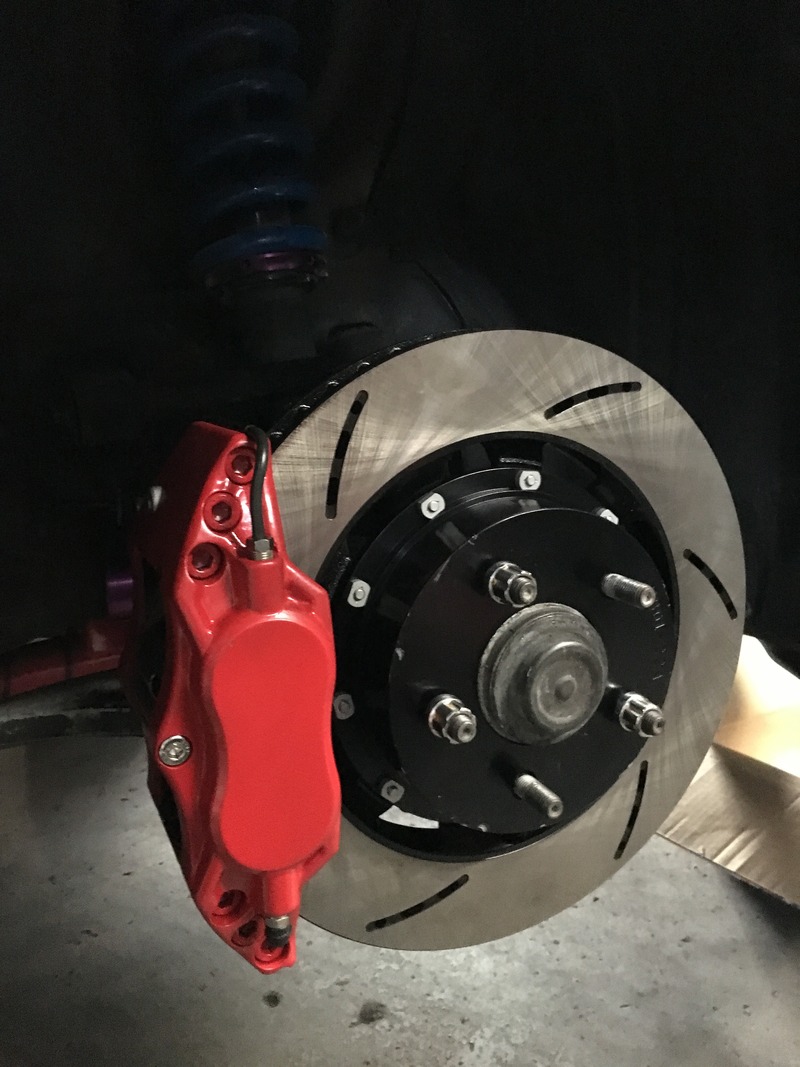
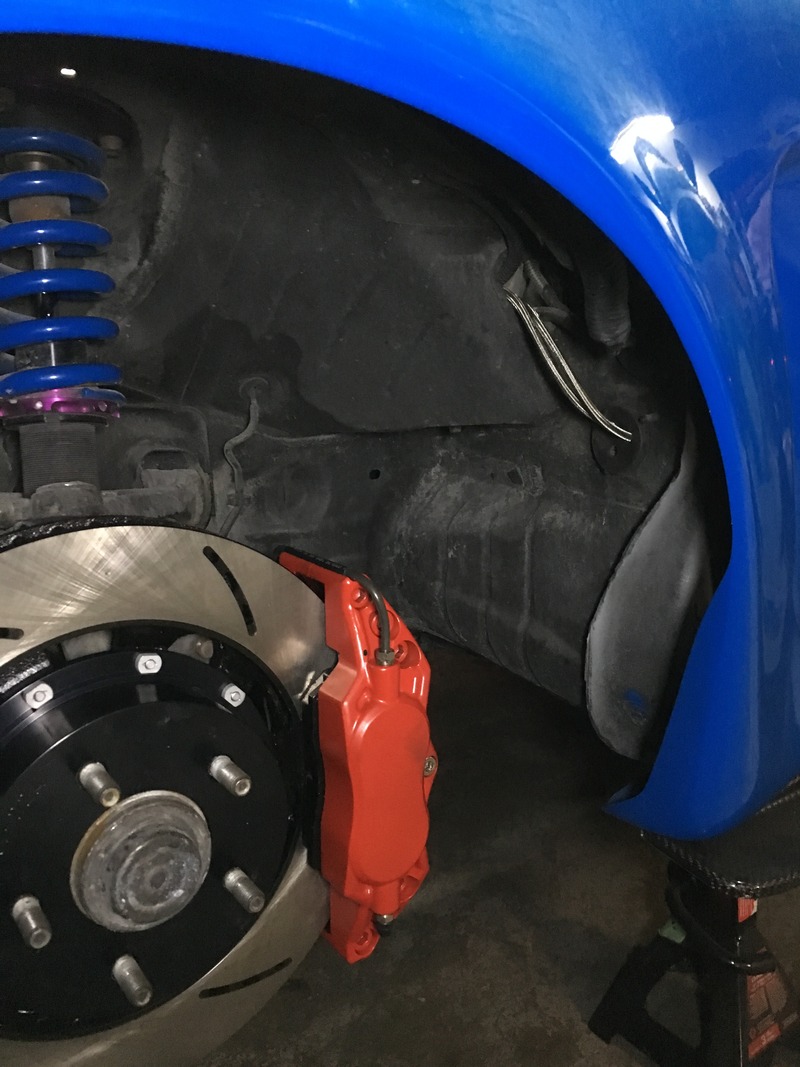
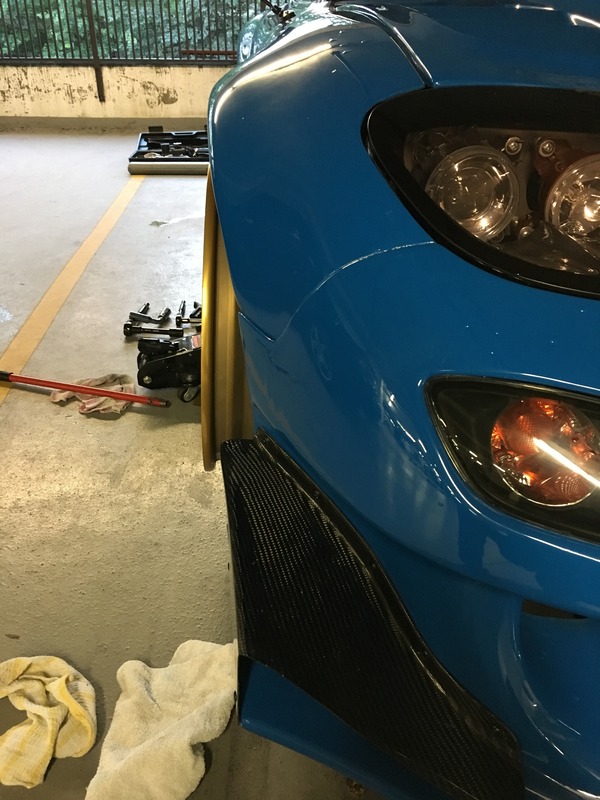
Slowing getting the brakes done, starting with the RB BBK. The carbon brake ducts don't work with them so those will be up for sale soon. Otherwise the bolted up pretty well and are not too overkill over stock which should be nice for the occasional street driving.
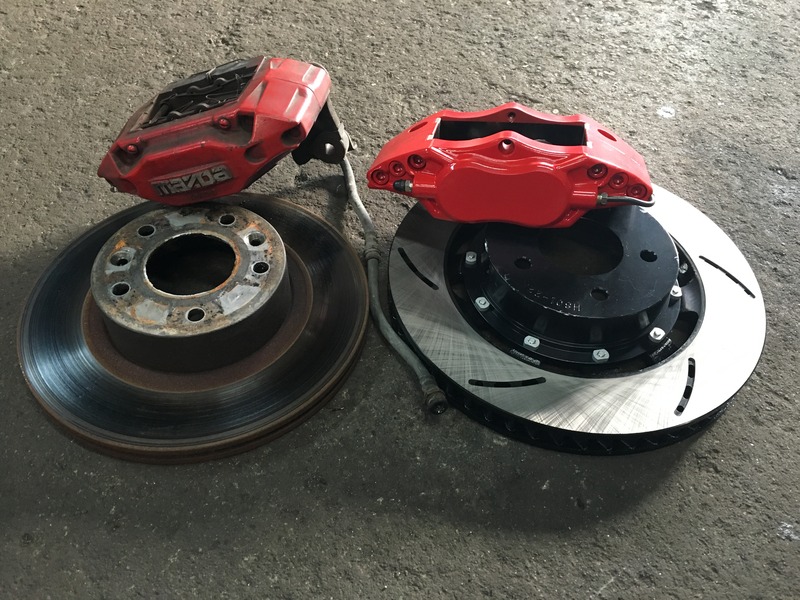
Passenger front, mine were originally black, so I changed them to red to match how my OEM ones looks previously.
I am not a fan after having them for a while, the hardware is not stainless and even as far inland as I am there is oxidization starting on the nuts holding the mirror arms.
Got a bit of work done while my friend started doing the final welding on the new custom exhaust.


Still have the muffler and rear tubing to complete the look, it will definitely not be for everyone much like the rest of the car.
Slowing getting the brakes done, starting with the RB BBK. The carbon brake ducts don't work with them so those will be up for sale soon. Otherwise the bolted up pretty well and are not too overkill over stock which should be nice for the occasional street driving.

Passenger front, mine were originally black, so I changed them to red to match how my OEM ones looks previously.

Thread Starter
Joined: Feb 2007
Posts: 477
Likes: 3
From: Vancouver, BC, Canada
Small update, rear brake upgrades are done so all four sides are good to go with SS lines. This week is ABS removal and brake bias controller in the car.


Thread Starter
Joined: Feb 2007
Posts: 477
Likes: 3
From: Vancouver, BC, Canada
Some good and not so good updates to the build before my car has to head home from the shop a bit early.
ABS is no more! I picked up the same ABS delete kit a few of us have, but got a few new lines and fittings on my own since I don't see why the controller for the brake bias is setup to go in the engine bay?... So mine is now relocated inside under the dash for easy access. Also seen here is my upgraded 929 master cylinder for some added pedal feel while keeping things factory parts where I can.
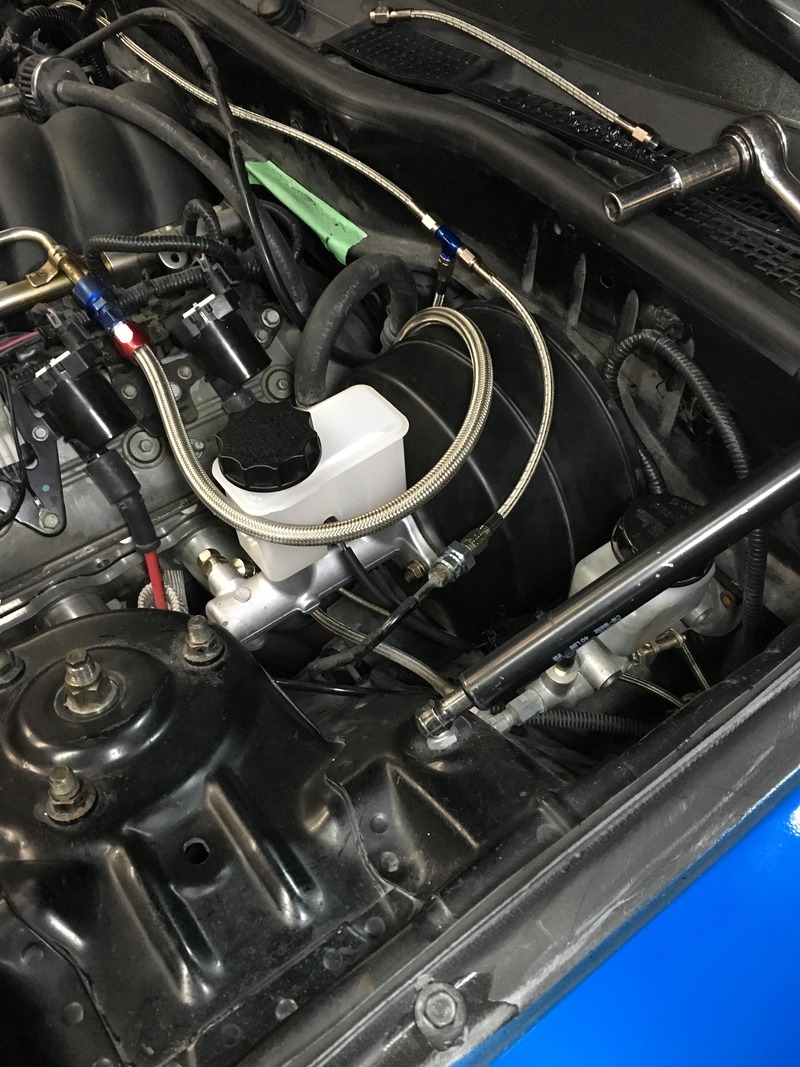
And the lines running into the cabin through a oem grommet.
Preview of the new custom muffler setup, it is either a hate or like design but I wanted something completely custom and had a vision for it that my fabricator friend was able to put together.

Oh and the bad news is one of the calipers was leaking fluid from a fitting, I pulled it and had to do some re-threading from some damage inside. The bottom half of the threads thankfully were in tact and I was able to clean out the caliper and clean up the fitting getting everything fully re-seated. Fingers crossed for bleeding the brakes tomorrow with some fresh Motul fluid.
ABS is no more! I picked up the same ABS delete kit a few of us have, but got a few new lines and fittings on my own since I don't see why the controller for the brake bias is setup to go in the engine bay?... So mine is now relocated inside under the dash for easy access. Also seen here is my upgraded 929 master cylinder for some added pedal feel while keeping things factory parts where I can.


And the lines running into the cabin through a oem grommet.

Preview of the new custom muffler setup, it is either a hate or like design but I wanted something completely custom and had a vision for it that my fabricator friend was able to put together.

Oh and the bad news is one of the calipers was leaking fluid from a fitting, I pulled it and had to do some re-threading from some damage inside. The bottom half of the threads thankfully were in tact and I was able to clean out the caliper and clean up the fitting getting everything fully re-seated. Fingers crossed for bleeding the brakes tomorrow with some fresh Motul fluid.
Last edited by Tai-Lun; Mar 15, 2016 at 03:54 AM.
Thread Starter
Joined: Feb 2007
Posts: 477
Likes: 3
From: Vancouver, BC, Canada
I swapped things over, tightened up the lines tonight and began bleeding. Turns out not only does the line that wasn't seated right before leak, but all the lines are leaking no matter how tight I make everything. Looking into it further, it seems a few of the earlier caliper setups had this issue across the board. I managed to get everything to stop making mess of Motul fluid all over the floor, but the front cross over lines were still wet when I left the shop.
Not so happy about the complete lack of front brakes and what I might have to do as far as towing the car to a second floor complex to store again. I am going to try reaching out to Racing Brake to see if they can offer up any solution, or else I have to look at different front options which all cost a pretty penny right now with the CDN dollar at an all time low.
Did anyone else who has a RB BBK on the front have this issue? My calipers refuse to seal and I'm not about to go start experimenting in ways to try and seal things up...
What hood strut kit is that?
And I did the same thing with my calipers after a winter of them being off... it took me about 2 quarts of brake fluid, and A LOT of swearing to finally realize why my brakes would not bleed after my ABS delete.
And I did the same thing with my calipers after a winter of them being off... it took me about 2 quarts of brake fluid, and A LOT of swearing to finally realize why my brakes would not bleed after my ABS delete.
Thread Starter
Joined: Feb 2007
Posts: 477
Likes: 3
From: Vancouver, BC, Canada
Hopefully RB gets back to me and I can get some new calipers...
Also what is going on back there?....


If it's just the crossover pipe fittings leaking, you can make your own fairly easily. Just need the flare tool and a pipe bender. I think you can rent both of those with a refundable deposit from most part stores. Not sure if it's the case for you up in Canada though.
However, if these are brand new RB should provide you with new ones.
However, if these are brand new RB should provide you with new ones.
Thread Starter
Joined: Feb 2007
Posts: 477
Likes: 3
From: Vancouver, BC, Canada
Thanks! It's, my daily fun creative outlet heh
I was talking to RB today, the brakes I bought from jimlab a while back so I doubt they will provide me with any new ones even though they are brand new. The damage is on the caliper itself, we took the crossover off and the threads are shot on the top half of caliper side where the fitting goes in. I was hoping the remaining threads would be enough, but there is still a leak.
I'd rather actually try their newer designed calipers as it looks like the pads are held in place better but it would require a bit of sponsorship on their side, just have to wait and see.
If it's just the crossover pipe fittings leaking, you can make your own fairly easily. Just need the flare tool and a pipe bender. I think you can rent both of those with a refundable deposit from most part stores. Not sure if it's the case for you up in Canada though.
However, if these are brand new RB should provide you with new ones.
However, if these are brand new RB should provide you with new ones.
I'd rather actually try their newer designed calipers as it looks like the pads are held in place better but it would require a bit of sponsorship on their side, just have to wait and see.
Thread Starter
Joined: Feb 2007
Posts: 477
Likes: 3
From: Vancouver, BC, Canada
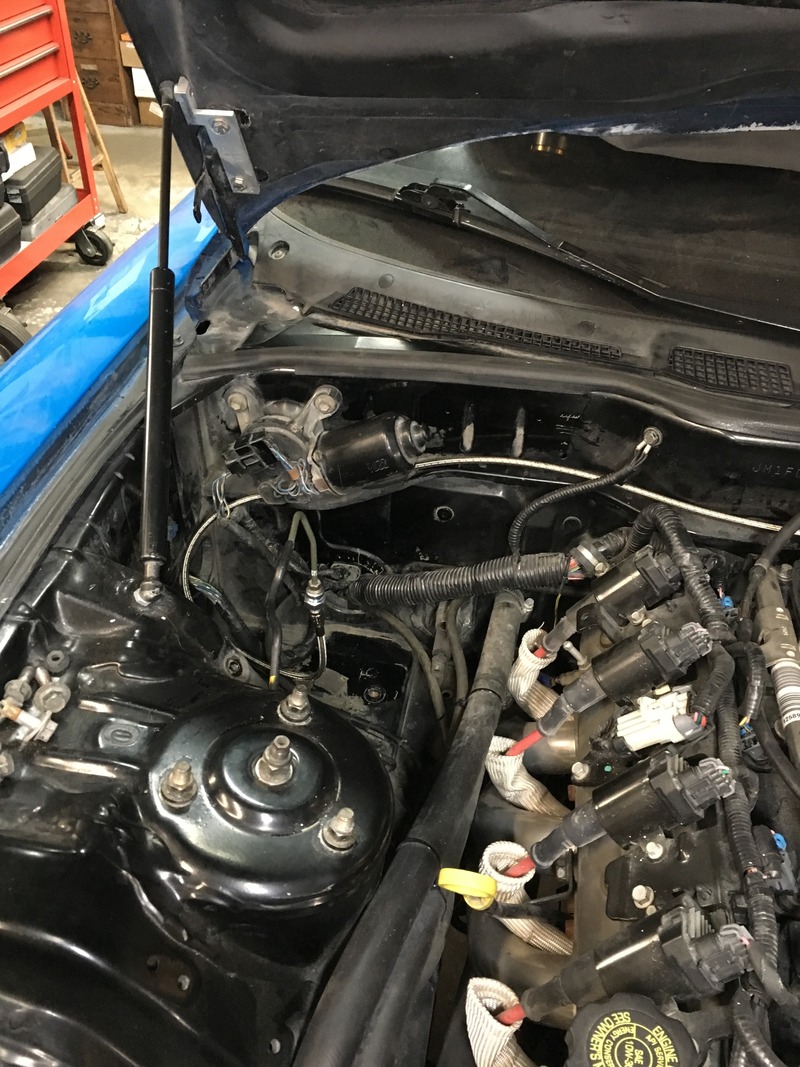
Waiting for RB to get back to me on what the plan for replacing the caliper is, but in the mean time we finished up the ABS removal cleanup, new diffuser brackets, hangers, headlight wiring and got as much of the system bled as possible.
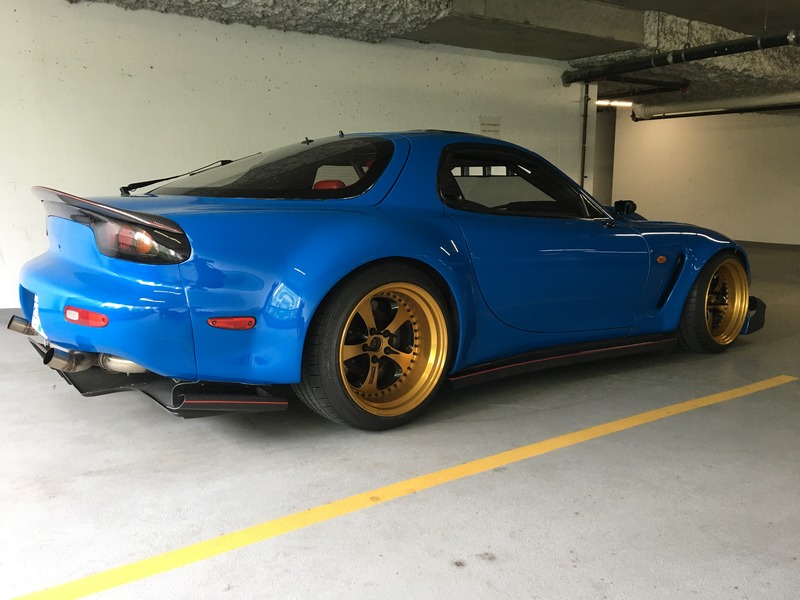
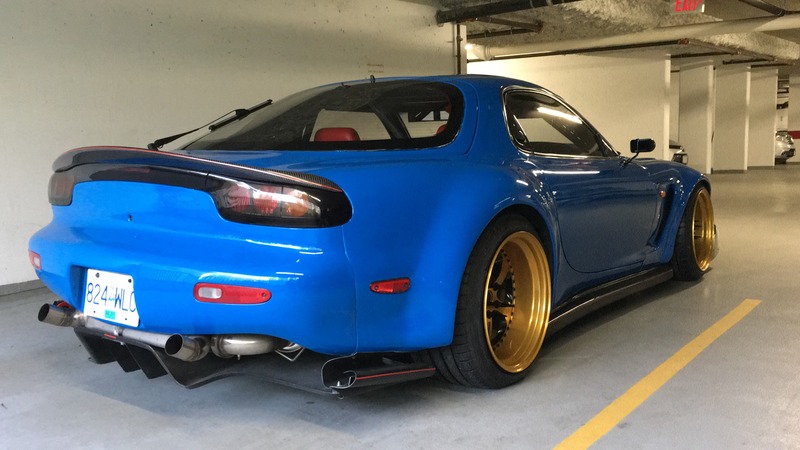
Got it back home finally. Here is one more shot of the new exhaust, it is one of my favorite parts now.

Got it back home finally. Here is one more shot of the new exhaust, it is one of my favorite parts now.

Thread Starter
Joined: Feb 2007
Posts: 477
Likes: 3
From: Vancouver, BC, Canada
I am however looking at possibly slipping on some nice titanium tips over the stainless ends out the muffler, or possibly quad tips lol... no just single titanium tips if I come across some really nice ones that would compliment the car.
Thread Starter
Joined: Feb 2007
Posts: 477
Likes: 3
From: Vancouver, BC, Canada
So a lot has been happening outside the FD, partly because I had been having issue with RB customer service and needed to get my brakes sorted. Since brakes are not something to mess with especially with all the other upgrades to the car, I have been looking for either beefing up the OEM (and tired) brakes or a similarly balanced BBK to the RB setup.
Thankfully at the last moment Heath and the folks over at Sakebomb Garage stepped in with their full AP Racing front+back kit, and damn is it a nice setup! I cannot stress enough how well SBG customer service was throughout the whole process, not just being a complete contrast from what I was experiencing, but even down to the packaging and amazing package they put together for me so that all my brake needs were met and then some.
The RB brakes were big and not bad for a BBK, but these are on a whole other level in materials and finish. The AP calipers and brackets for the front and back were so light, and you can feel the pride in the finished product from the people who put them together. Installation was a breeze, with the only tiny concern even after printing the caliper template being clearance on my RE-Amemiya wheels.
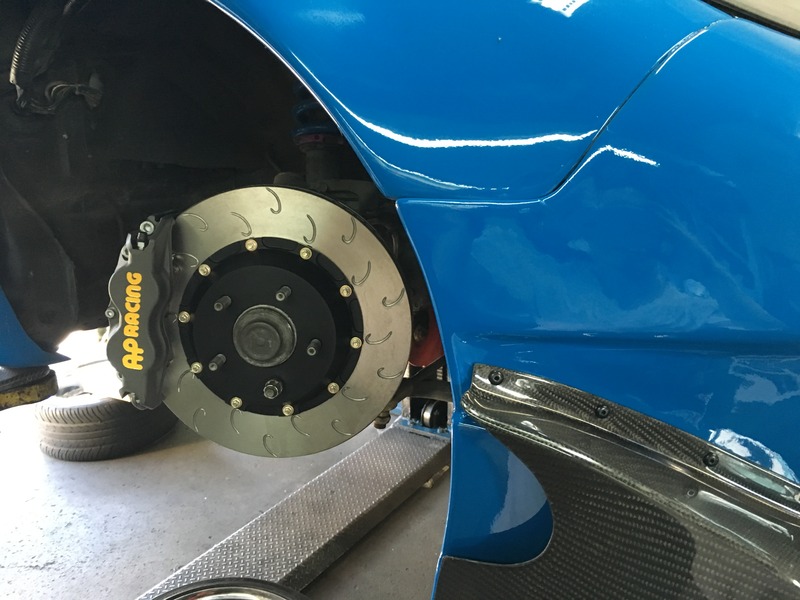
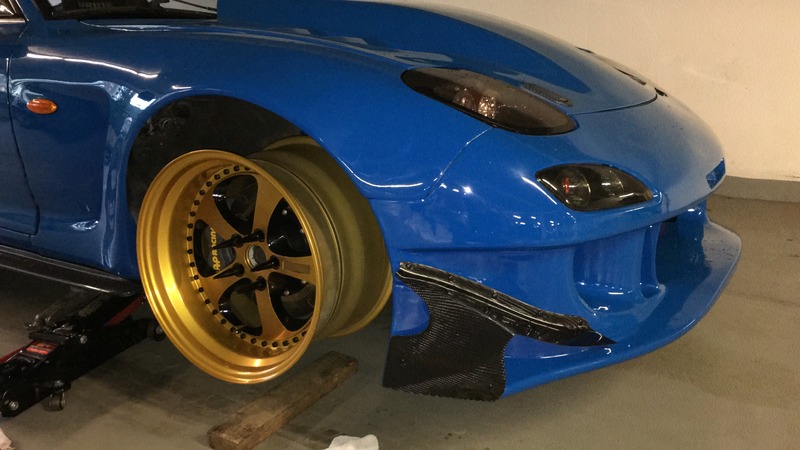
...and they clear! Just barely, but they clear and that is all that matters. With the 17" faces and the double step lips, the brakes look even bigger.
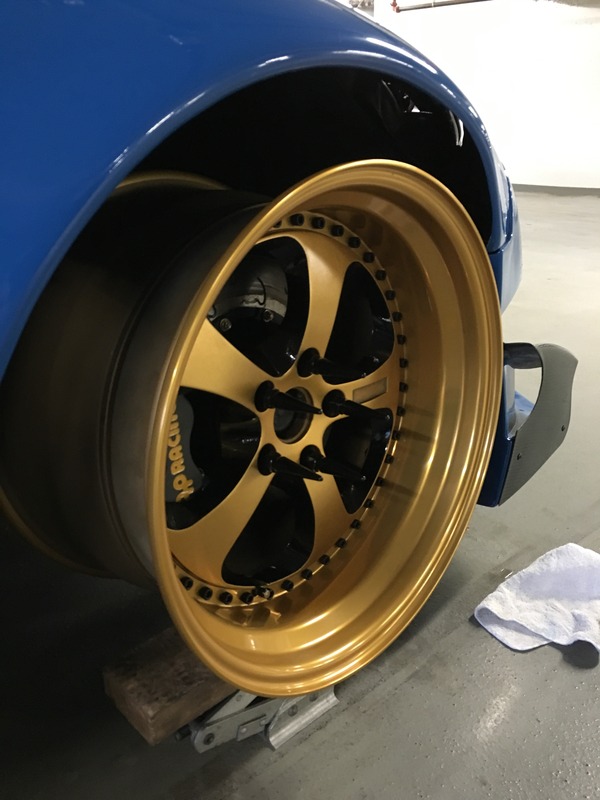
It was a good time to do a quick fitment check too on the new 18x10.5s up front, should be good for some decent rubber tucked in there when the time comes.
Feels good to have some powerful brakes on the car. The ABS is removed, all SBG braided lines, 929 MC, and fresh Motul fluid throughout. The bias controller is now under the dash for easier adjustments when testing later on in different weather. The car needs a major wheel alignment among other things, but that will have to wait until I have time again... which will be... I don't know when lol.
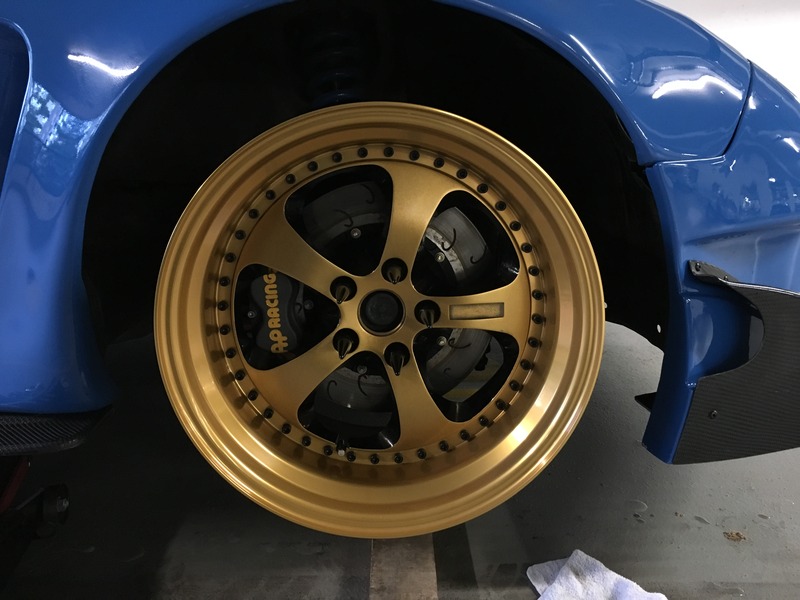
One last fun shot showing off the spiked lugs and AP's.
My OEM, RB setup, carbon brake ducts, ABS and MC will be up for sale soon too. Need to clear out storage and bolt on the rest of the parts.
Thankfully at the last moment Heath and the folks over at Sakebomb Garage stepped in with their full AP Racing front+back kit, and damn is it a nice setup! I cannot stress enough how well SBG customer service was throughout the whole process, not just being a complete contrast from what I was experiencing, but even down to the packaging and amazing package they put together for me so that all my brake needs were met and then some.
The RB brakes were big and not bad for a BBK, but these are on a whole other level in materials and finish. The AP calipers and brackets for the front and back were so light, and you can feel the pride in the finished product from the people who put them together. Installation was a breeze, with the only tiny concern even after printing the caliper template being clearance on my RE-Amemiya wheels.

...and they clear! Just barely, but they clear and that is all that matters. With the 17" faces and the double step lips, the brakes look even bigger.


It was a good time to do a quick fitment check too on the new 18x10.5s up front, should be good for some decent rubber tucked in there when the time comes.

Feels good to have some powerful brakes on the car. The ABS is removed, all SBG braided lines, 929 MC, and fresh Motul fluid throughout. The bias controller is now under the dash for easier adjustments when testing later on in different weather. The car needs a major wheel alignment among other things, but that will have to wait until I have time again... which will be... I don't know when lol.
One last fun shot showing off the spiked lugs and AP's.

My OEM, RB setup, carbon brake ducts, ABS and MC will be up for sale soon too. Need to clear out storage and bolt on the rest of the parts.
Glad to see everything coming together. That fitment looks perfect on the wheels.
I love the blue/gold/carbon theme you have going.
Do you know what price you're thinking for the FR RB brakes?
I love the blue/gold/carbon theme you have going.
Do you know what price you're thinking for the FR RB brakes?
Thread Starter
Joined: Feb 2007
Posts: 477
Likes: 3
From: Vancouver, BC, Canada
Thanks, and for the RB full setup it will be priced such that it would be silly to get a new set from RB. I just have to clean them up a bit and will post them FS. One of the calipers needs a piston rebuild so that will factor into the price too.

Full Member
Joined: Aug 2012
Posts: 75
Likes: 10
From: Baton Rouge, La.
I know you havent updated in a while, but very nice car!
Way back when you had the RE vented hood, did you have to do any modifying to get it to fit with the LS and strut bar? It's always been my favorite hood style but I was told repeatedly it wouldnt fit on an ls swapped car.
Way back when you had the RE vented hood, did you have to do any modifying to get it to fit with the LS and strut bar? It's always been my favorite hood style but I was told repeatedly it wouldnt fit on an ls swapped car.
Thread Starter
Joined: Feb 2007
Posts: 477
Likes: 3
From: Vancouver, BC, Canada
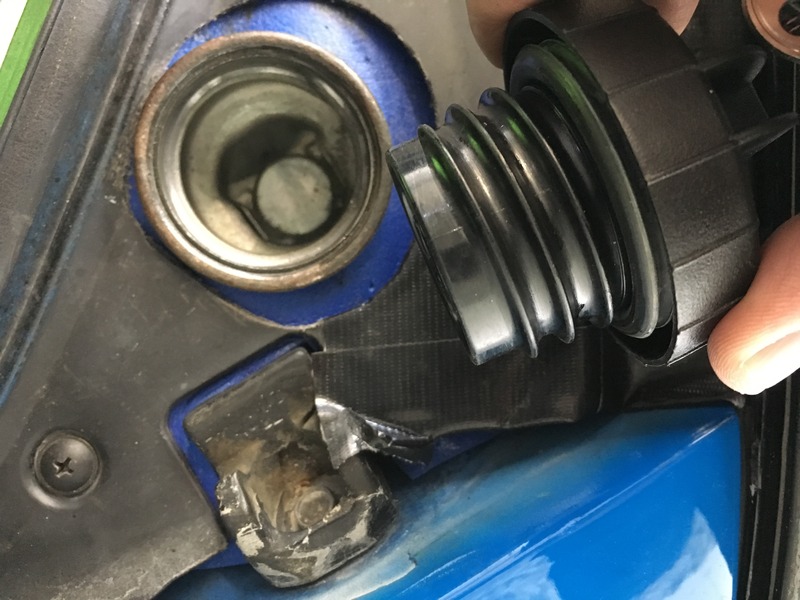
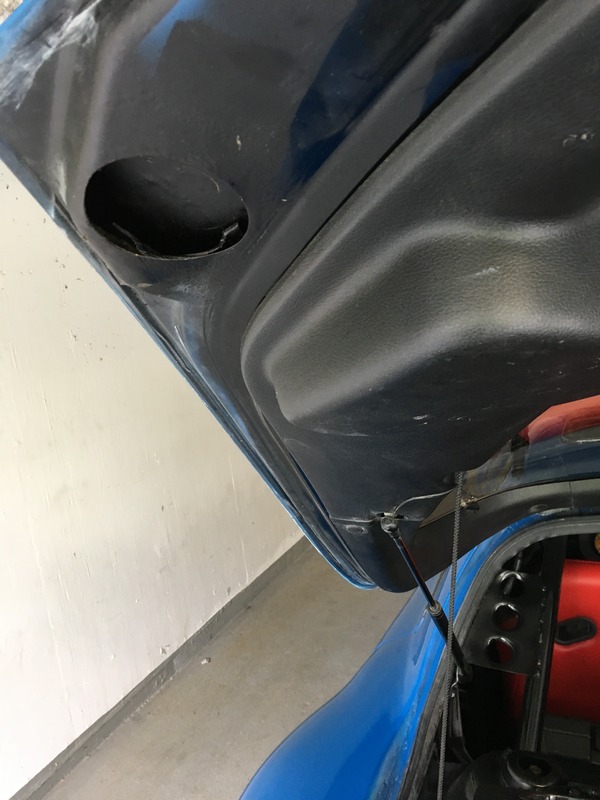
So I have been asked about the fuel filler setup and the go over it in more detail. Now because we used to have to pass a fuel cap inspection where I live, I don't run a fuel cell. It would have been significantly easier for the fuel filler and exhaust if I ran a fuel cell though.
Here is what I did:
- OEM filler neck with cap
- hole cut behind driver tail light to clear the filler neck and bolts
- hole cut in rear fender inside to access fuel tank neck
- fuel safe hose (orderd from a UK company) 90's and 45's matching fuel tank hose size
- aluminum pipes for connectors and fuel safe hose for breather we fabbed up from extra pipe
- hole cut on hatch to clear OEM gas cap
My tail light plastic was smashed when I got my FD so I have a bit of a ghetto plastic surround for now on the cap. I get the odd look at the gas station popping the hatch to fill up, but the fuel fill up is no different than before and stops on the pump. If I still had rear plastics, you'd never see the hoses and the connector to the tank is behind a factory debris shield.
If you guys have any questions just let me know, I know a few folks have thought about this over the years. I will be posting about the exhaust setup next, and then wheel specs.
Here is what I did:
- OEM filler neck with cap
- hole cut behind driver tail light to clear the filler neck and bolts
- hole cut in rear fender inside to access fuel tank neck
- fuel safe hose (orderd from a UK company) 90's and 45's matching fuel tank hose size
- aluminum pipes for connectors and fuel safe hose for breather we fabbed up from extra pipe
- hole cut on hatch to clear OEM gas cap
My tail light plastic was smashed when I got my FD so I have a bit of a ghetto plastic surround for now on the cap. I get the odd look at the gas station popping the hatch to fill up, but the fuel fill up is no different than before and stops on the pump. If I still had rear plastics, you'd never see the hoses and the connector to the tank is behind a factory debris shield.


If you guys have any questions just let me know, I know a few folks have thought about this over the years. I will be posting about the exhaust setup next, and then wheel specs.


So I have been asked about the fuel filler setup and the go over it in more detail. Now because we used to have to pass a fuel cap inspection where I live, I don't run a fuel cell. It would have been significantly easier for the fuel filler and exhaust if I ran a fuel cell though.
Here is what I did:
- OEM filler neck with cap
- hole cut behind driver tail light to clear the filler neck and bolts
- hole cut in rear fender inside to access fuel tank neck
- fuel safe hose (orderd from a UK company) 90's and 45's matching fuel tank hose size
- aluminum pipes for connectors and fuel safe hose for breather we fabbed up from extra pipe
- hole cut on hatch to clear OEM gas cap
My tail light plastic was smashed when I got my FD so I have a bit of a ghetto plastic surround for now on the cap. I get the odd look at the gas station popping the hatch to fill up, but the fuel fill up is no different than before and stops on the pump. If I still had rear plastics, you'd never see the hoses and the connector to the tank is behind a factory debris shield.


If you guys have any questions just let me know, I know a few folks have thought about this over the years. I will be posting about the exhaust setup next, and then wheel specs.

Here is what I did:
- OEM filler neck with cap
- hole cut behind driver tail light to clear the filler neck and bolts
- hole cut in rear fender inside to access fuel tank neck
- fuel safe hose (orderd from a UK company) 90's and 45's matching fuel tank hose size
- aluminum pipes for connectors and fuel safe hose for breather we fabbed up from extra pipe
- hole cut on hatch to clear OEM gas cap
My tail light plastic was smashed when I got my FD so I have a bit of a ghetto plastic surround for now on the cap. I get the odd look at the gas station popping the hatch to fill up, but the fuel fill up is no different than before and stops on the pump. If I still had rear plastics, you'd never see the hoses and the connector to the tank is behind a factory debris shield.
If you guys have any questions just let me know, I know a few folks have thought about this over the years. I will be posting about the exhaust setup next, and then wheel specs.
Thread Starter
Joined: Feb 2007
Posts: 477
Likes: 3
From: Vancouver, BC, Canada
Thanks everyone, it keeps coming along slowly. Currently I am sorting out a leaking rear wheel and a few other small fixes, lowering the rear was great for the look and taking out the rake, but now there is some major rubbing on the harder bumps even with the suspension set to the hardest and my diffuser has been taking a major beating... poor carbon fibre.
But, onto the exhaust as requested.
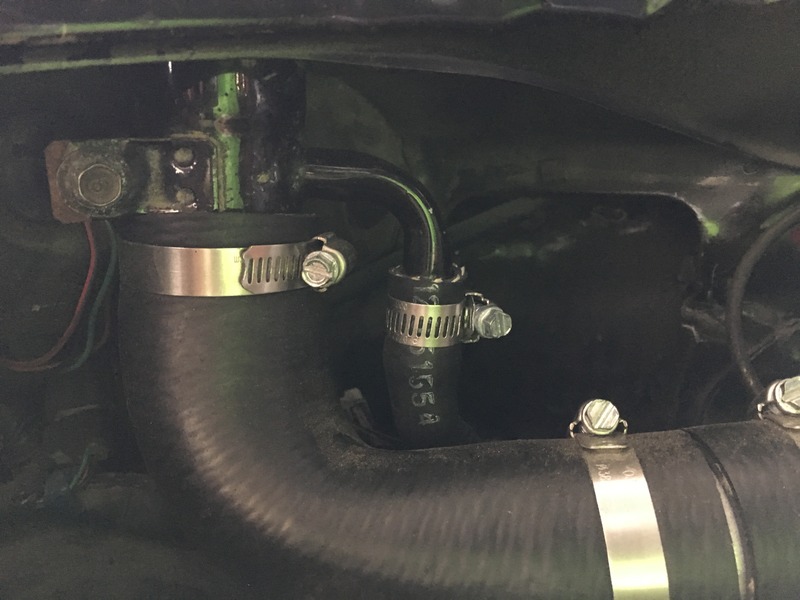
I have long tube headers from the engine like most on my LS2, and they merge to a Y-pipe with a 3" outlet. Everything is stainless steel and was welded at a friends shop by him from scratch including the muffler. I designed the muffler myself to work with the RE-Amemiya diffuser and clear the OEM fuel tank. Ground clearance was key as both my HKS ones scratched a lot.
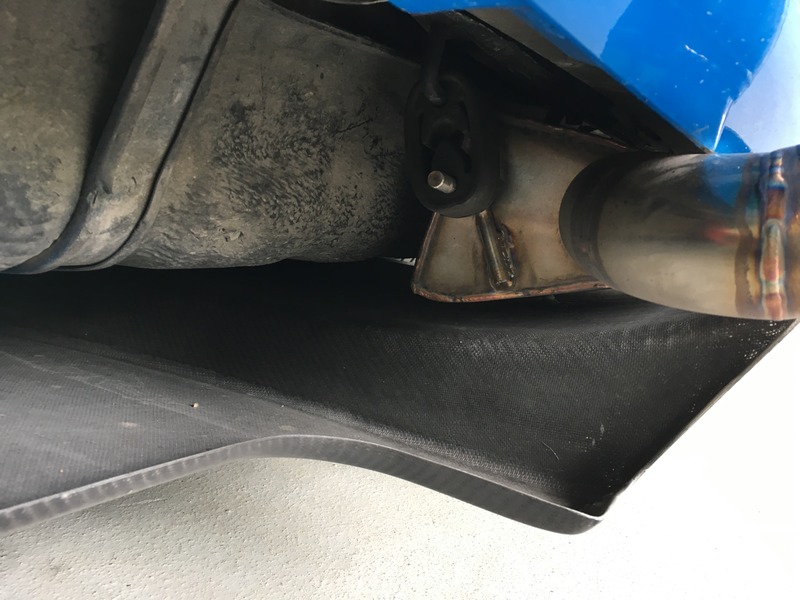
The main 3" pipe with the flex joining the y-pipe:
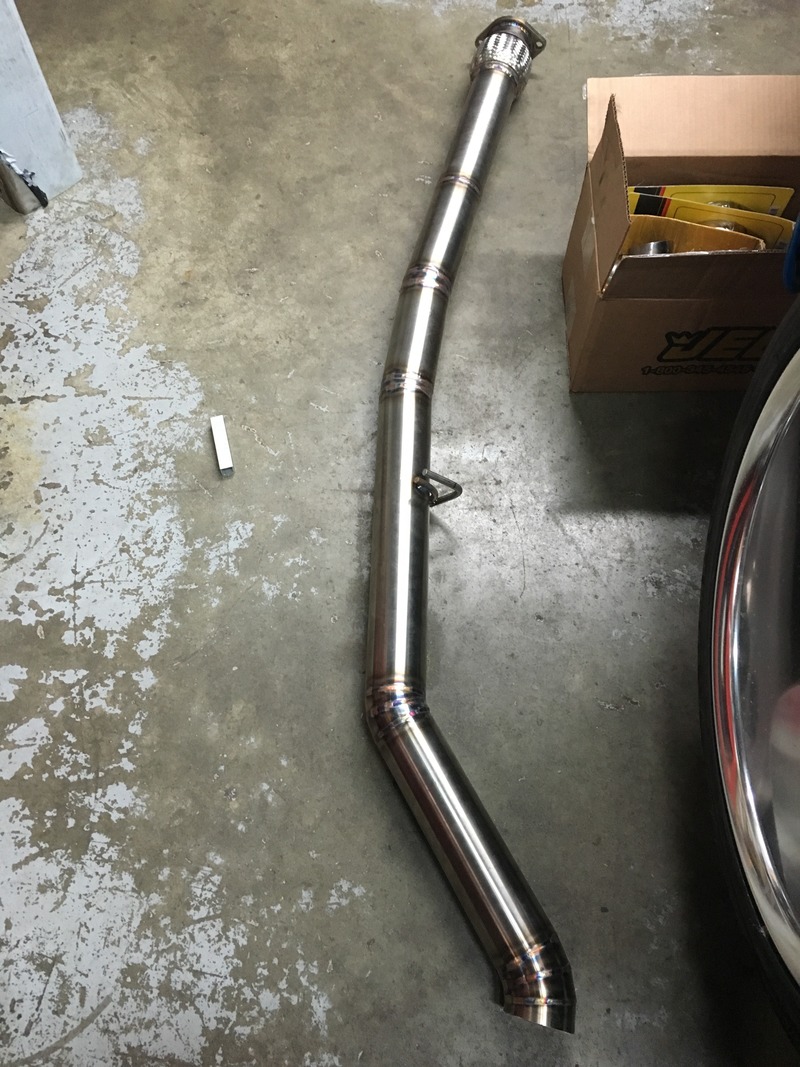
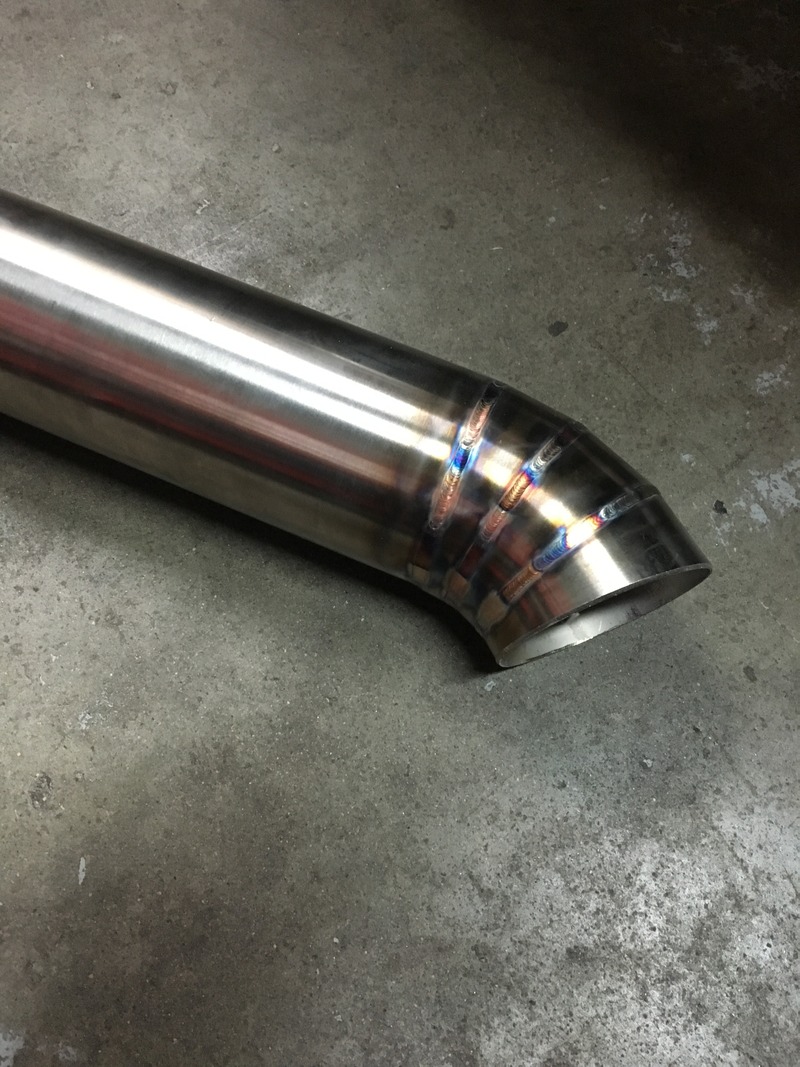
One of the bends:
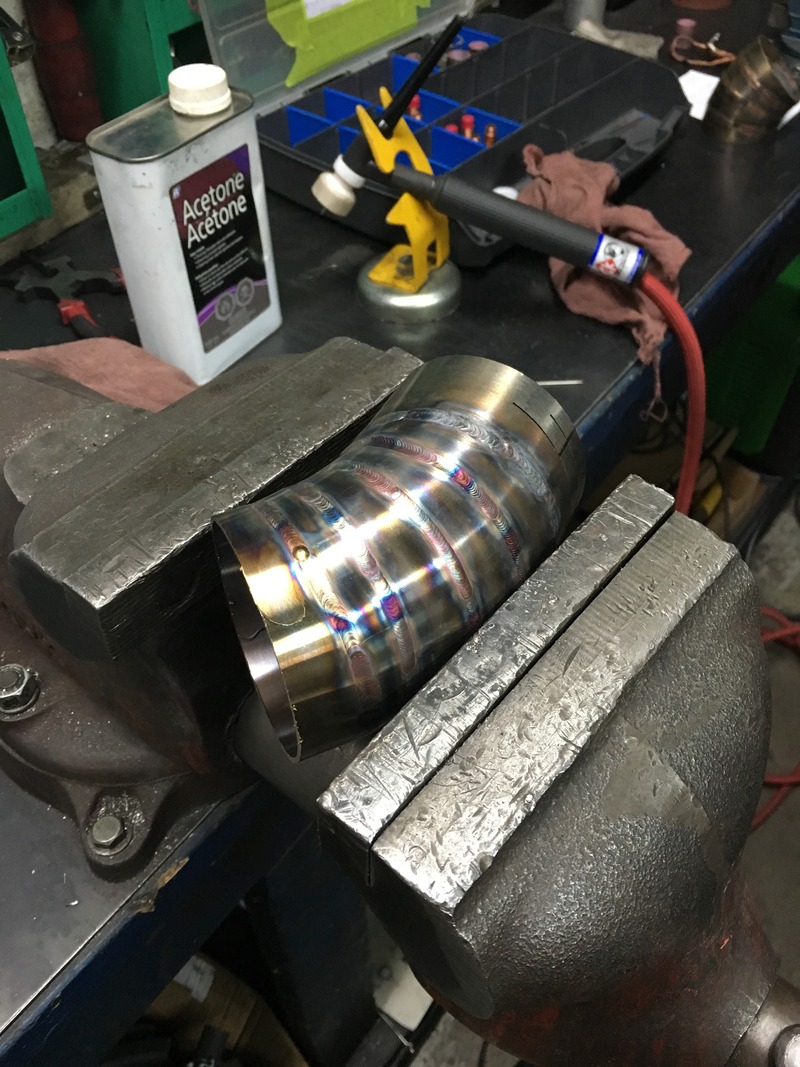
The bend on the main pipe:
The muffler, inspiration for the compact, nearly triangle design came from Lotus Elise, and the NSX on packaging.
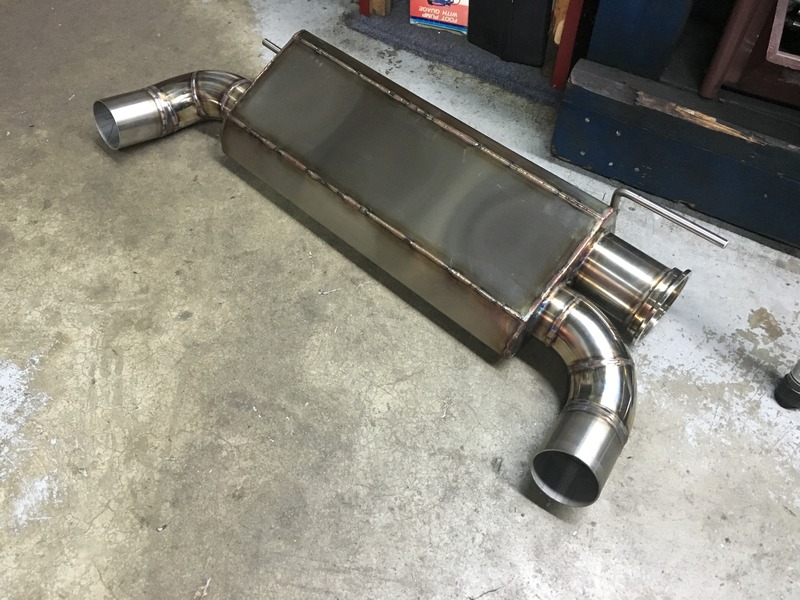
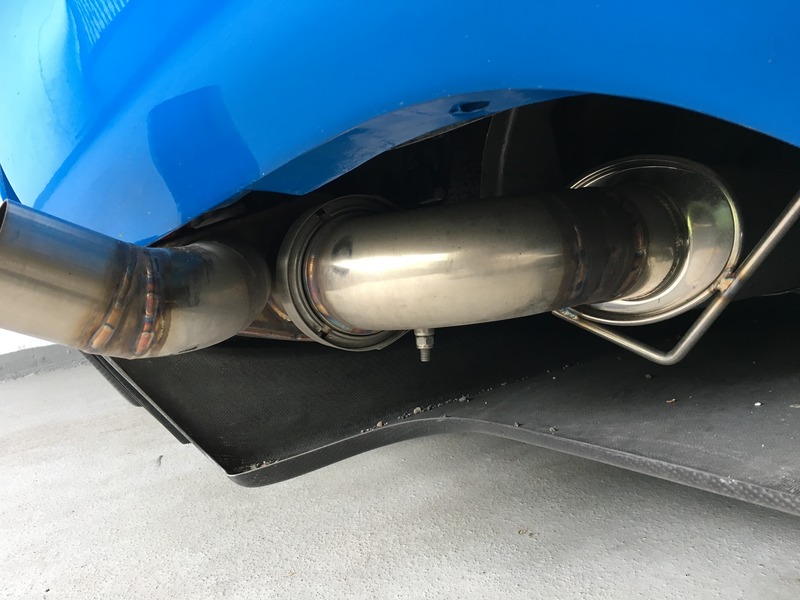
The connector to the rest of the exhaust and single Vibrant short 3" muffler. The car is quite quiet compared to before at highway speeds and idle.
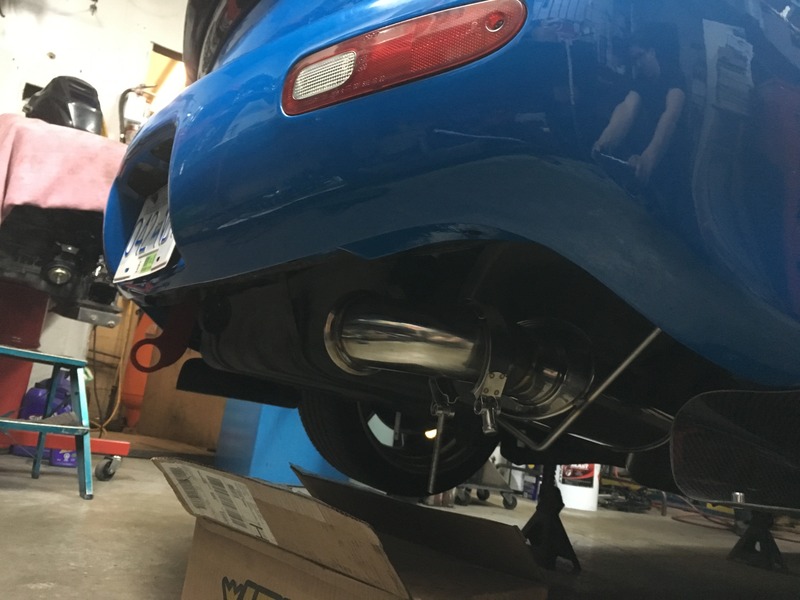
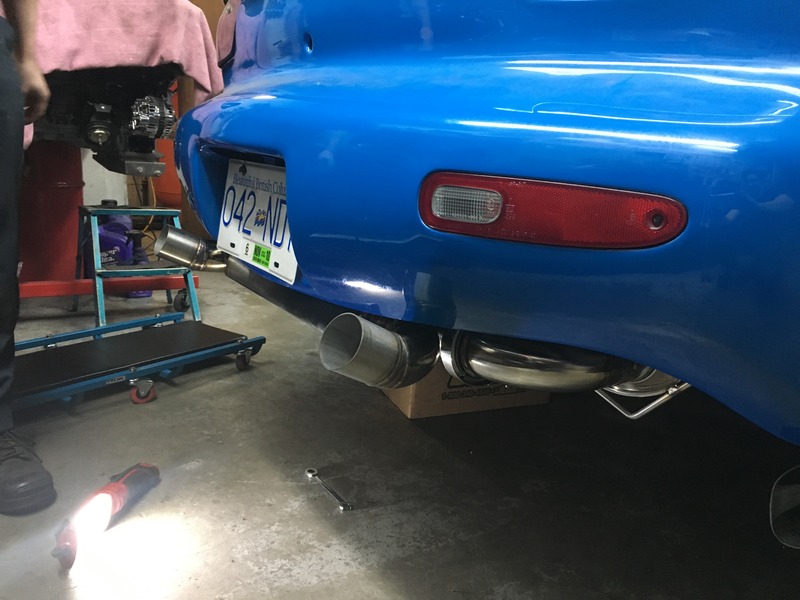
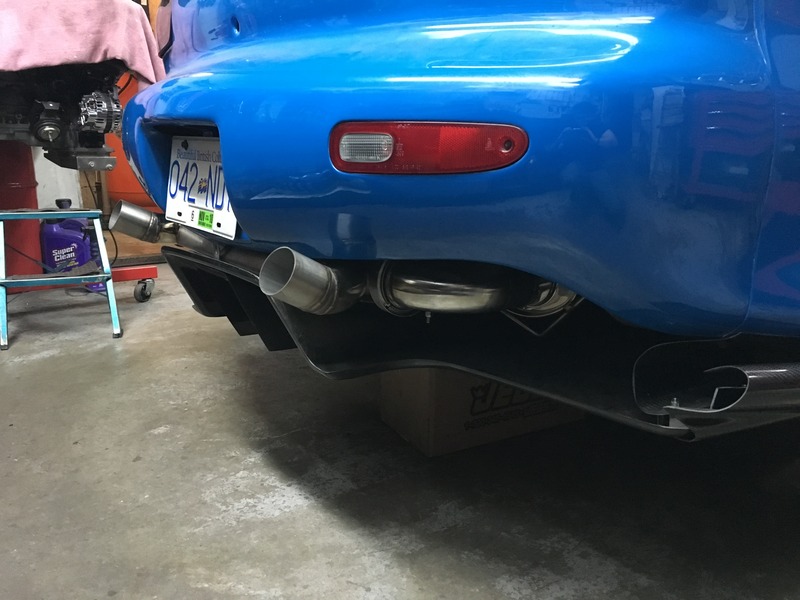
Shot of the rear before the back was lowered, the muffler baffling was done with perforated piping like any high flow muffler, but it splits into a Y. The 3" split goes into a 2.5" perforated pipe up to the ends of the muffler and then pie cut angles up for that old school look. I have some tips that I may modify to put on top of the 2.5" tips, but it's quite low on the priority list to get on the car.
When I sort out the wheel leaking, I'll post some specs on building those too. Currently I am trying to upgrade my 285's to 295's since I can clear them in the rear. It was hard to know if things would clear, but if I can't size up then I will just order 295's next time and then fitment will be spot on.
But, onto the exhaust as requested.
I have long tube headers from the engine like most on my LS2, and they merge to a Y-pipe with a 3" outlet. Everything is stainless steel and was welded at a friends shop by him from scratch including the muffler. I designed the muffler myself to work with the RE-Amemiya diffuser and clear the OEM fuel tank. Ground clearance was key as both my HKS ones scratched a lot.
The main 3" pipe with the flex joining the y-pipe:
One of the bends:
The bend on the main pipe:

The muffler, inspiration for the compact, nearly triangle design came from Lotus Elise, and the NSX on packaging.

The connector to the rest of the exhaust and single Vibrant short 3" muffler. The car is quite quiet compared to before at highway speeds and idle.


Shot of the rear before the back was lowered, the muffler baffling was done with perforated piping like any high flow muffler, but it splits into a Y. The 3" split goes into a 2.5" perforated pipe up to the ends of the muffler and then pie cut angles up for that old school look. I have some tips that I may modify to put on top of the 2.5" tips, but it's quite low on the priority list to get on the car.

When I sort out the wheel leaking, I'll post some specs on building those too. Currently I am trying to upgrade my 285's to 295's since I can clear them in the rear. It was hard to know if things would clear, but if I can't size up then I will just order 295's next time and then fitment will be spot on.

any updates on this build? I have the same cowl hood without the vents on the side and I really like it. I think it goes well with the V8 under the hood. Kind of a tribute to the muscle car. Is it possible to do the ronin wide body without relocating the fuel filler? Or is that something that just makes more sense to do? Attached a photo of my 95 with the cowl hood.