
Mission Impossible

Thread Starter
Joined: Oct 2004
Posts: 1,353
Likes: 4
From: Istanbul / Sydney
Thread Starter
Joined: Oct 2004
Posts: 1,353
Likes: 4
From: Istanbul / Sydney
Thanks guys. The centre cap is a generic Honda cap. iirc it was a plastic accord cap 57 or 67mm, although the centre may be aluminum. I got stickers cut but knowing it won't hold against pressured water or weather conditioms we sprayed over it with clear coat.
At the end of the day the car has 18yo paint and although you can't see in pics it got few scratches and dents. I've spent a lot of time and money into this so i might as well do it once and do it right. I want the car to have mirrorlike finish and only be able to look at it with welding goggles
At the end of the day the car has 18yo paint and although you can't see in pics it got few scratches and dents. I've spent a lot of time and money into this so i might as well do it once and do it right. I want the car to have mirrorlike finish and only be able to look at it with welding goggles
Thread Starter
Joined: Oct 2004
Posts: 1,353
Likes: 4
From: Istanbul / Sydney
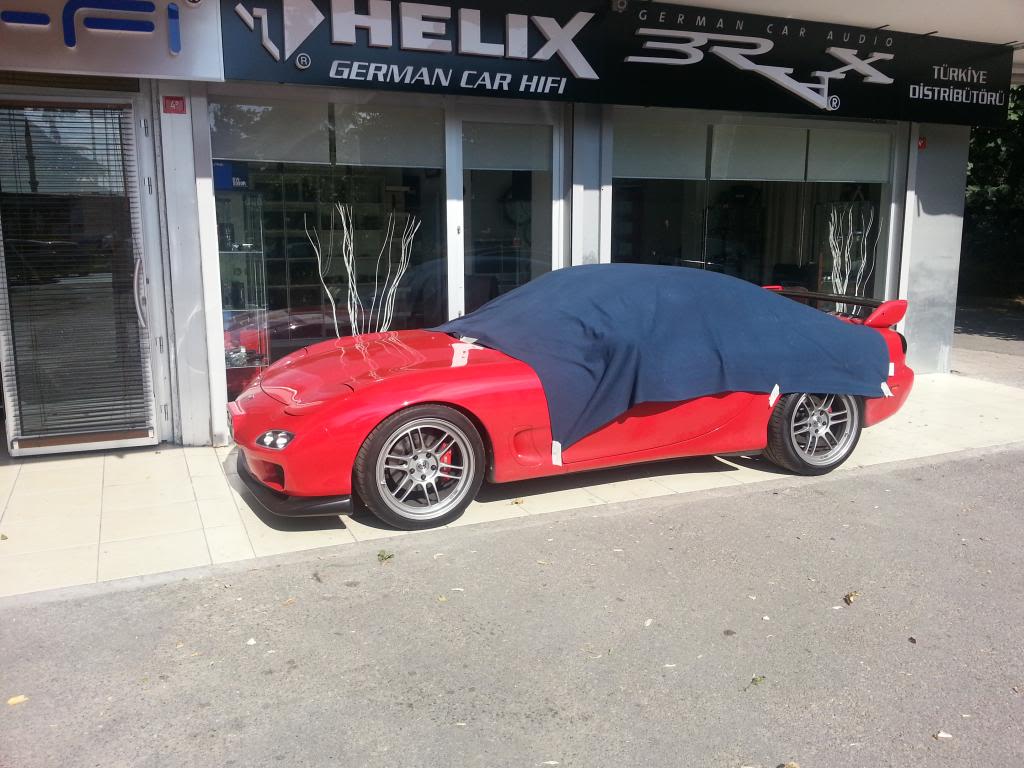
Lately I have been very busy with work and family but somehow managed to get the car back on the road. It's not 100% but at least now I can drive to places and get minor fixes done.
I decided to postpone the full respray simply because I couldn't wait any longer!
Some of the things done recently:
- Front bumper, rear spoiler and trunk got painted
- Factory sideskirt attachment lip got painted in matte black
- OEM looking mesh installed on front bumper
- Fender rolling
Adjusting coilovers:

Turkish tea is a part of Turkish hospitality and offered in every shop or house you walk into.

Bumper fins had to be trimmed to fit the mesh properly:


The car in its current state:

Time for sleep:
I decided to postpone the full respray simply because I couldn't wait any longer!
Some of the things done recently:
- Front bumper, rear spoiler and trunk got painted
- Factory sideskirt attachment lip got painted in matte black
- OEM looking mesh installed on front bumper
- Fender rolling
Adjusting coilovers:

Turkish tea is a part of Turkish hospitality and offered in every shop or house you walk into.

Bumper fins had to be trimmed to fit the mesh properly:


The car in its current state:


Time for sleep:

Thread Starter
Joined: Oct 2004
Posts: 1,353
Likes: 4
From: Istanbul / Sydney
Break-in miles are very boring without a sound system so I went back to my installer to have my sound system re-installed.
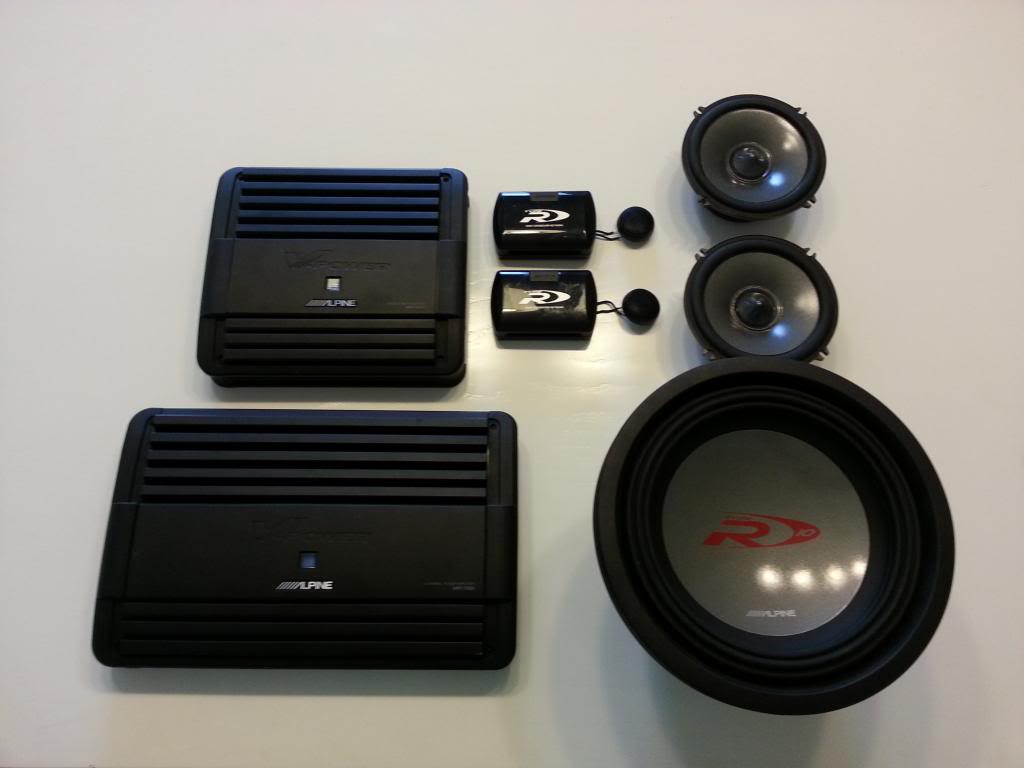
Head unit: Alpine CDA-9887R
Amps: Alpine MRP-F600 & MRP-M500
Components: Alpine Type-R SPR-17S
Sub: Alpine Type-R SWR-1042d
Sound system build thread:
https://www.rx7club.com/interior-ext...e-here-906605/
It has been a long project and I've done few miscalculations along the way, now I am facing another one which is called Odyssey PC 925 (28amps vs. old varta 72amps). I wasn't thinking about my sound system when I bought this battery and relocated it to the rear bin. I was more concerned about the weight reduction and distribution. I found out that this battery is not suitable to use with my existing system so I am keeping the battery and going for a whole new sound system which will not have as much punch but will provide higher quality sound and will be easier on the battery as well as being lighter in weight.
My new system will be:
Head unit: Pioneer DEH-80PRS
Front speakers: Helix P236 components
Rear speakers: Helix E69X 6x9 coaxial system
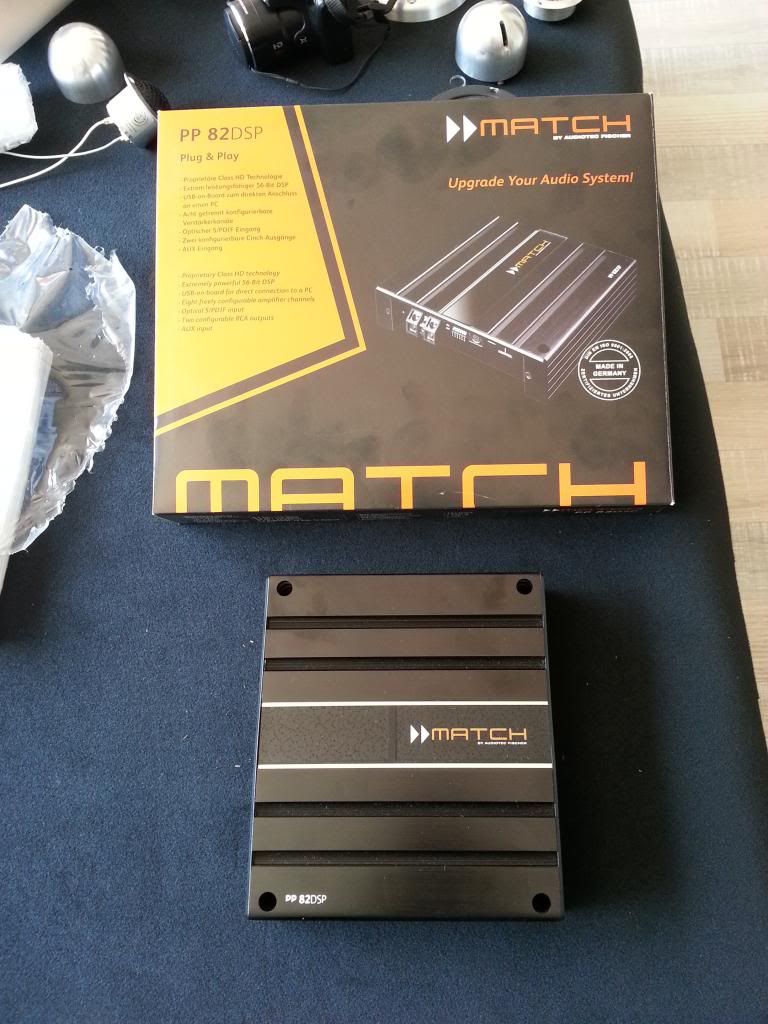
Amplifier: Match PP82DSP
I was not happy with the tweeter pods and location in my old set-up and my new setup will give me a chance to fix that. At the moment I do not have any pics but will take some of new tweeter pod design later.
Bye bye old system The sad thing is I bought them brand new and used it for less than 1000miles:
Waiting for the new system install:
Head unit: Alpine CDA-9887R
Amps: Alpine MRP-F600 & MRP-M500
Components: Alpine Type-R SPR-17S
Sub: Alpine Type-R SWR-1042d
Sound system build thread:
https://www.rx7club.com/interior-ext...e-here-906605/
It has been a long project and I've done few miscalculations along the way, now I am facing another one which is called Odyssey PC 925 (28amps vs. old varta 72amps). I wasn't thinking about my sound system when I bought this battery and relocated it to the rear bin. I was more concerned about the weight reduction and distribution. I found out that this battery is not suitable to use with my existing system so I am keeping the battery and going for a whole new sound system which will not have as much punch but will provide higher quality sound and will be easier on the battery as well as being lighter in weight.
My new system will be:
Head unit: Pioneer DEH-80PRS
Front speakers: Helix P236 components
Rear speakers: Helix E69X 6x9 coaxial system
Amplifier: Match PP82DSP
I was not happy with the tweeter pods and location in my old set-up and my new setup will give me a chance to fix that. At the moment I do not have any pics but will take some of new tweeter pod design later.
Bye bye old system
The sad thing is I bought them brand new and used it for less than 1000miles:
Waiting for the new system install:

Thread Starter
Joined: Oct 2004
Posts: 1,353
Likes: 4
From: Istanbul / Sydney
Alpsta... This really came out well as a whole package. All the things you've done are very nicely balanced and make the car very cohesive. Everything fits together and it ends up looking factory (your factory, but, hey, factory). Especially like the double DIN face for the display and the LED lights built in, the red seat belts are a nice touch, and so are the custom wheel caps. Very stock looking with some very nice, subtle touches. Engine work and engine bay are of matching quality to the rest.
Gordon
Gordon


Thread Starter
Joined: Oct 2004
Posts: 1,353
Likes: 4
From: Istanbul / Sydney
Thanks guys!
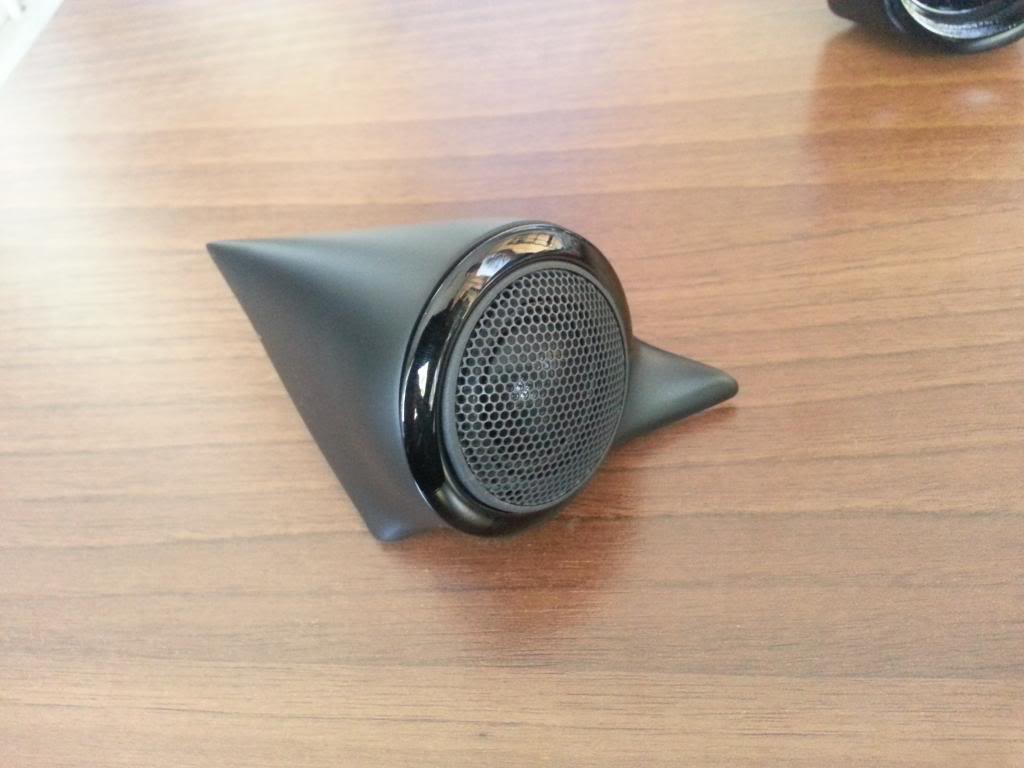
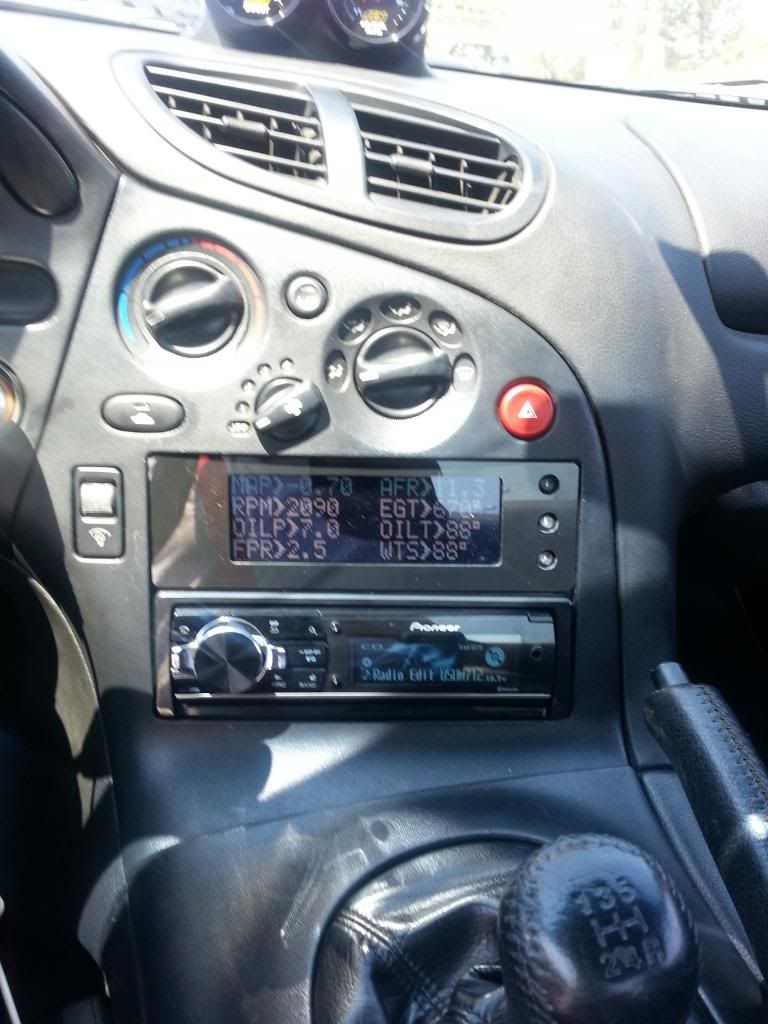
New Pioneer DEH-80PRS and Nardi / Personal steering wheel installed. Still working on tweeter pods. I wasn't happy with the old ones so we are making new ones using the mirror triangles.
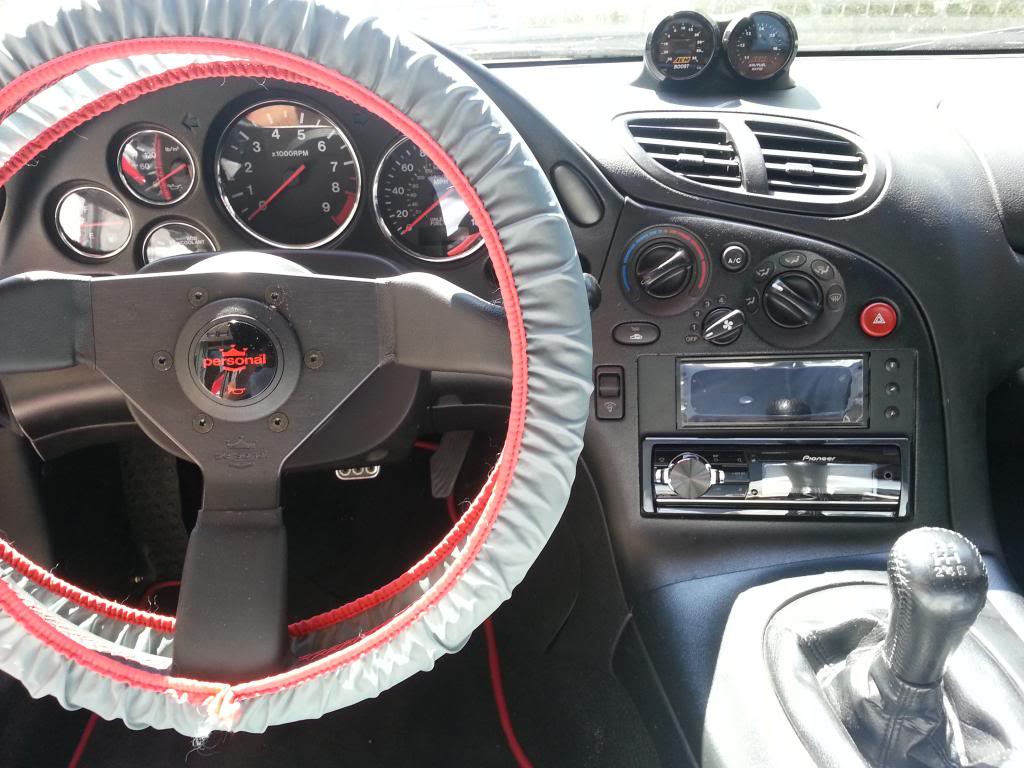


New Pioneer DEH-80PRS and Nardi / Personal steering wheel installed. Still working on tweeter pods. I wasn't happy with the old ones so we are making new ones using the mirror triangles.


Thread Starter
Joined: Oct 2004
Posts: 1,353
Likes: 4
From: Istanbul / Sydney
Thanks guys!
Mobster, my new sound system will be much more subtle than the old one so there won't be much to post picturewise.
2 Alpine amps, 1 Alpine sub and the sub box weighed 25kg / 55lbs! I am removing all this because my new battery can't handle it and also my project is more performance oriented then comfort oriented. Having said that the new system will have even better sound quality and clarity then the old system, just not as much bass.
I will post finished pics of the tweeter pods and below you can see the 8 channel amp I am using. Technology is amazing; this little amp is not only superlight but also provides as much power as my old amp and much easier on the battery.

Thread Starter
Joined: Oct 2004
Posts: 1,353
Likes: 4
From: Istanbul / Sydney
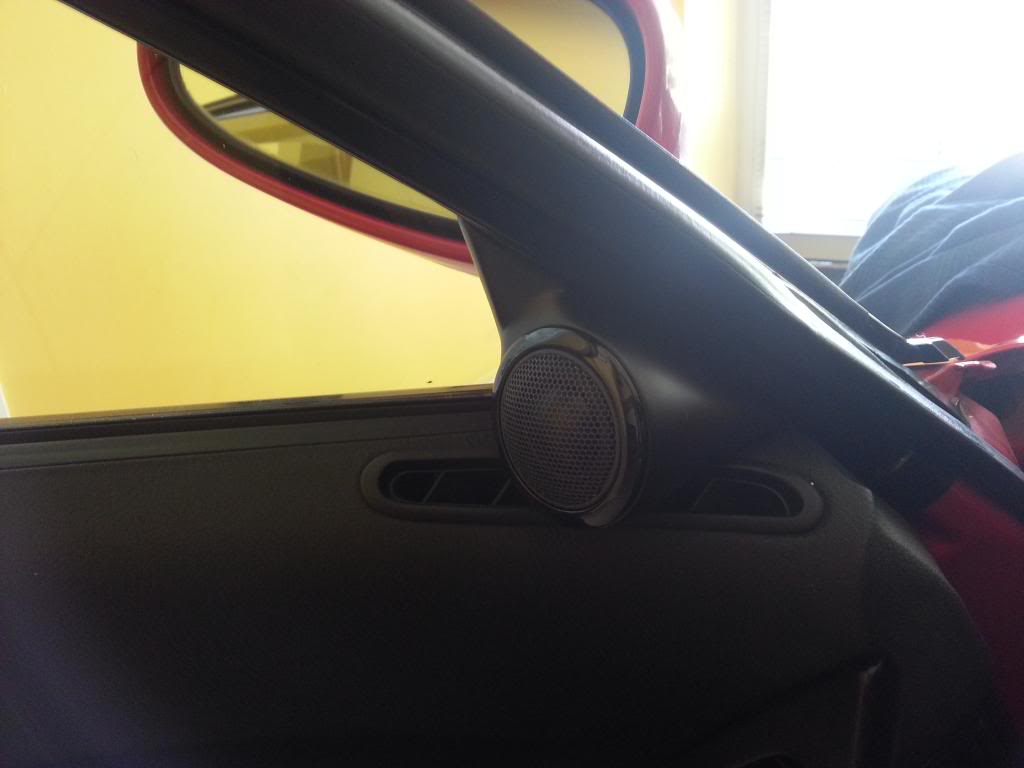
Got the tweeter pods from painters. I went with matte black for the pods. I also got the tweeter bezels removed and painted for a modern look and to match my AEM gauges in Tripower dual centre pod.
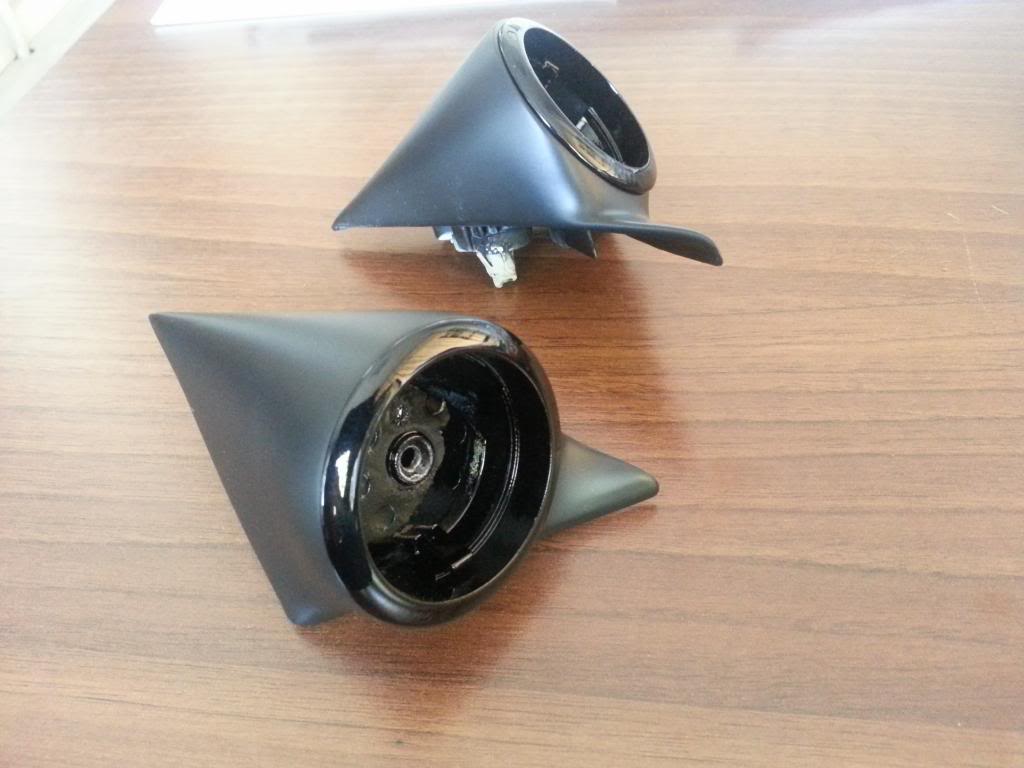
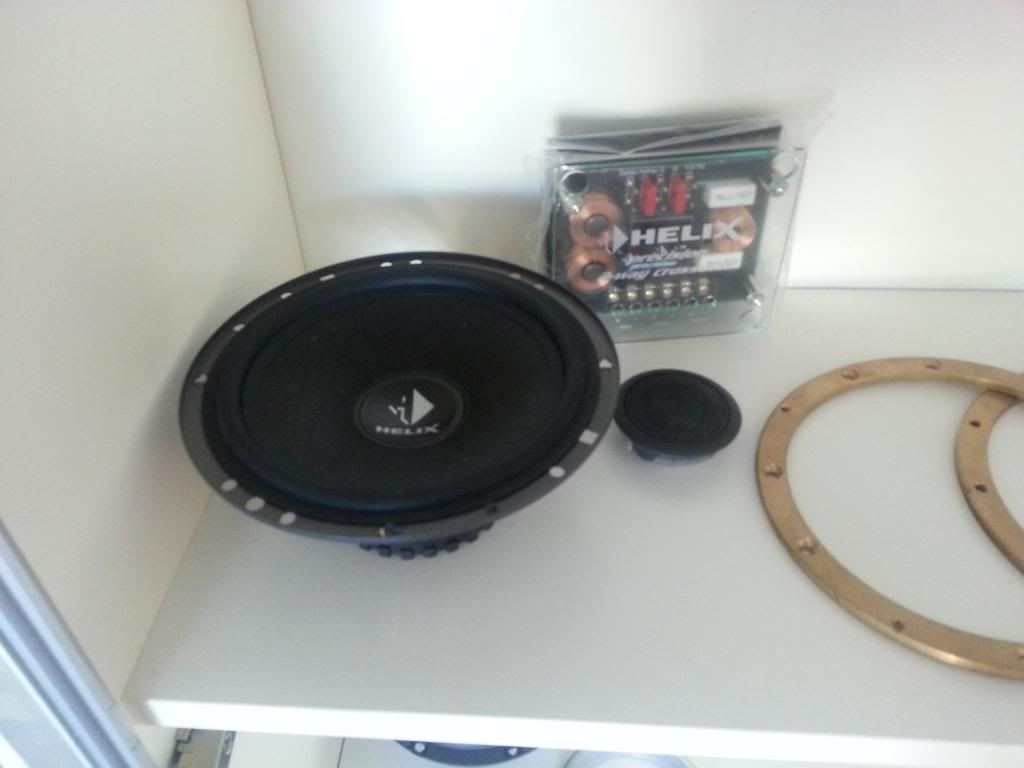
These are the Helix P236 components to replace my Alpine SPR-17s


These are the Helix P236 components to replace my Alpine SPR-17s

Thread Starter
Joined: Oct 2004
Posts: 1,353
Likes: 4
From: Istanbul / Sydney
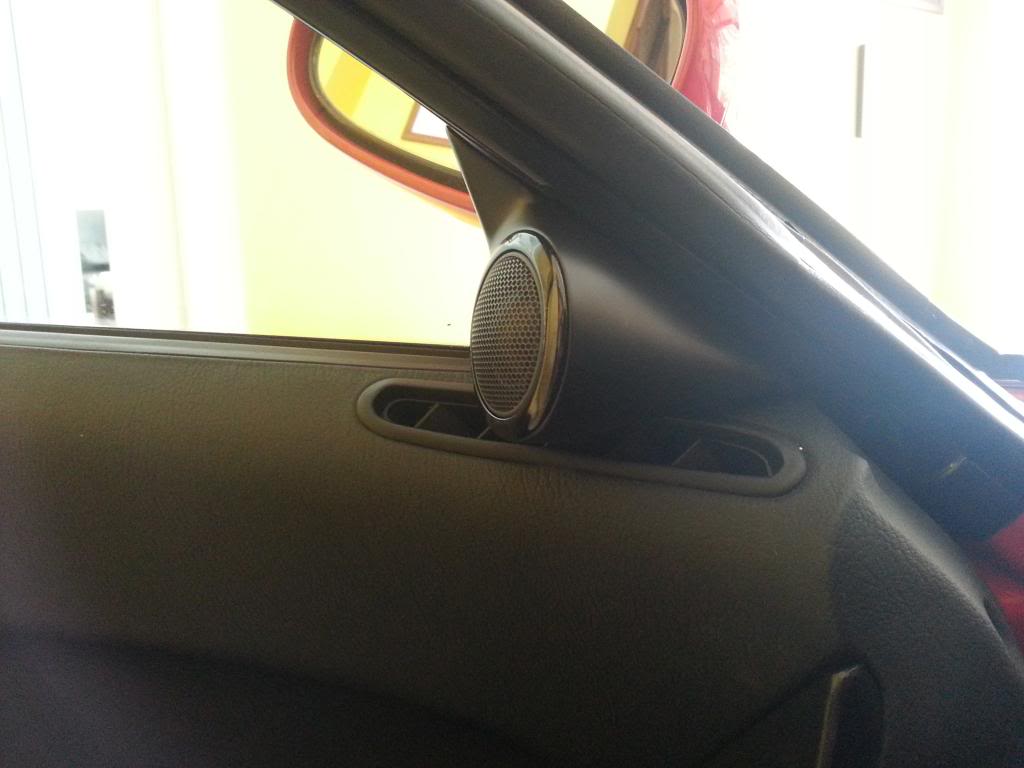
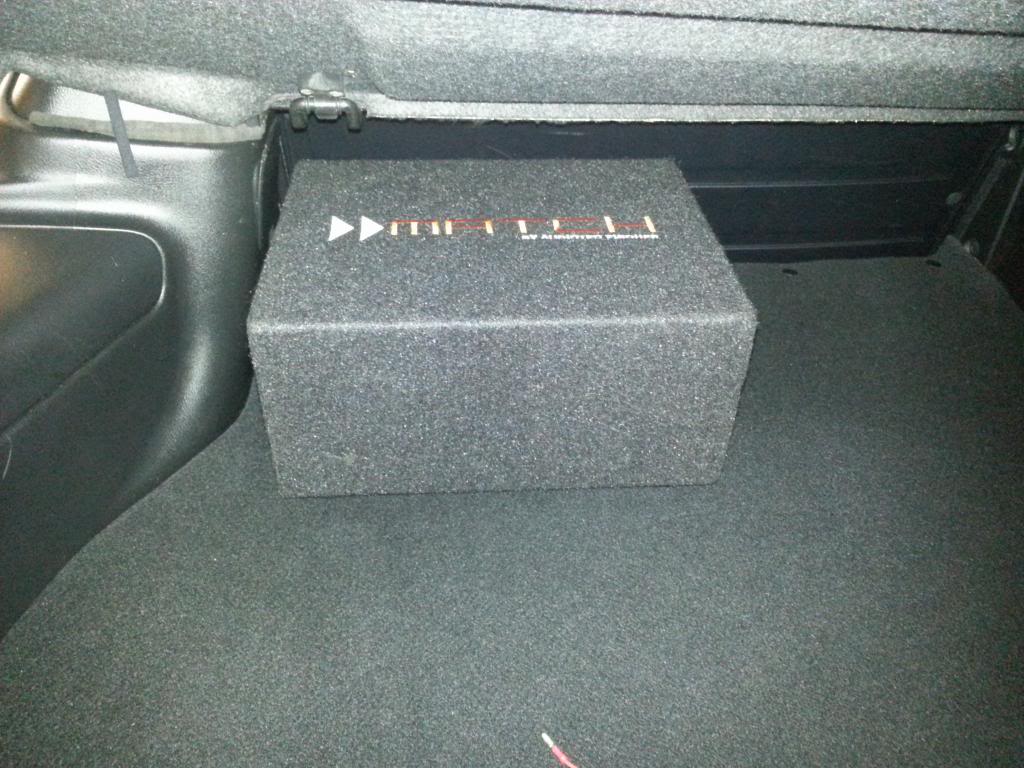
Tweeter pods installed. I decided to add Match PP 8E-Q subwoofer and enclosure and URC 2A remote controller (to adjust gain and bass from the driver seat) to my setup. The subwoofer and enclosure weighs only 7kg and very easy to remove in case needed.
The pics are from test fitting of the sub enclosure, I will mount it in centre or right not on the left like in the pics.
One of the fan control **** bulbs was blown which gave me an excuse to remove and clean everything. While at it some tidy up and insulation of wiring was done. There has been lots of aftermarket additions like gauges and displays in the last few months so it was time for a proper tidy up.
I can't decide whether to do LED cluster lighting mod or not while the cluster panel is out. I will probably leave it as it is because if I do the cluster I will have to do the fan control ***** section as well.
Bigger dilemma at the moment is to find room for AVC-R, PFC Commander and the subwoofer remote. I am not happy with AVCR and PFC Commander in the glove box, even though my MaxiDisplay shows most of the information I need.


The pics are from test fitting of the sub enclosure, I will mount it in centre or right not on the left like in the pics.

One of the fan control **** bulbs was blown which gave me an excuse to remove and clean everything. While at it some tidy up and insulation of wiring was done. There has been lots of aftermarket additions like gauges and displays in the last few months so it was time for a proper tidy up.
I can't decide whether to do LED cluster lighting mod or not while the cluster panel is out. I will probably leave it as it is because if I do the cluster I will have to do the fan control ***** section as well.
Bigger dilemma at the moment is to find room for AVC-R, PFC Commander and the subwoofer remote. I am not happy with AVCR and PFC Commander in the glove box, even though my MaxiDisplay shows most of the information I need.


Thread Starter
Joined: Oct 2004
Posts: 1,353
Likes: 4
From: Istanbul / Sydney
Sound system is installed and tuned. Very happy with the end result. My installer spent a lot of time fine tuning the system using sound analysers, competition CDs for tuning etc. It is like the songs are coming from the middle of the dashboard even though the the speakers are located in the doors (thanks to time delay function and processors) and the sound is crystal clear.
Every CD is recorded differently and there is not one correct setting for bass so I had this remote control installed to adjust gain and bass.

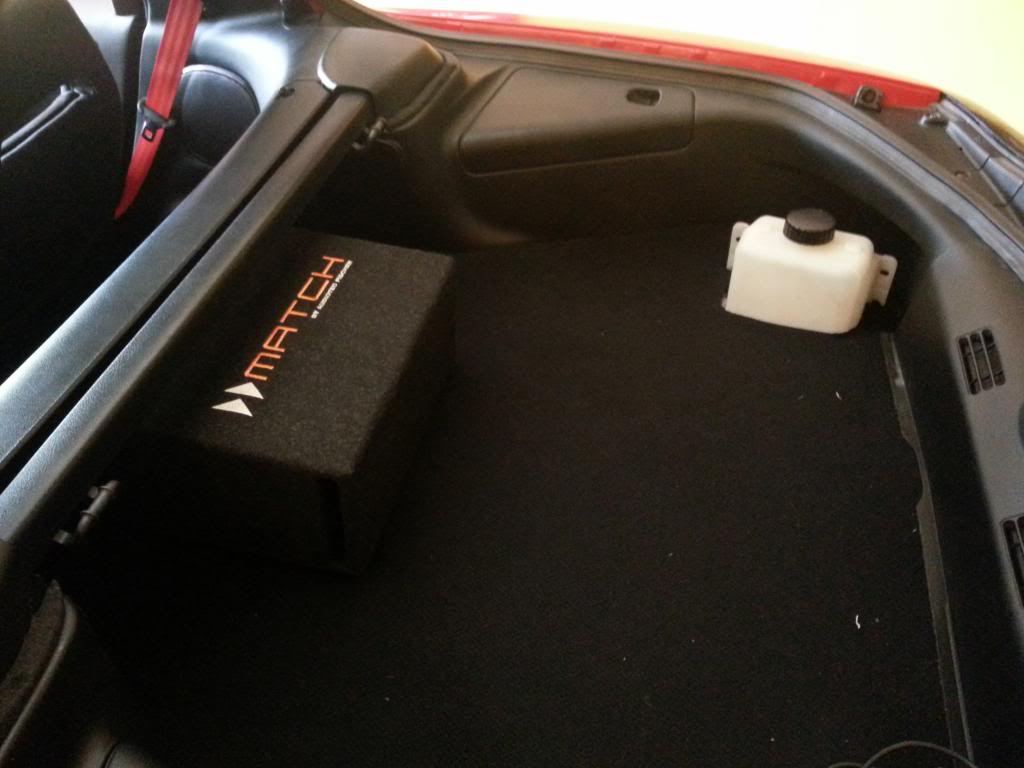
My subwoofer box and methanol tank placement:
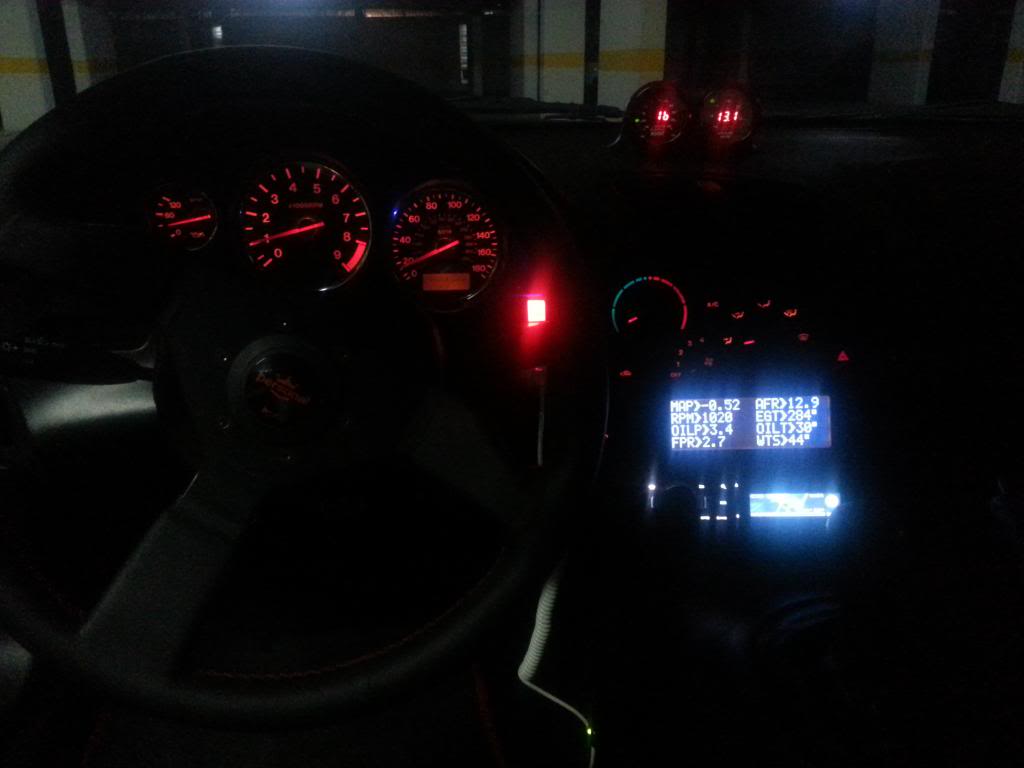
I was not happy with the way my maxidisplay gauge sat, so I had a plexiglass cover made for it, which makes it sit more flush. In the photo it looks gray but it is actually gloss black:
At night:
Not happy with AVC-R and PFC commander being in the glovebox but could not find mounting solutions for them at the moment.
Every CD is recorded differently and there is not one correct setting for bass so I had this remote control installed to adjust gain and bass.

My subwoofer box and methanol tank placement:

I was not happy with the way my maxidisplay gauge sat, so I had a plexiglass cover made for it, which makes it sit more flush. In the photo it looks gray but it is actually gloss black:

At night:

Not happy with AVC-R and PFC commander being in the glovebox but could not find mounting solutions for them at the moment.

Thread
Thread Starter
Forum
Replies
Last Post
t-von
3rd Generation Specific (1993-2002)
9
Sep 10, 2015 01:56 PM