When you click on links to various merchants on this site and make a purchase, this can result in this site earning a commission. Affiliate programs and affiliations include, but are not limited to, the eBay Partner Network.
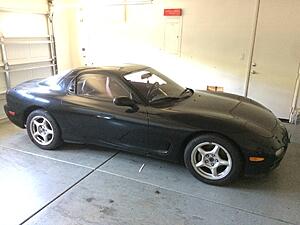
Hey all. Finally a dream come true! I got my stock black FD! Shout out to forum member ArmAnirx7 for the smooth sale and helpfulness.
It's a '93 BB touring with red interior, which looks really nice, and is pretty much bone stock. Currently it's on a truck en route to my house, so more pics to come when it arrives.
Before anyone asks, I'm NEVER LS swapping this car. IMO that just ruins one of the most iconic parts of this beautiful machine.
My goals are to slowly update this car over the next few years. I plan to go with almost an all '99 spec JDM exterior and I want to stick with stock twins for as long as possible while working on reliability mods and minor performance upgrades.
Currently the stock twins are leaking which is causing a large amount of smoke to billow out of the exhaust, so I need to address that ASAP. Hoping to pickup a pair of low-mileage stock twins for a decent price so I can focus on other aspects that need to be brought up to date.
Looking forward to learning about my FD and having fun wrenching on it in the coming years.
Good luck! Looking forward to see what you do with it.
Thanks! It's going to be a long haul, but I am looking forward to the journey and the learning.
Originally Posted by Ceylon
I do love how these cars look stock, great lines. Cant go wrong with red on brilliant black, either.
Look forward to seeing updates .
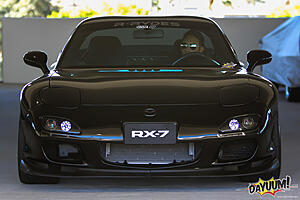
Couldn't agree more. This car has some of the best lines of any car ever produced IMO. The front profile is one of my favorites. How can you not love this:
Update:
Been busy with work so some updates are a few days old.
My FD arrived on 5/2 and is now safely resting in my garage! I got my MI plates and registration same day.
I also went out and dropped some coin on new tools:
-2 ton, aluminum, low-profile floor jack
-four 6 ton jack stands
-1/2", 3/8", and 1/4" universal joints, adapters, and extensions up to 20"
-1/2" and 3/8" torque wrenches (click type)
-replacement halogen bulb for shop lamp, and a hanging shop lamp
When I started her up upon arrival, the idle felt quite rough and I thought the car felt like it vibrated a little. I was driving it up the street to my house, and smoke was just pouring out of the exhaust. After some more reading on the forum, I am wondering if the the car is burning coolant somehow, or worse yet, the coolant seals are blown. The exhaust smoke is is more white than gray. I don't see any blue or black smoke, so I'm not convinced the problem is oil leaking into the DP via leaking turbos. I will try and take a video of a cold start, and the exhaust, this weekend (It has been raining almost non-stop this week), and I'll post in on the forums and ask for some further advice.
Right now I'm inclined to just go for an entire overhaul - take out everything from the engine bay, disassemble the engine and replace everything as needed.
Thanks guys. You weren't kidding about burning the wallet. Parts, parts, parts.
Purchased the following since the last update:
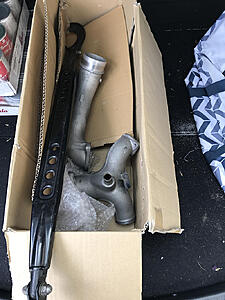
-HKS downpipe
-HKS RS intakes
-Low-mileage (50k mi) stock twins
-Efini Y-pipe
-Defi Advance CR boost and water temp gauges along with controller
-About $600 worth of gaskets, seals, bolts, and hoses courtesy Ray Crowe
So far I've pulled the battery, box and tray, fresh air duct, rad hoses, ducting, IC, IC piping, AST, air intake box, hoses, and filter. The IC was a bit frustrating due to some of the overlapping ducting and I couldn't pop out those plastic inserts (the plastic snap tabs or whatever they are called). Any tips on removing these things for the future?
Next weekend I'm going to swap the twins, and install the downpipe, Y-pipe, and boost gauge all in one go. I'll hold off on the RS intakes and water temp gauge until the car is stable and running again. Praying the turbo swap along with new gaskets and hoses will resolve the oil leak issue.
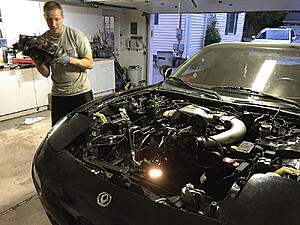
Busy as always, but time for an update. Twins were pulled along with the stock downpipe. I installed the HKS downpipe along with the lightly used set of stock twins.
I didn't realize how much of a PITA all of the heat shields and tight areas really were, but luckily I had a couple friends come over and it was a lot easier with extra hands all around. I had a ton of dirt and oil caked onto the subframe and inside the bottom of the engine bay, so I spent some time cleaning up what I could using paper rags and Green Stuff degreaser. That stuff works great!
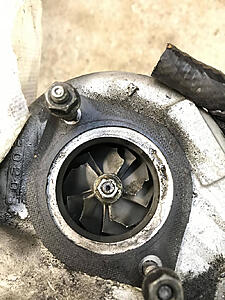
Man, the turbos were in bad shape when I pulled them off. As soon as I began to unbolt the pipes from the air inlet on the turbos, oil just started pouring out. There was a ton of play in the turbo shaft and I had cracked fins galore.
When I went to install the efini y-pipe, I realized that the used pipe had all it's bungs and nipples clamped and sealed. Previous owner had a non-sequential twin setup and it was basically just fabricated hard lines. I was able to work out a return and I purchased a good y-pipe from MattGold. I got an RZ strut brace from him as well. Swell dude!
The serpentine belt that hooks to the airpump was also split so I ended up just replacing both the AP and the PS A/C belts.
Lastly I just ordered a new Koyo N-Flo radiator. I will probably hit up Ray and order new OEM rad hoses along with a few other odds and ends that I need. Hopefully with this last batch of parts I can get my FD running and take the maiden voyage before summer is fully over.
I took a bunch of video that I need to edit when I get the chance and I'll try and make a short video out of it and post it up.
Interested in seeing where the build goes from here...
Good luck, ill be tuned in
Thanks buddy!
Update:
Came home Thursday after work to find this little guy sitting on my porch...
Koyo N-Flow rad!
Today I took some time and removed the front bumper. Man that was more of a PITA than I was expecting!!! Those bolts at the bumper and fender would be impossible to remove without a deep dish socket, universal joint, and extensions. I didn't think I had a deep dish 10mm socket, and I was just about to quit for the day, but I double checked my toolbox and saw I had one.
If someone could tell me the technical name for these plastic bolt-tabs and how to frickin' remove them, that would be fantastic!!!! I got so fed up with trying to remove them from the underside of the bumper that I just took the Dremel to them, cut the heads off and popped out the stud. They are the WORST!!!!
My goal is to get the efini Y-pipe, and the koyo rad installed, and hopefully have the car put back together and running in the next couple of weeks. If the turbo swap fixes the leaking oil and smoking exhaust issue, I want to enjoy some cruising time in the last half of summer.
If someone could tell me the technical name for these plastic bolt-tabs and how to frickin' remove them, that would be fantastic!!!! I got so fed up with trying to remove them from the underside of the bumper that I just took the Dremel to them, cut the heads off and popped out the stud. They are the WORST!!!!
)
I have found these little tools are useful for popping up what looks like the center "screw", then you can use one of the tools to pry out the whole assembly.
I have found these little tools are useful for popping up what looks like the center "screw", then you can use one of the tools to pry out the whole assembly.
You can get a similar set at harbor freight for pretty cheap. Came in handy when doing interior panels. Used to rely on a screwdriver which just broke and gouged everything.
I have found these little tools are useful for popping up what looks like the center "screw", then you can use one of the tools to pry out the whole assembly.
Originally Posted by earlqhan
You can get a similar set at harbor freight for pretty cheap. Came in handy when doing interior panels. Used to rely on a screwdriver which just broke and gouged everything.
Thanks a million guys!!! I'll be picking up a set from harbor freight ASAP!
Pretty big update finally. I got the Efini y-pipe installed. New gaskets and o-ring for the pipe that mates with the turbo control arm. Pretty straight forward job.
I also go the Koyo rad installed. Now that was an entirely different story. I have seen a lot of posts on the forum claiming, “It’s a drop-in replacement!” or “All you have to do is flip the brackets.” Etc. I don’t know if the people making these claims were working with already modified FDs or what, but in my experience, there were many little things that I had to do in order to get the fitment and clearances correct. As always, I shot a lot of video, but I still haven’t edited anything together. I am really more concerned with getting my FD running again and I want to enjoy it at least a little in the dog days of summer. Once I put the video together however, I think it will be pretty beneficial for any newcomers who choose to install this radiator into a stock FD. Thankfully my wife had just bought me a dremel for my birthday which came in clutch! I wouldn’t recommend this install without an angle grinder or a dremel.
Issue 1:
The mounting guides underneath the car will not house the Koyo rad correctly. The guides come in contact with the radiator and do not allow it to sit flush at the correct mounting angle. With a decent set of pliers and some muscle you can bend the tongue of the guides and allow for the larger radiator to sit comfortable into the mounting holes.
Issue 2:
The OEM radiator mounting brackets (C brackets?) do not have enough clearance to mate with the studs that are on the engine bay frame rails. I bolted the brackets on the Koyo rad with the same orientation as the OEM configuration, then I placed the radiator in the engine bay, and I marked the necessary clearance with a sharpie. I then used a dremel to cut out the necessary clearance on the brackets. I did not swap or change the orientation of the brackets. If you flip them, or swap sides, or whatever, the radiator near the front of the engine bay will sit too high and won’t have the necessary clearance for the fuse box that bolts to the front bumper. Also, your air shroud air box will have fitment issues as well, if you’re still running stock air intake.
Issue 3:
AC condenser passenger side mounting bracket. On my car, the 90-degree angle bracket on the passenger’s side of the engine bay wall that the AC condenser mounts to extended too far for the sidewall of the radiator to clear. This was causing the rad to still sit high in the engine bay. I marked with a sharpie how much I needed to remove and just took off 5-7mm with a dremel.
Issue 4:
AC condenser clearance. Due to the thickness of the Koyo rad, the AC condenser, and the face of the radiator were very close to each other. In order to create a little more space, I bought four M6 1.0 nuts, and just used them as spacers. The washer-head bolts had enough length on them to still bite and screw in properly, and it allowed me to have about 1cm of clearance between the condenser and the rad. At first I tried using some longer M6 1.0 bolts that I got from Home Depot, however, the thread pitch did not seem to match, and I was concerned about forcing them and ruining the threading. If anyone can comment on this that would be great. I would still like a bit more clearance between the AC condenser and the rad. Also, a better install would be to source some nice rubber bushings that act as better spacers than a metal nut.
Issue 5:
The fan assembly was the most simple part of the install. Unbolt from OEM radiator and bolt onto Koyo rad. All the mounting hardware mated perfectly. The only issue I ran into was that the fan assembly was raised a bit due to the thickness of the radiator. The corner of the fan assembly near the driver’s side closes to the driver was having slight clearance issues with the condenser hard lines and the oil line that runs through there. Again I went back to the dremel and notched out a small bit of the corner of the fan tray / assembly. I’m not 100% sure this is necessary as some of the lines can be pushed slightly, but I didn’t want anything rubbing or causing unknown issues.
It would be helpful to see what other people’s experiences are other than “It fits bro!”
I put in new OEM rad hoses, and did a thorough cleaning of the stock airbox. My airbox had a lot of old dirt, oil, and grease caked on inside and out. I picked up a new Wix air filter from O'reilly's.
Lastly changed both of the belts with new Gates belts. My old air pump belt was split.
I have to bolt the bumper back up as well as connect the rest of the air hoses, intercooler, AST, battery, and air shroud. So close!!!!
Ay caramba! Somehow that thread got missed in my searching. Hats off to Banzai-Racing for that great step-by-step guide. That definitely would have made my installation a bit quicker, but I might have used my dremel as much! I actually tried to remove the A/C condenser bracket at first, but the bolt would not loosen, and my socket was just stripping it, so I went to the dremel.
I haven't had a chance to work on it as I've been busy and out of town. I have some dedicated time set aside this weekend where I should be able to close all the loose ends. Fingers crossed. Would love to be able to cruise around on labor day weekend.
Originally Posted by earlqhan
Were you able to fix everything to get it running again? Where in MI?
I'm over in Northville. I see you're in Ann Arbor. My wife and I love going to Ann Arbor for some good eats! Any FD meetups in A2?
IMO stock panels without the rear spoiler makes for the best looking FD. Black/red is a great combo as well! Can't wait to see how the project unfolds!
I haven't had a chance to work on it as I've been busy and out of town. I have some dedicated time set aside this weekend where I should be able to close all the loose ends. Fingers crossed. Would love to be able to cruise around on labor day weekend.
I'm over in Northville. I see you're in Ann Arbor. My wife and I love going to Ann Arbor for some good eats! Any FD meetups in A2?
Not officially, just by default lol. A friend has a V8 drift car, just got a project for my wife, and my old roommate has an 8 and just picked up a FC.
Not officially, just by default lol. A friend has a V8 drift car, just got a project for my wife, and my old roommate has an 8 and just picked up a FC.
One of my closest friends is in the A2. Drives a black STi with the Rebel Alliance insignia on the emblems.
 04-25-17, 12:30 PM


 Those bolts at the bumper and fender would be impossible to remove without a deep dish socket, universal joint, and extensions. I didn't think I had a deep dish 10mm socket, and I was just about to quit for the day, but I double checked my toolbox and saw I had one.


 Somehow that thread got missed in my searching.
  Hats off to Banzai-Racing for that great step-by-step guide. That definitely would have made my installation a bit quicker, but I might have used my dremel as much!
  I actually tried to remove the A/C condenser bracket at first, but the bolt would not loosen, and my socket was just stripping it, so I went to the dremel.


