
HellaFella's FD Rx7 build


What's going on fellas? I'm new to the rotary motor and the Rx7 in general. I've been working on cars since 2006. I haven't done anything too crazy and I took a long 5 year break from working on cars when I joined the military in 2008. Here are a couple of my builds:
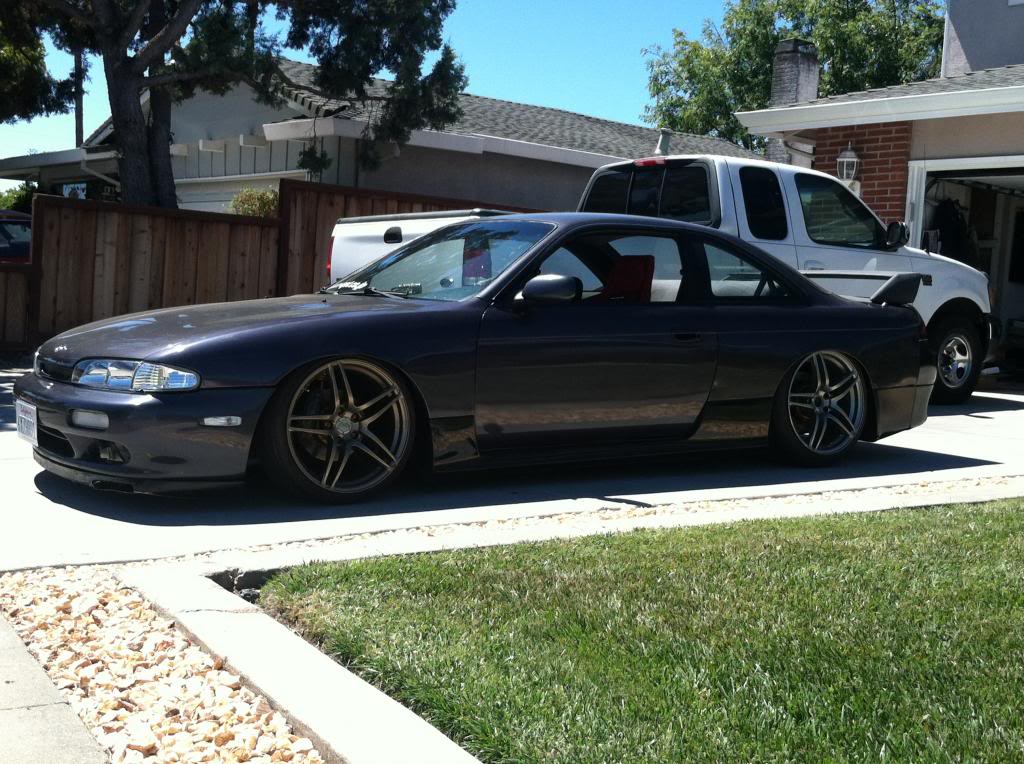
240sx with sr20 swap
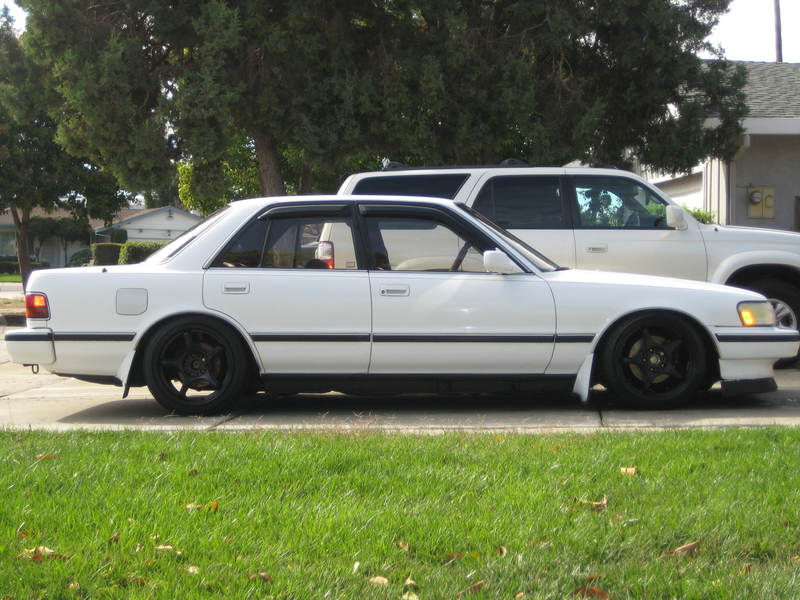
1989 cressida with manual transmission swap
I've built a few other cars I just can't seem to find the pictures.
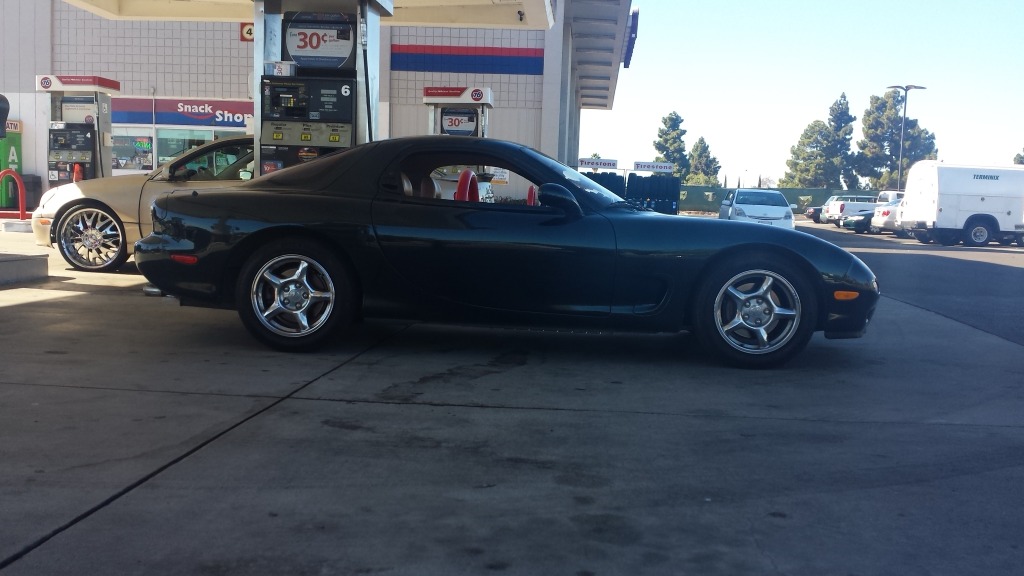
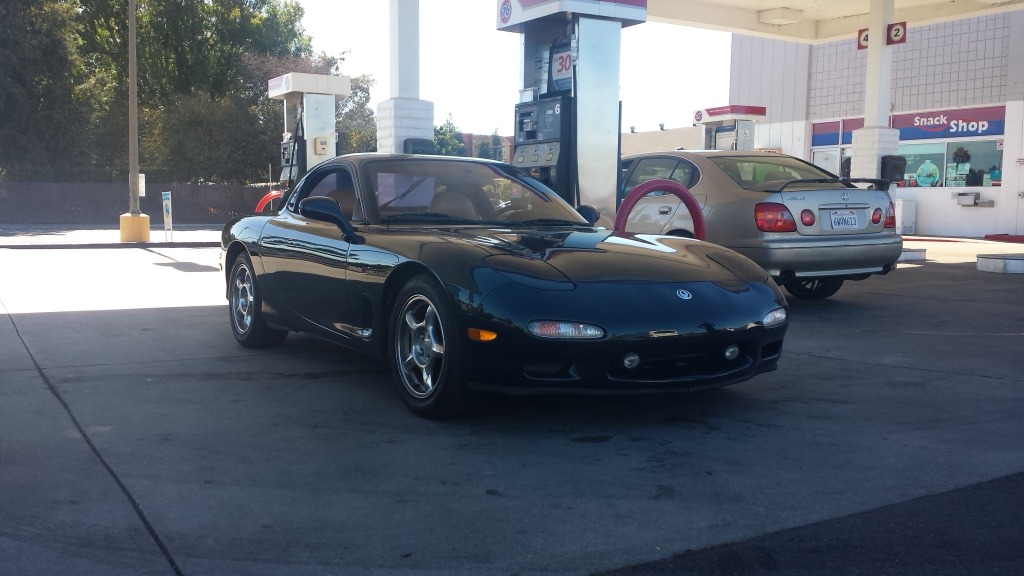
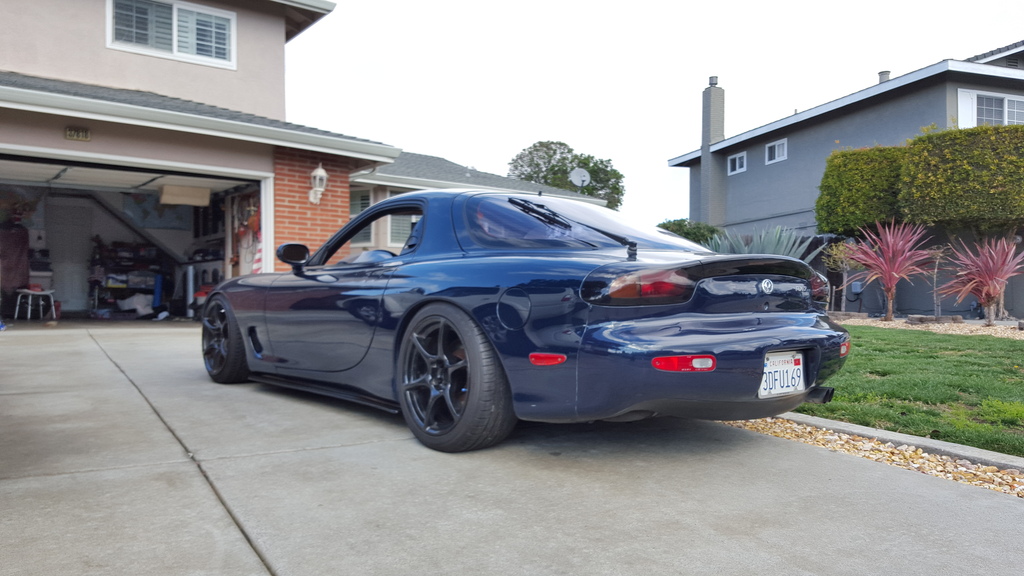
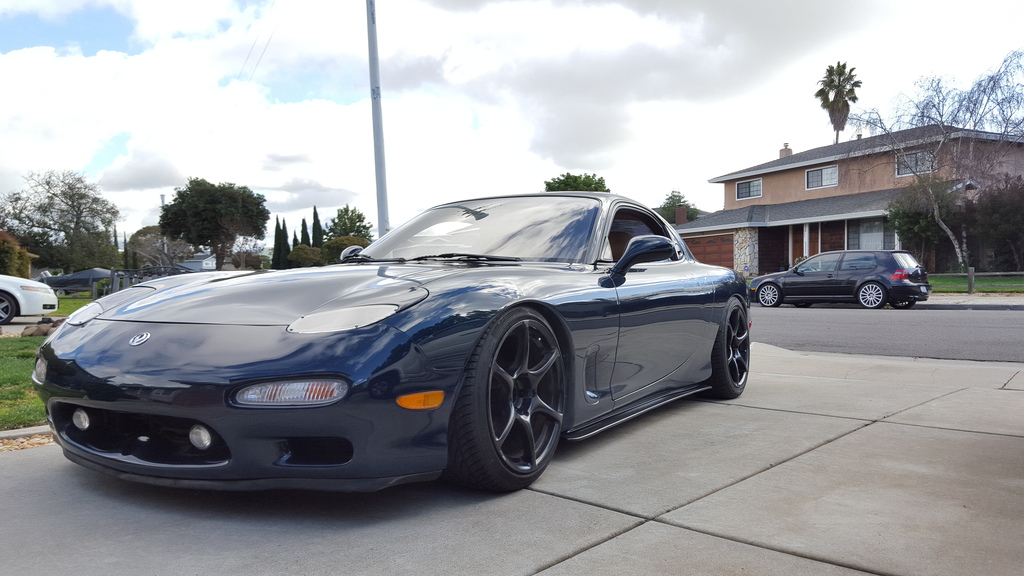
The FD Rx7 has been a dream car since I was young and I was finally able to pick one up in October of 2015. Found the car bone stock with 78k miles. The car was owned by an elderly lady who took the car to her local auto shop to have the maintenance done. This Rx7 has only had two owner and this lady has owned the car since 2008. She even had all the receipts and service records since she's owned the car!
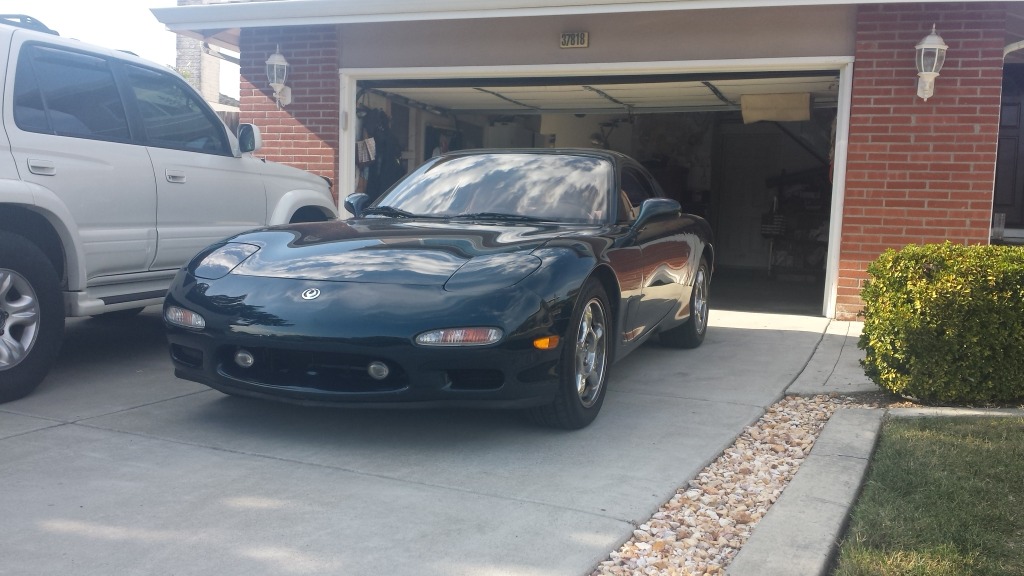
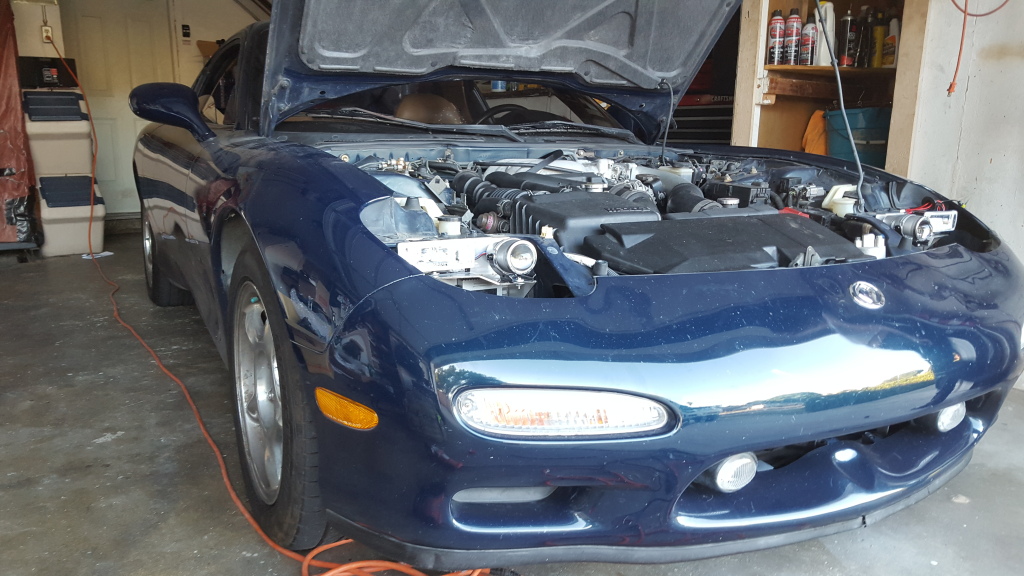
I've already started working on and throwing parts on the car. I'll continue to update the thread later. Man...I don't even know how I plan on building the car. All the options sound good from keeping the Rotary to swapping in an LS motor. I guess for now I'll focus on the cooling and trying to keep the car somewhat reliable.
240sx with sr20 swap

1989 cressida with manual transmission swap

I've built a few other cars I just can't seem to find the pictures.
The FD Rx7 has been a dream car since I was young and I was finally able to pick one up in October of 2015. Found the car bone stock with 78k miles. The car was owned by an elderly lady who took the car to her local auto shop to have the maintenance done. This Rx7 has only had two owner and this lady has owned the car since 2008. She even had all the receipts and service records since she's owned the car!


I've already started working on and throwing parts on the car. I'll continue to update the thread later. Man...I don't even know how I plan on building the car. All the options sound good from keeping the Rotary to swapping in an LS motor. I guess for now I'll focus on the cooling and trying to keep the car somewhat reliable.

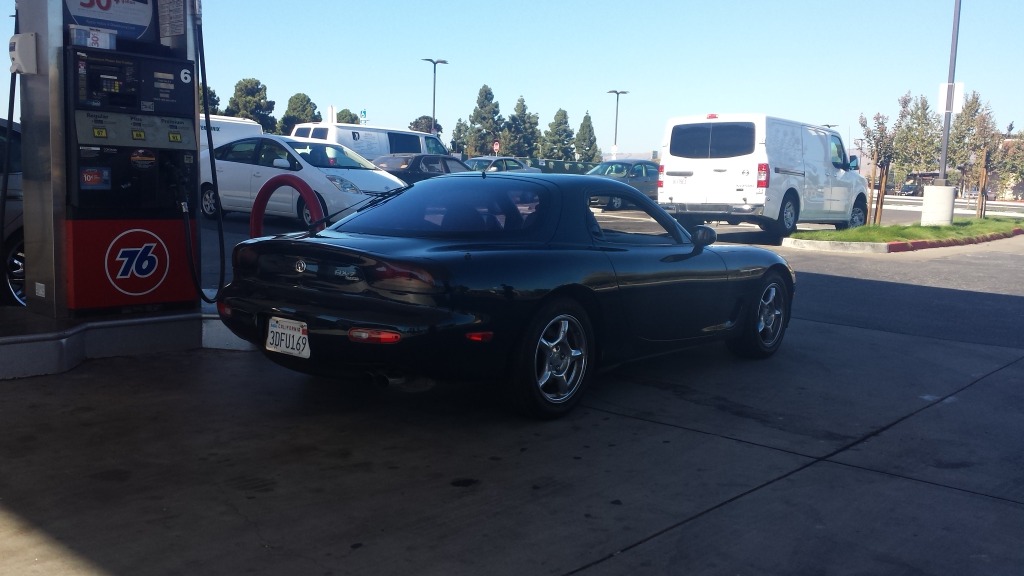
So probably about 2 or so weeks after picking up my car, I take a trip to San Francisco to visit a buddy of mine and show off the car. Just as I was getting on to one of the bridges I notice that my headlight covers were shaking like crazy and the next thing I know my headlight covers fly off! Man I was pissed!
When I finally got to San Francisco I was able to take a look at the vehicle. Although it was nothing serious, headlight covers were the last thing that I wanted to replace or fix first on the car.
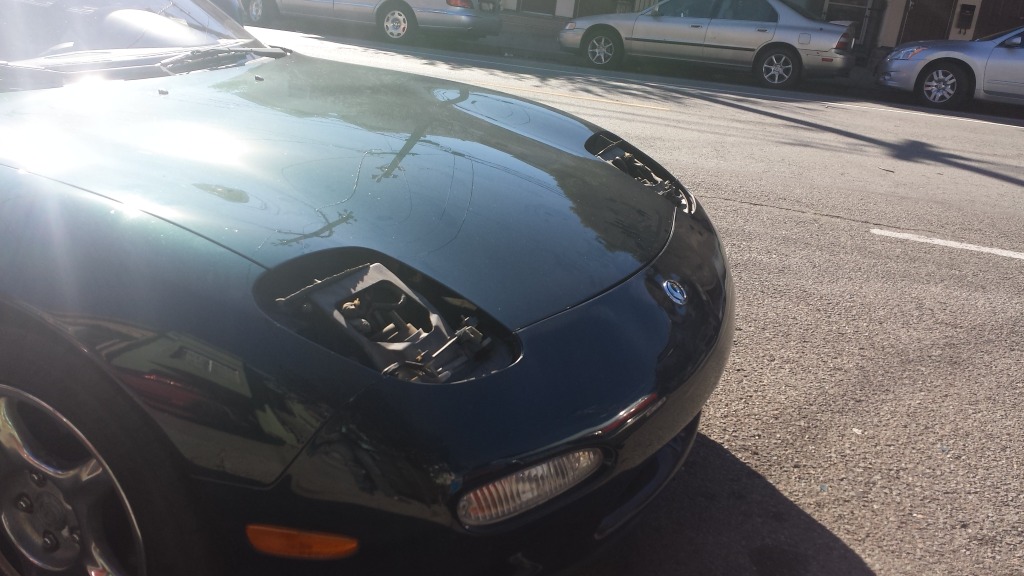
The car looked like it came out of junkyard...
So I started immediately searching for head light cover replacement and found out that these damn headlight covers were expensive. Even the replicas were just about 100 bucks for one cover!
I kept looking around and my buddy suggested that I look into the EVO-R Headlights since I was thinking about replacing my retractable in the future anyway.
Mazda Rx-7 FD3S DEMON-i Sleek Headlight Kit
I actually ended up really liking how they looked. I just couldn't find any reviews or installation write ups on these particular headlights. Just photos of how they would look on the car. I ended up just placing an order and taking a chance on them.
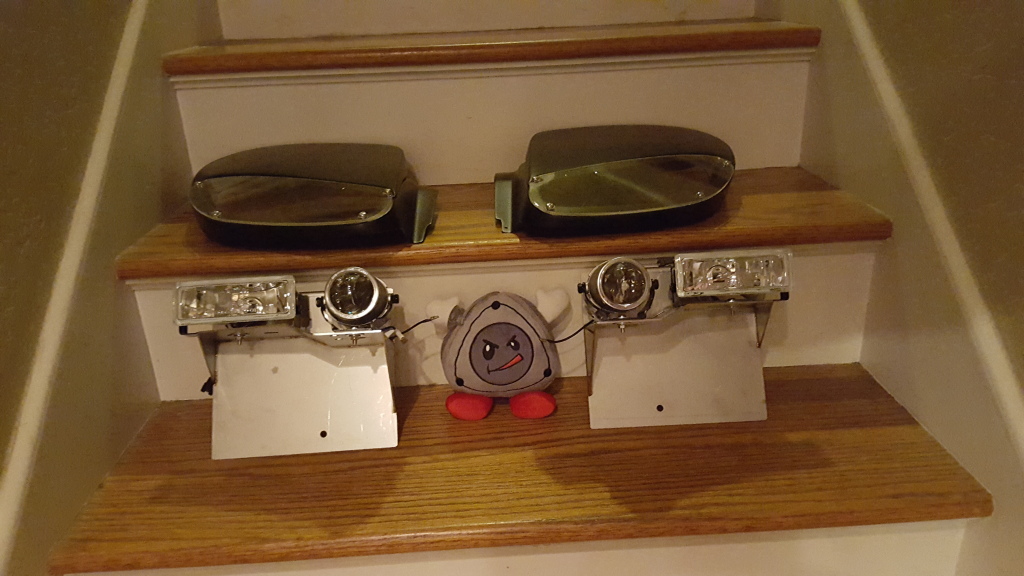
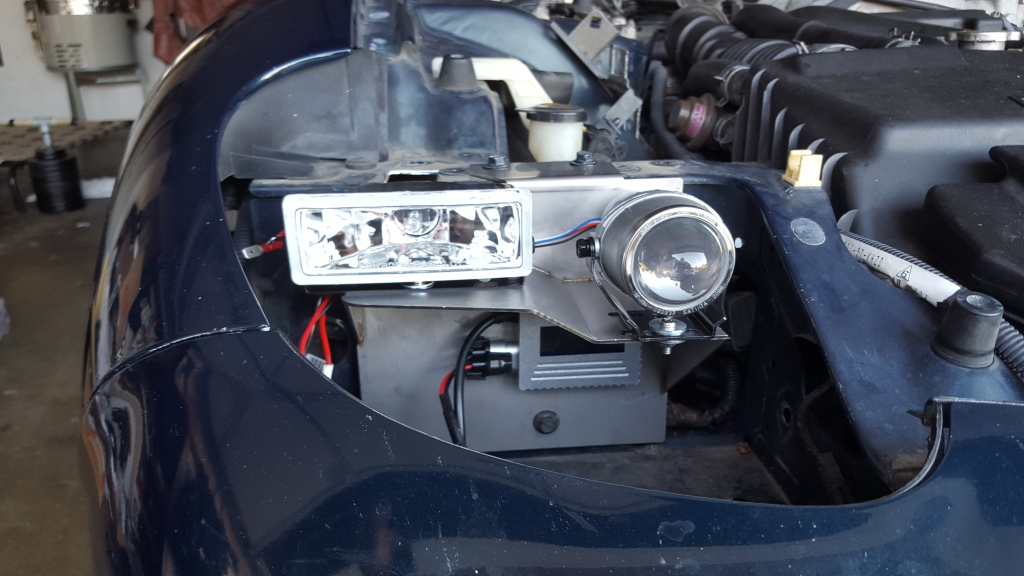
The Headlights appeared to be well made and at first looked to be like a pretty easy direct bolt on installation...I was wrong. LOL!
I got to removing the stock headlights and when I went to install the new headlights I was having issues with the headlight not clearing part of the frame. Also when I pulled out the wiring harness, **** was a huge mess. Wires were going all over the place and it was extremely unorganized. There were also no instructions provided on how to wire up these headlights. What the hell?!
So I emailed EVO-R and asked if they could provide me with instructions on how to install the headlights and they told me that I did not do any cutting and all I needed to do was do some drilling. They didn't say where that's all the information that they provided to me. Not too mention that I had to send them multiple emails in order to get a response from them.
I knew this dude had to have been lying to me. I looked through out the internet and found several pictures of installation and it looked like part of the chassis was cut in order to fit the lights...I kind of already knew the answer to this one.
I busted out the angle grinder and went ahead and cut just enough to get the headlights to fit. I was not happy about this, but I was already working on the car and decided to just stick with the kit and not return it.
After getting these lights in finally, I sent EVO-R another email and provided them with photos of what I had to do in order to fit the lights. Again, I sent multiple emails in order to get a response and finally said "Yes, you need to cut in order to make more room for the lights." What the F***, over?!?! What was so damn hard about telling me that and why couldn't they have just provided that information on their website for buyers to be aware of?! Ughhh...oh well it is what is.
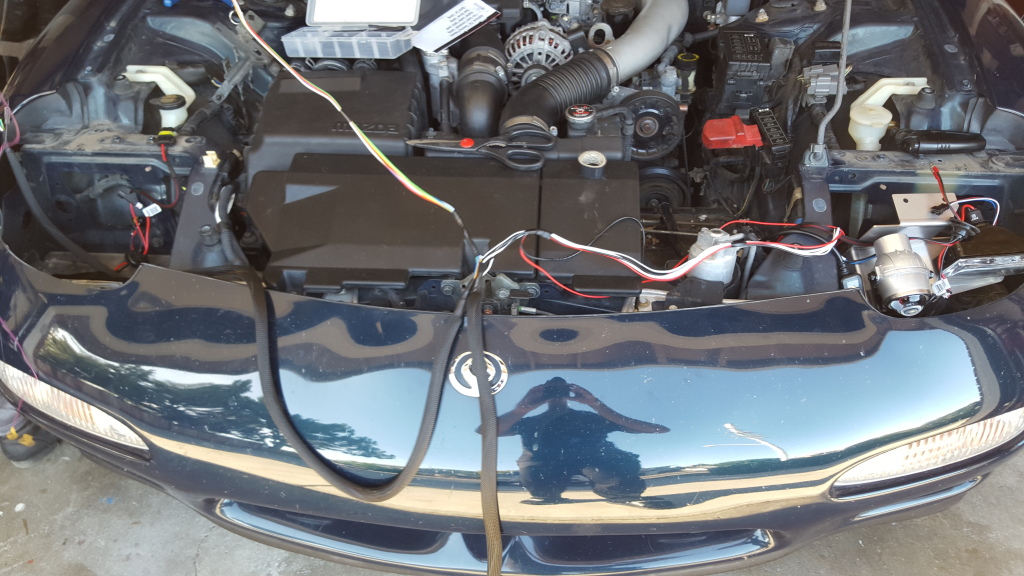
Now that I finally got those headlights in the next step was to figure out this wiring mess. The first thing I wanted to do was organize the wiring harness so it didn't look so confusing. I had a bunch of computer wire sleeves left over from my 240sx project, So I went ahead and started wrapping up the harness.
I forgot to take pictures of what it looked like before I started working on the harness, but it looked something like this:
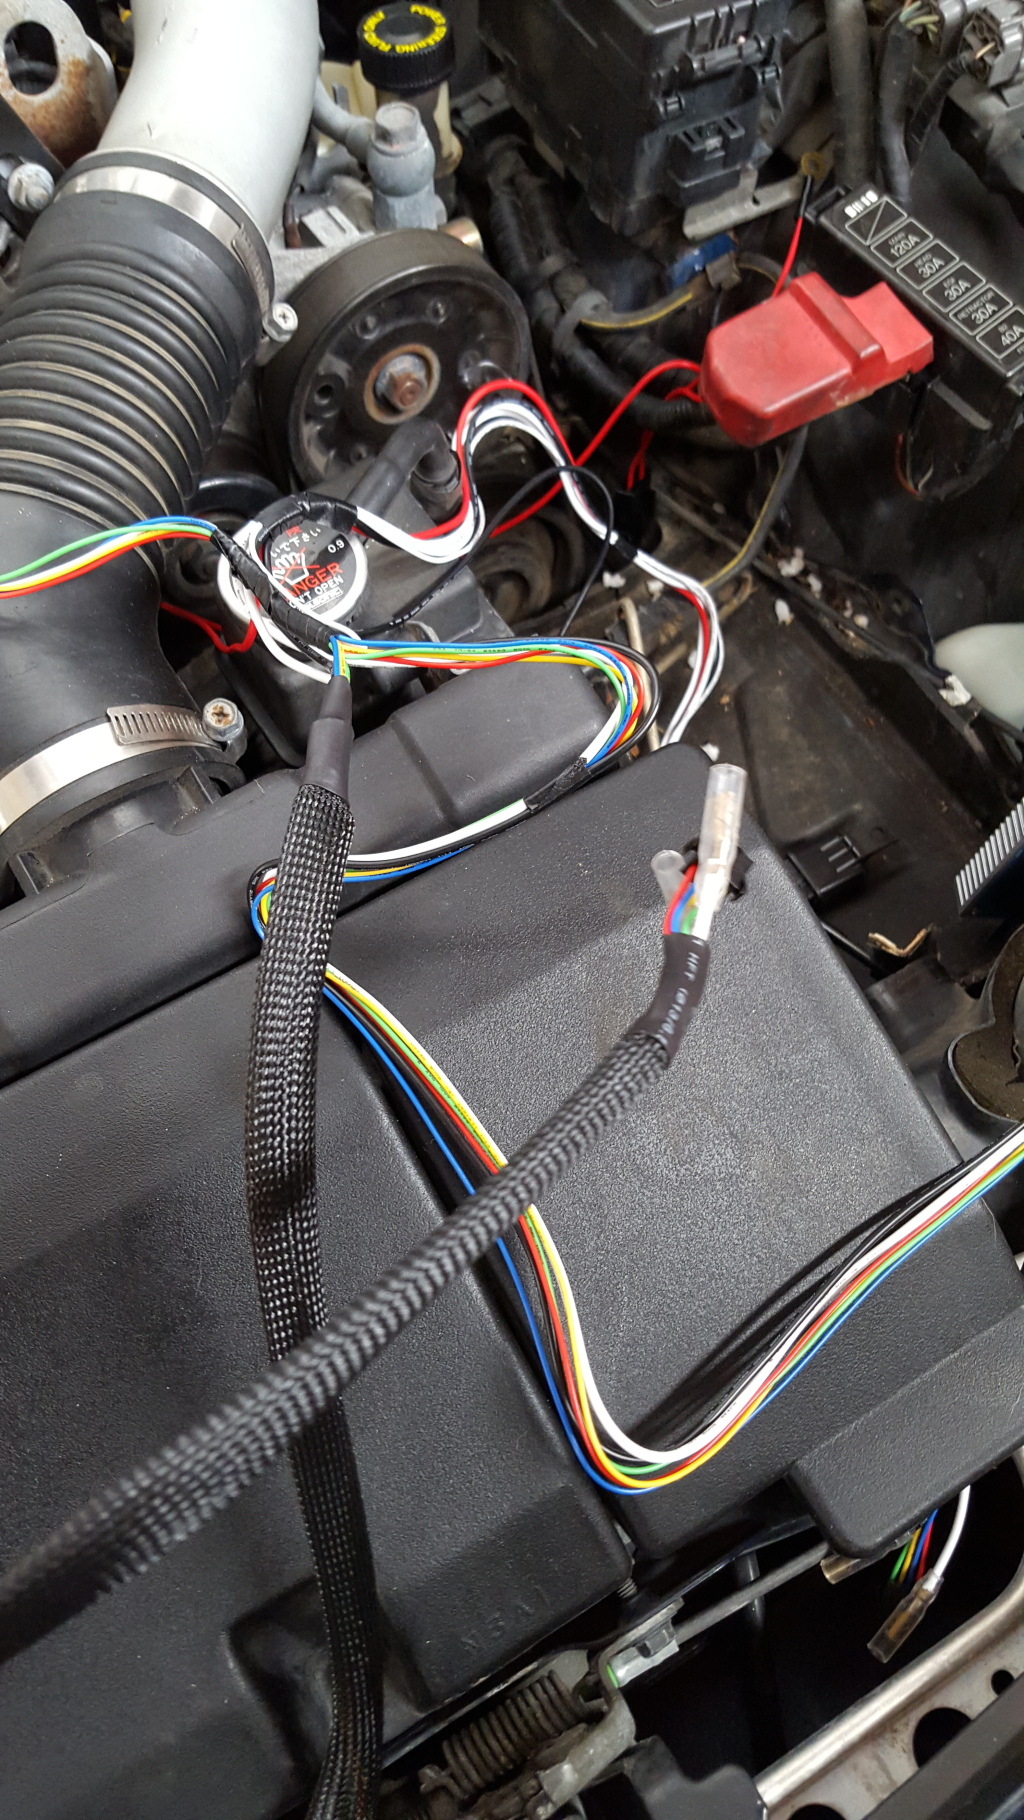
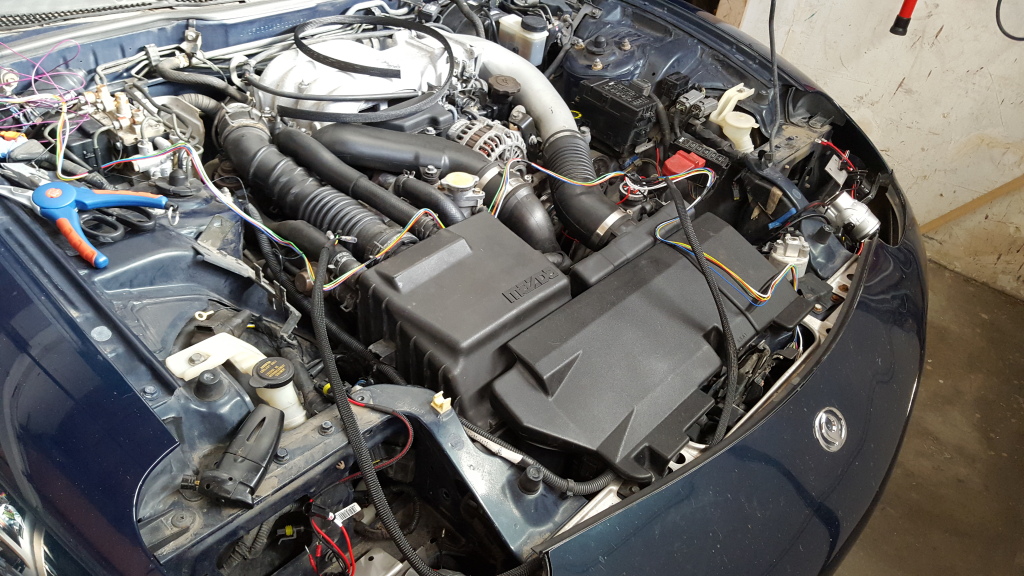
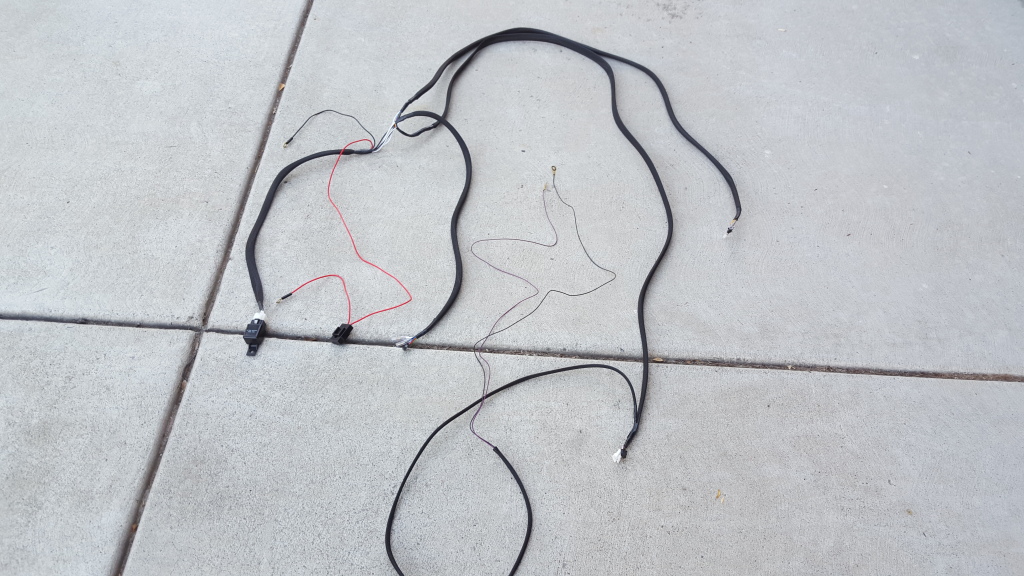
When I was done it looked like this:
When I finally got to San Francisco I was able to take a look at the vehicle. Although it was nothing serious, headlight covers were the last thing that I wanted to replace or fix first on the car.

The car looked like it came out of junkyard...
So I started immediately searching for head light cover replacement and found out that these damn headlight covers were expensive. Even the replicas were just about 100 bucks for one cover!
I kept looking around and my buddy suggested that I look into the EVO-R Headlights since I was thinking about replacing my retractable in the future anyway.
Mazda Rx-7 FD3S DEMON-i Sleek Headlight Kit
I actually ended up really liking how they looked. I just couldn't find any reviews or installation write ups on these particular headlights. Just photos of how they would look on the car. I ended up just placing an order and taking a chance on them.


The Headlights appeared to be well made and at first looked to be like a pretty easy direct bolt on installation...I was wrong. LOL!
I got to removing the stock headlights and when I went to install the new headlights I was having issues with the headlight not clearing part of the frame. Also when I pulled out the wiring harness, **** was a huge mess. Wires were going all over the place and it was extremely unorganized. There were also no instructions provided on how to wire up these headlights. What the hell?!


So I emailed EVO-R and asked if they could provide me with instructions on how to install the headlights and they told me that I did not do any cutting and all I needed to do was do some drilling. They didn't say where that's all the information that they provided to me. Not too mention that I had to send them multiple emails in order to get a response from them.
I knew this dude had to have been lying to me. I looked through out the internet and found several pictures of installation and it looked like part of the chassis was cut in order to fit the lights...I kind of already knew the answer to this one.
I busted out the angle grinder and went ahead and cut just enough to get the headlights to fit. I was not happy about this, but I was already working on the car and decided to just stick with the kit and not return it.


After getting these lights in finally, I sent EVO-R another email and provided them with photos of what I had to do in order to fit the lights. Again, I sent multiple emails in order to get a response and finally said "Yes, you need to cut in order to make more room for the lights." What the F***, over?!?! What was so damn hard about telling me that and why couldn't they have just provided that information on their website for buyers to be aware of?! Ughhh...oh well it is what is.
Now that I finally got those headlights in the next step was to figure out this wiring mess. The first thing I wanted to do was organize the wiring harness so it didn't look so confusing. I had a bunch of computer wire sleeves left over from my 240sx project, So I went ahead and started wrapping up the harness.
I forgot to take pictures of what it looked like before I started working on the harness, but it looked something like this:

When I was done it looked like this:

Yeah, so after that was done, it was pretty much figuring out what connected where and what all the extra wires and **** did.


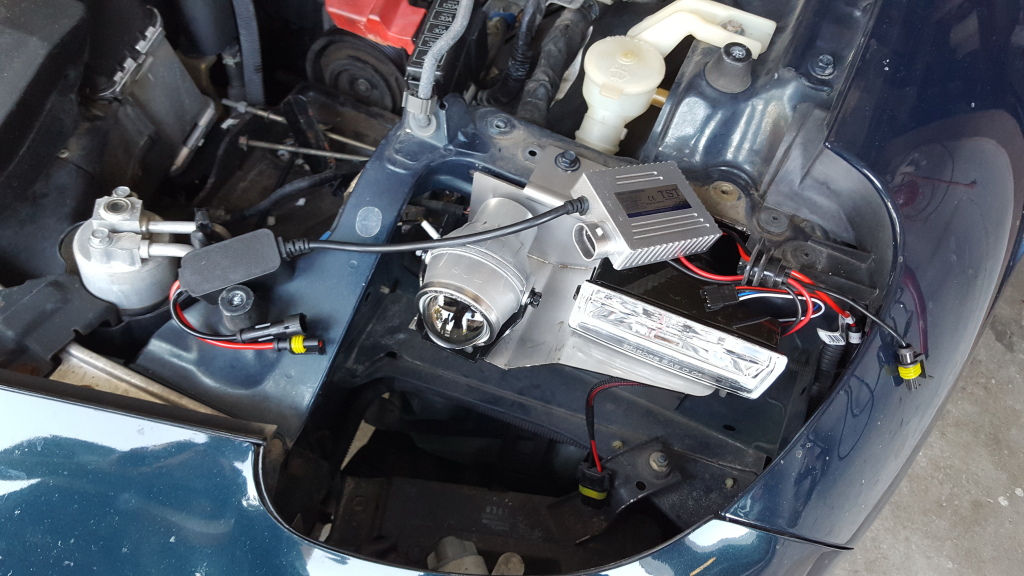
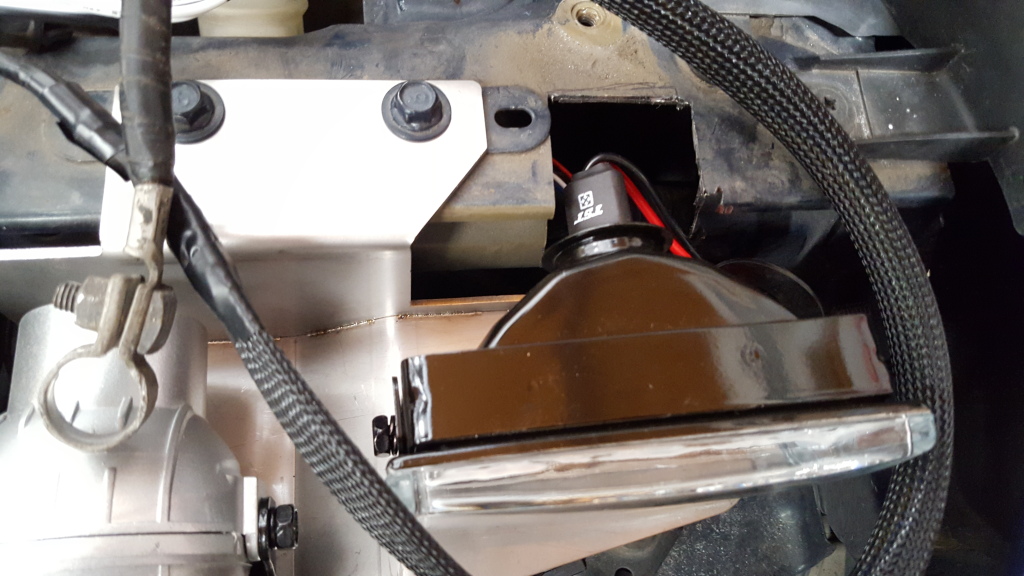
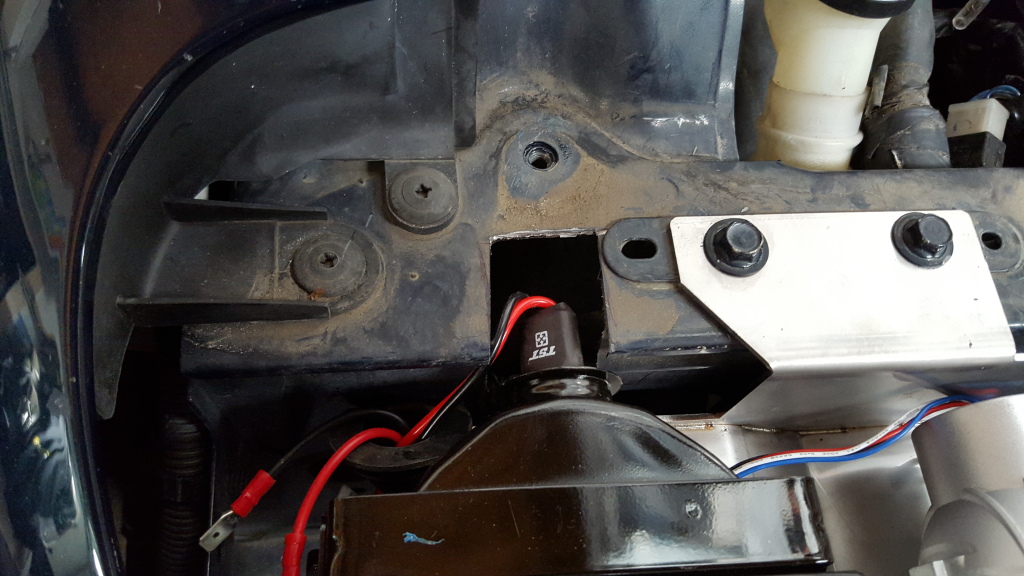
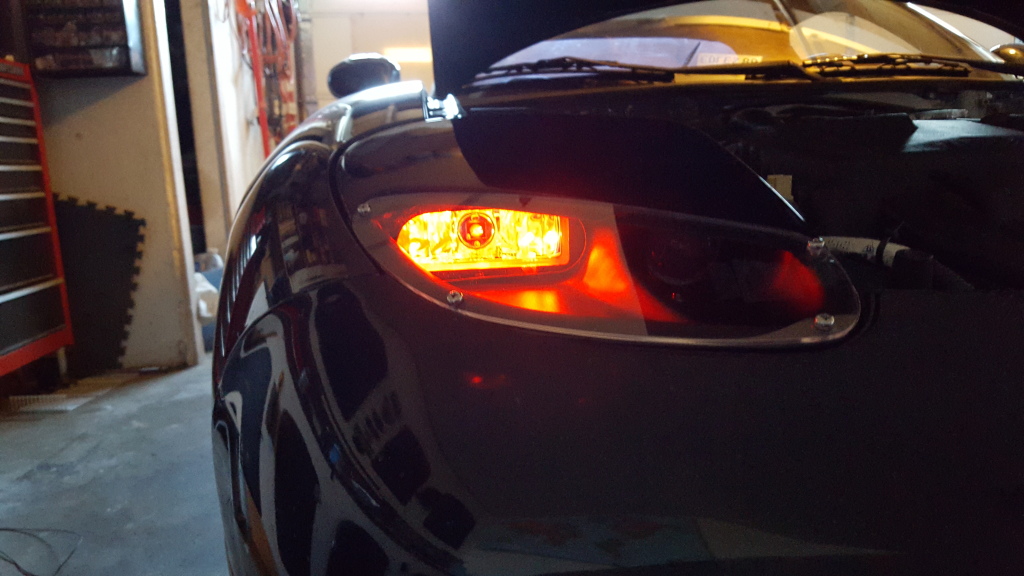
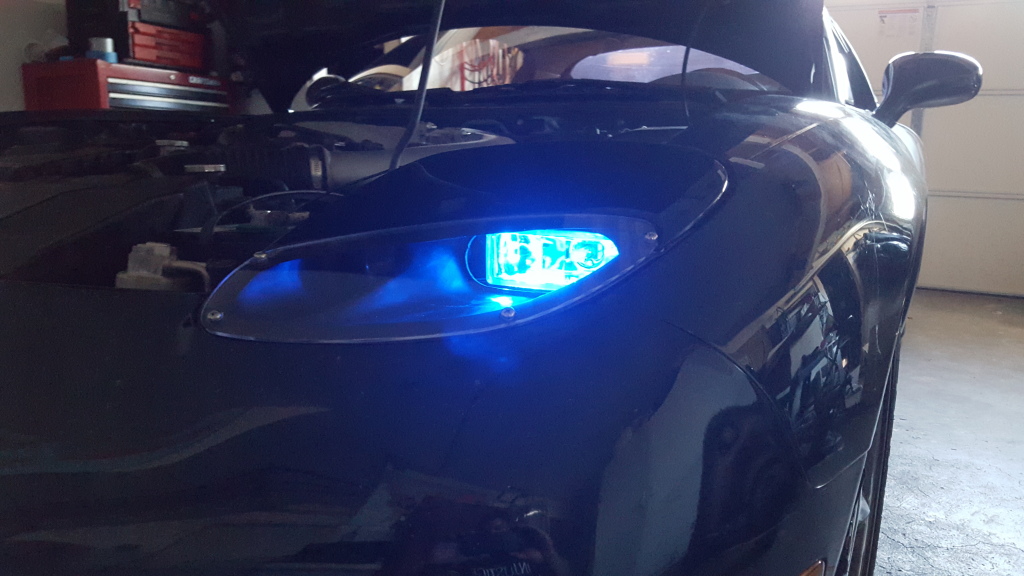
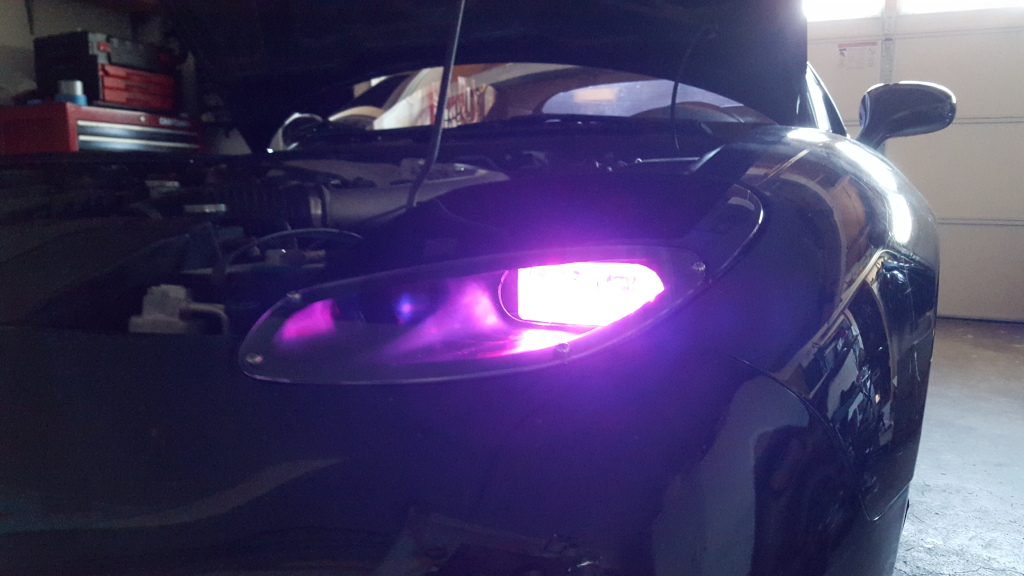
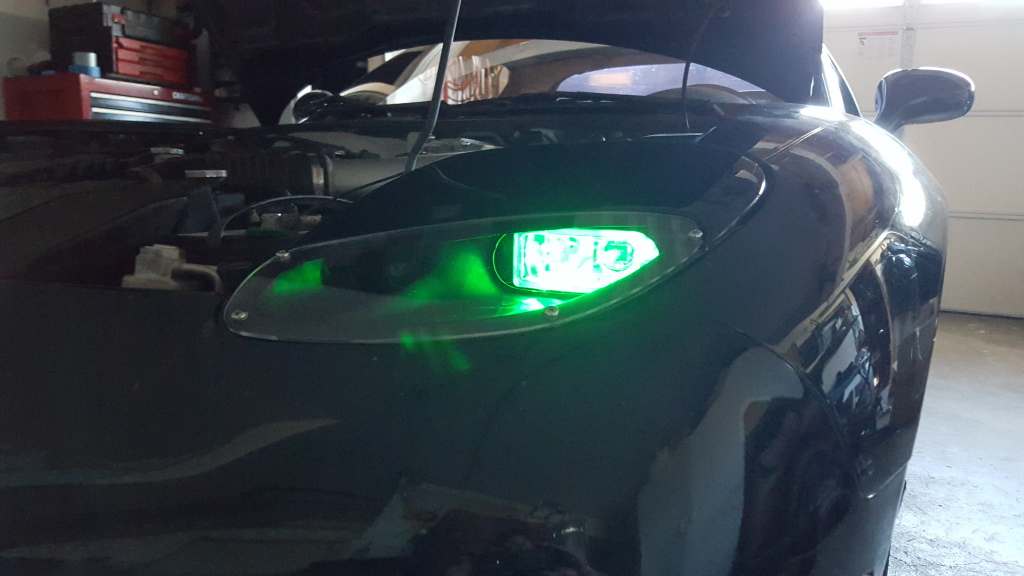
Headlight covers on:
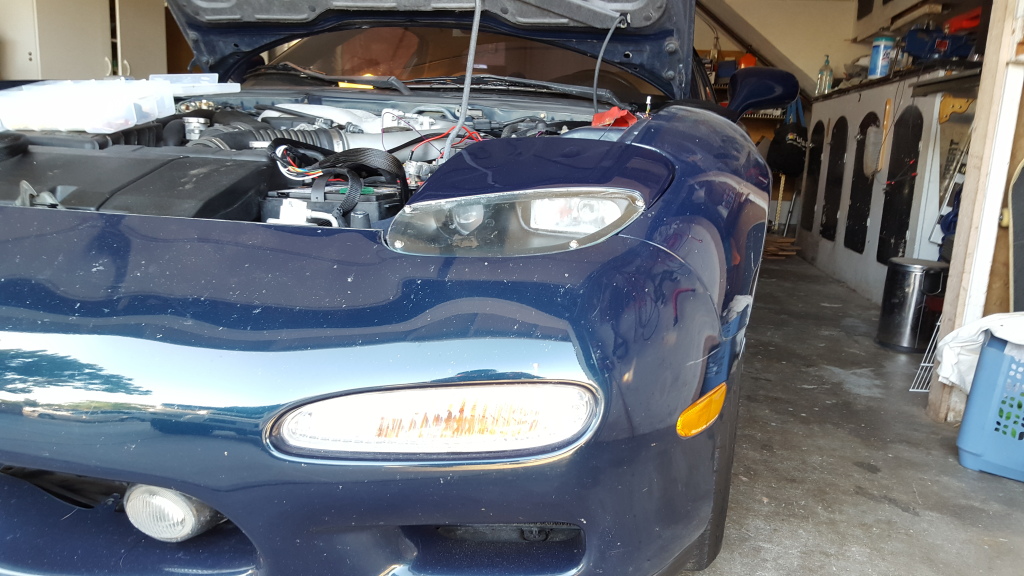
EVO-R doesn't even mention this feature in their website. Seems to be primarily used as parking lights.

Overall I was happy when I was finally done getting everything and figured out. The headlights looked good, but I wouldn't have bought this product if I had to deal with EVo_r's customer service. I don't care at all for the colored lights feature and if I would have been more patient and did further research I would have went with the HotWater Labs kit instead:
HWL FD001 Sleek HID Headlight kit / HotWater Labs
Oh man...Enough for now. The next update to this thread will be for the HKS Downpipe, filter and BOV, Efini Y-Pipe, Pettit AST and Koyo Raidator.


Headlight covers on:


EVO-R doesn't even mention this feature in their website. Seems to be primarily used as parking lights.


Overall I was happy when I was finally done getting everything and figured out. The headlights looked good, but I wouldn't have bought this product if I had to deal with EVo_r's customer service. I don't care at all for the colored lights feature and if I would have been more patient and did further research I would have went with the HotWater Labs kit instead:
HWL FD001 Sleek HID Headlight kit / HotWater Labs
Oh man...Enough for now. The next update to this thread will be for the HKS Downpipe, filter and BOV, Efini Y-Pipe, Pettit AST and Koyo Raidator.
So a couple of things, one I have these lights though I got them off of a buddy who replaced the main driving lights with PIAA's which is what you should do! I have them on my car no cutting needed to fit, my buddy didn't need to cut his car either. So it must be the position of the crap driving light it comes with idk.
Second the HWL set up is very legit! hahaha can't say much more on that.
Either way good write up and photos! Hope to see more of your detailed product reviews!
Second the HWL set up is very legit! hahaha can't say much more on that.
Either way good write up and photos! Hope to see more of your detailed product reviews!
Last edited by 4g63rotary; Jan 20, 2016 at 04:41 PM. Reason: Added Piaa link
Trending Topics


Well, I don't know what went wrong with mine, but I was definitely having fitment issues with my lights fitting otherwise I wouldn't have cut it. Either way it's already done, the headlights work and I think it looks great on the car.
Hey Deacon. The lights do fine during night time driving, they aren't too bad.
Hey Deacon. The lights do fine during night time driving, they aren't too bad.
Last edited by HellaFella11B; Jan 25, 2016 at 12:20 PM.
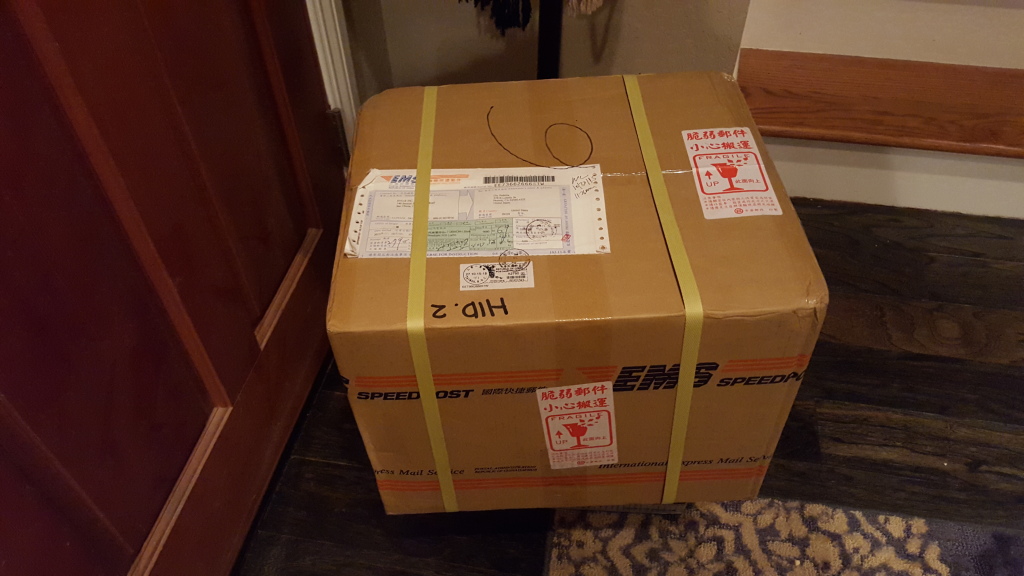
I bought a few parts from a buddy awhile back in November and I finally installed them just two weeks ago.
Unfortunately I didn't take as many before and after pictures as I would like....sometimes I get too excited and I just start throwing **** in my car without documenting anything. LOL!
I picked up an HKS downpipe, HKS RS intake and an HKS SSQV BOV without the insert (no bird chirpy sound) from a buddy.
Along side that I ordered an Efini y-pipe, new Koyo radiator, samco radiator hoses and a Pettit AST.
I also ordered some silicone vacuum hoses and I was going to go ahead and replace all the vacuum hoses with the silicone ones, but I couldn't find any Viton check valves, so I decided to hold off on all that.
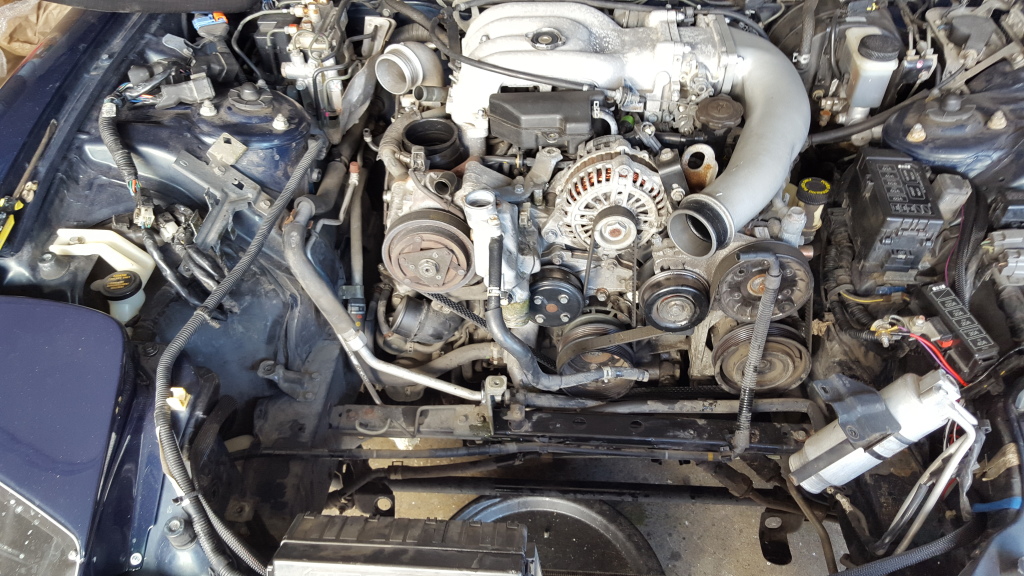
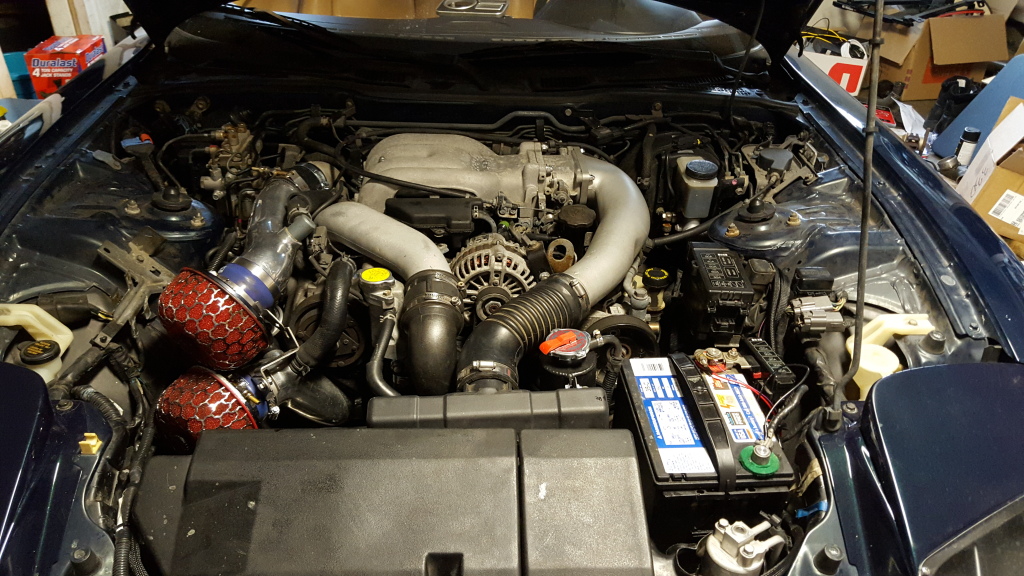
Obviously the first thing done was just to get all of the old stuff out of the way. Once everything was out I was very surprised to find how much room there was with all the plastic stuff removed.
The first thing I replaced was the old y-pipe with the Efini Y-pipe. Here are the comparison pics:
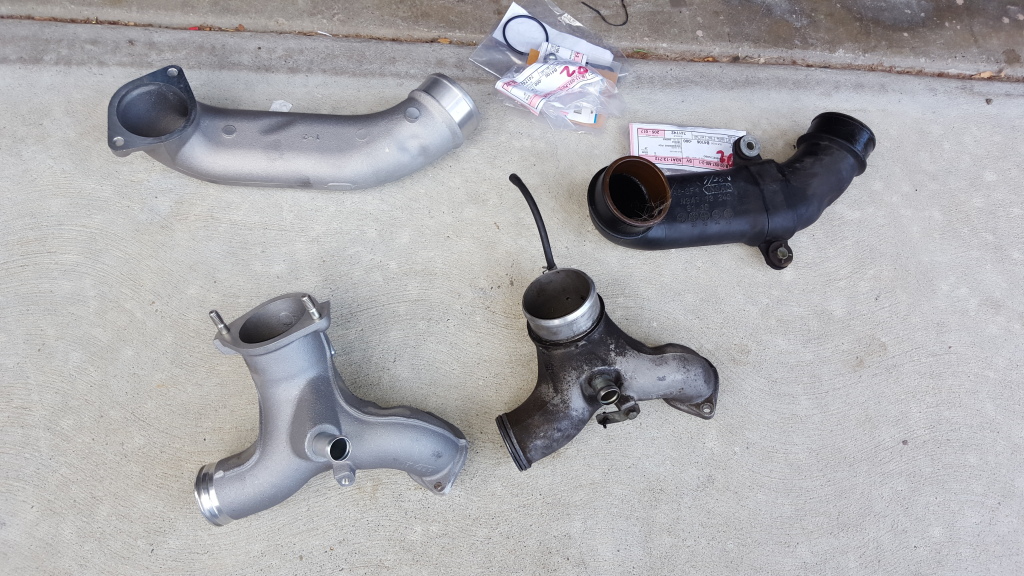
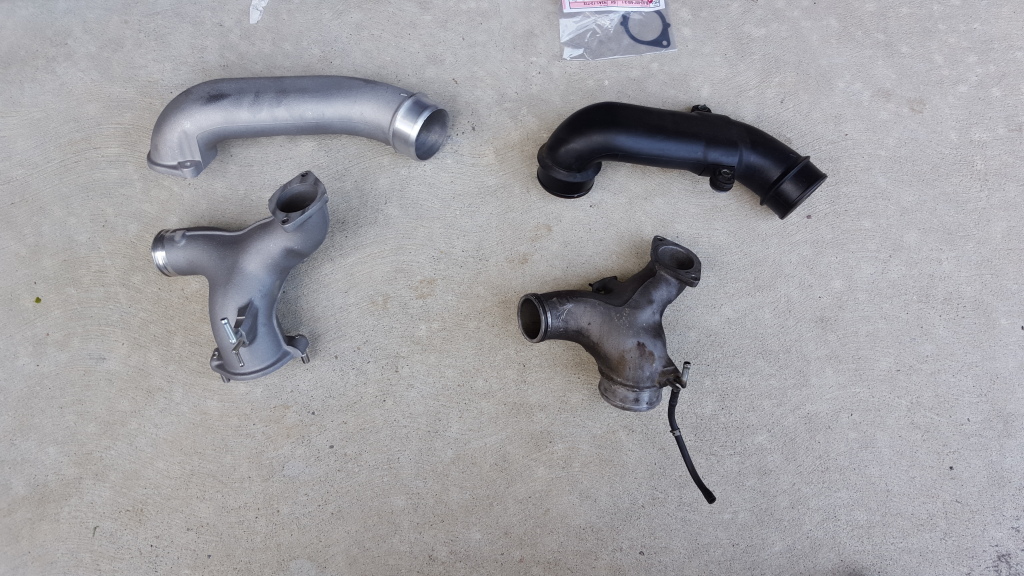
Pretty big difference in the way the engine looked after having these installed. Definitely made the motor look a lot cleaner and more proper.
I sprayed the HKS downpipe with hi temp silicone coating and wrapped it up with some exhaust wrap. Here is the HKS downpipe next to the old stock pre cat.
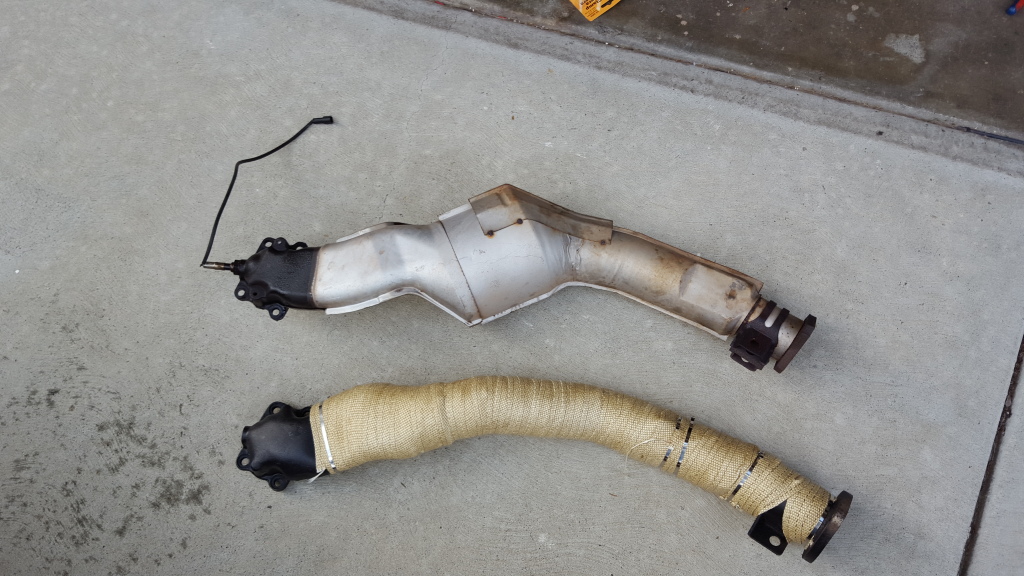
Out of all the items that I removed from the car, removing the down pipe was the biggest pain in the ***. Not necessarily hard....just a pain.
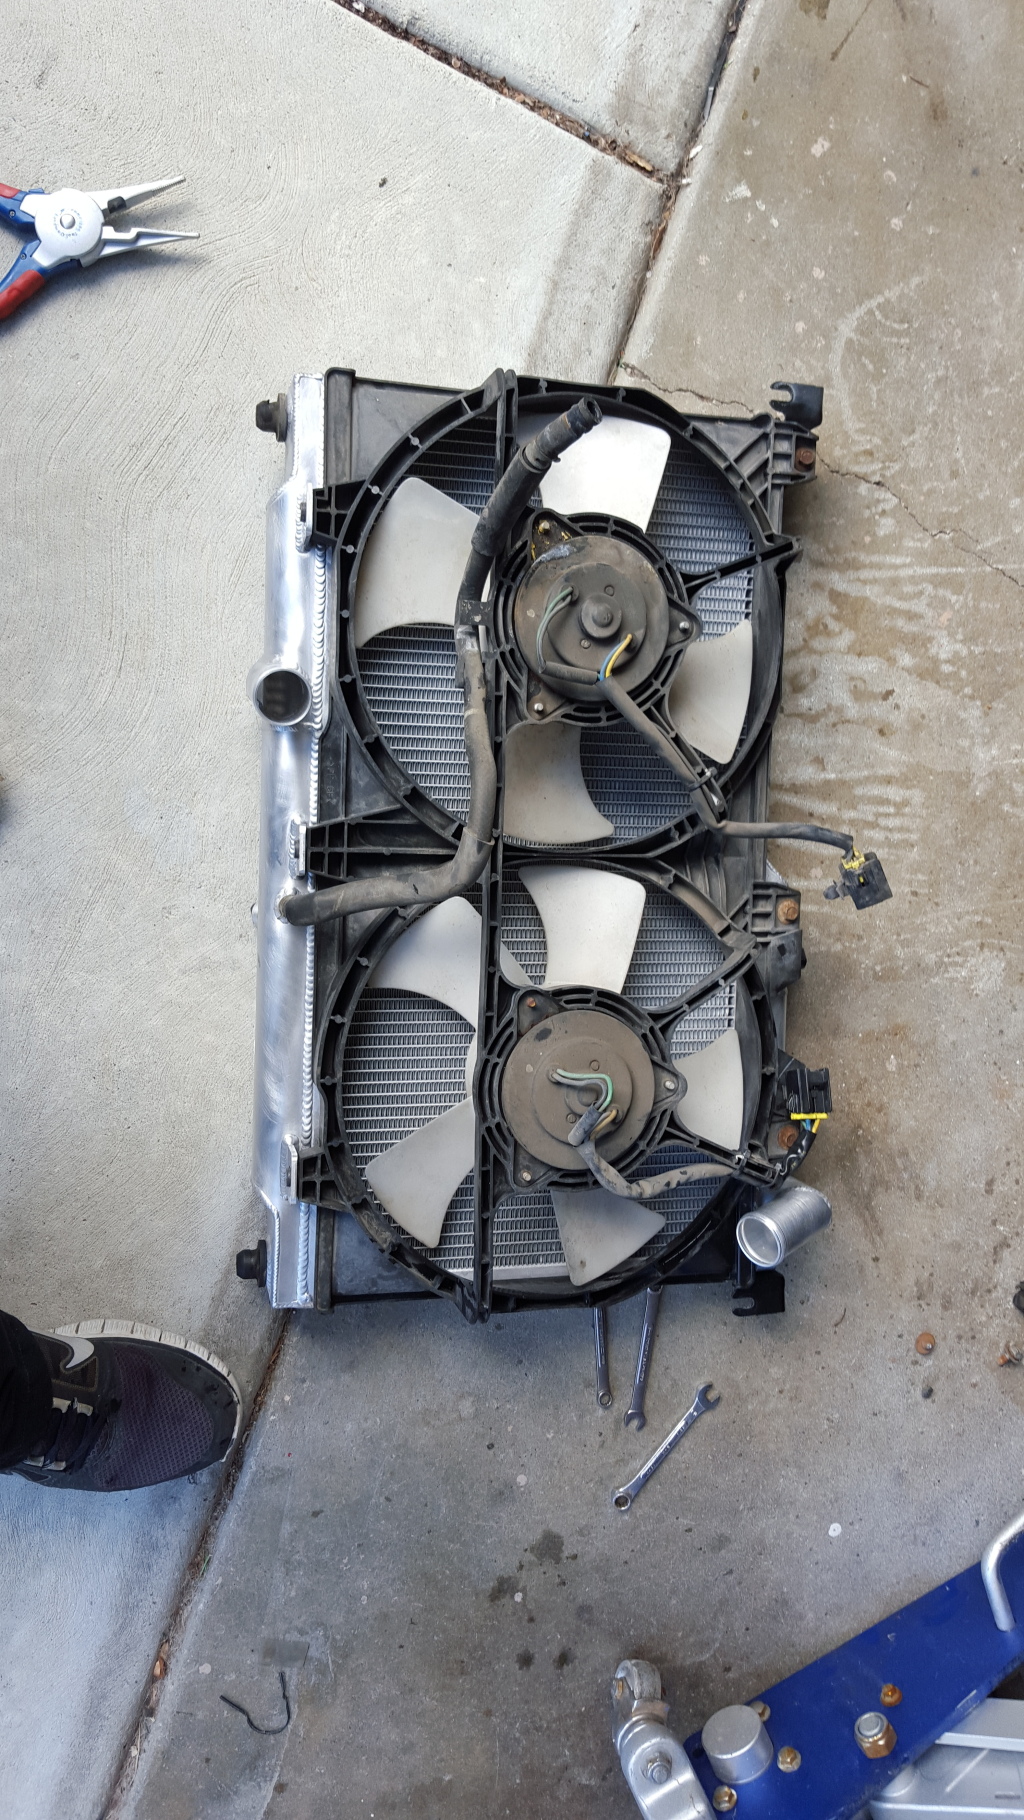
Here's the koyo rad and stock rad comparison.

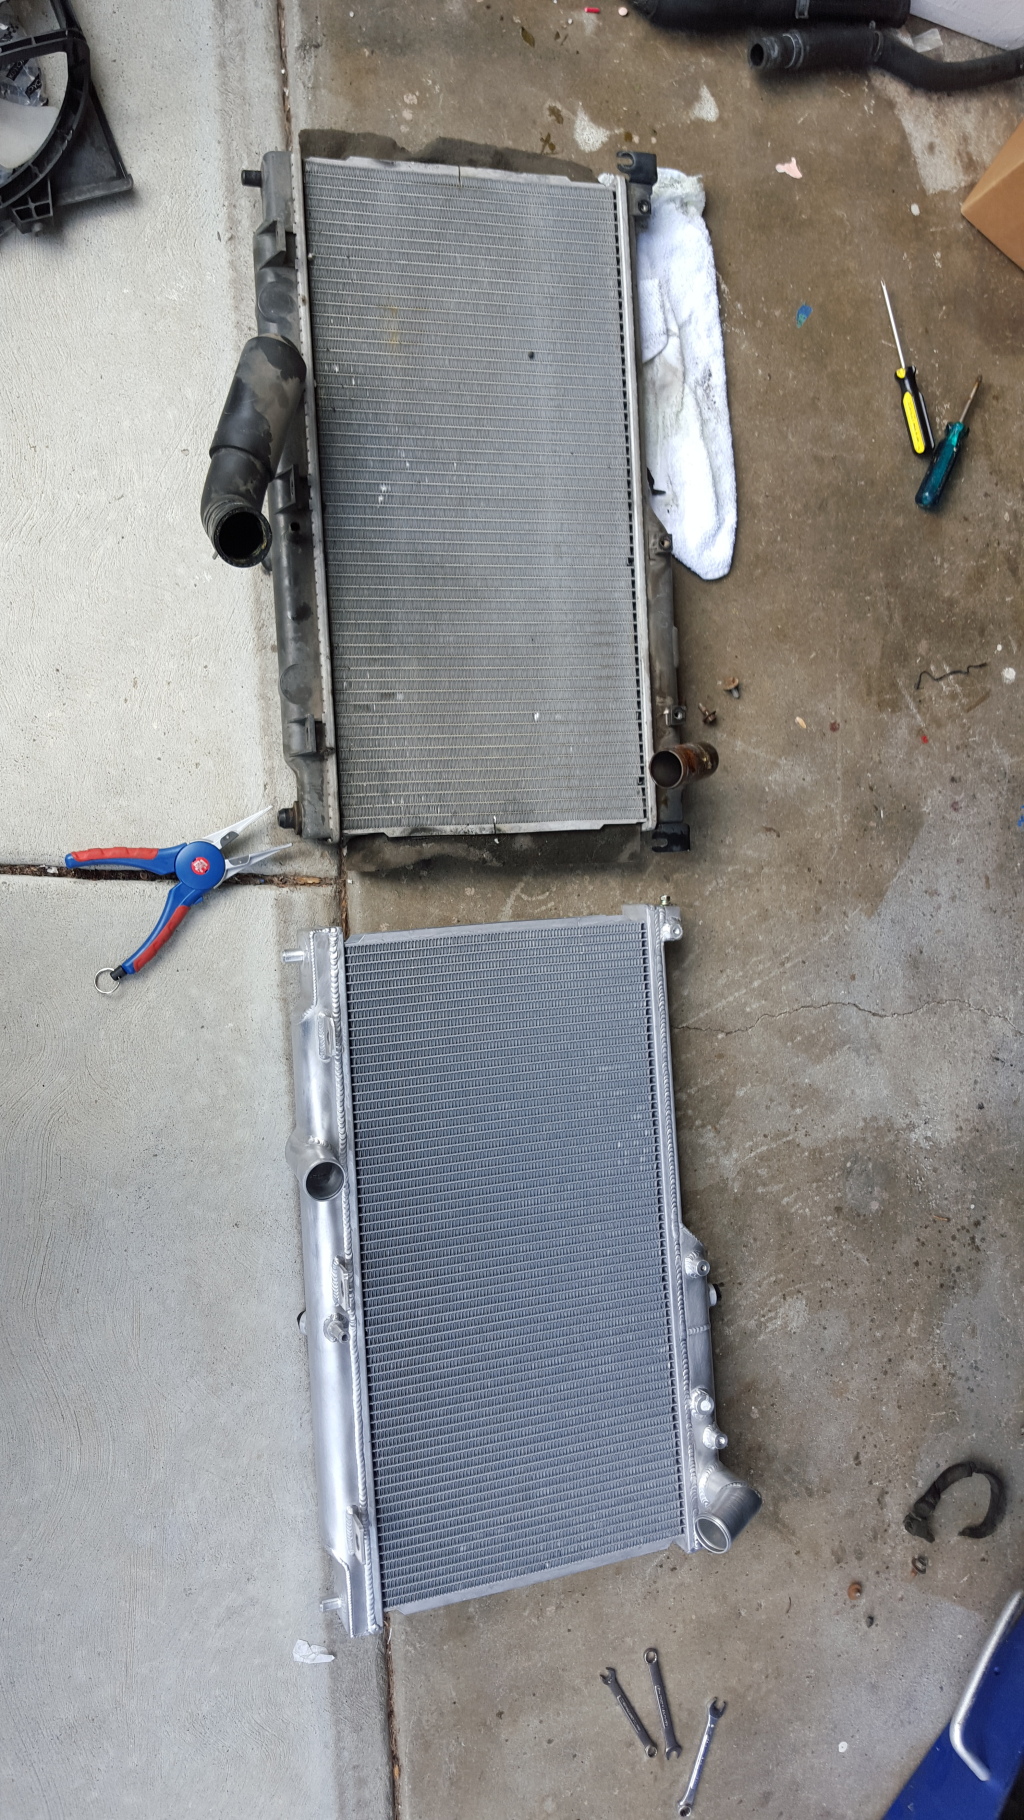
and the stock fan bolted right up to the new radiator
At first I was having issues with the intercooler fitting with the beefier radiator. I had to drill some holes in the bracket, so the Koyo radiator would sit deeper in to the car. Once that was done, I was able to get the intercooler in there.
Once that was all done I slapped everything all together and went ahead and did an oil change.
So now that I have all that in, I'm trying to figure out what intercooler I should get. Right now I'm debating on either a nice SMIC or forking out the cash for a v-mount setup.
So far the plan now is to save up for an exhaust, intercooler, and an EMS. Once I have all those I'll go ahead and throw them on all together. In the mean time I'm just going to replace small things here and there and try to clean up the engine bay and interior a little more. I also placed an order on a set of Fortune Auto 500 series coilovers at the end of December. I'm just waiting for those to come in so I can go ahead and install them.
And right now these are sitting in my garage to go with the Fortune Autos.
Grenade GX01 17x9 +15
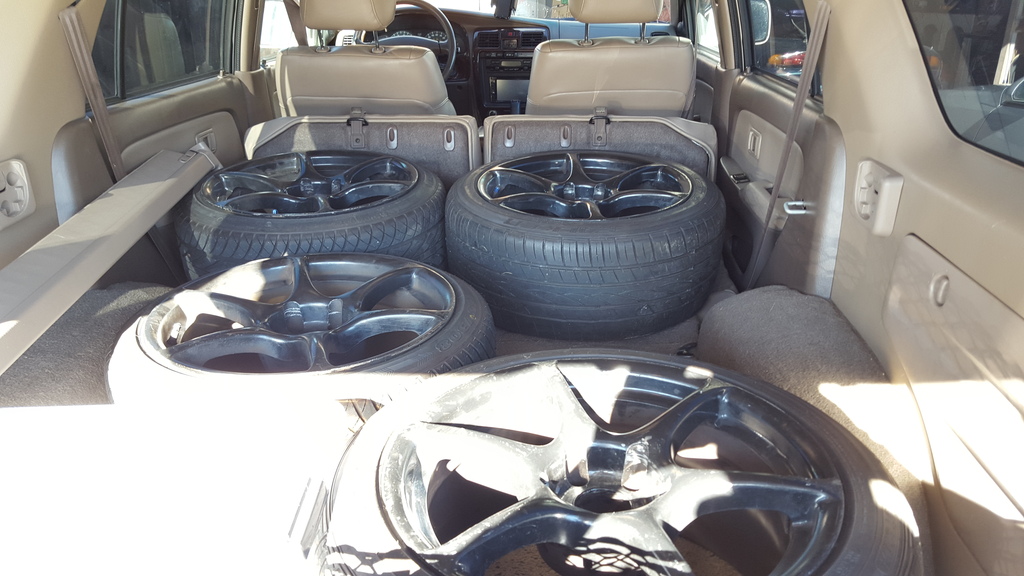
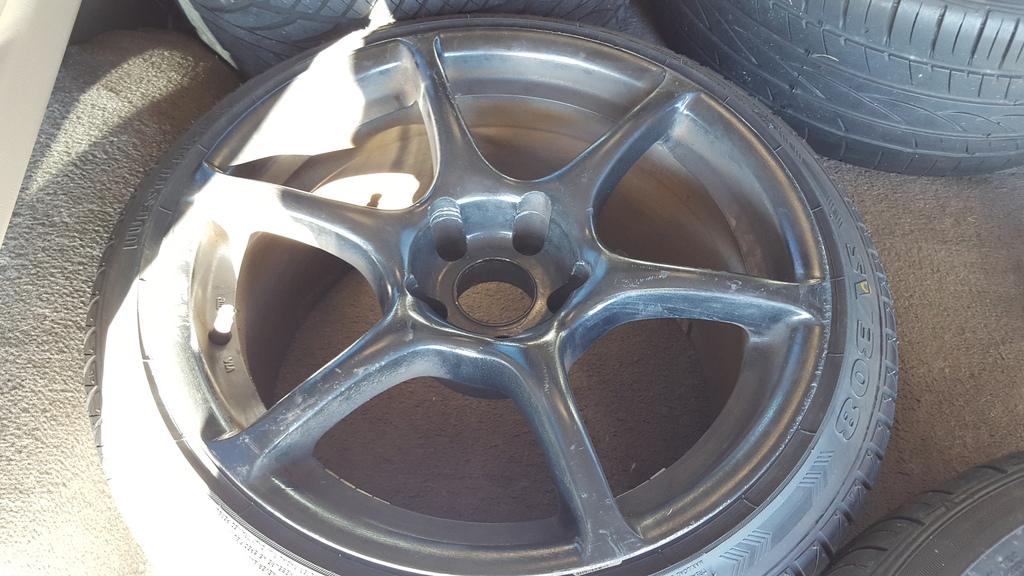
Probably gonna test fit these on the car soon.
Unfortunately I didn't take as many before and after pictures as I would like....sometimes I get too excited and I just start throwing **** in my car without documenting anything. LOL!
I picked up an HKS downpipe, HKS RS intake and an HKS SSQV BOV without the insert (no bird chirpy sound) from a buddy.
Along side that I ordered an Efini y-pipe, new Koyo radiator, samco radiator hoses and a Pettit AST.
I also ordered some silicone vacuum hoses and I was going to go ahead and replace all the vacuum hoses with the silicone ones, but I couldn't find any Viton check valves, so I decided to hold off on all that.
Obviously the first thing done was just to get all of the old stuff out of the way. Once everything was out I was very surprised to find how much room there was with all the plastic stuff removed.

The first thing I replaced was the old y-pipe with the Efini Y-pipe. Here are the comparison pics:


Pretty big difference in the way the engine looked after having these installed. Definitely made the motor look a lot cleaner and more proper.
I sprayed the HKS downpipe with hi temp silicone coating and wrapped it up with some exhaust wrap. Here is the HKS downpipe next to the old stock pre cat.

Out of all the items that I removed from the car, removing the down pipe was the biggest pain in the ***. Not necessarily hard....just a pain.
Here's the koyo rad and stock rad comparison.


and the stock fan bolted right up to the new radiator

At first I was having issues with the intercooler fitting with the beefier radiator. I had to drill some holes in the bracket, so the Koyo radiator would sit deeper in to the car. Once that was done, I was able to get the intercooler in there.
Once that was all done I slapped everything all together and went ahead and did an oil change.

So now that I have all that in, I'm trying to figure out what intercooler I should get. Right now I'm debating on either a nice SMIC or forking out the cash for a v-mount setup.
So far the plan now is to save up for an exhaust, intercooler, and an EMS. Once I have all those I'll go ahead and throw them on all together. In the mean time I'm just going to replace small things here and there and try to clean up the engine bay and interior a little more. I also placed an order on a set of Fortune Auto 500 series coilovers at the end of December. I'm just waiting for those to come in so I can go ahead and install them.
And right now these are sitting in my garage to go with the Fortune Autos.
Grenade GX01 17x9 +15


Probably gonna test fit these on the car soon.
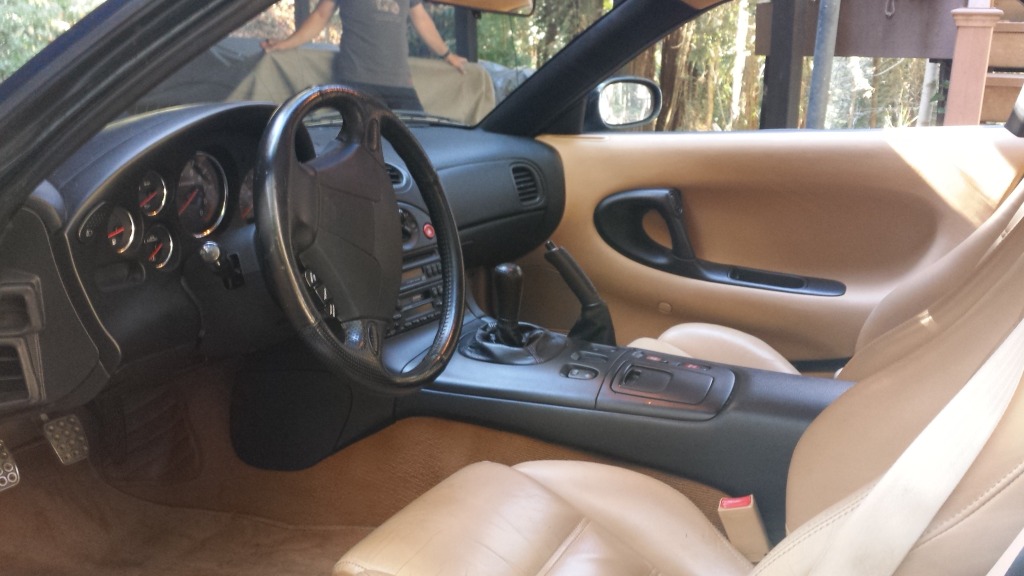
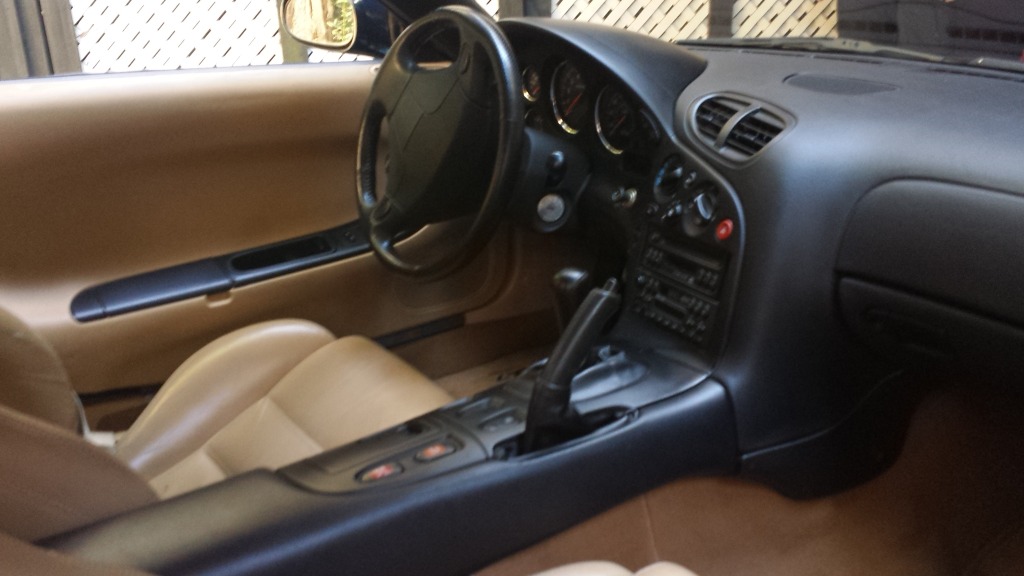
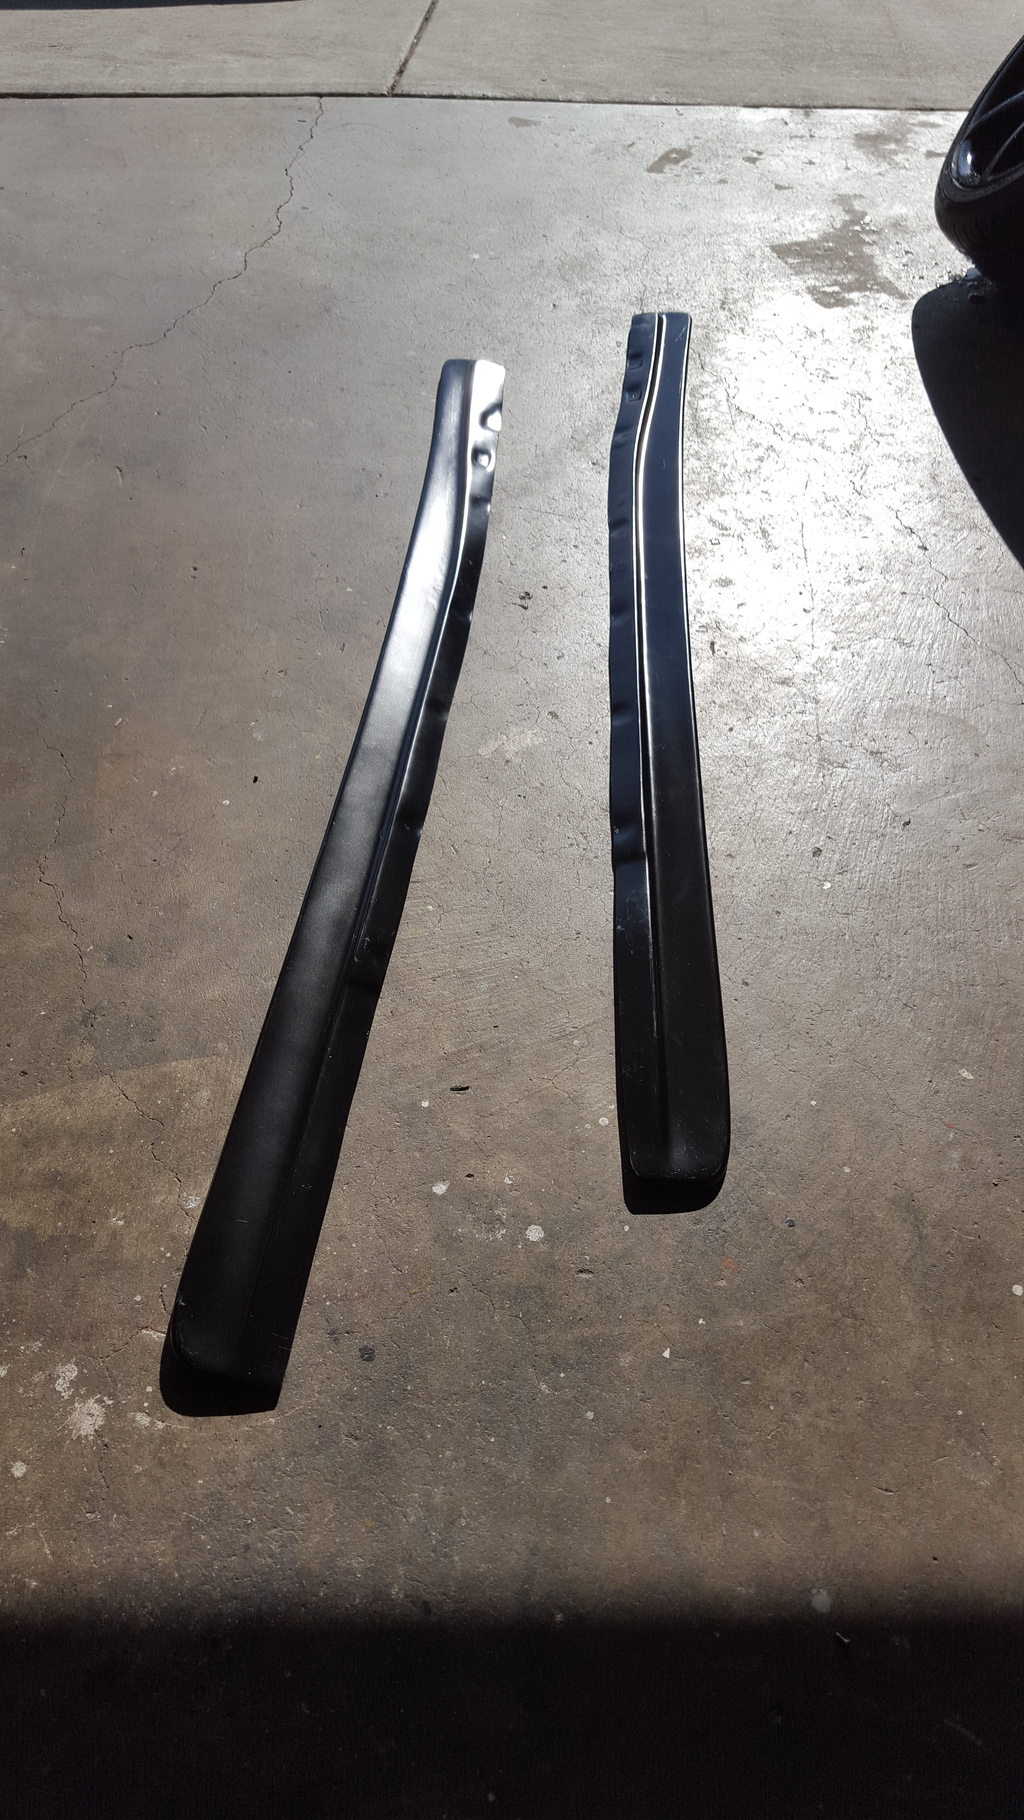
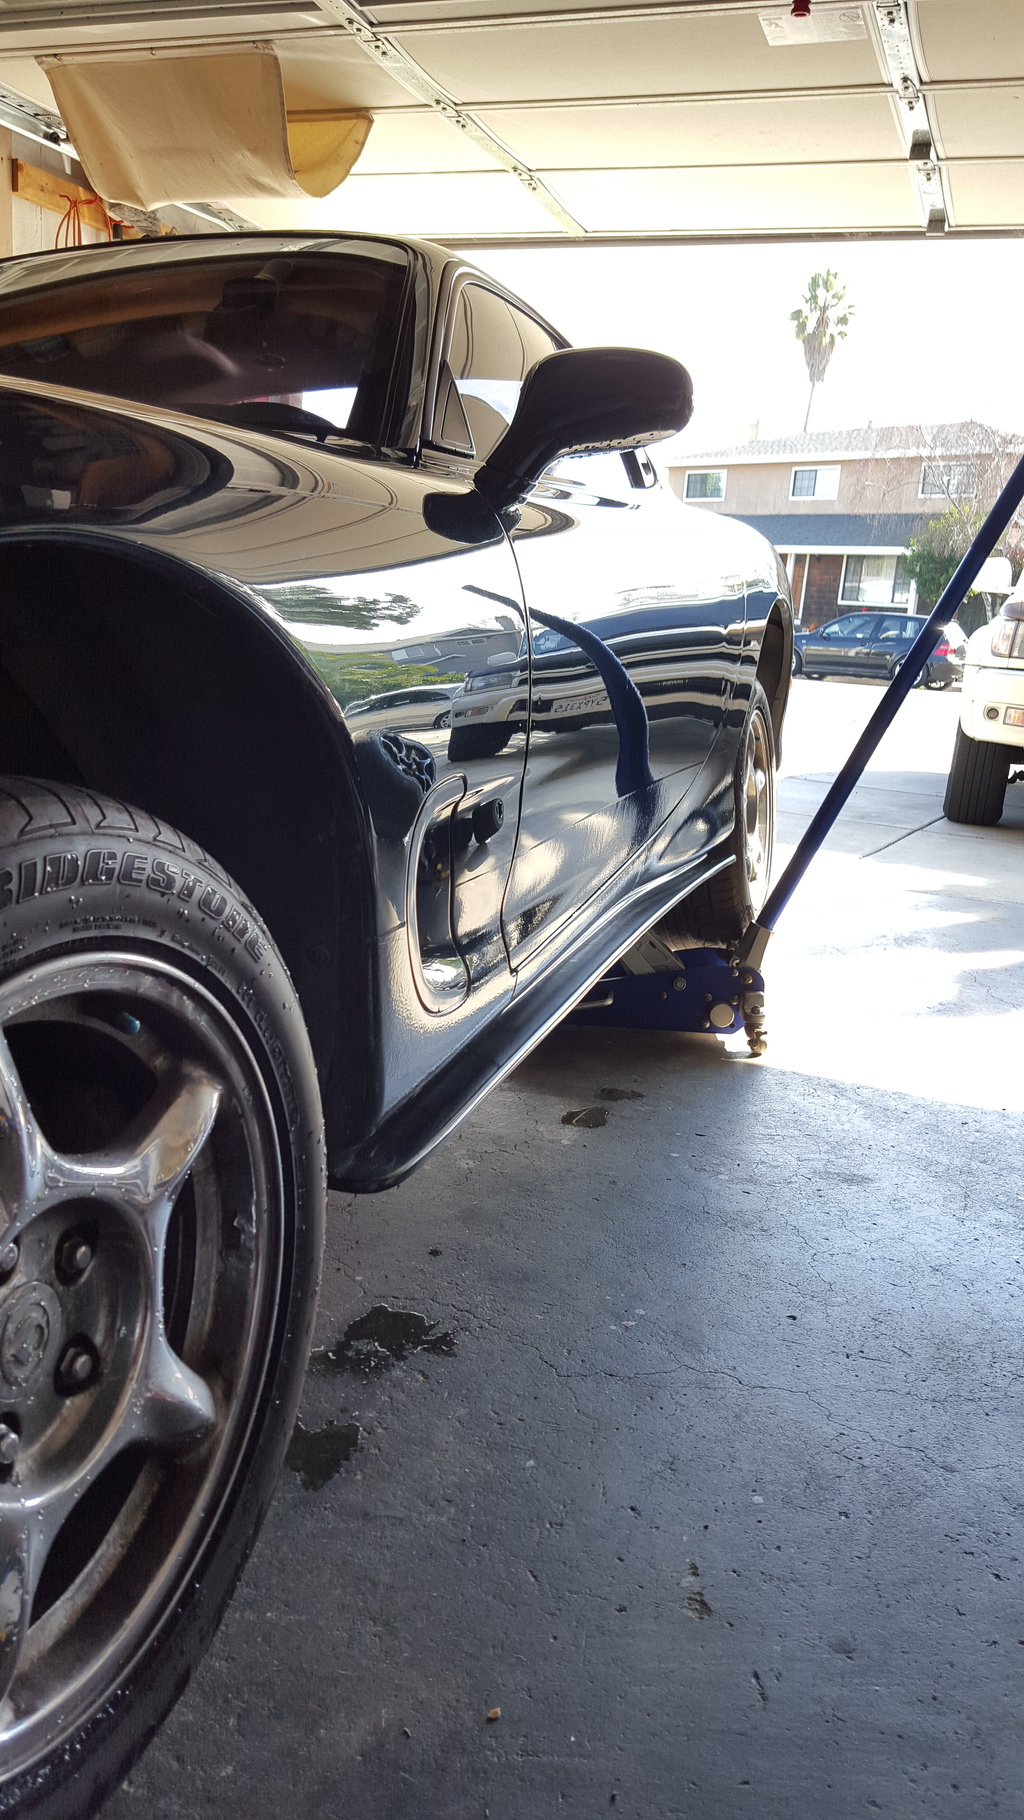
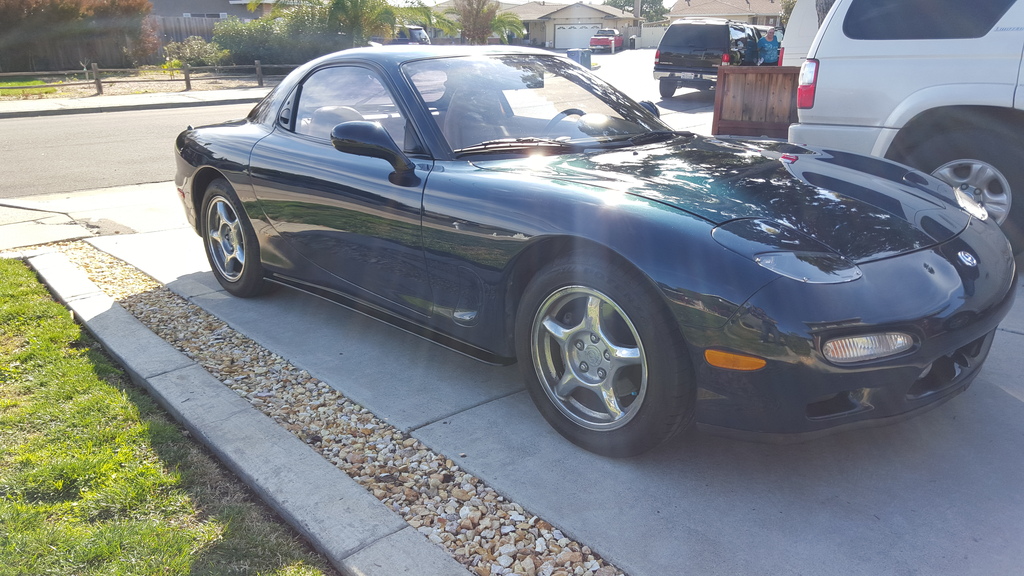
Alright, just a few things over the past couple weeks. Installed HotWater Labs side steps. Very easy install and it only took a little over an hour to complete following these instructions: https://www.rx7club.com/3rd-generati...nstall-863538/
Here are the Side steps uninstalled and installed. Good quality and very simple product that made a nice difference on the car. It looked even better once I lowered it!
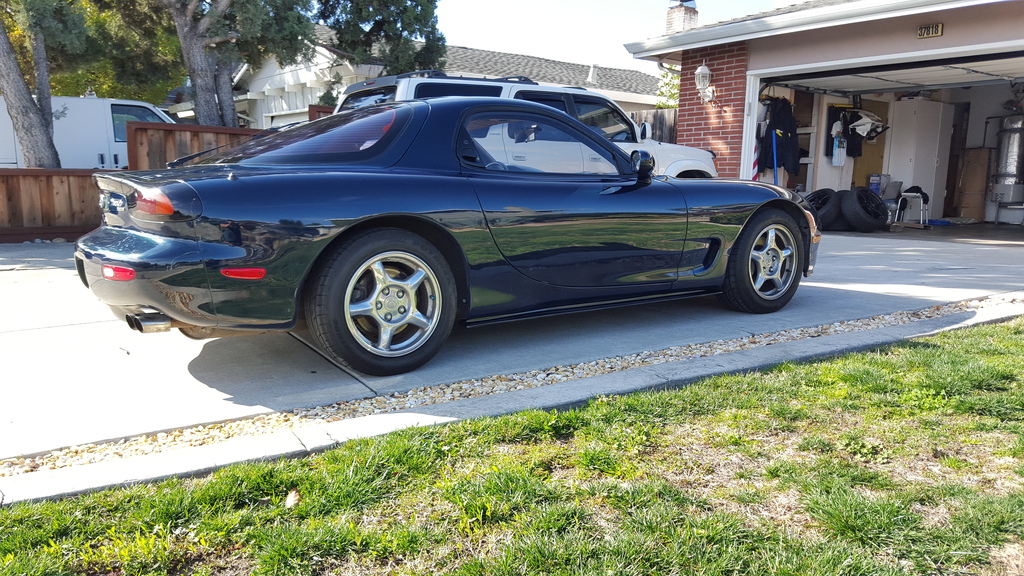
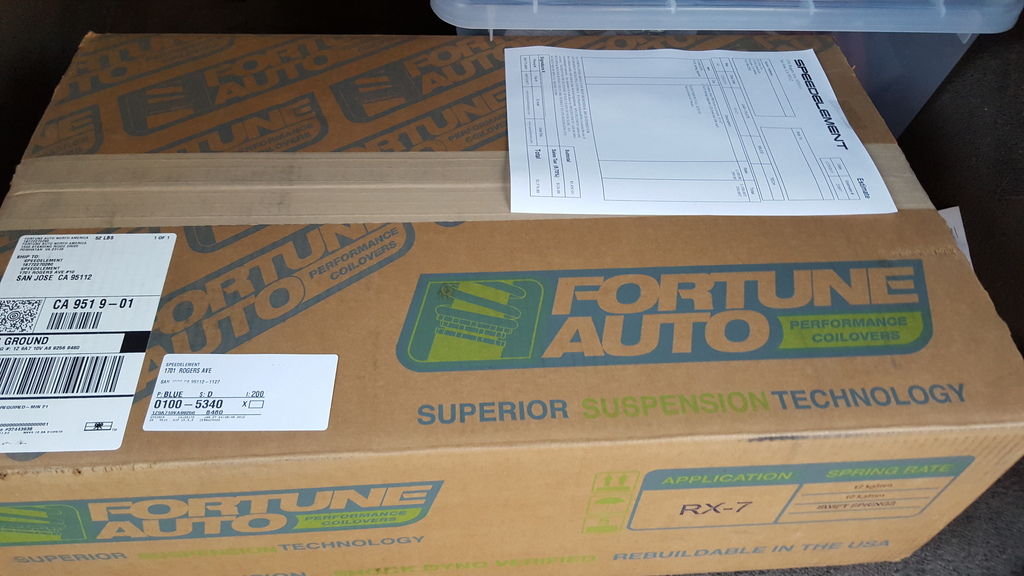
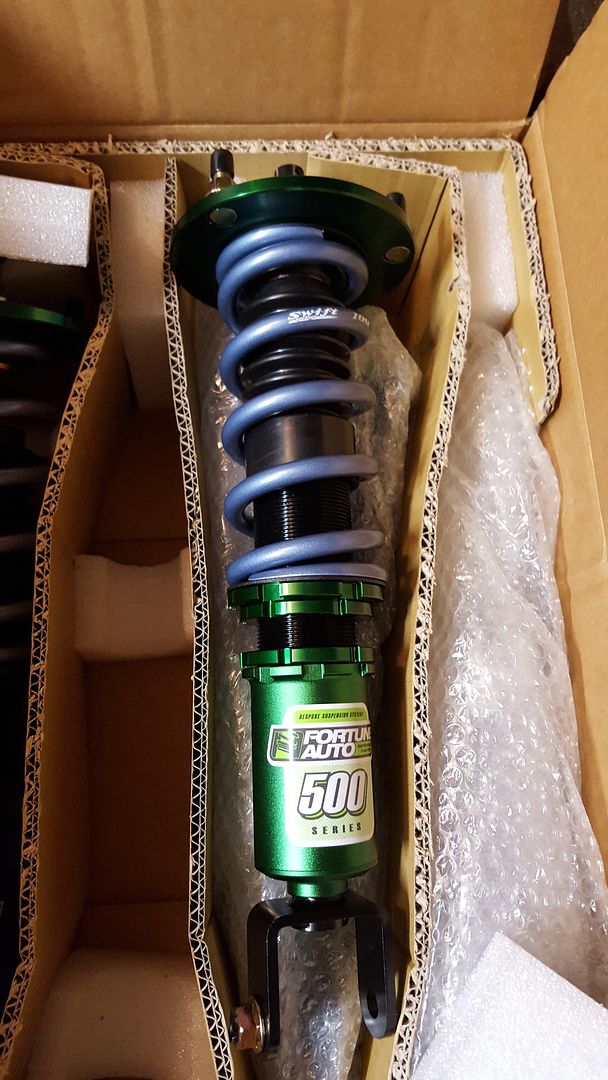
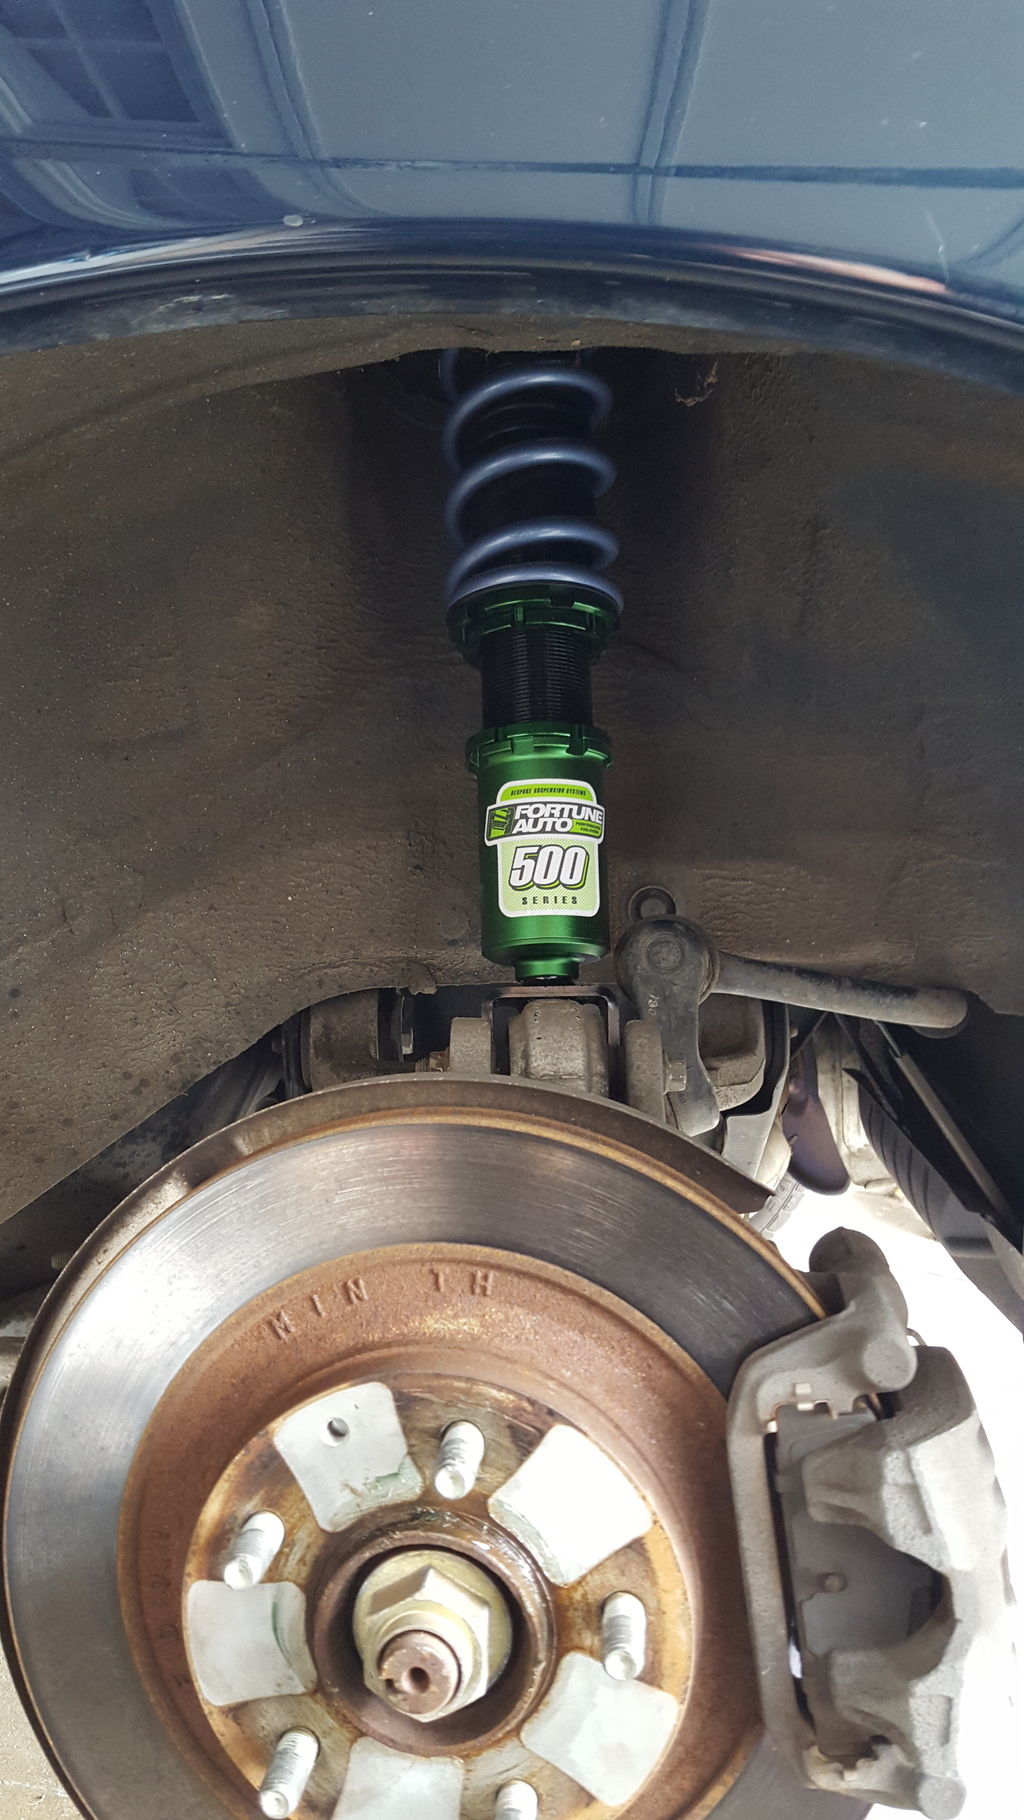
Shortly after installing these side steps, I got a call from Speed Element notifying me that my coilovers finally arrived. I wasted no time making the trip to get those coilovers!
Here are the Side steps uninstalled and installed. Good quality and very simple product that made a nice difference on the car. It looked even better once I lowered it!


Shortly after installing these side steps, I got a call from Speed Element notifying me that my coilovers finally arrived. I wasted no time making the trip to get those coilovers!
I was so excited to finally get these coilovers in. At first I was thinking about getting Stance coilovers, but recently I've been hearing about Fortune Auto coilovers from a few friends. I was pretty convinced after I found out that they build to order and build the coilover around the spring rate of your choosing. I believe some manufacturers will sell you what ever coilover is available on their shelf and slap on the springs with spring rates you want. I know Stance and PBM will do this, unless that has changed in the past few years.
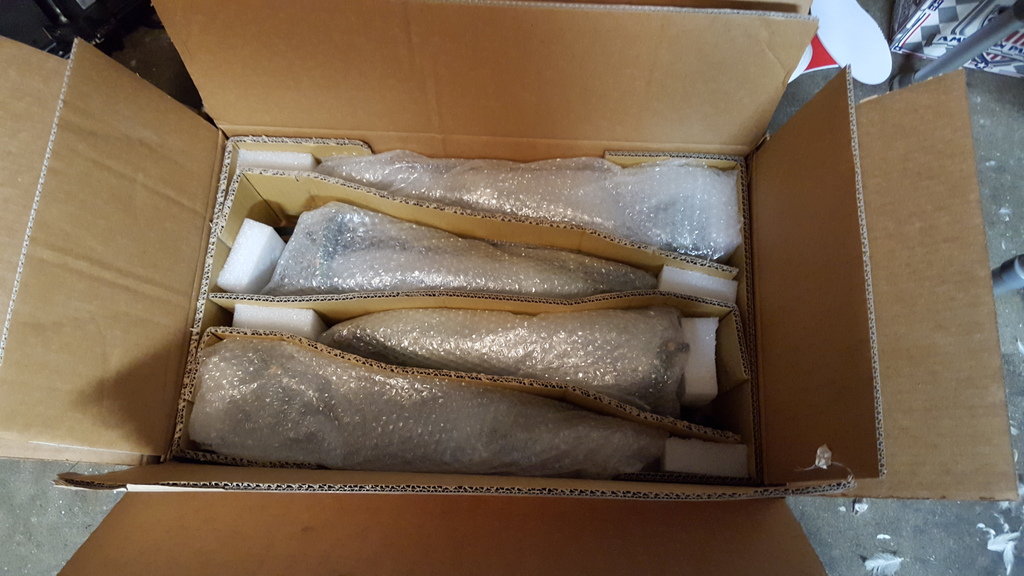
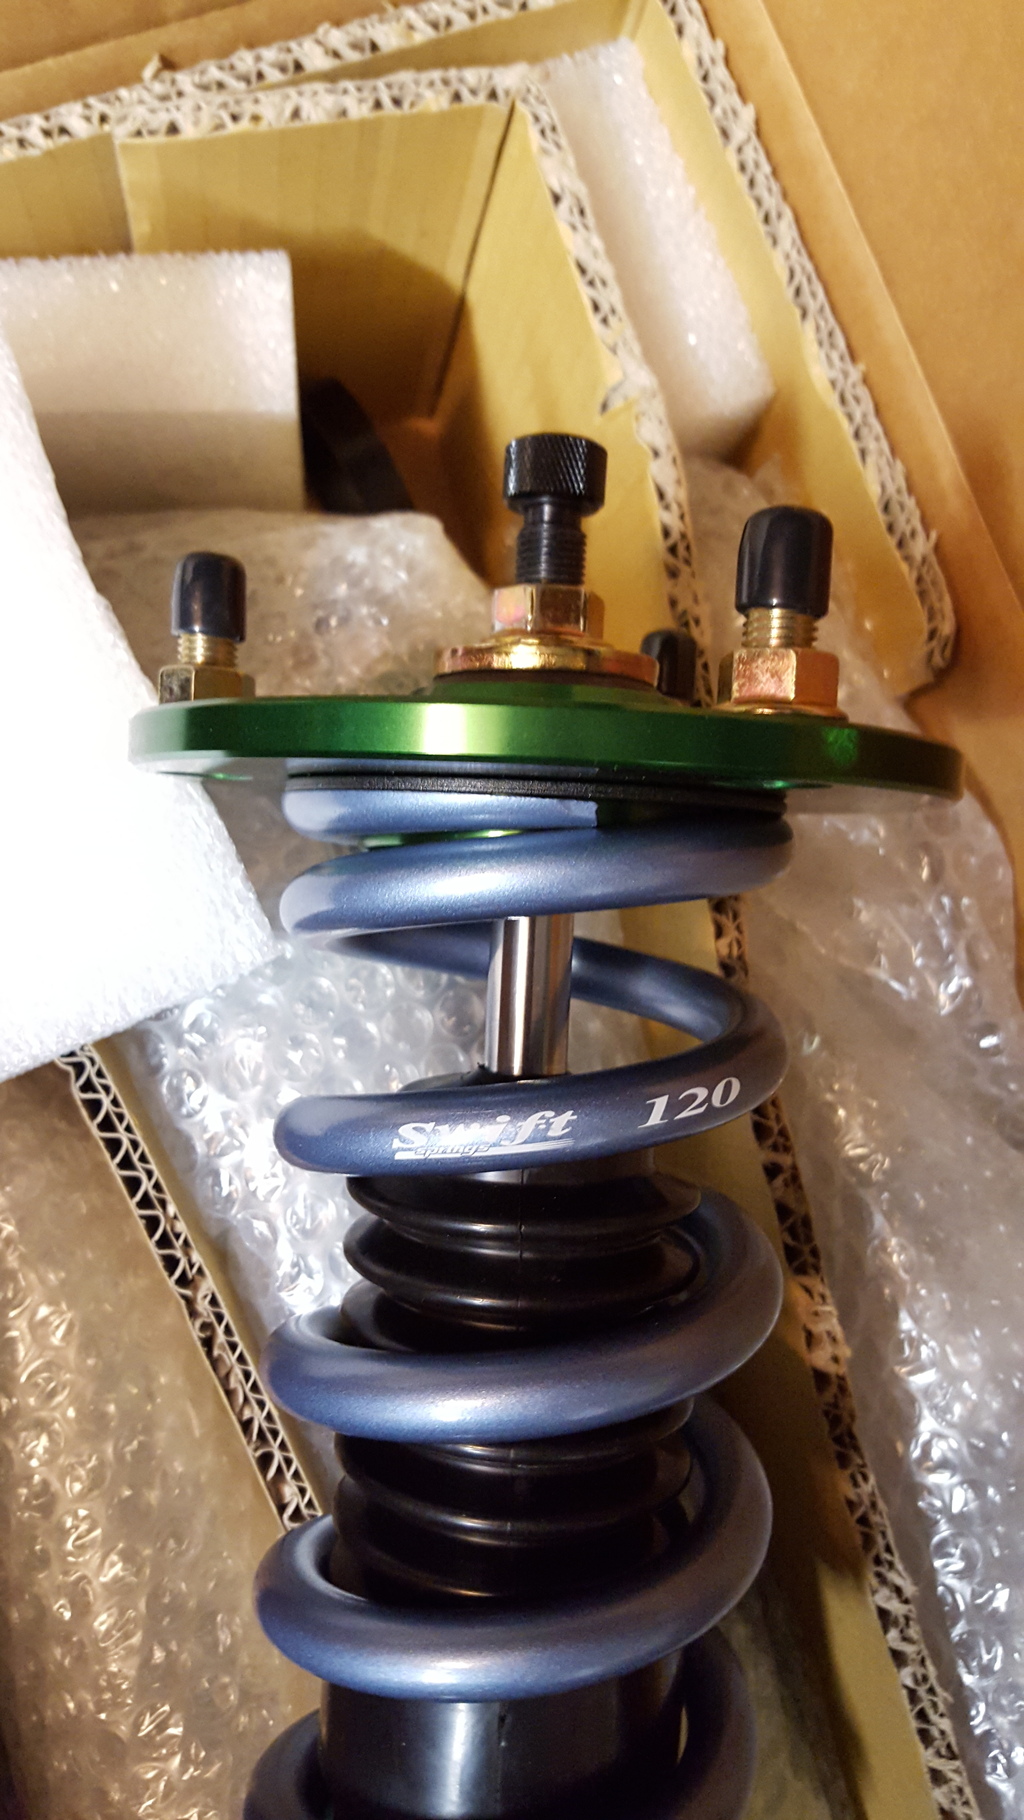
Anyways, here are some pics
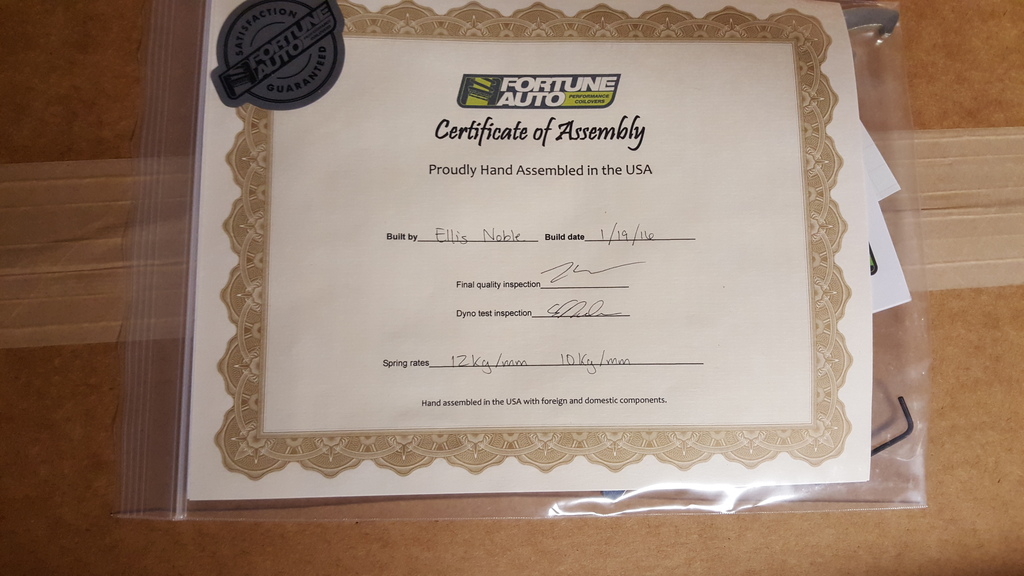
I thought this right here was pretty cool to see. I've personally never seen any manufacture provide a "Certificate of Assembly" with their coilovers. Tell me that they put a lot of pride into building their products.
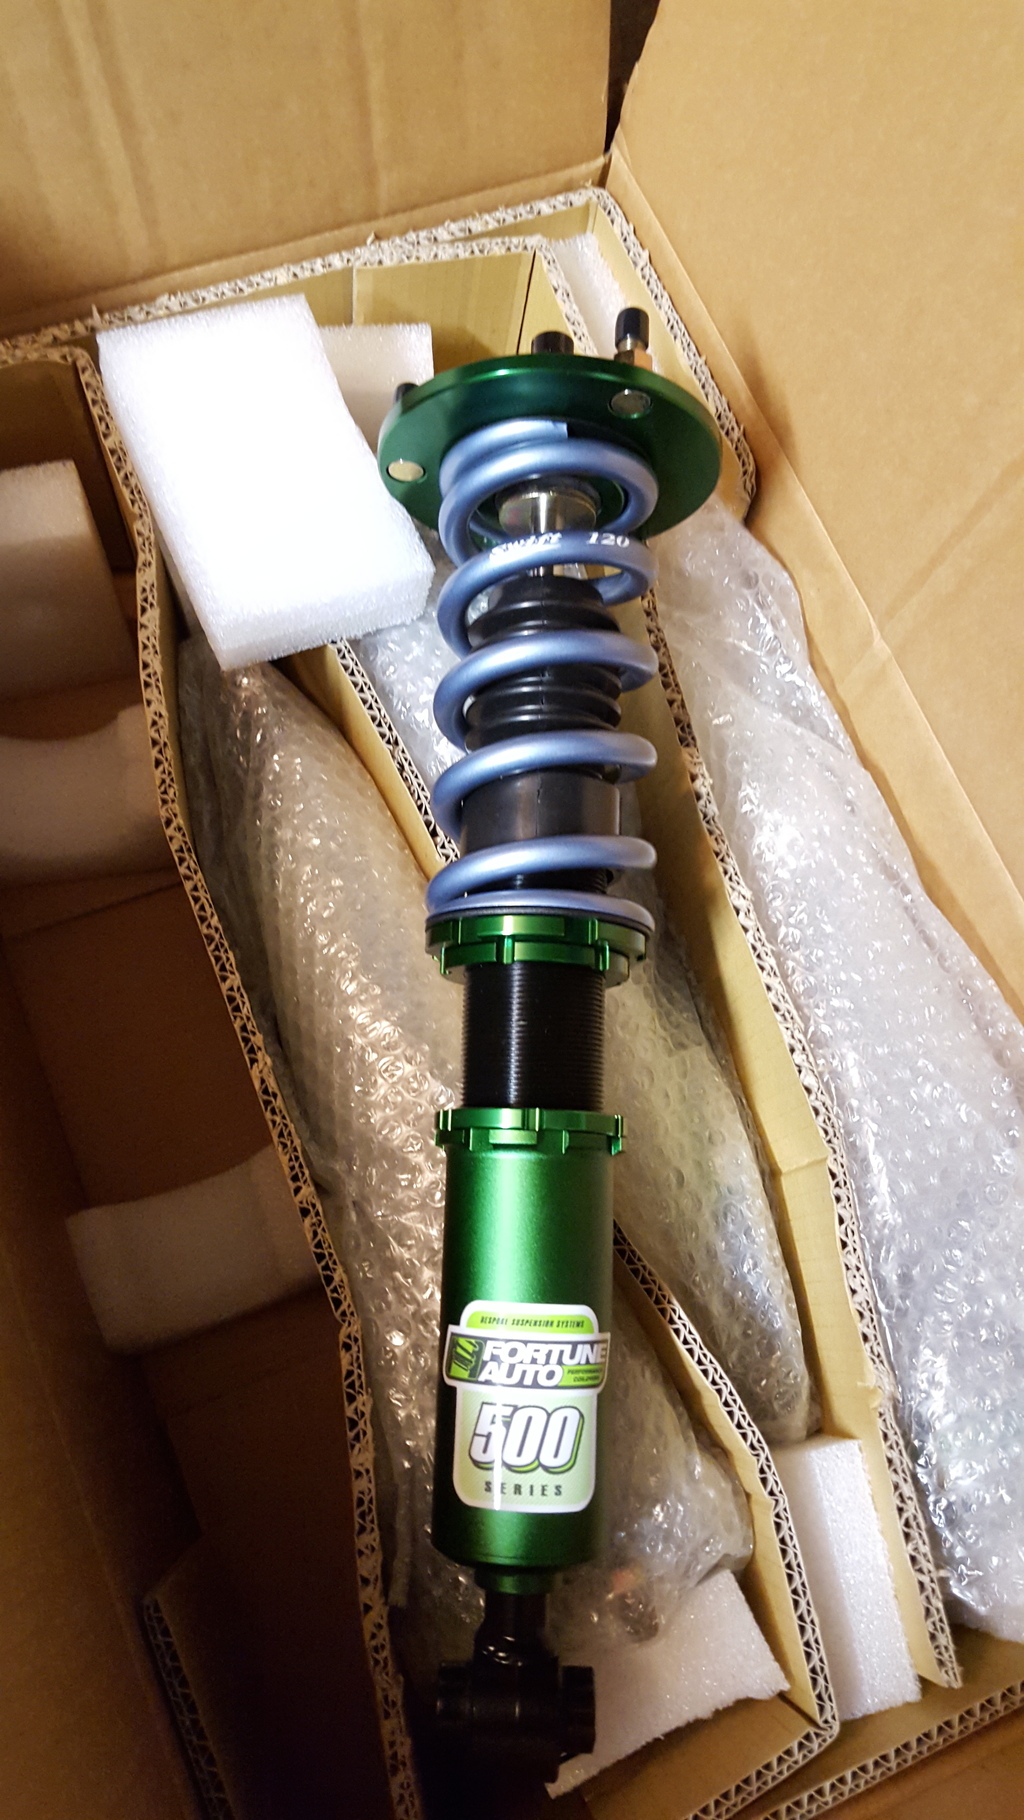
Sneak peak:

Anyways, here are some pics

I thought this right here was pretty cool to see. I've personally never seen any manufacture provide a "Certificate of Assembly" with their coilovers. Tell me that they put a lot of pride into building their products.


Sneak peak:

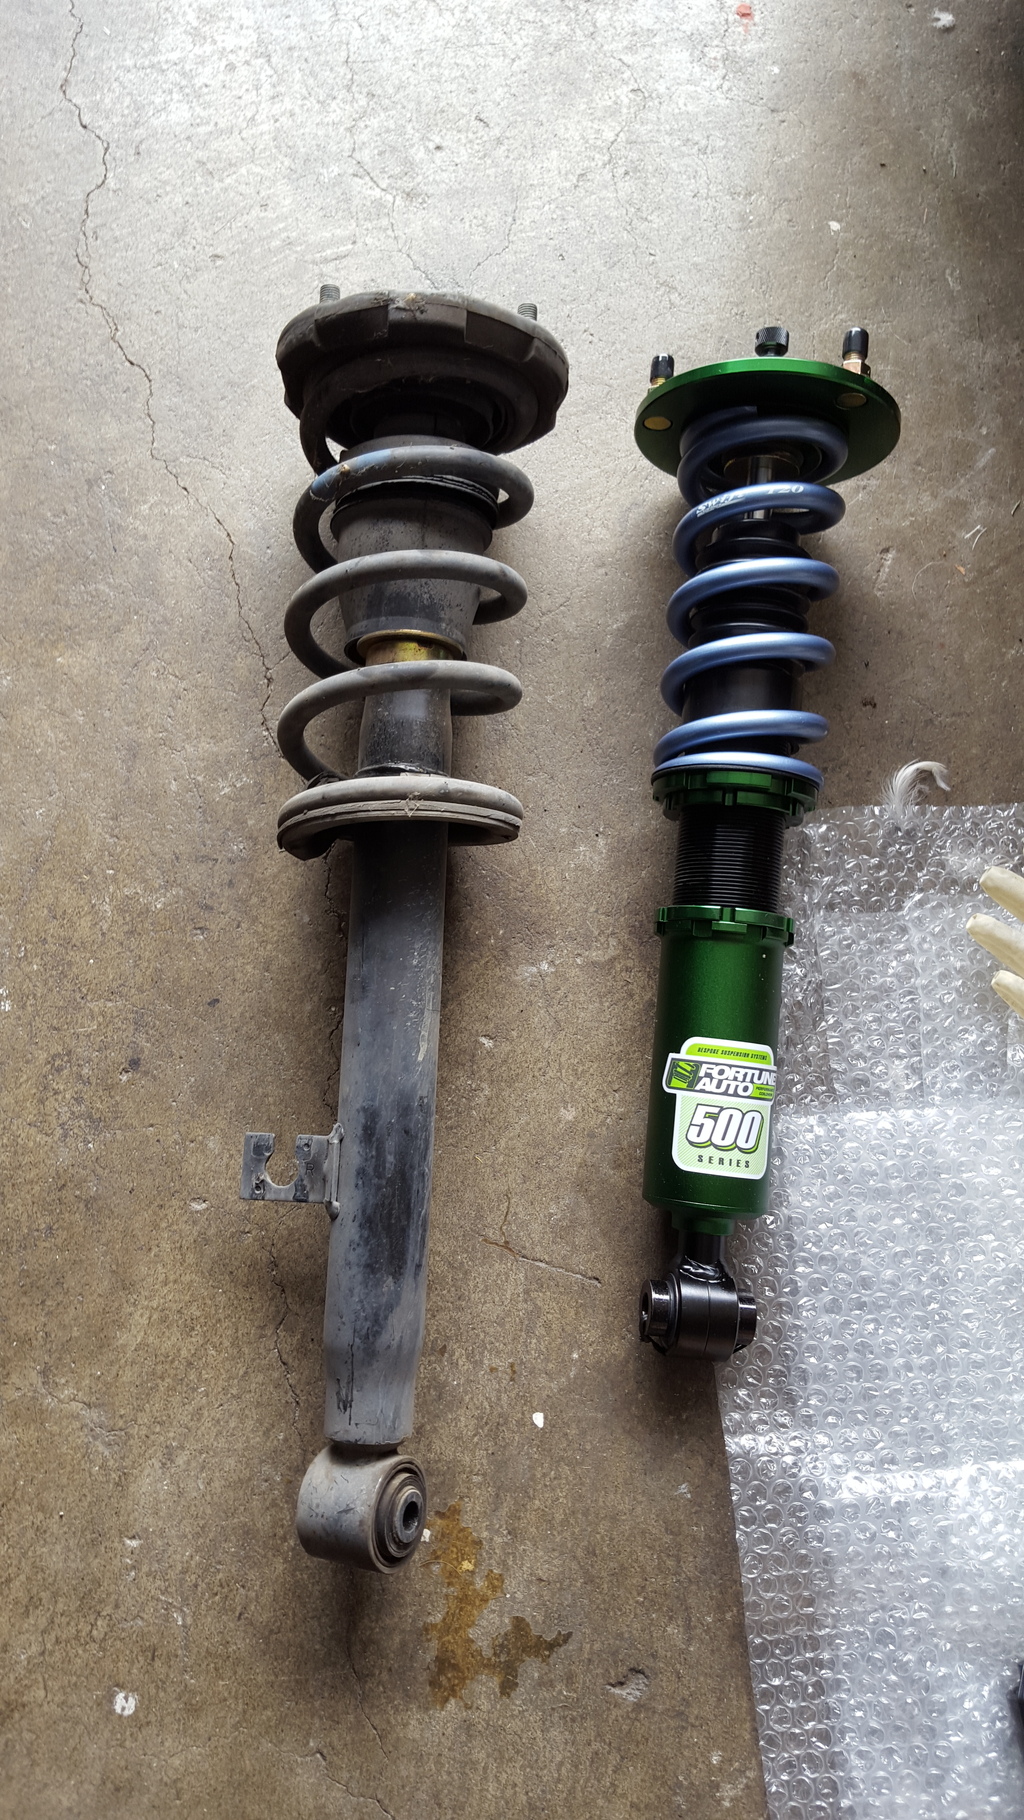
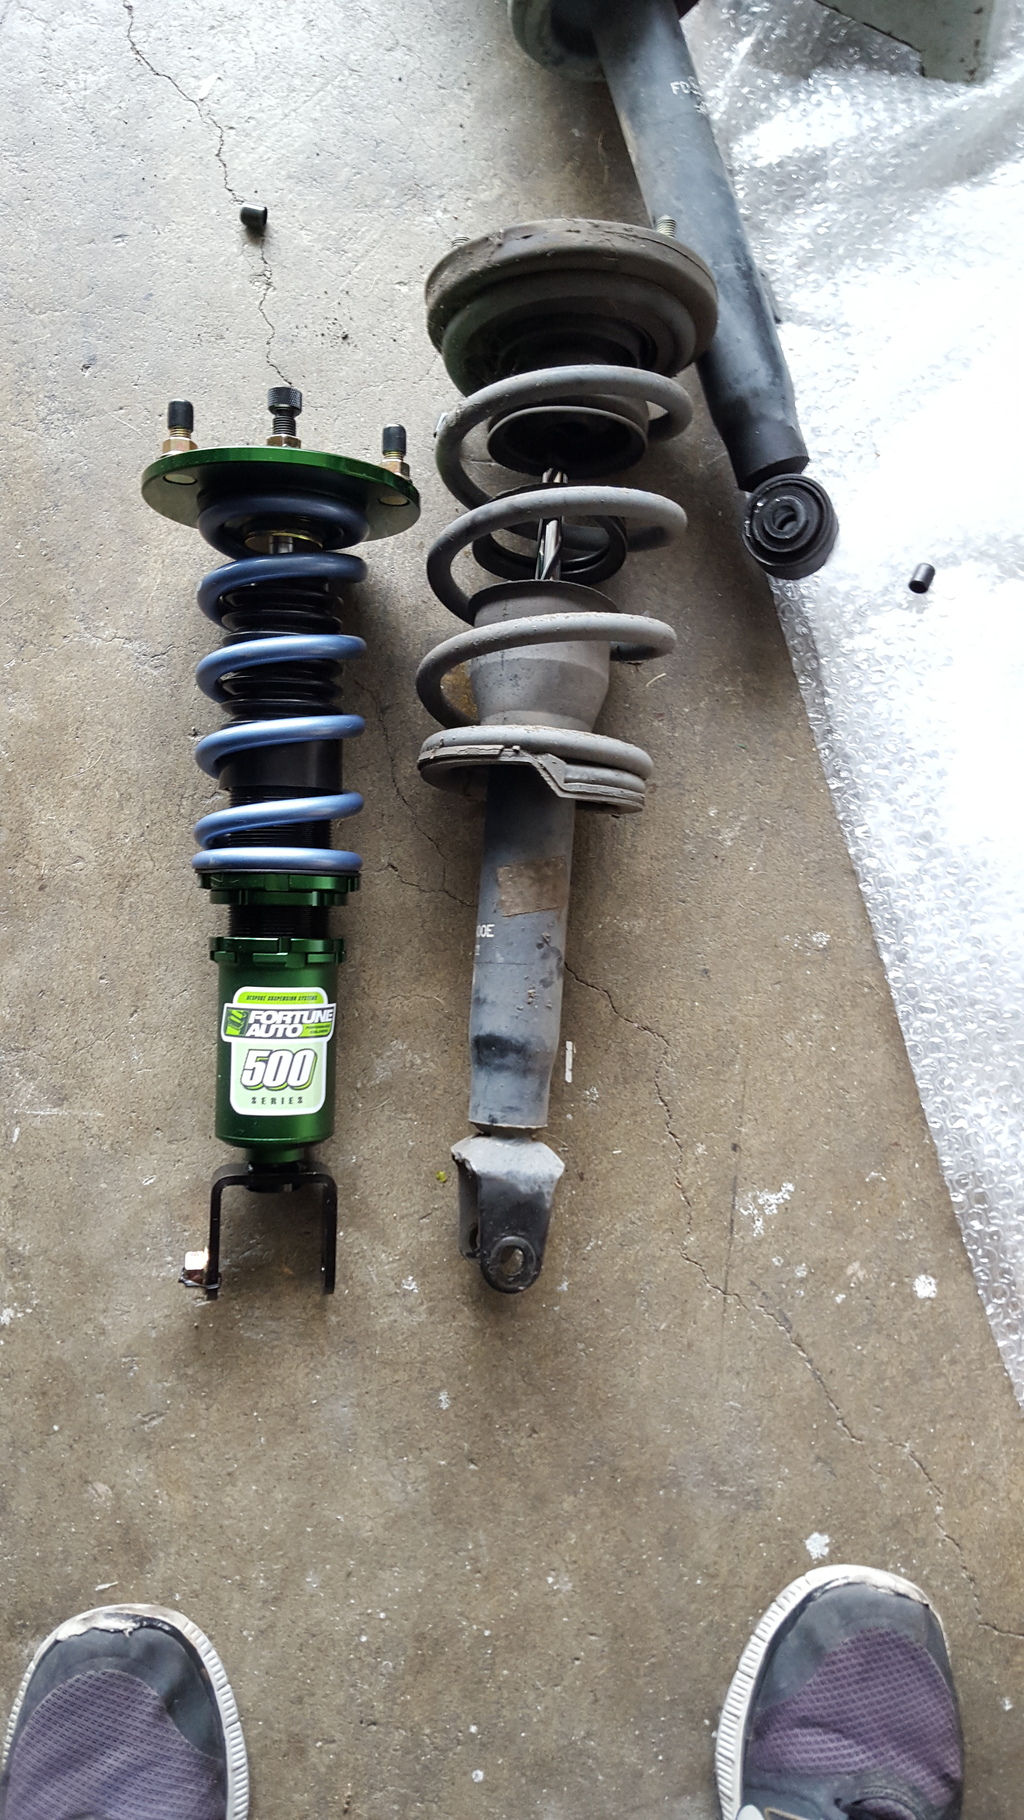
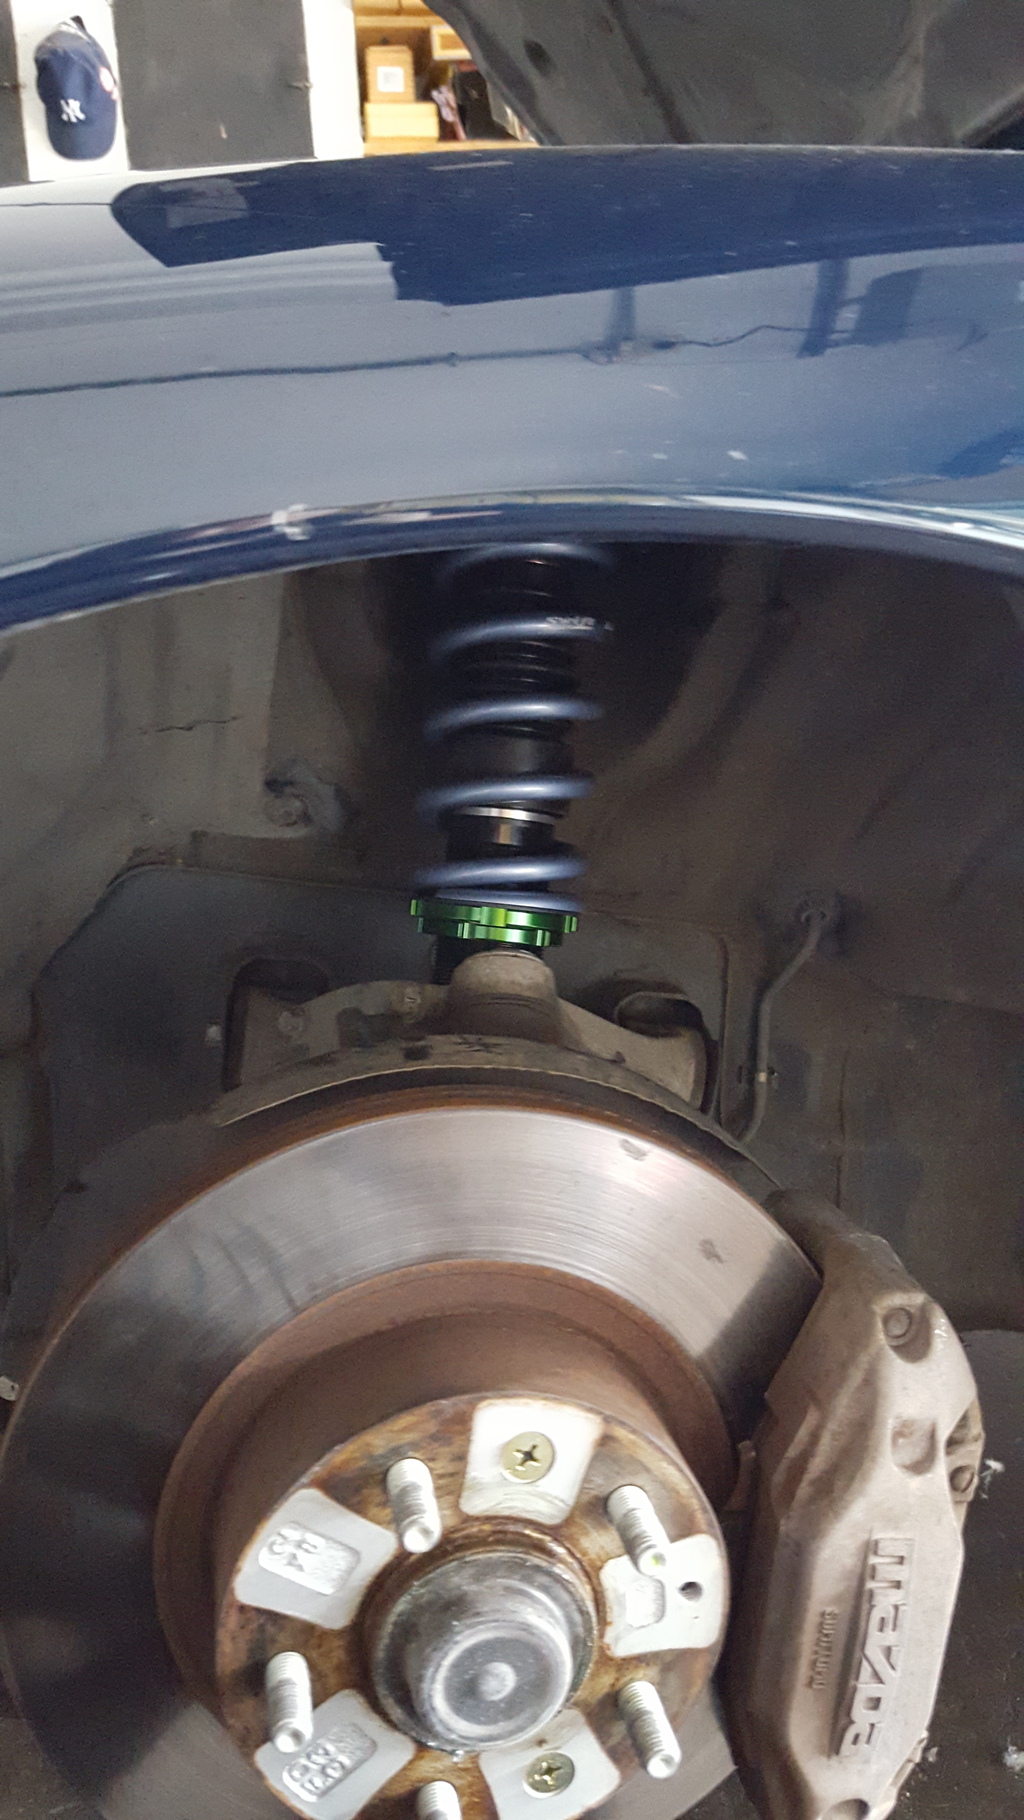
Front and rear comparison
On the car
Went to low

Readjusted
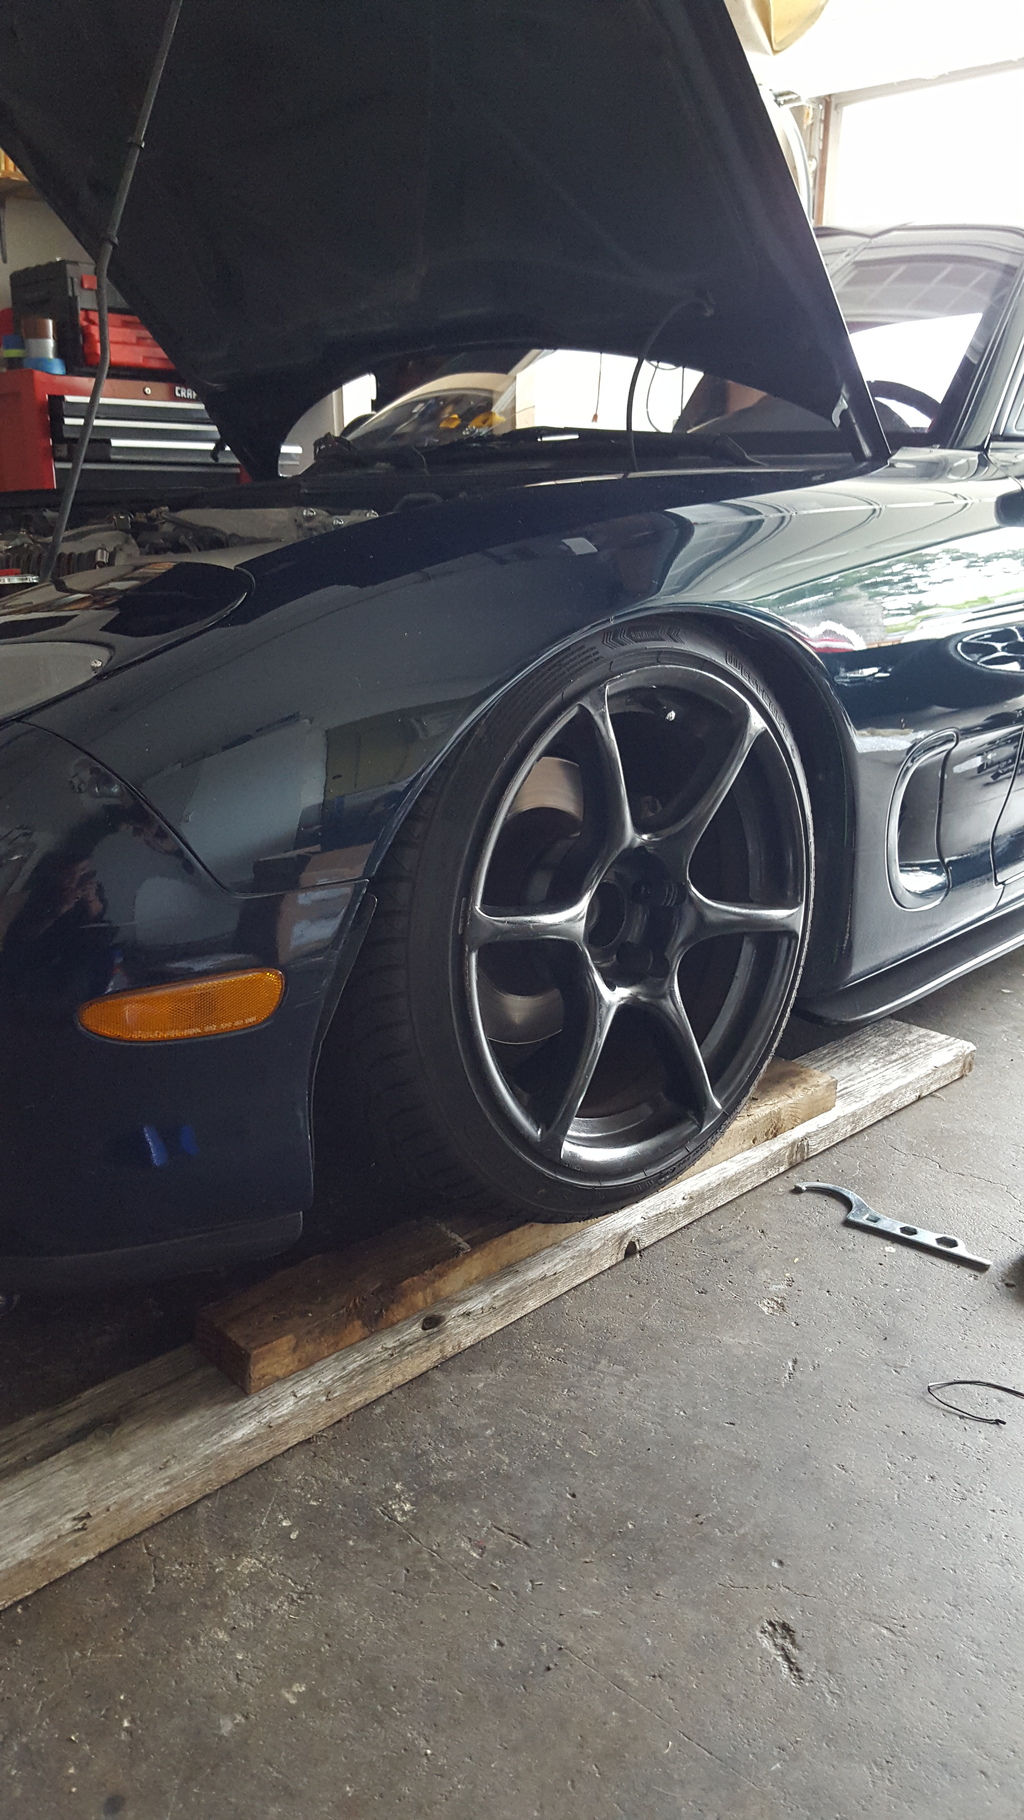
Final
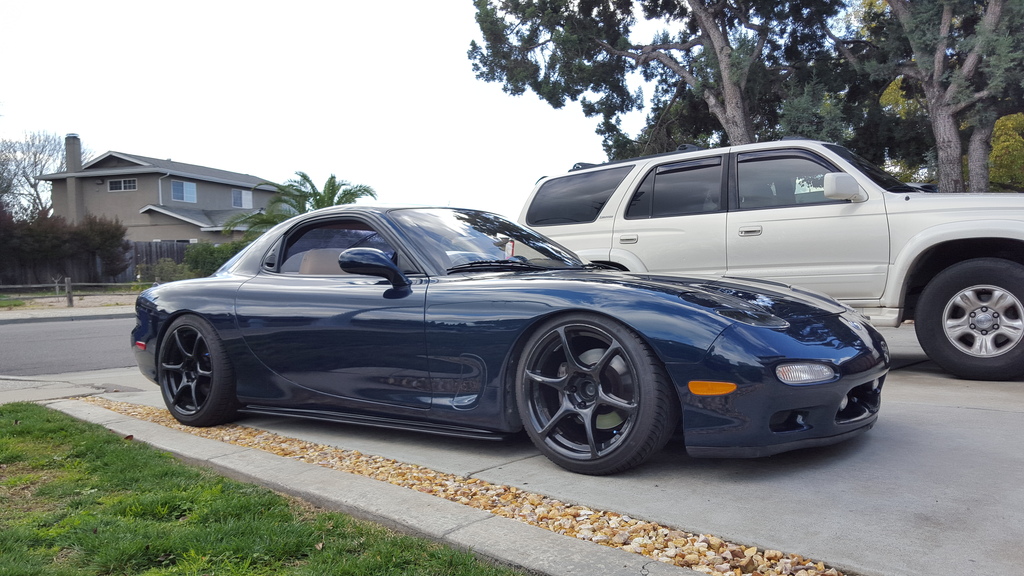
Very easy install. Just ran into a small problem with one of the bolts stripping. Not a problem if you have stripped bolt extractor. Overall, the car with the new coilovers, drive very smooth and feels softer than stock, yet at the same time feels stiff. It's difficult to explain. Might go a half inch lower in the rear.


On the car


Went to low

Readjusted
Final


Very easy install. Just ran into a small problem with one of the bolts stripping. Not a problem if you have stripped bolt extractor. Overall, the car with the new coilovers, drive very smooth and feels softer than stock, yet at the same time feels stiff. It's difficult to explain. Might go a half inch lower in the rear.


Thanks fellas! The car is coming a long nicely. I took a short break after the car nearly lit on fire do to my fan fuse burning out. The passenger side fan seized up and I guess that caused fan contreoller fuse to blow up nearly melting my wiring harness. Good thing I caught it in time other wise there would be no rx7 for me. Lmao! The problem has been corrected.
Right now I'm waiting for the greddy v mount group buy to close out with sake bomb garage. I also bought a sake bomb electric water pump and am in the process of having a few other things changed out. Hopefully by the middle of summer my car will have a tune and the rx7 will be where I want I to be.
Right now I'm waiting for the greddy v mount group buy to close out with sake bomb garage. I also bought a sake bomb electric water pump and am in the process of having a few other things changed out. Hopefully by the middle of summer my car will have a tune and the rx7 will be where I want I to be.


Thread
Thread Starter
Forum
Replies
Last Post

