When you click on links to various merchants on this site and make a purchase, this can result in this site earning a commission. Affiliate programs and affiliations include, but are not limited to, the eBay Partner Network.
Nice. I'm gearing up to do an OMP and lines this weekend. What sheathing did you use?
And where is the material on the new vs old injectors. I can't seem to find it. Nvm. I see the link. Interesting read, but looks like the main issue ended up being different size jets in each housing?
Last edited by TwinCharged RX7; Jun 23, 2023 at 12:57 AM.
Nice. I'm gearing up to do an OMP and lines this weekend. What sheathing did you use?
And where is the material on the new vs old injectors. I can't seem to find it. Nvm. I see the link. Interesting read, but looks like the main issue ended up being different size jets in each housing?
There were so many topics and in that thread I posted has links to other threads about the older oil injectors "failing less". I did see the jets but also the rubber spacer was found to be damaged in one thread.
But overall the goal is to make something less prone to fail. Which may include swapping jets and so on... still looking into it.
Ummm... the sheath came from a scrap pile at an undisclosed location.... which I no longer have access too. It might take me some time to source the info.
Ummm... the sheath came from a scrap pile at an undisclosed location.... which I no longer have access too. It might take me some time to source the info.
I talked to another engine builder (MO at Palm Tree Rotary), and he confirmed that the newer oil injectors (check valves) with the smaller orifice fail at a higher rate. He said some have even been DOA.
He also mentioned the newer jets and spacers are fine to use with the older style larger orifice oil injectors from the early models..
If the spacer is a rubber seal then maybe some of the clogged brass jets are from over tightened oil injectors smashing the seal causing it to fail prematurely?
How much pressure is being applied to the rubber spacer when the crush washers and the oil metering line is in place? Time to take some measurements.
So yeah, Denso Omp, older injectors and inspect the rubber spacers if you have them on your engine. I will inspect mine when I swap to the older style oil injectors to be safe.
Easy Peasy.
Last edited by rotaryextreme; Jun 29, 2023 at 07:52 AM.
Calvin Wan�s Drift FD3S Period Correct Refresh By Rotary Extreme
C.Wan FD3S Refresh � Update 11
"So yeah, if you're buying a new engine - off the top - take the pan off and check for casting squeeze out".
It was time to do some re-work on C.Wan�s motor. Since C.Wan�s car is race first street second I wanted to replace the eccentric shaft oil thermostat with the solid pellet to prevent any premature failure of the thermostat and eliminate oil starvation if it should fail. It may fail open or closed but the worst is closed which would cause oil starvation and damage the eccentric shaft bearings. With the oil pellet mod the car will take longer to warm up and that�s OK. The other thing I wanted to do was re-seal the oil pan with a high strength/temp RTV. C.Wan�s motor was sitting for a while and when I went to install the engine mounts the bolts that were taken out still had wet RTV. I spoke to other builders who mentioned seeing wet RTV even after a few heat cycles on a running motor. I never imagined that changing the pan would end up being somewhat of a disappointment in quality control from Mazda and a PSA for myself and others with new engines. Read below in section 06 and found out why. OK, onto C.Wan�s motor.
"So yeah, if you're buying a new engine - off the top - take the pan off and check for casting squeeze out".
01 � Eccentric Bolt Out
02 � Eccentric Thermal Oil Pellet
03 � Oil Pan Off
04 � Oil Injection Parts
05 � Oil Pan Test Fit
06 � PSA - Rotor Housing Cast Squeeze Out
"So yeah, if you're buying a new engine - off the top - take the pan off and check for casting squeeze out".
07 � Clean And Glue Pan
08 � Back Together
01 � Eccentric Bolt Out
I finally got to use my Pineapple Racing 13B engine block bracket on my engine and now it was time to use it on C.Wan�s. I had to remove the PS, PS/AC bracket, and Alt to get the bracket on. It was nice to find out it clears the spark plugs. I got the engine on the stand and positioned it pulley side up to prevent the shims from moving that set shaft play while the eccentric shaft bolt is removed. Removing C.Wan�s eccentric shaft bolt went way easier this time since I figured out how to do it on my engine. First thing is to secure the engine stand from moving since I will be using a 4-foot cheater bar to loosen the bolt � yes it is absolutely necessary on new engines. lol. I put a strap around the engine stand base and 2 of my metal racks and placed a thick piece of foam between the oil pain and the shelf it was resting against. I removed the main pulley and heated the eccentric shaft nut with a harbor freight heat gun at it�s highest setting, allegedly 500+ degrees for 3 minutes. Then I took my harbor freight impact gun and zapped it CCW (off), then CW (on), then CCW (off) for 10 sec each to weaken the thread lock Mazda uses during assembly. Once the eccentric shaft nut cools, I use the 4-foot cheater bar to loosen it. I used a � drive 19MM impact deep socket with a � breaker bar, then I use my cheater bar which is the extension arm in my engine hoist, I just slide that onto the cheater bar and push away. All done in 3 minutes � no joke.
02 � Eccentric Thermal Oil Pellet
I pulled out the stock oil thermostat and spring and cleaned the eccentric bolt and the area inside where it goes back in. I put the oil thermo pellet and spring back in and prepped the eccentric bolt with RTV on the flat face and the top part of the thread with red loctite on the lower part of the threads and torqued it to 200 ft-lbs. The eccentric bolt locking bracket was close to the original locking position, maybe 1/2 hole, so I tightened it just a tad more. Everything lined up like before so I bolted the front pulley back down and took a lunch break.
03 � Oil Pan Off
Now that the e-bolt is in it was time to flip the engine over, and it was at that time I knew I messed up. Oil came out the oil filler neck and all over the floor.. lol. Luckily I had a oil pan nearby so I was able to catch the rest of it. I used a putty knife to get the pan off and to reduce bending of the sealing faces of the oil pan. There was a lot of RTV that needed to be cleaned off the engine and most of the time was spent cleaning RTV in the threads. I picked out the big gobs of RTV in the bottom of each tapped hole and then used a brush to clean the threads. I did try a brass brush but it just left little brass hairs behind so I switched up to the plastic ones.
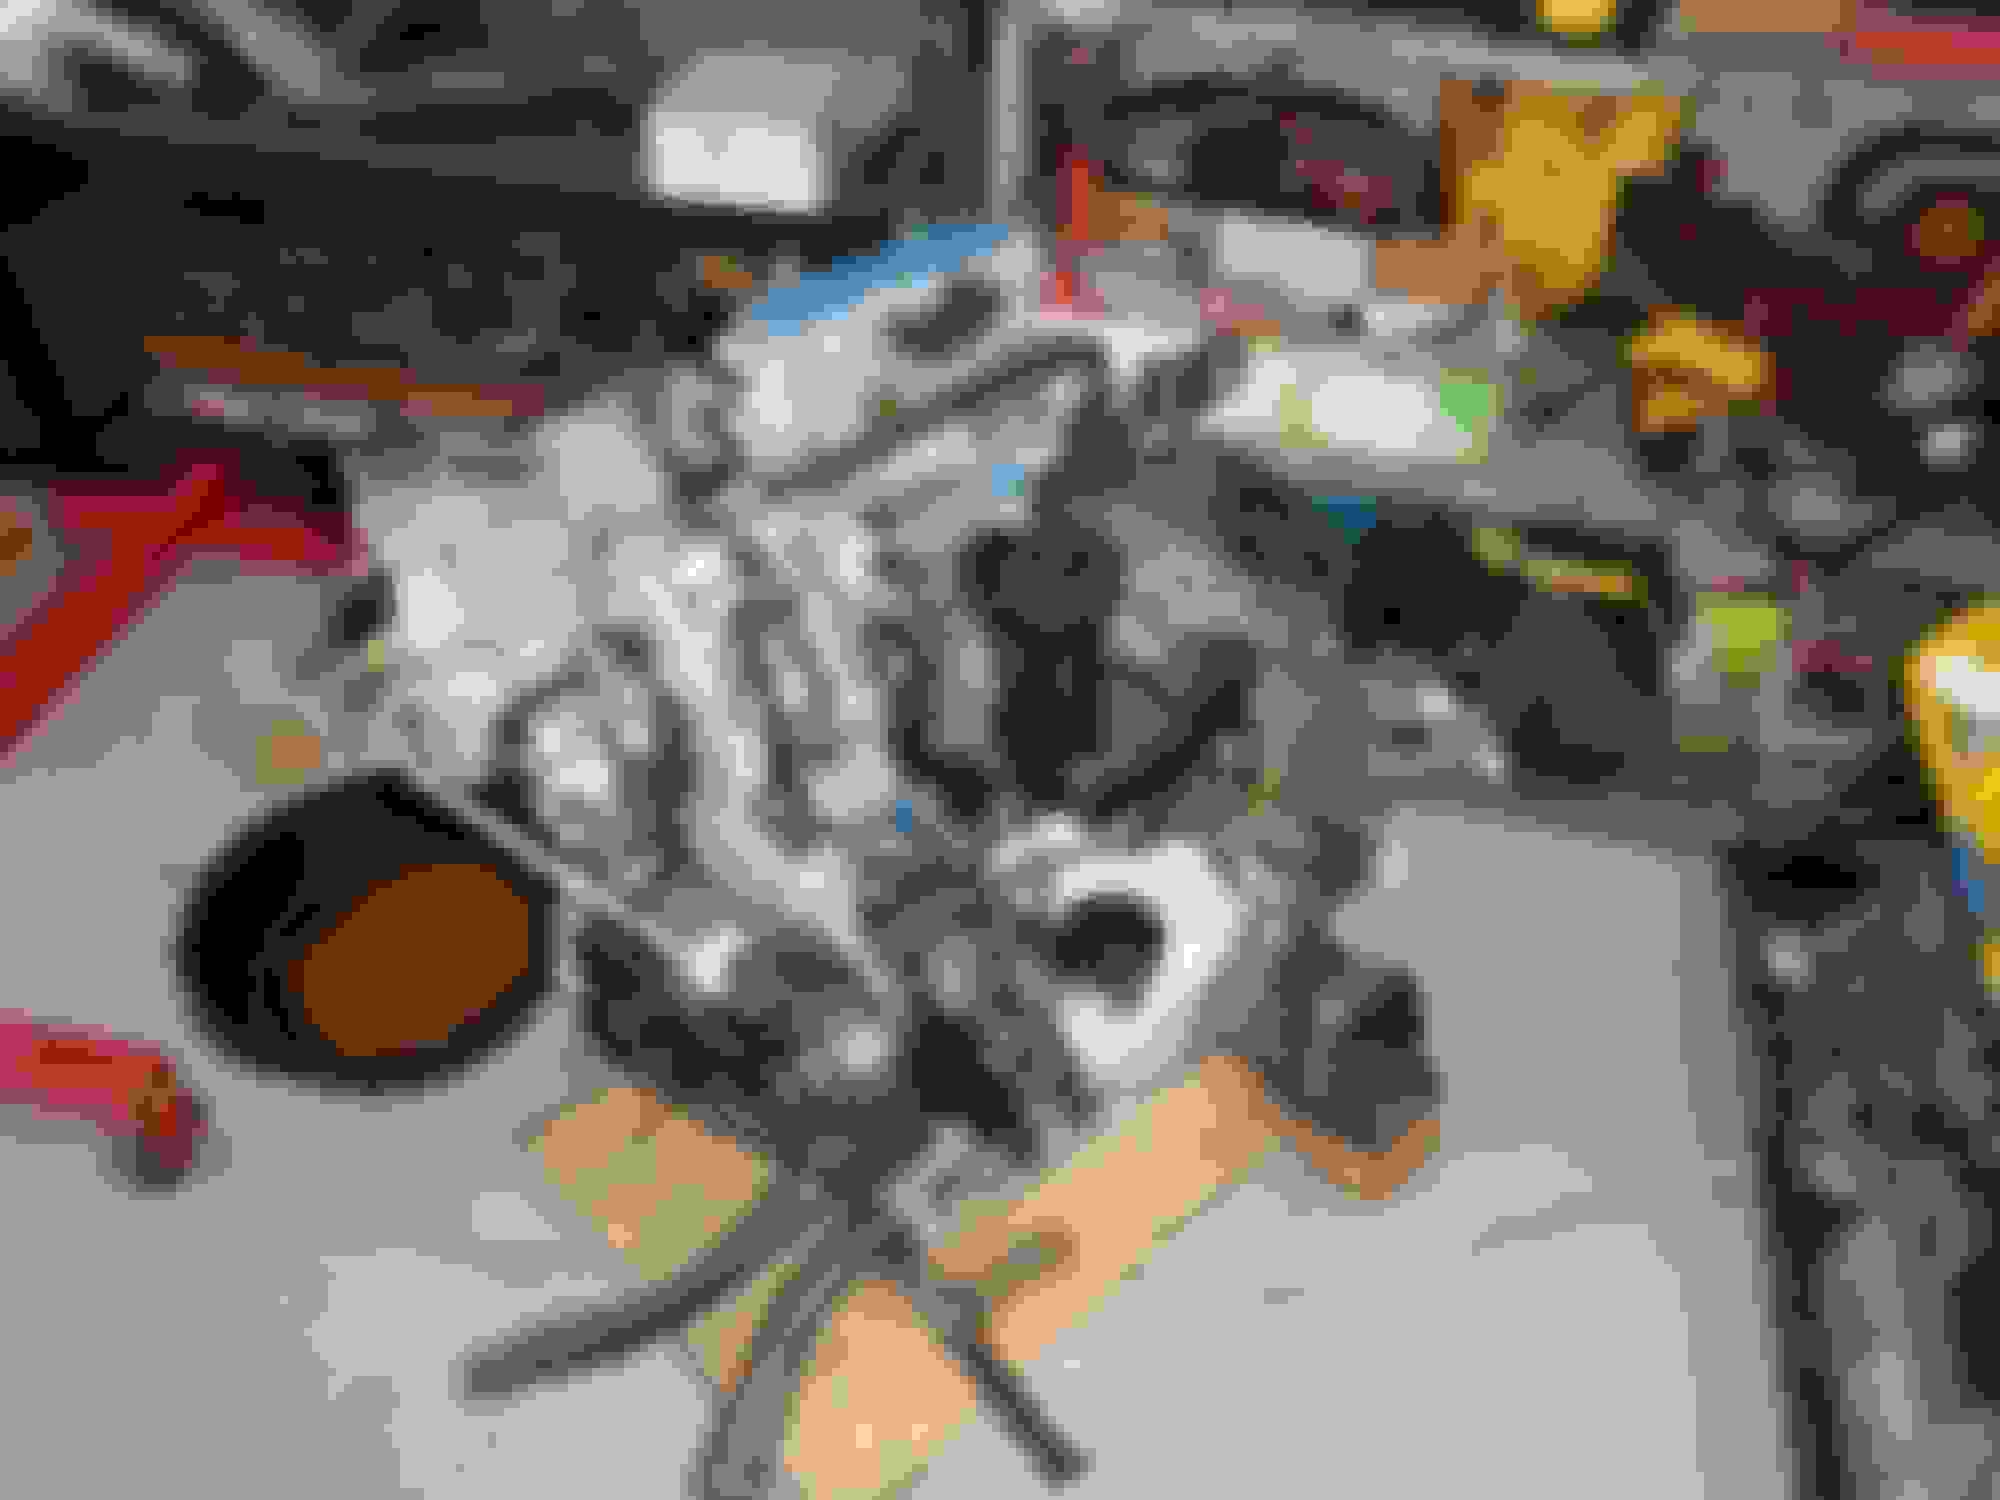
04 � Oil Injection Parts
I got 4 older style oil injectors from Tomsn16 on the RX7Club. They were all good and the check valves worked but had different resistance when I blew through them. You could tell they were 2 matching pairs and I gave the cleaner ones to C.Wan since this pair had similar resistance when blowing through them. I sent another message to Tomsn16 on the forum for some more in hopes I can get another matching set with the same resistance check. Before putting the injectors in I gave them a good cleaning by soaking them in ATF for 2 days, while making sure air bubbles were coming out, then spraying PB blaster into the top side to remove any small debris. All 4 were easier to blow through after this. Some of these oil injection parts are of my motor and I verified C.Wan's motor had the same style. The newer brass oil jets are look like they are pressed into the rotor housing. The brass jets have a small offset galley from the center hole and both jets appear to have the galley positioned downward to act like a reservoir. The rubber spacer has a rounded top which faces the oil injector and a stepped lower section where part of a metal washer is visible which faces the brass oil jet. I went to the older style oil injectors because they have a larger orifice and less prone to fail like the new oil injectors with the smaller orifice.
05 � Oil Pan Test Fit
It was time for the oil pan. I remove all the RTV and took a scuff pad to the flange area. Before gluing the pan back on I wanted to do a test fit to make sure all the faces were level. To protect the engine from debris I put tape over the whole bottom. I test fit the pan, had to make a few small adjustments and re-cleaned everything again.
06 � PSA - Rotor Housing Cast Squeeze Out
This is where I had my WTF moment. I was going over everything in the bottom to make sure there were no RTV bits and whatever and then I saw it, then I saw many. I'm sure at the factory they do their best to clean the squeeze out from the aluminum casting, but common Mazda - really. I found so many little flappers that could have been a potential to break free and cause some damage. I saw scratch marks from someone trying to lift one up, I used a small pick and got it. One piece was even 1/2 inch long! Unbelievable, I bagged them all up and saved them for C.Wan. I also noticed on the inside face of the front rotor housing on the spark plug side, there was some repair welding where the tension bolt goes through the plates. So yeah, if you're buying a new engine - off the top - take the pan off and check for casting squeeze out.
07 � Clean And Glue Pan
Time to put the pan on. The engine side and pan were ready to go, but I forgot to clean the bolts. I came up with a quick way which was to put them in a drill and then hold them against the wire wheel. I tried the other way and it was harder to hold the nut while the wheel was spinning around .. lol. Somebody come get her, she's dancing like a stripper. Anyways with everything cleaned I laid some Ford Motorcraft High Performance black RTV down. PN#TA-357. I got this trick from Mo at Palm Tree Rotary, this stuff seals real good. I put the pan on and torqued the 10mm to 9.5 ft-lbs and then torqued the motor mount bolts to 68 ft-lbs. I taped the oil drain plug to the bottom of the pan and let it sit for 2 days to dry.
08 � Back Together
Today is July 4rth and it was time to get C.Wan's engine back on the engine assembly dolly and buttoned back up. I wanted to check eccentric shaft end play and it was at the maximum allowance of .0035 in. Did Mazda change their specs on the newer engines? C.Wan's and my new engine both checked in at .0035 in. I had to remove the primary fuel rail to install the oil injectors, while I was at it I verified C.Wan's motor had the new style pressed in brass jets and rubber spacers in his rotor housings. I swapped in the older larger orifice oil injectors, applied a little grease to the pri rail orings and put the primary fuel rail back in place. Next was the PS pump bracket, Alternator, and belts. Finally I'm done with the go-backs and I can finally move forward with the next task - which I have no idea what that is right now since I have so much to do.
"So yeah, if you're buying a new engine - off the top - take the pan off and check for casting squeeze out".
Calvin Wan�s Drift FD3S Period Correct Refresh By Rotary Extreme
C.Wan FD3S Refresh � Update 12
A small update for C.Wan. I am installing the Apexi AVC-R in my car which requires splicing into the engine harness and body harness where they connect to the main ecu. The Apexi AVC-R instructions are easy to understand and they give you a lot of pictures and take time to explain things in the instruction manual.
When I removed all the harnesses from C.Wan's car I had to cut the Apexi AVC-R harness out to separate the harnesses. Since I will be installing connectors on my car where the splices will be I realized now would be a good time to install them on C.Wan's car as well.
Whoever spliced the wires did a nice clean job. They pulled the pins, did the splices and used some shrink tubing to cover it. All the shrink tubing is the same size and centered over the splice. You can see in the past it was cut to disconnect it from the body harness and re-crimped.
The Apexi AVC-R has 6 wires and 3 go to the body harness and the other 3 go to the engine harness. Thankfully I only had to get 3 pin connectors. To prevent any accidental mates I put a male on 3 wires and then a female on the other 3 wires on the Apexi AVC-R side and then I installed the other connector gender for each on the harness side. The connectors I used also have a press lock feature so you don't have to worry about it vibrating loose.
Here is a recent interview on C.Wan.
This interview focuses on C.Wan himself and not too much into car builds.
If you want to know some Falken Drift history - here ya go.
Calvin Wan’s Drift FD3S Period Correct Refresh By Rotary Extreme
C.Wan FD3S Refresh – Update 13
Time to get back to C.Wan's FD
1. C.Wan Arrives
2. Dash Harness
3. Temporary Suspension
4. FEED Fender Brace
5. Apexi Filter For Turbo
6. CF Fender Liners
7. C.Wan Corner
8. C.Wan Toys
1. C.Wan Arrives
C.Wan's FD is finally back. Calvin got the trailer in the driveway damn near on the first attempt. He just made a slight adjustment and back right in like a pro.. oh yeah because he is a pro driver..lol. It's so nice to be able to get an auto transport in your driveway. I can fit 2 cars in the garage but it's more like a giant 1 car garage. Thankfully I can open the doors completely on both sides without hitting the shelves. I tucked Calvin's car in for the night and carefully rolled the rest of the equipment in.
2. Dash Harness
The first thing I did was re-install the dash harness. Thankfully Calvin left his spare dash support bar and harness so all I had to do was match that. Thankfully I taped over the ground spots on the dash bar so all I had to do was a slight scuff to get the oxidation off and install new bolts.
3. Temporary Suspension
The car is so light in the front I had to tie it down to the lift. Not trying to have any horror stories of cars falling backwards off the lift. Calvin wanted to rebuild his Apexi coilovers, so I put my lowering spring set-up on his car. The set-up is used Eibach Pro Kit springs with Tokico shocks. Oh man, after the swap his car looks like a monster truck and some serious tow-in on the front tires. NOTE: I did install the front shocks with the brake line retaining bracket on the back to prevent snagging C.Wan's brake line set-up for use with his Apexi Coilovers.
4. FEED Fender Brace
After cutting so much material from the body for steering clearance, Calvin went with the FEED fender brace kit. I used RHD Japan to order it and it arrived within a week. It's a really nice piece and made very well. I like the fact that it uses 2 mounting holes at the top of the wheel arch. I ended up replacing all the bolts holding the door hinge to the body with new larger flanged head bolts.
To Install.
Step 1. Make sure the door is closed and latched.
Step 2. Make sure the door hinge center bolts are tight where the hinges bolts to the body.
Step 3. Pull out the top and bottom bolts of each hinge.
Step 4. Mount the FEED brace by starting the bolts where the door hinge side is. Do not tighten them down because you need the brace to swing out.
Step 5. Slide the front brace backing plate into location and hold the tab that sticks up and out.
Step 6. Put loctite on the Allen head bolts that will bolt down in those locations and run them down until they are a little snug. There will be alot of movement and flex in this area and hopefully the loctite will prevent the bolts from becoming loose.
Step 7. Fully seat the bolts on the door hinges to the TQ spec, or to your best judgment.
Step 8. Fully seat the bolts going into the backing plate on the front of the brace.
The fitment is solid and clears the lip I added after removing the material and old lip. I included a bunch of photos if anyone else was wondering about doing what I did.
5. Apexi Filter For Turbo
Calvin was running an HKS mushroom filter, since most of his car is Apexi I got him an Apexi filter with a 4 inch adapter plate to match the turbo inlet. It will be interesting to make the new VM kit to clear this filter.
6. CF Fender Liners
The inner fender liners were trashed and barely hanging on with zip ties. I was going to go to the junk yard and repurpose some clean fender liners to modify but it would still be the same problem. The tires could rub on the inside and will just tear them up again. The solution was to get some Carbon Fiber fender covers that bolt down in the engine bay and cover that opening. The fun part is going to be modifying stuff to hide what I can under those. Thank you to @mr2peak .
7. C.Wan Corner
I have some historic pieces from Calvin. I have a properly beaten Exedy dual carbon clutch, a nice picture collage from supporting him over the years, and the spoiler and right side headlight cover from his red FD that was the start of it all. There is a crazy story about that car, but it's not my story to tell. You can catch Calvin's interview here.
Some other cool stuff I have is Calvin's Drifting Performance Handbook and a replica toy car of his white FD made by real wheelz. Its super dope since it has all his sponsors (including Rotary Extreme), and it has lights that light up too.
Alrighty, thats it for now.
Happy Sunday everyone, time to hit the sack.
1. C.Wan Arrives
Last edited by rotaryextreme; Apr 29, 2024 at 01:31 PM.