
C.r.e.a.m.


^all good.
anyway, on to fun stuff. i started testing my rack solenoids.
started off with 7.
a friend of mine broke nipples off of 2 of them, and I broke 1 off another. that left me with 4.
picked up 7 more from boosted414.
all 14 of them ohmed out to ~37ohms
unfortunately, 1 of the originals, and 2 of the new ones didn't function when applying 12V.
so 7-3+7-3=7
of those 7, all 7 held vacuum just fine, 4 held boost/pressure just fine. 2 had a slow leak when pressure added, and 1 had a quick leak when pressure added.
so far, i've only tested them cold, as I am confused when reading the write-up from the FAQ.
according to the write-up, when you test them like this:

the vacuum/pressure is supposed to be released when you remove the 12V power. for me, it gets released when you ADD the 12V. (so not sure what I'm doing wrong here) posted up in the thread itself. https://www.rx7club.com/3rd-generati.../#post11692564

like I said, fun stuff
anyway, on to fun stuff. i started testing my rack solenoids.
started off with 7.
a friend of mine broke nipples off of 2 of them, and I broke 1 off another. that left me with 4.
picked up 7 more from boosted414.
all 14 of them ohmed out to ~37ohms
unfortunately, 1 of the originals, and 2 of the new ones didn't function when applying 12V.
so 7-3+7-3=7
of those 7, all 7 held vacuum just fine, 4 held boost/pressure just fine. 2 had a slow leak when pressure added, and 1 had a quick leak when pressure added.
so far, i've only tested them cold, as I am confused when reading the write-up from the FAQ.
according to the write-up, when you test them like this:
the vacuum/pressure is supposed to be released when you remove the 12V power. for me, it gets released when you ADD the 12V. (so not sure what I'm doing wrong here) posted up in the thread itself. https://www.rx7club.com/3rd-generati.../#post11692564
like I said, fun stuff
I should mention, I have the aftermarket AzEKnightz kit as well. I haven't gotten far enough to figure out how many rack solenoids I'll even still need/use after doing the simplified sequential and adding the aftermarket kit.
and ironically enough, going simplified sequential will delete 4 of the rack solenoids, and with the kit, i'll be replacing 2 of them with aftermarket, so really only 1 of these will be staying. (solenoid A)
when you apply pressure/vacuum to one of the front ports you will see it through the other front port on the gauge that's hooked up. Once 12 volts is applied it will release through the gold port. That is how the 3 way solenoids function.
Make sure they hold pressure or at least a few do or leak very slowly. You can heat them up in an oven to repeat the test to check the integrity when the internal solenoid coil is hot.
If you haven't already...I would suggest going simplified sequential as it removes a lot of the emissions bs. There's only like 4 that are really needed if i remember right
I was only running Turbo control, charge control, charge relief solenoids and everything was fine.
I eliminated air pump, acv and all the associated solenoids, eliminated double throttle solenoid, hooked the fuel pressure line directly to the intake manifold and eliminated the solenoid, and I had an aftermarket boost controller so both the wastegate and precontrol solenoids were eliminated.
I eliminated air pump, acv and all the associated solenoids, eliminated double throttle solenoid, hooked the fuel pressure line directly to the intake manifold and eliminated the solenoid, and I had an aftermarket boost controller so both the wastegate and precontrol solenoids were eliminated.
when you apply pressure/vacuum to one of the front ports you will see it through the other front port on the gauge that's hooked up. Once 12 volts is applied it will release through the gold port. That is how the 3 way solenoids function.
Make sure they hold pressure or at least a few do or leak very slowly. You can heat them up in an oven to repeat the test to check the integrity when the internal solenoid coil is hot.
Make sure they hold pressure or at least a few do or leak very slowly. You can heat them up in an oven to repeat the test to check the integrity when the internal solenoid coil is hot.
the AzEKnightz solenoids install instructions are a step by step guide of installing the solenoids on an already completely assembled engine (not starting from scratch).
i've got this staring me in the face:!

thanks for the help
I was only running Turbo control, charge control, charge relief solenoids and everything was fine.
I eliminated air pump, acv and all the associated solenoids, eliminated double throttle solenoid, hooked the fuel pressure line directly to the intake manifold and eliminated the solenoid, and I had an aftermarket boost controller so both the wastegate and precontrol solenoids were eliminated.
I eliminated air pump, acv and all the associated solenoids, eliminated double throttle solenoid, hooked the fuel pressure line directly to the intake manifold and eliminated the solenoid, and I had an aftermarket boost controller so both the wastegate and precontrol solenoids were eliminated.
Mt. Prospect.
I was once at the stage of being completely confused looking at that thing as well but now it's a piece of cake.
Basically you want to start with the OEM vacuum diagram because that will show all the pipes on the rats nest thing you pictured.
Then you need to decide what you want to keep as far as emissions (if any) and then start connecting those hoses on the pipes. Then move on to the turbo controls and hose those in. This is easiest when using the stock solenoids in the original locations (in that rack). I am unfamiliar with the AZE kit and where those solenoids are supposed to be located.
If you pick it apart component by component it's very easy. But you need to start with a list of what your keeping to function as far as solenoids and then move down the list checking the OEM diagram and how that solenoid/system is routed and then move on to the next.
I would be glad to help if you have any questions
haha this was my first time removing the UIM years and years ago. I was so overwhelmed and was like 16 or 17 so I took the OEM diagram and color coded every single vacuum line and the solenoids they went to with tape so that I would have no problem reconnecting things. This was when I was bone stock with full emissions and everything so it's quite the cluster ****.
pic from my build thread:
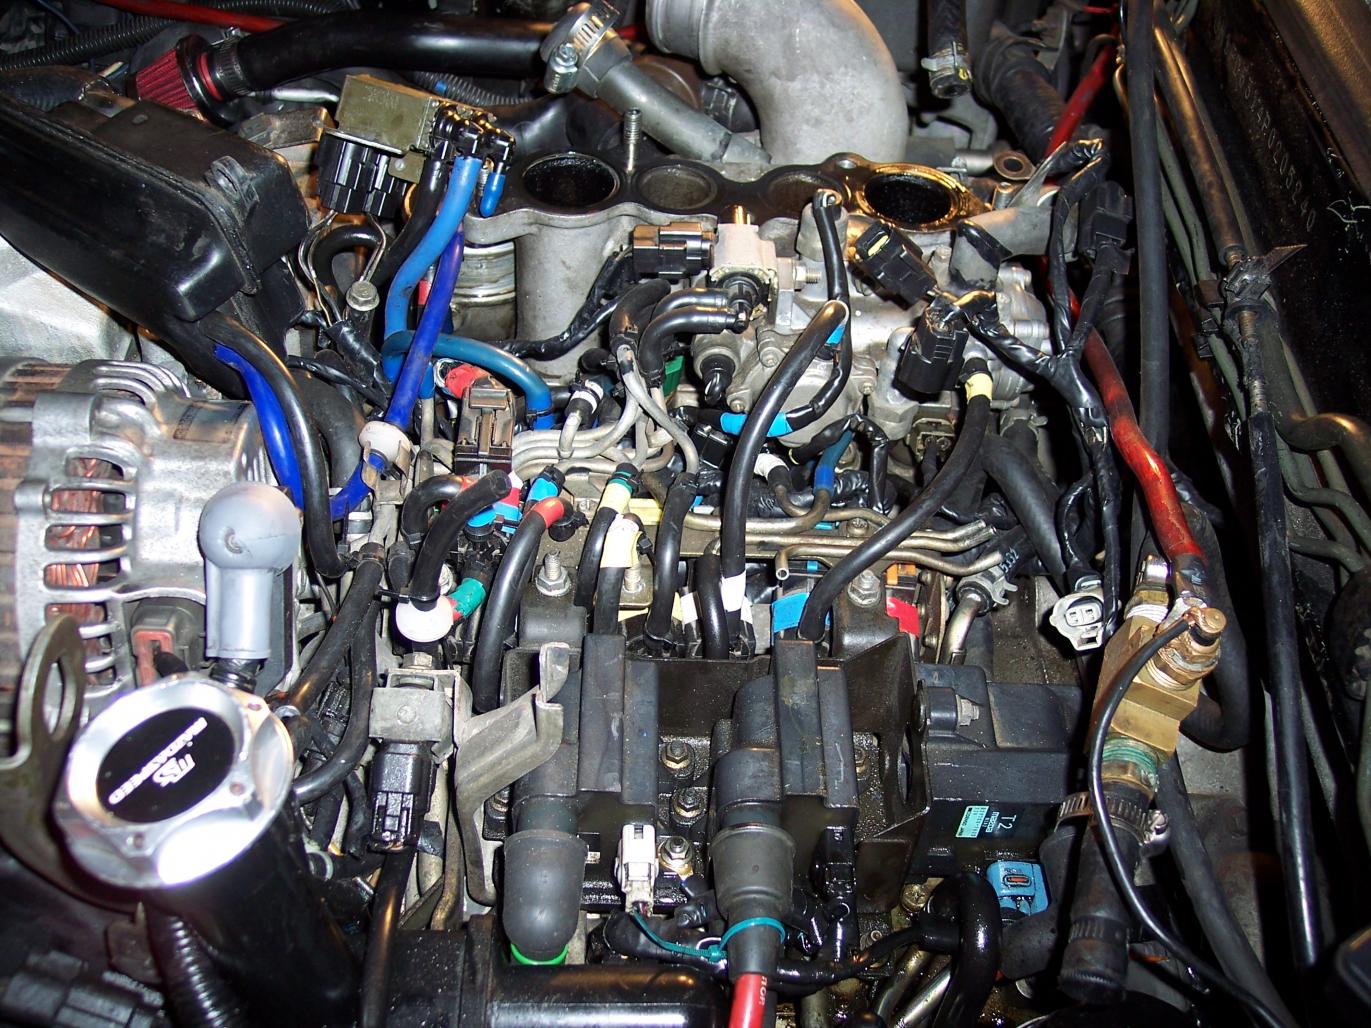
90% of it was eventually eliminated once I understood how everything worked and knew what was only necessary to be there.
pic from my build thread:
90% of it was eventually eliminated once I understood how everything worked and knew what was only necessary to be there.
thanks for the help. i plan on deleting all emissions nonsense. glad to know you are close by, in case i ever need to bribe you for your help.
the aze kit replaces the turbo control, charge control, and charge relief solenoids.
will have to catch up on your build thread for sure.
thanks
the aze kit replaces the turbo control, charge control, and charge relief solenoids.
will have to catch up on your build thread for sure.
thanks
took a departure on the solenoids for now. thought i'd have time last night, or today to work on the project, but things came up. I had a couple hours tonight, but didn't want to do anything too involved this late.
I determined that i'm going to have to use my old lower intake manifold, as the new one had the vacuum nipples ground off (and holes left in their place). I took some of the remaining stuff off of my old engine, and transferred it over to the new one.
one problem I ran into, even though I am not going to be using the stock rails, I wanted to transfer them over, just to see how everything lined up and fit. It appears that the mixing plates in the new motor are not seated down far enough, the stock primary rail won't lay flat (with the spacer). Is there an easy fix for this? (didn't want to risk breaking anything)
so basically, I tried reassembling everything, in a half-assed manner, mainly to get organized, see what parts I'm missing, and see what challenges lie ahead for me since I wasn't too organized when disassembling the old engine.
got some stuff in the shopping cart at mazdatrix:
o-rings for the oil filler and the oil filter
water pump gasket
thermostat w/ gasket
lower intake manifold gasket
debating which gaskets I really need to replace.....
should also probably get all new crush washers..
anyway, some pics to try to make this less boring:


oh, also found some water coolant boogers in my old water pump housing.

I determined that i'm going to have to use my old lower intake manifold, as the new one had the vacuum nipples ground off (and holes left in their place). I took some of the remaining stuff off of my old engine, and transferred it over to the new one.
one problem I ran into, even though I am not going to be using the stock rails, I wanted to transfer them over, just to see how everything lined up and fit. It appears that the mixing plates in the new motor are not seated down far enough, the stock primary rail won't lay flat (with the spacer). Is there an easy fix for this? (didn't want to risk breaking anything)
so basically, I tried reassembling everything, in a half-assed manner, mainly to get organized, see what parts I'm missing, and see what challenges lie ahead for me since I wasn't too organized when disassembling the old engine.
got some stuff in the shopping cart at mazdatrix:
o-rings for the oil filler and the oil filter
water pump gasket
thermostat w/ gasket
lower intake manifold gasket
debating which gaskets I really need to replace.....
should also probably get all new crush washers..
anyway, some pics to try to make this less boring:
oh, also found some water coolant boogers in my old water pump housing.
The primary injector diffusers have a little nub molded into the top of them that orient them is a certain position. This nub corresponds with a divit in the actual injector ports in the block. Make sure they are seated down and properly oriented and not backwards. I believe the Factory Service Manual has pictures to detail this if it is unclear.
There is really nothing else to keep the rail from seating, granted the rubber grommets on the rail are in good shape.
also the primary and secondary diffusers (mixing plates) are different. The primary is the slanted bottom one just in case they were mixed up.
There is really nothing else to keep the rail from seating, granted the rubber grommets on the rail are in good shape.
also the primary and secondary diffusers (mixing plates) are different. The primary is the slanted bottom one just in case they were mixed up.

I'm pretty much at the same stage in my rebuild and also did a AzeKnight kit with emissions delete. I'm hoping to try a first fire this week actually and am up in Gurnee. I've made so many changes and taken a year to piece it together. Fingers cross this thing doesn't catch fire on me.
As for the vacuum hoses, I printed out on legal paper AZs diagram, Simplified Sequential, and the Factory diagrams and took them to Kinkos to laminate. We're practically neighbors, PM me if you want help wrenching one night. I also may ask Boosted, TpCp, Ze to come over and drink my beer and hold my hand on first start up.
BTW, jealous of your garage work. I should do the same with mine.
^awesome, will definitely hit you up.
little interim update:
been busy recently, and had planned to work this weekend, but a busted hot water heater/flood at the house was enough to exhaust me for the one day I had planned to work on it.
before I go any further, I'm going to have to have my ugly dirty pipes sandblasted, as well as the intake manifolds. going to try to do that this week, so I can work over the weekend.
I did get some more cool goodies from japan over the weekend, so i'm excited for those to show up. the only "need" on that list of goodies is the powerfc, so I can at least scratch that off the list.
All that's left, that I really need to purchase to get the car running, is my fuel setup. I guess the wiring harness could get looked at as well, but I might be ok with mine.
I've searched through many fuel related threads, but didn't find anything definitive, but is there a thread/resource that shows exactly what I'd need to purchase, if I'm going to do the fuel lines myself? I will be going ID725/ID2000 (or something in that neighborhood). I realize I'd be happy with the FFE or CJM rails. However, I am not sure how I'll need to route things, or if I will run into any clearance issues with the solenoid rack/sequential setup. (in regards to how the lines are routed, and which FPR to run, etc)
Also, I've been meaning to take a picture of those mixing plates, as they do seem to be aligned properly, just not seated all the way down?
so here is what i was talking about with the mixing plates:


it's kind of hard to tell, but you can see the one on the left is higher than the one on the right. they look like they're aligned right.. what would be my next move here?
here's the only stud left that needs to get transferred over to my good manifold. man these things are a pain.

and some of the stuff I need to clean up/sandblast:

sorry for the boring posts, it'll get better. appreciate all the help.
it's kind of hard to tell, but you can see the one on the left is higher than the one on the right. they look like they're aligned right.. what would be my next move here?
here's the only stud left that needs to get transferred over to my good manifold. man these things are a pain.
and some of the stuff I need to clean up/sandblast:
sorry for the boring posts, it'll get better. appreciate all the help.
I've searched through many fuel related threads, but didn't find anything definitive, but is there a thread/resource that shows exactly what I'd need to purchase, if I'm going to do the fuel lines myself? I will be going ID725/ID2000 (or something in that neighborhood). I realize I'd be happy with the FFE or CJM rails. However, I am not sure how I'll need to route things, or if I will run into any clearance issues with the solenoid rack/sequential setup. (in regards to how the lines are routed, and which FPR to run, etc)
I actually just ripped everything out yesterday and have the FFE rails mounted on the block. First issue I ran into is the OEM harness running into the primary rail makes it very hard to run fuel lines, this will be 10x easier if you have a reworked harness and have the coolant nipple removed during rebuild, or go single lol. Right now I'm leaning towards keeping the stock primary because of the space issue, and just run FFE secondary with EV14 2000, that will be more than enough fuel for what I'm shooting for and all the lines I previously made for the stock system will still work, and FFE has this nice banjo bolt adapter for anyone who want to upgrade just the secondary so it'll be pretty much a bolt-on affair.
As far as routing goes, you can have it many different ways. In my stock setup, I replaced the FPR and FPD with Garfinkle adapter, feed the secondary first, then use a 120deg fitting to throw the line toward the AFPR that's mounted on the front of the UIM, the return line then run under the UIM above the secondary rail back to to the firewall. I also deleted the entire rats nest to get me more space under the UIM, all those metal lines above the solenoid rack are all gone, I route my own vacuum line with 4 bass T fittings from McMaster Carr, simpified seq don't need a lot of vacuum line anyways.
I bought a HF parts cleaner and used mineral spirits and a brush to clean mine up. I think I had an oil leak from every orifice on my FD. I think it has been the most used tool in my garage on this rebuild.
so here is what i was talking about with the mixing plates:
it's kind of hard to tell, but you can see the one on the left is higher than the one on the right. they look like they're aligned right.. what would be my next move here?
here's the only stud left that needs to get transferred over to my good manifold. man these things are a pain.
it's kind of hard to tell, but you can see the one on the left is higher than the one on the right. they look like they're aligned right.. what would be my next move here?
here's the only stud left that needs to get transferred over to my good manifold. man these things are a pain.
Pop those diffuser out and try to re-install them? I see that you don't have the LIM on so it's piece a cake.
Those manifold studs are a PITA, I combined the best studs from 2 sets of turbos and I still have to order some from Ray.
I just use purple power to clean everything when I stripped mine down to bare block last year, I replaced pretty much every gasket, not a single drip on my garage floor since.
yeah, I guess that kind of helps me with the fuel thing, and also kinda doesn't, haha. and that's my problem, I'll still have the rats nest, or at least, a simplified rats nest under there, I believe, so room might be an issue.
are you saying I can just pop out the diffusers from the intake ports? (didn't even think of that since they're taped over)
I've got some purple power I might try, I swear that stuff gives me a headache though.
thanks guys
are you saying I can just pop out the diffusers from the intake ports? (didn't even think of that since they're taped over)
I've got some purple power I might try, I swear that stuff gives me a headache though.
thanks guys