When you click on links to various merchants on this site and make a purchase, this can result in this site earning a commission. Affiliate programs and affiliations include, but are not limited to, the eBay Partner Network.
Update time - after I found out the compression was low I pretty much instantly set off to tearing down the car and unbolting/cleaning things as I went to prepare the engine for pulling. I've been following the Rotary Resurrection teardown and it's been getting me pretty much there except for some of the mods I had already pulled out like the V Mount setup. At this point all that's left is the electrical connector behind the ABS(not sure if this needs to be disconnected?), disconnecting the fuel lines, and unbolting the transmission from the PPF since I'll be pulling the engine out with the trans attached.
The state of the car right now is an ADD dream - if I get distracted doing one thing there's always something else to work on no matter where I look, which is fun, but also quite daunting once I get to the point where the part costs start piling up. I'm trying to sell my 40th Anniversary RX8 before I can fund the engine rebuild, so as soon as that goes this is going to speed up a lot.
At this point I have a list of things(in no particular order) I know I want done before any kind of maiden voyage is taken once the engine is rebuilt:
Remove, clean, and evaluate brake and clutch master cylinders, as well as check out clutch slave cylinder. The clutch pedal sticks to the floor when I press it all the way, might just be lack of use, might be a failed slave/master.Update 3/23/18 - Slave cylinder boot is busted, squirting fluid everywhere. Will need to replace for sure - not sure if it's worth it to rebuild.
Replace all brake pads, clean/refurbish calipers, and a full system bleed. I don't play games with brakes.
Get rid of the Microtech LT8, and purchase/install a Power FC + Commander. If anyone has one for sale in good working order let me know!Update 3/23/18 - Purchased a PowerFC Commander + Data Logit - debating if I should bother with the old ECU during engine break in since it was at least previously tuned(although maybe badly) for the existing turbo setup.
Replace coolant hoses(all of them). If the previous owner said the car overheated while driving in traffic at average speed, I need to get to the bottom of why. Might have been compression/water seals, might be something completely different.
Figure out why fans are always on with ignition. Might be fixed by #3.
Fuel filter and potential line replacements. Crazy story on this further down.
Replace transmission cover plate (the little one that lets you see through to the clutch and flywheel)
Install stock-style popup headlights. Working on a deal with a guy in Columbia, SC for some with an HID kit installed.Update 3/23/18 - Picked up some used headlights off a guy not far away - one of the positioning clips is broken where the plastic marries the headlight to the screw bracket, so I'll need to gorilla glue/jb weld that piece back together. They're also HID converted so hopefully I can get that happily working. The headlights themselves are in need of a good cleaning that I'll probably have to separate the glass to do, will work more on that soon.
Dash harness. Either re-wiring the whole thing myself or replacing. The existing wiring has been pretty badly butchered to accommodate the early 2000's and the Microtech. Not even sure it would work correctly with a PowerFC.Update 3/23/18 - Picked up a used R1 dash harness that will need to be installed when the weather is nicer, don't want to break more plastic in the dash than necessary.
Replace tires(and possibly wheels). It's been sitting a while and there's probably a bit of dry-rot to deal with at this point. Current setup SSR Integral A2s in 17x8 front and 17x9 rear wrapped in 225/45/17 and 265/40/17 Kumho Ecsta Supra tires, seems a little thin for the grip and handling levels I want.
Evaluate or replace the wastegate spring. I have no idea how this car is currently managing boost levels except through fuel cut or something along those lines from the Microtech. There isn't a boost controller as far as I can tell.Update 3/23/18 - It seems like I have an older style HKS Wastegate(don't think it's knockoff), so while it's nice to know that, still don't know the spring, need to just replace that since it should be cheap.
Thought it might be a good time to revisit the list on the previous post - see above for comments. It did me some motivational good to re-read this thread so far to see what progress I'm making since staring at the pile of parts all over the garage can feel daunting at times. I've also torn the engine apart and have started cleaning pieces. Will post again later with more info but it looks like the internals are in fairly good shape. No major gouges, dents, or holes. Won't know 100% until the rotors are spotless but nothing major stands out. There are a few little rough spots on the rotor faces that I'm unsure of as far as damage goes, it looks fine, but not sure.
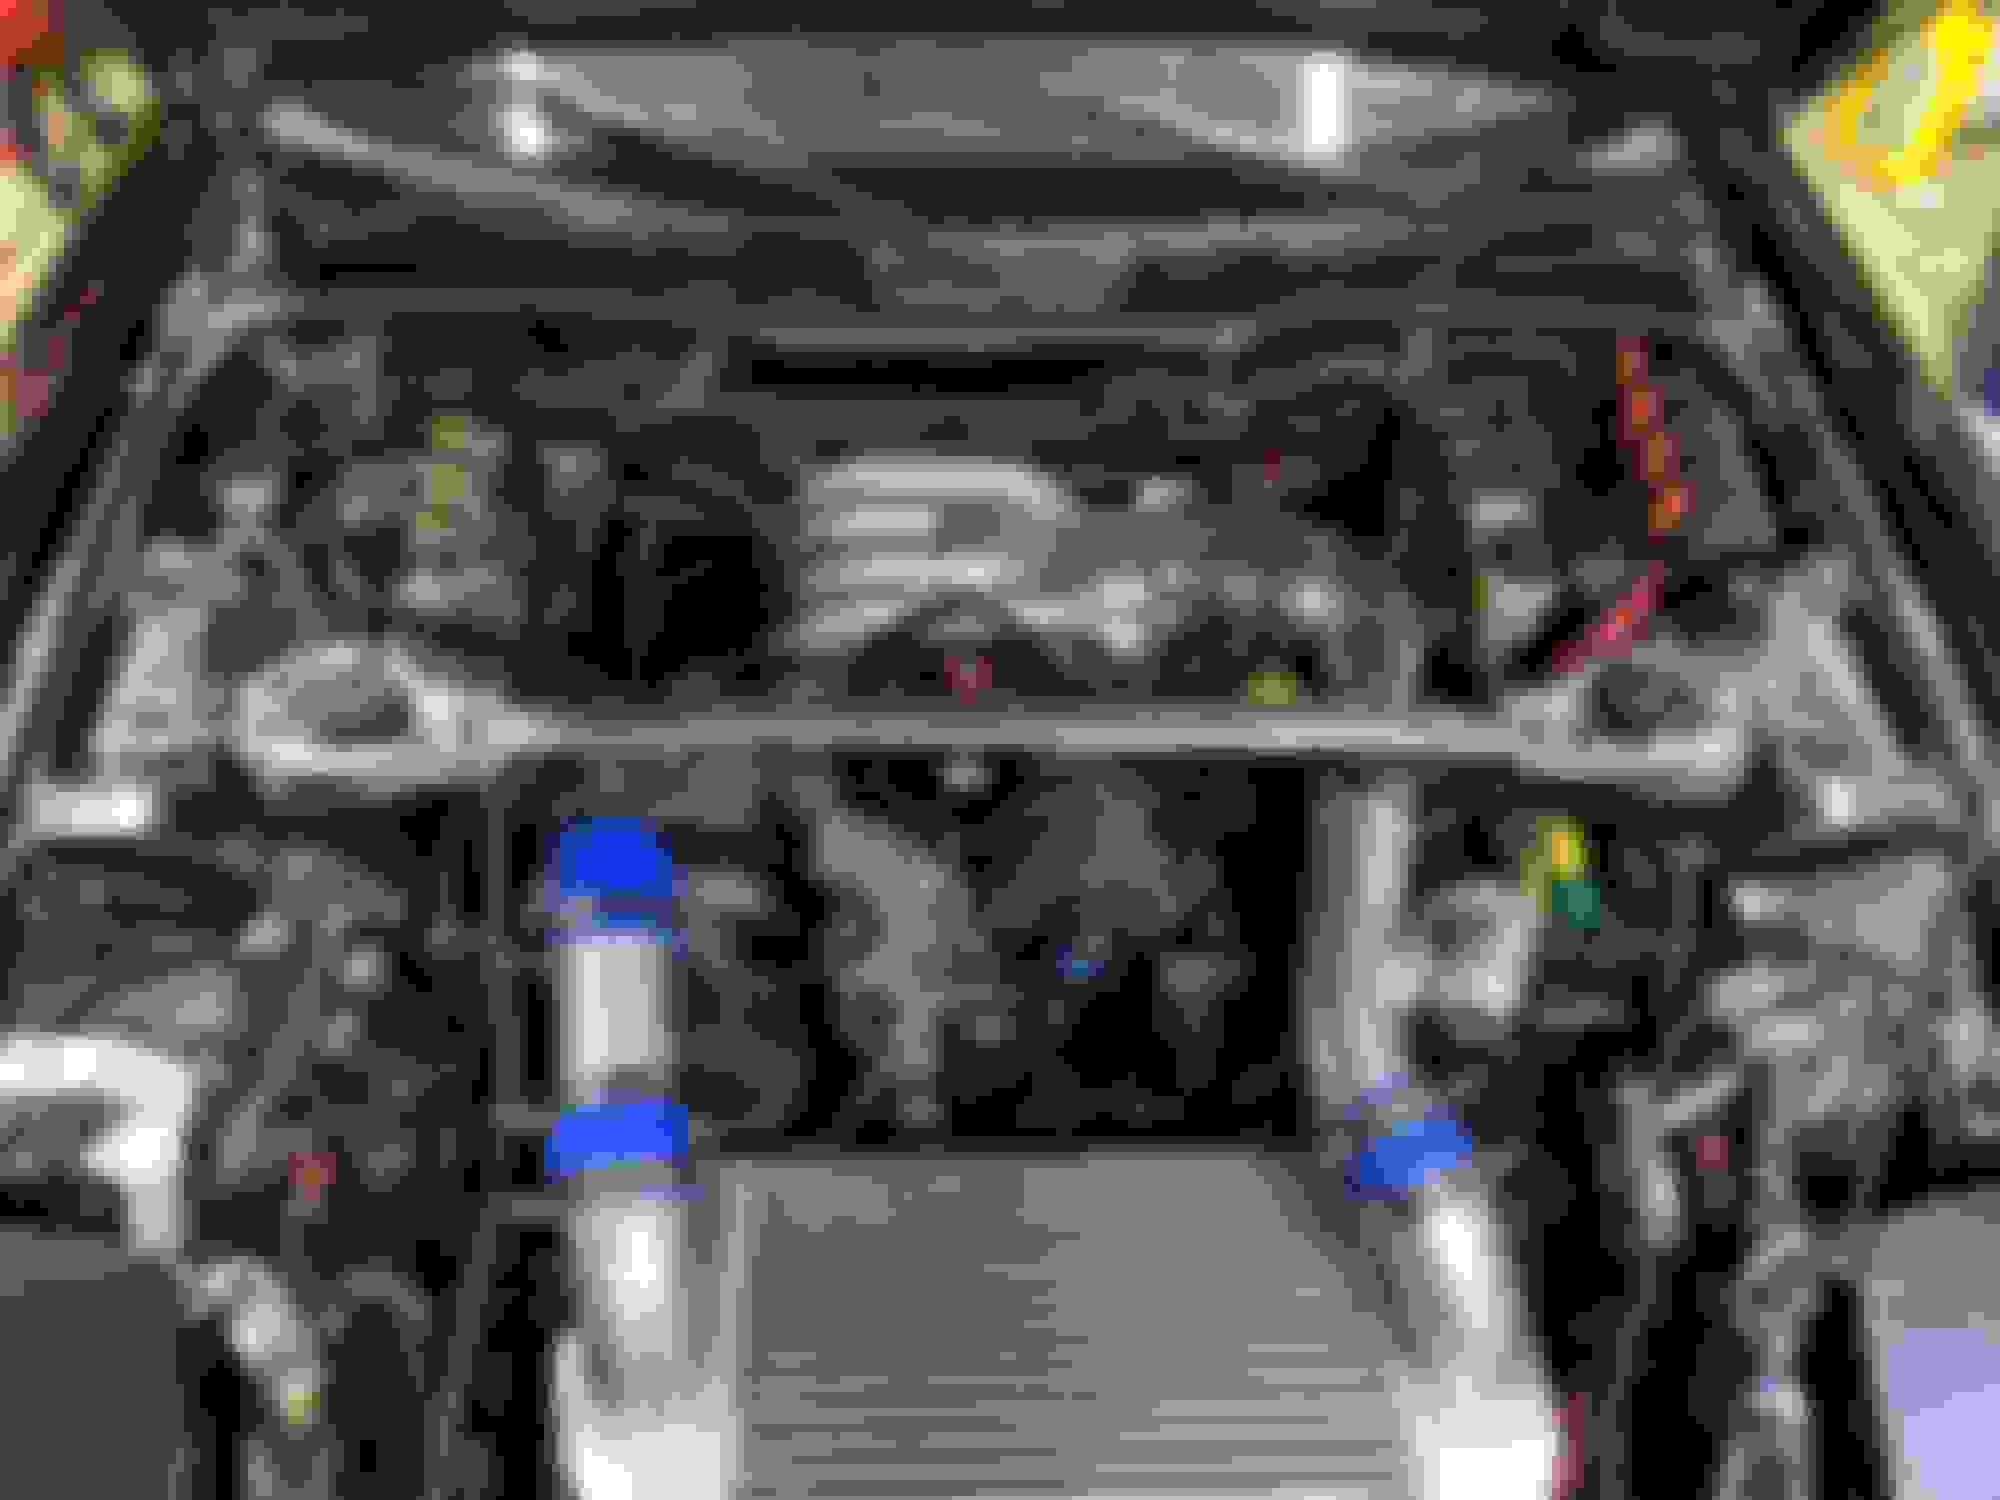
Few engine pics for now:
Housing wear - can barely feel the difference with a thumbnail. Rear Iron Quarters instead of Freeze plugs? Is this a Tii Housing set? Carbon buildup on one of the rotors, all faces pretty much looked like this
Filling in from memory a couple weeks ago so bear with me if things don't go in order.
I ordered a flywheel socket and stopper tool set to take the bolt off and start tearing down the engine for damage assessment. A local friend is out of the rotary game (for now anyways) and sold me his Pineapple Racing stand adapter that I bolted up to a Harbor Freight stand as well. I actually managed to get the flywheel nut off without much hassle from one of the 5xx~ lb/f impact wrenches from HF as well - apparently that doesn't happen often based on people I've talked to so far.
Before cracking it open I got to looking around at everything and noticed the rear rotor primary fuel injector diffuser was missing. Seems like it either wasn't installed or broke off and went through the engine. Who knows, maybe this is why the compression failed, but I can't find any evidence of that happening so far.
Anyways - started pulling everything apart and at least as far as the rear rotor (R2?) was concerned, things are looking pretty good. All 3 seals were in place, although 2/3 were stuck and all seals throughout the engine ended up only having 1 spring behind the apex seals instead of 2. I don't know if the stuck seals are due to sitting or are part of the reason the engine quit running and/or overheated in the first place. I still don't know the source of the overheating previously but that very well could have been a failed water jacket. All of the WJs pretty much ripped apart as I was pulling the plates apart so I don't really know their full condition before that.
The oil pickup had some nasty junk in it, mostly paint and what looks like either metal shavings from somewhere in the engine or even potentially some screw threading. As far as I can tell the bearings don't look too bad but I'm tempted to replace them anyways and will leave that at the discretion of whoever ends up rebuilding the engine(I don't want to do the re-assembly since I don't have the tools or the patience to deep clean everything and strip the ghetto paint off of the irons.
^ That's probably a little more HD than necessary but hey, nothing like some good pictures.
Oil pump, chain, counterweight, etc. And again the awful and flaking housing paint:
This bearing seems good - but they're not that expensive so I may end up replacing it as well:
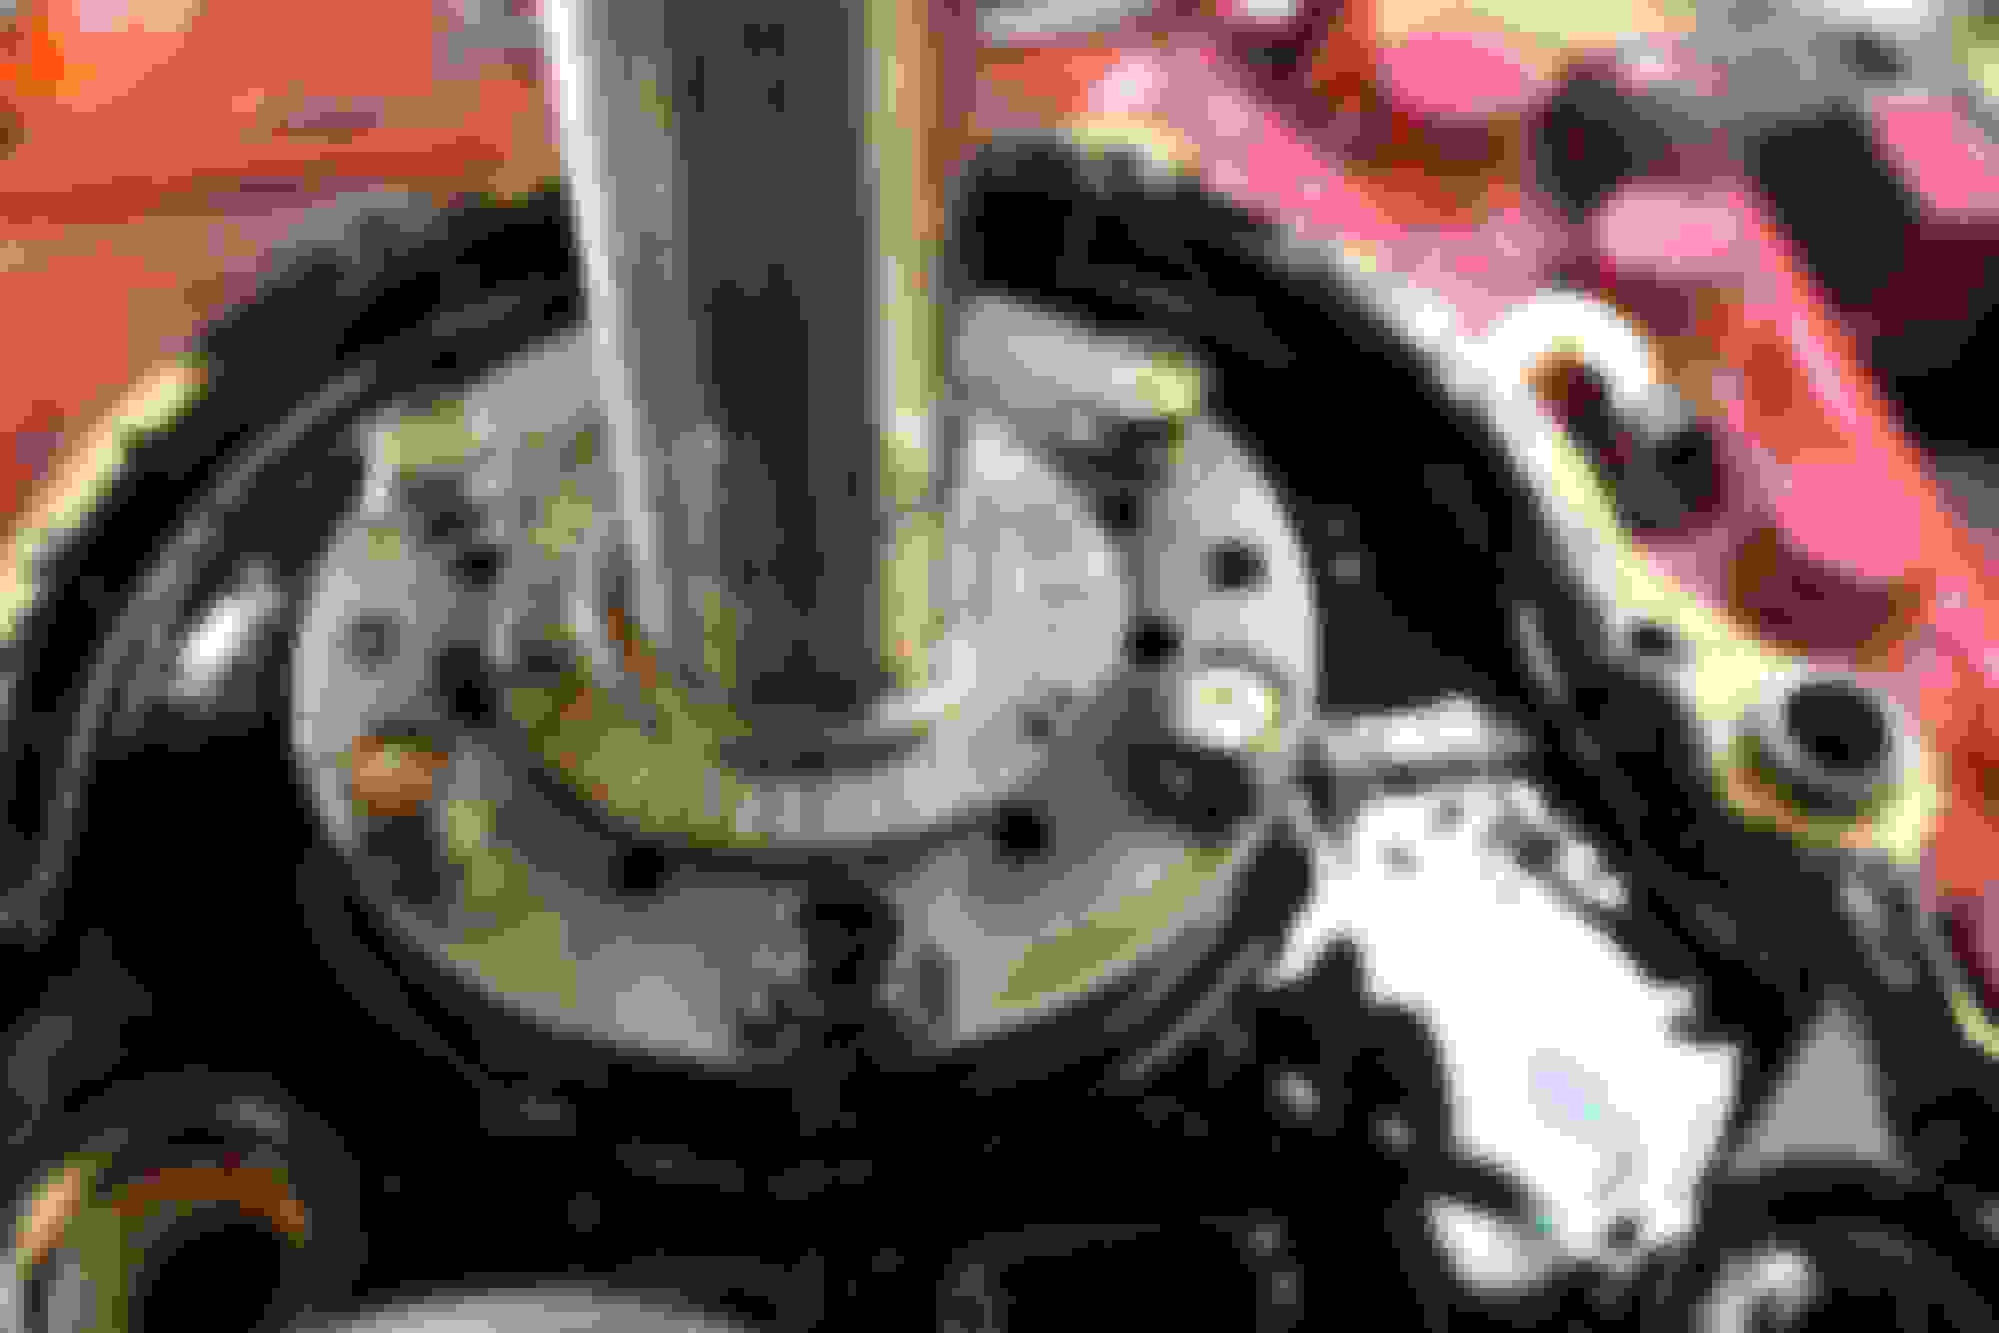
On to the bolts on the other side once I got everything off the front - the one I'm pointing at was fighting alot and not wanting to back out, maybe it was just the angle of the engine but the rest of them seemed to come out easily enough:
Once I got all that out of the way - it was time to finally see what the inside of this engine looks like. I was pleasantly surprised and pretty happy to not see any major damage, just alot of carbon on the rotor.
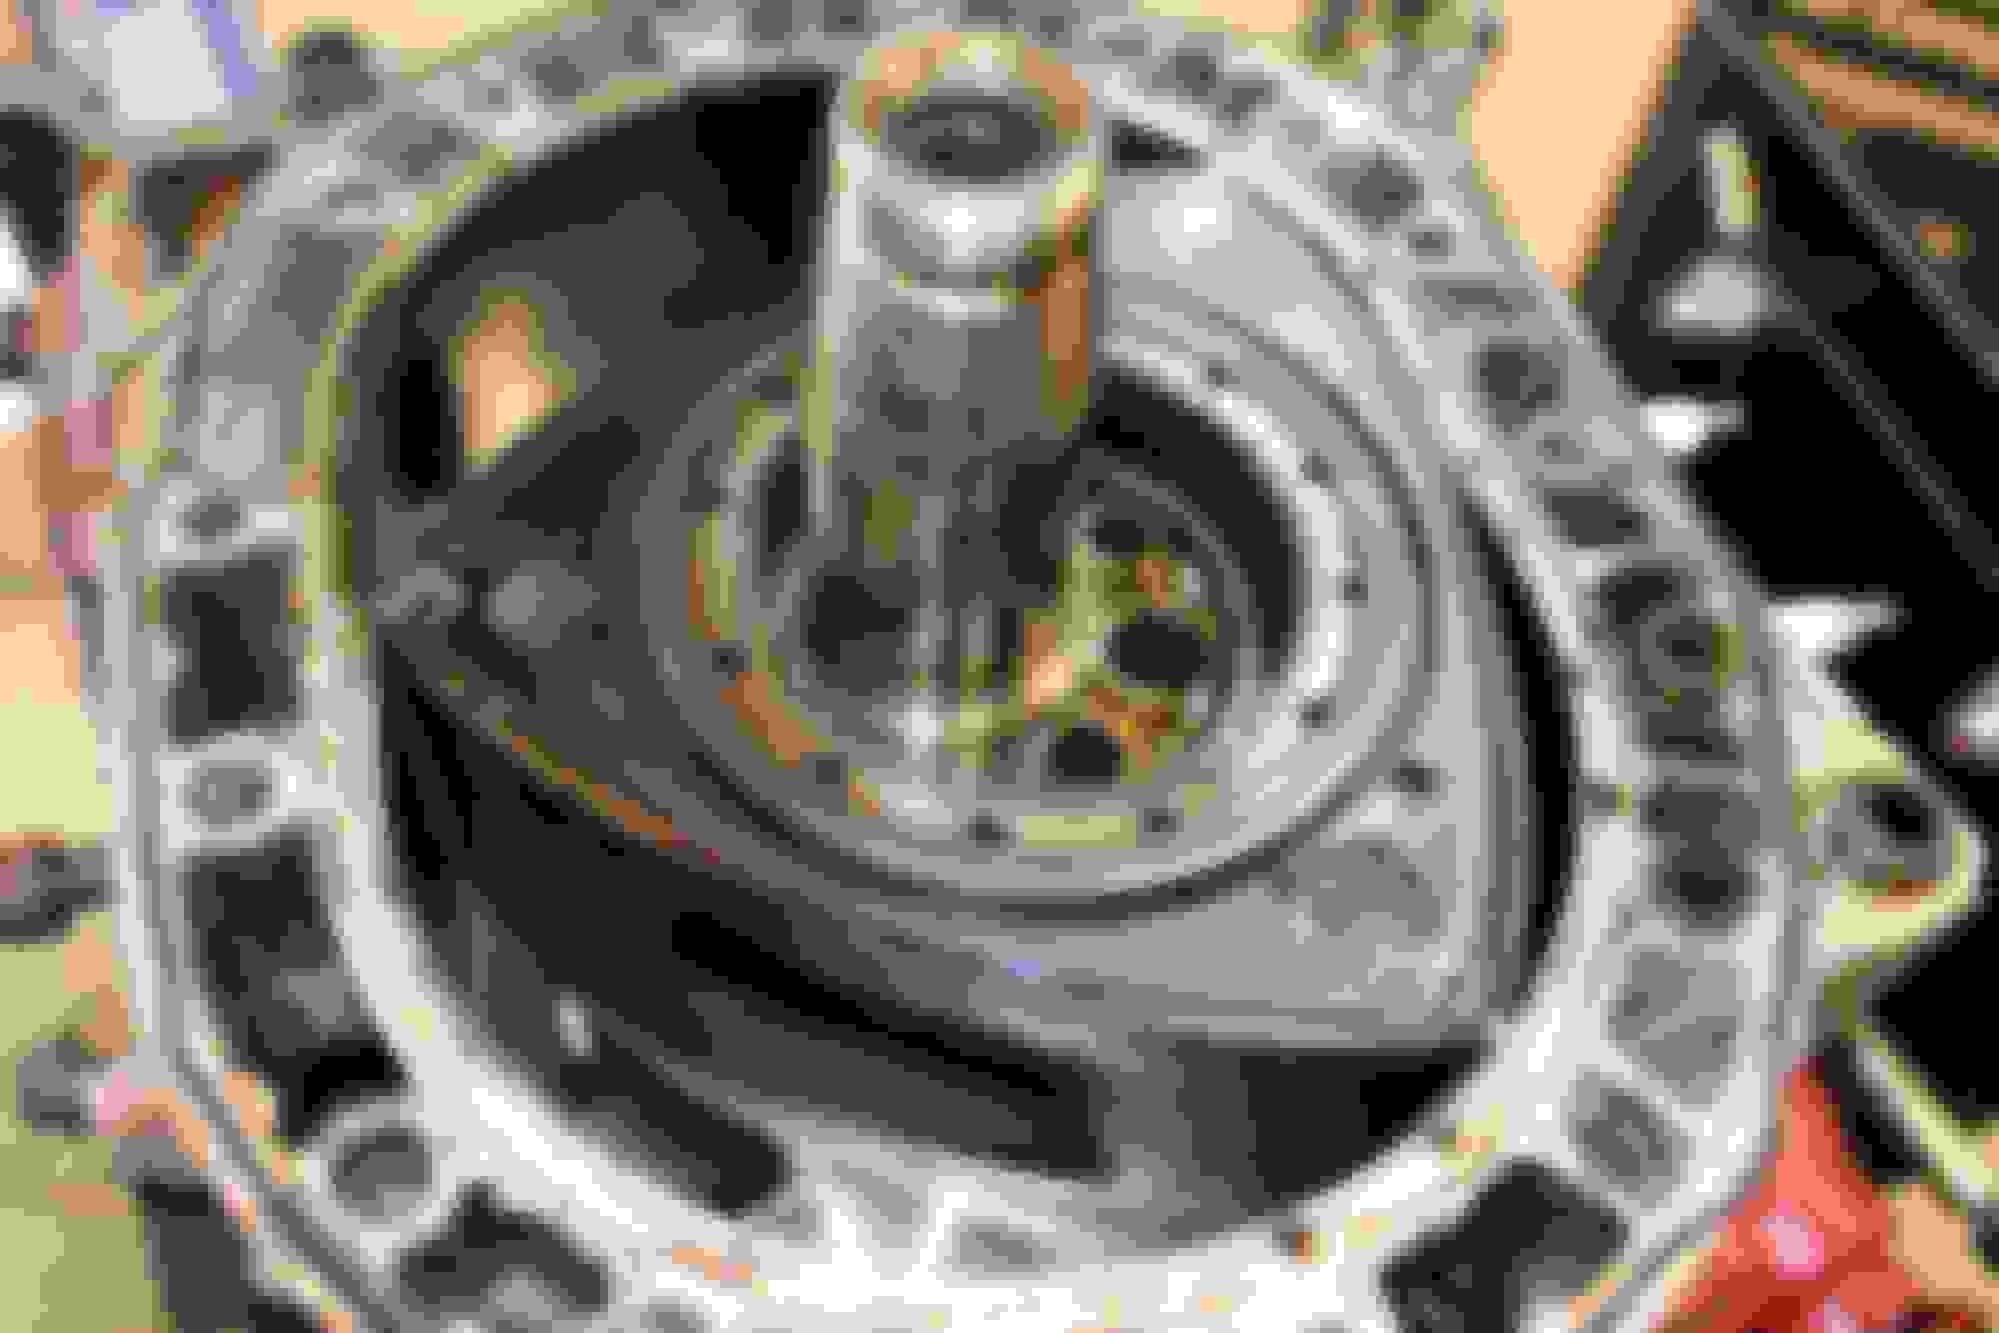
Rear Rotor/R2
The front housing was sticking as well as being tricky with the whole lift-the-eshaft and twist thing, so I reached out to a buddy who was out for a cruise in his gorgeous 20B FD and he stopped by to help with the lifting.
R1/Front Rotor and housing seemed to be in good shape as well, if not worn down a bit. If my information is correct from PO and previous for-sale threads, the engine probably has something between 10-15k on it since the last rebuild. Not sure what seals these are but contact seemed pretty mild so I'm thinking they may be OEM or possibly Atkins. Either way they only used 1 spring behind each seal throughout the engine which I feel would have contributed to the stuck seals on R2 and ultimately why it probably had no compression. This could also have happened from the diffuser coming apart if that happened during this rebuild's lifespan.
There is one little ***** on the center iron, and I'm not sure if this is something that's big enough to be concerned about. Seems like nothing but I don't know nearly enough about this stuff(yet) to make that kind of call:
I'm probably getting close to the pic limit on one post so I'll continue this again soon.
Continuing on - I'm pretty much at a point now where financially all I can do is clean stuff until the 40th Anniversary RX8 sells. I've been busy returning that to stock in hopes that it will help interest and I can also get some turnaround funds from the parts I'm pulling off of it(Mazdaspeed/AEM intake, Mazdaspeed Rear Spoiler, Cobb AP, HKS Hi Power exhaust, etc).
Here's some more pictures of the engine teardown: Rear Rotor with 2/3 stuck seals at 12 and 8 o'clock Rear Iron as soon as I opened it up
And for some reason it's not posting anymore pictures so that's gonna be all for now. I'm not sure if lapping or polishing is a good idea but the worst of the damage on the housings themselves was 2 posts back. This is where a professional rebuilder will probably have to intervene and check it all out in person, just trying to settle on where I want to go with it. At this point I do think I want all OEM seals except maybe water jackets, and even that may end up Mazda instead of something else.
That's about par for the course with carbon on the rotors, they ALL look like that in short order. Running water injection helps minimize the carbon big time.
Those are aftermarket corner seals of some kind, not sure what kind.
Get everything cleaned up good then evaluate. Half the time of building a motor is just CLEANING PARTS. Post pictures up and we can help you determine if you can run parts or not.
I'd like to see a picture of the apex seals and springs when you get a chance, I wonder what seals those are and if they are designed to be run with just one spring or something. Since they aren't stock corner seals it's possible they aren't stock apex seals.
The gouge in the face of the iron is your call - if it's flat and isn't sticking up any it won't hurt side seals as they go by. But you will lose a little compression at low speed there. If you're going budget I'd be thinking about it, if you're not totally budget find a good used iron to replace it. Or, see if someone like Chips Motorsports can lap and re-nitride the iron to fix it.
Dale
Here's a shot of the apex seals and their springs, it looks like they were designed for two springs, so i'm not sure if there was a reason to use only 1 unless some builder uses that as a failsafe for lower compression somehow?
As for cleaning parts I can totally see how that is half (or more than half) the battle... Debating how much the effort is worth to do it myself vs. paying someone else to. I really hate the paint on this engine and need to have it all gone so I'm still trying to figure the best way to go about that. The rotors themselves are sitting in a bucket of gasoline I drained from the tank and I'm scrubbing at them with a brass brush when I get the chance and the carbon is coming off in waves as I take some layers down. Hopefully after the next cleaning whenever I get time they'll be nice and shiny and will make for some good analysis.
I wouldn't necessarily want to consider this a "budget" build, but then again I guess to me a budget build is anything under $1k - and I'm looking at probably $2-2.5k minimum in parts and labor, and that's assuming I get cheaper labor rather than more expensive.
Do 'master" parts kits make sense or do they come with alot of parts and pieces that aren't necessary for a standard rebuild? I plan on keeping this car for the foreseeable future so I don't want to just make quick compression that may fail in a thousand miles. I would assume the cheapest route is usually going to be piece-mealing the necessities, but since I'm in there now it almost makes sense to refresh/replace the bearings and such as well as all the gaskets.
It makes more sense to buy parts as you need them. Atkins Rotary is a great resource here.
I'd just make a list of what you need as you go through it.
In general, things I always do on a rebuild -
- new OEM water seals
- new oil control O-rings (the later Viton ones)
- new tension bolt washers
- Engine o-ring kit (dowel pin o-rings, oil pedastal o-rings, rear stationary gear o-ring)
- Front and rear main seals
- METAL front cover gasket - the paper ones are crap
That will get you the "soft" parts needed. Things you can re-use if they are in good shape -
- Metal cases for the oil control o-rings - check for excessive wear or broken, but 9 times out of 10 they are re-usable.
- Springs for oil control o-rings, again if they aren't worn or flattened they're fine, clean the carbon off and go.
- Corner seal springs if they aren't too worn, they may have been new when the motor was built. If they are stock springs.
- Side seals, but you may need some more to file and fit side seals.
- Side seal springs if they came out of the grooves easily, aren't bent, and aren't worn down on the tips.
Really hard to say on the apex seals, not sure what they are. You may want to invest in some good apex seals, some of the new ones like RXParts and Goopy can take a lot of punishment and keep going. I would get new apex seal springs.
On the paint on the irons, get a can of aircraft paint remover. Spray it on, let it sit, scrub with a brush, hose off, Stuff works great. It will bubble that paint right off.
Dale
That's a great list, thank you! I keep going back and forth on Apex seals but a consensus seems to be that standard Mazda OEM seals will be sufficient without screwing up the housings much within my power goals(400hp~ or less). OEM other seals are probably the way I'm thinking as well. I'm assuming Goopy are going to be a little more aggressive on the housings as well?
I haven't really made any progress on the car in the last month or so - but I did sell the RX-8 last week! The new owner was buying it as a surprise gift for his wife and previously owned another RX8 for almost 10 years as well. As glad as I am to have it sold, I'm really going to miss it this week at the dragon; and was secretly hoping it wouldn't sell so quickly that I wouldn't be able to take it. With the funding freed up to continue on the rebuild, I'll be jumping right on that after DGRR. I'm driving up in a Civic, and wouldn't miss the event for anything. I'm hoping to gleam as much extra wisdom as possible before I start buying parts and sending off the engine for the rebuild. I may even bring up the engine components I have to get some advice from folks in person before attempting to reuse this stuff or source an entirely different motor.
I haven't had a lot of time to wrench, but am getting close on parts decisions. I was going back and forth between stock hardlines + rubber hoses for the fuel system but think I'm going to settle for a PTFE stainless line setup, married to a single Supra TT/NipponDenso pump. The injectors are supposedly 550/1680, which I'm going to send off to be cleaned and inspected to see that they are correctly flowing as necessary. Summit Racing seems to have all of the line and fittings that I'll need, once I get an actual count on where and what that process will require. I'm assuming that -6AN is going to be big enough, but will need to do some more research on whether or not I should bump that up to -8AN, and where the limitations will be if I do that. With the rubber hoses it would have been easier to just hook up to the stock type of fuel filter and such as well, but need to come up with an alternative this way.
I'll be the really tall guy (6'6") with a plastidipped yellow FD, make sure to track me down and say hi!
If you're looking for 400hp aftermarket seals is the way to go. Many of them can take a LOT more pinging and abuse than the stock ones. They're usually kinder on rotor housings as well. Really, stock apex seals only makes sense on stock cars.
I finally got a chance to clean up the rotors to inspect them - they've been sitting in a bucket of gas for about a month now. I was hoping they were in good shape but it actually looks more like they're pretty pitted from coolant or something sitting for a while. I'm assuming they're toast but I don't really know. Trying to make up my mind on buying a pre-assembled engine and trading in everything as a core or rebuilding with what I've got and replacing what's necessary. Dale's previous comment about 400hp on aftermarket seals has me rethinking what I should be doing but it seems like there is conflicting information all over the place. I don't think I'll start out at 400HP although I should have enough turbo and fuel for it when this is all done.
1.1
1.2
1.3
1.4
1.5
2.1
2.2
2.3 - the worst of the pitting, also some nicks on the edges.
I decided right after DGRR to step it up a notch with a brand new Mazda REW engine that my friends at Eccentric Motorsports were able to procure and set to work on street porting and upgrading the seals over to Goopys. I'm also replacing the entire fuel system in preparation for later E85 compatibility with the following:
-6AN PTFE Fragola line all the way back fed in parallel to
Full Function Engineering(FFE) Secondary(normal) and Primary(light) rails with
ID1050x primary Injectors and ID2000 secondaries.
A Walbro 480(maybe 460?) is pumping the gas and filtered through a
10 micron FuelLab in-line filter.
Currently the plan is to hang this with the stock hanger and will probably require some kind of modification to make everything fit up nicely. I haven't ordered the fuel line or fittings yet - I want the motor back in the bay to see how everything lays cleanly.
The porting and restacking of the motor is complete and I should be taking delivery in a week or two.
I went ahead with an OMP blockoff kit and will be premixing 1.5-2oz/gallon to offset the OMP absence.
I also picked up a used ACT Street/Strip clutch that I will be trying out for a while and if I like it I'll be buying an all-new one when the time comes.
Couple other new goodies to go with the build:
Optima Yellow Top under the driver side bin
Greddy Profec II Spec B - still need to plumb the manifold sensor into the turbo compressor outlet or IC piping.
HKS Twin-Power and a stock FD leading coil - the car previously had a T2 Ignition coil that was swapped in and I think I'm going to have to correct some wiring hacks that were made originally to accommodate that.
EBAY front strut brace - don't have this one yet but got a great deal on it from a buddy so that works for me.
I'm sure there's more I'm forgetting. They'll show up in the thread at some point with pics.
I still need to cook open the OEM popups that I bought used and clean out some water residue and rust. They were HID converted - which is probably going to be pretty rough but we'll see when I get to them. Also need to have some parts painted - I picked up an OEM rear bumper to replace the cracked KnightsSports rear bumper that came on the car, and finally have both popup eyelids that need fresh paint. One came with the used set of lights and the other I just ordered fresh from Mazda.
Just wanted to put out an update, getting real close to go time now that the parts are all stacking up, with the new motor putting the cherry on top.
With E85 i would think you would want to retain the OMP set up. There are lots of threads in the E85 section about premix and how the oil separates quickly.
Good call on the brand new motor, its hard to beat that kind of deal. However, i would suggest that you get the OEM apex seals they are pulling out of the new motor and rebuild the original motor that came out of the car yourself. You wont have a motor as nice as the one your are getting build from eccentric, but there is something about building your first rotary that makes you appreciate the everything a little bit more and makes you not afraid to push it for the results you want.
So they make different(and expensive) e85 favored premix that actually properly mixes and I think incorporates well with the mixture.
I actually originally was going to keep the seals, however since Zachariah over at Eccentric cut me a buddy deal for the motor work - I let him have them for future customer builds if necessary. I also found out that the original motor's rotors were modified for 3mm seals - so I'd need a whole new set of rotors anyways for that. I'll probably rebuild or at least stack the next one myself though.
Originally Posted by TomU
So much for the budget But that's the way things go with owning an FD
And FWIW, most put the battery on the passanger side to offset a little weight from the driver side. Not sure it makes that much difference though
Haha - "FD=Financial Disaster" right? I'm probably still under $20k all in at this point, which isn't terrible for where the car should be sitting once it fires up. I'd actually have preferred the passenger side battery setup, however the driver side bin was already cut up to accommodate the previous battery, so aside from ruining the other bin as well, I'll probably keep it on this side for now and make decisions on the bins down the road about replacement or even if I relocate the battery further back into the trunk area - although that comes with its own concerns being so close to fuel.
Originally Posted by gmonsen
Goopy, Fragoloa, FFE, and Injector Dynamics... All the best stuff. Should make for a very nice motor. Not sure about the e85, but, hey...
Yeah I figured if stuff needs replacing they hey, why not? Yeah it's a little more now but at least as far as the fuel stuff goes, the only thing I should need down the road if I do land on the e85 route will probably be an additional fuel pump and a conversion to -8AN feed line to the split for parallel rails.
Originally Posted by aplscrambles
Awesome updates. Love the direction you are going mostly. We'll have to agree to disagree on the e85, but to each his own.
Poor man's race gas dude! I know lots of people going hard on high boost pressures and not destroying their engines - although arguably most of those guys are doing drag/street pulls that aren't really my cup of tea. I'm more about great handling and quick spool in mid-horsepower territory personally. Either way, I'm going to need some additional heavy modifications for e85 down the road but I'd rather do as much of this fuel stuff once as I can, so I went ahead and factored ethanol compatibility in with the lines, injectors, and pump. I'll probably be on pump gas 100% of the time for at least a year or two, since I'll likely need more fuel pumps, a new ECU, a flex sensor, and an engine harness rewire to go with the new ECU.
I got the engine in on Wednesday, and have slowly started adding things on before realizing there's all kinds of things I could have done while I was waiting. my factory motor mounts were shot, so I went with some eBay special Delrin mounts (yeah I know this is gonna be more bumpy). Cutting up the factory rubber mount off of the aluminum arm was a major pain, as it had all but fused with the metal and took the better part of an hour with a pocket knife cutting and scraping loose. I also decided to fully switch the GT35R turbo oil feed and drain lines to -4AN in and -10AN out and realized I didn't have the right ports on the motor to handle AN so I ordered the proper ELITE "pedestal" or oil drain port whatever you want to call it, as well as a -4AN 0.035 restrictor fitting for the turbo itself. Those things are on their way so in the meantime I'll probably get back to work on cleaning things and mocking up what I can. I'm having a time and a half trying to figure out exactly what fuel fittings I need without physically being able to see the routing of the hoses over the engine bay in the car yet, but that's probably next.
Thanks for reading! Pics coming soon of that sexy new motor.
So I kind of fell off the forum grid for a while, but the build progress continued! I got her fired up the first time in early October and have gradually been driving and tuning as I go. I'm about 2000~ or so miles into the rebuild, things are running great and the tuning process is coming along pretty well for a first-timer.
List of major changes since the project start/rebuild:
Engine/Powertrain:
Walbro 450 Fuel Pump w/ battery rewire mod.
All new fuel lines everywhere. Fragola -6AN Feed/Engine engine side hose. the only e85 incompatible line is the system currently is a -6AN Nylon hose from the FPR up front to the factory underchassis return hardline, and then from the factory return hardline to the tank. Will change out these two hoses at some point when I get closer to ethanol use.
Full Function Engineering Primary and Secondary Fuel Rails
Relocated the previous Aeromotive FPR from the back of the bay to just in front of the intake manifold with the IRP bracket. Also locked it in at 43.5psi atmosphere.
ID1050x Primary Injectors and ID2000 Secondary Injectors
PowerFC + Commander + Datalogit
OMP Delete
PTP T3/T4 Turboblanket (Lava)
Sakebomb Garage IGN-1A Smart Coils w/ BUR9EQP plugs all around
ACT Street/Strip Clutch (used - will buy new when necessary now that I know I like the way it feels)
-4AN Fragola Turbo Oil Feed line
JDM "cryo treated" upper and lower intake manifolds
Greddy elbow (as opposed to the one with two injector nozzle ports that the car came with)
New idler pulley bearing. Pushed this one in a couple weeks ago as the one on the car sounded pretty rough.
New Coolant Overflow bottle. One of the last in the country. The old setup was bypassing the overflow completely and had no AST either. I'm still not running an AST but have the overflow correctly plumbed and have never seen running temps over 85c.
Interior:
AEM UEGO Wideband
Prosport Electronic Boost Guage
DRAKES Dual gauge center speaker gauge pod
RX8 Shift ****
Those are most of the changes so far, along with the completely new Mazda REW engine that was purchased back in May, that was subsequently street ported with Goopy apex seals by Eccentric Motorsports.
Upcoming changes:
Brakes. Still using the ones that came with the car, working okay but a little less bite than I'd like. I'm kind of baffled at how even with a build of this size, I still haven't bled the brakes or changed out the lines to stainless steel yet. That's next on the list. Will be installing new rotors (unsure if slotted or standard), Hawk HP+ pads, as well as cleaning and repainting the calipers something other than mid-life-crisis red.
Suspension. A buddy is actually giving me some Tein Street Basis coilovers in great condition, so I'll be installing those until I feel like they're not enough. Currently the car has something like stock springs and white and rusty Tokiko Illumina Shocks. After the coilovers I'll be going with a full Powerflex bushing kit as soon as I get a 20-ton press.
Body/Paint. I bought a montego blue rear bumper used, and need to get that prepped and painted over to black, as well as painting the two headlight covers I bought(currently plastidipped black), as well as repainting the moon(or is it sun?) roof as that is the only place on the car with actively fading and really damaged paint. I'm also a sucker for big wings, say what you want, so I may go Voltex or APR GT200 type, so trunk holes will need to be cleaned up, assuming I decide to not keep the 99-spec wing that's on the car right now.
Electronic Boost Controller. I found out that the existing HKS-style 50mm wastegate and spring are opening around 10-11psi max, so in order to actually hit my goal of 14psi, I need a different spring AND to implement the Greddy Profec 2 spec B EBC that I bought, or just the EBC, which is the more likely route at the moment. This should help with not cracking before 11psi as well if I decide to keep that as a "low" boost setting.
New Exhaust. I have this one lined up from a buddy, as the one currently on the car is so loud my ears ring for hours after a 30 minute drive. I found some really great filtering earplugs called "Eargasm"s that actually work surprisingly well, but we all agree that earplugs are not the correct solution for this no-name grapefruit cannon of a loud exhaust.
Replacement Turbo Filter. This one is pretty dirty and clogged and wouldn't surprise me if it's hurting performance as it is. Not sure if I should go Greddy style replacement, or just some size-matched K&N filter.
Here's a few pics of how she's sitting right now! Needs some major fitment love on the front bumper and headlight areas. Not having an undertray currently is causing the way the front bumper sits/bends to be a little pesky.
I was planning to originally, but with the unfortunate move to the beginning of May (my anniversary weekend), I won't be able to attend this year. Hopefully 2020 is back to an April schedule, otherwise I won't be attending until death do us part.
Nothing more romantic than standing in a Walmart parking lot around a popped hood with the smell of unburnt hydrocarbons in the air.
Seriously, you are close enough you could come for one of the days or something. It's an amazing event and it's great to meet people and make contacts, as well as seeing what others have done with their cars.
Dale
Yeah I may be able to slide a day in - maybe Thursday. This next year is our 5th year anniversary and we're throwing a big party so this particular one might be just a smudge trickier than the rest.
I hate to miss it! I went the past two years and had a blast. The first year I still had my RX8 and last year the RX8 sold just days before the event but still went up anyways.
I actually think I met Johnny and his wife last year up near the cabins!
Used Tein Street Basis Coilovers - A buddy was installing some HKS Hipermax on his car and gave these to me for helping out. Can't argue with that. Previous setup was Tokico Illuminas with alot of age and wear and some unknown Eibach Springs.
Hawk HP+ Brake Pads
Stop Tech Stainless Brake Lines
ATE Typ 200 DOT4 Brake Fluid
R1Concepts Black Zinc coated slotted rotors
Should help the handling and stopping a lot more, although I haven't had a chance to drive since installing the coilovers. Whatever pads, fluid, and rotors were on the car now were not doing the job. I had planned on doing all the brake stuff alot sooner than now so I haven't even bled the fluid that was in the car when I first got it. Definitely feels like it's aged and cooked out as even 1-2 stops from high 4th gear gets the car feeling quite shaky and pedal spongy. Excited to get things up to snuff! While I'm doing the brakes I'll be hitting the calipers with some aircraft grade paint stripper to take them back to metal and will either leave them OEM Metal colored or go with a black or silver G2 caliper paint.
I'll leave a pic of these for now - with the puppy and cat tax included haha! I know they won't stay black on the wear surface but definitely looks cool right now in the box! R1 Concepts Black Zinc coated slotted rotor
These kinds of stories where an abused animal or car find a loving home are so gratifying to read.
At first I was looking at all the pictures thinking "Oh no, he doesn't know what he is in for- what if he does the logical thing and gives up on this mess?"
A month goes by, two, three, four, five....
But then oh, its back; driving around and looking all nice under the engine bay.
I dont understand why in the hell someone paint the inside of the irons.. specially center iron oil feeler. I discovered similar stuff in my broken engine.
good for you that you are enjoying your car..
 03-23-18, 04:25 PM


 But that's the way things go with owning an FD