
AFGMOTO1978 Build Thread

Thread Starter
Joined: Jul 2005
Posts: 2,913
Likes: 4
From: Kingman, AZ
5/7/07
Well finished sanding at 2am today. Very, very sore now. Primer and jams painted shortly.
I also got somemore goodies this weekend


5/10/07
Got my seats in Yesterday, it's going to be a tight fit, but it will work. Will have to modify the floor and make custom side mounts for them.
See picture for Snap-On plastic welder part number and the a view of the emblem hole I filled on the rear bumper. View of surface before I sanded.


I though the material I used would be compatible, but unfortunately I was wrong. Should have used a plastic based body filler instead.
Well finished sanding at 2am today. Very, very sore now. Primer and jams painted shortly.
I also got somemore goodies this weekend
5/10/07
Got my seats in Yesterday, it's going to be a tight fit, but it will work. Will have to modify the floor and make custom side mounts for them.
See picture for Snap-On plastic welder part number and the a view of the emblem hole I filled on the rear bumper. View of surface before I sanded.
I though the material I used would be compatible, but unfortunately I was wrong. Should have used a plastic based body filler instead.
Thread Starter
Joined: Jul 2005
Posts: 2,913
Likes: 4
From: Kingman, AZ
5/10/07
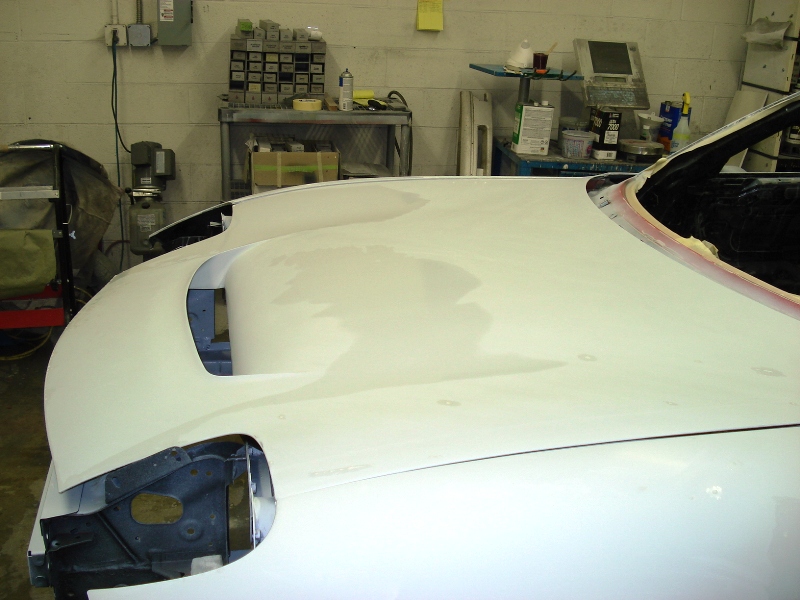
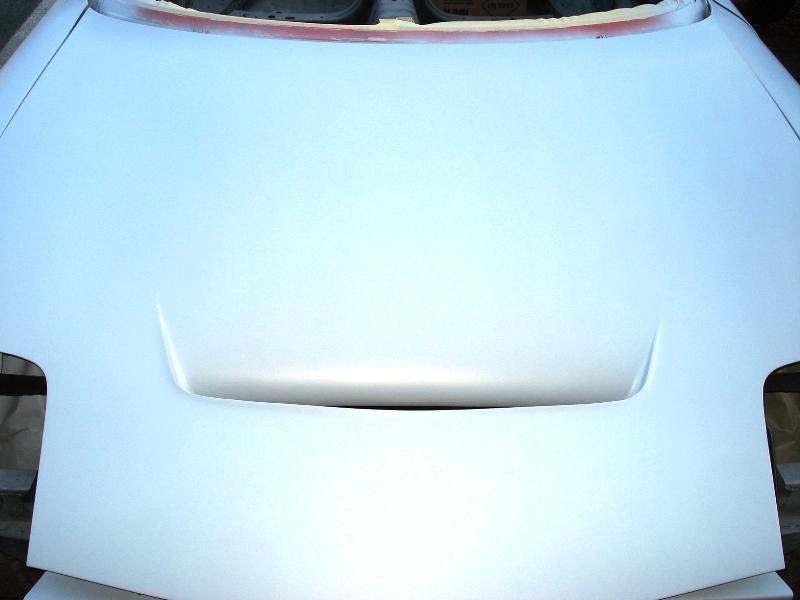
Car ready for primer, hopefully Leo will have the primer on by the time I get to the shop today to wet sand it.


5/11/07
Primer wet sanded, didn't get done till 3am today. Bobby and Spyder help. If wasn't for them I would have never gotten it done that night.


Car ready for primer, hopefully Leo will have the primer on by the time I get to the shop today to wet sand it.
5/11/07
Primer wet sanded, didn't get done till 3am today. Bobby and Spyder help. If wasn't for them I would have never gotten it done that night.
Thread Starter
Joined: Jul 2005
Posts: 2,913
Likes: 4
From: Kingman, AZ
5/14/07
Car is painted - Knowing what I know now I should have done the paint job myself and been patience with the process. The PPG paint materials I used required a 48 hour cure between coats. But instead did it all in one night. I should have done more research on the materials I used and asked more questions on what was required. As of now paint is bubbling in a lot of areas.


PPG Deltron 2000 - OEM: 32P Mazda DBC912270 SC "Tungsten Gray Metalic"
VOC: 6.0/% Lead: 0.00/MSDS: BDC1
Tinting guide:
DMD1690 - 1828.4
DX685 - 116.7
DMD1683 - 554.0
DMD1676 - 68.1
DMD1605 - 171.0
DMD1607 - 19.2
PRL98 - 155.7
DBX1689 - 583.5
DMD650 - 136.2
Car is painted - Knowing what I know now I should have done the paint job myself and been patience with the process. The PPG paint materials I used required a 48 hour cure between coats. But instead did it all in one night. I should have done more research on the materials I used and asked more questions on what was required. As of now paint is bubbling in a lot of areas.
PPG Deltron 2000 - OEM: 32P Mazda DBC912270 SC "Tungsten Gray Metalic"
VOC: 6.0/% Lead: 0.00/MSDS: BDC1
Tinting guide:
DMD1690 - 1828.4
DX685 - 116.7
DMD1683 - 554.0
DMD1676 - 68.1
DMD1605 - 171.0
DMD1607 - 19.2
PRL98 - 155.7
DBX1689 - 583.5
DMD650 - 136.2
Thread Starter
Joined: Jul 2005
Posts: 2,913
Likes: 4
From: Kingman, AZ
5/20/07
In process of engine build mock up and mod'n. As expected I have clearance issues with the new LIM, but nothing too extreme. Did some porting of the water pump housing to improve flow. I also simplified the rats nest, used my blue silicone hose for the lengths and routing needed before I cut up my expensive Viton hose I got. Waiting for the fuel injection kit I ordered to come in and Spider to bring me a few replacement items he borrowed awhile back....


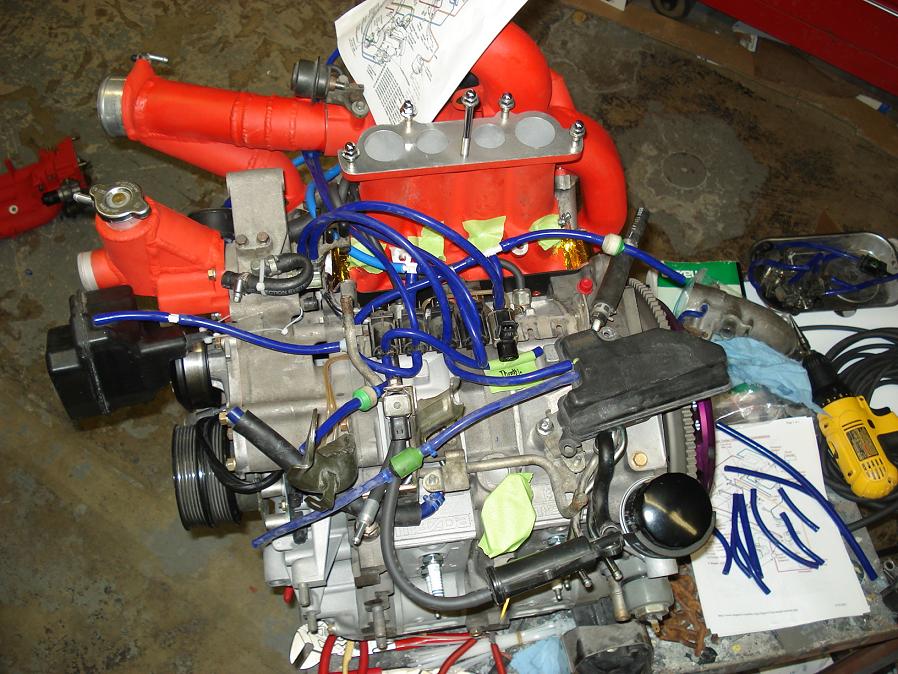

In process of engine build mock up and mod'n. As expected I have clearance issues with the new LIM, but nothing too extreme. Did some porting of the water pump housing to improve flow. I also simplified the rats nest, used my blue silicone hose for the lengths and routing needed before I cut up my expensive Viton hose I got. Waiting for the fuel injection kit I ordered to come in and Spider to bring me a few replacement items he borrowed awhile back....
Thread Starter
Joined: Jul 2005
Posts: 2,913
Likes: 4
From: Kingman, AZ
5/24/07
Still waiting for the fuel injection kit to come (RX7Store), but Spider did bring me an alternator, be it a bit oxidized (thanks Mark). I took more pics of the clearance issues observed caused by the GZ LIM and the difference in location of where the throttle body is now. I did a little metal forming with a BFP so that the throttle body mounting tab lined up with the throttle body. The stock oil filler neck does not fit now, so I ordered an ReSpeed aluminum filler neck, decided to buy instead of fabricate. I also ordered one of there machined oil pedestals.


5/25/07
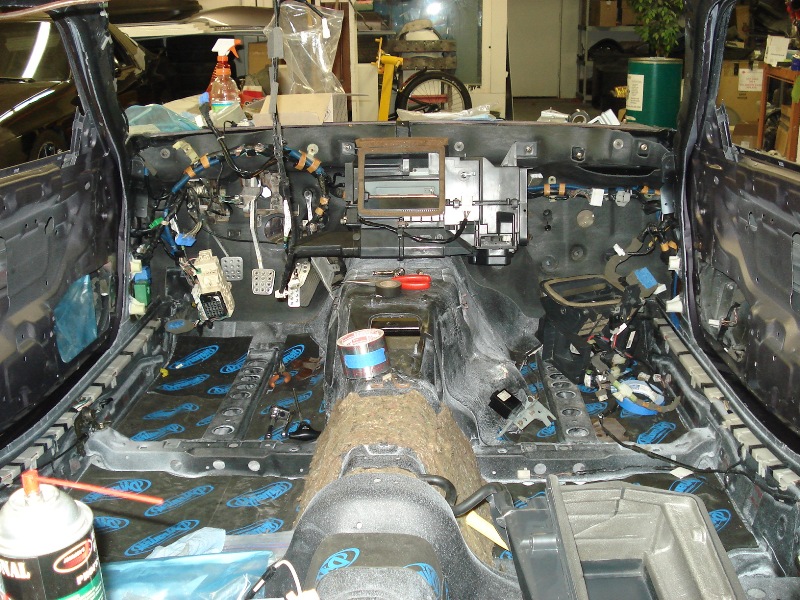
More progress today, engine build nearly complete, waiting for the fuel system I ordered to come in to verify everything fits before I put it into the engine bay. Got the ReSpeed oil filler neck and oil pedestal in today; nice pieces. I also cleaned the interior compartment and started laying up sound deadening.


Still waiting for the fuel injection kit to come (RX7Store), but Spider did bring me an alternator, be it a bit oxidized (thanks Mark). I took more pics of the clearance issues observed caused by the GZ LIM and the difference in location of where the throttle body is now. I did a little metal forming with a BFP so that the throttle body mounting tab lined up with the throttle body. The stock oil filler neck does not fit now, so I ordered an ReSpeed aluminum filler neck, decided to buy instead of fabricate. I also ordered one of there machined oil pedestals.
5/25/07
More progress today, engine build nearly complete, waiting for the fuel system I ordered to come in to verify everything fits before I put it into the engine bay. Got the ReSpeed oil filler neck and oil pedestal in today; nice pieces. I also cleaned the interior compartment and started laying up sound deadening.
Thread Starter
Joined: Jul 2005
Posts: 2,913
Likes: 4
From: Kingman, AZ
5/29/07
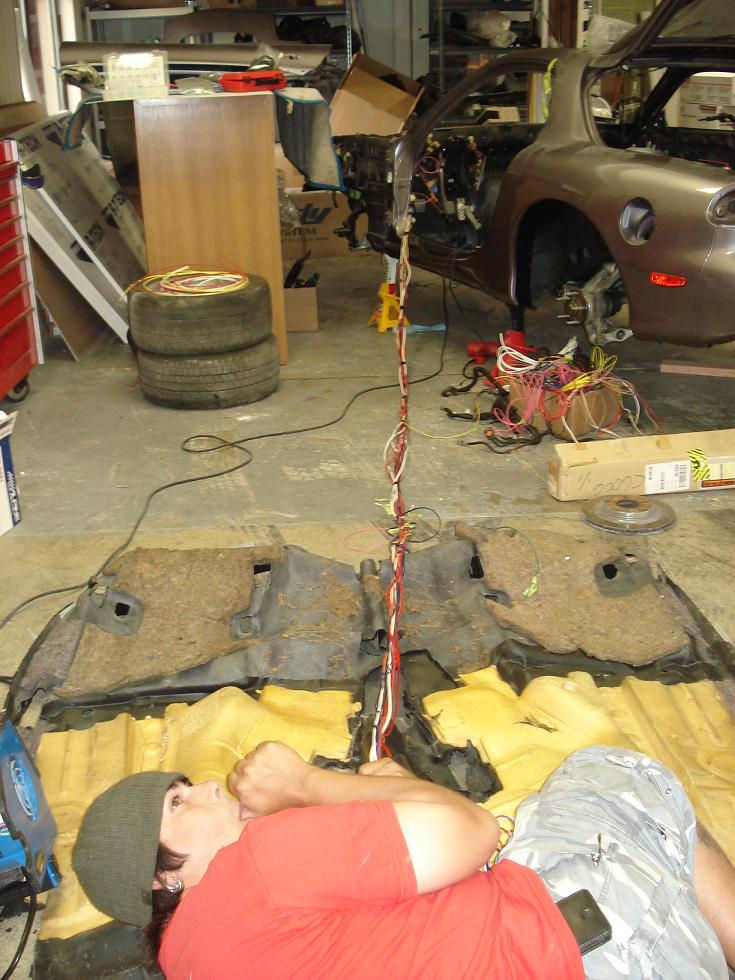
Started the arduous task of putting the wire harnesses back in, thanks to Wadejg letting me use his FD as a template to work off of, I was able to make some progress without scratching my head too much. I now have to modify the main chassis harness and engine harness now, yeah. Relocating the battery cables, relay boxes and fuse boxes on the main body harness. I then need too removing redundant items on the engine harness.


5/31/07
I removed the unusable diagnostic plug & wiring and most of the fan relay/control setup. I retained some of the wiring that may potentially be used by the Spal fan controller I will be using instead of the stock setup.
Man do I have a lot of wiring to do!!

6/3/07
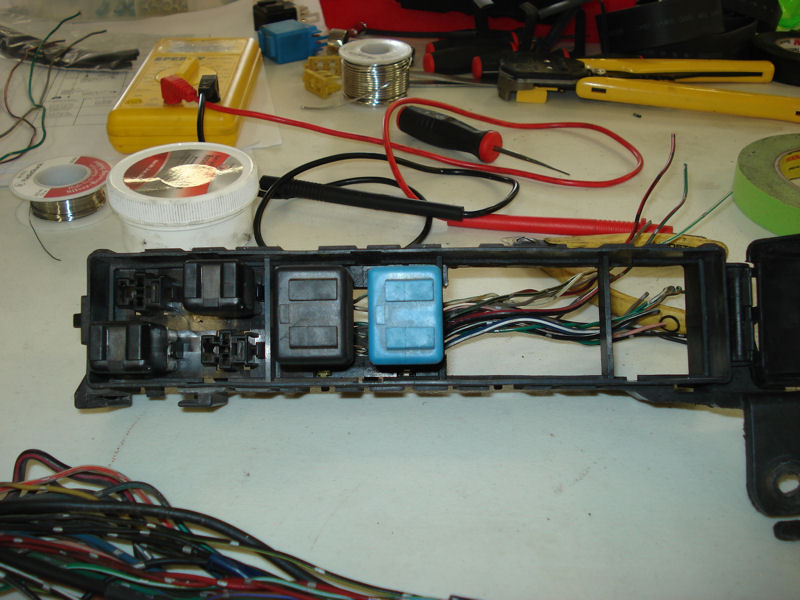
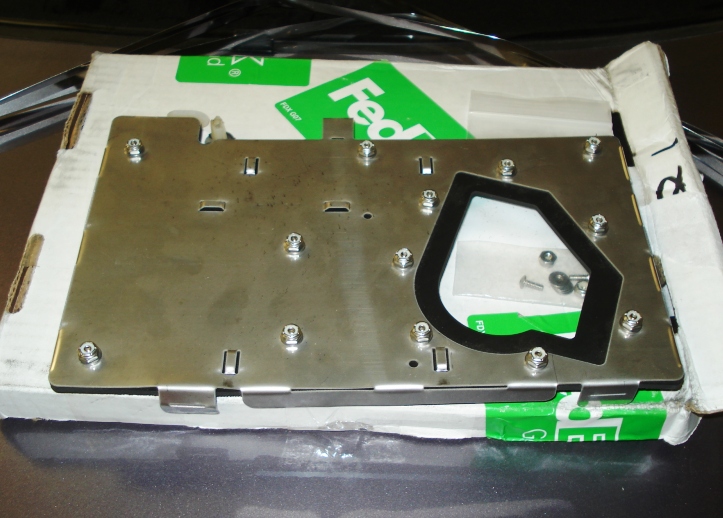
Slowly modifying the body harness (don't want to F up something), thank god Mazda provided detailed wiring diagrams on the net or I would be F'd. Anyways, removed and moved relays, modified the front relay box to house less relays, (Another plastic welder product). Just need to make a new mounting frame for the relay box where the fan relays used to be.
The Spal fan controller box will be mounted on the same frame. Picking it up Monday. Looks like the wiring I saved from the original setup will be used for this controller.
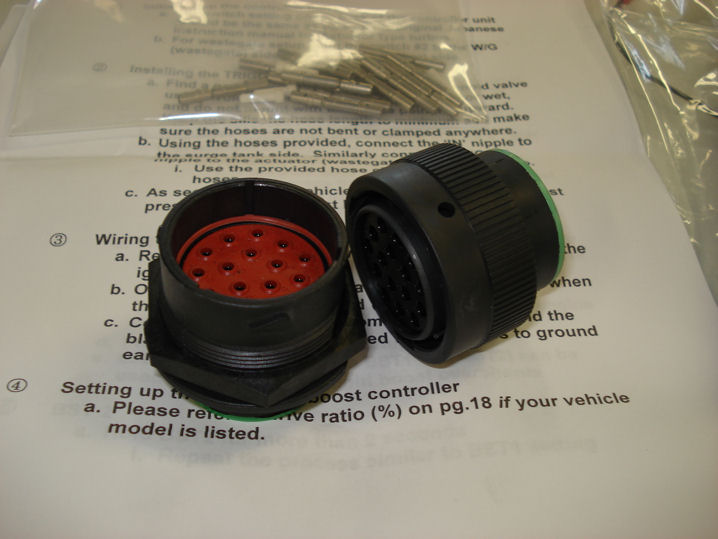
The quick disconnect plug will be using for the battery relay box I will be moving with the Battery. The plug will be placed where there is an unused orifice on the driver side firewall. Need to cut grooves for the prongs and it will slip right in.


Started the arduous task of putting the wire harnesses back in, thanks to Wadejg letting me use his FD as a template to work off of, I was able to make some progress without scratching my head too much. I now have to modify the main chassis harness and engine harness now, yeah. Relocating the battery cables, relay boxes and fuse boxes on the main body harness. I then need too removing redundant items on the engine harness.
5/31/07
I removed the unusable diagnostic plug & wiring and most of the fan relay/control setup. I retained some of the wiring that may potentially be used by the Spal fan controller I will be using instead of the stock setup.
Man do I have a lot of wiring to do!!
6/3/07
Slowly modifying the body harness (don't want to F up something), thank god Mazda provided detailed wiring diagrams on the net or I would be F'd. Anyways, removed and moved relays, modified the front relay box to house less relays, (Another plastic welder product). Just need to make a new mounting frame for the relay box where the fan relays used to be.
The Spal fan controller box will be mounted on the same frame. Picking it up Monday. Looks like the wiring I saved from the original setup will be used for this controller.
The quick disconnect plug will be using for the battery relay box I will be moving with the Battery. The plug will be placed where there is an unused orifice on the driver side firewall. Need to cut grooves for the prongs and it will slip right in.
Thread Starter
Joined: Jul 2005
Posts: 2,913
Likes: 4
From: Kingman, AZ
6/5/07
Completed wiring the new front relay box and started integrating the new Spal fan controller. I'm also integrating a removable secondary relay for a potential second fan if it looks like I need it.
Today finish that up and start working on the battery relay box relocation and what not.


Completed wiring the new front relay box and started integrating the new Spal fan controller. I'm also integrating a removable secondary relay for a potential second fan if it looks like I need it.
Today finish that up and start working on the battery relay box relocation and what not.
Thread Starter
Joined: Jul 2005
Posts: 2,913
Likes: 4
From: Kingman, AZ
6/24/07
Got a little stuff done today, started setting up the external kill switch.

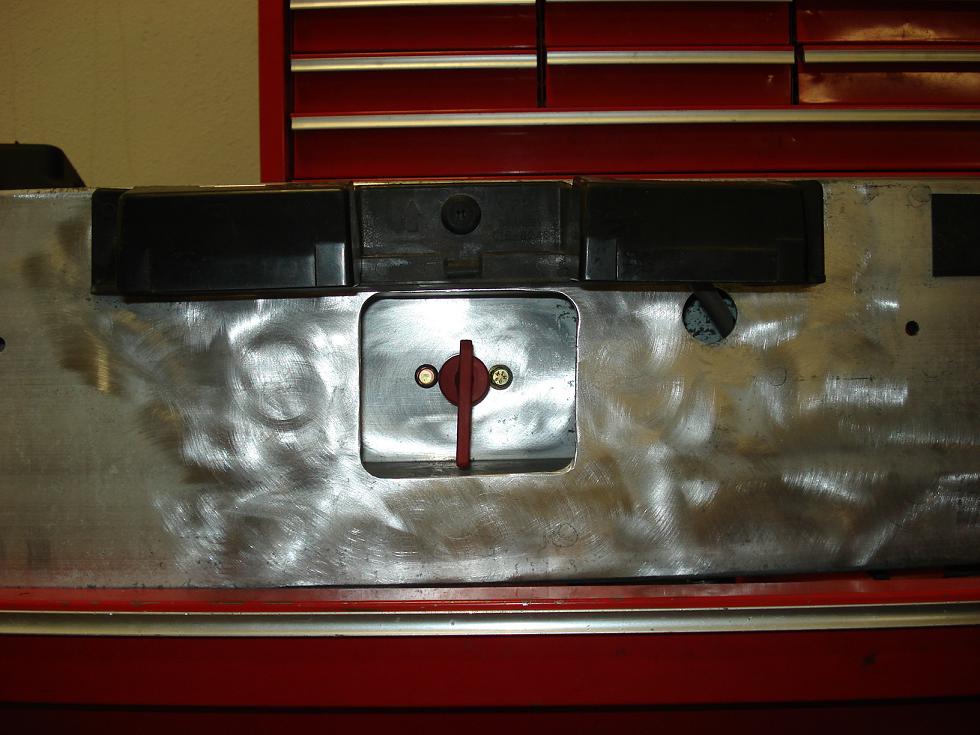


Wish I had just put the kill switch next to the battery. Would have saved a lot of weight.
Got a little stuff done today, started setting up the external kill switch.
Wish I had just put the kill switch next to the battery. Would have saved a lot of weight.
Thread Starter
Joined: Jul 2005
Posts: 2,913
Likes: 4
From: Kingman, AZ
6/24/07
Started putting body plug on and couldn't for life of me find or remember if the holes I covered with aluminum tape had plugs or not. Oh well. Started to also put the battery and fuse block in, need to get some special hardware to finish the battery install.


6/27/07
With the assistance of Bobbo and Spider things have started rolling at a faster pace.
Setup of the firewall plug is nearly complete, had to double up on a few wires, but no big D.
Spider started greasing the Delrin bushings, replace my worn-out steering end-links and putting new dust seals on the upper A-arm. Though I need to either buy or borrow the tool necessary to instal the new bust boot clips.
Bobbo, cut out my rear brake shields for preparation of my new BBK I'm getting. FD New Brake Options Re-reinstall my diff and put half shafts on.
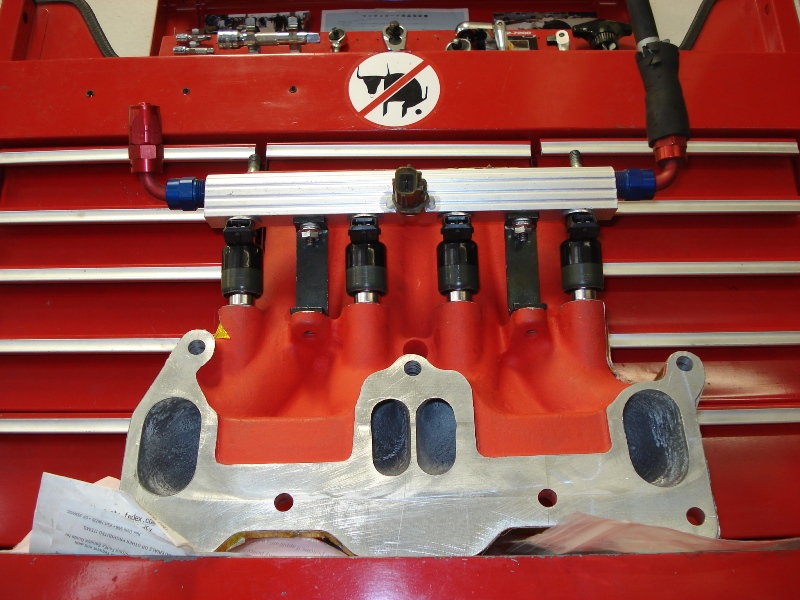
Oh and I got the GZ Secondary Fuel rail (1 of 4 available for sale at GZ). After talking with Frank at GZ and a few other experienced tuners, I may run four 1600cc or four 1000cc injectors for secondaries running two injectors in series. That way I would utilize all the GZ injector ports and I wouldn't need to integrate a resistor. 550cc side feeds would be used on the primary rail for good low idle smoothness. Overkill on fuel, but it would actually turn out to be easier in the long run with my future single turbo setup. Stay tuned.


Started putting body plug on and couldn't for life of me find or remember if the holes I covered with aluminum tape had plugs or not. Oh well. Started to also put the battery and fuse block in, need to get some special hardware to finish the battery install.
6/27/07
With the assistance of Bobbo and Spider things have started rolling at a faster pace.
Setup of the firewall plug is nearly complete, had to double up on a few wires, but no big D.
Spider started greasing the Delrin bushings, replace my worn-out steering end-links and putting new dust seals on the upper A-arm. Though I need to either buy or borrow the tool necessary to instal the new bust boot clips.
Bobbo, cut out my rear brake shields for preparation of my new BBK I'm getting. FD New Brake Options Re-reinstall my diff and put half shafts on.
Oh and I got the GZ Secondary Fuel rail (1 of 4 available for sale at GZ). After talking with Frank at GZ and a few other experienced tuners, I may run four 1600cc or four 1000cc injectors for secondaries running two injectors in series. That way I would utilize all the GZ injector ports and I wouldn't need to integrate a resistor. 550cc side feeds would be used on the primary rail for good low idle smoothness. Overkill on fuel, but it would actually turn out to be easier in the long run with my future single turbo setup. Stay tuned.
Thread Starter
Joined: Jul 2005
Posts: 2,913
Likes: 4
From: Kingman, AZ
6/30/07
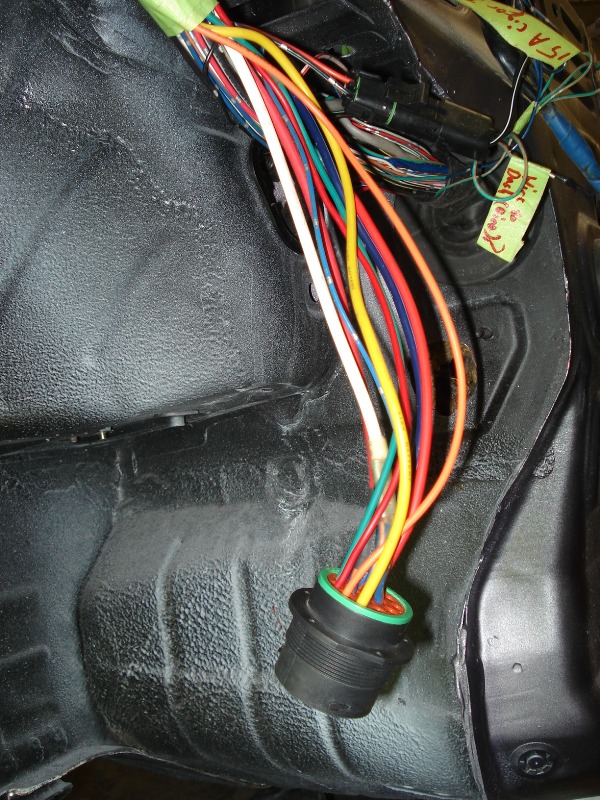
LOL, well the umbilical cored is done and I need to route to the passenger compartment now.
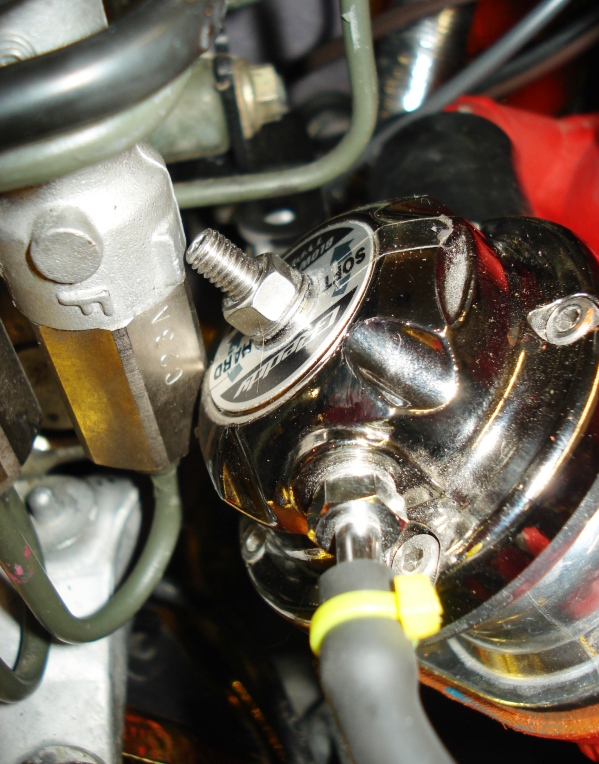
Got some parts recently, two Synapse Engineering BOVs, these just became available in limited quantities. Awesome units by the way. Mostly complete fuel system setup, got the secondary rail and fuel reg from GZ and the rest at Oil Filter Services (they have everything!). Just need to get injectors.


LOL, well the umbilical cored is done and I need to route to the passenger compartment now.
Got some parts recently, two Synapse Engineering BOVs, these just became available in limited quantities. Awesome units by the way. Mostly complete fuel system setup, got the secondary rail and fuel reg from GZ and the rest at Oil Filter Services (they have everything!). Just need to get injectors.
Thread Starter
Joined: Jul 2005
Posts: 2,913
Likes: 4
From: Kingman, AZ
7/1/07
Mostly done with the wiring in the passenger compartments. Still need to tie in the battery cables and finish the main distribution box mounting.


7/3/07
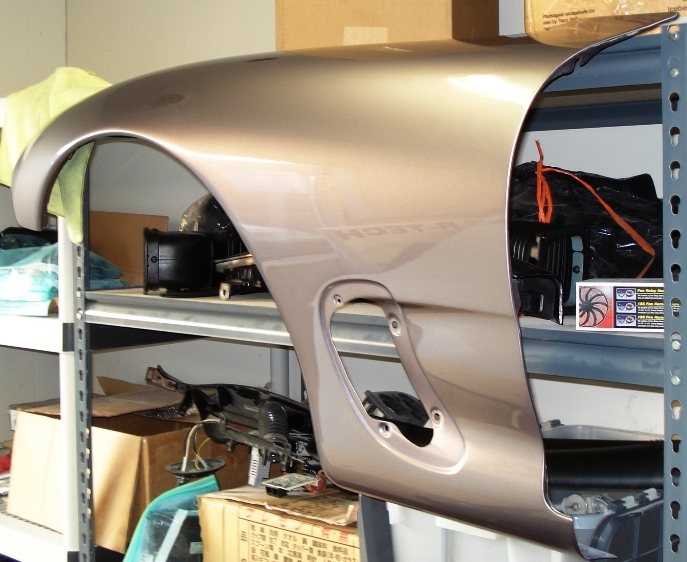
Interior wiring complete. Attached is a pic of a before/after refurbish body panels.


Mostly done with the wiring in the passenger compartments. Still need to tie in the battery cables and finish the main distribution box mounting.
7/3/07
Interior wiring complete. Attached is a pic of a before/after refurbish body panels.
Thread Starter
Joined: Jul 2005
Posts: 2,913
Likes: 4
From: Kingman, AZ
7/9/07
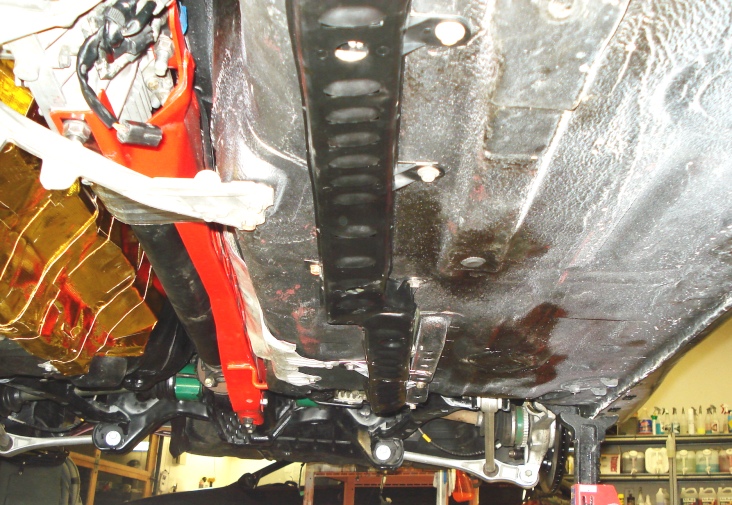
Finally got all four corners of the suspension put together (had an issue with recieving a wrong half shaft assembly from MC) and put on the heat shield material for the exhaust. A bit overkill, but the passenger shouldn't have an issue of being slowly roasted.


7/15/07
Well I was hoping to have the motor in the engine bay by today, but in order of ease of setup and installation I need to wait for my injectors to come in and I need some fittings for the FPR. Then fabricate a mount for the FPR and the pressure vessel for the wastegate control. Easier to remove and install stuff with the motor out.
So mostly done with mod'n the engine harness, just need the injectors and injector clips. I went with 4 1000cc secondaries, two in series per side. And two new 550cc side feed units (main reason on holding off on installing the motor, major PITA to install those).


7/24/07
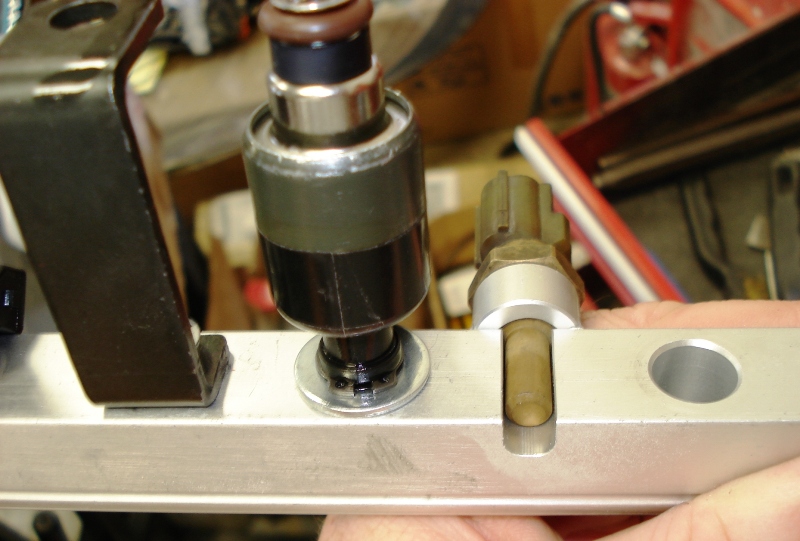
Finally got my 1000cc secondary injectors, need to make new mounting tabs for the rail to seat the injectors better into the LIM.
Expect my primaries to be clean and ready to go today and I will be getting my BBK!


Finally got all four corners of the suspension put together (had an issue with recieving a wrong half shaft assembly from MC) and put on the heat shield material for the exhaust. A bit overkill, but the passenger shouldn't have an issue of being slowly roasted.
7/15/07
Well I was hoping to have the motor in the engine bay by today, but in order of ease of setup and installation I need to wait for my injectors to come in and I need some fittings for the FPR. Then fabricate a mount for the FPR and the pressure vessel for the wastegate control. Easier to remove and install stuff with the motor out.
So mostly done with mod'n the engine harness, just need the injectors and injector clips. I went with 4 1000cc secondaries, two in series per side. And two new 550cc side feed units (main reason on holding off on installing the motor, major PITA to install those).
7/24/07
Finally got my 1000cc secondary injectors, need to make new mounting tabs for the rail to seat the injectors better into the LIM.
Expect my primaries to be clean and ready to go today and I will be getting my BBK!
Thread Starter
Joined: Jul 2005
Posts: 2,913
Likes: 4
From: Kingman, AZ
7/26/07
Big Brake Kit in now, had to modify a few things, but that was to be expected. Finally got all my injectors, should have the motor in the engine bay later this week. After looking into it, I will be add an FJO low impedence fuel injector controller to the mix for proper fuel control.


7/27/07
Modified my Nardi steering wheel to accept the cruise control switch module and installed the wheel on the steering column.


Big Brake Kit in now, had to modify a few things, but that was to be expected. Finally got all my injectors, should have the motor in the engine bay later this week. After looking into it, I will be add an FJO low impedence fuel injector controller to the mix for proper fuel control.
7/27/07
Modified my Nardi steering wheel to accept the cruise control switch module and installed the wheel on the steering column.
Thread Starter
Joined: Jul 2005
Posts: 2,913
Likes: 4
From: Kingman, AZ
7/30/07
Motor and tranny are in; secondary fuel rail fits, but is a bit tight with the Marren fuel dampener in place and the synapse bov may not work at the secondary boost control setup because of clearances. Will have to see when everything is in place. Rear brakes are also done, had to sand off material on the pads in order to fit. I had this same issue with my stock brakes and HP+ pads.....
And the dash is being repaired, the back lip of the center speaker pod was peeling up.
Thread Starter
Joined: Jul 2005
Posts: 2,913
Likes: 4
From: Kingman, AZ
8/8/07
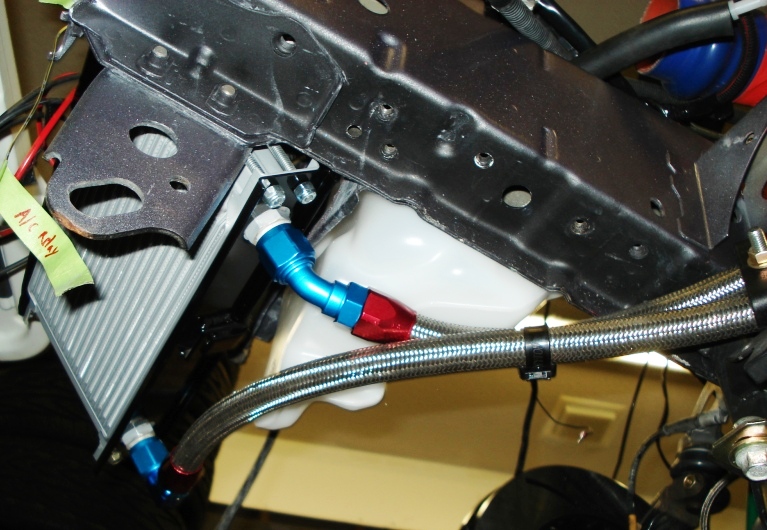
I modified the oil thermostat to include a section for an oil temp sensor; I did this to eliminate the giant cluster F$%K the Mocal temp sensor adapter would have caused. Just need to fab up a rubber isolated mount to the sway bar mount stiffening bar and oil lines can then be routed.
I also removed all the old pealing top coat on my 93 center console and re-textured it to look and kinda feel like a 94 unit.


8/11/07
Almost done with the oil cooler mount/sway bar stiffening bar. Had to make another fuel Y splitter, the original was to big of a diameter tubing, doh. Got my RE street diffuser, nice piece, but it got damaged during shipping, will fix cracks and coat with rhino liner, or something with similar properties.


I modified the oil thermostat to include a section for an oil temp sensor; I did this to eliminate the giant cluster F$%K the Mocal temp sensor adapter would have caused. Just need to fab up a rubber isolated mount to the sway bar mount stiffening bar and oil lines can then be routed.
I also removed all the old pealing top coat on my 93 center console and re-textured it to look and kinda feel like a 94 unit.
8/11/07
Almost done with the oil cooler mount/sway bar stiffening bar. Had to make another fuel Y splitter, the original was to big of a diameter tubing, doh. Got my RE street diffuser, nice piece, but it got damaged during shipping, will fix cracks and coat with rhino liner, or something with similar properties.
Thread Starter
Joined: Jul 2005
Posts: 2,913
Likes: 4
From: Kingman, AZ
8/15/07
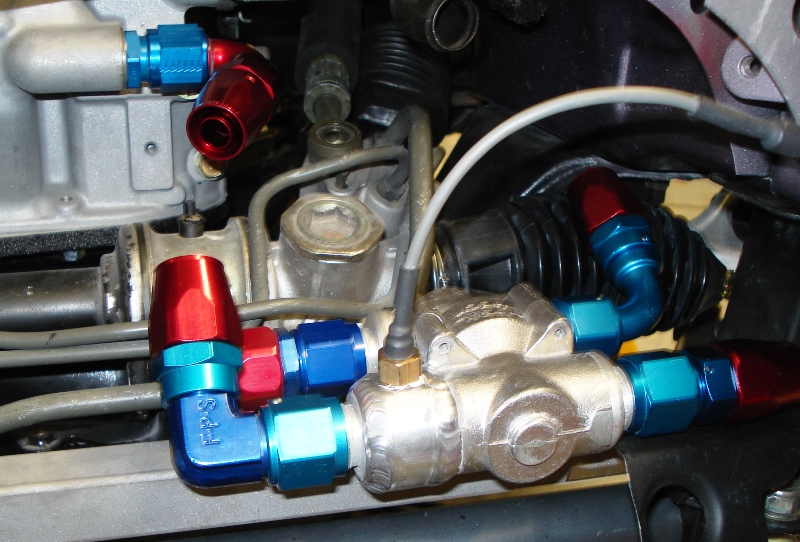
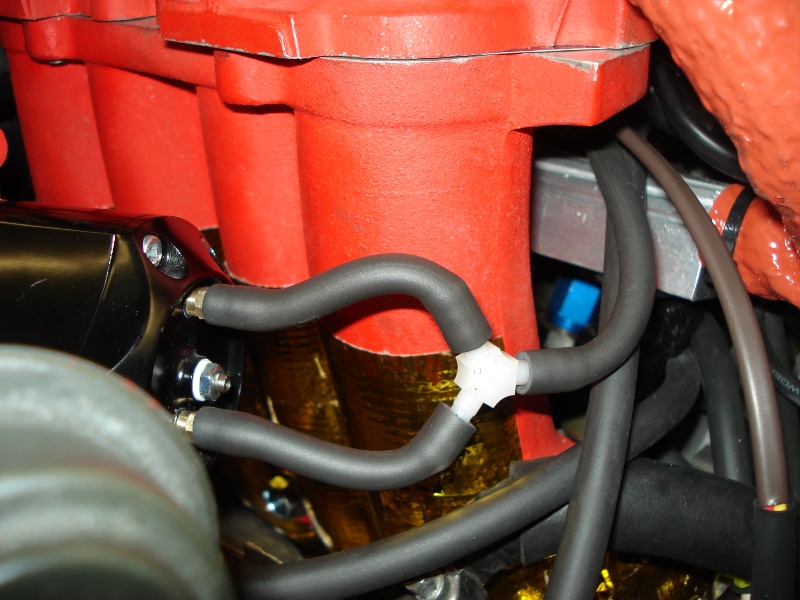
Finished wiring in the FJO Peak and Hold Injector controller and cleaned up the engine harness while i was at it. I had some major routing issues with lines and wires, so while I was finishing wiring up the injector controller plugs and wires, I did rerouting of a coolant line and some vac lines. I'm so looking forward to get my single and getting rid of these control valves and lines.
The only thing I really don't like about this whole setup is the fuel lines to the FPR, I need to looks deeper into my options as far as fittings go...maybe AN fitting bangos, if there's such a thing.


Figured out the routing of the fuel lines to the FPR, had to think more 3D. Engine harness in, now need to finish main harness in the engine bay and most of my wiring except for lights should be done. Finally


Finished wiring in the FJO Peak and Hold Injector controller and cleaned up the engine harness while i was at it. I had some major routing issues with lines and wires, so while I was finishing wiring up the injector controller plugs and wires, I did rerouting of a coolant line and some vac lines. I'm so looking forward to get my single and getting rid of these control valves and lines.
The only thing I really don't like about this whole setup is the fuel lines to the FPR, I need to looks deeper into my options as far as fittings go...maybe AN fitting bangos, if there's such a thing.
Figured out the routing of the fuel lines to the FPR, had to think more 3D. Engine harness in, now need to finish main harness in the engine bay and most of my wiring except for lights should be done. Finally
Thread Starter
Joined: Jul 2005
Posts: 2,913
Likes: 4
From: Kingman, AZ
8/19/07
Fuel System Done


8/20/07
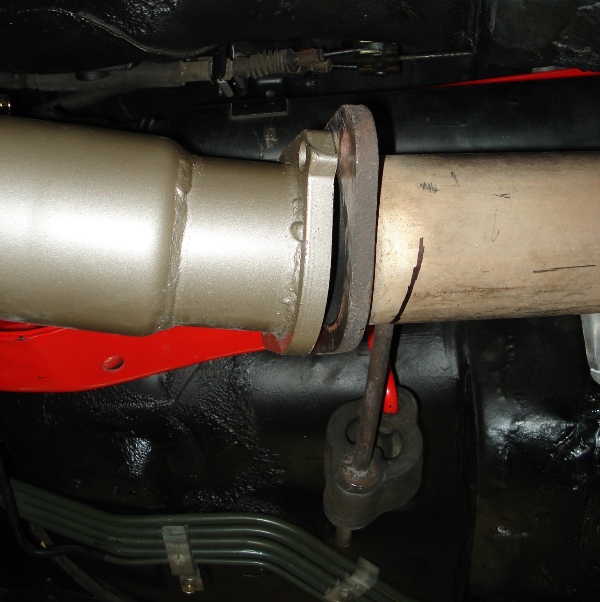
Exhaust mostly in, need to mod the mid cat pipe to fit new Greddy Evo2 catback, weld in the wideband bung and weld in a check valve for the air pump tube. A while back I had Pineapple make some custom ultra high temp exhaust gaskets. In the past I kept blowing through the originally supplied units. As a test I modified one of the their header gaskets. No blow-by and it reduced dBs under the cabin as a side effect. Good stuff.
Also finished wiring in the battery, starter, alternator cables. And the body-engine harness.


Fuel System Done
8/20/07
Exhaust mostly in, need to mod the mid cat pipe to fit new Greddy Evo2 catback, weld in the wideband bung and weld in a check valve for the air pump tube. A while back I had Pineapple make some custom ultra high temp exhaust gaskets. In the past I kept blowing through the originally supplied units. As a test I modified one of the their header gaskets. No blow-by and it reduced dBs under the cabin as a side effect. Good stuff.
Also finished wiring in the battery, starter, alternator cables. And the body-engine harness.
Thread Starter
Joined: Jul 2005
Posts: 2,913
Likes: 4
From: Kingman, AZ
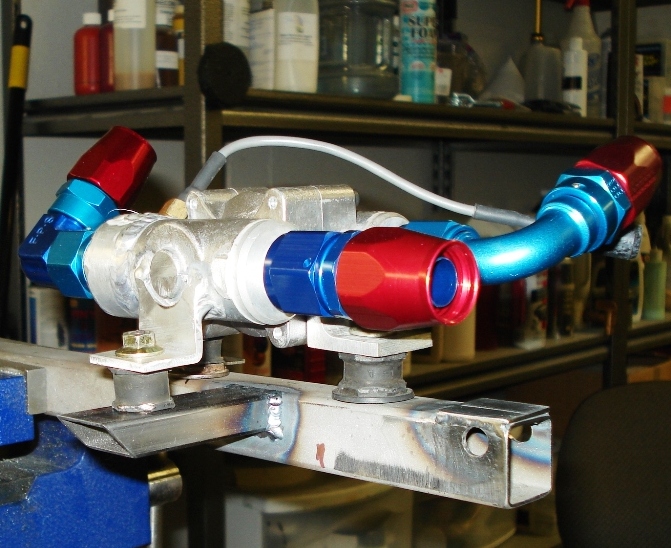
8/23/07
FPR mount done, and close to being done with the mid cat. Finalize boost controller mounting and the remaining accessory wiring needs to be completed. Possibly may be able to start the motor this weekend.


Mid cat pipe done, just barely had enough leftover tubing after cutting to re-weld. My big cluster F of a relay box, fan controller, Boost solenoid and fan relay is next on the list.


FPR mount done, and close to being done with the mid cat. Finalize boost controller mounting and the remaining accessory wiring needs to be completed. Possibly may be able to start the motor this weekend.
Mid cat pipe done, just barely had enough leftover tubing after cutting to re-weld. My big cluster F of a relay box, fan controller, Boost solenoid and fan relay is next on the list.
Thread Starter
Joined: Jul 2005
Posts: 2,913
Likes: 4
From: Kingman, AZ
8/25/08
As I feared the Secondary BOV interfers with the ABS unit, so I need to rotate that tubing assembly. Heat sink for the WB in, needed two crush washers to get the orientation. Mostly finished with engine bay wiring except for the headlights and EDFC(routing). Started install of EDFC stepper motors, thank god for work instructions. And I found out the FC dip stick is a nice upgrade to the short FD dip stick unit, gets to the finger ring should be a lot easier now.


I needed to modify the secondary turbo tubing I went ahead and put in one of my synapse BOVs. Also finished the engine bay wiring, utilized the AC firewall plug. Next will be finishing the Secondary intake tube recirc tubing, air pump air line routing, welding in water temp and water level bungs into the Rad, welding in the second BOV after the IC (for better throttle response when motor is under vacuum) and all the wiring to the dash.


As I feared the Secondary BOV interfers with the ABS unit, so I need to rotate that tubing assembly. Heat sink for the WB in, needed two crush washers to get the orientation. Mostly finished with engine bay wiring except for the headlights and EDFC(routing). Started install of EDFC stepper motors, thank god for work instructions. And I found out the FC dip stick is a nice upgrade to the short FD dip stick unit, gets to the finger ring should be a lot easier now.
I needed to modify the secondary turbo tubing I went ahead and put in one of my synapse BOVs. Also finished the engine bay wiring, utilized the AC firewall plug. Next will be finishing the Secondary intake tube recirc tubing, air pump air line routing, welding in water temp and water level bungs into the Rad, welding in the second BOV after the IC (for better throttle response when motor is under vacuum) and all the wiring to the dash.
Thread Starter
Joined: Jul 2005
Posts: 2,913
Likes: 4
From: Kingman, AZ
8/29/07
Had a little unpleasant surprise the other day; the primary turbo accessory fitting came loose. So I made a plug for it since I will be tapping into the tubing at the juncture where I will get a more accurate pressure differentiation between the primary and secondary turbo transition. The secondary BOV and tubing is in, man talk about a tight fit. I almost needed five year old hands just to tighten the small set screws for the Synapse BOV.


Water temp and level sensors are on the Rad now and I need to decide where I will locate the primary BOV and special air filter for it. Where ever it is placed I need to tap into the air filter for the air pump. Minimizing tubing length may be the determining factor.


Had a little unpleasant surprise the other day; the primary turbo accessory fitting came loose. So I made a plug for it since I will be tapping into the tubing at the juncture where I will get a more accurate pressure differentiation between the primary and secondary turbo transition. The secondary BOV and tubing is in, man talk about a tight fit. I almost needed five year old hands just to tighten the small set screws for the Synapse BOV.
Water temp and level sensors are on the Rad now and I need to decide where I will locate the primary BOV and special air filter for it. Where ever it is placed I need to tap into the air filter for the air pump. Minimizing tubing length may be the determining factor.
Thread Starter
Joined: Jul 2005
Posts: 2,913
Likes: 4
From: Kingman, AZ
8/30/07
Holy sharp edges batman, nearly slit my wrists getting the fuel tank surge tank cover in place. Nice piece, hyperion did a awsome job designing and making these things.
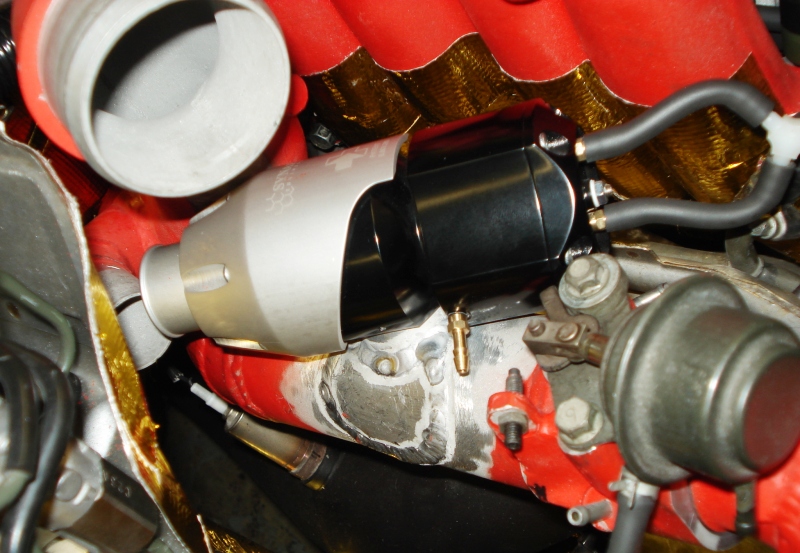
Primary BOV is in, decided to have seperate air filters for the air pump and BOV. More maintence items to deal with, but less hose and clutter in the engine bay.


Holy sharp edges batman, nearly slit my wrists getting the fuel tank surge tank cover in place. Nice piece, hyperion did a awsome job designing and making these things.
Primary BOV is in, decided to have seperate air filters for the air pump and BOV. More maintence items to deal with, but less hose and clutter in the engine bay.
Thread Starter
Joined: Jul 2005
Posts: 2,913
Likes: 4
From: Kingman, AZ
9/3/07
Started making a custom boost gage, EDFC and datalogit stereo din assembly. I was going to do it where the a/c controls were, but decided against it due to potential serviceability issues. This setup works nice, but it pretty much voids all of these items warranty, which I think had already expired anyways so whatever, lol.


9/4/07
Added a wide band calibration button to the BOV-EDFC-Datalogit assembly and did some wiring. Dash will go in today, finish most of the wiring and start modifying the gauge cluster.


Started making a custom boost gage, EDFC and datalogit stereo din assembly. I was going to do it where the a/c controls were, but decided against it due to potential serviceability issues. This setup works nice, but it pretty much voids all of these items warranty, which I think had already expired anyways so whatever, lol.
9/4/07
Added a wide band calibration button to the BOV-EDFC-Datalogit assembly and did some wiring. Dash will go in today, finish most of the wiring and start modifying the gauge cluster.
Thread Starter
Joined: Jul 2005
Posts: 2,913
Likes: 4
From: Kingman, AZ
9/5/07
Thanks Barry, hope your not melting in the heat in Louisiana. And yeah, maybe no mustang at the gap in 08 and lets hope the cop coverage reduces to a level where we can have some fun too, hehe.
Barry, what plane did you pull your turbo heat shield off of? I know it was off of a turbine motor, but wasn’t sure of the model you pull it from. I want to do something similar for when I get the 500R.
Dash in, dash units in, gauge cluster is next, then fluids and a crank over.