
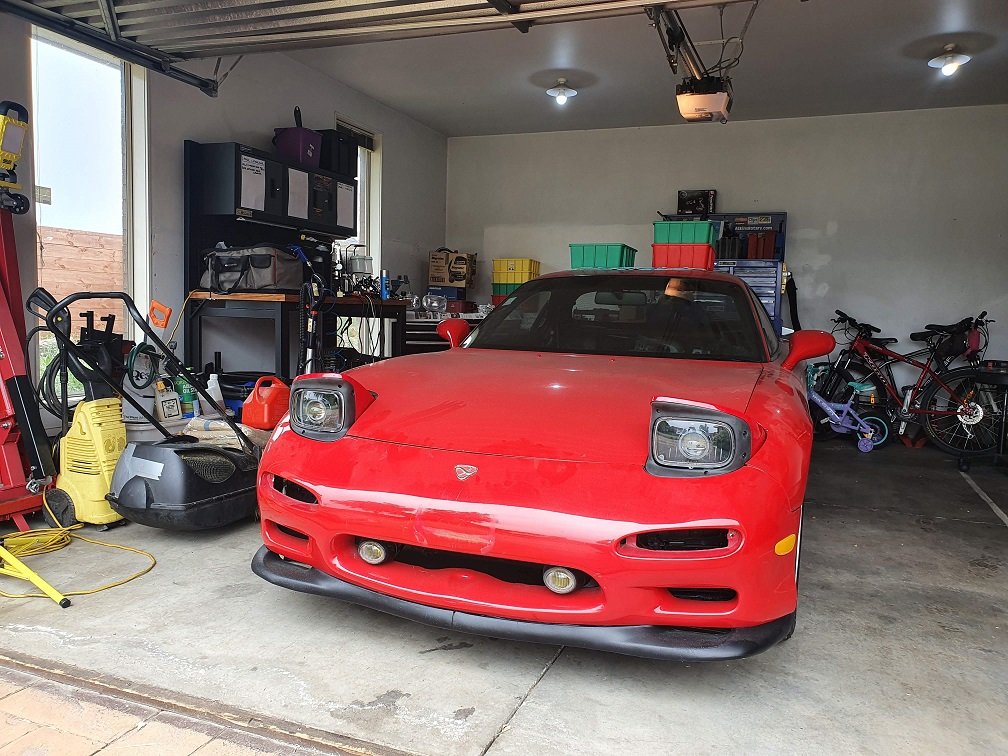
1992 Red JDM RestoMod


You are meeting the challenges well.
https://www.ebay.ca/itm/265163227349...cAAOSwrJldhwck
Just sayin.....
https://www.ebay.ca/itm/265163227349...cAAOSwrJldhwck
Just sayin.....
Last edited by Redbul; Sep 25, 2021 at 07:01 PM.

Thread Starter
Full Member
Joined: Aug 2015
Posts: 170
Likes: 92
From: New Zealand
I've thought about those as the stock rear valence on this is actually in good nick, not melted... But part of the reason for going with the racing beat system I that shouldn't need one. Plus, I'm only going to shoot for ~300hp at the wheels on this thing, so it wont have a glowing red exhaust shooting flames :-).

Full Member
Joined: Aug 2020
Posts: 75
Likes: 26
From: British Columbia
I've thought about those as the stock rear valence on this is actually in good nick, not melted... But part of the reason for going with the racing beat system I that shouldn't need one. Plus, I'm only going to shoot for ~300hp at the wheels on this thing, so it wont have a glowing red exhaust shooting flames :-).
Loving how you redid those rubbers. Brilliant.
Thread Starter
Full Member
Joined: Aug 2015
Posts: 170
Likes: 92
From: New Zealand
I'm an engineer in the Mech dept. Of the local university, so we have lots and lots of good toys to play with, pretty spoiled really.
Full Member
Joined: Aug 2020
Posts: 75
Likes: 26
From: British Columbia
Good to know! Cheers. Looking forward to getting that exhaust here. These cars need twin tips! It's a shame RB don't use double walled tips anymore that were more like the originals, but the rolled tips are still excellent :-).
I'm an engineer in the Mech dept. Of the local university, so we have lots and lots of good toys to play with, pretty spoiled really.
I'm an engineer in the Mech dept. Of the local university, so we have lots and lots of good toys to play with, pretty spoiled really.
 .
.Are you planning on keeping with the stock 16s and space them out or a diff route? I also love the 93 front bumper and pretty much all the aesthetics of the original design (feel the 99 bumper ruins the flow and lines of the car). I stayed with the 16s for the driving feel but did space them out to get a nice flush fit with the fenders.
I believe mine are the old double walled ones you are referring to. Not a mark on my valance.


Thread Starter
Full Member
Joined: Aug 2015
Posts: 170
Likes: 92
From: New Zealand
Might make me wanna go back to school for a semester. Talk about value for tuition .
Are you planning on keeping with the stock 16s and space them out or a diff route? I also love the 93 front bumper and pretty much all the aesthetics of the original design (feel the 99 bumper ruins the flow and lines of the car). I stayed with the 16s for the driving feel but did space them out to get a nice flush fit with the fenders.
.Are you planning on keeping with the stock 16s and space them out or a diff route? I also love the 93 front bumper and pretty much all the aesthetics of the original design (feel the 99 bumper ruins the flow and lines of the car). I stayed with the 16s for the driving feel but did space them out to get a nice flush fit with the fenders.
Our cars will be different coloured clones by the sound of it, because yes on all accounts! I love the earlier front bumper, and agree the later ones don't fit the rest of the lines as well. Also yes to keeping the stock 16's, and spacing them out a little to beef up the stance slightly.
Yeap, those are the double walled tops I'm referring to, they're like a more badass version of the originals. I'll have to settle though.

Joined: Aug 2004
Posts: 4,786
Likes: 145
From: Colorado Springs, CO
I love threads like this. So satisfying to watch. Even the little things like cleaning up the plastic bits and making new rubber pieces, it's the little things like that that really make a difference in the end. Great work so far!
Thread Starter
Full Member
Joined: Aug 2015
Posts: 170
Likes: 92
From: New Zealand
More waiting, more restoring parts that don't actually help the thing run....
A front wiper motor popped up for sale cheap, so I nabbed it. I'd done the rear motor, so figured I should do the front too.
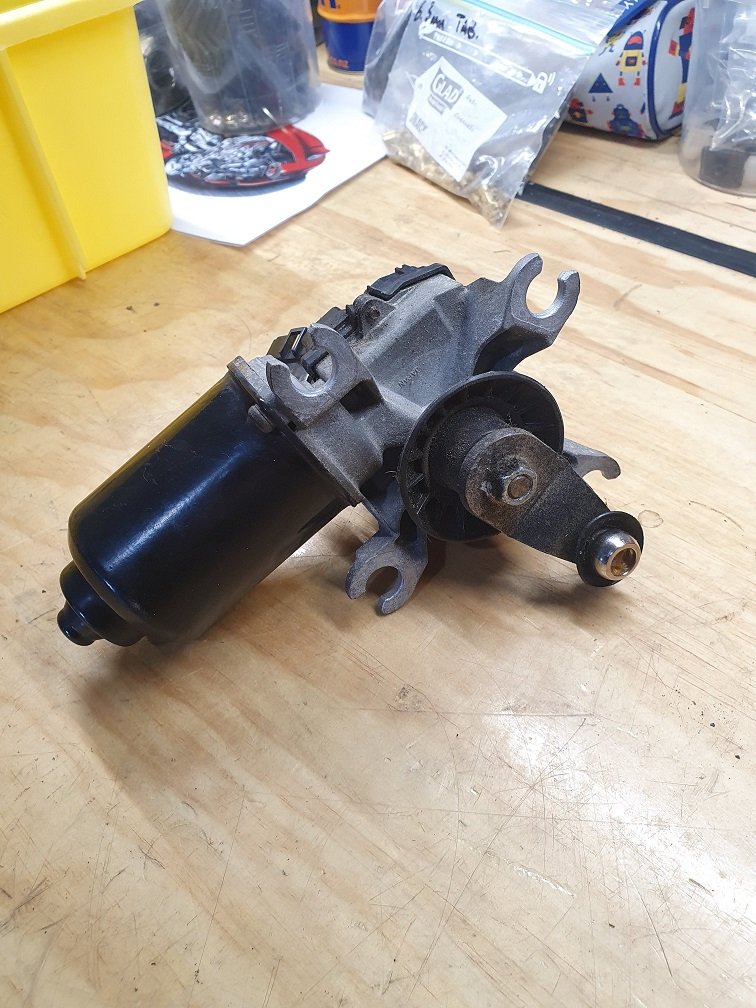
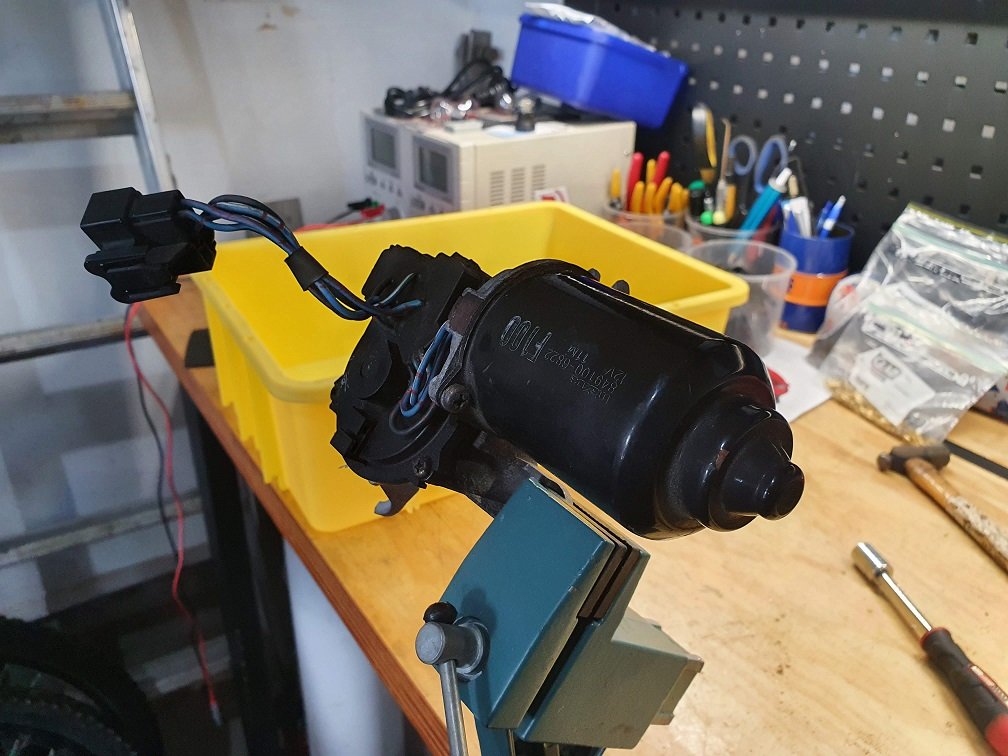
In the scheme of things, not terrible, but stuffed powder coat, a bit of rust setting in, and filthy. Atleast it actually ran at a decent speed though, so better than the rear one! Blew it apart, cleaned everything up, sanded the commutator and gave the brushes a tickle up, they have heaps of life left yet. Didn't go full-bore on this and get everything re-zinc plated, most of the bits were absolutely fine, just needed a good clean, aluminium housing blasted, and the motor casing painted.
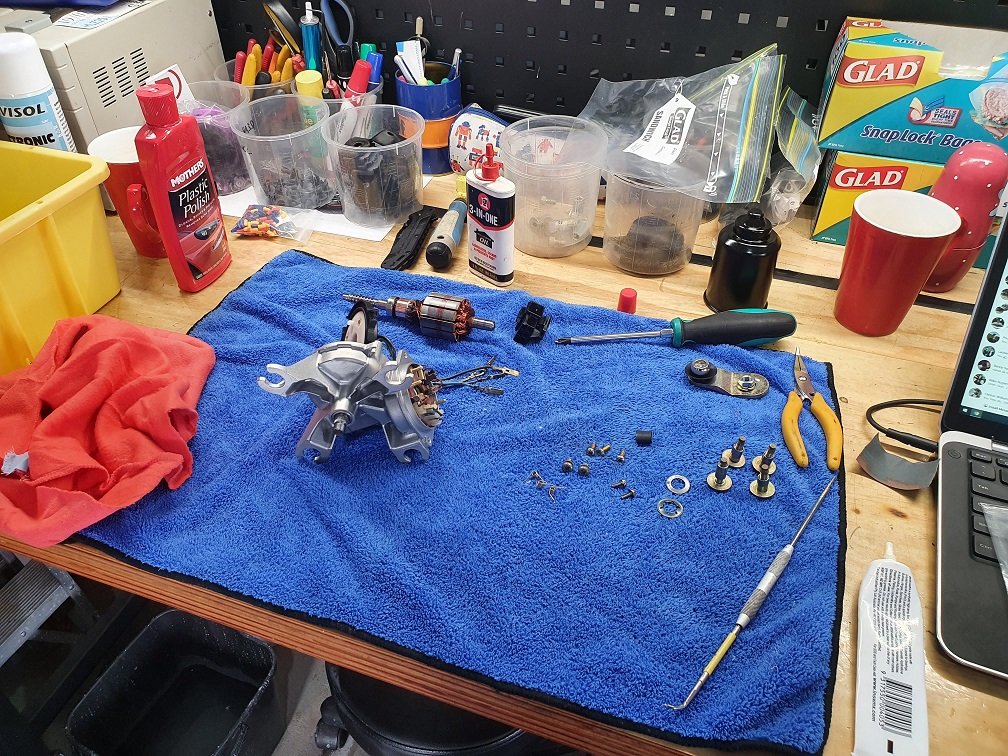
Reassembly time. Nothing complicated here.
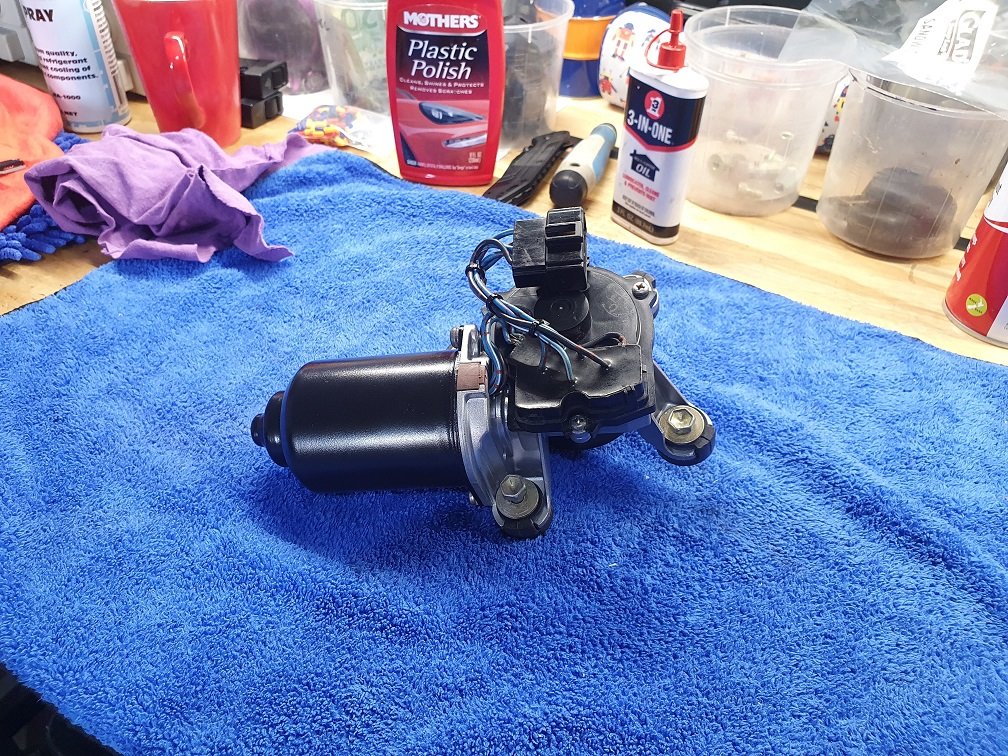
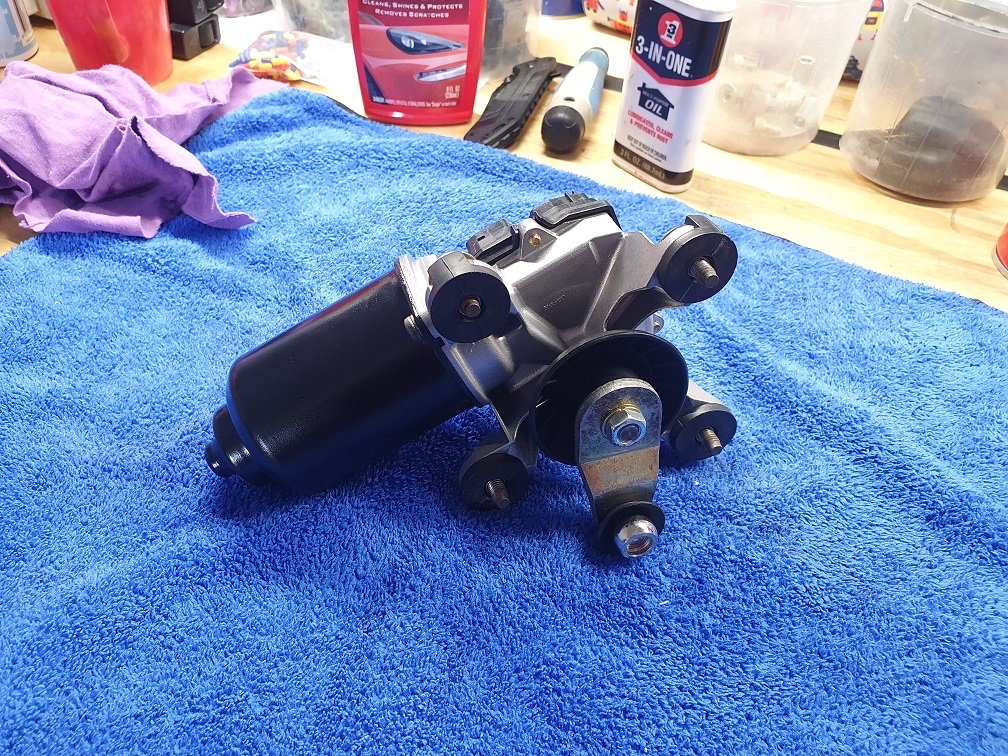
I was a little bit of an idiot and didnt mark the alignment of the pivot arm when I disassembled it. I'll be able to sort that when fitting it to the car though. Draws a little less current and sounds smoother than it did before the job, so that's got to be a score :-).
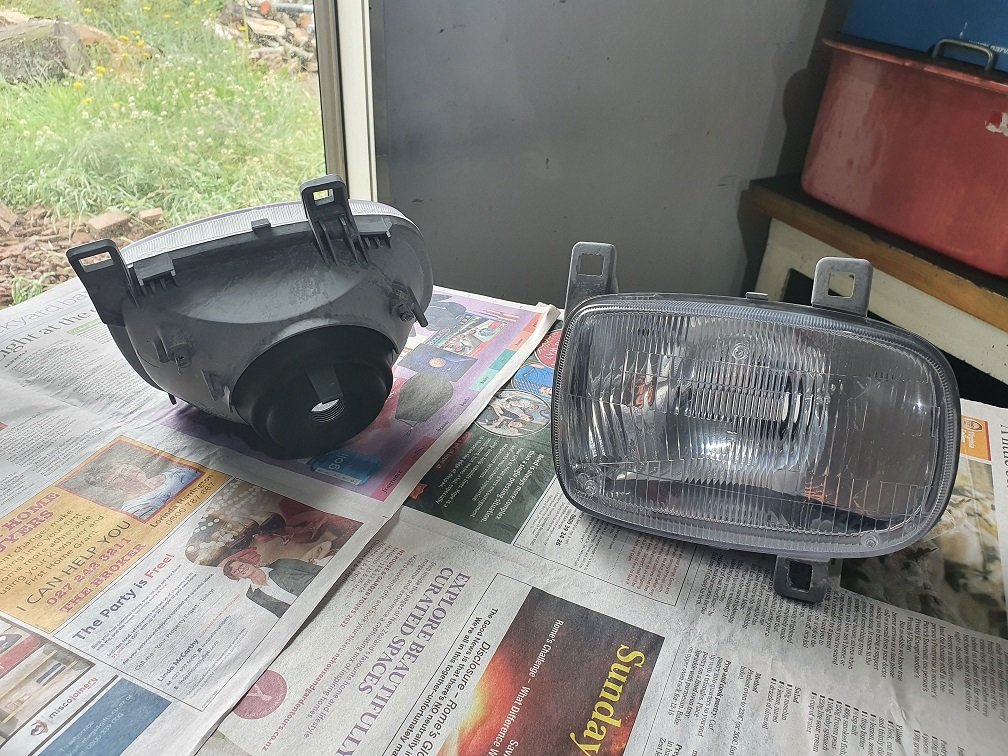
Spent a few evenings sanding down, then back up through the grades, and polishing all the exterior lights. The fogs are ones I stripped and had the housings powdercoated when I had the white car, were still sitting in a box in the garage, so that's a score. Really early cars like mine have yellow lenses inside the fogs, but I prefer the clear ones, so was nice to have this set from a later model car. The yellow ones are still on my car, so maybe they'll get a resto at some point too, nice to have options :-). Everything has new LED bulbs. I'll need to put a load resistor in parallel in the indicator circuit somewhere to trick the flasher / body ecu thingee, but that should be all the lighting sorted and ready to fit.
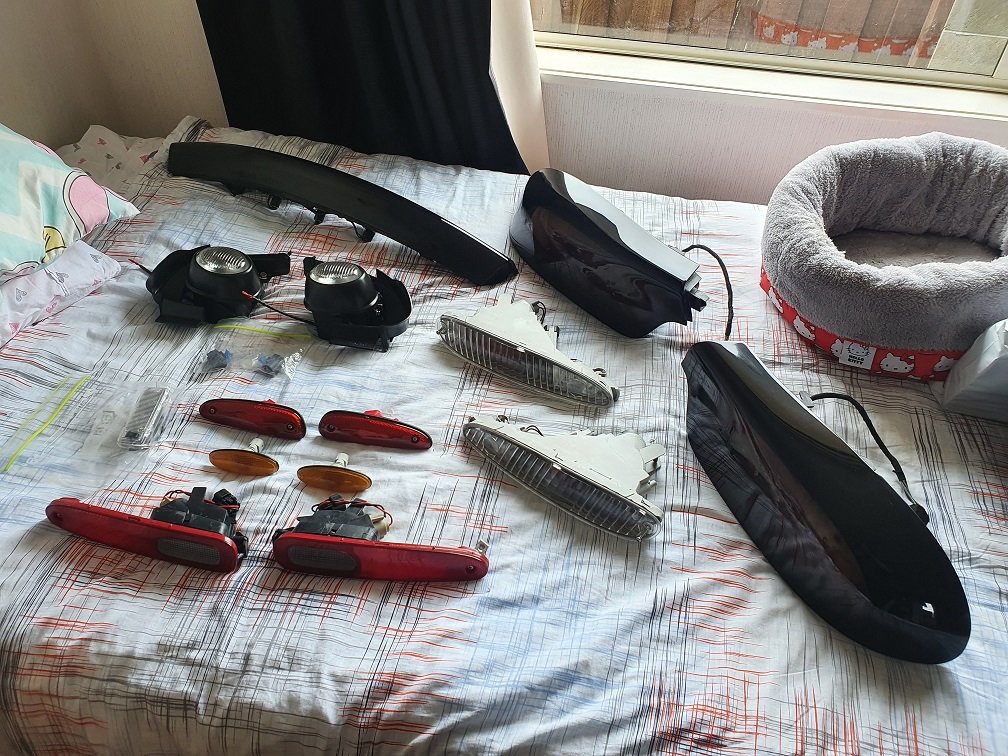
I've got a few ***** up in the air restoring other parts, the door handles are an interesting one, waiting for them to come back from powdercoat. I'm also modding a set of aftermarket headlights to bring them into the 21st century, but I'm not a hundy on how that's going to work out, will be interesting.
One day soon I'll stop procrastinating and dive into the engine bay again.
A front wiper motor popped up for sale cheap, so I nabbed it. I'd done the rear motor, so figured I should do the front too.
In the scheme of things, not terrible, but stuffed powder coat, a bit of rust setting in, and filthy. Atleast it actually ran at a decent speed though, so better than the rear one! Blew it apart, cleaned everything up, sanded the commutator and gave the brushes a tickle up, they have heaps of life left yet. Didn't go full-bore on this and get everything re-zinc plated, most of the bits were absolutely fine, just needed a good clean, aluminium housing blasted, and the motor casing painted.
Reassembly time. Nothing complicated here.
I was a little bit of an idiot and didnt mark the alignment of the pivot arm when I disassembled it. I'll be able to sort that when fitting it to the car though. Draws a little less current and sounds smoother than it did before the job, so that's got to be a score :-).
Spent a few evenings sanding down, then back up through the grades, and polishing all the exterior lights. The fogs are ones I stripped and had the housings powdercoated when I had the white car, were still sitting in a box in the garage, so that's a score. Really early cars like mine have yellow lenses inside the fogs, but I prefer the clear ones, so was nice to have this set from a later model car. The yellow ones are still on my car, so maybe they'll get a resto at some point too, nice to have options :-). Everything has new LED bulbs. I'll need to put a load resistor in parallel in the indicator circuit somewhere to trick the flasher / body ecu thingee, but that should be all the lighting sorted and ready to fit.
I've got a few ***** up in the air restoring other parts, the door handles are an interesting one, waiting for them to come back from powdercoat. I'm also modding a set of aftermarket headlights to bring them into the 21st century, but I'm not a hundy on how that's going to work out, will be interesting.
One day soon I'll stop procrastinating and dive into the engine bay again.
Thread Starter
Full Member
Joined: Aug 2015
Posts: 170
Likes: 92
From: New Zealand
I FIXED SOMETHING THE CAR ACTUALLY NEEDS TO BE DRIVABLE!
Okay, but its also an OCD ****-fest... Sooooo best of both worlds?
The stopper that actuates the brake light switch on the pedals was missing, as it had crumbled into oblivion, this is really common apparently. I ordered a new one as they're only a few bucks, expecting to just chuck it in and call it job done. While I was under there, I checked the brake light switch itself though, and found it to be faulty too. These switches have two circuits in them, one normally open, one normally closed (although this terminology becomes confusing when you start thinking about the position of the brake pedal, as it actually releases the switch when the pedal is pressed...). The normally open circuit (smaller terminals), wasn't working. It occasionally closed its contacts if you pushed the plunger really hard, and squinted just right... But not reliably. I have no idea what this circuit is actually for in the car, but there are wires going to it, so I figure I should make it work. About this time a set of pedals popped up on FB marketplace local that were pretty cheap, so I thought, why not? Went and grabbed em. They had a good stopper for the brake light switch, and a good brake light switch itself, so I swapped them into the car, and hey presto, all fixed :-).
Job done, right?
Yeah, nah.
The pedals are a really cool feature of these cars, as they're aluminium from the factory, which is a little uncommon. I now had a spare set of ragged, run down pedals, and, well, you know how much I love overboard restoring things....
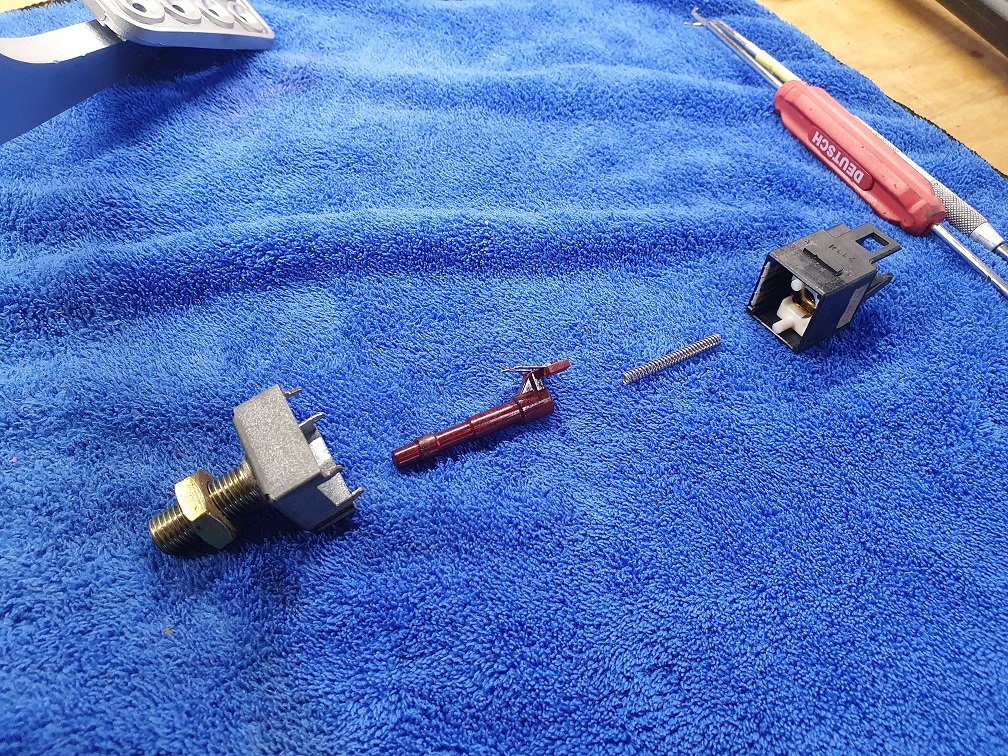
First up was the stuffed switch. Getting it apart was pretty easy, just a couple of crimped tabs. Gave everything a really good clean, and sanded the contacts with 400 grit. Re-lubed with dielectric grease, assembled, and presto, all working perfectly again :-).

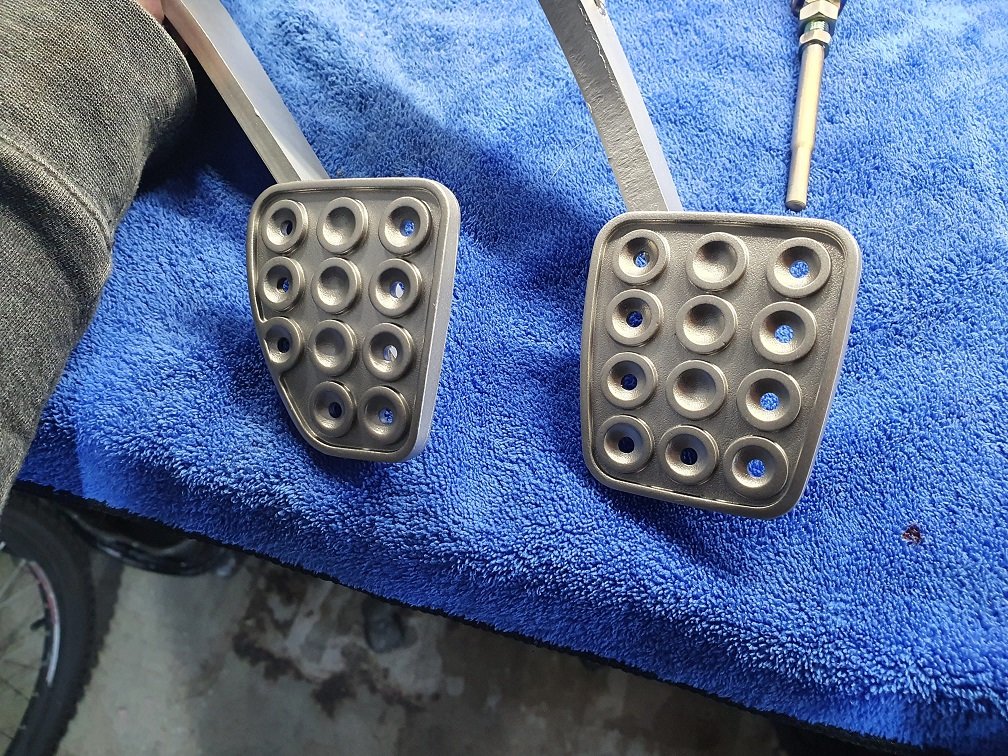
The pedal bodies are bare-metal from factory, as they aren't really exposed to the elements. Still, they looked pretty grunge. I blasted everything, and had the bodies powder coated satin black. The pedals themselves are just awesome, I love the stiffener bracket in there, and the pedal faces just being raw, no rubber covers. Very sports car, much wow.
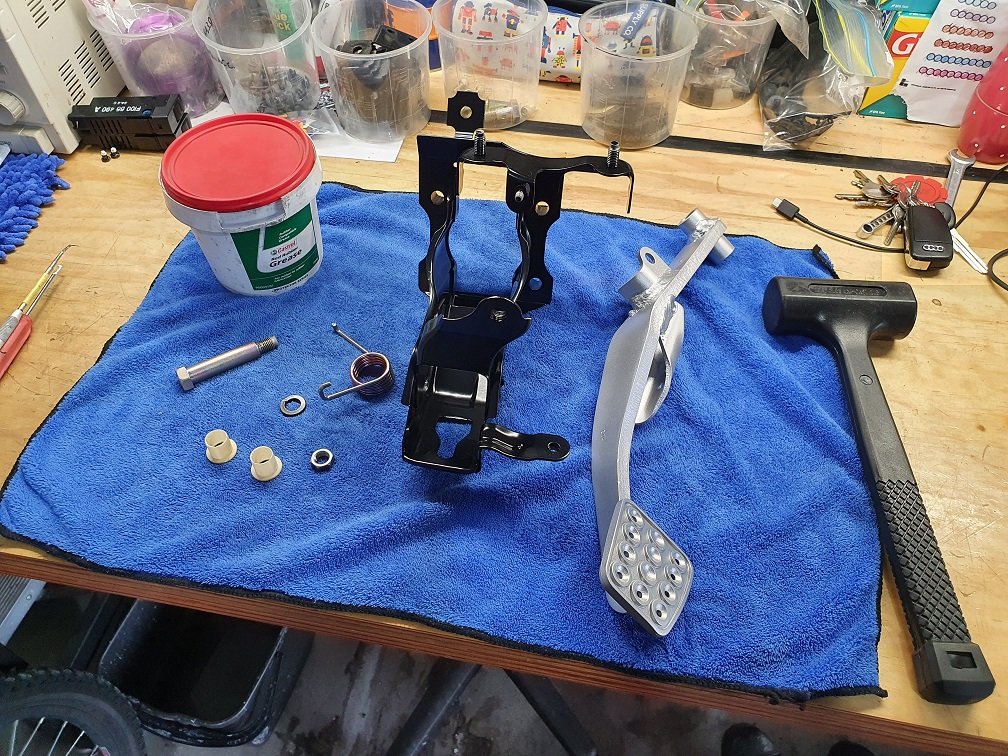
That pedal isn't painted, that's just the vaporblasted finish, and it looks fookin lovely :-). I sent another batch of stuff through Christchurch Metal Refinishers for zinc and gold passivation, they're just bloody awesome guys in there. All the hardware for these was included in that lot. The springs in particular came out looking very very pretty :-).

Assembly was the reverse of disassembly. I lubed with red rubber grease as I know it'll play nicely with the plastic bushings. Nothing complicated here, but a damn satisfying result. Obviously I did the clutch pedal as well, as they need to match!
More parts to squirrel away in the wardrobe for the future when the car one day gets a major tear-down and rebuild, or when I finally admit to myself that is what I'm already doing....
Okay, but its also an OCD ****-fest... Sooooo best of both worlds?
The stopper that actuates the brake light switch on the pedals was missing, as it had crumbled into oblivion, this is really common apparently. I ordered a new one as they're only a few bucks, expecting to just chuck it in and call it job done. While I was under there, I checked the brake light switch itself though, and found it to be faulty too. These switches have two circuits in them, one normally open, one normally closed (although this terminology becomes confusing when you start thinking about the position of the brake pedal, as it actually releases the switch when the pedal is pressed...). The normally open circuit (smaller terminals), wasn't working. It occasionally closed its contacts if you pushed the plunger really hard, and squinted just right... But not reliably. I have no idea what this circuit is actually for in the car, but there are wires going to it, so I figure I should make it work. About this time a set of pedals popped up on FB marketplace local that were pretty cheap, so I thought, why not? Went and grabbed em. They had a good stopper for the brake light switch, and a good brake light switch itself, so I swapped them into the car, and hey presto, all fixed :-).
Job done, right?
Yeah, nah.
The pedals are a really cool feature of these cars, as they're aluminium from the factory, which is a little uncommon. I now had a spare set of ragged, run down pedals, and, well, you know how much I love overboard restoring things....
First up was the stuffed switch. Getting it apart was pretty easy, just a couple of crimped tabs. Gave everything a really good clean, and sanded the contacts with 400 grit. Re-lubed with dielectric grease, assembled, and presto, all working perfectly again :-).
The pedal bodies are bare-metal from factory, as they aren't really exposed to the elements. Still, they looked pretty grunge. I blasted everything, and had the bodies powder coated satin black. The pedals themselves are just awesome, I love the stiffener bracket in there, and the pedal faces just being raw, no rubber covers. Very sports car, much wow.
That pedal isn't painted, that's just the vaporblasted finish, and it looks fookin lovely :-). I sent another batch of stuff through Christchurch Metal Refinishers for zinc and gold passivation, they're just bloody awesome guys in there. All the hardware for these was included in that lot. The springs in particular came out looking very very pretty :-).
Assembly was the reverse of disassembly. I lubed with red rubber grease as I know it'll play nicely with the plastic bushings. Nothing complicated here, but a damn satisfying result. Obviously I did the clutch pedal as well, as they need to match!
More parts to squirrel away in the wardrobe for the future when the car one day gets a major tear-down and rebuild, or when I finally admit to myself that is what I'm already doing....
Thread Starter
Full Member
Joined: Aug 2015
Posts: 170
Likes: 92
From: New Zealand
Cheers, I love bite-sized project like this I can do over a short time period, all about that short term gratification ;-).
Grit size is a mixed bag, 100-300 micron glass bead. This is in a vapor blaster, so basically the same as a standard blast cabinet, but uses water in the mix as well.
It doesn't polish plastics, but is very good for cleaning them, and removing overspray. I turn the air pressure down to around 20psi (usually its ~75psi), and its fairly gentle on them, but will still leave them with a somewhat matte appearance. It does seem to give an excellent surface for paint adhesion though, even on hard to paint stuff like PP. It wont get rid of any scratches really, but if you sand the scratch out with 400 or finer grit, it does a pretty good job of unifying the surface around where you've worked before paint.
Thread Starter
Full Member
Joined: Aug 2015
Posts: 170
Likes: 92
From: New Zealand
Back to regularly scheduled programming, which is of course restoring things that aren't really necessary right now... But its about the journey right? Or some **** like that... What it is, is delightfully fun :-). If you're not interested in a stupid level of detail about FD3S door handles... uhhhh, you might want to look away.
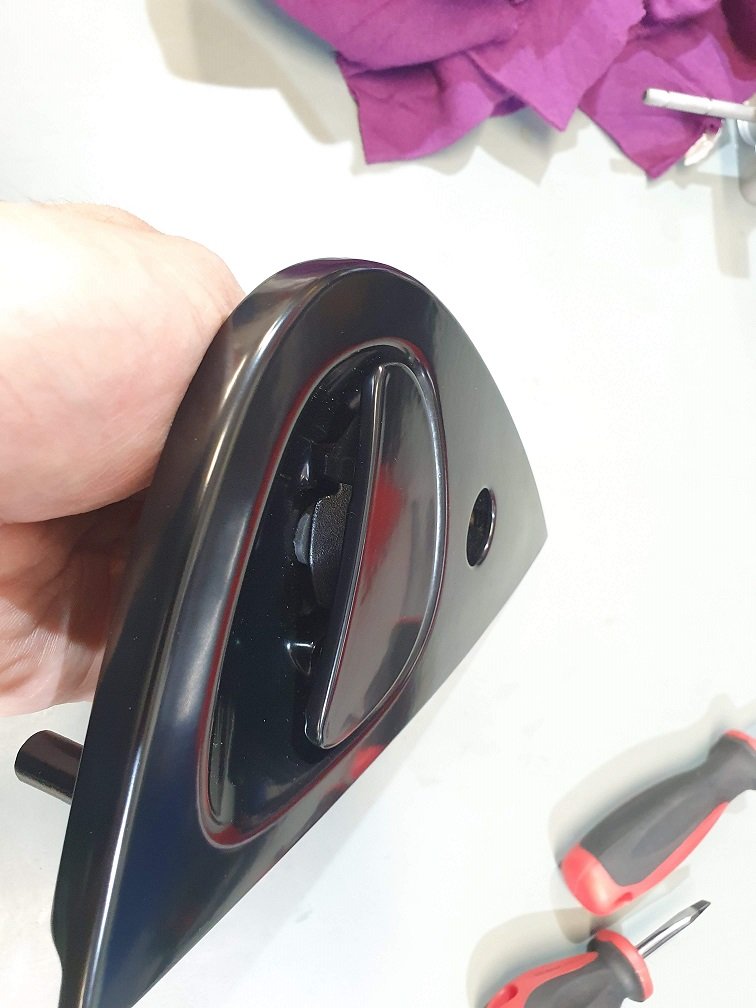
A pair of doorhandles appeared on FB marketplace pretty cheap, because they were really really rough... But they were complete :-). One of mine is missing the plastic trim insert that goes between the lock barrel and the main handle casting, which while not impeding the function, looks hella rough. It's on the drivers side too, so not even like I can ignore it as that's my side of the car! Although I'm not sure for how long, as my four year old (going on fourteen) has informed me that she wants to do a burnout in her red car... Not sure where she is learning these things, but it certainly bought a tear to the eye ;-).
The door handles on these are notorious for snapping, as while the main body is cast aluminium, the handle itself is plastic, and after years of stressing and temp cycles... one day, snaparoo. Both of the ones on the car are okay, but the rough set I purchased was snapped on the drivers side.
Did I mention they were cheap? Hah. Came with a key though, which is nice. I'll obviously swap my lock barrels into them as having different keys for the doors and ignition is a no-go. Those lock barrels will also undoubtedly get a tickly up, as a nice crisp 'snick, snick, snick' as you insert the key is one of life's pleasures... If you're a weirdo... Which I am.
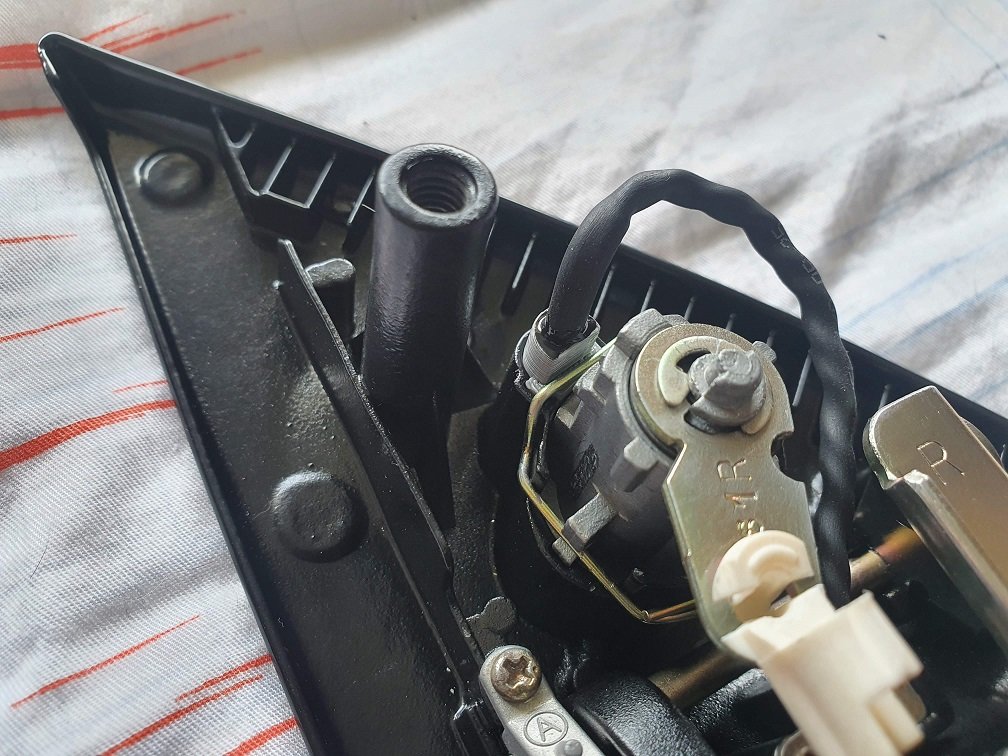
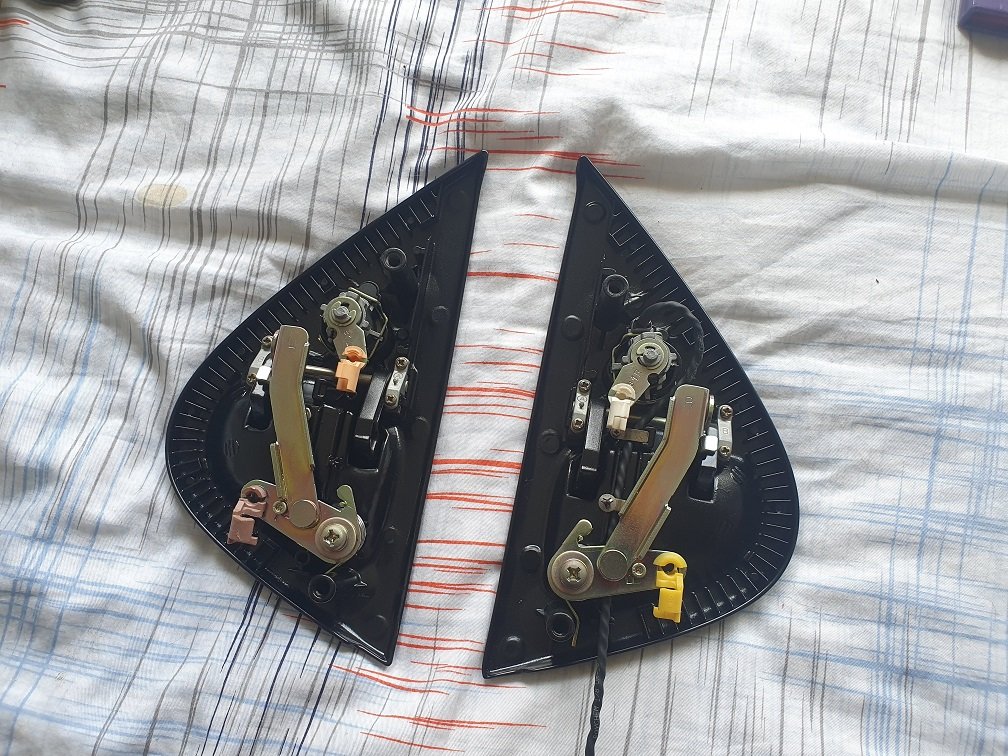
Now, FD3S handles have a known problem that develops over time. As you lift the handle up, they act on a sprung pivot arm which pushes down on the control rod that actuates the door latch. Over time, things wear, and the pivot arm returns further and further, until in its returned position puts the lever point almost in line with the pivot point... This makes the first bit of movement of the handle very, very stiff, and largely contributes to the broken plastic handles, as you really need to wrench on them to open the doors.
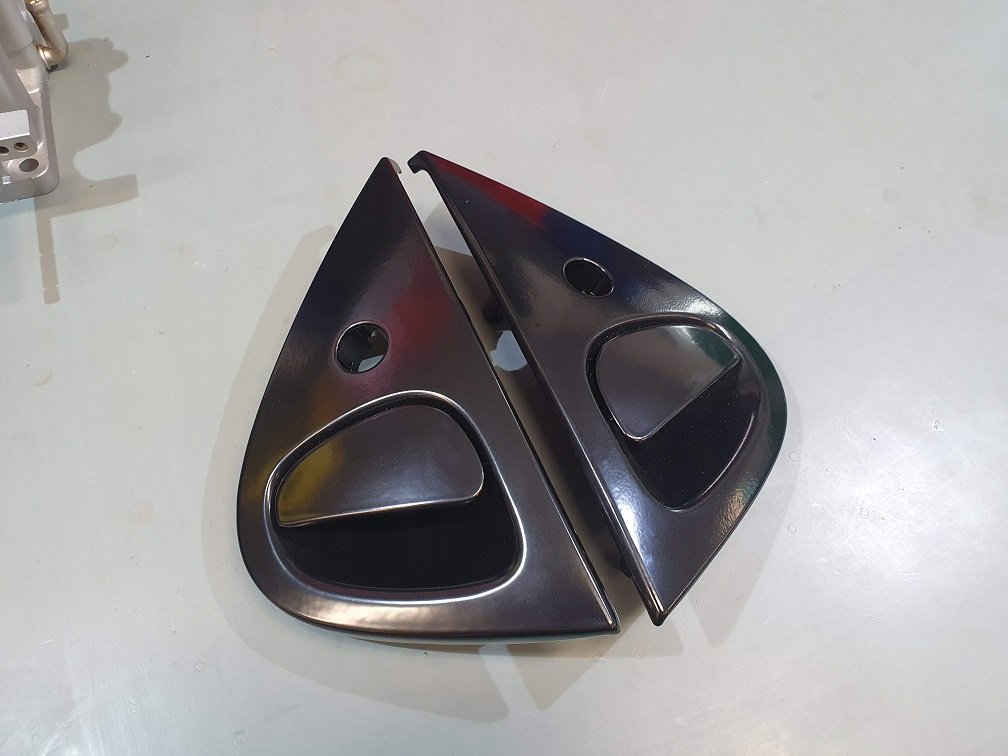
You can see here a (completely stolen) picture of a new set of handles:
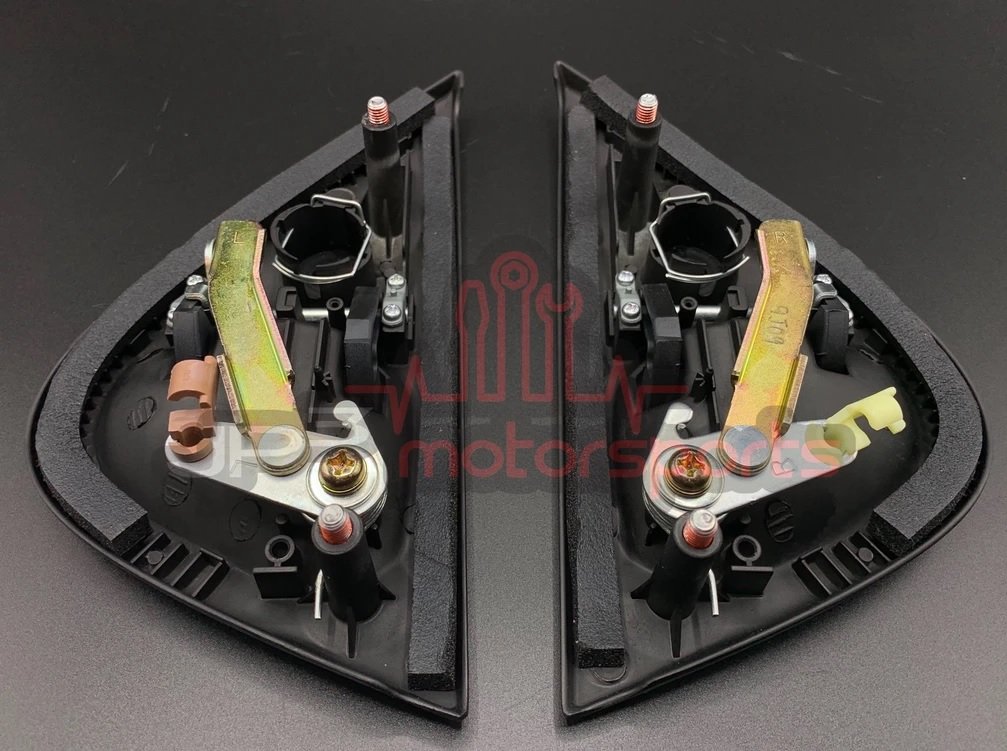
vs a totally worn out set (pic also stolen):
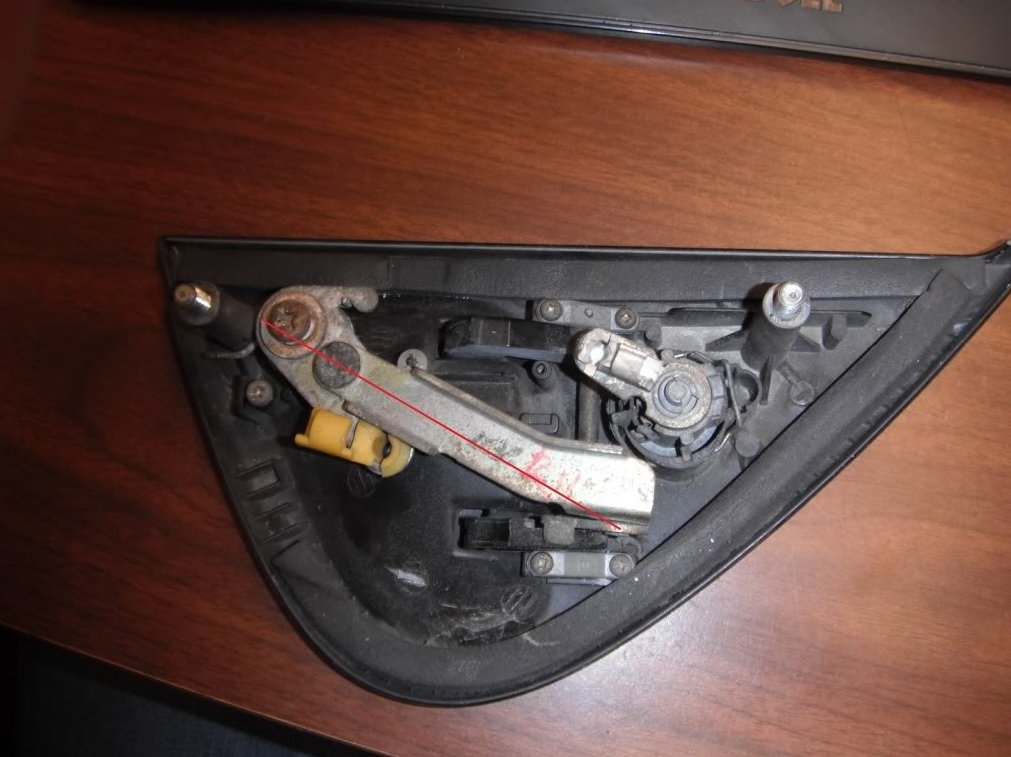
There is a documented mod to fix this, which on the surface seems to makes sense, and that is to carefully drill and tap the lever arm and install a small fastener that stops it returning too far. I went ahead and did this, and it 'sort of' fixes the problem, but its more of a band-aid, and doesn't really address the root cause.
With the handles assembled, and everything held in place like it should be, I scribed a line on the pivot arm in the 'most returned' position it should sit in. Then I offset from this the radius of the head of an m4 cap screw, punched, drilled and tapped:
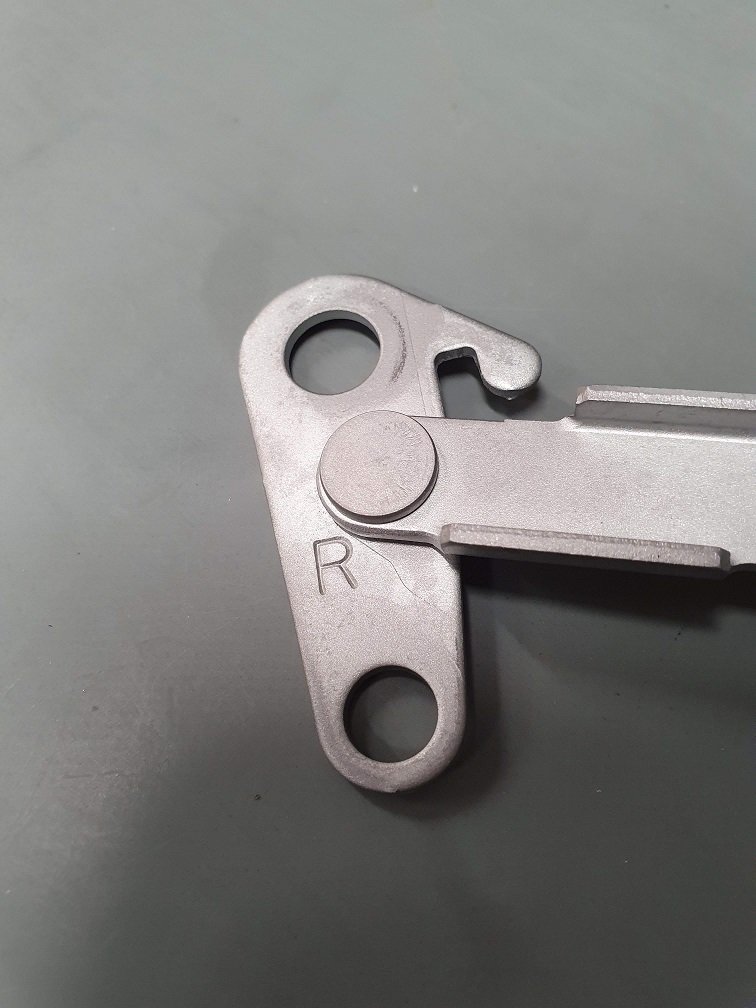
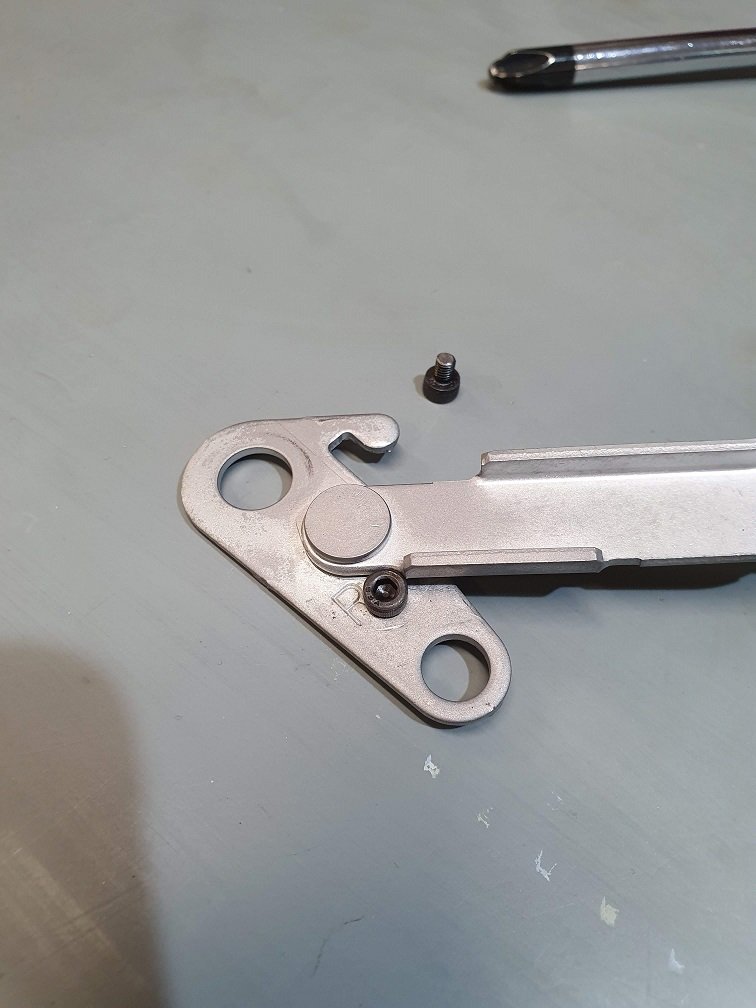
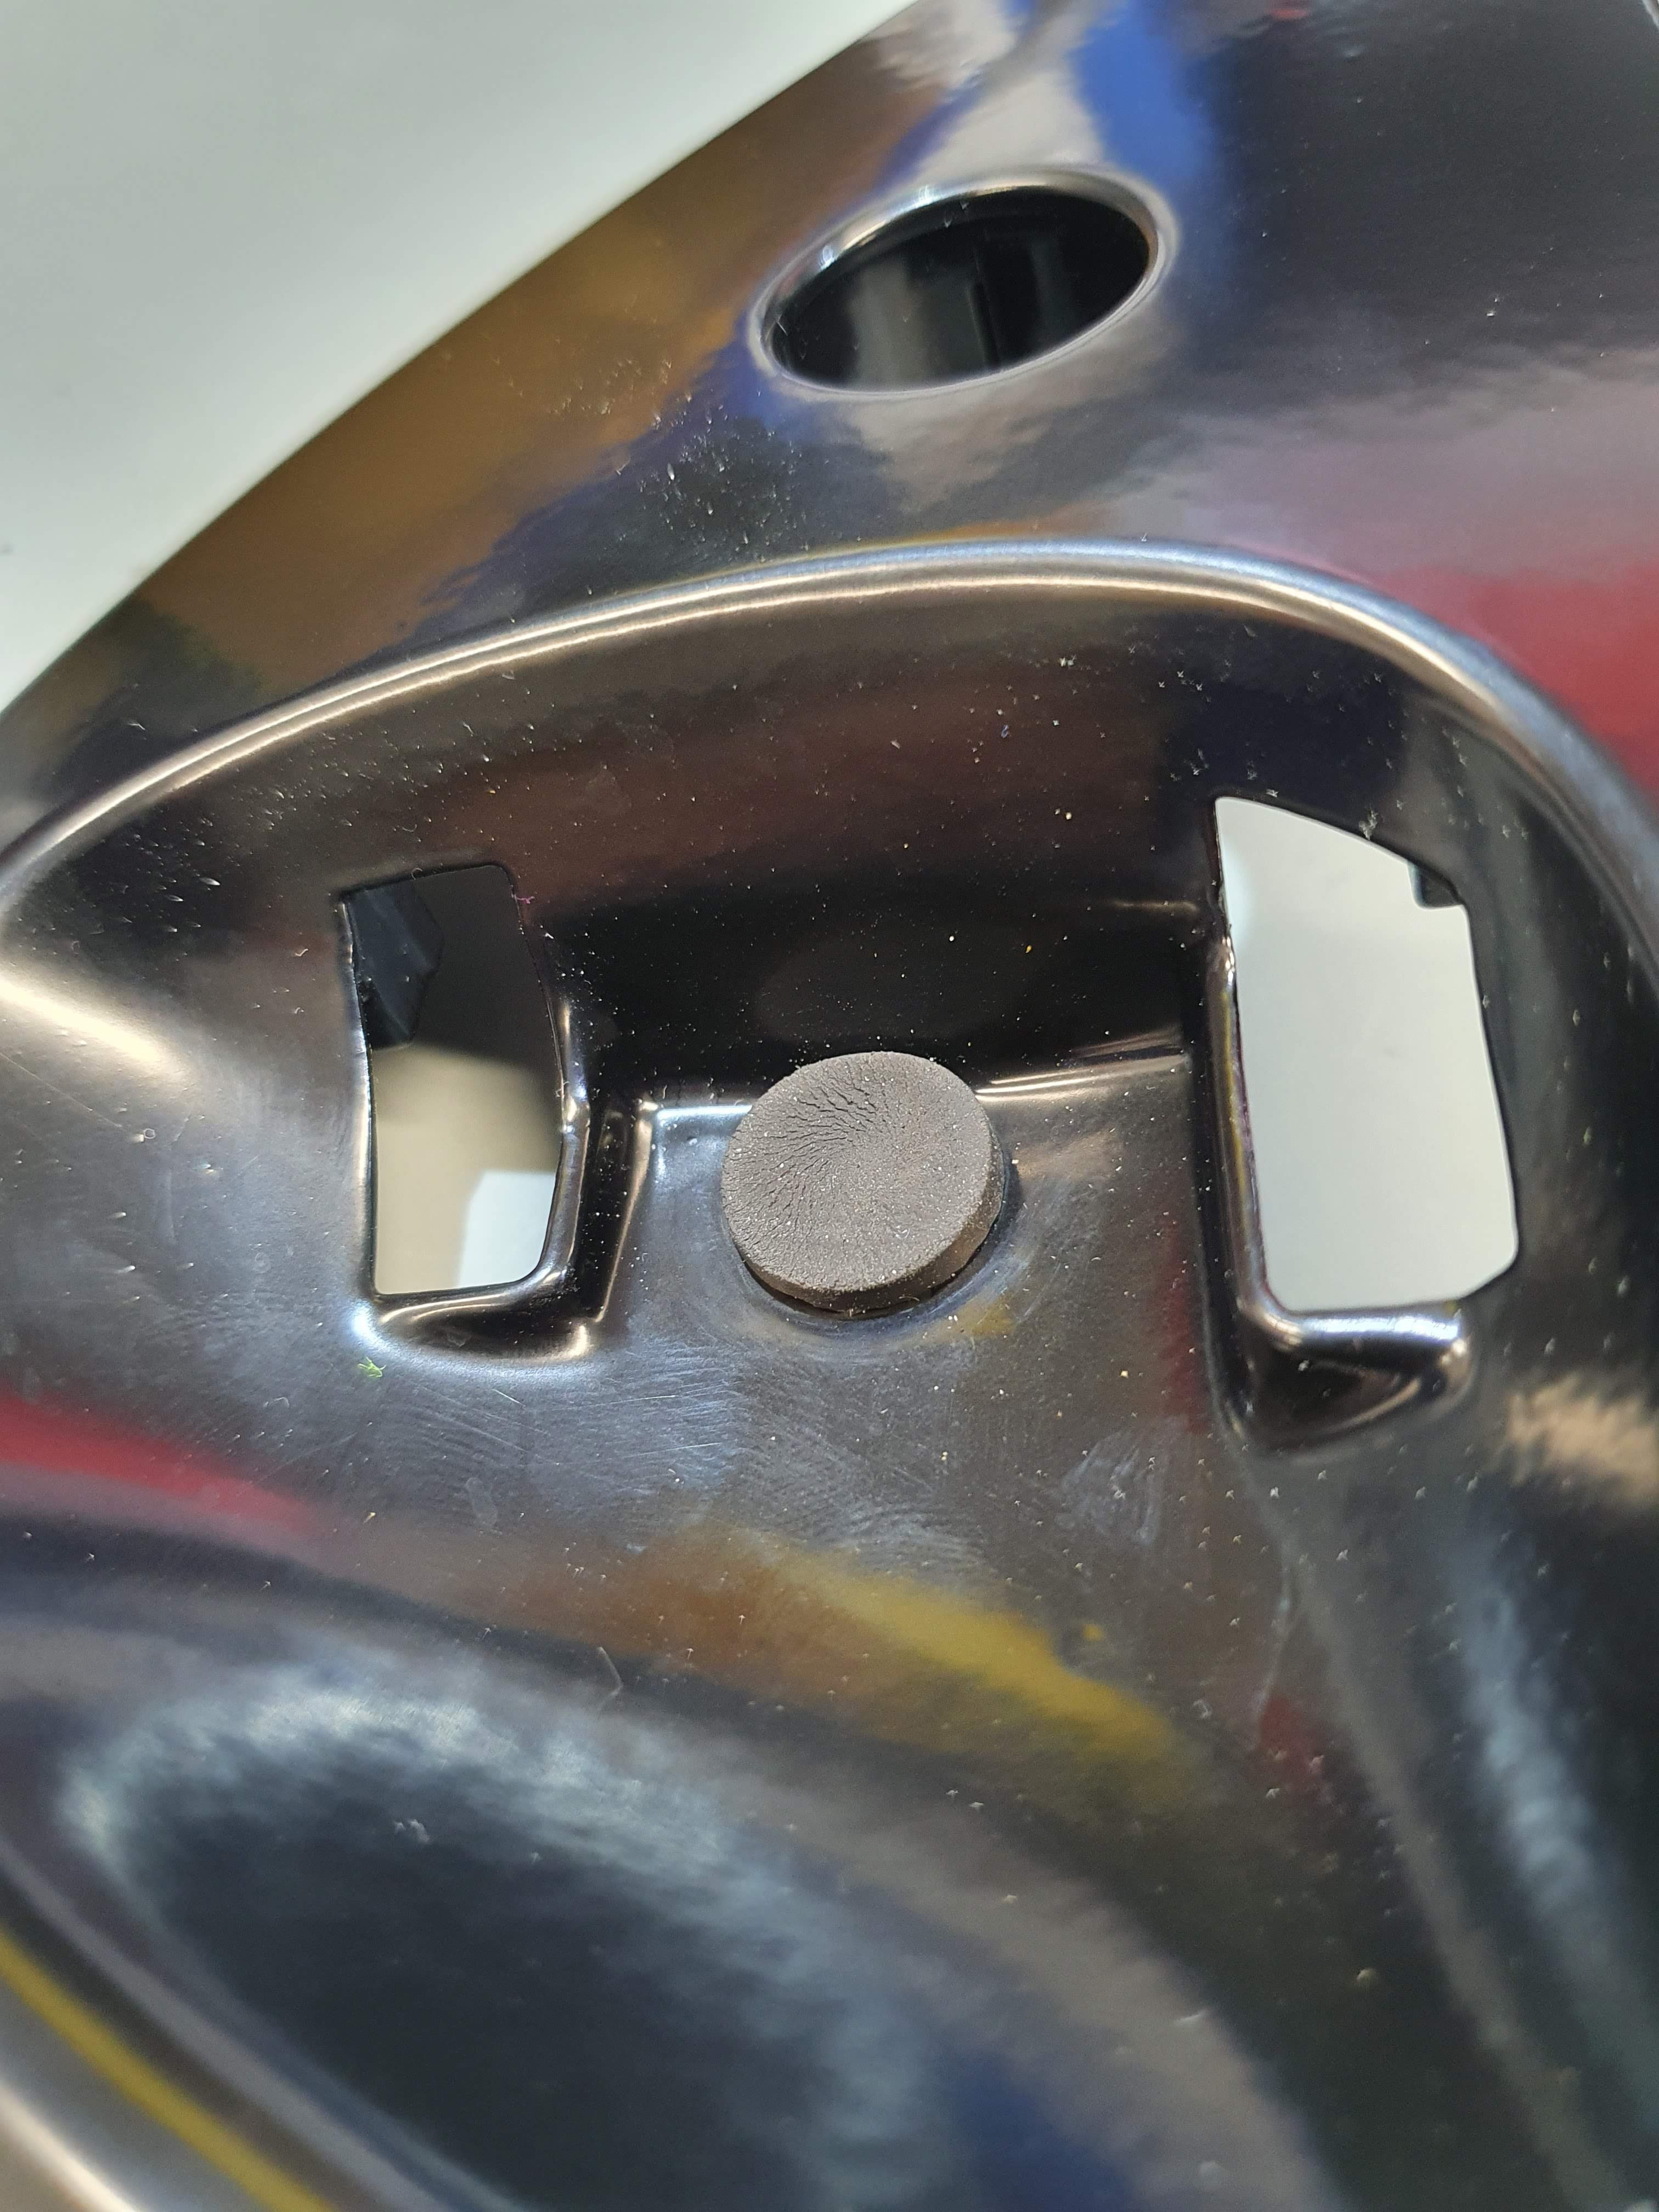
Voila, problem solved, right!? Yes, but also no. As the pivot return spring now returns the pivot onto this installed stop, it no longer returns the handle onto its intended stop, which is this small push in rubber grommet that sits underneath the handle itself.
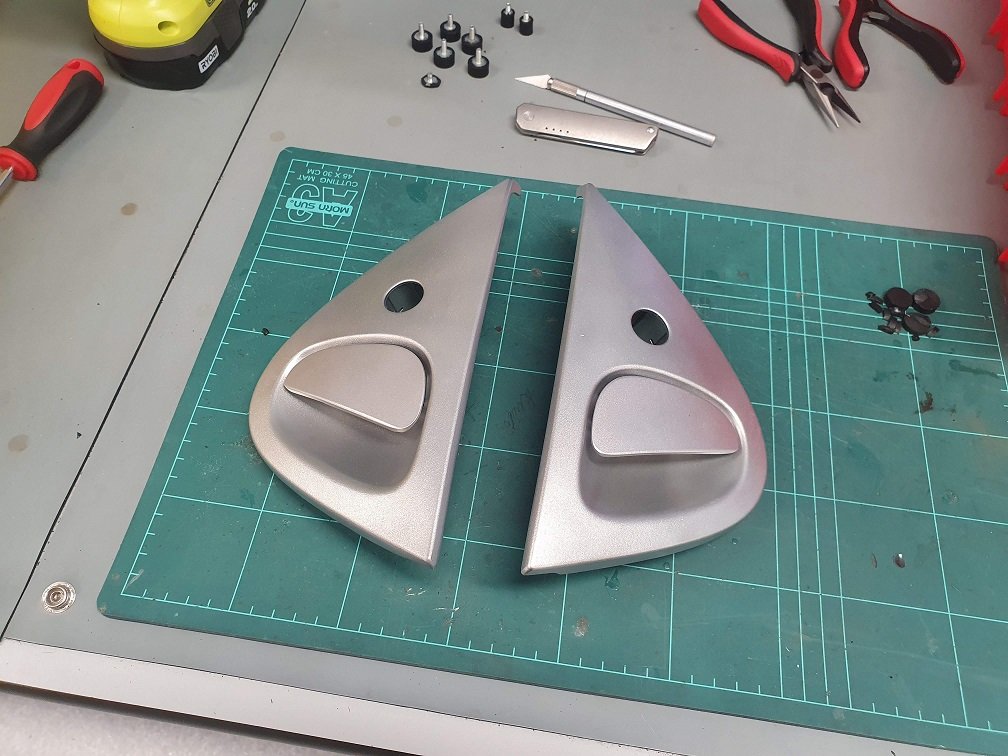
So what the newly installed stop ends up doing is ensuring that the pivot doesn't over-return, but that the handle is no longer pulled down tight onto this stop. This means the handle, and attached pivot have an amount of free-play, so they rattle terribly. Can't have that. I think the over all root cause of the initial problem is this small rubber stop wearing out. This is compounded by a small amount of wear in the pivot arm linkages also. Both of these problems we can fix however :-). The following fixed should work with the original plastic handles too, but because one of mine was already broken, I bought a pair of the replacement cast aluminium ones. They look basically identical though.
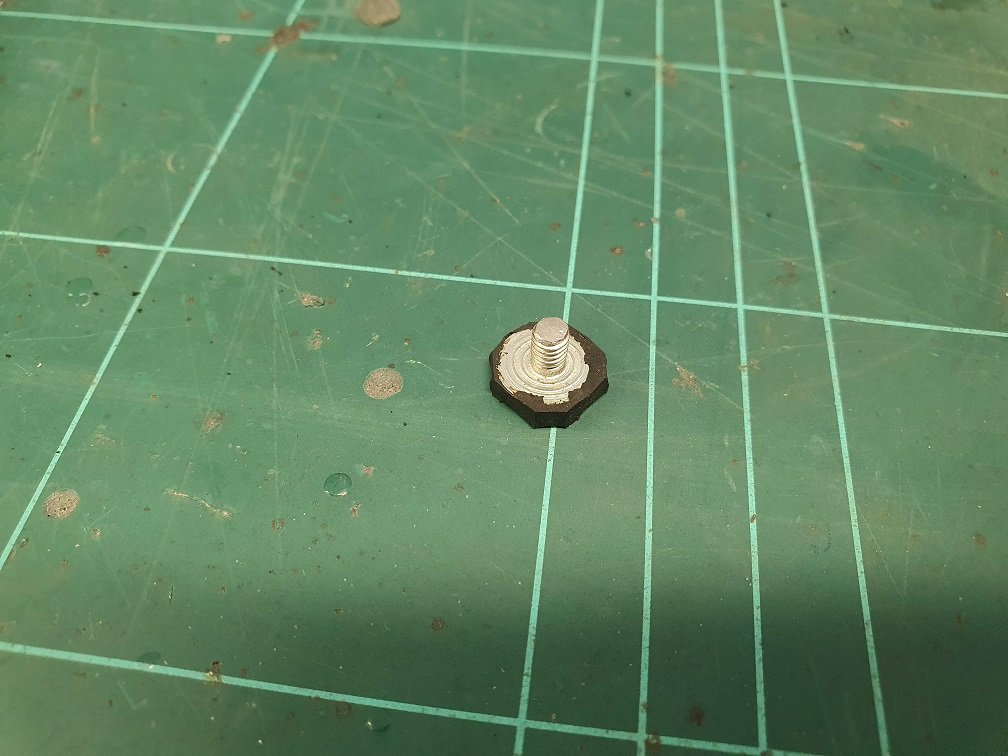
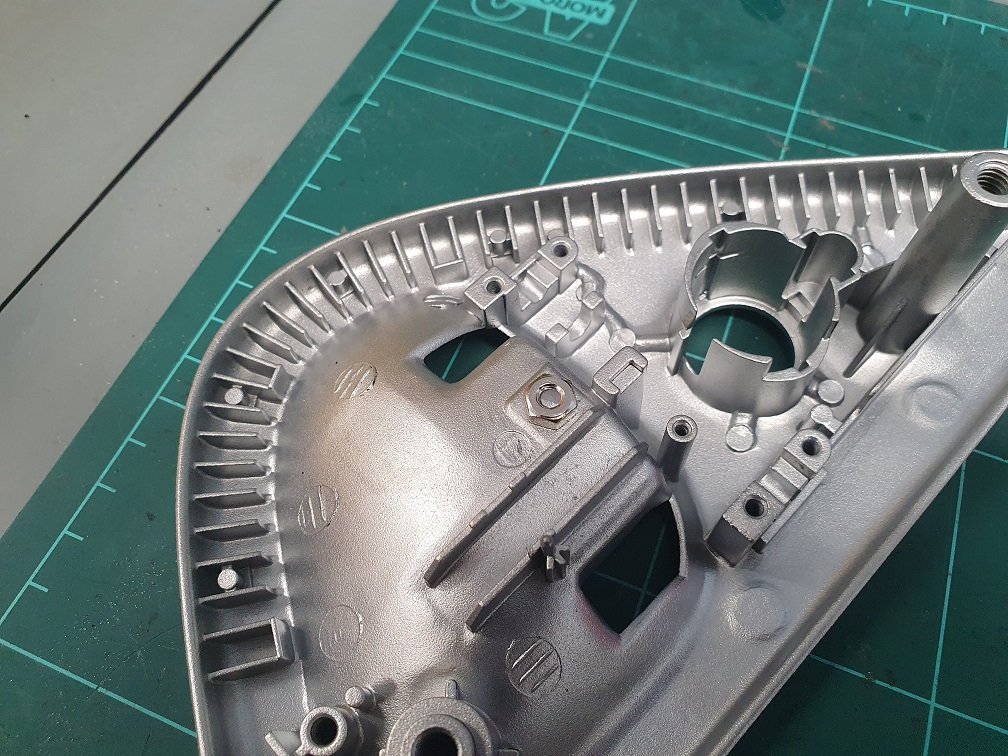
I drilled and tapped (M4) the small hole the push in rubber stopped goes into, and then modified some M4 rubber equipment feet, shortening them down to ~2.3mm. I figured this would give an amount of adjustability if needed, but TBH, I just put them in as tight as they would go, secured them with a nut on the back side, and they were spot on from the get-go. I've also sand, and then vapor blasted the handle bodies in these pics, that's why they look so shiny :-).
Stupid me didn't take a photo of what it looks like installed from the front, but I'm sure you can imagine. I'll have one later when they're all assembled.
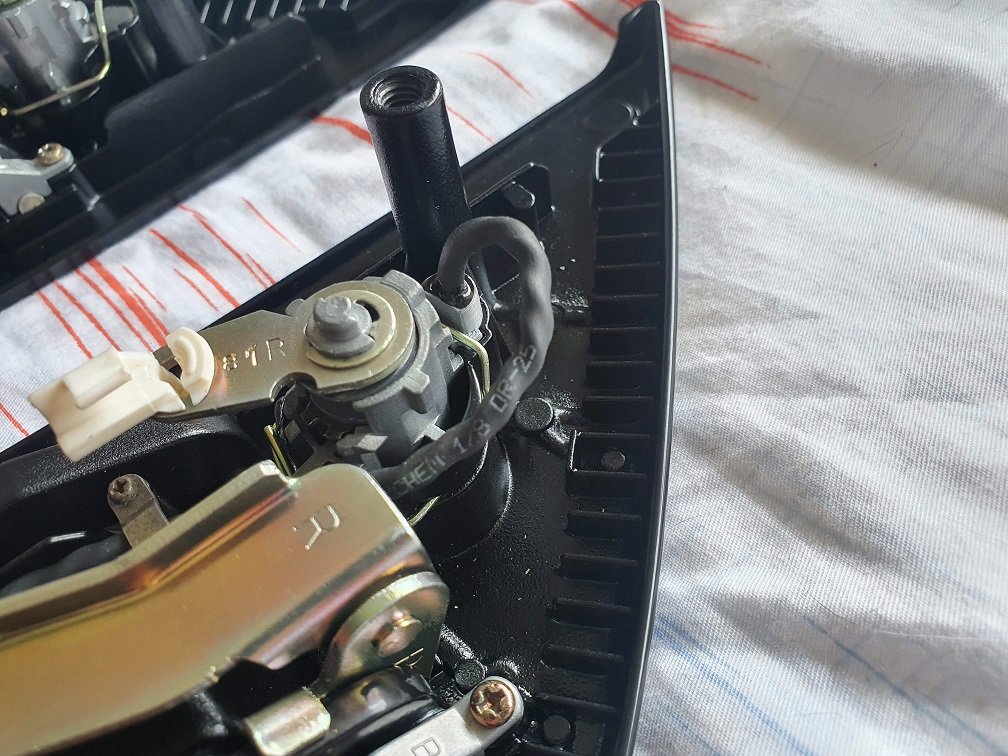
The other part of this problem is that wear in the pivot arm itself. I think this is actually a pretty small contributor to the over all problem, but tuning it up a little can't hurt. I grabbed a couple of M4 washers, which were pretty terribly manufactured, resulting in different thicknesses from 0.7mm to 1.1mm... This was great though, as it meant I had options, as I was going to use one as a shim :-). Ended up on around 0.8mm being about right.
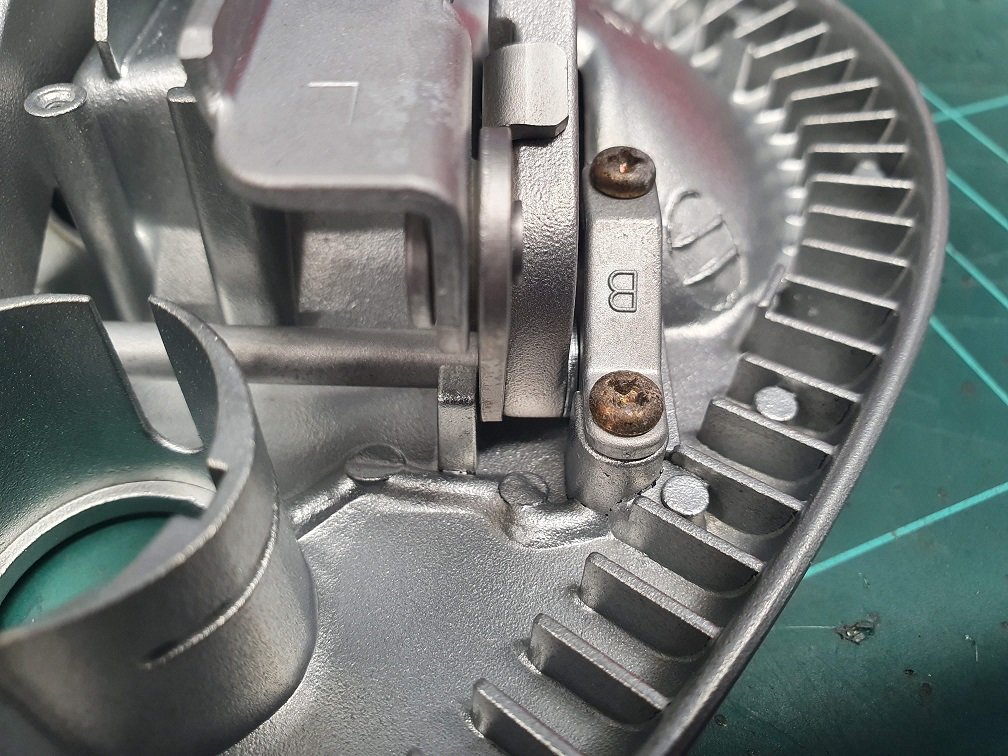
You can see it installed between the rod-clamp, with 'B' on it, and the handle itself. Depending on which side you put a shim here, it will move the handle relative to the housing, so make sure you put it on the side that results in it looking right :-). Probably different for every combination. I suspect thinner plastic shims, installed on each side would be a better option. This limits the side to side play in the pivot, and just generally tunes everything up so its a bit nicer.
With all that sorted, I fully assembled them with everything in place and damn, satisfying result! Lovely smooth action, no stiff point at the beginning of the travel, no rattle, nice and sorted. I left the over-return stop in place, the spring was returning the handles onto the new rubber stoppers, and it was only *just* touching the cap-head stop. This means that if those rubber stoppers don't live up to the task (a total possibility), the pivot will still work, but things will just start to rattle again, letting me know I need to find a better rubber stopper solution down the line... Cross that bridge if I come to it?
With the mechanicals sorted, next up is the cosmetic restoration, which has turned in a slight cluster-****. Choose your powdercoaters wisely my friends!
A pair of doorhandles appeared on FB marketplace pretty cheap, because they were really really rough... But they were complete :-). One of mine is missing the plastic trim insert that goes between the lock barrel and the main handle casting, which while not impeding the function, looks hella rough. It's on the drivers side too, so not even like I can ignore it as that's my side of the car! Although I'm not sure for how long, as my four year old (going on fourteen) has informed me that she wants to do a burnout in her red car... Not sure where she is learning these things, but it certainly bought a tear to the eye ;-).
The door handles on these are notorious for snapping, as while the main body is cast aluminium, the handle itself is plastic, and after years of stressing and temp cycles... one day, snaparoo. Both of the ones on the car are okay, but the rough set I purchased was snapped on the drivers side.
Did I mention they were cheap? Hah. Came with a key though, which is nice. I'll obviously swap my lock barrels into them as having different keys for the doors and ignition is a no-go. Those lock barrels will also undoubtedly get a tickly up, as a nice crisp 'snick, snick, snick' as you insert the key is one of life's pleasures... If you're a weirdo... Which I am.
Now, FD3S handles have a known problem that develops over time. As you lift the handle up, they act on a sprung pivot arm which pushes down on the control rod that actuates the door latch. Over time, things wear, and the pivot arm returns further and further, until in its returned position puts the lever point almost in line with the pivot point... This makes the first bit of movement of the handle very, very stiff, and largely contributes to the broken plastic handles, as you really need to wrench on them to open the doors.
You can see here a (completely stolen) picture of a new set of handles:
vs a totally worn out set (pic also stolen):
There is a documented mod to fix this, which on the surface seems to makes sense, and that is to carefully drill and tap the lever arm and install a small fastener that stops it returning too far. I went ahead and did this, and it 'sort of' fixes the problem, but its more of a band-aid, and doesn't really address the root cause.
With the handles assembled, and everything held in place like it should be, I scribed a line on the pivot arm in the 'most returned' position it should sit in. Then I offset from this the radius of the head of an m4 cap screw, punched, drilled and tapped:
Voila, problem solved, right!? Yes, but also no. As the pivot return spring now returns the pivot onto this installed stop, it no longer returns the handle onto its intended stop, which is this small push in rubber grommet that sits underneath the handle itself.
So what the newly installed stop ends up doing is ensuring that the pivot doesn't over-return, but that the handle is no longer pulled down tight onto this stop. This means the handle, and attached pivot have an amount of free-play, so they rattle terribly. Can't have that. I think the over all root cause of the initial problem is this small rubber stop wearing out. This is compounded by a small amount of wear in the pivot arm linkages also. Both of these problems we can fix however :-). The following fixed should work with the original plastic handles too, but because one of mine was already broken, I bought a pair of the replacement cast aluminium ones. They look basically identical though.
I drilled and tapped (M4) the small hole the push in rubber stopped goes into, and then modified some M4 rubber equipment feet, shortening them down to ~2.3mm. I figured this would give an amount of adjustability if needed, but TBH, I just put them in as tight as they would go, secured them with a nut on the back side, and they were spot on from the get-go. I've also sand, and then vapor blasted the handle bodies in these pics, that's why they look so shiny :-).
Stupid me didn't take a photo of what it looks like installed from the front, but I'm sure you can imagine. I'll have one later when they're all assembled.
The other part of this problem is that wear in the pivot arm itself. I think this is actually a pretty small contributor to the over all problem, but tuning it up a little can't hurt. I grabbed a couple of M4 washers, which were pretty terribly manufactured, resulting in different thicknesses from 0.7mm to 1.1mm... This was great though, as it meant I had options, as I was going to use one as a shim :-). Ended up on around 0.8mm being about right.
You can see it installed between the rod-clamp, with 'B' on it, and the handle itself. Depending on which side you put a shim here, it will move the handle relative to the housing, so make sure you put it on the side that results in it looking right :-). Probably different for every combination. I suspect thinner plastic shims, installed on each side would be a better option. This limits the side to side play in the pivot, and just generally tunes everything up so its a bit nicer.
With all that sorted, I fully assembled them with everything in place and damn, satisfying result! Lovely smooth action, no stiff point at the beginning of the travel, no rattle, nice and sorted. I left the over-return stop in place, the spring was returning the handles onto the new rubber stoppers, and it was only *just* touching the cap-head stop. This means that if those rubber stoppers don't live up to the task (a total possibility), the pivot will still work, but things will just start to rattle again, letting me know I need to find a better rubber stopper solution down the line... Cross that bridge if I come to it?
With the mechanicals sorted, next up is the cosmetic restoration, which has turned in a slight cluster-****. Choose your powdercoaters wisely my friends!
Looks great. Aluminum replacement handles are available from "Napoli" on ebay. Terrific product.
Good enough for -30 degree Canadian winters.
(Just the lever part I mean).
Good enough for -30 degree Canadian winters.
(Just the lever part I mean).
Last edited by Redbul; Oct 21, 2021 at 02:29 AM.


Thread Starter
Full Member
Joined: Aug 2015
Posts: 170
Likes: 92
From: New Zealand
Yikes, disaster with the handles this morning though. The powercoat job on them was super average, so I scuffed it up and painted them which went pretty well, but some junk fell in them on the last coat! I baked them, nibbed the junk out, and hit them again this morning, and it's total paint-fry city, big time reaction. Will sand blast them again and get the powercoated somewhere else, which is the call I should have made originally anyway, so almost nice to have my hand forced into that decision, hah.
Thread Starter
Full Member
Joined: Aug 2015
Posts: 170
Likes: 92
From: New Zealand
Bloody hell, the saga of these door handles! Definitely could have just bought a new set... I've saved a bit of money this way, but invested a heap of time in its place... Still, every parts has a story, its something you touch every time you use the car, and this set is even better than a new set now with the aluminium cast handles instead of the factory plastic pieces.
I got a local company to powdercoat the handles, and they did a pretty average job TBH. They said they'd re-coat them, but after waiting a month without that happening, I gave up and just collected them. The coat was so thick in places I couldn't assemble them without cutting bits of it away, and the finish was pretty rubbish... I re-blasted them to get it all off and was back to where I started. After watching a couple of youtube videos (to become an expert in the subject, as we all know that's what youtube is for...) I purchased Eastwoods DIY powercoating setup and some semi-gloss black powder.
Wow, this is one of those rare occasions where the reality was actually as easy as it looked on youtube, and the outcome surpassed what I was expecting. Easy process, nice and clean, and super durable finish in exactly the right colour / gloss level to match the factory parts.
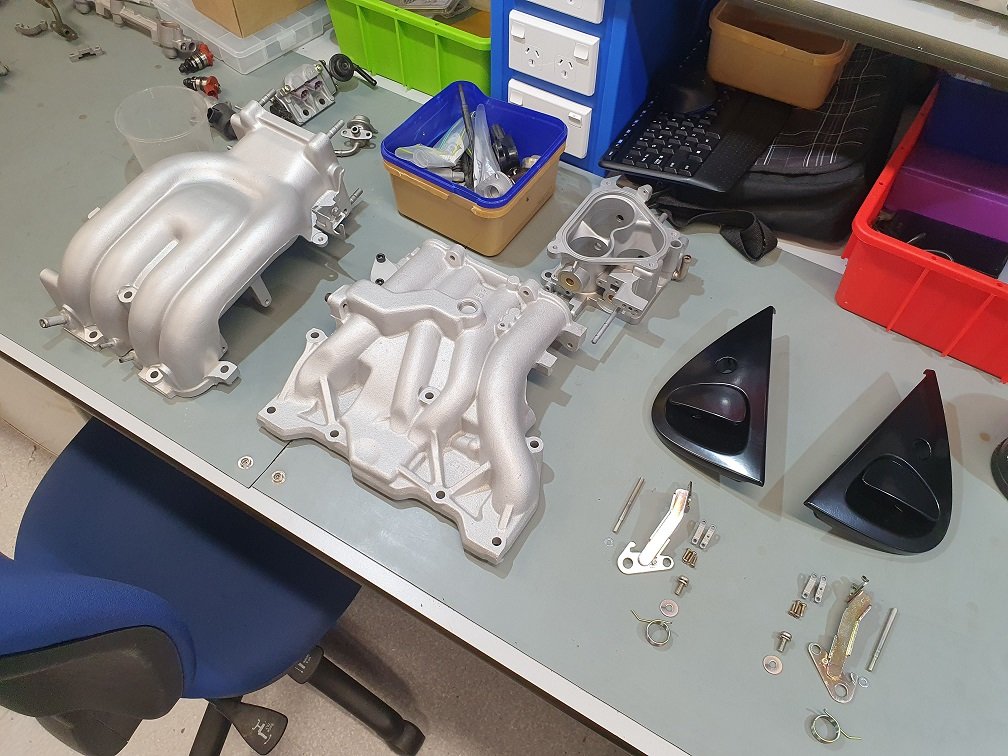
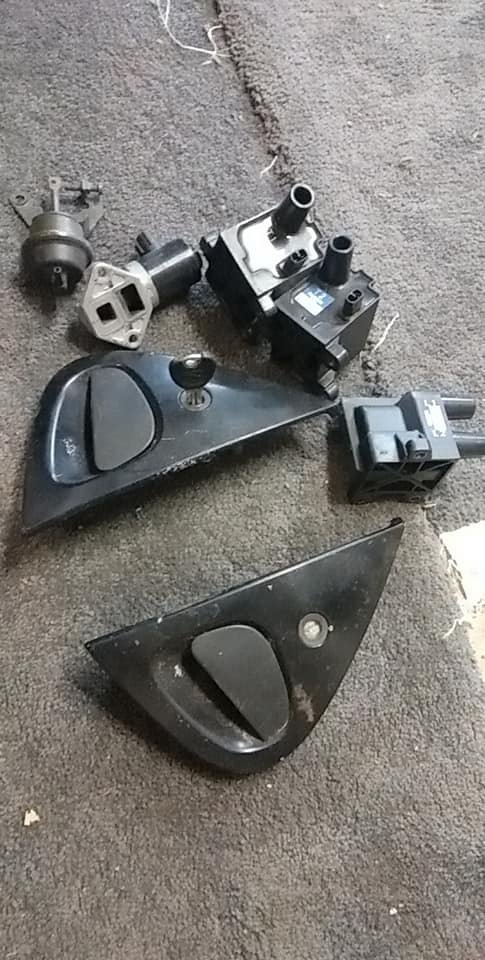
Handles there ready for final assembly, with some other bits I've got on the boil.
I made some better rubber stoppers to set the handle height correctly when the doors are closed. These are 16mm diameter m4 threaded rubber equipment feet that I trimmed down, chucked up in a drill and linished to about 2mm thick, while spinning them in the drill to keep things even. Time will tell if they're up to the task, but this thing will never be a daily again, so I think they'll be okay.

Then assembly is simply the reverse of disassembly, with the addition of an m4 flat washer as a shim.
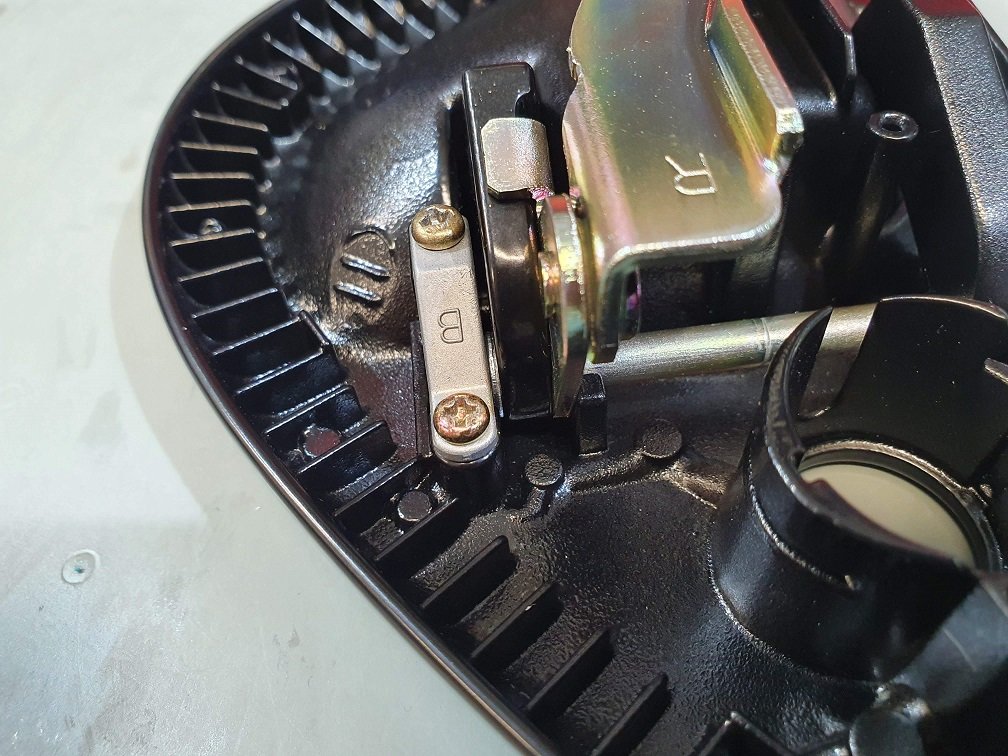
Just to the right of the 'B' clamp there. Kind of a pain to get into place, but it removes all the play in the system.
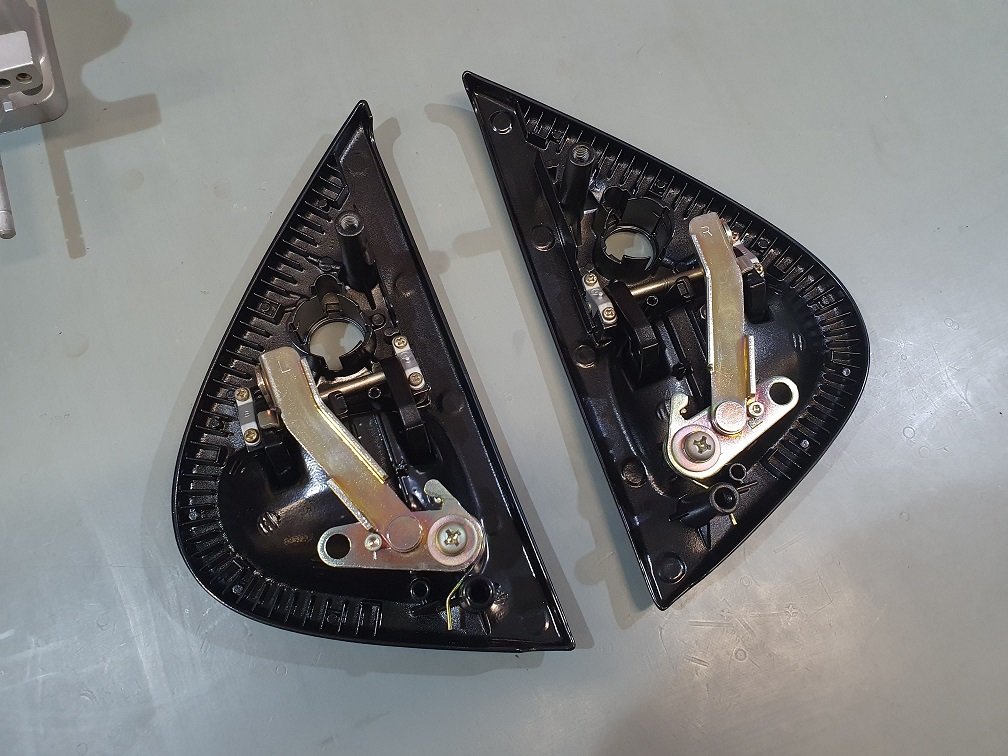
All the moving parts got a smear of grease so keep things smooth. You can see the stopper bolts there, but they're not engaged when the handles are fully closed, so are doing nothing whatsoever.
With the larger diameter stoppers, the handles close down onto them properly. The original ones seem to small to really do much. One of them was missing on this handle set, and the other was pretty thin.
Voila! What a faff for a set of door handles.... But dayum, they do look fine :-). I've blasted all the lock housings, but I need to take the tumblers from the original set so the car is keyed the same all around. Future job, these can get wrapped up and put away in the wardrobe for now, and I'll get back onto things the car needs to run... maybe... or I'll get distracted by something shiny ;-).
I got a local company to powdercoat the handles, and they did a pretty average job TBH. They said they'd re-coat them, but after waiting a month without that happening, I gave up and just collected them. The coat was so thick in places I couldn't assemble them without cutting bits of it away, and the finish was pretty rubbish... I re-blasted them to get it all off and was back to where I started. After watching a couple of youtube videos (to become an expert in the subject, as we all know that's what youtube is for...) I purchased Eastwoods DIY powercoating setup and some semi-gloss black powder.
Wow, this is one of those rare occasions where the reality was actually as easy as it looked on youtube, and the outcome surpassed what I was expecting. Easy process, nice and clean, and super durable finish in exactly the right colour / gloss level to match the factory parts.
Handles there ready for final assembly, with some other bits I've got on the boil.
I made some better rubber stoppers to set the handle height correctly when the doors are closed. These are 16mm diameter m4 threaded rubber equipment feet that I trimmed down, chucked up in a drill and linished to about 2mm thick, while spinning them in the drill to keep things even. Time will tell if they're up to the task, but this thing will never be a daily again, so I think they'll be okay.
Then assembly is simply the reverse of disassembly, with the addition of an m4 flat washer as a shim.
Just to the right of the 'B' clamp there. Kind of a pain to get into place, but it removes all the play in the system.
All the moving parts got a smear of grease so keep things smooth. You can see the stopper bolts there, but they're not engaged when the handles are fully closed, so are doing nothing whatsoever.
With the larger diameter stoppers, the handles close down onto them properly. The original ones seem to small to really do much. One of them was missing on this handle set, and the other was pretty thin.
Voila! What a faff for a set of door handles.... But dayum, they do look fine :-). I've blasted all the lock housings, but I need to take the tumblers from the original set so the car is keyed the same all around. Future job, these can get wrapped up and put away in the wardrobe for now, and I'll get back onto things the car needs to run... maybe... or I'll get distracted by something shiny ;-).
Thread Starter
Full Member
Joined: Aug 2015
Posts: 170
Likes: 92
From: New Zealand
Okay, okay okay. These door handles. We're so far past the point of ricidulousness with them... But they are finally done! Well, almost...
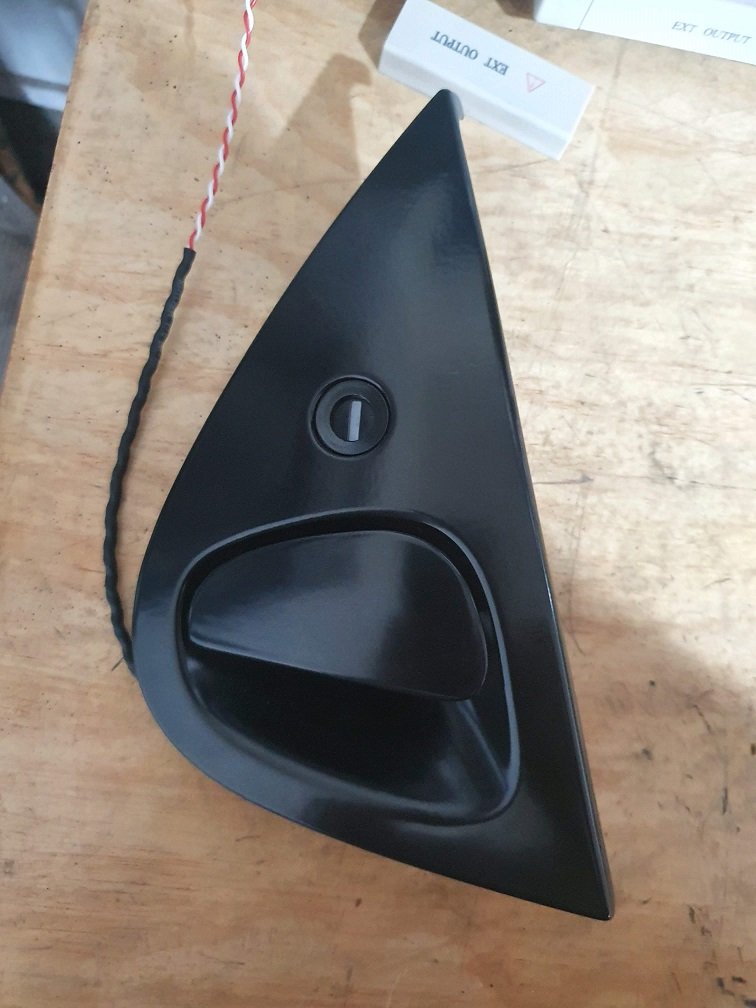
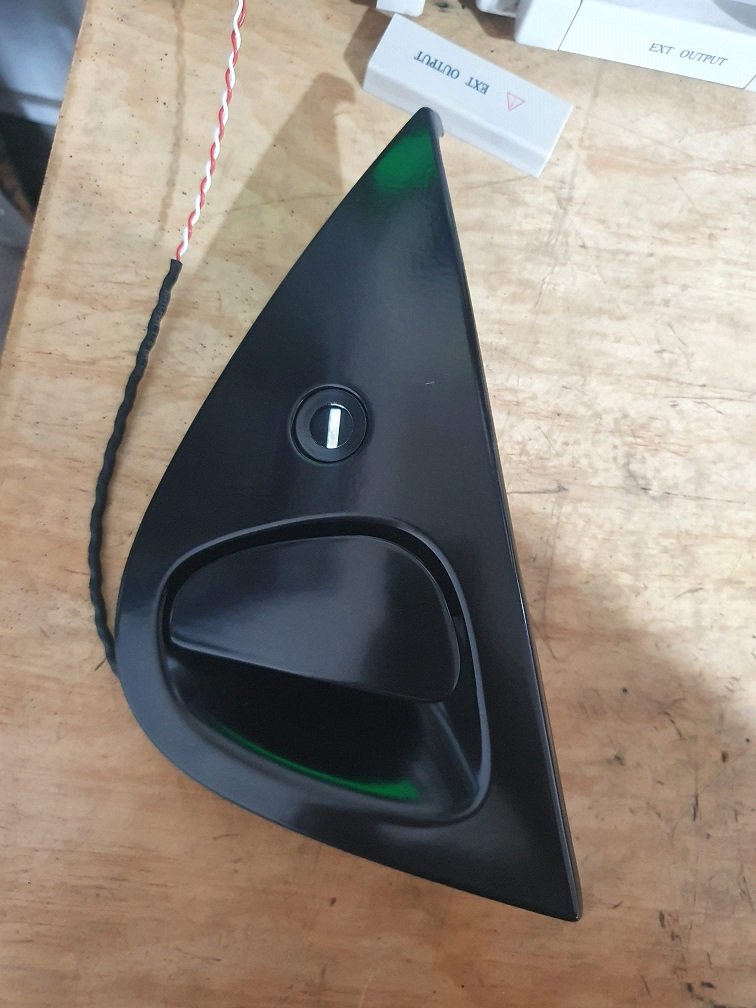
Early FD's, or maybe if they were optioned with it, I'm not sure on the determining factor, have a light in the drivers side keyhole that illuminates for 30 secs when you lift the handle with the door locked. Presumably this is so you can find the keyhole in the dark easily. My car has the wiring there for this, which means it must have had this at some stage. The light is long gone, and the door handle has been replaced at some stage... But, if it was there originally, I've got to make it work again, right... right? RIGHT!?
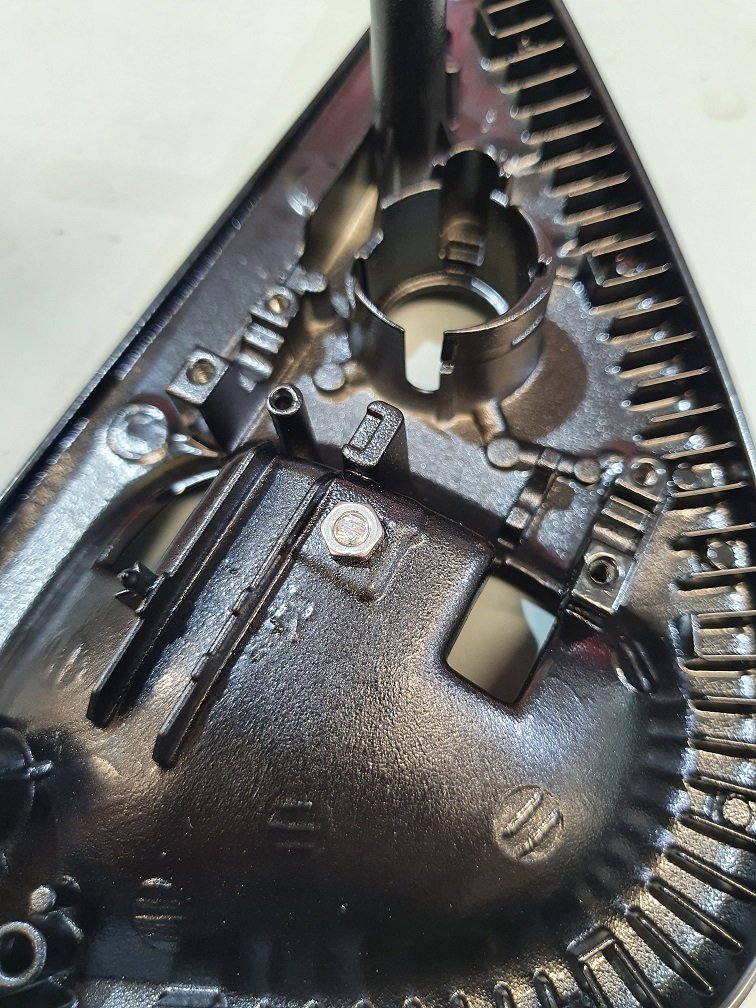
I CAD'd and 3d printed up a wee housing for a wide angle high brightness white LED. It has a forward drop of 3.1V at its rated 20mA, so I put a ~470Ohm resistor in series with it to keep it happy at automotive voltages. Shrunk some shrink onto it to seal it up, and potted it into the housing. Should hopefully last a while :-).
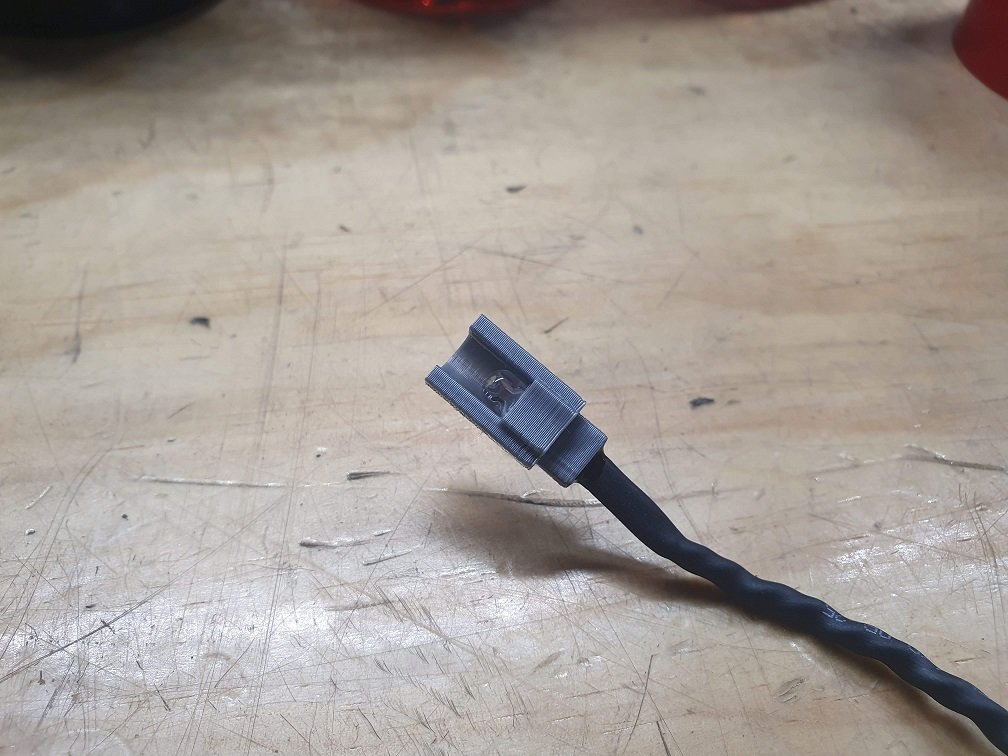
This is where it sits, it's held in place by the spring slip that keeps the key-barrel where it needs to be.
I got a pair of replacement frosted plastic keyhole spring covers from a guy over in the states.
Off vs on:
These door handles have to be the most thoroughly 'touched' set in existence by this stage, and I know they're just handles, but **** they're lovely to use. Smooth, super positive stops at the end of the travel... I've disassembled, blasted and cleaned all the lock barrels and tumblers. Re-lubed the tumblers with a dusting of graphite powder, and the detent ball with a smear of grease. They keys now have a nice crisp insertion sound and feel... ****, typing this out I'm really realising how much of a barry I am... But, honestly, so much fun in a project like this.
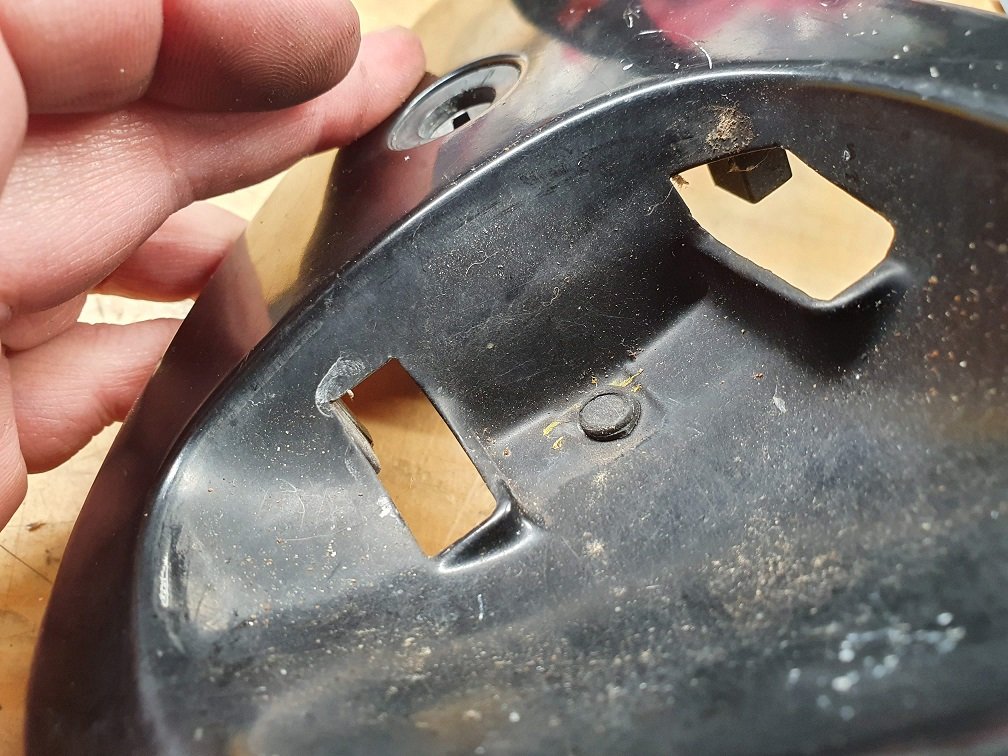
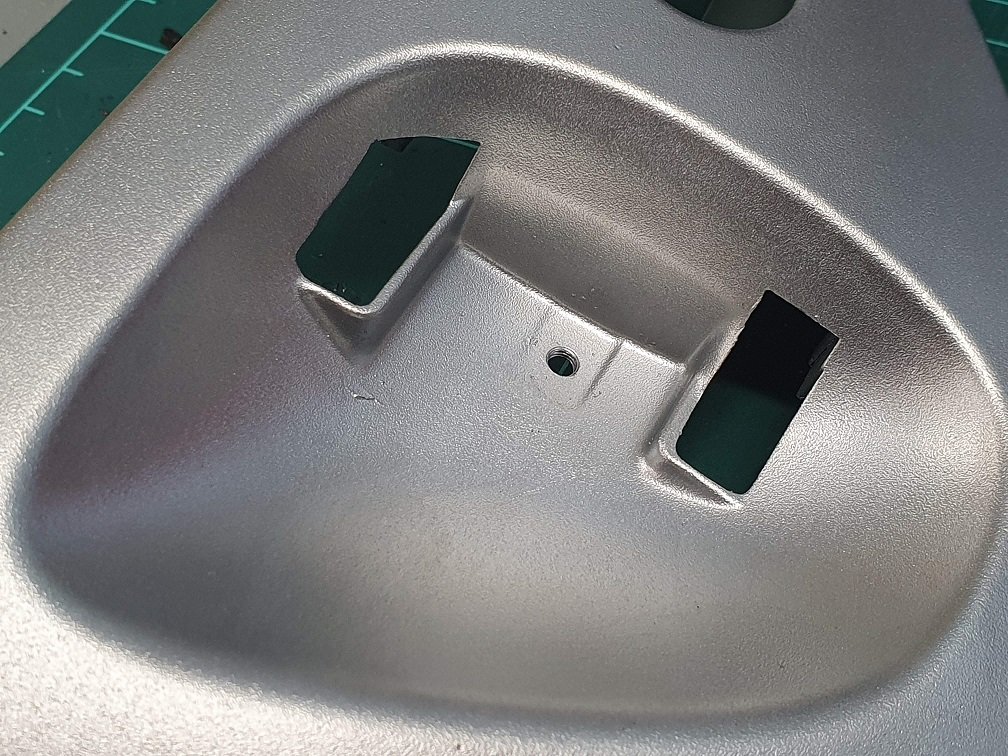
Last part of the puzzle is to cut some foam buffer strips to replace the originals. I've got some closed cell foam here that should be good for this, or there might be some knocking around at work too I think. They're just straight strips that are glued into place on the backside of the housings, around the perimeter.

Word has it that supply of these new is drying up, so I'll hang onto the original set from the car at the moment and maybe give them the same treatment at some stage. Keep them as spares or gouge the market when new ones are truly NLA, hah.
In other news, some of the wiring harness build supplies finally showed up! Design is being fleshed out... it's setup as basically a stock replacement harness, but much better materials and fit. Plus plenty of things tidied up and added in to make running different ECUs in the car as easy as possible, and additional sensors not a pain to add down the line. I've got stock 8bit and 16bit ECUs here, a PowerFC + Datalogit, and a Link Fury. I suspect it'll run on the PowerFC for a while till I get another control system for the twins figured out and can transition over to the link. Fun (Fast) times in Tahoe.
Early FD's, or maybe if they were optioned with it, I'm not sure on the determining factor, have a light in the drivers side keyhole that illuminates for 30 secs when you lift the handle with the door locked. Presumably this is so you can find the keyhole in the dark easily. My car has the wiring there for this, which means it must have had this at some stage. The light is long gone, and the door handle has been replaced at some stage... But, if it was there originally, I've got to make it work again, right... right? RIGHT!?
I CAD'd and 3d printed up a wee housing for a wide angle high brightness white LED. It has a forward drop of 3.1V at its rated 20mA, so I put a ~470Ohm resistor in series with it to keep it happy at automotive voltages. Shrunk some shrink onto it to seal it up, and potted it into the housing. Should hopefully last a while :-).
This is where it sits, it's held in place by the spring slip that keeps the key-barrel where it needs to be.
I got a pair of replacement frosted plastic keyhole spring covers from a guy over in the states.
Off vs on:
These door handles have to be the most thoroughly 'touched' set in existence by this stage, and I know they're just handles, but **** they're lovely to use. Smooth, super positive stops at the end of the travel... I've disassembled, blasted and cleaned all the lock barrels and tumblers. Re-lubed the tumblers with a dusting of graphite powder, and the detent ball with a smear of grease. They keys now have a nice crisp insertion sound and feel... ****, typing this out I'm really realising how much of a barry I am... But, honestly, so much fun in a project like this.
Last part of the puzzle is to cut some foam buffer strips to replace the originals. I've got some closed cell foam here that should be good for this, or there might be some knocking around at work too I think. They're just straight strips that are glued into place on the backside of the housings, around the perimeter.
Word has it that supply of these new is drying up, so I'll hang onto the original set from the car at the moment and maybe give them the same treatment at some stage. Keep them as spares or gouge the market when new ones are truly NLA, hah.
In other news, some of the wiring harness build supplies finally showed up! Design is being fleshed out... it's setup as basically a stock replacement harness, but much better materials and fit. Plus plenty of things tidied up and added in to make running different ECUs in the car as easy as possible, and additional sensors not a pain to add down the line. I've got stock 8bit and 16bit ECUs here, a PowerFC + Datalogit, and a Link Fury. I suspect it'll run on the PowerFC for a while till I get another control system for the twins figured out and can transition over to the link. Fun (Fast) times in Tahoe.
Thread Starter
Full Member
Joined: Aug 2015
Posts: 170
Likes: 92
From: New Zealand
I'm going to technically claim that this counts as working on something the car critically needs to work, as headlights are pretty important, really. As should be pretty obvious, this thing has had a home-based re-spray at some point, and the person doing the job was not exactly clinical with their masking, so its dusty red and dirty clear overspray just.... everywhere. Including all over the headlights. I've sanded and polished a few lights in my time (including every other exterior light for this car...), so was anticipating a relatively smooth, if somewhat tedious job...
Instead, I veered hard left (well, actually, I made that turn a long time ago, so I just stayed on the road I'm already on...) and decided to do a projector retrofit. I don't really have any defensible reason for this, other than I think they look cool :-)... Well, and I remember the headlights in my last FD being just terrible, even with replacement higher wattage bulbs. There are a couple of places that sell these ready made for FD's, but I'd be looking at around $1500 kiwi, and that's not money I'm willing to part with for something I can do myself (this is always flawless logic...).
After researching a bit on the topic, It looks like the way to go is to use a pair of the available aftermarket headlight housings that shift the beam pattern generation onto the housing itself, and use a totally clear lense. There are a few places selling these, but they're all the same SONAR housing. I found a pair for sale cheap on ebay, so was around $180NZD into things.
Getting them apart suuuuuuuuucked. Well, that's not strictly true, it wasn't particularly hard. Remove the spring clips, heat liberally with a heatgun, and pry slowly and gently... what sucked was dealing with the adhesive after the fact. This **** is sticky, and gets everywhere. It is reusable however, so if you can get them apart cleanly, you'd be able to re-heat the glue, reassemble and have them nicely sealed again... This is not what I did because.... reasons. Instead I decided to clean off all the glue, and will re-seal them myself using some butyl tape... I regret this decision. Prying all the old adhesive out with a screw driver took ages, and removed a lot of the chrome finish. Petrol was pretty decent at dissolving the residue left behind. I managed to slip with the screw driver and scratch one of the housings on the inside pretty decently. Guess I'm painting them then!
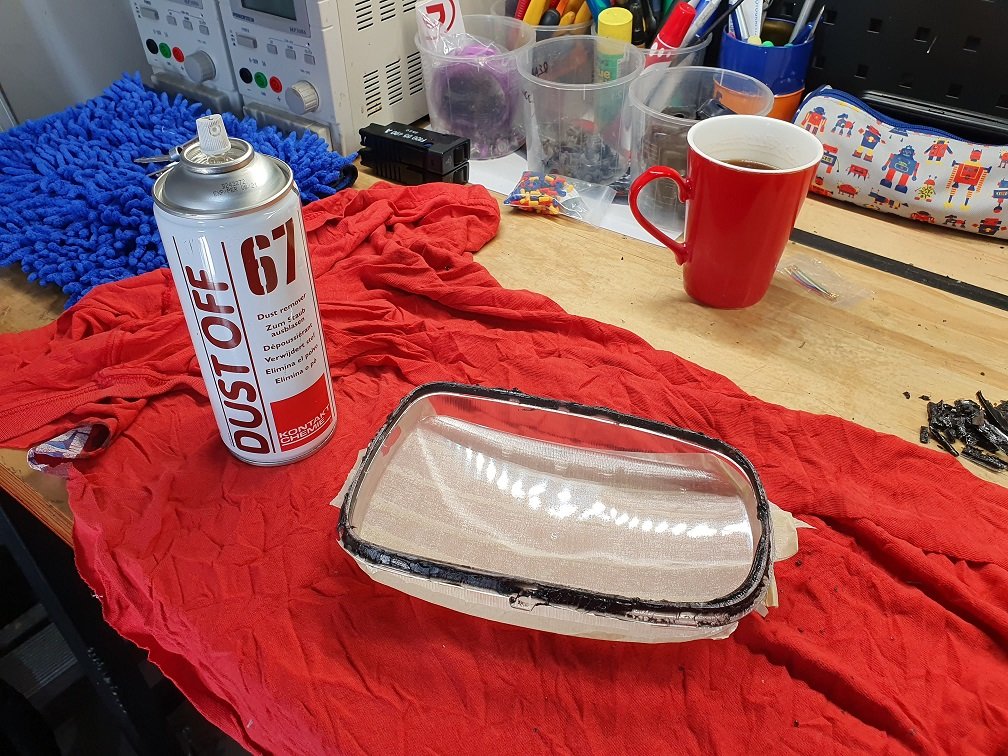
The lenses are polycarbonate (I'm pretty sure, anyway), and solvents will mark them. The best way I found to get the glue off these was to freeze it. It would then chip off pretty cleanly, and the residue could be removed with some citrus goo-gone type stuff.
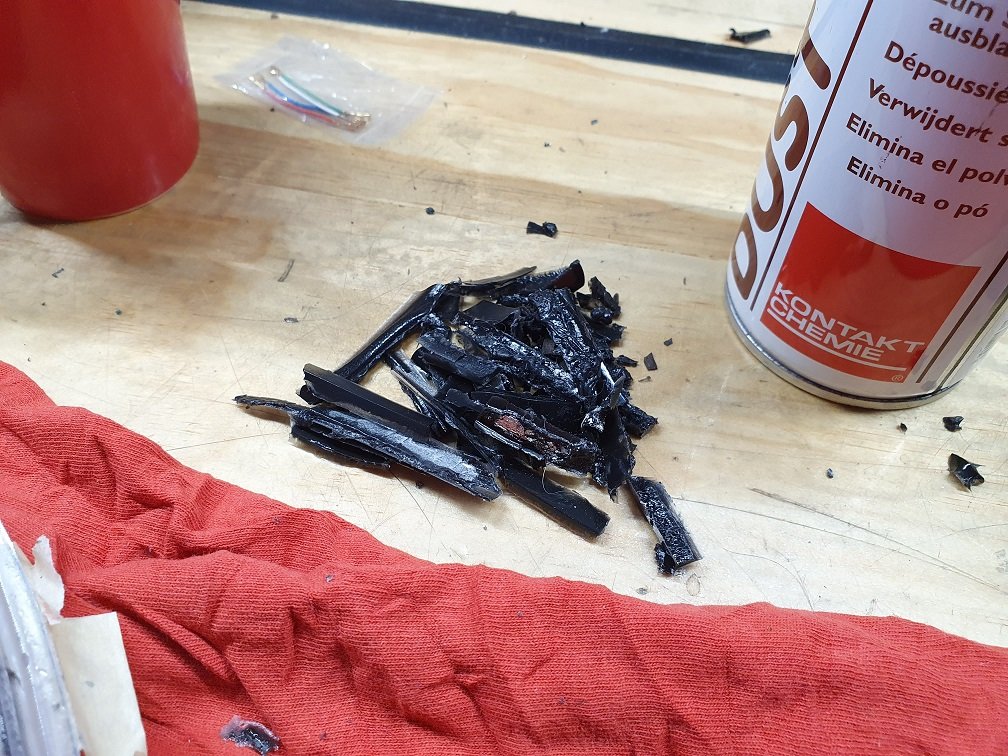
Dispose of this **** while it is still frozen, because once it warms back up to room temperature, its ******* annoying to deal with.
With the housings apart and cleaned, I started measuring things up, and settled on some 2.5" bi-LED projector units. These set me back around $80, and a two month wait. Lots of sellers of these on aliexpress, but they all look like they're made in the same factory: https://www.aliexpress.com/item/1005002797444025.html?spm=a2g0o.productlist.0.0.17 7c7147zgorov&algo_pvid=9558ac48-7b09-434a-802a-155a9e69b03d&algo_exp_id=9558ac48-7b09-434a-802a-155a9e69b03d-4&pdp_ext_f={"sku_id"%3A"12000022229395886"}
If you're ordering any, make sure you get them with the correct beam pattern for the side of the road you drive on. Left in this case of course :-).
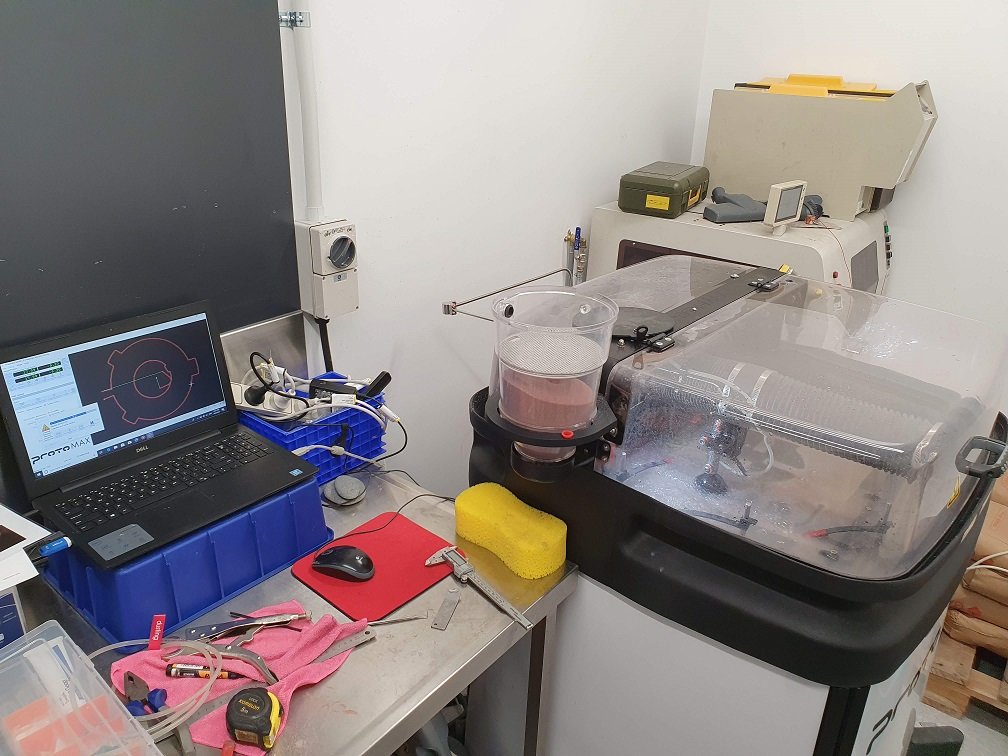
From the measurements, I figured they'd fit inside with a few mm of clearance to the front lense. They come with an adaptor to mount where an H4 bulb originally went, so that's a score. Once they arrived I mocked them up, and immediately found that the adaptor mounts put the projects at totally the wrong angle, and the beam pattern was rotated along the axis of the car by around 20 deg. I 3dprinted some other adaptors and for them nice and level, and things were starting to look good. 3d printed adaptors aren't going to cut the mustard though, as they'd soften and melt with the heat of the projectors. Luckily we got a little waterjet cutter at work a while back, and its just bloody perfect for stuff like this :-).
Cool. Now the rotation of the beam pattern was correct, I gave aiming them a go, and discovered that to get them level I was running out of adjustment on the bottom adjuster. Cue some more 3d-printing to make another insert. This bolts on using some existing holes so everything is totally reversible down the track.
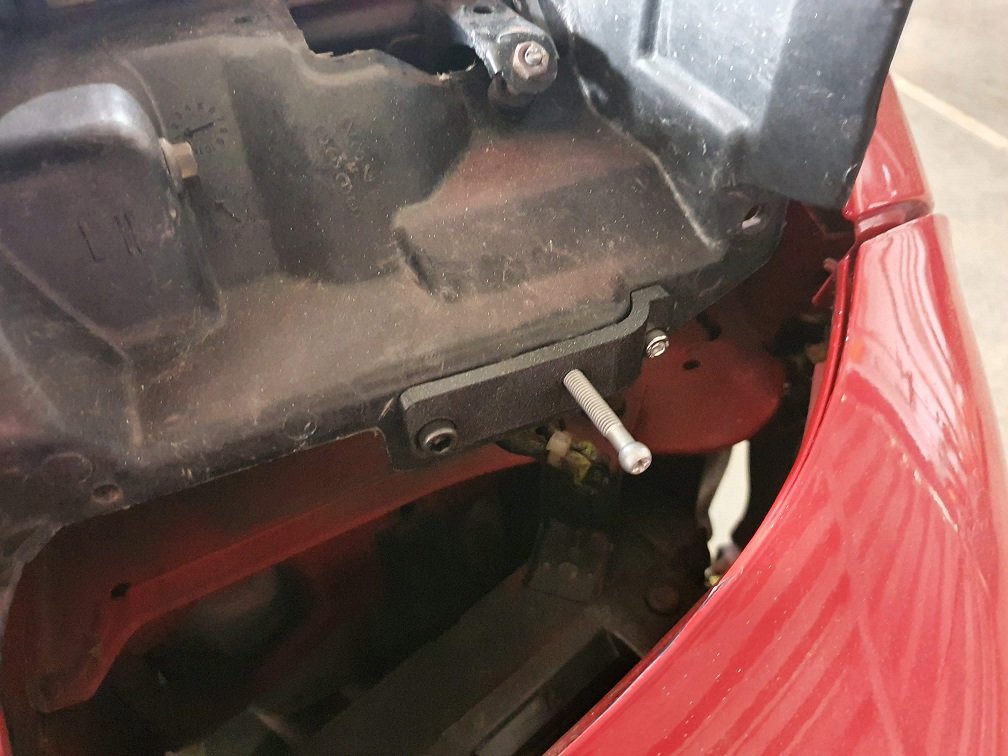
See all that dusty overspray? It's literally everywhere, that's the **** I'm dealing with.
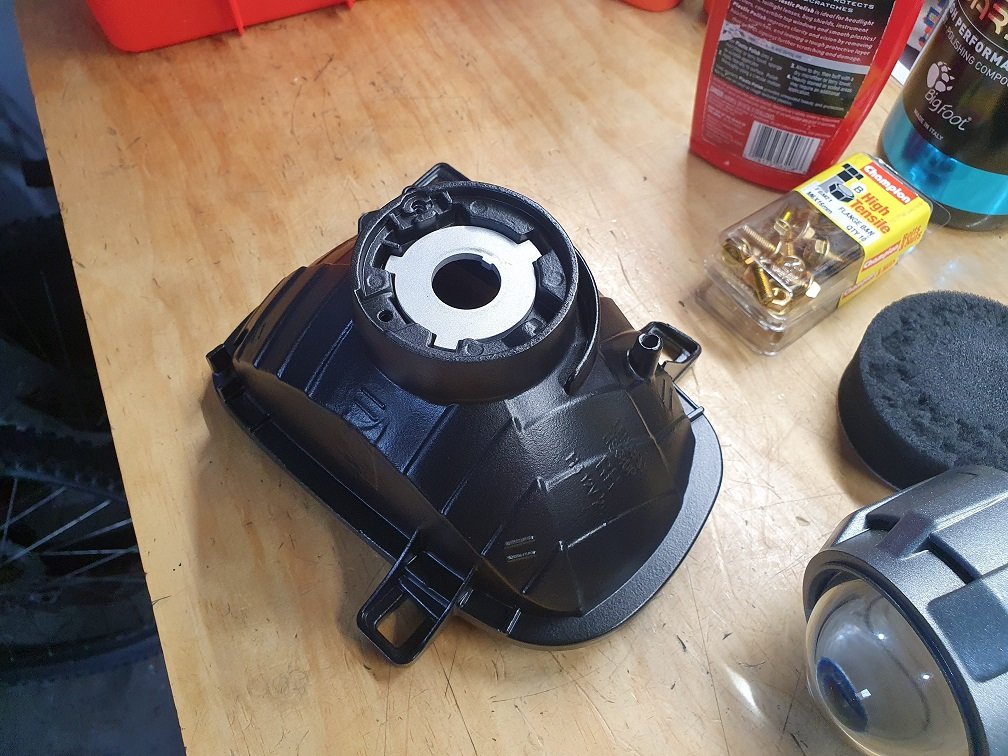
Phew, now I had enough adjustment I could get everything squared up. As I munched the housings pretty good cleaning them up and generally ******* around with them, they needed paint to look presentable again. cue some blasting to prep them...
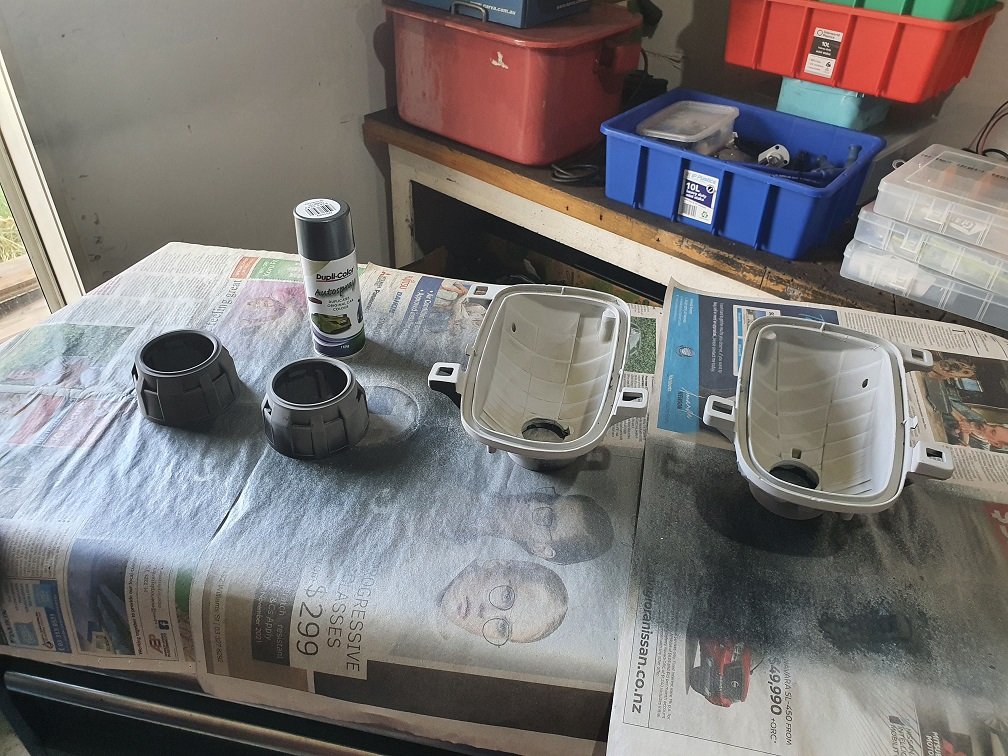
And some gun-metal touch up paint. Side note, seems repco isnt stock these little cans anymore. Shame, its really good paint, dries in like 5 mins with a heat gun, sprays out really well, and is just excellent to work with.

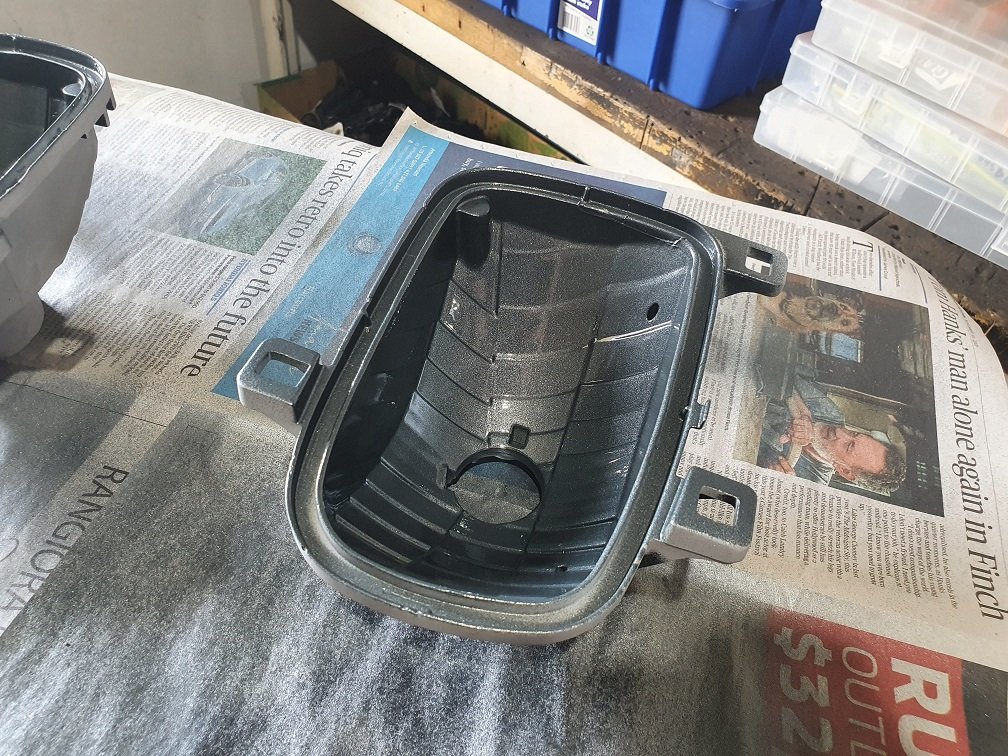
It's more of a semi-gloss finish once it's dry, which looks really good in the housings.
Time for final assembly and another test-fit!
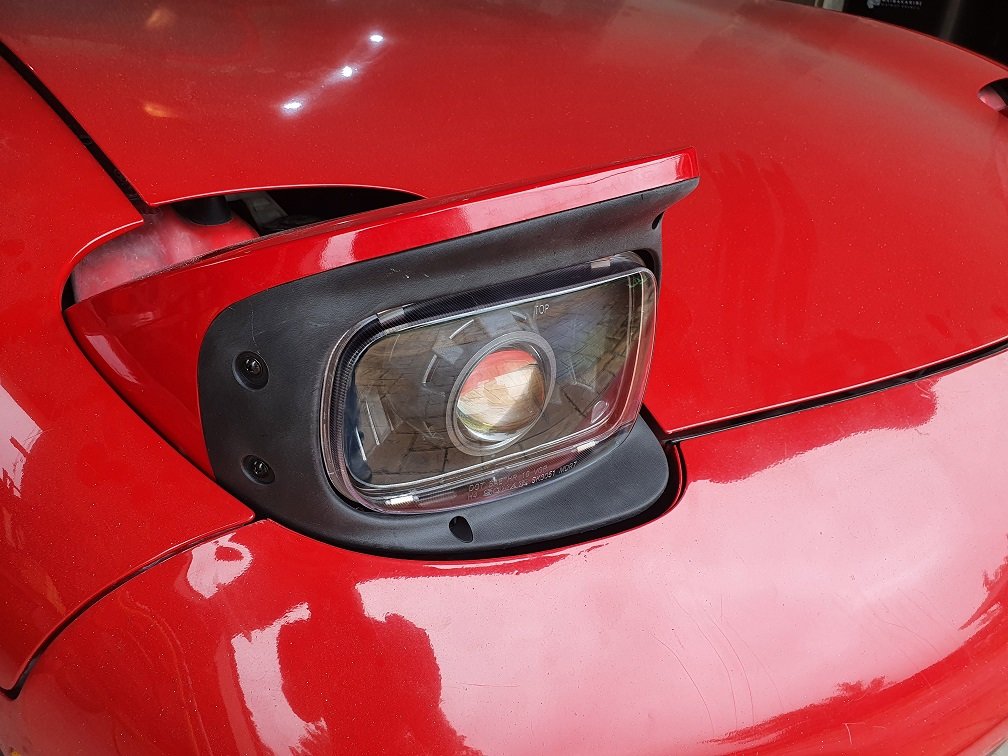
Hmmmmmm, frog eyes. I like them, but... honestly, it was a hell of a lot of work for maybe a questionable result? Hah. At least I had fun. Obviously haven't driven with them yet, but testing at night in the driveway shows a hell of a lot more light, in more distinctly correct places than the factory ones.
That being said...... I also restored the factory housings.
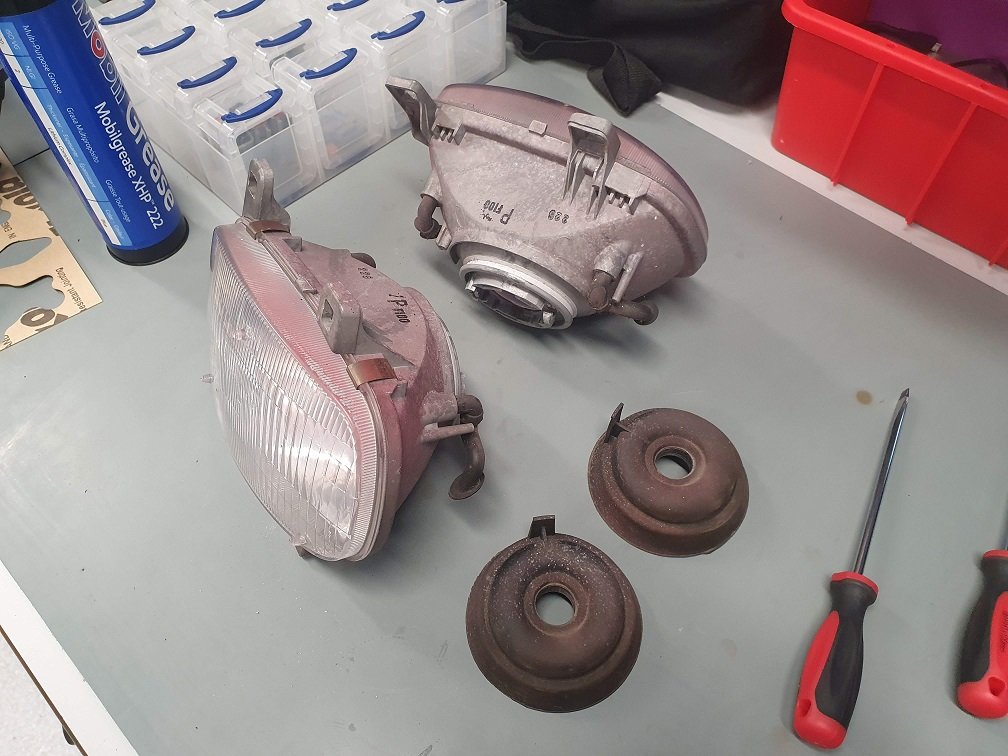
You know, because the projector ones are probably not even vaguely legal, and maybe these will actually work okay with some of the new-fangled LED replacement bulbs that are apparently not-****?
Instead, I veered hard left (well, actually, I made that turn a long time ago, so I just stayed on the road I'm already on...) and decided to do a projector retrofit. I don't really have any defensible reason for this, other than I think they look cool :-)... Well, and I remember the headlights in my last FD being just terrible, even with replacement higher wattage bulbs. There are a couple of places that sell these ready made for FD's, but I'd be looking at around $1500 kiwi, and that's not money I'm willing to part with for something I can do myself (this is always flawless logic...).
After researching a bit on the topic, It looks like the way to go is to use a pair of the available aftermarket headlight housings that shift the beam pattern generation onto the housing itself, and use a totally clear lense. There are a few places selling these, but they're all the same SONAR housing. I found a pair for sale cheap on ebay, so was around $180NZD into things.
Getting them apart suuuuuuuuucked. Well, that's not strictly true, it wasn't particularly hard. Remove the spring clips, heat liberally with a heatgun, and pry slowly and gently... what sucked was dealing with the adhesive after the fact. This **** is sticky, and gets everywhere. It is reusable however, so if you can get them apart cleanly, you'd be able to re-heat the glue, reassemble and have them nicely sealed again... This is not what I did because.... reasons. Instead I decided to clean off all the glue, and will re-seal them myself using some butyl tape... I regret this decision. Prying all the old adhesive out with a screw driver took ages, and removed a lot of the chrome finish. Petrol was pretty decent at dissolving the residue left behind. I managed to slip with the screw driver and scratch one of the housings on the inside pretty decently. Guess I'm painting them then!
The lenses are polycarbonate (I'm pretty sure, anyway), and solvents will mark them. The best way I found to get the glue off these was to freeze it. It would then chip off pretty cleanly, and the residue could be removed with some citrus goo-gone type stuff.
Dispose of this **** while it is still frozen, because once it warms back up to room temperature, its ******* annoying to deal with.
With the housings apart and cleaned, I started measuring things up, and settled on some 2.5" bi-LED projector units. These set me back around $80, and a two month wait. Lots of sellers of these on aliexpress, but they all look like they're made in the same factory: https://www.aliexpress.com/item/1005002797444025.html?spm=a2g0o.productlist.0.0.17 7c7147zgorov&algo_pvid=9558ac48-7b09-434a-802a-155a9e69b03d&algo_exp_id=9558ac48-7b09-434a-802a-155a9e69b03d-4&pdp_ext_f={"sku_id"%3A"12000022229395886"}
If you're ordering any, make sure you get them with the correct beam pattern for the side of the road you drive on. Left in this case of course :-).
From the measurements, I figured they'd fit inside with a few mm of clearance to the front lense. They come with an adaptor to mount where an H4 bulb originally went, so that's a score. Once they arrived I mocked them up, and immediately found that the adaptor mounts put the projects at totally the wrong angle, and the beam pattern was rotated along the axis of the car by around 20 deg. I 3dprinted some other adaptors and for them nice and level, and things were starting to look good. 3d printed adaptors aren't going to cut the mustard though, as they'd soften and melt with the heat of the projectors. Luckily we got a little waterjet cutter at work a while back, and its just bloody perfect for stuff like this :-).
Cool. Now the rotation of the beam pattern was correct, I gave aiming them a go, and discovered that to get them level I was running out of adjustment on the bottom adjuster. Cue some more 3d-printing to make another insert. This bolts on using some existing holes so everything is totally reversible down the track.
See all that dusty overspray? It's literally everywhere, that's the **** I'm dealing with.
Phew, now I had enough adjustment I could get everything squared up. As I munched the housings pretty good cleaning them up and generally ******* around with them, they needed paint to look presentable again. cue some blasting to prep them...
And some gun-metal touch up paint. Side note, seems repco isnt stock these little cans anymore. Shame, its really good paint, dries in like 5 mins with a heat gun, sprays out really well, and is just excellent to work with.
It's more of a semi-gloss finish once it's dry, which looks really good in the housings.
Time for final assembly and another test-fit!
Hmmmmmm, frog eyes. I like them, but... honestly, it was a hell of a lot of work for maybe a questionable result? Hah. At least I had fun. Obviously haven't driven with them yet, but testing at night in the driveway shows a hell of a lot more light, in more distinctly correct places than the factory ones.
That being said...... I also restored the factory housings.
You know, because the projector ones are probably not even vaguely legal, and maybe these will actually work okay with some of the new-fangled LED replacement bulbs that are apparently not-****?
Add some jet engine noises and your neighbours will think a 747 is landing on your street at night.
Actually if you could mount in the fog light housings, you could have your headlights and searchlights, too.
Actually if you could mount in the fog light housings, you could have your headlights and searchlights, too.