
Mounting bracket for rear seat latch/catch?

Thread Starter
Joined: May 2003
Posts: 4,150
Likes: 0
From: CA (Bay Area)
I recently bought a set of rear seats for my US spec FD. The rear seat is on a pivot, and in the upright position it clicks into place into contacting the latches (which stick out from the sides of the trunk area. I was missing these pieces so i bought the catch/bolts/mounting bracket/and plastic trim to go over it from mazda japan. on my US spec car there are blanks covering where you would mount the seat back latches. i removed them but found no bolts sticking out or welded nuts to mount the bracket i just bought (on the sides of the rear shock towers). since you guys mostly have rear seats in your areas, would you happen to have a picture of how the latches are mounted to the shock towers? maybe im missing something or maybe mazda didnt include those mounting points on US spec FD's (however every other mounting point for the rear seats IS there, so i cant imagine why these points would not be). thanks for your help and your responses/pictures are sincerely appreciated. -heath

Rotary Freak


Joined: Jun 2005
Posts: 1,679
Likes: 288
From: sydney
None of the local FDs were delivered with a back seat.
No idea myself, might check the first page (about 2/3rds the way down) for a conversion the other way for a Jap import
http://www.ausrotary.com/viewtopic.p...=44725&start=0
for a few pics of the various mounts.....you have to register to view.
No idea myself, might check the first page (about 2/3rds the way down) for a conversion the other way for a Jap import
http://www.ausrotary.com/viewtopic.p...=44725&start=0
for a few pics of the various mounts.....you have to register to view.
Thread Starter
Joined: May 2003
Posts: 4,150
Likes: 0
From: CA (Bay Area)
hmm it wont let me register for some reason. says that i cant use my email, although i tried two different accounts. could i ask you a huge favor to repost the pictures that are in that link. here are some pictures that someone in the Japanese FD forum sent me with the stock mounting locations. obviously i cant replicate this because these specialized brackets are spot welded to the rear shock towers. anyway, if it would be possible to repost a few of the mounting solutions i would greatly appreciate it! cheers, Heath 

Thread Starter
Joined: May 2003
Posts: 4,150
Likes: 0
From: CA (Bay Area)
bump. any way you could repost the pictures from that site? i even made another email account just so i could try and register and it still wont let me. "email address is not allowed"
Rotary Freak
Joined: Jun 2005
Posts: 1,679
Likes: 288
From: sydney
Take it you are trying to use a hotmail account or some such?
Anyhow....hope he won't mind.
Anyhow....hope he won't mind.
Originally Posted by Black Talon
You need the storage bins, the backrest piece, and the side trims. If you want to be religous, you will also want the boot carpet, and the small square bits that go where the backrest anchor points were. You will also need a few extra 10mm and 12mm bolts, and some plastic trim clips of various types.
A lot of people don't understand that the side trims are a different shape, as the 4 seater ones have the seat padding on the lower half. You may or may not have to swap your speaker grills to the new side trims. It depends on the trims you get. I had to, as the trims came from a car with the Bose stereo.
Remove the boot carpet (number 1). It is clipped onto the back of the seat backrest with a heap of plastic trim plugs.
Remove rear seat backrest (number 2). 4 12mm bolts in boot.
Remove rear seat base (number 3). 1 clip on each side.
Remove seat belts (number 4). 2 16 or 17mm bolts for the actual belt, and one for the attaching point (number 5) per side.
Remove rear side trims (number 6). Heaps of those metal trim clips, and a few plastic ones as well. You will need to remove the strut top piece (number 7) to do this. You will need to pull the door rubbers off a bit, and the hatch rubber as well for each side.
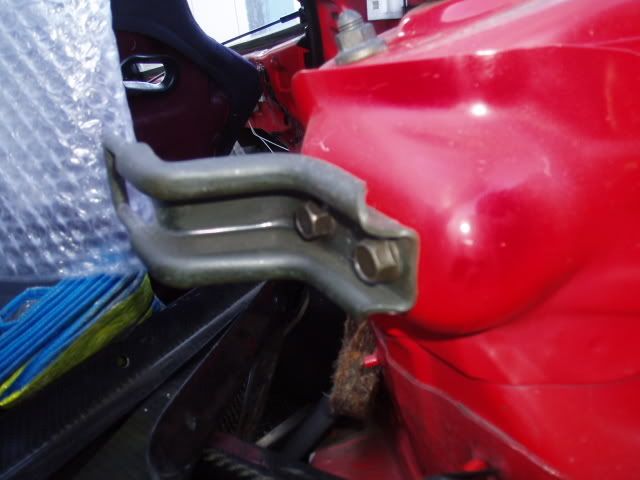
Remove the plastic covers, and the big metal anchor points for the folding backrest (number 8.). 2 12mm bolts each.


That is the job of removing the seats done.
You will want to put some bolts in the lower seat belt attaching holes, or some good strong tape over them.
You will need to cut a small slit in the carpet on each side where the seat base used to be. This is on the outside edges of the storage bin section. You also need to cut a small hole in near the tunnel for a 10mm bolt on each side.
The storage bin section just slides into the lug on the floor pan.
Put a 10mm bolt in each side in the lower front (in blue).


The original 2 seater has 3 bolts sticking up from the boot floor that hold the storage bin section to the boot floor (green arrow). Your 4 seater doesn't have these. If this worries you, you can drill a hole in the storage bin section on each side that will correspond with one of the original seat backrest bolts (pink arrow). The anchor points for the seat backest will want some tape over them (aqua arrow).

The yellow arrows above are the trim holes that the carpet is clipped to in the 2 seater. You won't have these holes in your carpet, but it wouldn't be hard to do. You can always try getting the carpet from the 2 seater, or just punch the holes in your carpet. I did neither, as damn near all 2 seaters in Aus have the Bose system, with a screwed up bit of carpet.
Put the new side trims in AFTER you have put the storage bin section in. They clip in the same as the originals. You need a couple of extra plastic trim clips here, one for each side right at the very front, where the side meets the storage bin section.
Put the new bit in where the backrest was. It just clips in and out for quick removal if you need to carry something big.
Put the strut tops back on.
Put the door and hatch rubbers back on.
Don't forget to tape the holes where the backrest used to anchor (pink). The small square plastic piece from the 2 seater that covers this whole bit is almost impossible to get, unless you stripped the 2 seater yourself (green).

I can't tell you if it is possible to do the opposite of this swap, and go from 2 to 4 seats. The bit I am unsure about is the anchor bolts holes for the backrest of the seat. I just don't know if a genuine 2 seater has these in the boot floor, and on the struts.
In all I think it took me a little over an hour and a half to do by myself. You will need a bit of space so you can get both doors wide open.
A lot of people don't understand that the side trims are a different shape, as the 4 seater ones have the seat padding on the lower half. You may or may not have to swap your speaker grills to the new side trims. It depends on the trims you get. I had to, as the trims came from a car with the Bose stereo.
Remove the boot carpet (number 1). It is clipped onto the back of the seat backrest with a heap of plastic trim plugs.
Remove rear seat backrest (number 2). 4 12mm bolts in boot.
Remove rear seat base (number 3). 1 clip on each side.
Remove seat belts (number 4). 2 16 or 17mm bolts for the actual belt, and one for the attaching point (number 5) per side.
Remove rear side trims (number 6). Heaps of those metal trim clips, and a few plastic ones as well. You will need to remove the strut top piece (number 7) to do this. You will need to pull the door rubbers off a bit, and the hatch rubber as well for each side.
Remove the plastic covers, and the big metal anchor points for the folding backrest (number 8.). 2 12mm bolts each.
That is the job of removing the seats done.
You will want to put some bolts in the lower seat belt attaching holes, or some good strong tape over them.
You will need to cut a small slit in the carpet on each side where the seat base used to be. This is on the outside edges of the storage bin section. You also need to cut a small hole in near the tunnel for a 10mm bolt on each side.
The storage bin section just slides into the lug on the floor pan.
Put a 10mm bolt in each side in the lower front (in blue).

The original 2 seater has 3 bolts sticking up from the boot floor that hold the storage bin section to the boot floor (green arrow). Your 4 seater doesn't have these. If this worries you, you can drill a hole in the storage bin section on each side that will correspond with one of the original seat backrest bolts (pink arrow). The anchor points for the seat backest will want some tape over them (aqua arrow).
The yellow arrows above are the trim holes that the carpet is clipped to in the 2 seater. You won't have these holes in your carpet, but it wouldn't be hard to do. You can always try getting the carpet from the 2 seater, or just punch the holes in your carpet. I did neither, as damn near all 2 seaters in Aus have the Bose system, with a screwed up bit of carpet.
Put the new side trims in AFTER you have put the storage bin section in. They clip in the same as the originals. You need a couple of extra plastic trim clips here, one for each side right at the very front, where the side meets the storage bin section.
Put the new bit in where the backrest was. It just clips in and out for quick removal if you need to carry something big.
Put the strut tops back on.
Put the door and hatch rubbers back on.
Don't forget to tape the holes where the backrest used to anchor (pink). The small square plastic piece from the 2 seater that covers this whole bit is almost impossible to get, unless you stripped the 2 seater yourself (green).
I can't tell you if it is possible to do the opposite of this swap, and go from 2 to 4 seats. The bit I am unsure about is the anchor bolts holes for the backrest of the seat. I just don't know if a genuine 2 seater has these in the boot floor, and on the struts.
In all I think it took me a little over an hour and a half to do by myself. You will need a bit of space so you can get both doors wide open.
