
Writeup: DIY poly motor mounts

Thread Starter
VV That's mine VV
Joined: Jan 2007
Posts: 583
Likes: 0
From: Chapel Hill, NC
Writeup: DIY poly motor mounts
During my rebuild I purchased most of the standard things (ie Banzai oil pan brace, IRP SS OMP lines etc), but I refused to shell out the money for poly motor mounts.
The choices:
Banzai Racing - $250 for the mounts for the 1 aluminum/1 steel arm setup or $130 if you already have 2 steel arms (I had a stock aluminum one). My worry was that I've heard reports of people having vibration issues, but I don't know if that's actually true as I've had no direct interaction with their product.
IRP - I was quoted $200 for mounts made to work with 2 steel arms. I thought these were an attractive option since they have a poly puck under the subframe to cut down on vibration.
Garfinkle? - I've seen some pictures of blue nylon ones that I believe are made by Garfinkle but they weren't out when I was ready.
DIY - I could make my own with a puck for a lower price with an order to McMaster and the purchase of a steel motor mount arm.
What you need
McMaster:
Amber poly rod, 3" diameter, 6" long, 80A durometer (you can buy softer or harder) - $55.40 (8784K983)
Amber poly rod, 1.5" diameter, 6" long, 80A durometer - $21.18 (8784K923)
Jumbo washer, 3/8" screw size, 3" OD - $5.32 (98264A275)
Large washer, 3/8" screw size, 1.5" OD - $8.53 (91525A140)
2 3/8" bolts approximately 4" long plus 2 nylock 3/8" nuts (local hardware)
Optional: Steel motor mount arm (I got mine from Japan2LA)
Tools: Drill press and bandsaw
Walkthrough
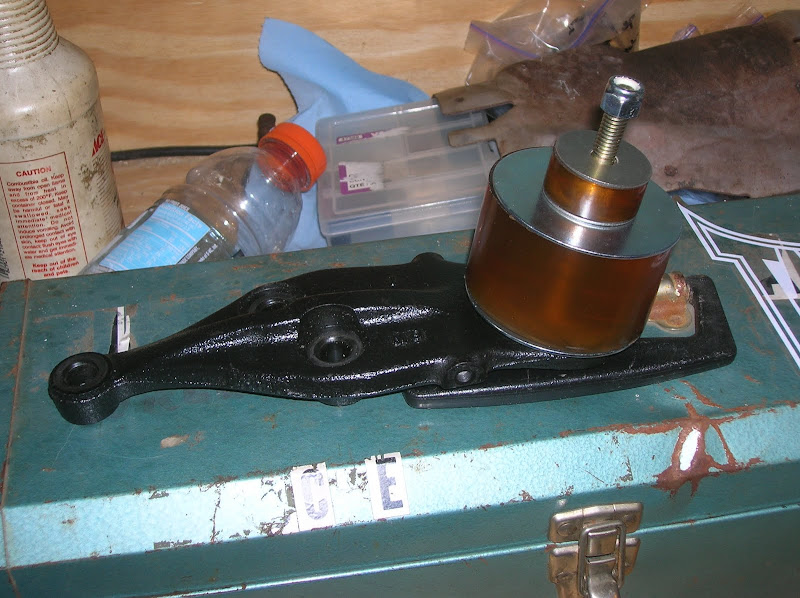
You first need to decide how thick you want your mounts. My measurements put the stockers at 2.25" thick. To offset the rise caused by my 3/8" thick Banzai oil pan brace, I cut the 3" poly rod to a depth of 2". Word to the wise, this is easier said than done than on a bandsaw. My suggestion would be to practice cutting in the middle of the rod then when you're ready, cut your mounts off of the ends of the original rod (since the ends are already clean cuts from McMaster). Mark all the way around the rod with a marker and take your time. Next, cut pucks out of the 1.5" poly rod for placement under the subframe. I cut them to .75" thick. Then, drill 3/8" holes down the center of the 3" and 1.5" poly rod pieces with a drillpress. After assembly it should look like this:
During installation you should put a dab of sealant between the large poly and its lower washer to stop the washer from simply falling off the bolt. I torqued the nylock nut so everything was in contact, but I didn't follow torque specs due to the fact that it would crush the poly and increase the chance of transmitting vibration.
Final total: $90.43 + shipping and optional steel motor mount arm
Ride quality
When everything was assembled, I was actually quite worried due to the fact that the engine was rock solid (I guess I was used to the movement with my blown OEM motor mount). Thankfully, after putting 200 miles on the mounts they have been completely vibration free from mile 1. Very happy with the results.
The choices:
Banzai Racing - $250 for the mounts for the 1 aluminum/1 steel arm setup or $130 if you already have 2 steel arms (I had a stock aluminum one). My worry was that I've heard reports of people having vibration issues, but I don't know if that's actually true as I've had no direct interaction with their product.
IRP - I was quoted $200 for mounts made to work with 2 steel arms. I thought these were an attractive option since they have a poly puck under the subframe to cut down on vibration.
Garfinkle? - I've seen some pictures of blue nylon ones that I believe are made by Garfinkle but they weren't out when I was ready.
DIY - I could make my own with a puck for a lower price with an order to McMaster and the purchase of a steel motor mount arm.
What you need
McMaster:
Amber poly rod, 3" diameter, 6" long, 80A durometer (you can buy softer or harder) - $55.40 (8784K983)
Amber poly rod, 1.5" diameter, 6" long, 80A durometer - $21.18 (8784K923)
Jumbo washer, 3/8" screw size, 3" OD - $5.32 (98264A275)
Large washer, 3/8" screw size, 1.5" OD - $8.53 (91525A140)
2 3/8" bolts approximately 4" long plus 2 nylock 3/8" nuts (local hardware)
Optional: Steel motor mount arm (I got mine from Japan2LA)
Tools: Drill press and bandsaw
Walkthrough
You first need to decide how thick you want your mounts. My measurements put the stockers at 2.25" thick. To offset the rise caused by my 3/8" thick Banzai oil pan brace, I cut the 3" poly rod to a depth of 2". Word to the wise, this is easier said than done than on a bandsaw. My suggestion would be to practice cutting in the middle of the rod then when you're ready, cut your mounts off of the ends of the original rod (since the ends are already clean cuts from McMaster). Mark all the way around the rod with a marker and take your time. Next, cut pucks out of the 1.5" poly rod for placement under the subframe. I cut them to .75" thick. Then, drill 3/8" holes down the center of the 3" and 1.5" poly rod pieces with a drillpress. After assembly it should look like this:
During installation you should put a dab of sealant between the large poly and its lower washer to stop the washer from simply falling off the bolt. I torqued the nylock nut so everything was in contact, but I didn't follow torque specs due to the fact that it would crush the poly and increase the chance of transmitting vibration.
Final total: $90.43 + shipping and optional steel motor mount arm
Ride quality
When everything was assembled, I was actually quite worried due to the fact that the engine was rock solid (I guess I was used to the movement with my blown OEM motor mount). Thankfully, after putting 200 miles on the mounts they have been completely vibration free from mile 1. Very happy with the results.
Good try for a DIY job. You won't be able to get a good cut on a band saw. I tried many times and it is very difficult to get a straight cut without deforming or melting the material. I machine the poly to the size I need.
Last edited by IRPerformance; Oct 3, 2009 at 09:43 AM.
Hmm I think a miter saw and multi purpose cutoff wheel should cut this stuff pretty good. The disk will also sand while cutting. This is actually what I used for most of my cutting on my 20b project.

What about solid aluminum mounts. See them on ebay for fb and fcs for like $40-$70. How come now one has one for the FD there and cant the ones from the FC be used anyway providing it the right height?

Solid mounts are just that, SOLID MOUNTS. They don't reduce engine vibrations. I don't like my filling shaking off my mouth or have to yell at my passenger because it is loud inside the cabin.
I did this about 6 years ago and I still think it is the way to go.
I did this about 6 years ago and I still think it is the way to go.
Trending Topics
Trust me, it is annoying. I was only able to put up with it for less than a day. I put them on, started the car and I couldn't stand it. Drove the car to the end of the street to go back and put the stock ones back on.
Thread Starter
VV That's mine VV
Joined: Jan 2007
Posts: 583
Likes: 0
From: Chapel Hill, NC
Well I did get a good cut as my picture shows. First off, I ran the bandsaw as slow as possible. Then I started with a very shallow cut around the circumference as a guide. Finally, I cut in one direction until I felt like it was starting to bind and turn at which point I backed out and started from another direction.
I did say "easier said than done" and I'm sure there are better ways, but this method did work for me with the tools I had on hand.
I did say "easier said than done" and I'm sure there are better ways, but this method did work for me with the tools I had on hand.
Thread Starter
VV That's mine VV
Joined: Jan 2007
Posts: 583
Likes: 0
From: Chapel Hill, NC
i just ordered the himni-racing poly mounts made to fit the stock steel and aluminum mounts so I dont have to get another steel mount, saved $45, I dont have to bother making them, and they only $105 shipped. It seems like a great deal. I cant imagine them being much different than the others, but I will be sure to post some feedback on them after I get my rebuilt motor back in the car. I bought them on ebay and they had all good feedback on ebay from the other buyers who bought these for their FD.
I also kind of wondered why Mazda stopped using the aluminum one and basically all of the other companies modify them for use (if they'll even use them at all).
ya i know I was suprised there has not been any talk about them on here. It seems like a good cheap option, hopefully I am happy with them. Their communication has been good, they emailed me back and said I just have to get all the rubber off the aluminum mount bracket and drill a hole, they are made to fit perfect after that.
Thread Starter
VV That's mine VV
Joined: Jan 2007
Posts: 583
Likes: 0
From: Chapel Hill, NC
ya i know I was suprised there has not been any talk about them on here. It seems like a good cheap option, hopefully I am happy with them. Their communication has been good, they emailed me back and said I just have to get all the rubber off the aluminum mount bracket and drill a hole, they are made to fit perfect after that.
The Polypropylene rod can be found quite a bit cheaper if you search around. I've seen it for around $10 ft for 3" diameter. When i purchased mine i got an assortment of different sizes for like $25, probably close to 4ft worth in different diameters. It turns down real nice on a lathe, itls actually kinda fun to turn it down.
Ever tried with high tooth count blade for softer metals?
Thread Starter
VV That's mine VV
Joined: Jan 2007
Posts: 583
Likes: 0
From: Chapel Hill, NC
The Polypropylene rod can be found quite a bit cheaper if you search around. I've seen it for around $10 ft for 3" diameter. When i purchased mine i got an assortment of different sizes for like $25, probably close to 4ft worth in different diameters. It turns down real nice on a lathe, itls actually kinda fun to turn it down.
Here is some pictures of the Himni Racing motor mounts and the drivers side aluminum motor mount bracket with a hole drilled and the rubber taken off so the Himni racing mount fits good on it, all this was easy to do, a drill press makes drilling the hole easy.

Porsgrunn
Joined: Aug 2008
Posts: 14
Likes: 0
From: Norway
Just got the Himny ones myself.
To me they seem very hard, and I fear they will transmit alot of nois and vibration.
I made a set of poly engine mounts earlier this year from durameter 90 poly. and this worked quite well with only a small amount of vibration.
A while afterwards however my diff started making horrible noises, and it turned out that the drive axle was out of balance. After replacing all bearings in the diff and not wanting to repete it soon again I decided not to trust the home made engine mounts. Measuring the Himny mounts they are same hight left and right, while my left one was 1/5" longer.
This might have contributed, but probably I also had the drivetrain misaligned.
Anyone experienced similar problem?
Only hope Himny got the hight right
Ya they are very hard, like solid. Are the other poly mounts this hard? Was the 90 poly alot softer? Mines not a daily driver so it won't be that big of a deal if there is a bunch of vibration, but I hope it's not bad. I will know in a couple weeks when I get the rebuilt motor in.
Just got the Himny ones myself.
To me they seem very hard, and I fear they will transmit alot of nois and vibration.
I made a set of poly engine mounts earlier this year from durameter 90 poly. and this worked quite well with only a small amount of vibration.
A while afterwards however my diff started making horrible noises, and it turned out that the drive axle was out of balance. After replacing all bearings in the diff and not wanting to repete it soon again I decided not to trust the home made engine mounts. Measuring the Himny mounts they are same hight left and right, while my left one was 1/5" longer.
This might have contributed, but probably I also had the drivetrain misaligned.
Anyone experienced similar problem?
Only hope Himny got the hight right
To me they seem very hard, and I fear they will transmit alot of nois and vibration.
I made a set of poly engine mounts earlier this year from durameter 90 poly. and this worked quite well with only a small amount of vibration.
A while afterwards however my diff started making horrible noises, and it turned out that the drive axle was out of balance. After replacing all bearings in the diff and not wanting to repete it soon again I decided not to trust the home made engine mounts. Measuring the Himny mounts they are same hight left and right, while my left one was 1/5" longer.
This might have contributed, but probably I also had the drivetrain misaligned.
Anyone experienced similar problem?
Only hope Himny got the hight right