
What to use for mounting RE tail light cover...?


i used 3 m and when it drys it turns yellow and also its hard if the re tail finisher has been on another car and is alrady warped what i did i drilled 2 holes on the top and on the bottom and dint mess up the lights or leave an nasty holes i used a rotary tool to sand down the screw so it cam out really nice. and it dint mess up the lights i can send you pics if you like?
Senior Member
Joined: Jun 2003
Posts: 617
Likes: 0
From: Edmonton Alberta Canada
I just got rid of mine. As I understand, it is supposed to clip around the taillamp housings at each side of the car. You put tapping screws along the bottom of it to the rear bumper cover. It needs a rail along the top, as it tends to warp, and doesn't match the curvature of the hatch. I recommend a small aluminum angle bar, say 1/2" on each side, running underneath the top, and carefully bent to the correct curve (to match the hatch). Epoxy the angle to the appique. If you glue it to the tail lamps, you will have difficulty replacing bulbs when they burn out. Once you get tired of it, you will need new tail light housings, as they will be damaged when you remove it (mine were - now have 99 spec. housings). Take your time, and sand the inside so it fits correctly, install the angle, then paint it. Mine was done the way you guys are suggesting, and it was a mess up close. Not bad from a distance. Oh, be sure to use flexable paint on it. Mine was painted with regular paint, and it had cracks all over it. It flexes a lot.
Blow up or win
Joined: May 2001
Posts: 2,014
Likes: 3
From: Altezzaville
Originally posted by Fd3BOOST
3M double sided tape is all you need.
Its really not a big deal.
3M double sided tape is all you need.
Its really not a big deal.
Clean both surfaces lightly with alcohol and a microfiber cloth and make sure you have it lined up perfectly before applying. A good way to do this is to leave the backing on and pull just a tiny corner of it off at a 90 degree angle to form a "tab" so that you can tack it lightly in place before applying full pressure. When you are satisfied it is in the correct position just slowly pull the "tab" at an angle while pressing down with firm pressure as you go - best at 70F or above.
Trending Topics

HEY!!! thats not a V-8 

without killing your thread, i do bodywork, and when i had my tail finisher i was going to opt for the 3m double sided tape, which will work fine so long you use enough of it and clean both surfaces properly.
Only bad thing is, if you ever decided you dont want it anymore and try to remove it.(3m doube sided tape sucks in that aspect) Also if you have shitty *** thieves in the area and they try stealing it, cracking your stuff up in the process damn thieves....
Maybe wanna consider using somones scuffed or not so great shape tail lights, so youll have mint ones if you ever do remove it.
just my 2 cents and them some
-james
without killing your thread, i do bodywork, and when i had my tail finisher i was going to opt for the 3m double sided tape, which will work fine so long you use enough of it and clean both surfaces properly.
Only bad thing is, if you ever decided you dont want it anymore and try to remove it.(3m doube sided tape sucks in that aspect) Also if you have shitty *** thieves in the area and they try stealing it, cracking your stuff up in the process
damn thieves....Maybe wanna consider using somones scuffed or not so great shape tail lights, so youll have mint ones if you ever do remove it.
just my 2 cents and them some
-james
Super Snuggles
Joined: Feb 2001
Posts: 10,091
Likes: 34
From: Redmond, WA
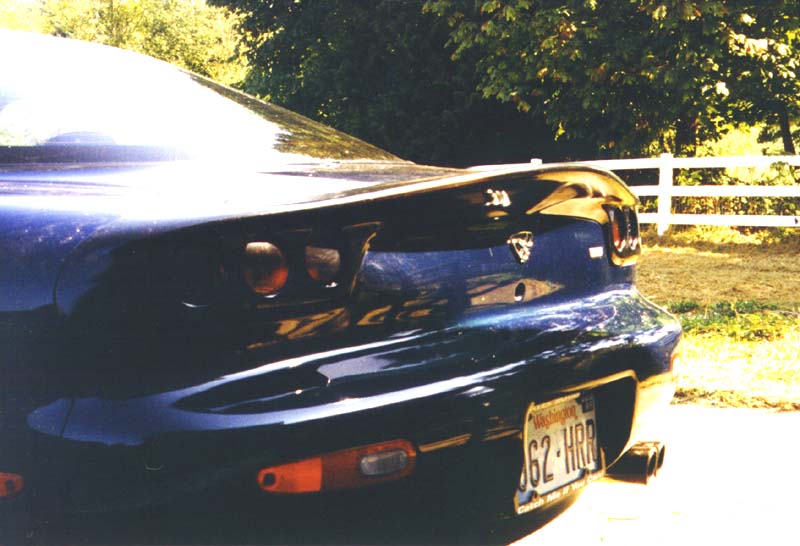
My genuine RE cover fit so tightly that no adhesive or fasteners were required. I believe the instructions showed removing the center (3rd brake light) section and snapping it into the cover separately, then snapping the entire assembly over the tail lights before reinstalling the nuts holding the center section in place.
I've seen replicas and they didn't have a complete set of "tabs" and had to be held in place with adhesive and/or screws. My cover not only had a lip that clamped over the top of the tail lights and center section, but also had a lip that snapped into place beneath the lights, holding it firmly in place.
Once on the car, you couldn't move it by hand and it took considerable effort to get it back off the tail lights. It also matched the contour of the hatch very well, and the finish was very good and required no prep before paint besides a good scuffing with a ScotchBrite pad. This was 1998, though, so things may have changed since.
This is the best picture I have at the moment. I was still using 35mm film at that point and scanned some of the prints, so unfortunately the detail isn't that great.
Last edited by jimlab; Nov 11, 2003 at 11:52 PM.
Thread Starter
I Sold My Car 2 the Devil
Joined: Oct 2001
Posts: 2,361
Likes: 0
From: Duncanville, Tx
Thanks jim... and everyone else...I hope mine clips right on like you mention. Probably won't... but I hope
After this... start work on putting together a new motor to go w/ my turbo Oh and find out why my leading coil isn't getting any power.
After this... start work on putting together a new motor to go w/ my turbo
Oh and find out why my leading coil isn't getting any power.