
V-mount custom garage ducting.


Rotary Enthusiast
Joined: Feb 2001
Posts: 1,094
Likes: 0
From: Orange County, CA
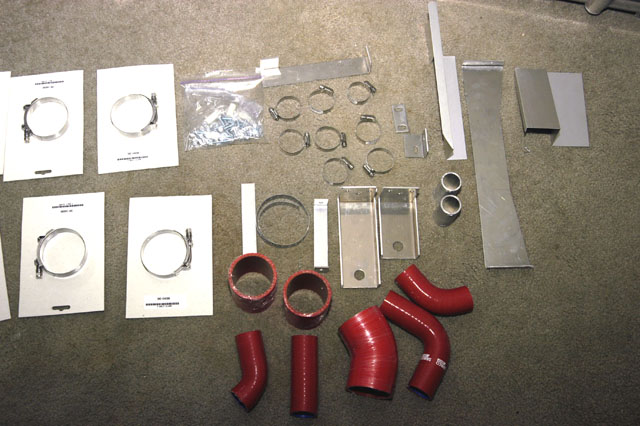
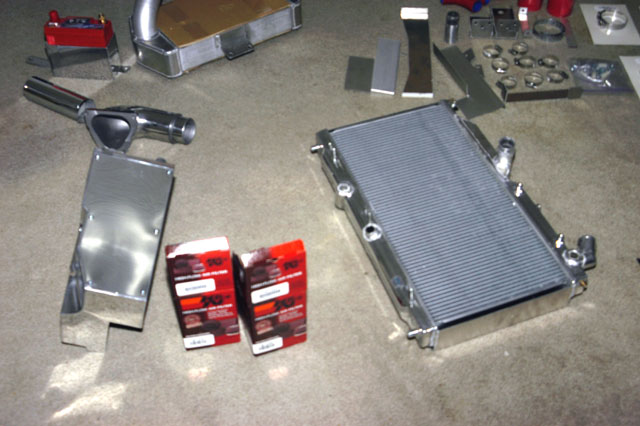
The kit includes:
$350 Radiator
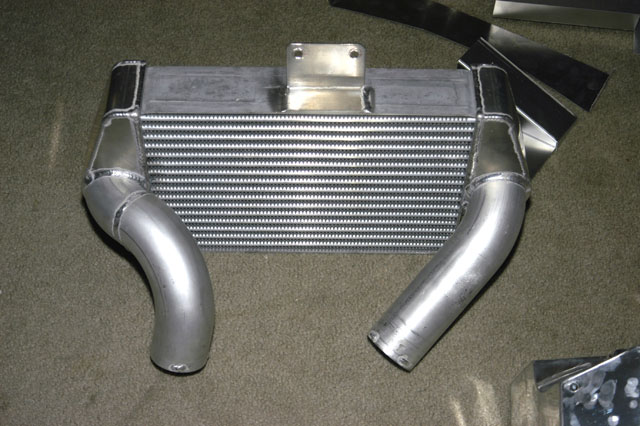
$1000 Intercooler - custom work
$350 Piping/bending
$150 Brackets
$250 (2) hours welding changing the Radiator
-----
~$2100 for the hardware and welding, not to mention the time to get everything together, his time and design/fitment work.
How many hours do you think it takes him to get this **** together? An hour?
And people think he's making MAD dough? Lol....
$350 Radiator
$1000 Intercooler - custom work
$350 Piping/bending
$150 Brackets
$250 (2) hours welding changing the Radiator
-----
~$2100 for the hardware and welding, not to mention the time to get everything together, his time and design/fitment work.
How many hours do you think it takes him to get this **** together? An hour?
And people think he's making MAD dough? Lol....
Last edited by atihun; Aug 12, 2005 at 05:57 PM.


This is not Chucks, but this is how I did mine, since a lot of people in various threads have requested pics here are mine at least. I think it works very well because it is very adjustable and I can easily install my IC and rad then push it up and into place once everything is installed to match up exactly as I wish it to. It can move front to back of the car on the support that bolts the frame and up and down with the bracket that is mounted to the isolator for the radiator.
Not the best pics but use your 3D orbiting imagination to see exactly how they hold the IC assembly up.
I don�t know about chucks but mine is isolated from solid mounts on the main supports for the radiator and has nonstructural solid �just for show really� top mounts for the IC.
I used a double male rubber isolator between 2 plates of aluminum, so just incase it should ever fail it will simply come to rest on the metal flange. Though I think with the sandwich construction it should hold nicely for years, and if it should fail the built in redundancy should take care of it until I can fix it.
HTH


Not the best pics but use your 3D orbiting imagination
to see exactly how they hold the IC assembly up.I don�t know about chucks but mine is isolated from solid mounts on the main supports for the radiator and has nonstructural solid �just for show really� top mounts for the IC.
I used a double male rubber isolator between 2 plates of aluminum, so just incase it should ever fail it will simply come to rest on the metal flange. Though I think with the sandwich construction it should hold nicely for years, and if it should fail the built in redundancy should take care of it until I can fix it.
HTH
Thread Starter
13B Rotary Turbo
Joined: Dec 2004
Posts: 649
Likes: 0
From: South California
Originally Posted by Nameless
Pretty cool, I wanted to do something like that with my Vmount as well. Wanna help me out? haha.
It took quite awhile, but I really do love doing it, it really is a past time of mine building things and making them better (at least in my opinion  )
)
My recommendation is if you have the time and ability and facilities to build something go ahead, it really helps put into perspective what is required to put something like Chucks Vmount together. It is not as easy as it looks and for the time and research I put into it chucks product is a steal by almost anyones standards I think. Though I would never trade the experience and things I learned from the process.
But for me I wanted a very purpose built system that chucks probably wouldn�t have facilitated without a lot of modifications, so I just made one to fit exactly how I wanted it to.
I think it turned out all right. The ducting is a little rough but I intend to make a nice piece when I get some time. Its really only functional without really a lot of visual surface area , so that�s why it hasn�t gotten priority.


) My recommendation is if you have the time and ability and facilities to build something go ahead, it really helps put into perspective what is required to put something like Chucks Vmount together. It is not as easy as it looks and for the time and research I put into it chucks product is a steal by almost anyones standards I think. Though I would never trade the experience and things I learned from the process.
But for me I wanted a very purpose built system that chucks probably wouldn�t have facilitated without a lot of modifications, so I just made one to fit exactly how I wanted it to.
I think it turned out all right. The ducting is a little rough but I intend to make a nice piece when I get some time. Its really only functional without really a lot of visual surface area , so that�s why it hasn�t gotten priority.
development
Joined: Aug 2002
Posts: 5,714
Likes: 7
From: Lafayette, LA
^clean clean clean car, but man...don't rest lug nuts on your polished IC!
very nice set-up (like the wp idler!)
you can slide this entire assembly up from underneath???
so, does your RAD alomst sit horizontal?
very nice set-up (like the wp idler!)
you can slide this entire assembly up from underneath???
so, does your RAD alomst sit horizontal?
Belligerent Security
Joined: Jul 2003
Posts: 70
Likes: 0
From: Pulling you over
Originally Posted by ptrhahn
And that's the point. Before I spent $2600 i'd want to see detailed pictures of exactly how it goes together, what's needed, and what you "loose" in terms of clearance and why, etc.
Can't remember where I got these but here you go....
Originally Posted by dubulup
so, does your RAD alomst sit horizontal?
Latest pics of the most important part of my instillation
the protection for the radiator!Still need to clean it up and powder coat but its there.
wHiTe kNiGhT
Joined: Oct 2002
Posts: 1,393
Likes: 0
From: ct
thats some great work. I wish you lived near me. I'd love to see that in person. I always wondered if it was smart to have a bare radiator so close to the ground. How far back does that sheild go? looks like about maybe 12inches. any chance of getting and under view pic, maybe from the start of that sheild to the beginning of the subframe?
once again very nice work. i cant wait to start this project.
How far back does that sheild go? looks like about maybe 12inches. any chance of getting and under view pic, maybe from the start of that sheild to the beginning of the subframe?once again very nice work. i cant wait to start this project.
Thanks guys.
I just have to figure out the AC and I can call this whole project 99.9 % done
I have a condenser picked out, just have to get my hands on it and do a little modding to make it work for removal when I have to get back into the engine (god forbid!) and look right.
I need a 97+ or same body style mitsubishi eclipse condensor, it is just the right dimensions to fit over the radiator properly and has the correct large fin openings I would like to have.
I have one in my daily driver but I need that one (don�t think I havnt thought about it)
I just have to figure out the AC and I can call this whole project 99.9 % done
I have a condenser picked out, just have to get my hands on it and do a little modding to make it work for removal when I have to get back into the engine (god forbid!) and look right.
I need a 97+ or same body style mitsubishi eclipse condensor, it is just the right dimensions to fit over the radiator properly and has the correct large fin openings I would like to have.
I have one in my daily driver but I need that one
(don�t think I havnt thought about it)
Originally Posted by rx7raca
thats some great work. I wish you lived near me. I'd love to see that in person. I always wondered if it was smart to have a bare radiator so close to the ground. How far back does that sheild go? looks like about maybe 12inches. any chance of getting and under view pic, maybe from the start of that sheild to the beginning of the subframe?
once again very nice work. i cant wait to start this project.
How far back does that sheild go? looks like about maybe 12inches. any chance of getting and under view pic, maybe from the start of that sheild to the beginning of the subframe?once again very nice work. i cant wait to start this project.

Thread
Thread Starter
Forum
Replies
Last Post
SakeBomb Garage
Group Buy & Product Dev. FD RX-7
8
Oct 9, 2015 10:05 PM