
She's Tight But I Like Her!

Thread Starter
Eats, Sleeps, Dreams Rotary
Joined: Feb 2002
Posts: 3,045
Likes: 2
From: North Coast
Greddy FMIC Install:
Damn it, everyone said it was a tight fit but I didn't know it would be that tight! I was really thinking "Is the hood going to close?"
I just got done with the Greddy FMIC install and I have one thing to say�Damn, it�s a tight fit�I still haven�t gotten a battery yet (still haven�t driven it) and that�s the last thing to go in.
Some of the problems I encountered along the way was
- taking the brackets off the AC condenser and then breaking the screws off�Didn�t realize I didn�t have to do that.
- Problem putting the power steering line on�Couldn�t get the metal pipe into the hose that�s entangled by the oil cooler lines.
- The pipe that comes from the IC on the passenger side is a really tight fit and the radiator bracket had to be bent in toward the radiator to make it fit�Still I totally scratched up my superb polishing job
- Making all the pipes fit I had to keep the couplers almost right out to the end of the pipes.
- Had to cut the bumper several different times trying to find the right fit. Then shifting all around so the headlights didn�t rub when the went up and down.
- I decided to use the stock rad because I am currently running block weld and didn�t want to run it through my new Koyo�Will go on when the engine gets rebuilt
- Multiple knuckle busters�I currently have Neosporin all over my hands trying to ward of infection
- Overall it took me about 3 days�Not 3 full days� One day I removed the Front bumper, second day I installed the fmic, third day I reinstalled the bumper�
- I also installed a B&M short throw which was about a 10 minute install..
Overall I would say this whole project was not hard but extremely time consuming�It can be done with one person but two is definitely better.
Anyway, I am getting a Miata battery tomorrow and going to give it a run and see what it feels like�also will post a couple of front on shots and engine bay shots too�
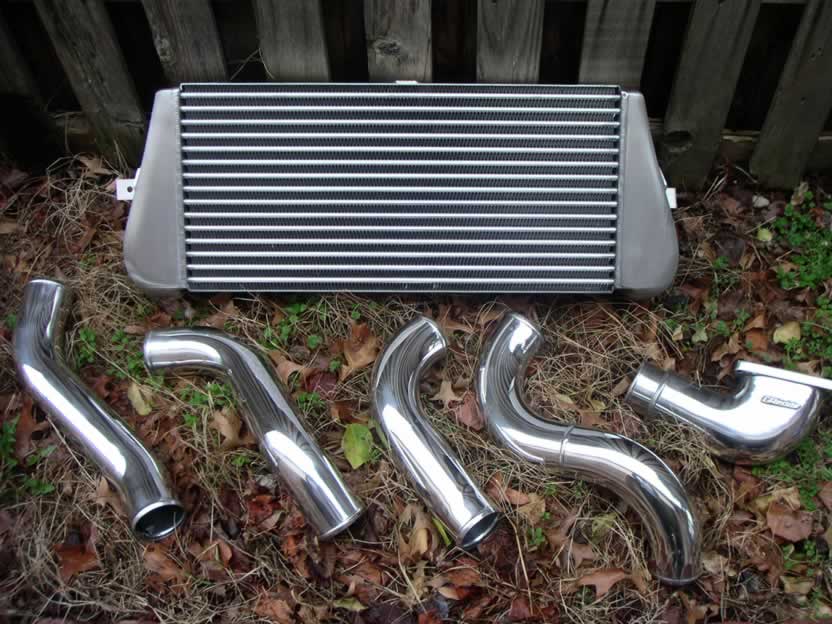
Here's the IC and the pipes after about 8 hours of polishing...I decided not to polish the end tanks because I did one side and then it looked a bit too bling for the outside of the car so I gave it the sanded finish again..
A photo of it just before the bumper went on...(Better pics will come with a new day when I am not so exhausted)
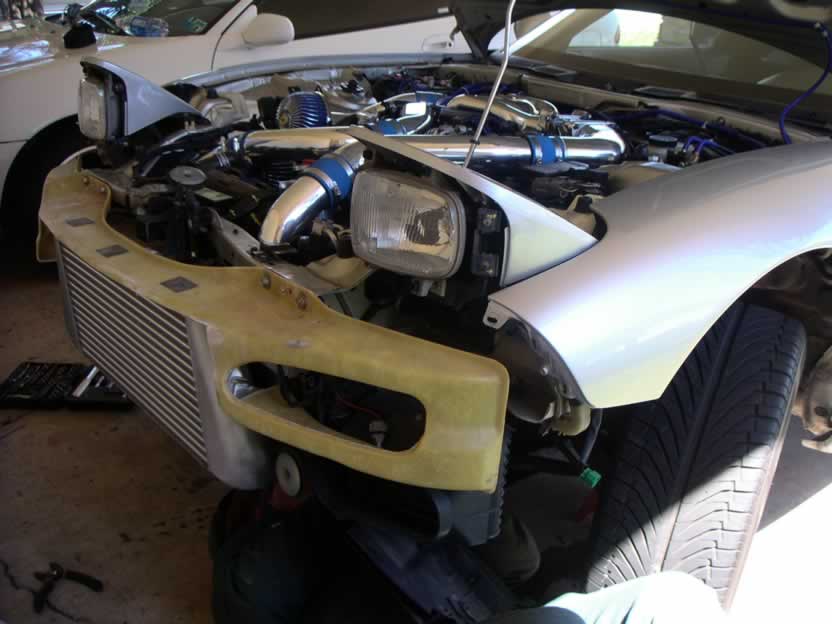
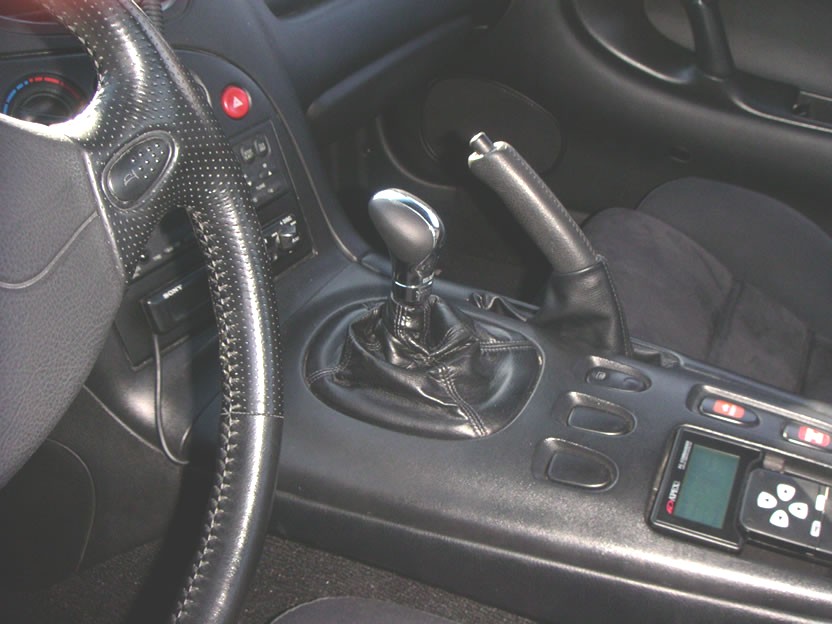
Photo of the beautiful B&M Short Throw just before I covered it with the center console.

A Big thanks to this website for hosting the pics that helped with the install tremendously.
Damn it, everyone said it was a tight fit but I didn't know it would be that tight! I was really thinking "Is the hood going to close?"
I just got done with the Greddy FMIC install and I have one thing to say�Damn, it�s a tight fit�I still haven�t gotten a battery yet (still haven�t driven it) and that�s the last thing to go in.
Some of the problems I encountered along the way was
- taking the brackets off the AC condenser and then breaking the screws off�Didn�t realize I didn�t have to do that.
- Problem putting the power steering line on�Couldn�t get the metal pipe into the hose that�s entangled by the oil cooler lines.
- The pipe that comes from the IC on the passenger side is a really tight fit and the radiator bracket had to be bent in toward the radiator to make it fit�Still I totally scratched up my superb polishing job
- Making all the pipes fit I had to keep the couplers almost right out to the end of the pipes.
- Had to cut the bumper several different times trying to find the right fit. Then shifting all around so the headlights didn�t rub when the went up and down.
- I decided to use the stock rad because I am currently running block weld and didn�t want to run it through my new Koyo�Will go on when the engine gets rebuilt
- Multiple knuckle busters�I currently have Neosporin all over my hands trying to ward of infection
- Overall it took me about 3 days�Not 3 full days� One day I removed the Front bumper, second day I installed the fmic, third day I reinstalled the bumper�
- I also installed a B&M short throw which was about a 10 minute install..
Overall I would say this whole project was not hard but extremely time consuming�It can be done with one person but two is definitely better.
Anyway, I am getting a Miata battery tomorrow and going to give it a run and see what it feels like�also will post a couple of front on shots and engine bay shots too�
Here's the IC and the pipes after about 8 hours of polishing...I decided not to polish the end tanks because I did one side and then it looked a bit too bling for the outside of the car so I gave it the sanded finish again..
A photo of it just before the bumper went on...(Better pics will come with a new day when I am not so exhausted)
Photo of the beautiful B&M Short Throw just before I covered it with the center console.
A Big thanks to this website for hosting the pics that helped with the install tremendously.


Senior Member
Joined: Mar 2002
Posts: 480
Likes: 0
From: nj, McGuire AFB
looks good. i went with the 2 row also. it wasnt as tight as you are explaining. my piping fit really well. as for the battery i put it in the back. i think it makes the engine bay look better. you did a real good job polishing those pipes you should do those end tanks too.
Thread Starter
Eats, Sleeps, Dreams Rotary
Joined: Feb 2002
Posts: 3,045
Likes: 2
From: North Coast
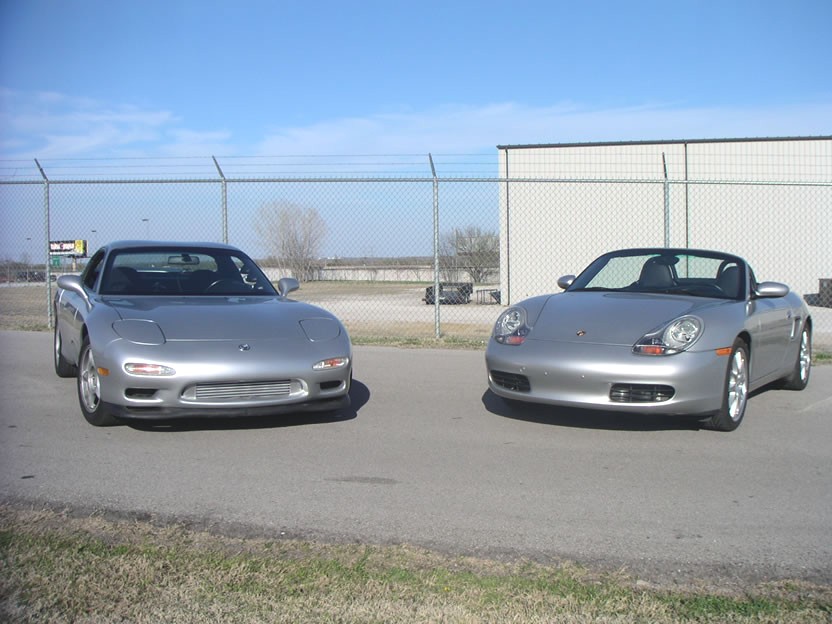
Ok, I finally got to drive it to work and all I can say is "God Damn!" it's pulling like crazy. I am getting a solid 10-8-10 boost with a small spike to between 11 and 12...Going to try and use the superduper home depot valves and tune it out. Here's a photo I took yesterday beside another friends Silver Boxster...I love how that Boxster handles but it's not as fast as the 7
7's definately sexier.
Momo Cobra ****.
7's definately sexier.
Momo Cobra ****.

Trending Topics
Thread Starter
Eats, Sleeps, Dreams Rotary
Joined: Feb 2002
Posts: 3,045
Likes: 2
From: North Coast
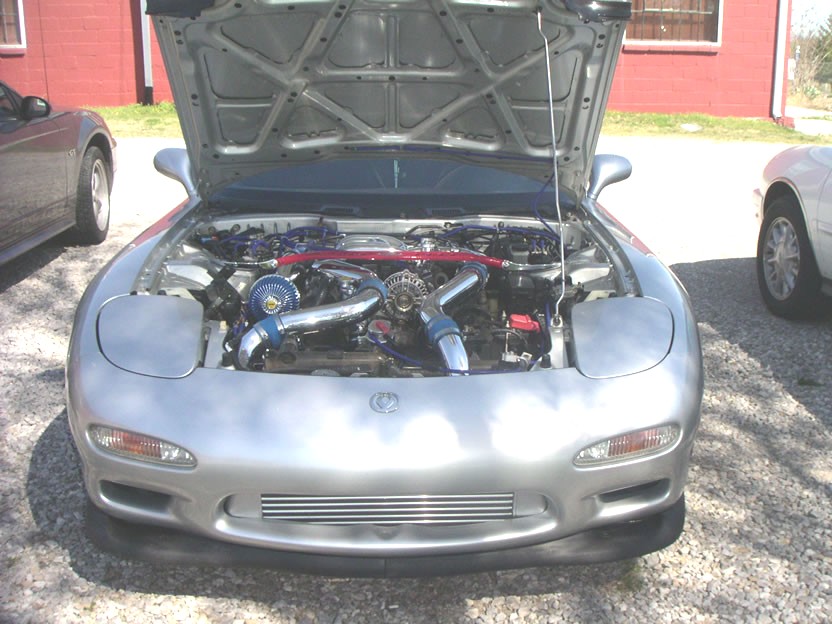
Here's another photo with the hood open.
I think I found out why she's so tight. I realized thaty I have the passenger side radiator bracket on wrong. Will fix that over the weekend.
I think I found out why she's so tight. I realized thaty I have the passenger side radiator bracket on wrong. Will fix that over the weekend.

development
Joined: Aug 2002
Posts: 5,714
Likes: 7
From: Lafayette, LA
apneablue - As always I like you work. I can't tell from the photo but do you have the Air Pump still? I just put an ordered the PFS SMIC, I envy the FMIC look...after some research I choose the SMIC...keeping with the sleeper look (if an FD can be a sleeper)
Thread Starter
Eats, Sleeps, Dreams Rotary
Joined: Feb 2002
Posts: 3,045
Likes: 2
From: North Coast
Originally posted by dubulup
apneablue - As always I like you work. I can't tell from the photo but do you have the Air Pump still? I just put an ordered the PFS SMIC, I envy the FMIC look...after some research I choose the SMIC...keeping with the sleeper look (if an FD can be a sleeper)
apneablue - As always I like you work. I can't tell from the photo but do you have the Air Pump still? I just put an ordered the PFS SMIC, I envy the FMIC look...after some research I choose the SMIC...keeping with the sleeper look (if an FD can be a sleeper)
Yeah, I still have the O2 pump...I want take it off and go with a MP but Chris and a bunch of other forum members didn't recommend it...Considering I am still on my original engine and all...Currently I am saving for my rebuild and will probably get it at the end of the year...But for now I guess I will continue to run the stock cat....You can bet that Mooing **** is coming off as soon as I get my rebuld though.
To be honest I had decided on the SMIC too and then at the last minute I changed my mind...don't know why...I do like the FMIC though...pulling hard...
I do notice a bit higher temps...Not real high...We have 70� ambient temp today and I was running at 88 - 89�C with the fans on...Without the fans I saw around 91-92�C...The fans with the stock IC worked well but it really drops fast with the FMIC...We'll really put it to the test with these Oklahoma 110-112�f summers
Anyway...I am really pleased with it...Would like to do a dyno run with it and see how much more it gave...my last run was 255rwhp without the FMIC...
development
Joined: Aug 2002
Posts: 5,714
Likes: 7
From: Lafayette, LA
Thanks for the insight. It seems my mods are very similar to yours. My last dyno tuning was 301rwhp @ 12-13psi running seq.
Since then I've gone full non-seq, added efini y-pipe, and misc other things after I in stall the SMIC and get my hard intake pipes fabed up and tune again (hopefully next week) I'll left you know on the numbers...
Since then I've gone full non-seq, added efini y-pipe, and misc other things after I in stall the SMIC and get my hard intake pipes fabed up and tune again (hopefully next week) I'll left you know on the numbers...
development
Joined: Aug 2002
Posts: 5,714
Likes: 7
From: Lafayette, LA
I had a run at 10-11 psi and I hit 280rwhp tuned to 11.7 a/f
my mod list is under construction...basically during those runs I had
PFS PMC, DP, racing beat dual tip CB, pettit CAI and pullies.
I believe that's it, I don't have an electronic copy of the A/F and Boost but I can email you the hp and torque curve if you want to see it. Torque was 257max for the 301rwhp run.
'95 PEP with 50k miles
Thread Starter
Eats, Sleeps, Dreams Rotary
Joined: Feb 2002
Posts: 3,045
Likes: 2
From: North Coast
Originally posted by dubulup
I had a run at 10-11 psi and I hit 280rwhp tuned to 11.7 a/f
my mod list is under construction...basically during those runs I had
PFS PMC, DP, racing beat dual tip CB, pettit CAI and pullies.
I believe that's it, I don't have an electronic copy of the A/F and Boost but I can email you the hp and torque curve if you want to see it. Torque was 257max for the 301rwhp run.
'95 PEP with 50k miles
. My dyno is in my sig.Would also like to see your dyno sheet..
e-mail: david@apneablue.com